By now you’re no doubt itching to get on to the next part of the process, the actual distilling of your spirit. You’ve mashed your grains, fermented the wash…now what?
I can’t stress too much the importance of taking your time, especially if you are new to distilling. It took at least half a dozen distilling runs before I was even starting to get comfortable with the process. Up till then, I spent all my spare minutes in the stillhouse rereading the instructions umpteen times, kind of like when I was first learning to use my pressure canner. But I digress.
Some home distilling books tell you to do all your distilling in one go. Theoretically, using a column still (and assuming you have some experience), it is possible to distill a good-quality spirit in one distilling run. For now, though, I think it’s a better idea to plan two distilling runs; I’ll tell you why in a minute. Some spirits require a third distillation run (Irish whiskey), and vodka is sometimes distilled four times or even more. While you’re learning, let’s focus on a basic two-run distilling process.
Technically, a fractionating still such as mine is capable of distilling whiskey in a single distillation run. However, when distilling most liquors, I prefer the two-run process, which involves a relatively fast “beer-stripping” run, followed by a spirit run.
The beer-stripping run is straightforward. No separation of heads, hearts and tails happens during this run; the intent is merely to concentrate the alcohol in the wash. Some impurities are also separated during this process. The resulting distillate is called low wines. The low wines, depending on the ABV of the wash, typically will come out at 20% to 25% ABV. For example, if the ABV of your wash is between 5% and 10%, you can expect to collect low wines of between 21% and 27% ABV.
Theoretically, up to one third of the wash will be collected as low wines in a stripping run. Depending on what I am distilling, I generally get between 2 and 3 liters of low wines from 15 liters of wash at about 10% ABV. Naturally, the amount of low wines you collect will vary depending on the ABV of your wash.
|
After all the work you’ve done to this point, mashing and fermenting your wash, don’t risk ruining it now by being in a hurry. It’s best to heat the still slowly to avoid burning the wash. My boiling pot doesn’t have a very thick bottom, so I’ve learned to be careful about this. With a little experience, you’ll know how high to set the heat so it heats the wash efficiently but without burning. I used a Sharpie pen to mark the regulator dial on my propane burner; anything I can do to ensure a consistent process seems like a good idea to me. Once again: Keep notes! |
|---|
Plan ahead before a distilling session. It’s important not to be distracted or need to step away from the still once you’ve begun heating it. Over the first few batches I ran through my still, I found that it consistently takes between 2 and 2¼ hours for a beer-stripping run to finish once I start heating the still. Most of the time you will not be actively involved, especially in the early part when you are waiting for the low wines to emerge. It can’t be over-emphasized: Never leave the still unattended once it is heating.
So bring something with you to read, or your iPod or unpaid bills or whatever. I often get a lot of writing done in the couple of hours I am in my stillhouse! It’s about a hundred yards from our house, so I’m not distracted by the phone or tempted to go bake cookies or change the oil in the truck or something.
Don’t forget to limit the amount of wash in the still to no more than three-quarters full to minimize the risk of boilovers. My boiling pot has a 25-liter capacity, but I never load more than 15 liters into it. (I’ve only had it come close to boiling over one time, and that was when I had loaded it with 19 liters of wash.) Also, when transferring the wash to the still, try to minimize the amount of sediment that ends up in the still. It may burn when the wash is heated, and will adversely affect the flavor of the spirit.
|
Finally, a use for flour-and-water paste. Once you’ve assembled your still, it’s a good idea to seal the seams and any potential leaks before turning up the heat. A simple flour-and-water paste works great for this. Mix some all-purpose flour with enough cool water to make a thick paste, and spread it around the joints on your still. The paste will harden and form a tight seal as the still heats up. If there happens to be an unexpected buildup of pressure in the still (usually due to a clog somewhere in the system), the paste will give way at the joints, preventing a possible explosion. |
|---|
You’ll just have to get used to me reminding you to make notes. Keeping records of your distilling runs will simplify things for you as you gain experience. For example, I learned early on that my still, with 15 liters of wash, consistently comes to a boil in 60 minutes. (However, my stillhouse is unheated, and this figure is based on the assumption that my wash was fermenting in the house and brought out and loaded into the still roughly at room temperature.) I also marked the regulator on the propane burner so I can be sure I set the flame at the same level every time.
On my still, although I can easily vary the flow rate of the distillate using the needle valve, for beer-stripping runs, I leave the valve wide open. Once the low wines start to drip, I do slow the flow rate a bit, though; this minimizes the amount of alcohol left in the still by ensuring some degree of reflux and separation. However, in general, I prefer to vary the flow rate by turning down the heat just a bit. Although this naturally slows the process down, it has the advantage of preventing the condenser water from heating up, so it actually increases efficiency.
Beware of slowing the rate too much, though; if you’re making whiskey or other flavor-positive spirits, slowing the flow rate will tend to strip out too many of the desirable congeners that are critical to the final flavor of the spirit. So take your time; for small batches like these, the difference in time is minimal, and I promise the results will be worth it.
The still head temperature will be about 80°C/176°F when the low wines start to drip. The temperature will rise to 98°C/208°F as the ethanol in the still is depleted. I usually end the stripping run once the still head temperature has reached 98°C/208°F. Typically the emerging distillate will be around 10% ABV at this point, and I don’t think it’s worth the extra fuel and time needed to recover just a little more ethanol.
The stripping run also, in my opinion, makes it easier to judge and make the cuts in the subsequent spirit run. With small batches like these, the cuts can happen very quickly; for a relatively inexperienced distiller like myself, every possible advantage is worth pursuing. What I like to do is ferment two large batches of the same type at once. I then do stripping runs; usually this means 3 or 4 batches in my still. I then have a good amount of low wines to work with. This is a more efficient use of the still. Also the more volume of low wines, the longer the transition times between the heads, hearts and tails, making it that much easier to accurately judge and make the cuts.
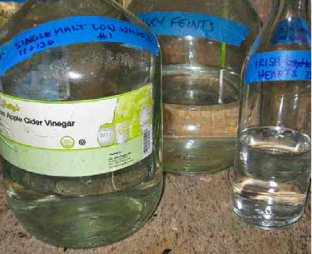
Low wines, feints and hearts. Masking tape and a Sharpie pen are handy for labeling.
When your stripping run is finished, be sure to record the amount of low wines collected and the aggregate ABV of the low wines. The low wines can now be redistilled in a spirit run, or saved to add to low wines from additional stripping runs. I like to store low wines in clean 1-gallon glass bottles retrieved from local businesses. Half-gallon Mason jars also work well. Remember to clearly mark each jar or bottle; low wines all look alike! I use blue masking tape and a Sharpie pen for this.
Once the wash is concentrated into low wines of around 25% ABV, it is much easier to monitor the ABV of the distillate and the still head temperature, and to make the cuts at the right time. As previously noted, the more volume of low wines in your spirit run, the longer the transitions between the cuts.
Important note: It is even more critical to avoid over-filling the still for a spirit run. Ethanol expands when heated, and the low wines you will use in your spirit run have a much higher concentration of ethanol than the wash used in your stripping run. I am probably over-cautious, but I usually don’t fill my boiling pot more than half-full for spirit runs, depending on the ABV of the low wines.
Assuming your still has a quality thermometer that is accurately placed, still head temperature monitoring is fairly straightforward. Personally, although I do like to keep an eye on the still head temperature, I prefer to check the ABV of the emerging distillate fairly often with an alcohol refractometer. This instrument is handy because it requires only a couple of drops of distillate to work. With small batches like mine, the ABV in a spirit run can change very quickly, so the ease and speed of using the refractometer is practical.
Since I did not have an experienced distiller looking over my shoulder while I was learning, I did find it helpful, during spirit runs, to divide the distillate into several small batches as it came off the still. This makes it possible to learn to smell and taste the distillate to judge the begin- and end-cuts. Believe me, it can be difficult to manage this when everything is happening so rapidly.
Here’s how to do it. Ideally you will have 8 to 10 small glass containers of the same size; I use plain shot glasses that I picked up at a thrift store. You should also have three larger glass receptacles on hand to empty the small glasses into. One of these will be marked “heads,” one “hearts” and one “tails.”
You might be surprised at how relatively slowly the distillate comes out of the still. It may be a thin but more or less steady stream, or it may be a fairly fast drip; it doesn’t gush out by the pint. I find it easy to smell and taste the distillate in each shot glass while the next is filling. If I decide, for example, that I’m still tasting heads, I empty that glass in to the “heads” container, then put the empty glass back in the line of glasses.

Graduated cylinders (250 ml and 500 ml) are very handy in the stillhouse.
|
I have two graduated cylinders from a laboratory supply company. One is 1 cup (250 ml), the other 2 cups (500 ml). As I got better at distinguishing the smell and taste of the distillate, I stopped using the shot glasses and began using the cylinders to collect the distillate. When one fills up, I put the other under the still and empty the full one into the appropriate heads, hearts or tails jug. This also helps me keep track accurately of how much of each I collect. |
|---|
It is interesting to me that many commercial distillers, with all the latest equipment and technical know-how and experience, still rely on their sense of smell and taste to ultimately decide when to make the cuts. So much of distilling is science, and yet so much depends on the kind of liquor being made, and what result the distiller is aiming for from any particular batch. To me, this was actually encouraging to learn, because it meant that, even without fancy modern equipment, I can learn the art of distilling myself.
There are three basic ways to determine when to make the cuts during a spirit run: still head temperature, measuring the ABV of the distillate or smell and taste.
A number of variables can influence the still head temperature, so I don’t recommend relying solely on that as a guide to making the begin- and end-cuts. It’s also not that easy to keep an eye on the thermometer (which, in my case, is well above my eye level) and the distillate at the same time. However, checking the still head temperature can definitely alert you as to the approaching phase changes, so don’t ignore it altogether, especially when you’re learning to judge the cuts.
If you use the same formula and quantity of low wines, it is possible to have a consistent process and result. For example: Say you start with a low wine of 25% ABV. You make the begin-cut when the distillate reaches 80% ABV, with a still head temperature of about 82°C/180°F. The end-cut is made when the distillate is at 65% ABV and the still head temperature is 94°C/201°F. However…straight malt wash might have an end-cut closer to 60% ABV. A different type of still with the same wash might have the begin-cut around 72% ABV, or the end-cut at 59% ABV or even a bit lower. So, the most reliable way to judge the cuts ultimately is by smell and taste. In fact, commercial distillers, with all their modern technology and know-how, most often make the final determination of cuts by smelling and tasting.
The first distillate coming off the still has a strong solvent-like smell usually compared to nail-polish remover. Gradually this smell fades, and the first hint of whiskey taste appears. This flavor will become stronger and more concentrated as the begin-cut (the change from heads to hearts) approaches. The hearts cut should be made when this flavor is apparent but still increasing in intensity.
As the hearts run continues, the intense whiskey flavor begins to fade into a smooth, sweet taste that will continue for most of the hearts phase. When this flavor starts to lose its sweetness and you notice a hint of a harsh, bitter taste, this alerts you that the tails cut is approaching. This bitterness will increase throughout the tails run. A small amount of this bitterness is acceptable in some whiskey types, but you should make the tails cut before too much of it is allowed into the hearts receiver.
Tails are collected until the distillate is down to about 10% ABV; the still head temperature will be 97°–98°C/206°–208°F. The tails can then be added to the heads container and marked “Feints.” These feints should be saved and added to future spirit runs (more about this later). As the quantity of feints naturally increases over time, some distillers periodically do a special spirit run using the feints alone. Reusing the feints not only enables the distiller to avoid wasting the residual alcohol left over from the spirit runs; redistilling the feints tends to produce a whiskey of very rich flavor, due to the abundance of flavorful congeners present, which are further concentrated with each additional spirit run.
Feints can also be used in a pure-ethanol spirit run; this results in a very pure, neutral spirit that can be used for vodka or gin.
|
If you miss the begin-cut (the transition from heads to hearts), you can empty the heads container back into the still and start over. I recommend turning the heat down a bit the second time around; this will slow the process down slightly and may make it easier for you to make the cut. |
|---|
As mentioned before, with this kind of still, it’s possible to vary the amount of separation in the emerging spirit, depending on what kind of spirit you are making. This can be accomplished two ways. One method is to increase the reflux ratio by varying the flow rate using the needle valve; this is typically done when making more high-proof, neutral spirits such as vodka or gin.
In the other method, the fractionating still can actually function more like a pot still, which requires much less reflux action during distillation. In this case, the needle valve is left wide open, and the flow rate is instead controlled by adjusting the heat source. The result is that virtually all of the condensed vapors exit the still, rather than returning to the column (reflux). In essence, this is how a pot still operates. This method works very well for making flavor-positive spirits such as whiskey or fruit brandies.
Every time you distill a batch of liquor, you will have heads and tails left over after your spirit runs. These are usually combined, and the resulting mixture is called “feints.” It is useful to recycle some of the feints in subsequent spirit runs by adding a certain amount to the low wines. Not only does this enable you to recover some of the ethanol separated from the hearts during the spirit run, it also contributes esters, acetaldehydes and other elements affecting the body and flavor of the spirit. Especially in whiskey production, commercial distillers routinely add a specific proportion of feints before a spirit run. In addition, occasionally the distiller will do a special spirit run using only the feints; some claim this is the richest, most flavorful whiskey of all.
I encourage you to experiment with the amount of feints you add to your spirit runs. Be sure to record the amount of low wines and the amount of feints in each spirit run, so you can compare results later and make adjustments. I typically add about 4 liters of feints to 11 liters of low wines when making whiskey (15 liters being the maximum amount put into the still), but I do a lot of experimenting with the percentage of feints.
Another useful tool is a proof hydrometer. It is similar to the hydrometer used to measure the specific gravity of mash or wort, except that it measures the alcohol content and the proof of distilled spirits. The proof hydrometer is calibrated based on the assumption that the liquid being tested contains ethanol and water and nothing else. It can’t be used to measure the alcohol content of beer, mash or any undistilled alcohol, because they contain sugars, acids and other elements that influence the specific gravity.
Proof hydrometers are usually calibrated to 20°C/68°F. Ethanol expands when it is heated, so even a small variation in the temperature of the sample can change the ABV or proof reading. If your sample is not at 20°C/68°F, use the Proof Hydrometer Correction Table that came with your hydrometer to accurately determine the alcohol content.
I really like the accuracy and ease of use of the proof hydrometer for measuring the ABV of low wines and finished spirits. However, I prefer the alcohol refractometer for measuring the output of the still during spirit runs, as it automatically compensates for temperature variations and only requires a few drops to work.
|
Low wines of 40% ABV or more will dissolve acrylic! Be aware that some common brewing equipment such as siphon starters and hydrometer test cylinders are often made of acrylic. This isn’t an issue with your mash or the fermented wort before it’s distilled. The 1-cup (250 ml) graduated Pyrex cylinder I use to catch the output of my still is just the right size to use with my proof hydrometer when measuring the ABV of low wines, hearts, etc. |
|---|
Very little seems to be written or discussed about the water in the condensing system, but I think it’s worth taking some time to consider. It’s often taken for granted that you will connect a garden hose to the condenser, turn it on and just let it go. You will need to run the water continuously for two hours or more; how long depends on the amount of wash you’re distilling, and whether it is a stripping run or spirit run. That’s a lot of water!
If you live in the city or somewhere with a more or less unlimited supply of water, it’s easy to take it for granted. Many hobby distillers simply let the cooling water run out onto the ground as it exits the condenser coil. Why not? Water is cheap, right?
I found I spent a lot of time figuring out the condenser part of the system. Our water supply comes from three wells next to a spring-fed pond. The water is pumped from the well to a holding tank on a nearby hill and gets to the house by gravity feed. My stillhouse is located far enough from our house that it isn’t practical to run a long hose to the still. Also, if I’m running water through a hose, the rest of the water system has very little pressure until I’m done. For example, we wouldn’t be washing dishes, taking a shower or filling poultry drinkers while the still was running. I suppose I could get around this difficulty by only running the still in the middle of the night, but…maybe not.
My solution is to use a small DC-powered water pump. My condenser is the heat-exchanger type, meaning the cooling water circulates through a copper coil inside an open-ended copper pipe. The pump sits in a large bucket of cold water and is connected to the condenser coil with vinyl tubing. One tube carries cooling water to the coil intake; the other takes output water back to the bucket.
I had to do a lot of experimenting to get this system working really efficiently. At first, I had a second bucket collecting the output, because the water tended to be fairly warm after going through the coil in contact with the hot vapor. I wasn’t wasting the water, though; once the distilling run was finished, I simply let the water cool off overnight to be reused another day.
Eventually I figured out that if I turn down the heat just slightly once the low wines start to drip, the output water remained cool. Again, this means the process takes a little more time, but it means I can use the same cooling water continuously. With my system, 3 to 4 gallons of cold water is plenty for a 3-hour distillation run.
|
When using a small pump like mine rather than a hose, be sure the pump has adequate lift power to push the water through your condenser. My pump has a maximum lift of 8 feet, plenty for my setup. |
|---|
This pump cost about $10 from an eBay seller. As I said, I spent a lot of time brainstorming this part of my system. I’m still tweaking details occasionally, but overall I’m quite happy with how it works. And I’m very pleased to have a cooling system that is efficient and doesn’t waste water. |
|---|
There is no electricity at my stillhouse (yet), so you might be wondering how I power that pump. I used 18-gauge automotive wiring to connect the pump leads to a 12-volt deep-cycle battery (remember, this is a DC pump). I keep the battery charged between uses with a small solar panel. The doors of my stillhouse face east, so it’s convenient to charge the battery with the morning sun. The pump isn’t much bigger than a golf ball, and draws very little power.
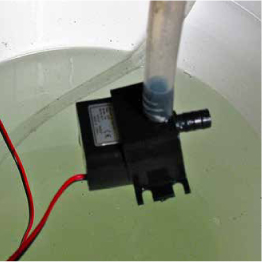
Inexpensive DC-powered water pump recirculates cooling water through the condenser.
Boiling Points of Elements in Low Wines
Compound |
°C |
°F |
|---|---|---|
Acetaldehyde |
20.2 |
68.36 |
Ether |
35 |
95 |
Acetone |
56.6 |
133.88 |
Methanol |
64.6 |
148.28 |
Acetate |
77.5 |
171.5 |
Ethanol |
78.3 |
172.94 |
Water |
100 |
212 |
Fusel oil |
80–160 |
176–320 |
Acetic acid |
118 |
244.4 |
