Next, open up mainwindow.h and add the following headers:
#include <QMainWindow>
#include <QDebug>
#include <QNetworkAccessManager>
#include <QNetworkRequest>
#include <QNetworkReply>
#include <QFile>
#include <QFileInfo>
#include <QFileDialog>
#include <QListWidgetItem>
#include <QMessageBox>
After that, add in the following variables and functions:
private:
   Ui::MainWindow *ui;
   QNetworkAccessManager* manager;

   QString ftpAddress;
   int ftpPort;
   QString username;
   QString password;

   QNetworkReply* downloadFileListReply;
   QNetworkReply* uploadFileListReply;

   QNetworkReply* uploadFileReply;
   QNetworkReply* downloadFileReply;

   QStringList fileList;
   QString uploadFileName;
   QString downloadFileName;

public:
   void getFileList();
Once you are done with the previous step, open up mainwindow.cpp and add the following code to the class constructor:
MainWindow::MainWindow(QWidget *parent) :
   QMainWindow(parent),
   ui(new Ui::MainWindow)
{
   ui->setupUi(this);

   manager = new QNetworkAccessManager(this);

   ftpAddress = "ftp://127.0.0.1/";
   ftpPort = 21;
   username = "tester"; // Put your FTP user name here
   password = "123456"; // Put your FTP user password here

   getFileList();
}
What we did was basically initialize the QNetworkAccessManager object and set up the variables that store our FTP server's information, since we will be repeated using it many times in later steps. After that, we will call the getFileList() function to start downloading files.txt from our FTP server. The getFileList() function looks like the following:
void MainWindow::getFileList()
{
   QUrl ftpPath;
   ftpPath.setUrl(ftpAddress + "files.txt");
   ftpPath.setUserName(username);
   ftpPath.setPassword(password);
   ftpPath.setPort(ftpPort);

   QNetworkRequest request;
   request.setUrl(ftpPath);

   downloadFileListReply = manager->get(request);
   connect(downloadFileListReply, &QNetworkReply::finished, this,
   &MainWindow::downloadFileListFinished);
}
We used a QUrl object to store the information about our server and the location of the file we're trying to download, and then fed it to a QNetworkRequest object before sending it off by calling QNetworkAccessManager::get(). Since we have no idea when all the files will get downloaded completely, we make use of Qt's SIGNAL and SLOT mechanisms.
We connected the finished() signal that comes from our downloadFileListReply pointer (which points to a QNetworkReply object in mainwindow.h) and linked it to the slot function downloadFileListFinished(), which we defined as follows:
void MainWindow::downloadFileListFinished()
{
   if(downloadFileListReply->error() != QNetworkReply::NoError)
   {
         QMessageBox::warning(this, "Failed", "Failed to load file
         list: " + downloadFileListReply->errorString());
   }
   else
   {
         QByteArray responseData;
         if (downloadFileListReply->isReadable())
         {
               responseData = downloadFileListReply->readAll();
         }

         // Display file list
         ui->fileList->clear();
         fileList = QString(responseData).split(",");

         if (fileList.size() > 0)
         {
               for (int i = 0; i < fileList.size(); i++)
               {
                     if (fileList.at(i) != "")
                     {
                           ui->fileList->addItem(fileList.at(i));
                     }
               }
         }
   }
}
The code is a bit long, so I have broken down the function into the following steps:
- If any problems occur during the download, display a message box that tells us the nature of the problem.
- If everything went nicely and the download has completed, we will try and read the data by calling downloadFileListReply | readAll().
- Then, clear the List Widget and start parsing the content of the text file. The format we used here is very simple; we only used a comma symbol to separate each file name: filename1,filename2,filename,... It is important that we do not do this in the actual project.
- Once we have called split(",") to split the string into a string list, do a for loop and display each file name on the List Widget.
To test whether the preceding code works or not, create a text file called files.txt and add the following text to the file:
filename1,filename2,filename3
Then, place the text file to your FTP directory and run your project. You should be able to see it appear like this on the application:
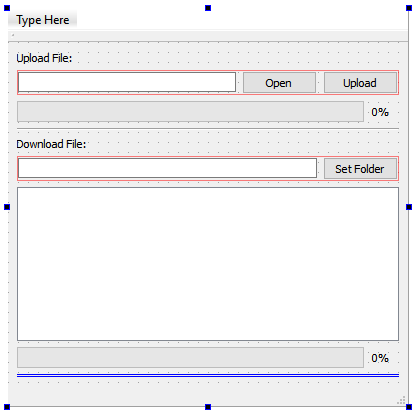
Once it is working, we can clear away the content of the text file and proceed to our next section.