Before we start writing any code, we must first enable the networking module by opening our project file (.pro) and add the network keyword there:
QT += core gui network
Next, open up mainwindow.h and add the following headers and variables:
#ifndef MAINWINDOW_H
#define MAINWINDOW_H

#include <QMainWindow>
#include <QDebug>
#include <QTcpSocket>

private:
   Ui::MainWindow *ui;
   bool connectedToHost;
   QTcpSocket* socket;
We set the connectedToHost variable to false by default in mainwindow.cpp:
MainWindow::MainWindow(QWidget *parent) :
   QMainWindow(parent),
   ui(new Ui::MainWindow)
{
   ui->setupUi(this);
   connectedToHost = false;
}
Once this is done, the first feature we need to implement is the server connection. Open up mainwindow.ui, right-click on the Connect button, then choose Go to slot..., and pick clicked(). After that, a slot function will be created for you automatically. Add in the following code to the SLOT function:
void MainWindow::on_connectButton_clicked()
{
   if (!connectedToHost)
   {
         socket = new QTcpSocket();

         connect(socket, SIGNAL(connected()), this,
         SLOT(socketConnected()));
         connect(socket, SIGNAL(disconnected()), this,
         SLOT(socketDisconnected()));
         connect(socket, SIGNAL(readyRead()), this,
         SLOT(socketReadyRead()));

         socket->connectToHost("127.0.0.1", 8001);
   }
   else
   {
         QString name = ui->nameInput->text();
         socket->write("<font color="Orange">" + name.toUtf8() + " has
         left the chat room.</font>");

         socket->disconnectFromHost();
   }
}
What we did in the preceding code was basically check for the connectedToHost variable. If the variable is false (meaning the client is not connected to the server), create a QTcpSocket object called socket and make it connect to a host at 127.0.0.1 on port 8801. The IP address 127.0.0.1 stands for a localhost. Since this is only for testing purposes, we will connect the client to our test server, which is located on the same computer. If you're running the server on another computer, you may change the IP address to a LAN or WAN address, depending on your need.
We also connected the socket object to its respective slot functions when connected(), disconnected(), and readReady() signals were triggered. This is exactly the same as the server code, which we did previously. If the client is already connected to the server and the Connect (now labeled Disconnect) button is clicked, then send a disconnection message to the server and terminate the connection.
Next, we will look at the slot functions, which we connected to the socket object in the previous step. The first one is the socketConnected() function, which will be called when the client has successfully connected to the server:
void MainWindow::socketConnected()
{
   qDebug() << "Connected to server.";

   printMessage("<font color="Green">Connected to server.</font>");

   QString name = ui->nameInput->text();
   socket->write("<font color="Purple">" + name.toUtf8() + " has joined
   the chat room.</font>");

   ui->connectButton->setText("Disconnect");
   connectedToHost = true;
}
First, the client will display a Connected to server. message on both the application output and the text browser widget. We will see what the printMessage() function looks like in a minute. Then, we take the user's name from the input field and incorporate it into a text message and send it to the server so that all users are being notified. Finally, set the Connect button's label to Disconnect, and set the connectedToHost variable to true.
After this, let's look at socketDisconnected(), which as its name implies, will be called whenever the client is disconnected from the server:
void MainWindow::socketDisconnected()
{
   qDebug() << "Disconnected from server.";

   printMessage("<font color="Red">Disconnected from server.</font>");

   ui->connectButton->setText("Connect");
   connectedToHost = false;
}
The preceding code is quite straightforward. All it does is show disconnected messages on both the application output and text browser widget, then sets the Disconnect button's label to Connect and the connectedToHost variable to false. Do note that since this function will only be called after the client has been disconnected from the server, we can no longer send any message to the server at that point to notify it of the disconnection. You should check for the disconnection at the server side and notify all users accordingly.
Then, there is the socketReadyRead() function, which will be triggered whenever the server is sending data to the client. This function is even simpler than the previous ones, as all it does is pass the incoming data to the printMessage() function and nothing else:
void MainWindow::socketReadyRead()
{
   ui->chatDisplay->append(socket->readAll());
}
Finally, let's look at what the printMessage() function looks like. Actually, it is just as simple. All it does is to append the message to the text browser and it is done:
void MainWindow::printMessage(QString message)
{
   ui->chatDisplay->append(message);
}
Last but not least, let's check out how to implement the function for sending messages to the server. Open up mainwindow.ui, right-click on the Send button, select Go to slot..., and choose the clicked() option. Once the slot function has been created for you, add the following code to the function:
void MainWindow::on_sendButton_clicked()
{
   QString name = ui->nameInput->text();
   QString message = ui->messageInput->text();
   socket->write("<font color="Blue">" + name.toUtf8() + "</font>: " +
   message.toUtf8());

   ui->messageInput->clear();
}
First, we take the user's name and combine it with the message. Then, we set the name to a blue color before sending the entire thing to the server by calling write(). After that, clear the message input field, and we're done. Since the text browser accepts rich text by default, we can use that to color our text by placing the text within the <font> tags.
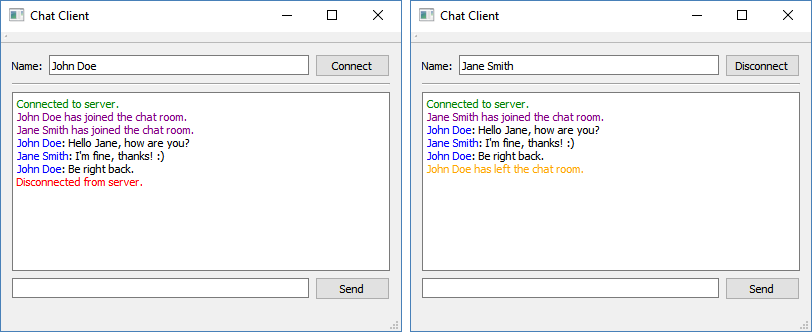
Compile and run the project now; you should be able to chat among yourselves on different clients! Don't forget to turn on the server before connecting the clients. If everything goes right, you should see something like this:
Meanwhile, you should also see all the activities on the server side as well:

That's it! We have successfully created a simple chat system using Qt. You are welcome to improvise on this and create a fully fledged messaging system!