HOW TO LIVE A DELICIOUSLY ELLA LIFESTYLE
Before we get into the ins and outs of how to be organized and stay healthy when you’re really busy, I quickly want to run you through my “ten commandments” for living a healthy, happy life. I know that food can be a complicated, emotional topic for people and that eating healthily can become obsessive and compulsive in the way that lots of diets can, when in reality it should just be a fun, easy, flexible component of your life. So I hope that the points below will guide you to a state of being where you can love anything and everything that you eat.
Enjoy your food—no matter what you’re eating, whether it’s kale or pizza, love every bite and savor each flavor. Food should always be fun.
Don’t look at healthy eating as a “diet”—it’s a lifestyle and an awesome way of living, so don’t deprive or starve yourself, as this won’t make you happy or healthy. Remember, we’re not counting calories or measuring portion sizes.
Open your mind—try new things and be flexible about your existing views on healthy eating. You’ll find healthy food is so much better than bland salads and you’ll enjoy it far more.
Balance is everything!—find what works for you, set realistic goals and be happy with them.
Be organized—take a little time every week to stock your fridge with nourishing ingredients, snacks and meals, so you always have something delicious on hand to eat.
Treat your body with respect—it is a beautiful, amazing thing that needs to be listened to. If you’re full, stop eating; if you’re hungry, have a snack; if you have digestive issues, examine your diet. Your body knows what it needs, you just need to learn to hear what it’s saying.
Eat a rainbow—try to make each meal as colorful as you can. Not only will this give you the best array of vitamins and minerals, it will also make your plate look more beautiful and appetizing. We all eat with our eyes first, so it will make your meal more delicious, too.
Don’t feel guilty—if all you want is chocolate cake, then eat a slice and enjoy it. Don’t binge-eat it and feel guilty afterward, and absolutely don’t restrict what you eat the next day as a result. Remember: no one is perfect!
Get creative—enjoy experimenting in the kitchen with new recipes and ingredients, adapt them as you like and don’t be afraid to try different things.
Slow down—take a minute to enjoy what you’re eating and don’t inhale your food. It takes about twenty minutes for your brain to register how full you are, plus you won’t appreciate how great the food is if you don’t take the time to think about it while you eat each bite.
The boring news is that staying healthy is all about organization; I know that doesn’t sound exciting but it’s so true. I’ll write more about getting organized in the on-the-go chapter, but for now I want to run through a few of the little things you should keep in your kitchen to help you with the organizational part.
Most importantly you’ll need lots of great containers; they will make all the difference to how good your food tastes and how long it stays fresh. It also means you can easily store food to take away with you, so you can just grab a container of goodness from the fridge, put it in your bag and bring it along to wherever you have to be. So what exactly do you need?
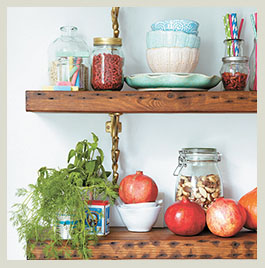
Glass jars with lids—my favorite storage items. They make everything look so pretty and it feels so much nicer picking up a beautiful jar than a plastic box! You can buy really cheap small glass jars online, or you can be super-eco-friendly and recycle old jars, which is what I do: my kitchen is filled with old tahini, almond butter and honey jars! Recycling jars also means you’ll have a wonderful range of shapes and sizes, so you’ll always have the perfect jar for your creation. I use jars for my breakfasts all the time as they’re perfect for holding smoothies, overnight oats and chia pots. I also use big jars to store my dry goods, mainly my nuts, grains and seeds.
Airtight food containers—your food needs to be kept airtight, as this stops it from going bad or losing flavor. Airtight, waterproof plastic boxes may not look as beautiful as glass jars, but they’re a total lifesaver when it comes to transporting your lunch. I keep my on-the-go lunches and leftover meals in these boxes in the fridge, plus I use them to store brownies, cookies, energy balls and pretty much everything else! You can buy them in all sizes and colors from almost everywhere.
Freezer bags—to be honest, these aren’t super-exciting either, but they’re very handy! They are the easiest way to store things in the freezer. Unlike plastic boxes, they take up very little space, so if you have a tiny freezer you should still be able to fit lots of bags on each shelf. I use them for portions of big batches of soup: I just take a bag out of the freezer and leave it in a bowl on the side to defrost for a few hours before I warm it up. Freezer bags are also great for storing slices of bread; as I don’t normally get through a loaf in a week I keep half of it, ready-sliced, in the freezer, so I can just take a piece out when I want. I also store frozen fruit in bags, as it takes up less space.
Glass bottles with rubber seals—these are less important than the three items above, but still really helpful to have around. I use them to store my nut milks, smoothies and juices, as they keep the air out to help keep whatever I’ve made fresh. It’s so important that the lid have a rubber seal around it, or air can get in and spoil what you’ve made. Again, these are readily available and really inexpensive.
OTHER EQUIPMENT
As well as the basics—grater, garlic crusher, kitchen scales and veggie peeler—a powerful blender is kind of essential and a food processor is useful as it means you can make more (especially when it comes to my soups, dips, dressings and smoothies). I’ve written at length about those in my first book, Deliciously Ella, so I won’t go into detail here except to say that they’re both worth investing in. I’ve tried to keep their usage to a minimum, though, so the recipes are achievable for everyone. And if you want to eat my zucchini noodles, a spiralizer would be handy and won’t break the bank, but you can use a veggie peeler instead. If you’re planning on making your own plant-based milks, you will also need a nut milk bag.
Again, I know this isn’t the most scintillating topic, but knowing how to properly store dry goods, as well as your awesome meals, means that you’ll get the most out of them.
STORING DRY GOODS
As I’ve said, I like using glass jars. I have shelves in my kitchen filled with almonds, cashews, quinoa, buckwheat, chickpeas, brown rice, chia seeds, cacao nibs, gluten-free pasta, oats and so on. It looks beautiful and it means you can see exactly what you have and how much of it is left. I find it’s a more economical way of keeping food, as I don’t go and buy more of something that I already have but couldn’t see, plus it means that you don’t have chickpeas and almonds spilling out of plastic packages everywhere!
I recycle small jars for things such as chia seeds or cacao nibs, and buy big rubber-sealed jars to keep bulk items, such as rice and pasta.
USING THE FRIDGE
This may sound like a totally ridiculous heading, I thought it was too when I first wrote it, as doesn’t everyone know what a fridge is and how to use one? But if you’re not much of a cook, then there are a few tips that can help you. The first thing to note is that putting anything in the fridge will cause it to lose some flavor; the cold just does this to food. So when you’re eating leftovers it’s important to let them warm up, otherwise you won’t enjoy them half as much. Either let them sit at room temperature for twenty minutes or so, or warm them in a pan with a little olive oil to remedy any dryness that has happened in the fridge. I do the same thing with any overnight breakfast recipe: I’ll take it out as soon as I wake up, so that by the time I have showered, dressed and got ready for the day it will have warmed up enough to taste delicious.
I keep leftover meals that I’m going to eat within the next few days in the fridge; if I’m not going to eat them in this time frame, I’ll put them in the freezer so they will keep for longer.
I don’t put baked goods in the fridge as I find it changes their flavor too much. Instead, they go into airtight boxes at room temperature.
USING THE FREEZER
Again, this might sound like a mad heading, but there are a few tips that can be handy here. The first is that it’s best to store as much as you can in freezer bags, as it saves so much room and you can see what you have, so you won’t have a curry sitting in the freezer for a year . . .
The other important thing is that you can freeze almost anything! Whenever I have overripe fruit, I chop it up and throw it into a bag in the freezer. I’ll do the same if I have too much spinach or kale, so I can use them frozen in my smoothies. It prevents waste and ensures that your drink is nice and cold.
If I have a frozen meal that I want to eat that evening, I take it out of the freezer when I leave the house in the morning and put it in the fridge to defrost; that way when I come home I can just put it straight in a pan to heat up, rather than dealing with a giant ice cube of stew!
The last thing to note is that food should only be defrosted once, so just take the amount you need out of the freezer and leave the rest of the meal in there for another time. (This is why it’s a good idea to freeze a meal in portions, rather than all in the same bag.)
SHOPPING LIST
As you go through the book you’ll see that the same ingredients come up all the time. This overlap is deliberate, as it means your meals will be quicker and cheaper to prepare and you won’t be spending lots of money on an ingredient that you’ll only use in one recipe.
If you’re totally new to this way of eating then it will be expensive to do an initial shop, to stock your cabinets with the items below; however, after this your meals should cost very little, as all you’ll need to buy are a few fresh ingredients. If you’re making Bircher muesli, for example, all you’ll need to buy are apples and, if you’re making the lentil and eggplant pasta, all you’ll need are eggplants and red peppers.
The fresh ingredients for my recipes are available anywhere in the world, so if your cabinets are stocked with everything else it will always be easy to make these recipes. I tend to shop for all the pantry ingredients listed here online, as I find it much easier: you often get better deals and won’t have to spend ages running around supermarkets to get dinner together, which is good in terms of saving time. Also, some smaller supermarkets may not stock items such as brown rice flour, coconut oil and chia seeds (though, these days, more and more of them do, which is amazing). If your cabinets are stocked with everything you need to make a wonderfully healthy and very delicious meal, then you’re much more likely to actually make it, rather than resorting to a bowl of cereal or ordering takeout.
I find the internet is normally the best place to get great deals on health foods, so I normally order from there. Even though your first shop will be expensive, everything you buy will last for ages, so it won’t go to waste . . . you never need to worry about your quinoa, tamari and maple syrup going off! I’ve talked more about the cost of eating this way in the Big-Batch Cooking chapter, so I won’t go into too much detail about it here, but just trust me: it’s so worth investing in your health.
DRY INGREDIENTS
Buckwheat groats
Cacao powder (raw)
Chia seeds
Flour (brown rice and buckwheat)
Hemp seeds
Noodles (buckwheat)
Nuts (almonds, cashews, hazelnuts, pecans)
Oats
Pasta (brown rice)
Pine nuts
Pumpkin seeds
Puy lentils
Quinoa
Rice (brown and short-grain brown)
Sesame seeds
Sunflower seeds
Black beans
Cannellini beans
Chickpeas
Coconut milk
Tomatoes (chopped)
CONDIMENTS/WET INGREDIENTS
Almond butter
Apple cider vinegar
Coconut oil
Miso paste
Olive oil
Sesame oil
Sun-dried tomatoes
Tahini
Tamari
Tomato paste
FRIDGE/FREEZER
Frozen peas
Plant-based milk
HERBS AND SPICES
Basil (fresh)
Cayenne pepper
Chili flakes
Cilantro (fresh)
Cinnamon (ground)
Coriander (ground)
Cumin (ground)
Ginger (ground and fresh root)
Mixed herbs/herbes de Provence
Paprika
Turmeric
Vanilla pods and powder
SWEETENERS
Dates (ideally medjool)
Honey (raw)
Maple syrup
Raisins
On top of these, there are a few fresh items that I buy every week as they are used in so many of my recipes. I often have an online delivery arranged for these on a Sunday evening, so my fridge is stocked with goodness all week and I’m inspired to make lots of healthy meals.
FRESH FRUIT AND VEG
Apples
Avocados
Bananas
Beets
Blueberries
Butternut squash
Carrots
Cauliflower
Cucumbers
Eggplant
Garlic
Kale
Lemons and limes
Mangoes
Mushrooms
Parsnips
Peppers
Potatoes
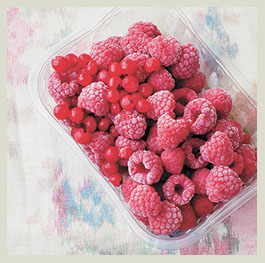
Raspberries
Spinach
Strawberries
Sweet potatoes
Tomatoes
Zucchini
Food healed me and made me feel better and more energized than ever before. Now, I want to show you how exciting it can be to eat a plant-based diet and also to inspire you with some of my fabulous recipes.
Let’s get cooking!