Chapter 4
Understanding How Pressure Cookers Work
In This Chapter
![]() Becoming acquainted with your pressure cooker
Becoming acquainted with your pressure cooker
![]() Getting some operational guidelines
Getting some operational guidelines
![]() Releasing the steam
Releasing the steam
![]() Testing your pressure cooker
Testing your pressure cooker
The pressure cooker has come a long way from its early days when it resembled a cast-iron cannonball that was heated in the hot cinders of the hearth until the cook “guessed” that the food was done (back in the days of our great-great grandparents!). It’s different even from what it looked like a short 85 years ago when it was made from die-cast metal. Aside from being cosmetically different, today’s stamped-aluminum or stainless-steel pressure cooker has at least three safety valves, making it the safest pressure cooker invented yet.
If you’ve never used a pressure cooker before, or if you have but plan to start using one of the new-and-improved versions, carefully read through this chapter. In it, I tell you everything you ever wanted to know about how this kitchen wonder works and what to expect along the way as it does its thing.
The Science of the Pressure Cooker
With the exception of oil and fat, all liquids that contain water boil at 212 degrees. When water boils, steam, which is hotter than boiling water, is produced.
For a moment, imagine a pot of boiling water that’s producing steam. You cover the pot and close the cover in such a way that the pot is sealed and the steam can’t escape. As long as the liquid boils, the trapped steam continues to increase, eventually condensing with nowhere to go and building up inside the pot. The pressure of this trapped steam can be measured in pounds per square inch, or psi.
Now pretend that the pot contains a 1-x-1-inch cube, and you’re applying approximately 10 to 13 pounds of force, or pressure, on all six sides of the cube. With the combined heat and pressure, the temperature increases by about 38 degrees and the cube starts to break down, which is exactly what happens to food when you prepare it in a pressure cooker. See Figure 4-1 for an illustration of cooking under pressure.
Figure 4-1: Trapped steam creates high pressure and a high cooking temperature.
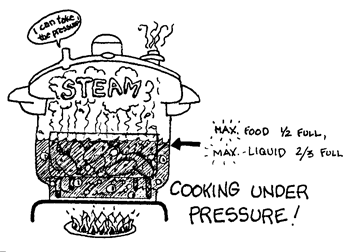
Illustration by Elizabeth Kurtzman
The Nuts and Bolts of Stovetop Models
Stovetop pressure cookers are deceptively simple-looking. When you consider that they consist of only four main components, it’s pretty amazing that you can cook such delicious food, so quickly, in such a simple product. But don’t be fooled. Each part plays an important role in getting the job done! I tell you about the most important parts — the pot and its cover, the rubber gasket, and the pressure-regulator valve — in the sections that follow. (Note: The electric pressure cooker, which I describe in the later section “Examining the Cord, Plug, and Buttons of Electric Models” has all these same parts.)
Looking at the pot and its cover
The two main components of the pressure cooker are the pot and cover. Originally made from die-cast metal, pressure cookers have been made of stamped metal ever since this process was introduced in France in the 1950s. Today’s stamped-aluminum or stainless-steel (usually high-quality, 18/10 stainless) pressure cookers are usually sold in a variety of sizes ranging from 4 to 8 quarts. The most commonly offered size is 6 quarts, which can easily accommodate 4 to 8 servings.
Whether you purchase and use an aluminum or stainless-steel pressure cooker is up to you. Aluminum is usually less expensive. However, because I use my pressure cooker almost each and every day, I prefer a heavier, stainless-steel model.
Most stainless-steel pressure cookers have a thick, three-ply plate attached to the bottom of the pot that comes in direct contact with the burner. Comprised of a sheet of aluminum or copper sandwiched between two sheets of stainless steel, this plate evenly distributes heat, eliminating hot or cold spots. Because I like to sauté and brown in the same pressure-cooker pot before cooking under pressure, I prefer a heavy-bottomed pot for even cooking.
 Also, the heavier the bottom, the less likely the food is to stick and burn when cooking under pressure. Some less-expensive aluminum pressure cookers have thin metal bottoms, which increase the risk of food sticking and burning over high heat as the pressure cooker is brought up to pressure.
Both aluminum and stainless-steel pressure-cooker pots tend to have two heat-resistant plastic handles. The pot cover has two matching handles. These handles are important for two reasons:
 They make it easier to move the pressure cooker from the countertop to the burner. Pressure-cooker pots are heavy. A 6-quart stainless-steel pot can weigh about 7 to 8 pounds empty; add some cooking liquid and food, and that pot gets awfully heavy mighty fast.
They help ensure you close the pressure cooker properly. If you look at the underside of a pressure-cooker cover and the top of the pot, you’ll see a jarlike locking mechanism for closing and sealing the pressure cooker. When the pressure cooker is closed properly, the top handles on the cover line up with the bottom handles on the pot. Some pressure-cooker cover handles also have a locking mechanism incorporated in the handle that has to be activated in order to lock the cover in place. Others self-lock when the cover is turned and locked in position.
 Regardless of the design, modern pressure cookers can’t be opened until the pressure has dropped to 0 psi. This is an important safety feature. Early model pressure cookers, for the most part, didn’t explode. People opened them under pressure, causing food to fly all over the kitchen! Fortunately, this scenario is no longer a possibility. If you happen to have one of those older models, say from the ’40s or ’50s, save it as a conversation piece — they’re no longer meant for cooking!
Relying on the ever-important rubber gasket
An important feature invented by Alfred Vischer, Jr., and incorporated in his 1938 Flex-Seal Speed Cooker (which I tell you about in Chapter 2) was the rubber seal or gasket. The gasket creates an air- and steam-tight seal when the cover is locked in place. All pressure cookers must have this feature because they don’t work without it.
Here’s why. Because metal expands when heated, the rubber gasket allows for a constant tight seal between the cover and the pot. By having this constant seal, air can’t get into the pressure cooker. The steam that’s created by the boiling cooking liquid is trapped inside the sealed pot and builds into pressure, which ultimately cooks the food up to 70 percent faster than using a regular pot and cover.
In order to perform as required, the gasket must be clean and flexible. Over the course of time, it can dry out and harden, losing its elasticity. If that happens, replace the gasket immediately. Make a habit of checking the gasket each time you use your pressure cooker (for more info, see Chapter 5). Most manufacturers suggest that the gasket be replaced at least once a year. Never use your pressure cooker without the rubber gasket properly positioned. Don’t use a damaged gasket because the cover won’t lock into place properly and/or steam won’t build up and may even escape.
Regulating pressure (and safety) with valves
In much the same way that electric appliances have on/off switches and temperature controls or settings, pressure cookers have pressure-regulator valves that allow you to control the amount of pressure inside the closed pot. Some of these valves have been around for decades; others are new and quite innovative. The kind of valve determines the type of pressure cooker you have. Basically, stovetop pressure cookers come in three varieties (as you can see in Figure 4-2): jiggler-valve cookers, developed-weight-valve cookers, and spring-valve cookers.
It’s rock ’n’ roll regulator time!: The jiggler valve
The jiggler valve is one of the oldest pressure-regulator methods around. People who recall that old, noisy pressure cooker sitting on top of their stove are thinking about the jiggler-valve type of pressure cooker.
Figure 4-2: The type of valve determines the type of stovetop pressure cooker.
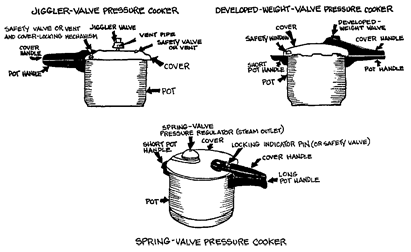
Illustration by Elizabeth Kurtzman
The jiggler valve is a round, metal weight that sits on top of a thin metal tube, or vent pipe, in the center of the cover of some pressure-cooker models. As pressure builds inside the pressure cooker, steam comes out through the vent pipe, causing that metal weight to rock back and forth and slowly turn. As pressure increases, so does the movement of the jiggler valve. In fact, the only method you have for figuring out the approximate level of pressure you’re cooking with is one of trial and error. Exceed pressure, and the infamous jiggler valve hisses and spits steam and condensation at you with no mercy.
Today’s jiggler-valve pressure cooker really hasn’t changed too much since its introduction. It has some additional safety features, like preventing removal of the cover while under pressure. Unlike the earlier ones made from die-cast metal, today’s versions are made from stamped aluminum or, in some cases, stainless steel.
The heavyweight: The developed-weight valve
A takeoff of the jiggler valve is the developed-weight valve. This pressure-regulator valve is positioned on the vent pipe (most are located on the cover handle) and locked in place by the user. When pressure is achieved, the weight rises up ever so slightly and steam is emitted, indicating to the user that maximum pressure has been reached and that the moment has arrived to adjust the burner heat to a level that’s low enough to maintain pressure.
It’s all in the turn of the dial: Spring-valve pressure regulators
Over the course of time, manufacturers have devised easier ways to regulate pressure, the best of which is the spring-valve pressure regulator.
The design of the spring-valve pressure regulator is different from brand to brand, although two common types exist:
A plastic dial that’s located on top of the cover (refer to Figure 4-2): Inside or under the removable dial is a spring mechanism. If you gently press down on the dial, you can feel the spring action. The dial usually has numerical settings and a burst-of-steam symbol that allow you to choose the level of pressure you want and release pressure after cooking. The following list gives a detailed description:
• Setting 0: Releases the dial, allowing you to remove the cover for cleaning.
• Setting 1: Used for low pressure (10 psi). Perfect for cooking soft foods, such as berries or fish, so they retain their shape.
• Setting 2: Works for high pressure (13 to 15 psi, depending on brand and model). I use this setting most frequently when cooking under pressure.
• Steam: Used to release pressure immediately after cooking.
A plastic or metal rod that’s built into the cover: This valve rises as pressure builds in the cooker. The spring-regulated rods indicate the level of pressure reached by color and/or height. Some models also have a pressure selector switch built into the handle that allows you to select a level of pressure, such as low (10 psi), medium (13 psi), or high (15 psi).
Hearing lots of hissing? It’s the safety valves!
After the cover is positioned on the pressure cooker and locked in place, the pressure cooker can be heated and brought up to maximum pressure over high heat. Steam pressure gradually builds up. Excess steam begins to come out of the pressure-regulator valve, and an audible hissing sound is heard. These things happen with all pressure cookers, regardless of the type of pressure-regulator valve.
If the burner heat isn’t adjusted and lowered, steam continues to come out as a safety feature. As pressure continues to build, the other safety valves also activate. All pressure cookers have at least three safety valves. Their function is to permit excess pressure to escape if too much pressure builds up due to one or more of the following reasons:
The heat is too high, creating too much steam.
A pressure-regulator valve is malfunctioning or obstructed.
The pressure cooker is overfilled.
Although every manufacturer refers to these valves by different names, for the most part they’re very similar in operation. Basically, by making so much racket, the pressure cooker reminds you to lower the burner heat to a simmer.
So where are these safety valves located? In addition to the pressure- regulator valve, another safety valve is usually located in the cover. This valve may be as simple as a rubber stopper or plug or as sophisticated as a metal lug-nut-type valve. In addition, depending on the design of the pressure cooker, some type of safety valve is usually located in the cover handle. A cutout in the cover rim allows for expansion of the rubber gasket under extreme excess pressure. Together, all these safety valves provide the user with a pressure cooker that’s safer to use than ever before. Nevertheless, all the valves must be kept unobstructed and clear of any food buildup to work properly.
Examining the Cord, Plug, and Buttons of Electric Models
Electric pressure cookers provide the gadget-savvy consumer with a totally new and innovative way to cook under pressure, as well as slow cook and even make rice, all in one appliance (see Chapter 3).
This appliance works on the same premise as a stovetop pressure cooker with a spring-valve pressure regulator (refer to Figure 4-2 to see what this stovetop model looks like). The electric pressure cooker (pictured in Figure 4-3) is made up of a metal electric base that houses the heating element, a cord and plug, and a control panel. The nonstick pot is easy to remove for washing. Depending on the brand and model, electric cookers come with a 5-, 6-, or 7-quart cooking pot made of nonstick aluminum. The base usually has two side handles, making it easier to move and carry the appliance.
Figure 4-3: Electric pressure cookers look nothing like their stovetop counterparts.
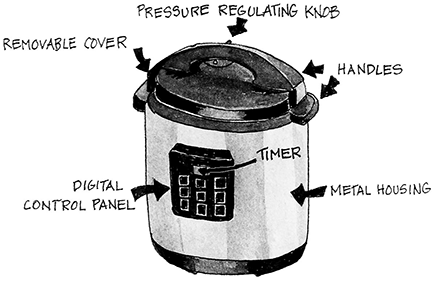
Illustration by Elizabeth Kurtzman
The removable lid, which locks into place when turned clockwise, is very similar to that found on a stovetop pressure cooker. At least three safety valves are built into the lid, including the spring-valve pressure regulator. The underside of the lid also has a removable rubber gasket.
Besides the cord and plug, the one feature that really differentiates the electric pressure cooker from the stovetop version is the electronic control panel on the front of the base (see Figure 4-4). Made up of a push pad and a digital clock, the control panel is the brain of the appliance. By pushing a button, you program the pressure cooker to do the things that you would otherwise have to do manually. The electric pressure cooker can brown and sauté, simmer, cook under high or low pressure, and keep the cooked food warm when done. The countdown clock/timer allows you to set the pressure cooker for the cooking time specified in the recipe. After the desired pressure is reached, the timer kicks in, and the pressure cooker beeps at the end of the selected cooking time. Easy, no?
Figure 4-4: The control pad of an electric pressure cooker.
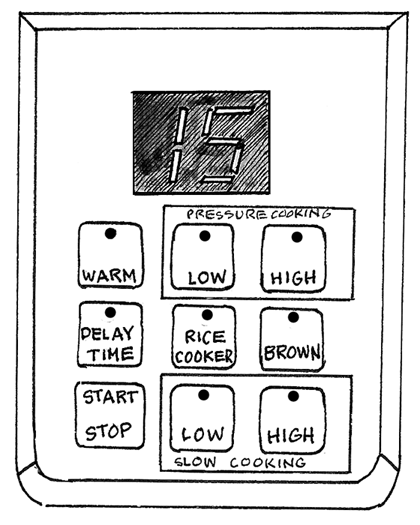
Illustration by Elizabeth Kurtzman
Say you want to make my Sunday Pot Roast recipe in Chapter 9. After adding the oil to the pot, you simply press the Brown and Start buttons. After 60 seconds of preheating, the oil is hot enough to begin cooking. After browning the meat and onions, you add the broth and press the Stop button. After positioning the lid on the pressure cooker and locking it in place, you press the High pressure button and, according to the recipe directions, set the programmable timer for 60 minutes. After that, you simply press Start and let the pressure cooker do its thing. The electric pressure cooker heats up, creates steam, and reaches high pressure, after which it stabilizes on its own and cooks the meat to perfection. At the precise moment that the pressure cooker reaches the chosen level of pressure, the countdown timer kicks in, and at the end of the cooking cycle, the appliance “beeeeeeps,” telling you that it’s done cooking. On most models, the pressure cooker automatically switches over to Keep Warm. At this moment, you’re ready to release the pressure by using either the natural-release method or the automatic-release method, both of which I tell you about in the later “Letting Off Some Steam” section.
Guidelines for Easy Pressure Cooking
As with any appliance or gadget, you have some basic, fundamental rules to follow to get the best results before and while you use your pressure cooker. Here’s what to keep in mind:
Never fill the pressure cooker more than half full with food or two-thirds full with liquid when making soups or sauces. Food, especially liquid, boils harder and faster under pressure, which means it has a tendency to increase in volume. Fortunately, most pressure cookers have a two-thirds mark stamped on the inside of the pot, eliminating any guesswork.
Never pack food down into the pressure cooker because that defeats the purpose of fast cooking by inhibiting the very hot steam from circulating around the food.
Maximize flavor by browning meat and poultry directly in the pressure cooker. When food is cooked quickly over high heat in a small amount of fat, such as canola or olive oil, it browns. The natural sugar found in food caramelizes in the hot fat, giving the food great color and intense flavor. I therefore always brown or sauté meat, poultry, chopped onions, carrots, celery, and (at times) hearty herbs such as thyme or sage, to give the food I’m preparing better flavor and, ultimately, texture.
When browning, you want the temperature to be hot enough to sear in the juices and flavor, but not burn the food. When you think the oil is hot enough, add a piece or two of food. If it sizzles without sputtering, the oil is at the ideal temperature. Add about half of the food to be browned and cook it evenly on all sides. If you add too much at once, the oil and pot drop in temperature and the food simmers rather than browns. Cooking food in small quantities at a time rather than all at once is called cooking in batches. Deglaze the pan before proceeding to cook under pressure to remove cooked-on particles of food as well as any cooked-on juices. Deglazing also makes the finished product superflavorful.
 Always brown with the cover off and usually over high or medium-high heat in order to sear the outer surface of the meat. Marinated foods should be well drained, and all meat and poultry should be patted dry before being placed in the hot oil.
 When using an electric pressure cooker, select the Brown setting and proceed as previously described.
Never force the cover when closing it. If the cover won’t easily close and lock, remove it from the pressure cooker and make sure the rubber gasket is properly positioned. The cover should sit squarely on the center of the pressure cooker before you try to close it.
Remember, a pressure cooker lid is like a jar top: Put it on the wrong way and you may not be able to open the jar easily or at all. The same is true with your pressure cooker. If you have to force the cover closed, either the lid isn’t sitting correctly on the pot or the rubber gasket may be twisted or improperly aligned. You’ll probably have a hard time getting the lid off the pressure cooker, if you can even get it off.
Some covers lock in place by being positioned on the pressure cooker and turned clockwise. These units usually have an arrow or some type of indicator mark that you need to line up with the long pot handle. Making sure that the cover is sitting flush to the pot, carefully turn clockwise. Because of the tight fit of the rubber seal gasket, some covers may offer more resistance than others when you’re closing the pressure cooker. Regardless, never force the cover shut.
Some pressure cookers have a self-locking cover mechanism. You simply position the cover on the pressure cooker in accordance with the manufacturer’s instructions and lock it in place.
Start the countdown time for cooking when the pressure cooker reaches the chosen level of pressure, not before. Pressure is rated in psi. As Table 4-1 indicates, the higher the pressure, the hotter the food is cooking.
The electric pressure cooker makes it even easier for you. Choose the level of pressure you want (high or low), set the timer, and press Start. When the pressure cooker reaches pressure, the countdown timer kicks in and beeps when done.
Follow cooking times carefully. Because pressure cookers cook up to three times faster than conventional cooking methods, food can overcook quickly! Either refer to the cooking times indicated in pressure-cooker recipes or use a suggested cooking times chart. If you’re uncertain about the exact time to cook something, undercook it. Undercooked food can easily be cooked under pressure an additional minute or two, whereas overcooked food usually becomes puree!
Table 4-1 Temperature-Pressure Ratios
|
Pressure Setting |
Cooking Temperature |
Pressure Level |
|
High pressure |
250 degrees |
13–15 psi |
|
Medium pressure |
235 degrees |
10 psi |
|
Low pressure |
220 degrees |
3 psi |
Letting Off Some Steam
Unless otherwise indicated in a recipe, pressure should always be released immediately after the required length of cooking time to prevent overcooking. There are three methods to release the steam: the natural-release method and two quick-release methods.
When releasing pressure, always choose the appropriate method for your model of pressure cooker or in accordance with the recipe’s instructions.
Natural-release method
The natural-release method can be used with all types of pressure cookers, including electric versions. Here’s how it works:
1. After cooking for the prescribed length of time, remove the pressure cooker from the burner and let it cool to room temperature.
As it cools, the pressure diminishes and eventually drops completely. The exact amount of time it takes depends on how full the pressure cooker is.
When cooking with an electric pressure cooker, the appliance automatically goes into the Keep Warm cycle. Press Stop when done cooking and the pressure will diminish automatically.
2. Open the pressure cooker when all the pressure has been released.
If using a jiggler-valve or weighted-valve pressure cooker, you can tell that the pressure has been released when you can touch or remove the valve and it no longer makes any noise. Pressure has been released in a spring-valve or electric pressure cooker when the pressure indicator pin drops all the way.
Save the natural-release method for when you’re cooking large, tough cuts of meat that won’t break down and get mushy, or when you’re making stock or broth and the solids (vegetables, poultry, meat, and so on) will be discarded. These foods benefit from the additional cooking time in a closed pot. For example, pot roast becomes more tender, and stock becomes more flavorful.
Quick-release methods
The two quick-release methods — the cold-water-release method and the automatic-release method — are the two most commonly used ways of releasing pressure. The method you use is determined by the model and type of pressure cooker you have, so check your manufacturer’s instructions.
Cold-water-release method
The cold-water release is the method to use if you have a jiggler valve, developed-weight valve, or spring-regulated valve pressure cooker without a pressure selector.
1. When finished cooking, remove the pressure cooker from the stove using potholders to grab the two handles, and place it in the sink.
2. Run cold water over the top side of the pressure cooker until all the pressure has been released.
If using a jiggler-valve or developed-weight-valve pressure cooker, you can tell that the pressure has been released when you can touch or remove the valve and it no longer makes any noise. Pressure has been released in a spring-valve pressure cooker when the pressure indicator pin drops all the way.
3. Open the pressure cooker when all the pressure has been released.
When cooking in an electric pressure cooker, never use the cold-water-release method, or you run the risk of electrocution!
Automatic-release method
Use the automatic-release method to release pressure after cooking if your pressure cooker has a pressure selector with steam release, usually indicated by a burst-of-steam symbol. The same holds true with electric pressure cookers.
1. Carefully turn or push the pressure selector to the steam setting.
The pressure cooker automatically and safely releases all the built-up steam through the spring-regulator valve.
2. Open the pressure cooker when all the pressure has been released.
You can tell the pressure has been released when the pressure indicator pin drops all the way.
In the event that you’re unable to open the cover of your stovetop pressure cooker, try the cold-water-release method because some pressure may still remain.
If you experience difficulties opening your electric pressure cooker, unplug it and contact the manufacturer’s customer service department.
Doing a Trial Run
The easiest way to get a feel for how to use a pressure cooker is by putting it through a test run and heating some water under pressure before you begin cooking any food.
Follow these steps for heating water:
1. Fill the pressure-cooker pot with 2 cups of water.
2. Cover the pot.
Look for the two arrows or triangles that are engraved in the top of the cover. Place the cover on the pot, matching the arrows with the long pot handle. Turn clockwise until the cover and long pot handles line up and you hear a click. If your pressure cooker isn’t shown in Figure 4-2, or if you’re using an electric pressure cooker, check the owner’s manual for instructions.
Before positioning and locking the cover in place, always check the rubber gasket to make sure it’s in good condition. Position it properly on the underside of the cover. Always check the owner’s manual to see whether the gasket has to be positioned in a specific fashion or location because some gaskets have small cutouts or openings that must be lined up in order for the pressure cooker to work properly.
Never force the cover when turning it to close. It should sit level on top of the pressure cooker and turn without much resistance. If you encounter difficulties, refer to Chapter 14.
If you don’t hear a click when closing the pressure cooker, the cover isn’t locked and the cooker won’t operate properly. In that case, inspect the gasket, cover, and pressure-cooker pot for possible damage.
3. For a jiggler-valve or developed-weight-valve pressure cooker, place the weighted valve on the vent pipe. If you have a spring-valve pressure cooker and it has a pressure selector, set the regulator for the level of pressure desired, in this case, high.
4. Place the pressure cooker on the stove and bring the water to a boil over high heat.
For electric pressure cookers, select high pressure, set the timer for 5 minutes, and press Start.
As the water boils, steam is produced.
If your pressure cooker is the jiggler-valve type, the jiggler valve will slowly begin to turn and rock as steam pressure builds up. With the developed-weight-valve type, the valve will rise slightly.
The mode of operation with spring-valve pressure regulators is even more diverse: Some have a pressure indicator pin that rises up until it’s level with the top of the cover. Others have a pressure-regulator valve that rises higher than the cover itself. Regardless, once the valve is up, your pressure cooker has reached the level of pressure you chose to cook with.
5. If using a stovetop pressure cooker, lower the burner heat to simmer to maintain pressure.
The pressure cooker is now cooking under pressure, which is when you start to clock the cook-down time.
If you’re using an electric pressure cooker, the appliance’s built-in timer will automatically kick in.
If you don’t own a digital kitchen timer, now is the time to purchase one. Available in the gadget section of most housewares stores and supermarkets, digital timers allow you to control the exact cooking time without any guesswork. If your stove has a digital timer, you can use that instead.
Make sure to watch for the following things when using a stovetop pressure cooker:
After you raise the heat to high, the pressure cooker will eventually start to hiss at you as it releases excess steam and pressure through the pressure selector. The pressure cooker is signaling you that it has reached the level of pressure you selected and it’s time for you to immediately lower the burner heat to a low setting, which on my gas range is a simmer.
If the pressure cooker is still pretty noisy after lowering the heat (with the exception of the jiggler- and weighted-valve versions, which normally operate with a certain amount of noise), turn the spring-valve pressure regulator to the steam release setting for a couple seconds to release some of the excess pressure. Things should now be stabilized, the pressure cooker almost quiet, and hardly any steam coming out of the pressure regulator.
If the jiggler valve slows down or stops spinning or if the weighted valve or indicator pin begins to lower while you’re cooking, raise the burner heat slightly so the valves remain operational.
To remove the cover after cooking, follow these steps:
1. Turn off the burner heat and remove the pressure cooker from the stove.
2. Release the pressure.
If using a jiggler- or weighted-valve pressure cooker or a spring-valve pressure cooker without a pressure selector switch, remove the pressure cooker from the stove and place it in the sink. Run cold water over the top side of the pressure cooker until all the pressure has been released.
For a spring-valve pressure cooker with a pressure selector, turn the selector to the steam setting to release the pressure.
When using an electric pressure cooker, press Stop when the pressure cooker beeps and release the pressure using the automatic-release method.
3. Unlock the cover.
You can’t remove the cover until after all the steam has been released. As long as any pressure remains in the pot, a safety-locking valve kicks in and makes removing the cover impossible, whether you have a stove-top unit or an electric one.