Chapter 5
Pressure Cooking Basics from Start to Finish
In This Chapter
![]() Establishing a routine for pressure-cooker use
Establishing a routine for pressure-cooker use
![]() Discovering how to create and maintain pressure
Discovering how to create and maintain pressure
![]() Canning under pressure
Canning under pressure
![]() Cleaning and storing your pressure cooker
Cleaning and storing your pressure cooker
Recipes in This Chapter
 Garlic Dill Pickles
Strawberry Jam

Your pressure cooker will last you quite a while if you take good care of it, which is why this chapter gives you some pointers on how to maintain it in perfect working shape for optimum use day after day, year after year. It also offers tips on what to look for every time you use your pressure cooker and introduces you to the concept of pressure canning for those times when you want to preserve the season’s best produce.
 If you haven’t looked at Chapter 4 yet, you may find it helpful to read that information first so you’re more familiar with the basic pressure-cooker parts and techniques that I refer to in this chapter.
First Things First To Get Cooking Under Pressure
The following five sections explain in detail the steps involved in using a pressure cooker successfully. Much easier than you probably imagine, it’s all a matter of finding out what to do and following a basic routine, as you would with any style of cooking. Observing each of the steps that follow will ensure many happy and successful hours of pressure cooking.
Keep it clean
Always wash the pressure cooker well after every use and when you haven’t used it for an extended period of time. Never leave any food or residue in or on the pot or cover. If you see something that doesn’t look like it belongs there, wash it off. For more pointers on cleaning your pressure cooker, flip to the later “Keeping Your Pressure Cooker Squeaky Clean and Shiny” section.
 Remove the gasket from the cover and check to see that the gasket, the inner part of the cover, and the outer rim of the pot are clean. (See the next section for how to inspect and replace the gasket.) Making sure these areas are clean reduces the risk of the cover sticking when you go to open it after the pressure has been released.
Inspect the gasket
The rubber sealing gasket or ring is what makes the pressure cooker airtight so that it can maintain pressure. Every time you use the pressure cooker, whether you have a stovetop model or an electric one, make sure that the rubber gasket is still flexible and hasn’t dried out.
I always remove the gasket and check it visually for any tears or cracks before I start cooking. Here’s the method that works best: Take the gasket in two hands, twist it into a figure eight, and stretch it. There should be some give. If not, or if you notice any signs that the gasket is dry or damaged, replace it immediately with a new gasket, obtainable from the manufacturer.
After checking the gasket, put it back in the rim on the underside of the cover. The gasket must slide flatly under the rim. Some pressure-cooker gaskets have markings or cutouts that indicate where to position them.
Check the valves
Just as you would never drive a car with a leaking gas tank, you should never use a pressure cooker that leaks. Routinely check your pressure cooker for leaks as well as blockages in the safety valves.
Each manufacturer’s design varies, so check the owner’s manual for the exact requirements for maintaining the safety valves in working order. The following are some of the things I look for:
 If your pressure cooker has a jiggler valve or developed weight with a vent pipe, stick a pipe cleaner or toothpick through the opening to make sure that the vent pipe is clean and not blocked. Also check the underside of the jiggler valve or weight and remove any caked-on food residue. Some of these pressure cookers have a rubber, stopperlike valve on the top of the cover. Be sure that it’s securely positioned and hasn’t dried out. Others have a brass or steel nutlike valve on the underside of the cover. Make sure that no food or residue has collected in the center of the nut.
If your pressure cooker has a spring valve, press or pull gently on the valve (depending on the design) to make sure that it moves without any resistance. Visually check any remaining valves on the underside of the cover. For the most part, these valves resemble brass or steel nutlike valves.
Another place to look for valves is in the handle assemblies. Here, too, remove any caked-on food or food residue.
Fill the pressure cooker properly
Filling your pressure cooker with the right amount of ingredients is critical. If you use too little cooking liquid, the pressure cooker may never reach the desired pressure. On the other hand, if you fill the pressure cooker with too much food or liquid, the steam and pressure will force the food or liquid up toward the cover and safety valves. As the pressure builds, food and liquid will be forced out through the valves, which is dangerous because food particles can become lodged in the valves and clog them, causing the safety system of valves to kick in, stop the cooking process, and continuously release pressure.
If you can remember the following points, you’ll always have a properly filled pressure cooker:
Never fill the pressure cooker more than two-thirds full.
Always use at least 2 cups of cooking liquid to obtain maximum pressure output.
Look, listen, and smell
As the pressure cooker begins to do its job, keep your senses alert.
Look to see that the pressure regulator valve is operating properly and that the pressure cooker isn’t taking longer than the anticipated amount of time to reach pressure. A good ballpark amount of time is about 5 to 10 minutes.
 If you happen to see condensation leaking from the cover onto the stove as the pressure cooker reaches or is cooking under pressure, you don’t have an airtight seal or the pressure cooker was overfilled. Stop everything and do the following: Release any pressure in the pot, remove the cover, and check to make sure that the gasket is indeed there and that it’s properly positioned and not damaged. Remove any excess food if the pot is more than two-thirds full.
 Electric pressure cookers operate a bit differently. Because they’re electronically controlled, steam hardly ever comes out of the pressure-regulator valve. The only thing that may come out is a bit of condensation that collects in the small, clear plastic reservoir located on the base handle.
Listen to the pressure regulator valve as it talks to you. Jiggler-valve pressure cookers are the noisiest kind there are. In order to cook under pressure, some steam and pressure have to come out of the vent pipe that the jiggler valve sits on; as it does, it makes a hissing sound. No sound, no pressure! The more sound the jiggler valve makes, the higher the level of pressure you’re cooking at.
Weighted-valve and spring-valve pressure cookers should make noise only when the pressure cooker exceeds the level of pressure chosen for the recipe or food being cooked. For example, suppose that you choose to cook at low pressure and set the pressure cooker accordingly, either with a low-pressure valve (a weighted-valve model) or by setting the spring valve on low. Once the pressure exceeds low, the excess pressure has to go somewhere. Slowly but surely, it’s released through the pressure-regulator valve and starts to make a racket. This is an essential safety feature on stovetop cookers. Basically, the pressure cooker is telling you, “Hey, you set me on low pressure; I got there, so why don’t you lower the burner to a simmer instead of making me sweat it out!”
Smell (from a safe distance!) and you will notice that the steam coming out of the pressure release valve is odorless; rarely will you smell anything while cooking under pressure. Rest assured, however, that if you cook at temperatures that are way too high, the food will stick and eventually burn. The food will also stick and burn, scorching the pot, if you don’t use enough liquid and it evaporates.
Surveying the Three Ways to Cook in a Pressure Cooker
There’s more one than one way to cook food in a pressure cooker. You can do any of the following:
Steam under pressure by using water and some sort of a steaming basket or tray. This technique is perfect for cooking farm-fresh vegetables and fresh lobster. You can also steam desserts such as cheesecake, puddings, and custards, which you would normally bake in the oven in a hot water bath — otherwise known as a bain-marie.
If your pressure cooker has a metal steaming basket, you’ll no longer end up with waterlogged veggies, and you’ll be able to create pressure-cooker-baked goodies like my cheesecake recipes in Chapter 12. Fill the pressure cooker with 2 to 3 cups of water. Put the trivet in the pot and the steaming basket on top. Fill with vegetables or whatever food you want to steam. Then cover and cook under pressure for the recommended cooking time.
Prepare foods that contain a lot of liquid, like soups, under pressure. You can prepare some of my favorite soup recipes (see Chapter 7) in a fraction of the time it would take using conventional methods, simply by using your pressure cooker.
Make an endless variety of entree and side dishes. Start off as you normally would by browning or sautéing in the open pressure cooker first (see Chapters 4 and 8 for more information) and then finish up the dish with a quick braise under pressure (see Chapter 9 for information on braising). This two-step cooking process is probably my favorite way to use the pressure cooker, especially when time is short and I need to get dinner on the table in less than an hour. See Chapters 8 and 9 for some top-notch main-dish recipes and Chapter 11 for some tasty side dishes.
Whatever you do, never deep-fry in a pressure cooker. Oil is a flammable liquid that’s rated by smoke point (the temperature at which the oil bursts into flames). Because you have no way to gauge the internal temperature of the hot oil as it heats in a closed pressure cooker, you have no idea how hot it is. Oil that reaches or exceeds its smoke point combusts and bursts into flames. You don’t want to remove the pressure-cooker cover to find flames shooting out of the pot. If you want to deep-fry foods, invest in an electric deep-fryer or use a frying pan.
Introducing Stop-and-Go Cooking
Not all food needs to cook for the same length of time (see Appendix A for recommended pressure-cooking times categorized by type of food). So what happens when you’re preparing a dish such as stew, which contains meat that needs to cook at least 20 minutes and vegetables that cook in less than half that time? If the vegetables are added at the beginning with the meat, they’ll cook too much and become mushy. The only way to avoid this is by cooking under pressure in steps, or — as I like to call it — stop-and-go cooking. To give you a better idea of what I mean, refer to the following two scenarios.
Scenario I: The long and the short of it
Pretend you’re cooking My Favorite Beef Stew recipe in Chapter 8. To be fork-tender, stew meat needs to cook at least 20 minutes under pressure. The green beans, carrots, celery, and potatoes, collectively, need less than 10 minutes; the mushrooms need only 60 seconds. What’s a cook to do? You have to group and cook the ingredients in stages, starting with the longest-cooking ingredients and finishing up with the shortest. Think of it in terms of steps:
1. Cook the meat under pressure for 15 minutes. Then release the pressure using a quick-release method.
I explain how to release the pressure in your cooker in Chapter 4.
2. Add all the veggies except the mushrooms and cook them with the meat for 8 minutes. Release the pressure using a quick-release method.
As the vegetables cook with the meat, a wonderful gravy is made with all the juices and the red wine.
3. Add the mushrooms and cook them with the meat and other vegetables for 1 minute under pressure.
All together, the meat cooked for 15 minutes, plus 8 minutes, plus another 1 minute, for a total of 24 minutes under pressure. The meat is fork-tender, having been cooked to perfection for the right amount of time; the faster-cooking vegetables have also been cooked for the right amount of time, so they retain their shape and flavor. And because all the ingredients were cooked together, the stew gravy is amazingly flavorful.
Scenario II: Soup versus stock
Another good example of how different cooking times affect the results of a dish is the comparison of chicken soup to chicken stock (see Chapter 7). Both recipes have similar ingredients. How they’re handled, however, determines the end result.
When making chicken soup, you want to extract enough flavor from the chicken and the vegetables so that you have a good broth. The chicken pieces need only about 15 minutes to cook, whereas small-cut veggies are done in under 5 minutes. Because dry, tasteless chicken and mushy vegetables aren’t on the menu, you have to cook them for different lengths of time by following these steps:
1. To make the broth, first cook the chicken in salted water, under pressure, to completion in 15 minutes.
So that the chicken doesn’t overcook, release the pressure using a quick-release method.
2. After removing the cooked chicken, add the vegetables to the chicken broth and cook them for only 4 minutes under pressure.
So that the veggies don’t get mushy, release the pressure using a quick-release method.
3. Add some cooked noodles and the cooked chicken that you cut into chunks while the vegetables were cooking.
The soup is now ready to serve.
The broth has the rich taste of the chicken and vegetables that were cooked in it. The chicken is tender and juicy; the vegetables are cooked to perfection!
Although chicken stock is basically made from the same ingredients as chicken soup, the process and end result are different. The objective in making chicken stock is to extract as much flavor from the chicken and vegetables as possible. To do so, forget about stop-and-go cooking. Instead, cook all the ingredients together for the same amount of time until they’re so soft that they’re virtually tasteless. To make sure this happens, remove the pressure cooker from the stove and let the pressure release on its own by using the natural-release method. As long as any pressure is left in the closed pot, whatever is inside continues cooking.
Looking at the High and Low of Pressure
When you cook with conventional cookware and bakeware, either on the stovetop or in the oven, you can always take a look at the food to see how it’s coming along or whether it’s done cooking. Because a pressure cooker is a sealed pot, you can’t peek in without releasing the pressure and stopping the whole cooking process. Timing is therefore of the utmost importance.
The whole idea of using a pressure cooker is to save time. In fact, food cooks up to 70 percent faster, on average, in a pressure cooker than by most conventional methods. To get things going quickly, you always want to begin cooking over high heat. If you’re using a stovetop pressure cooker, after it reaches the desired pressure, you need to lower the burner to a near simmer, or whatever it takes to maintain pressure without exceeding it, as I explain in detail later.
As mentioned earlier, the process is easier with electric pressure cookers because they electronically control the cooking temperature and steam output; there’s no human intervention.
But if the cover is locked in place, how do you know when to lower the heat to start the countdown for cooking? That’s easy — you set the timer once the pressure cooker reaches and maintains the level of pressure you’ve chosen. When you bake a cake in the oven, you always preheat the oven before baking, right? The same holds true when a pressure cooker is coming up to pressure. You bring it up to pressure over high heat. It’s like preheating before you’re ready to start cooking under pressure.
The following sections fill you in on how to determine and maintain pressure.
Determining whether your cooker has reached high pressure
If you use a jiggler-valve-type pressure cooker (see Chapter 4), you know that the pressure cooker is up to pressure when the jiggler valve is rockin’ ’n’ rollin’ at an even pace and some hissing is going on. Now’s the time to lower the burner to a simmer or thereabouts and start the cooking countdown time.
With a developed-weight-valve or a spring-valve model (see Chapter 4), you know that the pressure cooker has reached pressure when the weighted valve rises up or when the pressure regulator indicator is in the upright position. Wait until the pressure cooker begins to make just a bit of noise, and then lower the burner heat. Set the kitchen timer for the recommended cooking time, and you’re on your way.
If you’re using an electric pressure cooker, all you have to do is select high or low pressure and set the timer. The appliance self-adjusts when the level of pressure is reached and then cooks for the length of time selected.
Maintaining pressure
You know that you’ve exceeded pressure when the pressure release valve and safety valves start to make a hissing noise. Basically, the pressure cooker is telling you to lower the burner heat. How you do it depends on whether you’re using an electric or stovetop pressure cooker and, if the latter, the type of stove you have.
Electric pressure cookers
An electric pressure cooker makes maintaining pressure very easy for you because the appliance is self-regulating. After it reaches the level of pressure you choose on the control panel, it stabilizes the heat to maintain the heat and pressure for the cooking time chosen.
Gas stoves
If you cook on a gas stove, you already know that a simple turn of the burner knob one way causes the heat to go up immediately; turn it in the opposite direction, and it drops almost instantaneously.
So what are you waiting for? Turn down the heat, almost to a simmer or until you’re able to maintain pressure without exceeding it. Within a minute or so, the pressure cooker will get quiet again.
Element hopscotch
If you have an electric range, you know that, unlike gas stoves, turning the dial does not elicit an instant response from the element. Electric elements take longer than gas burners to react when you raise or lower the heat. This delayed reaction can be a problem when you cook with a pressure cooker. To overcome this problem, I suggest that you play “element hopscotch.”
In simple terms, element hopscotch means that you cook on two elements: one set on high heat and one set on a lower setting, whatever keeps water boiling at a simmer on your range. Use the element set on high heat to heat the pressure cooker for browning or sautéing the food and to bring the pressure cooker up to pressure once the cover is in place and locked into position.
After the pressure cooker reaches pressure, transfer it to the element that’s preheated to the lower setting. (Note: Don’t forget to turn off the high-heat element after the transfer!) This element must be set low enough so that the pressure cooker doesn’t exceed pressure. On the other hand, it has to be hot enough so that the pressure cooker can maintain the level of pressure it has reached without dropping. Otherwise, the food may take longer to cook.
Now You’re Cooking
After the stovetop pressure cooker reaches the desired pressure, the burner heat is lowered, and the kitchen timer is set, the pressure cooker should be fine doing its own thing. For the most part, you can take a breather, but don’t go too far from the kitchen. You need to be around in case the pressure cooker gets too hot and begins to exceed pressure. There’s really no need to be alarmed if it does, however. If you happen to hear it making a racket, just lower the burner heat until it stops.
Is it done yet?
Remember to remove the pressure cooker from the burner heat and release the pressure when the kitchen timer rings. Use one of the quick-release methods discussed in Chapter 4 or use the natural-release method.
Always choose the appropriate release method for the type of food you’re making. Use the natural-release method when preparing foods like large cuts of meat or stocks that benefit from the additional cooking time as the pressure drops on its own. For all other foods, use a quick-release method.
After releasing the pressure and removing the cover (see the following section for safety tips), check to see that the food is cooked. If it’s not to your liking, replace the cover and cook for an additional couple minutes under pressure.
Opening the pressure cooker safely
The food in the pressure cooker is extremely hot, so be careful opening and removing the cover. Hold the griplike handle on the pot with one hand and turn the cover counterclockwise by grasping and turning the cover handle. If you have a pressure cooker with a self-locking cover, check the owner’s manual for information on how to open and close the cover.
Regardless of the method you use to release the pressure, always remember the following when opening and removing the cover:
Always place the pressure cooker on a heatproof, stable surface. You don’t want to burn a table or countertop, and you certainly don’t want the pot to topple over.
Steam is hotter than boiling water and can cause serious burns. Even though there’s no further pressure in the pressure cooker, the cooked food will be very hot, and some steam will rise up out of the pressure cooker. Avoid contact with this hot steam when releasing pressure and removing the cover.
To avoid getting burned, never hold your face over the pressure cooker as you remove the cover. Also, if you use an automatic quick-release method (see Chapter 4), watch where your hands are in relation to where the steam comes out when the pressure is released.
A Primer on Pressure Canning
Canning involves packing hot food into special, sterilized canning jars; capping them; and then submerging them in a hot water bath and heating them over a prescribed period of time to kill dangerous bacteria that can spoil food. At the end of the process, the special canning jar lid forms a vacuum seal and the cooled jar of canned food can be stored without refrigeration. This process, called water-bath canning, is labor-intensive and time-consuming.
Pressure canning is an easier canning method and is the only method that’s safe for some foods. To pressure-can, you simply place the covered canning jar filled with hot food in a 6-quart or larger stainless-steel pressure cooker that has a high pressure setting of 15 pounds per square inch (psi). At 15 psi, the internal temperature of the pressure cooker reaches and may even exceed 240 degrees — the necessary temperature for destroying the hard-to-kill bacteria found in low-acid foods, including all fresh vegetables and some fruits. These foods require a higher temperature for processing than the water-bath method, which heats foods only to 212 degrees, provides.
Because electric pressure cookers don’t reach 15 psi, you can’t use them to pressure-can.
Pressure canning, which is simple and quick, requires only a few special tools that are readily available at your local hardware store, supermarket, or online. I tell you all about these tools and walk you through the basic pressure-canning process in the next sections. I also provide you with a list of recommended pressure-canning times and share with you a couple fun pressure-canning recipes to try.
Having the right equipment on hand
Making sure you have the proper equipment for pressure canning means first checking to see that you have the right pressure cooker for the job. Because most small pressure cookers don’t reach 15 psi, only 6-quart or larger, stainless-steel models are recommended for pressure canning, preferably one with a developed-weight or spring valve because jiggler valves can be tricky. Check your owner’s manual to verify that your pressure cooker reaches 15 psi at high pressure. If you’re still not sure after checking the documentation, contact the manufacturer.
The basic equipment for canning is the same whether using the traditional hot water bath method or a pressure cooker for pressure canning. The following is a list of the must haves:
Canning jars in 4-, 8-, 12-, or 16-ounce sizes, which are the sizes that fit best in a pressure cooker
Two-part lids (complete with lid bands and caps)
A canning or metal rack that fits on the bottom of the pressure cooker to place the jars on
A wide-mouth funnel to make it easy to fill the jars
A plastic bubble releaser to make sure that there are no air pockets in the jar of food you plan to can
Special pressure-canning kits, like the one in Figure 5-1, are available online. These kits make it easier to can under pressure and usually come with a rack to set the jars on, as well as a jar lifter. Some kits also include wide-mouth funnels and a bubble releaser, as well as a magnetic lid lifter and a jar wrench to tighten the lids. Amazon (www.amazon.com) is a good source to check for availability.
Here are some important equipment recommendations to follow:
When using a developed-weight model, be sure to use the 15 psi weight. With a spring-valve model, set the dial on high pressure only.
Only use well-cleaned and sterilized 1⁄2- or 1-pint canning jars and lid bands that are in excellent condition.
Only use new lids, never used or damaged ones.
Figure 5-1: A pressure-canning kit for a pressure cooker.

Illustration by Elizabeth Kurtzman
Knowing how long to cook
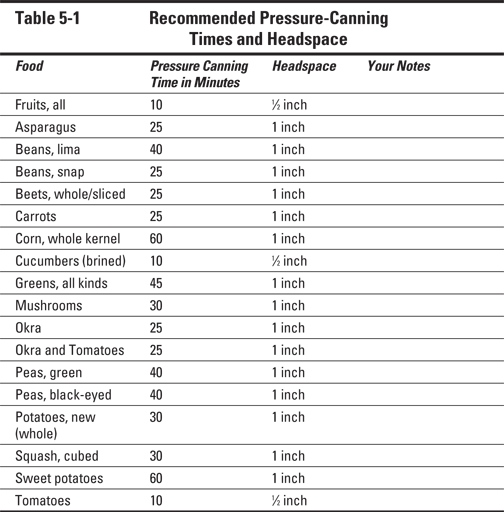
With the pressure-canning method, jars of hot food are placed in 2 to 3 inches of boiling water in a pressure cooker and heated under pressure at a temperature of at least 240 degrees or 15 psi for a length of time specified by either a recipe or a cooking chart, like the one in Table 5-1.
The pressure-canning times listed in Table 5-1 begin when the pressure cooker reaches and stabilizes at high pressure or 15 psi. Don’t reduce the recommended times, and be sure to allow the pressure to drop naturally. Also, when filling the jars with food, remember to leave the appropriate amount of headspace (the space between the inside of the lid and the top of the food or liquid in your jar), as specified either in the recipe or in Table 5-1. Headspace is necessary so that the jar doesn’t explode or crack when being heated during the canning process.
Walking through the steps
After you’ve gathered your equipment and checked how long it will take to pressure-can the desired food, you’re ready to get started. Follow these steps to pressure-canning success:
1. Prepare the food you want to can as directed by your recipe.
Regardless of what you’re making, all foods must be carefully washed in order to kill all bacteria. The food and/or canning liquid must be at least 212 degrees (the boiling point) when filling jars.
2. Wash all canning equipment, jars, and lids and sterilize them in boiling water.
3. Using a food funnel, carefully ladle the hot food and/or canning liquid into the clean, sterilized jars, leaving ample headspace to form a tight vacuum seal.
Consult your recipe or Table 5-1 to determine how much headspace to leave.
4. Release any air bubbles with a nonreactive utensil, preferably plastic, adding additional food or liquid to maintain the proper headspace.
5. With a clean, damp cloth, wipe the rims of the jars; then seal the jars with two-piece caps, hand-tightening the bands.
6. Set the processed jars on a wire rack in the pressure cooker without allowing them to touch, so steam can flow around each jar.
7. Pour boiling water between the jars in the pressure cooker until the jars are sitting in 2 to 3 inches of water.
8. Cover and bring the pressure cooker to high pressure, over high heat.
9. Lower the heat to stabilize the pressure and process for the time indicated in your recipe or Table 5-1.
Check frequently to make sure the pressure is constant and doesn’t drop below 15 psi.
10. When the processing is complete, turn off the gas or remove the pressure cooker from the electric burner.
11. Release the pressure using the natural-release method.
Never use one of the quick-release methods because you run the risk of the jars of hot food exploding inside the pressure cooker when the pressure is released quickly.
12. After the pressure releases naturally, wait 10 minutes longer before opening so that the pressure in the jars stabilizes.
13. Carefully open the pressure cooker.
14. Use a jar lifter to carefully remove the jars from the cooker.
15. Place the hot jars on a cooling rack or dry kitchen towels.
Leave at least 1 inch of space between the jars. Do not tighten the lids.
16. Allow the jars to cool, untouched, for 12 to 24 hours, and then tighten the lid bands.
Most two-piece canning lids will seal with a popping sound as they cool on the counter. When the jars are completely cooled, test each lid by pressing it gently in the center. It should curve down with no give. If a jar isn’t sealed properly (there’s give in the lid), refrigerate it and use the contents within a couple days.
Always examine jars of home-canned food before serving. If the contents smell foul or appear spoiled, don’t taste them; discard them immediately. Other telltale signs of spoilage are bulging lids and leaking jars.
For more information on pressure canning and other great canning tips and suggestions, I suggest you consult the latest edition of Canning and Preserving For Dummies by Amelia Jeanroy and Karen Ward (Wiley).
Diving into pressure canning
What good is a bunch of pressure canning advice without the chance for some practical application? Following are two recipes, including one of my favorite recipes for garlic dill pickles.
Garlic Dill Pickles
Prep time: 15 min • Cook time: 10 min under pressure • Yield: 4 pints
Ingredients
Twelve 4-inch gherkin cucumbers
11⁄2 cups white vinegar
21⁄4 cups water
1⁄4 cup noniodized salt
4 tablespoons fresh chopped dill weed
16 garlic cloves, unpeeled
4 teaspoons mustard seed
16 black peppercorns
Directions
1 Wash the cucumbers and quarter each one lengthwise. Place in a large bowl. Cover with a layer of ice cubes; refrigerate 4 hours. Drain completely.
2 In a medium saucepan, combine the vinegar, water, and salt and bring to a boil over high heat.
3 Pack the cucumbers into 4 clean, sterilized pint jars. Leave 1 inch of headspace. Place 1 tablespoon of the dill, 4 garlic cloves, 1 teaspoon of the mustard seed, and 4 peppercorns into each jar.
4 Pour the hot vinegar brine over the cucumbers and spices in each jar, leaving 1⁄2 inch of headspace. Cap and seal. Place the jars in the pressure cooker with 2 to 3 inches of boiling water.
5 Cover and bring to high pressure over high heat. Lower the heat to stabilize the pressure. Process for 10 minutes.
6 Remove from the heat. Use the natural-release method to release the pressure.
7 Wait 10 minutes longer so that the pressure in the jars stabilizes.
8 Carefully open the pressure cooker.
9 Use a jar lifter to carefully remove the jars from the canner. Place the hot jars on a cooling rack or dry kitchen towels. Leave at least 1 inch of space between the jars. Allow the jars to cool, untouched, for 12 to 24 hours; then tighten the lid bands.
Per serving (1 pickle spear, or 1⁄4 of a pickle): Calories 5 (From Fat 0); Fat 0g (Saturated 0g); Cholesterol 0mg; Sodium 292mg; Carbohydrate 1g (Dietary Fiber 0g); Protein 0g.
Note: This recipe is vegetarian, vegan, gluten-free, and dairy-free.
Strawberry Jam
Prep time: 60 min • Cook time: 10 min under pressure • Yield: 4 pints
Ingredients
5 cups strawberries
7 cups sugar, divided
Small pinch salt
One 13⁄4-ounce package powdered pectin
Directions
1 Wash the strawberries. Remove the stems and cut off any white parts. Cut the berries into quarters and place in a large saucepan. Add 2 cups of the sugar, stir well, and let sit at room temperature for 30 minutes.
2 With a potato masher or fork, mash the strawberries. Cook over medium-high heat, stirring constantly. Bring to a boil. Add the remaining sugar and, stirring constantly, bring to a second boil. Remove from the heat. Skim off any foam.
3 Ladle the jam into 4 clean, sterilized pint jars. Leave 1⁄2 inch of headspace. Cap and seal the jars. Place in the pressure cooker with 2 to 3 inches of boiling water.
4 Cover and bring to high pressure over high heat. Lower the heat to stabilize the pressure. Process for 10 minutes.
5 Remove from the heat. Use the natural-release method to release the pressure.
6 Wait 10 minutes longer so that the pressure in the jars stabilizes.
7 Carefully open the pressure cooker.
8 Use a jar lifter to carefully remove the jars from the canner. Place the hot jars on a cooling rack or dry kitchen towels. Leave at least 1 inch of space between the jars. Allow the jars to cool, untouched, for 12 to 24 hours; then tighten the lid bands.
Per serving (1 tablespoon): Calories 46 (From Fat 0); Fat 0g (Saturated 0g); Cholesterol 0mg; Sodium 3mg; Carbohydrate 12g (Dietary Fiber 0g); Protein 0g.
Note: This recipe is vegetarian, vegan, gluten-free, and dairy-free.
Keeping Your Pressure Cooker Squeaky Clean and Shiny
Clean and maintain your pressure cooker like any other piece of quality cookware. By doing so, you’ll get many years of quick and easy-to-prepare meals out of it.
Before putting your stovetop pressure cooker away, perform this cleaning process:
1. Remove the gasket from the cover and wash it separately by hand.
2. Wash the pressure cooker cover, pot, and gasket with a mild, liquid dishwashing soap and a nonabrasive sponge after each use. Rinse well under clean water.
Consult Chapter 14 if you have any problems getting your pressure cooker clean.
Never immerse the cover in water because it may affect and damage the safety valves. Also, never wash the pressure cooker in the dishwasher. Food particles in the recycling wash water or even dishwasher detergent can collect in and clog the pressure-regulator and/or safety valves.
3. Towel-dry all parts and properly reposition the rubber gasket under the cover.
Some gaskets have to be lined up a specific way. Make sure that you replace the gasket correctly.
Some manufacturers suggest that you disassemble and clean the pressure regulator valve after each use. Check the manufacturer’s instructional materials for further information.
Always wash your electric pressure cooker thoroughly after every use. Unplug and let it cool before cleaning (do not wash any parts in the dishwasher except for the removable cooking pot). Remove the removable cooking pot and wash it with warm, soapy water or in the dishwasher. Rinse and dry thoroughly. Wipe the outer housing and the lid with a clean, damp cloth. The temperature sensor and heating element, located on the inside of the outer housing, must be cleaned after each use. Wipe with a soft, damp cloth and be sure to dry thoroughly; do not submerge the housing in water. Remove the condensation reservoir from the outer housing handle by pulling it down. Wash it with warm, soapy water. Rinse and dry thoroughly. Replace by pushing it into place. Remove the gasket from the underside of the lid and wash it in warm, soapy water. Rinse and dry thoroughly. Replace the gasket by positioning it inside the edge of the lid. Never use abrasive cleaners or scouring pads to clean any of the parts. Only use clean, soft cloths and mild, liquid dishwashing soap.
Storing Your Pressure Cooker
Storing your pressure cooker properly is essential to maintaining its long and useful life. Here are some pointers on what not to do:
Never store the pot with food inside. Doing so is inefficient because the pressure cooker would take up too much room in the refrigerator. Furthermore, the food may stain the interior surface or pick up odd flavors. Always clean and dry your pressure cooker thoroughly before putting it away.
Never lock the cover in place because doing so can damage the rubber gasket seal or ring. Over an extended period of time, the rubber gasket can dry out and form a permanent bond between the pot and cover, making it nearly impossible to open the pressure cooker. Moisture can also prevent you from opening the cover because it can create an almost permanent seal.
The best way to store the cover is to place it upside down on top of the cooker.
Help Is But a Phone Call Away
Although I’ve tried to anticipate and answer any questions or concerns that I think you may have, you may need to contact your pressure cooker’s manufacturer if you have specific questions about your particular cooker. All the manufacturers have fully staffed customer service departments with trained representatives who are happy to answer your questions. Either check your owner’s manual for the manufacturer’s customer service number or look it up online.