Chapter 8
Personalizing Your Post
IN THIS CHAPTER
 Figuring out the ideal length for your captions
Learning the tricks to format a good caption
Discovering how to tag people and locations in your posts
Determining how to use hashtags, the secret sauce on Instagram
Earlier in this book, we show you how to add content to Instagram in the form of both photos and videos. In this chapter, we show you how to use the captions and additional tagging features to boost that content for even better exposure and engagement.
This chapter helps you craft captions that people are more likely to read and respond to, while also showing you how to tag people, places, and add hashtags for more exposure and growth.
Determining How Long Your Captions Should Be
A caption adds context to your post and lets people know what they’re seeing. If you don’t add a caption, your viewers may be confused, and that reflects poorly on your content. For example, if you post a selfie, but you don’t tell viewers why you posted it or what the backstory is to that image, they may think you’re just selfish and posting photos of yourself. Or, if you just a post a photo of a flower with no context, they may think it’s pretty, but it won’t generate a lot of dialog. When you leave out a caption, the viewer doesn’t know what you’re doing and may not engage with your post, and you’ll be left wondering why you’re not getting any attention.
After you create a post and edit your photo or videos, you add the caption in the New Post screen. Begin typing in the section where it says “Write a caption” (see Figure 8-1).

FIGURE 8-1: You can add the caption to your post on the New Post screen after uploading and editing a post, but before you publish it.
 How much text should be in your caption? It’s generally a good idea to communicate too much rather than too little, so consider writing one to three short paragraphs. Simple one liners can work for some people on Instagram if they’re very clever and creative.
Due to the formatting and layout on Instagram, a paragraph may actually be a single sentence — and that’s okay! It’s better to have your content well spaced and easy to read than trying to read one very long paragraph. Your three short paragraphs may only be a handful of sentences, or they may be longer, descriptive paragraphs.
We should also point out that you are not limited to just three paragraphs! You can actually write a significant amount of content on your Instagram captions. Instagram allows you 2,200 characters for a caption. When you hit that limit, you aren’t able to write any more content.
Some accounts choose to use Instagram as a micro-blog, writing longer captions to add more value and information for their audiences. Figure 8-2 shows an example of both a short caption and a long caption. Use whatever works for you!

FIGURE 8-2: An example of a short caption and a long caption that capture the attention of the audience in both cases.
Formatting Your Caption
A caption without formatting becomes one very long, run-on paragraph that can be hard to read. To avoid this, use spacing, emojis, and formatting tricks to break up the content for more visual appeal. Figure 8-3 shows an example from @tanya.plummer.health with spacing and emojis to make it easier to read and follow.

FIGURE 8-3: Good formatting on Instagram allows your content to be easily read and stands out as visually appealing.
 Getting spacing to work on Instagram can be incredibly frustrating if you don’t know this trick! Make sure that when you end your paragraph, there is no space after the last character. Most keyboards default a space after a word or punctuation mark, but that simple space will remove the formatting to drop a line and create a new paragraph. Backspace right up to the last character to avoid this issue.
Additionally, you can only have one special character as your last character. So, you can have a period or a question mark at the end of a paragraph, but you can’t have a question mark and an exclamation point together, or the formatting won’t work. The same thing applies to emojis. Unfortunately, you can’t have an emoji as the last character on the paragraph or the formatting won’t work.
Android users seem to have an easier time formatting their captions directly within the Instagram app and retaining the spacing. For iPhone users, it’s often recommended that you write your captions in the Notes app on the device and then copy and paste that caption into the Instagram post for better formatting options.
Instagram truncates all captions after two or three lines of text. If there’s more text to read, a “more” button appears at the end of the truncated text. To read the entire caption, you have to tap the “more” button.
Make sure that the first few lines are enticing enough that your viewer will want to tap or click the “more” button to read your entire caption. This first sentence of your caption should be captivating like a great title, or bold with emojis or capital letters. It should make a statement or ask a question. You want to entice the viewer to read more!
Including Calls to Action in Your Caption
Instagram is a visual platform, and you can’t leave a clickable link in a post description, so if you want your audience to take action, you have to give them a clear call to action (CTA) in the post caption.
 In Chapter 3, we show you how to set up your profile and decide if you want to include a URL in that section. If you want to review that information again, bookmark this page and turn back to Chapter 3.
In order to make CTAs effective on Instagram, you want to keep them as simple as possible. They should be one-step actions. The most commonly used one is “Click the link in my bio.” But you could also use actions like: “Tag a friend in the comments below” or “Send me an email for more information.”
The key is to keep the CTA simple to follow. It should be designed to reward the viewer by providing him some sort of value. He may learn something by reading an article you linked to on a website, or get a free product if he clicks the link, or be able to enter a contest by posting a photo and tagging you.
Calls to action are most commonly reserved for business accounts that want their audiences to follow through on an action for a reward. However, personal accounts may still use them if they want to drive traffic to a website. Maybe you want people to go to your YouTube channel or Flickr account and you have that link in your bio. A CTA would direct viewers to watch the full video by clicking the link in your bio.
Tagging People in Your Posts
After you’ve written your caption, you can still add more components to your post by adding tags to the post.
For example, you can tag another person’s Instagram account. From the New Post screen where you type your caption, you see a Tag People option. Tap that and follow these steps to tag someone in the post (see Figure 8-4):
After you tap Tag People, the next screen allows you to tap anywhere on the image to select a person.
In most instances, you want to tap the actual person or area of the image where that person or brand appears in the image.
- In the Search bar at the top of the screen, type the name or username of the account you want to tag.
- Select the account from the list of options.
- Add more accounts if appropriate.
- Tap the check mark or Done button when you’re finished tagging.

FIGURE 8-4: To tag someone in your Instagram post, tap Tag People and follow the steps to search for and add that account to your post.
When you’re all done, you’ll see the username of the person tagged listed in the section for “Tag People.” If you’ve tagged multiple people, it will say “[number] people.”
You should only tag people or accounts that are actually in the image. For example, if your friend is in the photo, you can tag her. If, in the photo, you’re holding a coffee cup from Starbucks, you can tag @Starbucks in your post. But don’t tag @Starbucks if the photo was taken in your backyard and you’re not holding a Starbucks cup — that’s just considered spam.
Adding Locations to Your Posts
Similar to tagging other accounts in your Instagram post, you can also tag a location. In the New Post screen, below where you tag people, there is the option to Add Location (see Figure 8-5). You usually see locations directly related to where you are at the time of upload listed there as well.
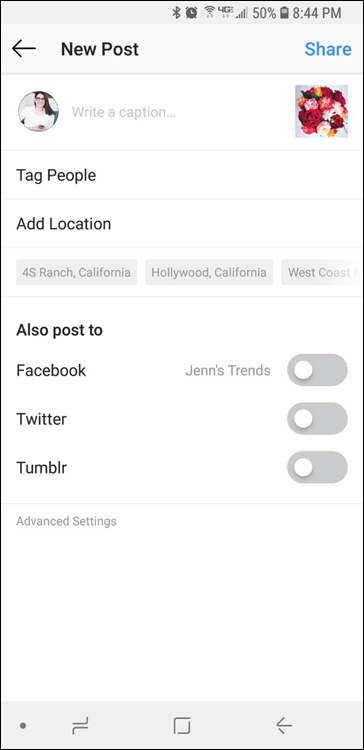
FIGURE 8-5: Use the Add Location option during the upload process to add more exposure to your posts.
Why would you want to add a location? Sometimes you just want to tell people where you were, and adding the location will provide that information. Adding a location can also help your content get exposed to more people as well. If your account is public, and you add a location, your post may show up in search results for that location.
If you added a local restaurant to your post, and someone else is looking for information on Instagram about that restaurant, she might see your post in that list of results.
You can also tag broader locations like a city name if you don’t want to be super-specific about your location.
If the location you’re looking for isn’t in the list of prepopulated options, simply tap in the Add Location field and begin typing the name of the location. A list of available options will appear for you to choose from.
Taking Advantage of Hashtags
Hashtags are the single best way to achieve growth and exposure on the platform. Hashtags always start with the # sign (found on the bottom right of your mobile phone keyboard when typing, or by pressing Shift+3 on a desktop computer keyboard) followed by a word, a phrase, a number, or an emoji with no spaces, such as #sundayvibes or #instamood.
 On an iPhone, the # sign is on the lower right of the mobile keyboard only when using the Instagram app (and some other social media apps like Twitter). If you’re writing your captions in the Notes app on your phone, you’ll need to tap 123 on your keyboard and then #+= to access the # sign in the special characters keyboard.
After you add a hashtag to your caption or comment, the hashtag becomes a searchable link that takes you to a page of all the posts using that hashtag (a hashtag hub) when tapped.
Figure 8-6 shows the hashtag hub for #bicyclebuiltfortwo.
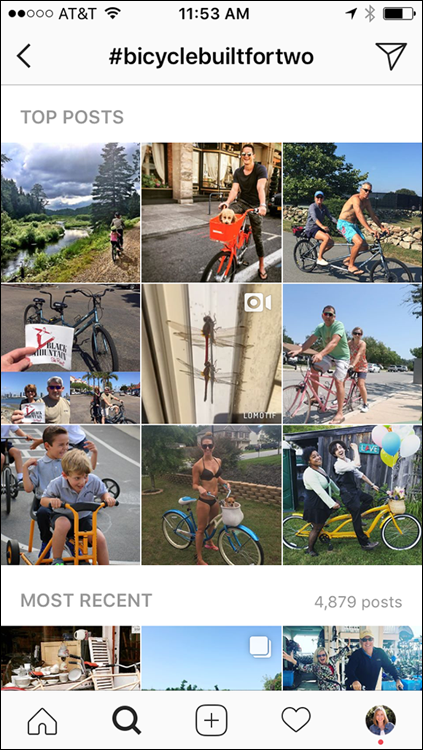
FIGURE 8-6: A hashtag hub displays the results of content uploaded by various users on Instagram using that specific hashtag.
Hashtags are added to a hashtag hub chronologically, based on when the photo was posted, not when the hashtag posts. Going back days later and adding hashtags to a post will not bump your post back up in the hashtag hub.
People search hashtags to find content for a variety of reasons, such as to find a product, to learn how to do something, to follow a brand, or even to watch videos of a certain theme.
If you have a private account, only users who are your approved followers will see your posts, even with a hashtag. If you’re trying to get a wider audience, set your account to public so anyone can search for your content via hashtags.
Knowing where to place hashtags in your post
Hashtags can be added to the caption itself before you upload the post to Instagram. Or you can upload your post and add the hashtags to a comment on the post.
There is no functional difference between placing your hashtags in the caption or in the comments. The method you should use is a matter of personal preference. Both options allow your content to appear in hashtag hubs.
All hashtag results pages on Instagram are algorithmically sorted. This means that not everyone will see the same results when they look at a hashtag gallery or hub. One user may see slightly different results and you may not even see your own post in a hashtag hub that you used on your post. This doesn’t mean others won’t see your content! But it’s not a guarantee that everyone looking at that gallery will see your post.
Identifying how many hashtags is ideal
If you’re familiar with using hashtags on Facebook or Twitter, you’re probably used to putting a couple of hashtags directly in your post. On Instagram, however, you can use up to 30 hashtags in a caption or in a comment.
You can use up to 30 hashtags for viable search. But you can use more than that in your content — they simply won’t be searchable after the 30th hashtag. For example, you may post 25 hashtags in your post caption and one of your friends may come and post 7 hashtags in a comment on your post. Your post would appear in your 25 listed hashtags and the first 5 of your friend’s, but not in the remaining 2 hashtags your friend posted in your comment.
Hashtags are a use-them-or-lose-them mentality. If you don’t use them, there’s no way you’ll appear in those searches. If you do use them, you have a good chance of appearing in those searches. If you’re looking to expand your reach and have more people find your content, then you’ll want to use as many hashtags as possible, up to that limit of 30.
Finding the right hashtags for you
There are endless hashtags available to use or create! So, how do you know which ones are right for you? It’s important that you find the right ones for you and the ones that are relevant to your content.
If you have a theme or style for your content, you can use hashtags related to that. For example, if you’re a stay-at-home mom, you may want to use hashtags related to #MomLife and #MomSoHard.
You can also use hashtags related to your content itself. For example, if the image is of a pool at the hotel you’re staying at, you can use hashtags like #Pool or #SummerVacation or #Poolside or #HotelLiving.
Additionally, when it comes to picking your hashtags, just like students in high school, some hashtags can be popular and some not so popular. You can view any hashtag by searching it in Instagram to see how many posts are associated with it. Follow these steps:
- Tap the Search menu (the magnifying glass icon at the bottom navigation bar).
- Tap on the Search bar.
- Tap the Tags tab.
- Start typing the hashtag topic.
Select the topic to review the results.
You’re taken to the hashtag hub (see Figure 8-7).

FIGURE 8-7: A hashtag hub displays the results of content uploaded by various users on Instagram using that specific hashtag.
In addition to the hashtag you searched for, Instagram will show you a list of other hashtags related to that one you chose. You can tap through to any of those to see that content. And you can use these recommendations to find new hashtags to use, related to the content you’re sharing.
The hashtag results are divided into two tabs — one for top posts and one for recent posts. The top posts are sorted algorithmically for your preference, whereas the recent posts are sorted chronologically with the most recent post at the top of the feed. Even though this content is chronological, there is still some algorithmic determination of what will appear in this hub.
Using really popular hashtags — those with over a million posts associated with them — can be perceived as great exposure, but in reality they don’t usually yield quality results. This content gets replaced incredibly fast by millions of other posts being uploaded as well. You may see some additional likes on your post by using these hashtags, but they aren’t often your ideal audience, and they’re often automated tools that are scouring that hashtag, rather than real people looking to connect with your content.
You should also be wary of some “blocked” or “banned” hashtags. Any hashtags that reference sexual activity or body parts are generally blocked and don’t normally belong on a post anyway. Using hashtags like this may get your account flagged for inappropriate activity.
However, you may also come across generic hashtags like #iphone that don’t produce any results. And during heavy peak post times like #July4th, you often won’t see any content on those hashtags either. Instagram will put a block on these hashtags simply because they’re too popular and they have too much content associated with them. Using these hashtags won’t get you flagged or punished. Your content just won’t appear in those searches — nor will anyone else’s!
Saving hashtags for repeated use
When you’ve figured out which hashtags you want to use on your content, you may find that there are some you’ll want to use on more posts in the future. Typing those same hashtags over and over again can get cumbersome!
Android users can take advantage of predictive text, which recalls the series of hashtags you used if you previously listed a number of hashtags. As you begin typing one hashtag, the Android predictive text will show you the next one you commonly use (see Figure 8-8).

FIGURE 8-8: Android devices utilize predictive text to easily select common hashtags.
If you don’t want to rely on predictive text, or if you use an Apple device, there are a few other options you can utilize to easily store and access your common hashtags:
- Notes: The Notes app is preloaded on iPhones, and similar apps like ColorNote or Evernote are available for download on Android phones. Create a new note for different categories or themes, and then list up to 30 hashtags, as shown in Figure 8-9 (left). Before you tap Share on your post, go over to your note and copy the desired hashtags. Tap Share and open a comment to paste the hashtags.
- Email: Another easy solution is to email yourself lists of hashtags. Simply open a new email, use the hashtag category in the Subject line, and then type up to 30 hashtags, as shown in Figure 8-9 (middle). Create several emails with different hashtag lists, and then store them in a special email folder to retrieve and cut and paste quickly and easily.
- Tailwind: A complete all-in-one solution, the Tailwind app, shown in Figure 8-9 (right), offers hashtag saving, plus content management for Instagram and Pinterest. You can upload your content, schedule it, get hashtag suggestions, save hashtag lists for later, and measure analytics. Unlike the Notes app or email, Tailwind is not free and you’ll have to pay a monthly fee for the service.

FIGURE 8-9: Store hashtags in a notes app (left), an email message (middle), or the Tailwind app (right).
Creating a new hashtag
Anyone can use any hashtag! No one owns any one hashtag, and anyone can create any hashtag phrase they want.
You’ll commonly see popular hashtags like #VacationMode or #tbt (throwback Thursday) or #Love or #TheStruggleIsReal. But you may also see a brand or a person use a hashtag like #IWouldntDoItIfIDidntWantTo. This is just a phrase that they would normally use in a sentence, but they turn it into a hashtag.
Similarly, you can create any hashtag you want! You can have one for your wedding guests to use, incorporating your names or the date of the wedding. You can create a hashtag related to your company name or nickname from college. Simply string those words together, and — boom! — you’ve got a hashtag.
You don’t own the hashtags you create, so if you’re creating a hashtag for, say, your wedding, you may want to start by searching for the hashtag you have in mind to see if anyone else is using it already. Instead of #JoniLovesChachi, you might want to go with something more specific like #JoniChachiWedding2020. Does that mean someone won’t come along and use your more specific hashtag? Nope. But it will reduce the chances.
If your hashtag is something really long, you may want to consider an acronym. For example, instead of #OutfitOfTheDay, you’ll often see #ootd on fashion posts.
And, finally, be careful to see how your hashtag reads as one long run on phrase. Just because you know what it’s supposed to say, doesn’t mean others will know what it says. Take this one for example: It should read Susan Album Party, but as a hashtag #susanalbumparty, you may read “Su’s anal bum party” — and yes, this is a REAL example that happened to Susan Boyle from Britain’s Got Talent. So, be careful when you’re creating new hashtags!