Chapter 13
Creating Instagram Stories
IN THIS CHAPTER
 Planning your stories
Learning the basics of creating an Instagram story
Using camera effects
Finding stories in your archives
In the last chapter, we explain the history of Instagram stories, where to watch them, how to watch them, and their specifications for images and videos. In this chapter, we go into more detail about how you can plan out the Stories you share (if you intend on planning), deciding what to share, and exactly how to upload photos, videos, and images to your stories. We also discuss camera effects, and how to save and access your stories after you’ve archived them.
Planning a Story from Start to Finish
If you’re using Instagram stories strictly for personal use, you may choose not to plan your stories at all, and publish things on the fly as they happen. However, many businesses, brands, and influencers use stories in a much more strategic way to truly, well, tell a story.
 An influencer is an individual with the ability to influence potential buyers of a product or service by promoting or recommending the items on social media.
 If you want your followers to stand up and take notice of your stories, here are some planning tips to make them “next level”:
- Use a planning tool such as Later or Planoly to “lay out” and schedule your stories so you can view them as you would a storyboard. You can find these tools in the app store for your device or find them online on your desktop if you like to load graphics and videos from your computer.
- Use consistent colors and fonts throughout the story so your story looks cohesive.
- Use a template to make your stories all look identifiable to you.
- Think about which tags, hashtags, or locations you want to add to your story.
Deciding What to Share
Instagram stories were designed to be a looser, less perfect part of Instagram. Many Instagrammers agonize over choosing the right photo or caption for their profile page so their aesthetic is flawless. Instagram stories allow those users to offer a less polished version of themselves, and offer a glimpse into their everyday lives that automatically goes away in 24 hours. In this section, we detail some of the common ways people use Instagram stories.
Sharing your less-than-perfect stuff
You may want to share
- Behind the scenes photos and videos: Because many Instagrammers are involved in launches, events, conferences, podcasts, and other exciting activities, behind-the-scenes stories are a great way to let your audience in on how the magic really happens. Whether it’s showing the types of equipment used (see Figure 13-1), hanging decorations for an exclusive party, or interviewing speakers backstage before a conference starts, followers love to get to know more about you through behind-the-scenes stories.
- Travel photos: You may have that one gorgeous meticulously edited shot of your trip for your profile page, but you have so many more that you’re dying to share right away! Stories are the perfect opportunity to load lots of photos that may not make the cut on your profile (like that funny one of Aunt Ethel wearing a sombrero and drinking tequila).

FIGURE 13-1: @isocialfanz shows his followers the equipment he uses to record his stories.
Showcasing your personality and lifestyle
To showcase who you really are, you might try the following:
- Talking to the camera: The popularity of video has surged in the last several years, so what better way to grab your followers’ attention than talking to them via Instagram stories (see Figure 13-2)? Talking directly to your followers gives them a familiarity with you that can’t be matched through still images.
- Candid shots or videos: Kids doing something silly around the house? Dog chasing a squirrel up a tree? These are perfect moments to share with your followers in a story to show the day-to-day happenings around you.
- Before and afters and series: Before and afters and series of photos are an exceptional way to tell a story. Maybe you recently remodeled your kitchen and want to show the differences, or you want to show the progression of a project that took you weeks to complete. Stories are a unique way to display the results along with how far you’ve come (see Figure 13-3).

FIGURE 13-2: @MartinHolsinger talks directly to his followers regularly using stories.
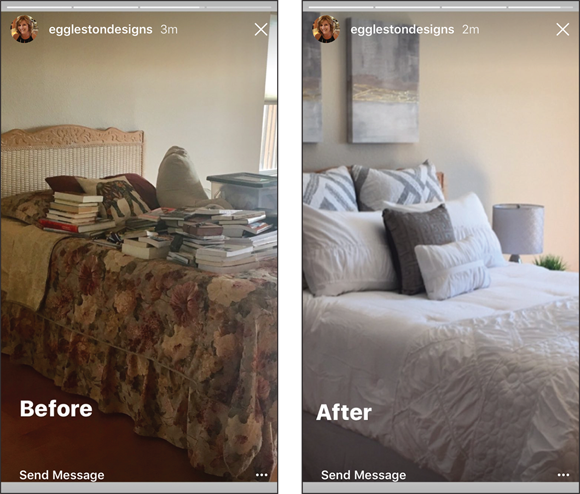
FIGURE 13-3: @egglestondesigns shows how she made over a messy room using before and after Stories.
Adding a Story Photo
To get started creating a photo story, follow these steps:
From your newsfeed (home screen), swipe right or tap the camera icon at the top left of the screen.
You can also tap your profile picture with the blue plus sign in the row of stories at the top of your screen.
Make sure the setting at the bottom of the screen is Normal, as shown in Figure 13-4.
Take a photo.
To take a photo, hold the phone up vertically and tap the white circle (refer to Figure 13-4).
If you want the phone in selfie mode (camera facing you versus away from you), tap the two arrows located to the right of the white circle before you tap the white circle. You can also double tap anywhere on the screen to switch the camera back and forth between the front- and rear-facing cameras.
- To retake the photo or video, tap the X at the top left of the screen, and repeat Step 2.
- Share your Story by tapping Your Story; save it by tapping the arrow; or send it as a DM by tapping Next, selecting the recipients, and tapping Send.

FIGURE 13-4: Tap the white circle in Normal mode to take a basic photo with the stories camera.
A face filter is an app that applies a filter over your face using the camera, making you look, for example, like a dog, a rock star, or just bathed in a warm glow. Here’s how to take a photo with a face filter:
- Open Instagram stories by swiping right or using the camera icon at the top of the newsfeed.
Put the camera in selfie mode by tapping the arrows to the right of the white circle.
Some filters can be used in rear-facing mode to add a filter, color or lighting element.
Tap the smiling face at the top of the screen.
Filters appear at the bottom of the screen. Scroll to the left to see all available filters. Instagram often adds new filters seasonally or when there are big events like the Super Bowl or the Grammys.
To apply a filter to your face, as shown in Figure 13-5, tap the filter.
To change filters, simply tap a different one.
Take a photo by tapping the white button, or record a video by holding down the white button.
 You can use filters in the following camera settings: Live, Normal, Boomerang, Rewind, Hands-Free, or Music.
- To try again, tap the X at the top left of the screen and go back to Step 4. If you want to try the photo without a filter, simply tap the smiling face to exit.
- Share your story by tapping Your Story; save it by tapping the arrow; or send it as a DM by tapping Next, selecting the recipients, and tapping Send.
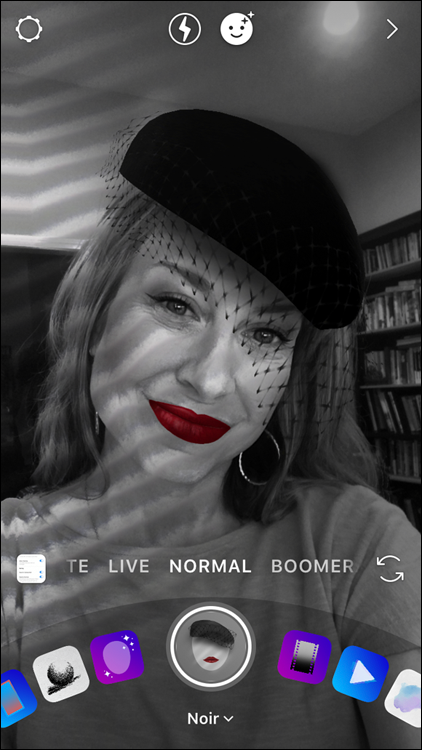
FIGURE 13-5: Face filters allow you to take on a whole new persona in your story!
You may prefer to upload a photo stored on your camera roll instead of capturing it in the Instagram app.
In the past, Instagram stories would load only photos or videos taken in the last 24 hours. Luckily, that has changed, and you can now access your entire camera roll. When you swipe up or tap the small photo icon to load a photo or video, you see photos from the last 24 hours first. If you keep scrolling up, you’ll see your entire camera roll, and you can load older items by tapping them.
Follow these steps to upload an existing photo to Instagram your story:
- Swipe right from the newsfeed or tap the camera icon at the top of the newsfeed to access your Instagram story.
Swipe up from the bottom of the screen or tap the box with a small photo thumbnail at the bottom left.
Thumbnails of all available photos and videos are displayed at the bottom of the screen, as shown in Figure 13-6.
This section shows photos or video taken in the last 24 hours first, but if you keep scrolling, you see your older content. You can also tap where it says last 24 hours on iPhone or Gallery on Android to select a specific folder from your gallery, like videos and screen shots.Tap the photo you’d like to post, or tap Select Multiple to choose up to ten photos.
Be sure to select them in the order you’d like them to appear in your story.
- To add a photo filter (not a face filter) to your photo, swipe right until you reach the filter option you want.
- Tap Your Story to post your Story, Close Friends, or Send To to send it as a direct message to an individual or group.

FIGURE 13-6: Swipe up from the bottom of the Instagram stories screen to see available photos to post.
Adding a Story Video
As video grows in popularity, so do the number of Instagram story videos! Video can definitely enhance your story, and it’s always fun to include. A standard story video is only 15 seconds long, but in this section we show you a new way to film up to a minute.
Filming with the stories camera
Filming a video within stories is very similar to taking a photo within stories. The main difference is holding down the button for video versus tapping it for a photo. Here are complete instructions for filming a video within stories:
From your newsfeed (home screen), swipe right or tap the camera icon at the upper left of the screen.
You can also tap your profile picture with the blue plus sign in the row of stories at the top of your screen.
Make sure the setting at the bottom of the screen is Normal, as shown earlier in this chapter (refer to Figure 13-4).
Take a video.
To take a video, hold the phone up vertically and hold the white circle down. On the iPhone, you see a red line form around the circle letting you know how much time you have left within your available 15 seconds. On Android, you’ll see a purple line that shifts to orange and yellow.
If you want the phone in selfie mode (with the camera facing you instead of away from you), tap the two arrows located to the right of the white circle before you tap the white circle.
- To retake the video, tap the X at the upper left of the screen, and repeat Step 2.
- Share your story by tapping Your Story; save it by tapping the arrow; or send it as a DM by tapping Next, selecting the recipients, and tapping Send.
As mentioned earlier, a standard Instagram story is only 15 seconds long, which is rather short, especially if you’re trying to convey important information or tell a complete story verbally. However, after several apps came along to “stitch” together longer videos, Instagram rolled out a way to do that directly in the app to allow for up to one minute of “seamless” video.
Here’s how:
From your newsfeed (home screen), swipe right or tap the camera icon at the upper left of the screen.
You can also tap your profile picture with the blue plus sign in the row of stories at the top of your screen.
Make sure the setting at the bottom of the screen is Normal, as shown earlier in this chapter (refer to Figure 13-4).
Hold down the white circle, but instead of releasing it when the red line moves all the way around the circle, keep holding it down.
The camera saves the first 15 seconds in a thumbnail that shows directly above the white circle. It may allow you to film over 1 minute, but it will only allow you to post the four 15-second segments to total 1 minute.
When you’re done filming, release the white circle.
The video thumbnails move down to the lower left of the screen, as shown in Figure 13-7.
- To upload all segments of the video, tap Next.
- The Share screen appears, allowing you to post Your Story by tapping Share and then Done.
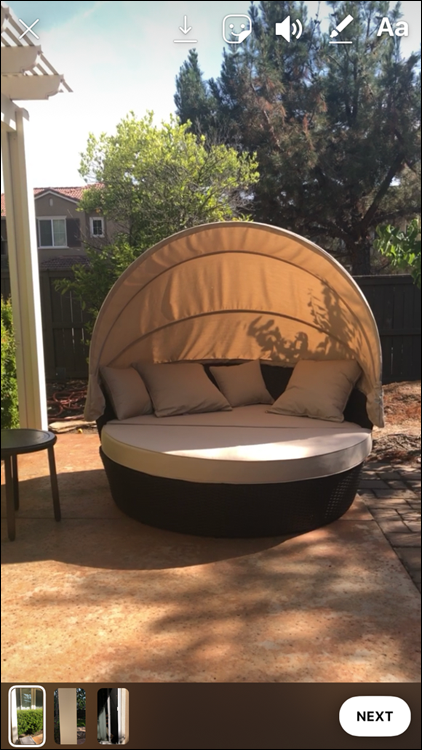
FIGURE 13-7: Each 15-second segment will move down to the bottom left of the screen.
 If you want to delete a longer video, you must delete each segment of the video. It doesn’t delete the entire video at once, even though it has been stitched together.
Experimenting with all the camera options
Instagram stories packed a lot in to their little piece of the Insta-world. Their camera has many added features to add fun and drama to your stories. In this section, we offer an overview of the different camera options.
Using SuperZoom for drama
SuperZoom is already loaded automatically within stories and allows you to add ten different dramatic effects to your photos. The stories camera zooms in on whatever you’re filming and then adds music and/or graphics to enhance the drama. Follow these steps to create a SuperZoom story:
- Open Instagram stories by swiping right or using the camera icon at the top of the newsfeed.
- Slide the Normal setting to the left, changing it to SuperZoom, as shown in Figure 13-8.
Slide through the ten available effects above the SuperZoom title until you find the one you like.
To switch from forward-facing video mode to selfie video mode and back, tap the arrows to the right of the white circle.
Tap the white circle with the SuperZoom logo (circle inside other circles).
You don’t need to hold down the white button as you would for video. The app zooms in on its own and adds the effect for you.
- If you’re not satisfied with your SuperZoom and you want to try again, tap X at the upper left and repeat, starting at Step 4, or Step 3 if you want to try a different effect.
- Share the SuperZoom Story by tapping Your Story or Close Friends; save it by tapping the down arrow; or send it as a DM by tapping Send To, selecting the recipients, and tapping Send.

FIGURE 13-8: Find the SuperZoom setting by sliding left from the Normal camera setting.
Using Boomerang and Rewind for fun
Boomerang is an app that takes a burst of photos and creates a looping backward and forward video clip from them. An action such as twirling a pencil or blowing a bubble becomes more exciting when played in a loop!
Follow these steps to use Boomerang:
- Open Instagram Stories by swiping right or using the camera icon at the top of the newsfeed.
- Slide the Normal setting to the left, changing it to Boomerang, as shown in Figure 13-9.
To switch from forward-facing video mode to selfie video mode and back, tap the arrows to the right of the white circle.
You can also use Boomerang with one of the face filters, as described earlier in this chapter.
Tap the white circle with the Boomerang logo (infinity symbol).
You don’t need to hold down the white button as you would for video. The app is actually taking several pictures in a rapid burst.
- If you’re not satisfied with your Boomerang and you want to try again, tap X at the upper left and repeat, starting at Step 4.
- Share the Boomerang Story by tapping Your Story or Close Friends; save it by tapping the down arrow; or send it as a DM by tapping Send To, selecting the recipients, and tapping Send.

FIGURE 13-9: Find the Boomerang setting by sliding left from the Normal camera setting.
Rewind stories often appear to look similar to Boomerang stories, but instead of taking a photo burst, it’s taking video. Your video replays over and over in a loop. The directions for Rewind are the same as Boomerang (although you must scroll a little farther left from the Normal camera setting to get to it), but instead of tapping the white button, you hold it down for the length of your video.
Rewind videos are 15 seconds, but you can also hold longer to piece together up to four segments to make a 1-minute video. Instructions for filming longer video are detailed earlier in this chapter.
Using Focus for great portraits
The Focus feature is a nice way to take photos or videos of yourself or others, enhancing their faces, but slightly blurring the background. Here’s how to create a Focus Story:
- Open Instagram Stories by swiping right or using the camera icon at the top of the newsfeed.
- Slide the Normal setting to the left, changing it to Focus, as shown in Figure 13-10.
- To switch from forward-facing video mode to selfie video mode and back, tap the arrows to the right of the white circle.
- Tap (for a photo) or hold (for a video) the white circle with the Focus logo (human avatar symbol).
- If you’re not satisfied with your Focus Story and you want to try again, tap X at the upper left and repeat, starting at Step 4.
- Share the Focus Story by tapping Your Story or Close Friends; save it by tapping the down arrow; or send it as a DM by tapping Send To, selecting the recipients, and tapping Send.

FIGURE 13-10: Find the Focus setting by sliding left from the Normal camera setting.
Using Hands-Free to make life easier
To film a video without the hassle of holding down the button the entire time, use the Hands-Free setting. Swipe left from the Normal setting until you reach Hands-Free. You can then record video by tapping the white circle with the colorful box inside. Tap the circle again to stop. If you don’t tap it again, Hands-Free will keep filming a longer video, but it will only allow four 15-second segments to post as a “stitched together” video.
Uploading a video from your camera roll
Have a great video on your camera roll already? It’s easy to upload to stories. Here’s how:
- Swipe right from the newsfeed or tap the camera icon at the top of the newsfeed to access Instagram Stories.
Swipe up from the bottom of the screen or tap the box with a small photo thumbnail at the bottom left.
Thumbnails of all available photos and videos are displayed at the bottom of the screen, as shown in Figure 13-11.
Tap the video you’d like to post, or tap Select Multiple to choose up to ten videos (can be combined with photos).
Be sure to select them in the order you’d like them to appear on your Story.
- To add a photo filter (not a face filter) to your video, swipe right until you reach the filter option you want.
- Tap Your Story to post your Story, Close Friends, or Send To to send it as a direct message to an individual or group.
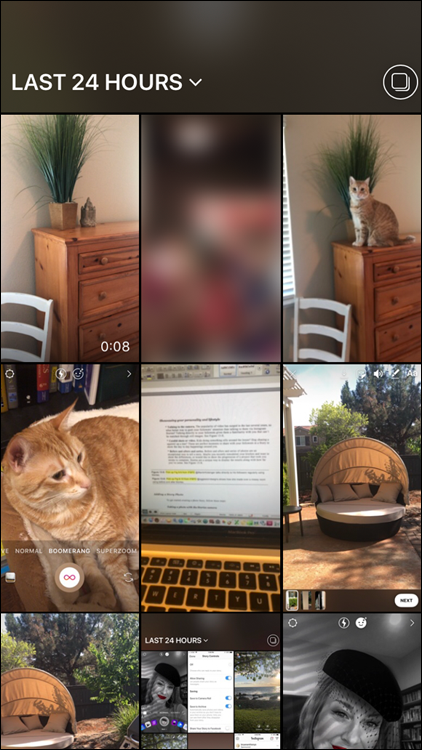
FIGURE 13-11: Available photo and video thumbnails are shown and can be selected by tapping on them.
Adding a Text Post
When Instagram Stories first released, only photos or videos were available to use as a backdrop for text. After several clever Instagrammers came up with workarounds for a solid colored background to create a text post, Instagram finally built that functionality into the app. Now you can easily select a color background, and type a text message overlay to your followers. Here’s how:
- Swipe right from the newsfeed or tap the camera icon at the top of the newsfeed to access Instagram stories.
- Slide the Normal setting to the right, changing it to Create, as shown in Figure 13-12.
- For a text-only post, make sure the white circle says Type underneath it.
- Tap the screen where it says, “Tap to type.”
- Enter your text.
Change your text’s color by tapping any of the colors below your text.
You can scroll left for more text colors, or use the eye dropper to sample a specific color. You can also change the background color of the screen by tapping the same-colored circle at the bottom of the screen on the iPhone or top of the screen on Android, and you can change the justification from left, center, or right by tapping the four lines at the upper left of the screen (only available on certain fonts).- Tap the bar marked Modern at the top of the screen to choose another font, or leave it in Modern mode.
- Tap Done.
- Tap Your Story to post your Story, Close Friends, or Send To to send it as a direct message to an individual or group.

FIGURE 13-12: Use the Create function to create a text-only post, or slide the icons to the left to reveal more features.
Other features in the Create setting
The Create setting also offers some other cool add-ons by scrolling past the Type option (refer to Figure 13-12):
- Questions: Ask your followers one of the preformatted questions, or tap the white question box to write your own question.
- Poll: Ask your own question with two replies, and Instagram will tally your responses.
- Countdown: Countdown to a big occasion like your birthday by editing the event title and countdown clock.
Saving Your Story
Sometimes stories are so good, you can’t bear the thought of them disappearing forever. Well, you’re in luck. You can save them to enjoy later and to repost on other social media networks in the following three ways.
Saving before publishing
After you create or upload a photo or video, tap the down arrow at the top of the screen and it will save it to your camera roll (see Figure 13-13). You must do this before you tap Your Story, Close Friends, or Send To.

FIGURE 13-13: Tap the down arrow at the top of your screen to Save a Story before sharing it.
Saving after publishing (within the 24-hour active window)
Go to the newsfeed or your profile page and tap your profile picture. If you have an active story, it will appear. Tap the right side of the screen until you see the story you want to save. Tap the three small dots at the lower right of the screen, and then tap Save (see Figure 13-14).
FIGURE 13-14: Tap the three dots at the bottom of your screen and then tap Save to save an active story.
Automatically saving all your stories
Tap the gear icon (Settings) at the top left of the stories page. On the Story Settings screen, you can choose to Save to Camera Roll (saving all stories to your phone) or Save to Archive (saving all stories to an accessible archive on Instagram). You can also choose neither of these options, or both! Sliding the slider to blue means that functionality is on. After you’ve made your selections, tap Done, as shown in Figure 13-15.
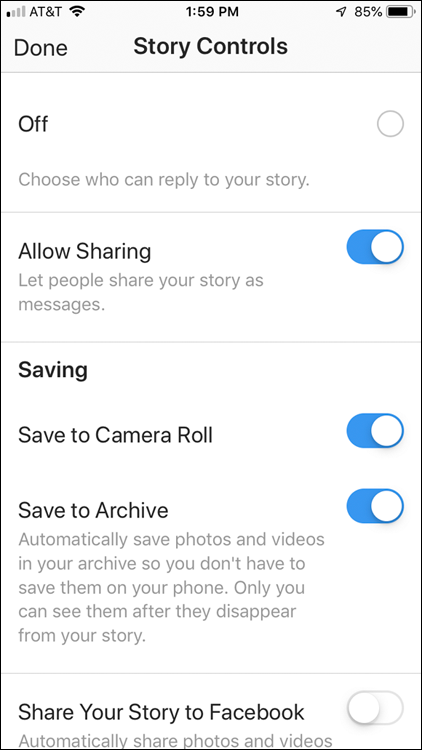
FIGURE 13-15: From the Settings screen, slide the Save to Camera Roll button right to automatically save all your stories to your camera roll or slide the Save to Archive button right to automatically save your stories to your Instagram Stories Archive.
Accessing your archives
In the previous section, we explain how to save your stories to Instagram’s archives (saving precious space on your camera roll). Here, we show you how to access them.
From your Profile page, tap the three lines at the upper right of the screen, then tap Archive, as shown in Figure 13-16. All the stories that you’ve posted since enabling the archive are available for you to view or reshare (see Figure 13-17). Instagram also suggests memories of photos taken on that day in years past to view or reshare with your followers.

FIGURE 13-16: Access archives by tapping the clock at the upper left of your Profile page.

FIGURE 13-17: Old stories are available for you to view and reshare.