Chapter 14
Adding Style to Your Stories
IN THIS CHAPTER
 Discovering stickers to add flare to your stories
 Exploring freehand tools to draw on your stories
 Learning the different text tools for stories
In this chapter, we explain how take your Stories to another level by adding personalized style and content, including various stickers, animations, doodles, and text. These features can be combined in a variety of ways to create your own unique style and message.
Jazzing Up Your Story Post Using Stickers
There are so many fun stickers to choose from on Instagram. And they keep adding more, so there are always fun new ways to augment your content. In this section, we look at some of the more common stickers available and explain how you can use them in your content.
Stickers are available by tapping the square smiley face icon in the story screen after you’ve uploaded or taken a photo or video. Tapping the sticker icon will open a screen (or tray) with various options of stickers and emojis (see Figure 14-1).
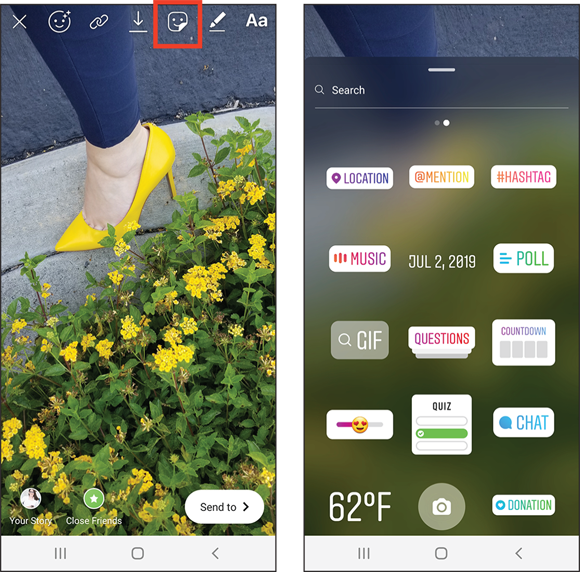
FIGURE 14-1: Access story stickers by tapping the sticker icon that looks like a smiley face.
Location, mention, and hashtag stickers for search and notifications
Just as you can @ mention someone on an Instagram post, or tag a location in a post, or use hashtags for search, you can do much the same with your Instagram stories.
Using these three stickers can help you appear in more searches, enable new people to find you, and let others know you’re talking about them.
Location stickers
Adding a location sticker to your post lets your followers know where you are. It also allows you to show up in search results (if you’re a public profile) for that location and others nearby.
When people look for locations in Instagram search, they see posts associated with that location. These search results combine both feed posts and stories in the results. When you add a location sticker, you may appear in those search results.

FIGURE 14-2: Tagging a small location — in this case, National University — allowed this post to appear in multiple other search results for surrounding areas.
When you tap the Location sticker to select it, a new screen appears with a list of nearby locations. You can scroll through this list and tap to select the location you want to add. If your location isn’t listed, or the location isn’t near you when you’re adding the story, you can type in the search bar for the name of the location you want to tag. A list of related locations will appear, and you can select the correct one by tapping on it (see Figure 14-3).
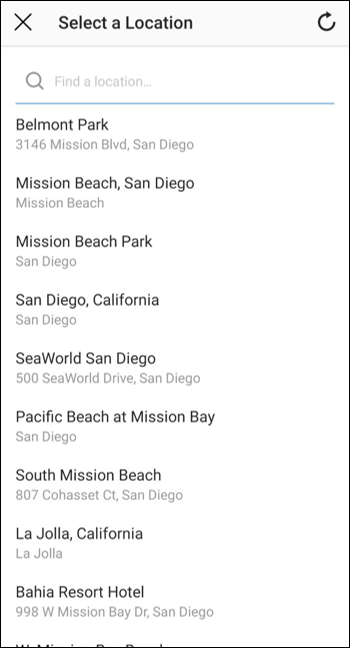
FIGURE 14-3: Select your location from the list of locations or use the search bar to find the location of your choice.
After you select the location, the sticker will appear on your story. You can pinch to zoom to make it smaller or larger. You can drag it around the screen or turn it on an angle to place it where you want.
You can also tap the location sticker to change the background. There are typically three color options available that you can tap through (see Figure 14-4).

FIGURE 14-4: Tap the location sticker to choose different color and background options.
Mention stickers
If you want to tag someone in your Instagram story, you simply have to tap the @Mention sticker.
Begin typing the name of the person or their username to find them. Relevant users who match that name will appear along the screen (see Figure 14-5). Keep typing until you find the person you’re looking for; then tap their profile photo to select their username and add the sticker to your story. As with Location stickers, you can drag the sticker around, pinch to enlarge or shrink, and tap to change the background and color options.

FIGURE 14-5: Type the name or username of a person you want to @ mention with a sticker and select the user from the list of options.
Hashtag stickers
You can use up to 30 hashtags on a feed post on Instagram, but you’re limited in terms of the number of hashtags you can use in a story post. If you use the hashtag sticker, you can only add one hashtag to each individual post.
To add your hashtag sticker, choose the Hashtag option from the sticker screen and start typing your hashtag (you don’t need to include the #). When you’re done, tap Done in the upper-right corner. You’ll see the sticker added to your story. Just as you did with the Location sticker, you can tap through to change color options, move the sticker around, and resize it.
GIFs, sliders, emojis, and more
The previous three stickers are incredibly functional and help with search and exposure. But they don’t do much for the fun factor or to drive engagement. Fortunately, there are plenty of other sticker options to up the fun factor!
GIF stickers
A cultural norm with social media is the use of GIFs (short animated pieces) to convey a thought, emotion, or response. Instagram is partnered with Giphy so that you can add GIFs to your stories, too.
Select the GIF sticker option from the sticker screen. A list of popular and trending GIFs will appear for you to choose from. You can also search for a keyword or topic related to the GIF you want to use (see Figure 14-6).

FIGURE 14-6: Use the search bar in the GIF sticker screen to find animations related to any topic of your choice.
You can add multiple GIFs to a story post to add the style and context you want. This is also a creative way to take a simple photo and make it animated and engaging.
Slider stickers
The Slider sticker is designed to boost engagement and interaction with your story. Viewers can physically drag the sticker to indicate their level of participation. There are plenty of creative ways you can find to utilize this sticker!
To add the sticker, select the Slider sticker (with the heart eyes emoji) from the sticker screen. Then select the emoji to include as the slider mechanism. Note that there are multiple options and you can scroll left and right on the emojis to see more options. Then type in your question and tap Done when complete. You can drag and resize the sticker to place it anywhere on the image (see Figure 14-7).
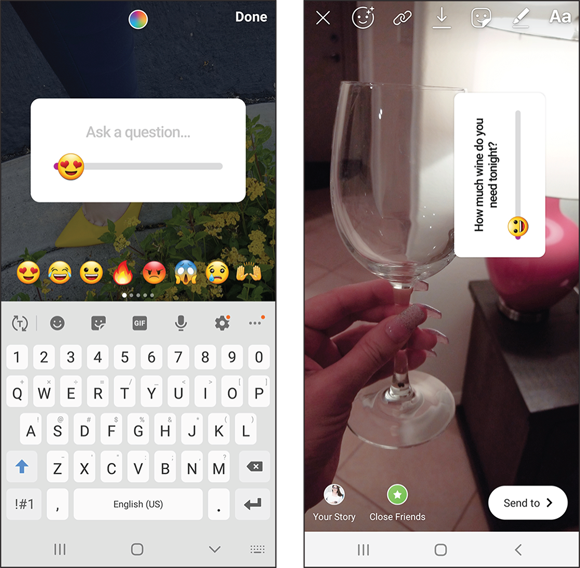
FIGURE 14-7: In this example, dragging the smiley face will indicate how much wine a viewer might want.
Emojis
You have the whole emoji keyboard to utilize and add as stickers to your stories. Tap the sticker icon and scroll up on the sticker screen to reveal trendy stickers, emojis, and more.
Questions, polls, quizzes, chats, and more
Do you want to learn more about your followers? Or maybe share more about you? The variety of questions, polls, quizzes, and chat stickers will allow you to do that and really draw participation from your followers.
Questions sticker
The Questions sticker allows you to pose a question to your audience and have them submit responses. Your question can be on any topic you choose! Responses will appear in the story insights for that post and are only visible to you.
Select the Questions sticker from the sticker screen, type in a question of your choice, and post the sticker to the story. Your followers will have the option to type in a response in the sticker itself. And you’ll be able to see those responses by tapping the viewers in the lower-left corner of your own story to navigate to the post insights (see Figure 14-8).
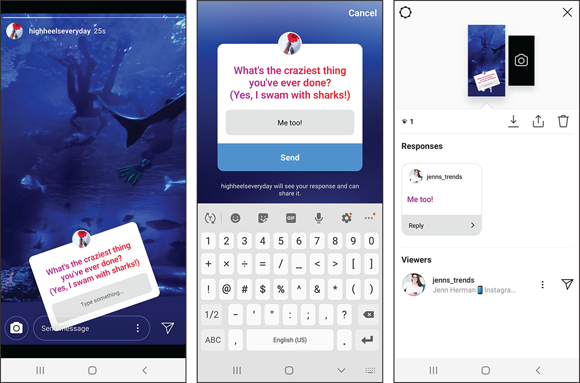
FIGURE 14-8: Use the Question sticker to generate dialogue and participation with your followers. You’ll be able to see their responses to your question.
Poll and Quiz stickers
Both the Poll and Quiz stickers work much the same as the Questions sticker. You can create a question and provide answer options for your audience to choose from. The polls results will appear after the viewer has selected a response.
For the Quiz sticker, type in the question and then add answers. It defaults to two, but you can add more options. Tap the option that is the correct response to highlight it (see Figure 14-9).
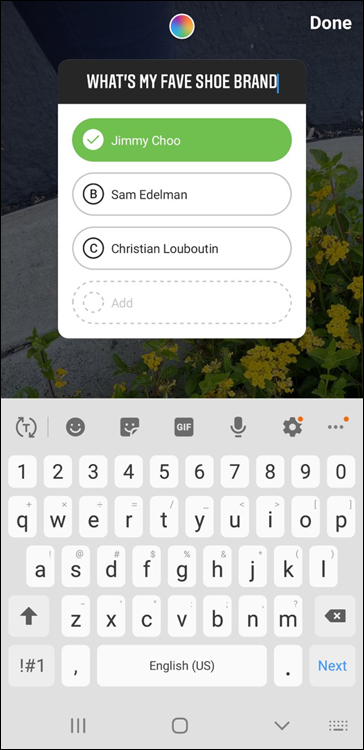
FIGURE 14-9: The Quiz sticker allows you to test your followers. Add multiple options for responses and select the correct one before adding it to your story.
As with all stickers, pinch, drag, and move them where you want them in your story.
Chat sticker
Again focused on interactions with your followers, the Chat sticker allows you to create a unique direct message thread exclusively for those who reply to the Chat sticker on your story.
When you add the sticker, followers can tap it to request to join the chat. When you approve them, this adds them to the direct message thread along with anyone else you approve into the chat. You can stop the chat thread at any time by turning it off, and no one will be able to continue chatting in that conversation.
Countdown and Music stickers to intrigue your followers
One of the best ways to keep your followers on top of what you have going on is to use the Countdown sticker. This allows you to set a date and time for an upcoming event. People can subscribe to the sticker to be notified when it expires.
If you’re hosting a party, or going live on Instagram, or leaving on vacation, or doing any other type of event, you can use the Countdown sticker to let people know when that event is going to happen.
The Music sticker may be one of the most sought-after stickers for most Instagram users. It’s widely available, but not everyone always has access to it. But it does allow you to add a music overlay to any Story post.
You can choose from Instagram’s music library (not your own) and add up to 15 seconds of music to an individual post. Select the Music sticker, navigate through the music options or search for a song or artist of your preference. Select the song by tapping it. Tap the number to the left of the slider to choose how long the music will play for (between 5 and 15 seconds). Drag the slider to the clip of the song you want to use (see Figure 14-10).
Lyrics for the song will appear on the screen. Slide through the Aa icons to choose the font option for the lyrics or choose one of the last options to display the song name or cover image instead of the lyrics.
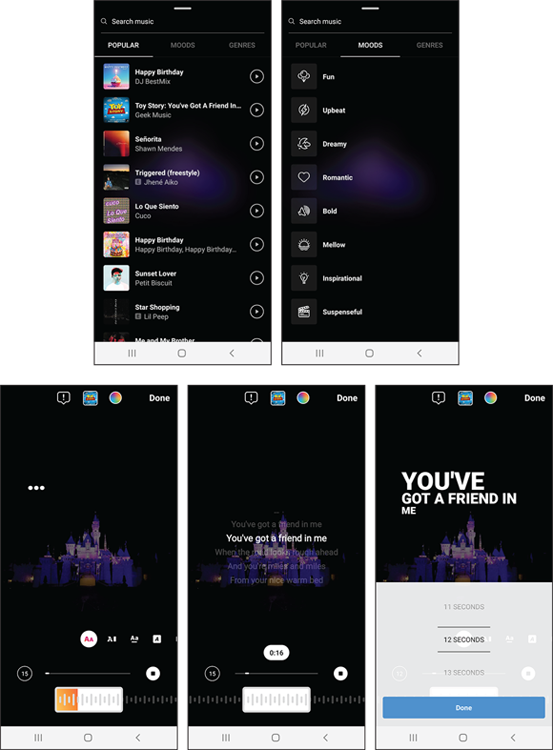
FIGURE 14-10: The Music sticker allows you to add a music clip of 5 to 15 seconds onto a story post.
Picture in picture for the fun of it
To make things even crazier with your stories, you can take a photo with the selfie (front-facing) camera to add to your story. Select the camera icon sticker from the sticker screen.
A small window will appear in your story showing the camera is on (see Figure 14-11). Position yourself or the object in the view of the lens and tap the white shutter button below the window to take the picture. Then you can drag the photo around the screen and pinch to change the size. You can also tap on the photo to change the frame of the photo.
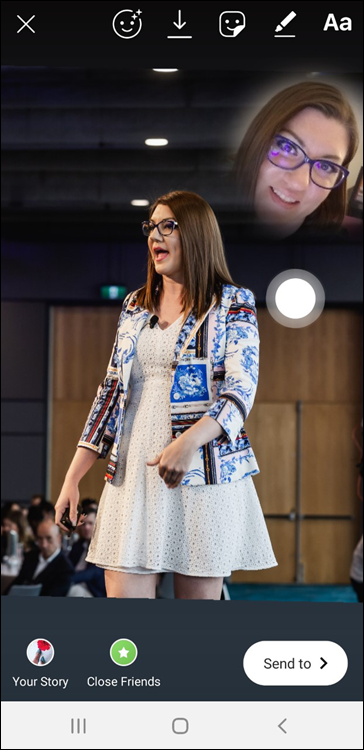
FIGURE 14-11: Add a picture-in-picture effect to your stories by using the camera sticker.
Deleting stickers that don’t work
It’s easy to add stickers, and it’s just as easy to remove them if you don’t like them (before you post the story). After you’ve added the sticker to your story, you can tap and hold the sticker. You’ll see the garbage can appear at the bottom of the story screen (see Figure 14-12). Simply drag the sticker to the garbage can and it’ll be removed.
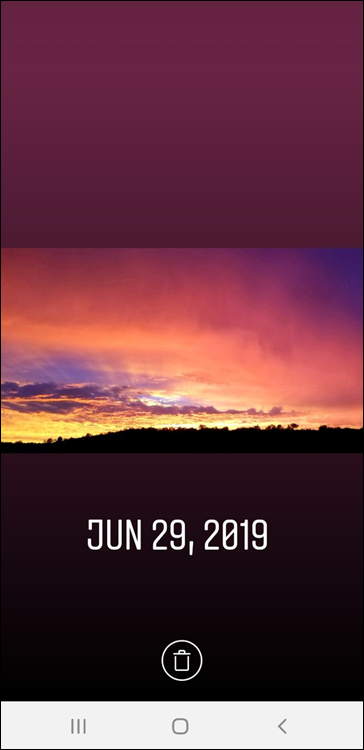
FIGURE 14-12: Tap and hold any sticker in a story to drag it down to the trash can to remove it from your post.
Personalizing Stories with Doodles
Instagram stories have a variety of drawing tools that allow you to add freehand doodles and scribbles of your own. To access the drawing tools, tap the pencil icon at the top of the story screen (see Figure 14-13).

FIGURE 14-13: Select the pencil icon from the story toolbar to access the drawing tools.
You’ll notice a variety of pen and drawing tools along the top of the screen. Each pen offers a different effect, from a simple pen/pencil to a highlighter, an eraser, and more.
On the left side of the screen, you’ll notice a sizing tool. You can drag the dot up and down to make the drawing tool thicker or thinner. Along the bottom of the screen are color options. You can scroll left and right along the color option bar to access more color selections (see Figure 14-14).
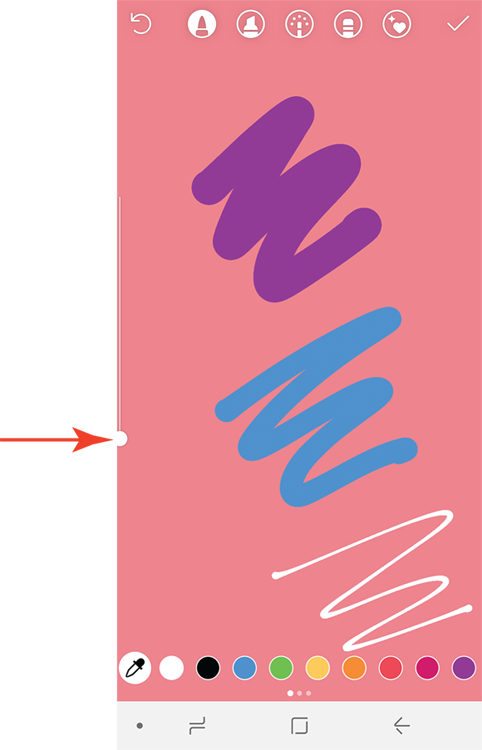
FIGURE 14-14: Doodle tools offer different pen options, different thickness options, and different color options.
If you want to match something specific, you can tap the eyedropper tool next to the color palettes and then tap the specific color you want to match on your image. That color will become your pen color.
You can even layer various aspects to get really creative with your drawing tools. For example, upload an image to your story. Then select the pen tool and color. Tap and hold the screen to fill the screen with that color, laying it on top of the image you uploaded. Then select the Eraser tool from the drawing tools and erase the color fill to reveal the image behind it (see Figure 14-15).
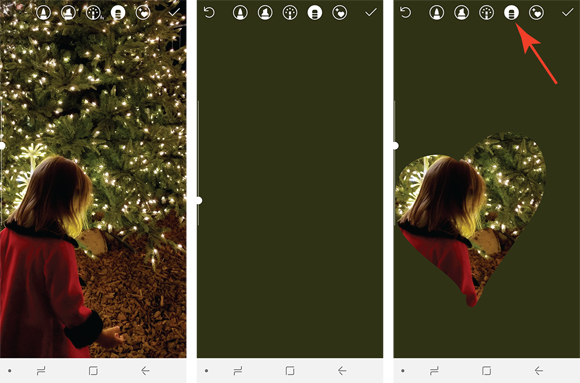
FIGURE 14-15: Combine drawing tools by overlaying a solid color on top of an image and then using the eraser tool to reveal the image behind.
When you’re done with any doodle, tap the check mark to save it to your story.
Saying More with Text
For all the fun you’ve had this far creating doodles and adding stickers, there’s still another way to personalize your stories! You can add text boxes to your stories, too.
To access the Text option, tap the Aa icon in the top toolbar when creating your story or simply tap anywhere on the screen to open the text tool.
You can add multiple text boxes to your story and place them wherever you choose. They can be pinched to change the size and rotated as you please.
Changing your font option
The font option will default to Classic. You can change this easily to one of the other font options by simply tapping the name of the font at the top of the screen. You’ll navigate through the available options (see Figure 14-16).

FIGURE 14-16: Instagram stories offer a variety of font options for you to personalize your posts.
Figure 14-17 shows you some examples of what the different fonts look like in stories. Choose the font that best represents your style or the purpose of that story.
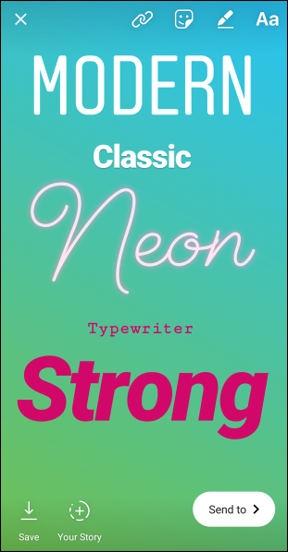
FIGURE 14-17: Instagram stories offer a variety of font options to choose from.
In addition to font choices, you can choose different colors for your fonts.
Some font options will allow you to change the justification from left to center to right justified by tapping the alignment icon in the upper-left corner of the screen. This option is only available for certain fonts; if the alignment icon isn’t available, it’s not available for that font choice.
Certain fonts will also allow you to add background colors or to fill the text box with a color. If you see the “A**” icon, that lets you know that option is available. Tapping the “A**” icon will fill the text box with the selected color, which you can also change by tapping a color palette of the options.
 For more exposure, use a location tag for the smallest location possible. Don’t tag a city; instead, tag a physical location or smaller area. When you tag a specific location, you increase your chances of appearing in more location results in surrounding areas, or in larger location results. For example, if you use a location sticker for a specific restaurant, the map system in Instagram knows exactly where that restaurant is located. You may show up in search results for that restaurant, for a park nearby, for that local neighborhood, and maybe even for that city as a whole (see
  The person or people who are tagged in your story will be notified via a direct message that you tagged them, and they’ll be able to see your story.