Chapter 16
Using Instagram Highlights to Keep Your Content Alive
IN THIS CHAPTER
 Learning about Story Highlight galleries
 Exploring how to create your own highlights
 Discovering how to add more content to your highlights
When you start using Instagram stories, you can keep those stories alive longer! Stories disappear after 24 hours, so it can be frustrating to know that the content you created is lost. Fortunately, however, highlights allow you to select certain stories to stay active on your profile in specific galleries you set up.
In this chapter, we explain how to set up highlights and how to add content to them. We also talk about some of the reasons why you may want to use highlights and give you some creative ideas for highlight topics.
Getting Acquainted with Highlights
Story Highlights are the series of circles directly beneath a person’s bio on his Instagram profile (see Figure 16-1). A person may only have a few of these galleries, or he may have a number of them that you can scroll through.
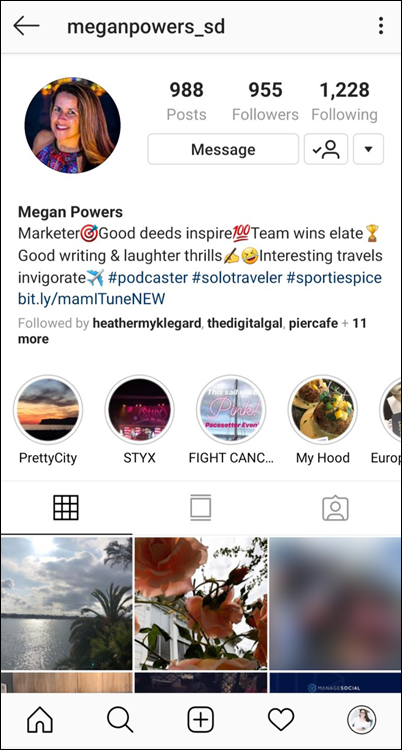
FIGURE 16-1: Story Highlights are the series of circles beneath the bio and are a place to collect stories to live more than 24 hours.
The highlight galleries are each a collection of stories from that account. There may be only one story post or a series of multiple story posts from various times uploaded to each highlight.
A story disappears from the account after 24 hours, but highlights are an opportunity to keep that content on your profile for as long as you want it there.
You can customize all the highlights for your own profile with whatever topics and titles you would like!
Creating a New Highlight Gallery
Story Highlights are available to all users. You do have to have active or archived stories on your profile, though, in order to have access to adding a highlight gallery. If you’ve never shared a story before, go ahead and create one! That will open up the option to add highlights to your profile.
If you do have access to the highlights, you’ll notice the Story Highlights section beneath the bio information on your profile. If you haven’t yet created any highlights, the circles will be gray and you’ll see a circle with a plus sign (+) to create a new highlight easily.
Adding a highlight from your profile
To create a new highlight from your profile, tap the plus sign (+) in the circle below your bio. A list of your archived stories will appear (see Figure 16-2). Scroll through the list of posts and select one or more you want to add to that highlight.
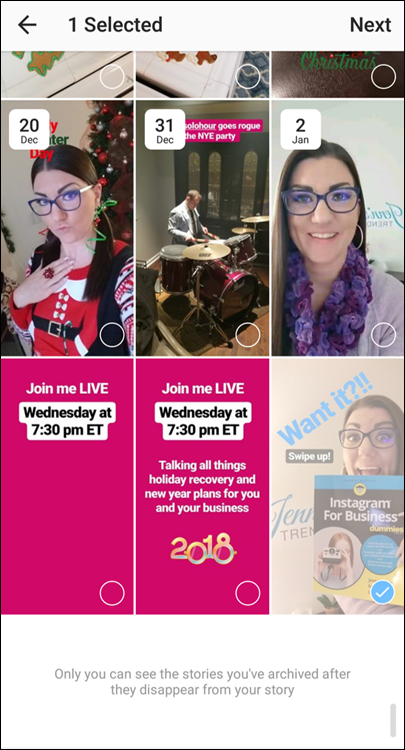
FIGURE 16-2: When starting a new Story Highlights gallery, you’ll be able to choose from your archived stories which post(s) to add to the highlight.
Tap Next after you’ve selected your posts and move on to the following instructions for naming and customizing your highlight.
Adding a highlight from an active story
If you have an active story on your profile and you want to use that one to create a new highlight, you can easily do that by opening the story post from your profile or feed.
At the bottom of your story post is a variety of buttons, including the Highlight button, which is a circle with a heart in the center (see Figure 16-3). Tap that icon, and then select New from the Add to Highlights screen. Proceed with the following instructions for naming and customizing your highlight.
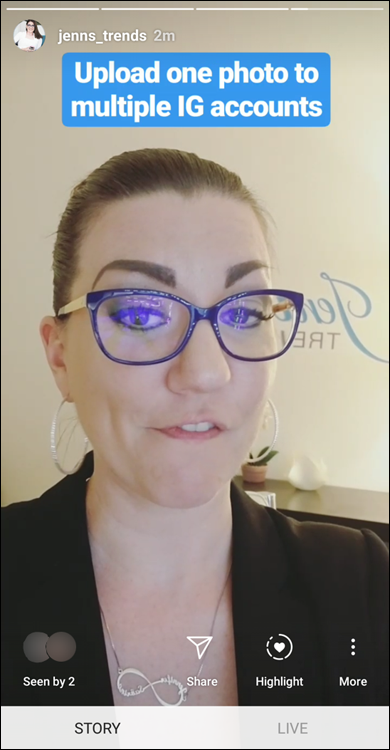
FIGURE 16-3: When you access your active stories, you’ll see the Highlight icon (the circle with the heart in the center), which will allow you to add that active story to a highlight gallery.
Naming and customizing your highlight
Now that you’ve started a highlight, you need to give it a name! Here are some things to be aware of:
- Highlight titles can be up to 16 characters in length.
- The titles get cut off after a handful of characters (there’s no set limit).
- Keep the titles as short as possible and keep the important title info at the start of the title.
Type in your highlight title and tap Add to create the new Highlight on your profile.
Setting a cover image for your highlight
When you’re done naming the highlight, you need to assign it a cover image. By default, the cover image will be the first image you uploaded into the highlight. Because stories are vertical 9:16 images, and the cover image is a circle, chances are, the image won’t crop the way you want it to.
To improve the look of your cover image, tap Edit Cover and then drag or zoom (by pinching) to reposition your cover image (see Figure 16-4).
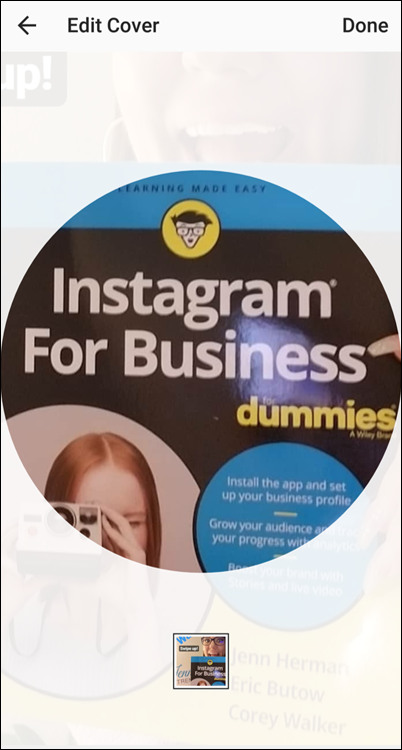
FIGURE 16-4: The cover image for your highlight isn’t likely to crop to a nice section of the first photo in your highlight. Reposition the placement for a more favorable alignment.
At any point after creating your highlight, you can edit the cover image to be a crop of any image in that highlight gallery. Simply tap that highlight from your profile to open the gallery. In the lower-right corner, tap the three-dots button and select Edit Highlight from the list. Then tap Edit Cover and follow the same steps to select a new image and position it for the cover image.
Creating a custom cover image
You may notice that people have specific images or logos set up for their highlights (see Figure 16-5). In this situation, they’ve uploaded a custom-designed image to their stories and then added it to their highlight.
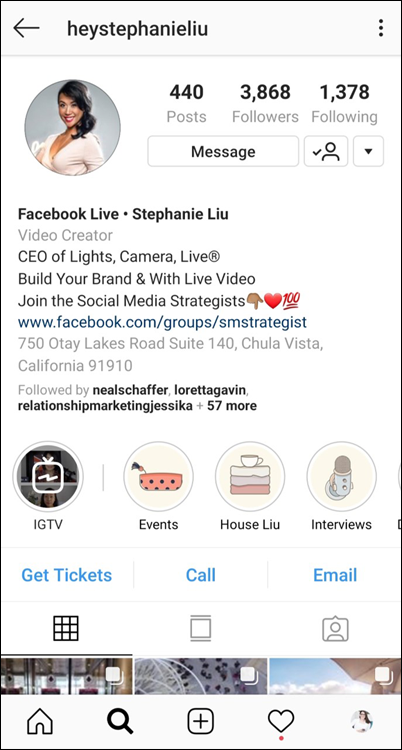
FIGURE 16-5: Custom covers for highlights offer a creative and appealing way to showcase the topics of each highlight.
Tools like Canva offer templates for creating these types of covers, but you could also create them in Photoshop or other design tools. Simply create the background color or design you want and place your cartoon, graphic, or logo in the center of the image. Edit your highlight following the steps earlier to select a cover image and set this as your cover image for each individual highlight.
Adding Content to a Highlight
Now that you’ve got your highlights set up, you’ll want to keep adding content to them. Here, we walk you through the steps to add and delete content from a highlight.
Sharing a current story
If you have an active story on your profile that you want to add to an existing highlight, you simply have to access that story from your profile and tap the Highlight icon (the circle with the heart in the middle) just as you would when creating a new highlight.
Scroll through the list of highlights and select the one you want to add the story to. Tap that highlight cover image, and your story will be added to the highlight.
Finding an archived story
To add more content to an existing highlight, you can also select from older, archived stories.
The first option is to tap the highlight on your profile. When you’re in the highlight, tap the three-dots button and tap Edit Highlight. You can then select the Add tab (on Android devices) or the “Archive” tab (on iOS devices) to scroll through archived stories and select as many as you want to add to that highlight (see Figure 16-6).
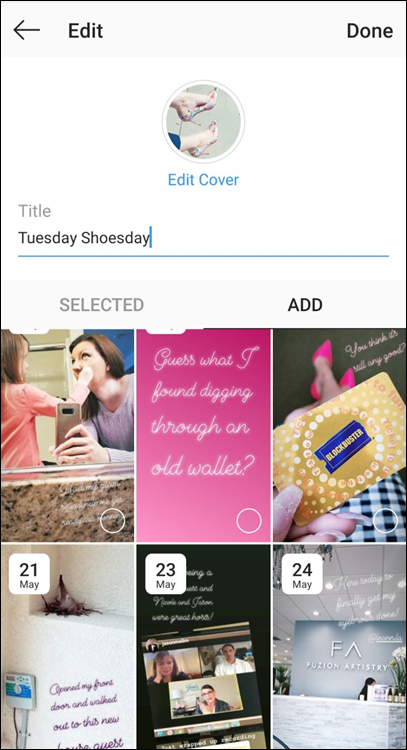
FIGURE 16-6: Add archived stories to a highlight from the Edit Highlight option on any existing highlight by tapping the Add tab (Android) or the Archive tab (iOS) and selecting the story posts to include.
Alternatively, you can go into your archived stories by tapping the three-line button on your profile screen, and selecting the Archive tab from the menu page to view all your old stories in that feed. Select any story from the list and tap the Highlight icon at the bottom of the story to add it to a highlight (see Figure 16-7).
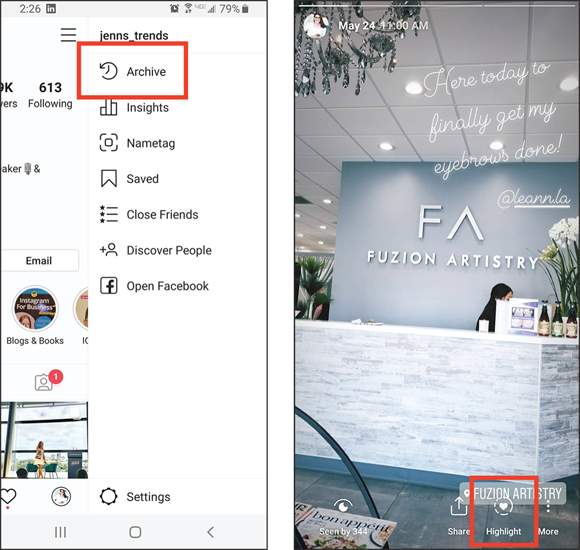
FIGURE 16-7: Add archived stories to a highlight by accessing the archived stories from your profile and adding each one to a highlight.
Deleting a story from a highlight
If, at some point, you decide you no longer want a particular story to appear in your highlight gallery, you can easily remove it.
Select the highlight from your profile and advance through the story posts in the highlight until you arrive at the one you want to remove. Tap the three-dots button in the lower right. Tap Remove from Highlight from the pop-up screen (see Figure 16-8), and confirm that you want to remove that item from the highlight.
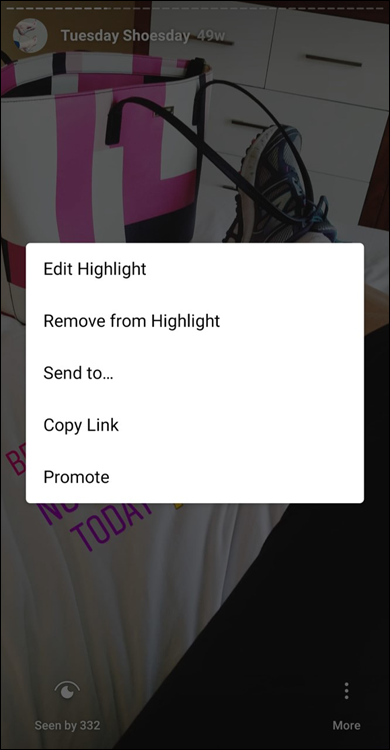
FIGURE 16-8: Deleting any post from a highlight is just as easy as adding a new one!
If you want to delete a bulk number of story posts, you can go to Edit Highlight from the three-dot button and uncheck all the story posts from the list. Tapping Done will save the changes, removing those stories from the highlight.
Coming Up with Fun Ideas for Highlights
You can use highlights for any topic that you create with your stories! It’s best to group your stories into specific topics for your highlights, though.
For example, you may have a lot of stories of your family. But you could create one highlight for family vacations, another one for holiday celebrations, and another one for just your pets.
 You can have plenty of different highlights so feel free to use them as best suited for you. Just realize that only the four most recently used highlights appear on the profile. After that, users will have to scroll to see your other highlight galleries.