Chapter 17
Going Live on Instagram
IN THIS CHAPTER
 Understanding how Instagram Live works
 Determining when to go live
 Discovering how to interact on live videos
 Learning how to save and share live videos
Quickly after they launched, Instagram stories dramatically changed the way people used Instagram. Some users even abandoned the newsfeed and went all in on Instagram stories.
With the popularity of stories and the growth of Facebook LIVE, including a live video option in Instagram stories seemed like a natural next step.
In this chapter, you learn all about how to go live, and get tips for making your live broadcast more successful before, during, and after filming.
Getting Started with Live Videos
So, you’re ready to go live, but how do you even get to it? How do you use it? Its location is not exactly obvious. Follow these steps:
- Open Instagram stories by swiping right or using the camera icon at the top of the newsfeed.
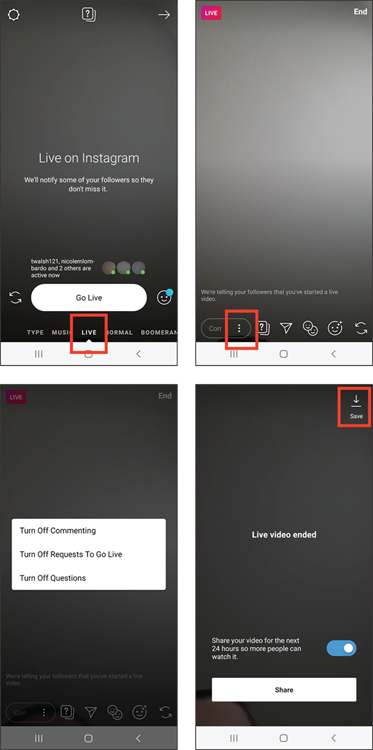
At the bottom of the screen, swipe Normal to the right so you’re on Live.
Figure 17-1 (upper left) shows the Instagram Live screen.
- If you want only certain people to view your live broadcast, tap the gear icon (Settings) at the upper left, tap Hide Story From, and select the followers you want to omit.
When you’re ready to start, tap Go Live.
Instagram checks your connection, and then the timer counts down 3, 2, 1, and you’re on! You’ll begin seeing Username Has Joined and the number of people who have joined.
Wait a minute or two before diving into your topic so that people have time to join.
Greet as many people as possible. Say hi, calling them by their name or username. Make them feel welcome.
- Now that you’re live, you can do the following:
- Turn off comments by tapping the three dots at the lower right of the screen, as shown in Figure 17-1 (upper right and lower left). However, we recommend that you keep them turned on for more interaction.
- Add a face filter by tapping the face with stars icon.
- Turn the camera from the front-facing selfie camera to the rear-facing camera to showcase what you’re seeing, rather than showing your face. Tap the curved double arrow (shown in Figure 17-1) to change the camera view.
- Enter the name of your live broadcast by typing it in a comment and tapping Send. Then tap the comment and choose Pin Comment from the options menu. This pins the name to the top of the comment feed, where it acts like a title.
- To keep track of your time, tap the pink Live button in the upper right. A timer appears.
- To see the names of the people who have joined, tap the number to the right of the pink Live button. To kick people out of your Live broadcast, place an X by their name.
- When you’re finished, tap End, and then tap End Live Video.
Save the live video by tapping Save at the upper left.
The Save button is easy to miss, but you can see where it is in Figure 17-1 (lower right). Your video is saved to your camera roll so you can reuse it elsewhere.
 You must save your live broadcast immediately after recording (before you agree to share it). After it’s shared, there is no option to go back and save it.
- To share the live video with your Instagram followers for 24 hours, go to the bottom of your screen and make sure the sharing tab is pushed to the right showing blue; then tap Share, as shown in Figure 17-1 (lower right).

FIGURE 17-1: Go live on Instagram (upper left), turn off commenting or questions (upper right and lower left), and save and share your live video (lower right).
Knowing When to Go Live
You may also want to broadcast when you’re at an event or experiencing something in your life. Sometimes these can’t be planned in advance, and it’s okay to go live when the moment strikes you.
Developing a Game Plan
- Think of a topic that will interest your followers. Some ideas to consider: Showcase your family life, stream your child’s rehearsal, show off some of your vacation, share a holiday tradition.
- If you plan to talk on the live broadcast, jot down several talking points, but don’t memorize or look overly rehearsed. Live broadcasts are supposed to be a bit off the cuff.
- If possible, do a test video on your regular camera app where you plan to do the live broadcast, and at the same time of day. Check the lighting and the background. Make sure that you can get a decent signal in that location.
- Promote your live broadcast ahead of time by posting about it in your Instagram stories, on Facebook, and other social media.
- Be as interactive as possible with your followers during the broadcast.
- Save your broadcast so you can repurpose it to other online media, and then publish your broadcast so it’s available for 24 hours.
Interacting with Live Guests
While you’re waiting for more people to view your live video, acknowledge the people who are joining you. Use their names or usernames and thank them for participating. Introduce the topic you’re sharing on the live video, and after a few minutes of welcoming guests, you can start speaking about the topic at hand.
People will likely comment while you’re talking. It’s nice to answer questions and comments as they arise, but sometimes it’s not practical if you’re trying to explain something. In this case, let them know that you’re happy to take comments and questions and you’ll address them at the end or when you wrap up that current thought.
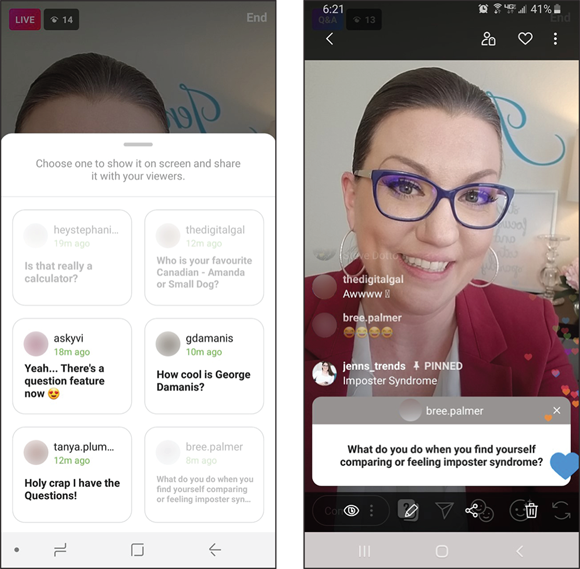
If you really want to keep the questions organized, you can encourage your viewers to tap the Questions icon — it looks like a question mark — to send you questions. You’ll see a numerical notification listed on the Questions icon to let you know someone has posed a question. When you tap the Questions icon, you’ll see the list of questions people have submitted (see Figure 17-2). You can tap any one from the list and it will appear on the screen in your live video so that viewers know what question you’re answering. Tap the X on the question box on the screen when you’re done answering that question.

FIGURE 17-2: Use the Questions feature on live video to collect and select questions to respond to on your broadcast.
Inviting a Guest onto the Live Broadcast
If being live on camera alone makes you nervous, or if you just want to include someone else in your video, Instagram allows you to invite one guest into the live show with you.
Tap the two-face icon (see Figure 17-3) in your live video to invite someone to that video. A screen will appear with a list of recommendations of people to invite into the video, or you can use the search bar to type their name.

FIGURE 17-3: The two-face icon allows you to invite someone into your live video to share the screen with you.
Alternatively, someone can request to join your live video when they tap the same button while watching your live broadcast. You’ll receive a notification that they want to participate, and you can choose to add them or ignore them.
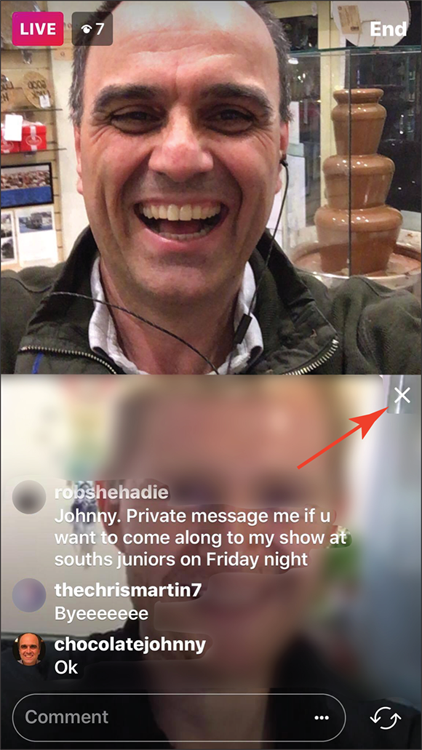
When the guest joins you on the live video, he’ll occupy half the screen, sharing his video and audio as well (see Figure 17-4).

FIGURE 17-4: Guests on a live broadcast will share the screen with you until they leave.
Saving Live Broadcasts and Sharing Them
After you’ve completed your live broadcast, don’t forget to save it! After you’ve tapped End Live Video, tap Save on the screen that appears (refer to Figure 17-1, lower right). The broadcast is saved to your camera roll on your device.
When you save your Instagram Live broadcast, it becomes a regular video that you can use any way you’d like. Here are some places to reuse it:
- Post it on your YouTube channel, and then share the link to the YouTube video on LinkedIn and Twitter.
- Post the video on your Facebook page or profile.
- Post the video on your IGTV channel.
You can also edit the video to create sound bites of 1 minute or less, and upload them directly to Instagram, Facebook, LinkedIn, and Twitter. Or create a graphic about the video for Instagram, and then link to the video (on YouTube or your website) via the link in the bio on your Instagram profile page.
 You can go live anytime you want. But it helps to go live when you have plenty of followers online. Pick times of day that work best for you and your followers to ensure more people tune in to the live broadcast.
 You can reuse live content in so many creative ways — don’t let it go to waste!