Chapter 6
In This Chapter
• Creating your WordPress account
• Starting your first WordPress blog
• Getting to know the WordPress dashboard
You’re ready to start your first blog, and you’ve chosen to use the free
WordPress.com blogging application. Congratulations and welcome to the blogosphere! You’re sure to meet new people from around the world here—and have a lot of fun!
The first step to launching your WordPress-hosted blog is to create a
WordPress.com account. In this chapter, I teach you how to create your own account and start your first blog with
WordPress.com. I also introduce you to the WordPress dashboard, the place online where you’ll do everything to manage your blog, including writing and publishing posts, configuring your sidebars, setting up comment moderation, and much more!
There’s a lot to learn, but don’t feel overwhelmed! This chapter breaks down what could feel daunting into easily digestible pieces. Let’s get blogging!
Your new life as a blogger begins with a visit to
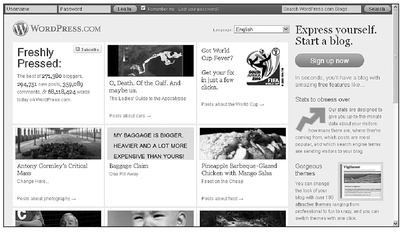
WordPress.com, as shown in Figure 6-1. To create your own WordPress account, click the
Sign up now button in the upper-right side of the page.
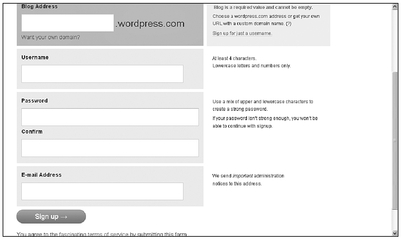
A form opens, as shown in Figure 6-2, where you are asked to enter a blog address, username, and password as well as your e-mail address. You can’t change your username once you select it, so try to choose one you’ll be happy with for the long haul. Furthermore, your e-mail address is imperative, because after you submit your completed form, WordPress sends you an automated e-mail with your WordPress account activation link. You must click on the link in the e-mail to activate your account. Be sure the e-mail address you enter in this form is accurate!
PROCEED WITH CAUTION
The username and e-mail address you enter in the sign-up form cannot already be used by another WordPress account or you’ll receive an error message prompting you to select an alternative.
Finally, it’s a good idea to click the link below the Sign up button to read the fascinating terms of service, which you automatically agree to by submitting the form.
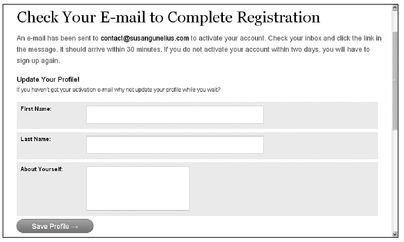
After you’ve completed the form, click the Sign up button to register your new account and blog. When you do so, a page opens like the one shown in Figure 6-3. This notifies you that an e-mail has been sent to the address you provided when you registered your account with a link you need to follow to activate your new WordPress account.
Figure 6-2 Complete this form to create your WordPress account.
Figure 6-3 Registration and activation of your blog is not complete until you receive the registration e-mail.
Notice in Figure 6-3 that you’re given two choices to proceed. You can either wait to receive the e-mail from WordPress to activate your account and blog, which typically only takes a few minutes to arrive, or you can make some basic entries to your profile first. I recommend waiting to create your personal profile until you activate your account via the e-mail you receive from WordPress. You’ll need to visit this section of your WordPress account once it’s activated to access and update even more settings. To save time, you can do it all at once after your account is activated, as described later in this chapter.
DEFINITION
Your WordPress profile is similar to a short biography you create by filling in fields from the My Profile section of your WordPress dashboard. It can include your name, contact information, and other details about yourself you want to share. If you prefer, you can also publish your personal information on a separate “About” page on your WordPress blog.
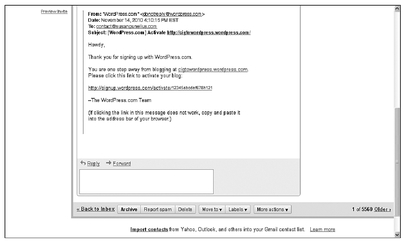
If you choose this option, you don’t have to do anything on the WordPress registration completion page shown in Figure 6-3. Instead, click the link in the activation e-mail shown in Figure 6-4 to activate your new
WordPress.com blog.
Figure 6-4 To complete your WordPress account registration, click the link sent in your activation e-mail.
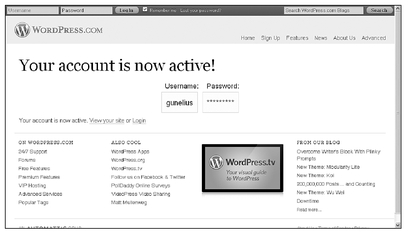
Once you click the activation link in your registration e-mail from WordPress, you’ll be taken to the Your account is now active! page, shown in Figure 6-5, where you can log in to your new account.
Figure 6-5 When your account is active, you can view your WordPress blog or log in to your account.
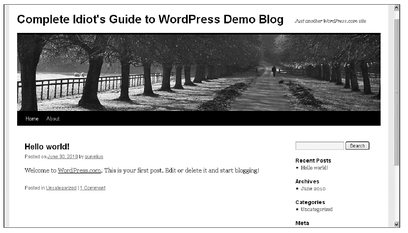
Notice on this page that you can follow a link to View your site or Login to your WordPress account. Click the View your site link near the center of the page, so you can see your new blog. It should look just like the one in Figure 6-6.
Figure 6-6 A new WordPress blog looks good right out of the gate!
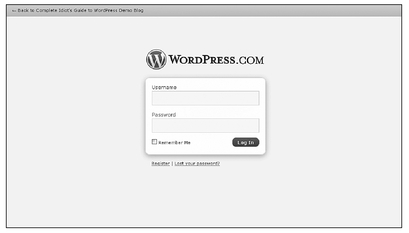
It’s that easy to create your own WordPress blog shell. Now, you just have to customize it and add content! To get started, click the Login link in the center of the page, as shown in Figure 6-5, to open the login page for your blog, shown in Figure 6-7. Enter your username and password.
QUICK TIP
Bookmark the WordPress login page in your web browser so it’s easy to find when you need to log in to your WordPress account later.
Figure 6-7 Enter your username and password to log in to your WordPress dashboard.
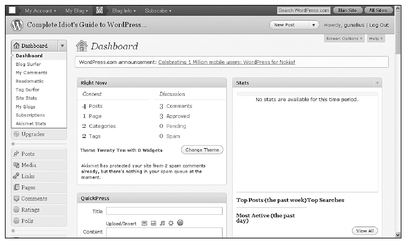
Click the Log In button to open your WordPress account and go to your WordPress dashboard, shown in Figure 6-8. Your WordPress dashboard is where you can make all the changes, enter all the content, and do all the things you want to do to your blog. If your dashboard doesn’t open automatically, click the Dashboard link in the My Blog drop-down list in the top navigation bar that appears after you log in.
The remainder of this chapter helps you understand what all those links and sections on your WordPress dashboard are about, and in later chapters, you learn how to use the majority of these components to personalize your blog.
Figure 6-8 All your blog-management tasks are easily accessible from your WordPress dashboard.
Your Dashboard’s Admin Bar
The easiest place to start is with the Admin Bar, the navigation bar that spans the width of your WordPress dashboard. This navigation bar, visible above all WordPress.com-hosted blogs when you’re logged in to your WordPress account, includes four primary links with drop-down menus providing additional links:
• My Account
• My Blog
• Blog Info
• Subscribe
In addition, to the right of the Admin Bar, you’ll see a search box. Here you can input keywords to search within your own blog or to find other WordPress.com-hosted blogs related to topics of interest to you.
My Account
The My Account link and sublinks in the Admin Bar allow you to navigate to a number of useful features.
New Quick Press Post This link opens a rudimentary blog post editor where you can input and publish blog posts quickly.
Edit My Profile Your Public Profile is available to anyone with Internet access. You can add as much or as little information to this profile as you want to help people get to know you.
Read Freshly Pressed Quickly navigate to the Freshly Pressed section of
WordPress.com, which shows the 10 handpicked posts published by
WordPress.com users each day as chosen by the
WordPress.com staff.
Read Posts I Like When you visit other
WordPress.com blogs, you can click the
Like button in the top navigation bar of any blog post on
WordPress.com to add that post to your list of Likes accessible through your WordPress dashboard. Once you “like” them, you can easily find them again later.
Read My Subscriptions To quickly access and read WordPress.com-hosted blogs you enjoy, you can subscribe to and read them in this section of your account.
Manage My Subscriptions If you want to receive e-mail messages when specific WordPress.com-hosted blogs are updated with new posts, you can add and manage e-mail subscriptions in this section of your account.
Track My Comments See when people reply to comments you’ve left on
WordPress.com blogs in this section of your account.
Global Dashboard This page provides information from WordPress, as well as links to new and popular posts from other WordPress.com-hosted blogs.
Get Support This link provides information about all aspects of the
WordPress.com application.
Log Out You can log out of your WordPress account by clicking this link in the My Account menu.
INSIDER SECRET
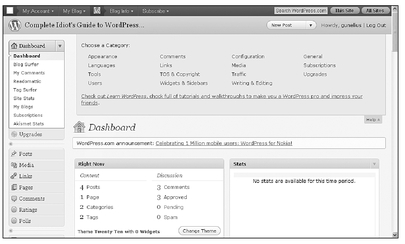
To reveal a list of links to specific sections of the Support site, as shown in Figure 6-9, click the Help link on the right side of your main WordPress dashboard screen located directly beneath the Log Out link.
My Blog
The My Blog link and sublinks in the Admin Bar allow you to navigate to a number of useful features and frequently used features related to your own blog.
Dashboard You can quickly navigate to the main page of your WordPress blog’s dashboard by clicking the Dashboard link.
New Post When you log in to your WordPress account, this link makes it easy for you to quickly navigate to the new post section of your dashboard.
Site Stats Here you can access high-level statistics related to your blog’s performance.
Manage Comments Quickly navigate to your comments screen to moderate, edit, approve, or delete comments submitted to your blog posts.
Read Blog Click on this link to visit your blog’s live home page.
Register a New Blog It’s very easy to create a brand-new blog. Just click this link!
Blog Info
The Blog Info drop-down menu includes links you might use when you’re visiting other WordPress.com-hosted blogs.
Random Post Select this link to view a randomly selected post on the WordPress.com-hosted blog you’re visiting.
Get Shortlink If you use Twitter or another tool where you need to shorten URLs to links, you can automatically shorten the URL to any
WordPress.com blog page by selecting
Get Shortlink from the Blog Info drop-down menu.
Report as Spam If you visit a
WordPress.com blog you believe is spam, click this link to report it.
Report as Mature If you visit a
WordPress.com blog you think is only appropriate for adult audiences, click this link to report it as such.
Subscribe
If you find a
WordPress.com blog you enjoy, you can subscribe to it and receive e-mail messages when that blog is updated with new posts. Just click the
Subscribe link to add and manage your e-mail subscriptions.
INSIDER SECRET
When you’re actually navigating your WordPress account dashboard, you’re far more likely to access features and tools using the links in the left menu, rather than through the Admin Bar.
The first thing you’re likely to notice when you arrive at your WordPress dashboard (shown in Figure 6-8) are the many boxes of information, called modules, across the largest part of the page. You can completely customize this section, and you can show a huge amount of information about your blog here, depending on the boxes you choose to display and where you display them.
You can click on the header of any module on your dashboard to drag it to another area of the page, so the modules you’re most interested in are visible above the fold. If you prefer, you can minimize or maximize sections by clicking on the drop-down arrow in the right corner of each module’s title bar.
DEFINITION
The content visible on a web page without requiring scrolling is referred to as being above the fold, similar to how information in the top half of a folded newspaper’s front page is visible without having to unfold or flip the newspaper to view it.
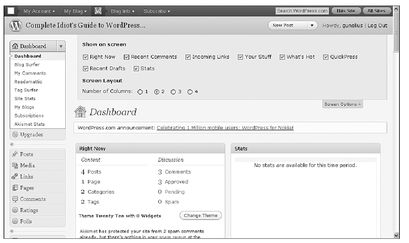
You can also click on the Screen Options link near the top-right side of your dashboard to reveal a hidden menu of options, shown in Figure 6-10. These options let you configure the layout of your dashboard modules in a 1-, 2-, 3-, or 4-column layout.
Figure 6-10 You can customize your dashboard layout by selecting or unselecting what options you show on-screen.
The modules available on the Screen Options section of your dashboard include the following:
Right Now This module gives you a quick snapshot of your blog’s setup and content with links to access additional information within specific sections of your WordPress dashboard. For example, you can see how many posts, pages, and comments have been published, if any posts or comments are pending review before being published, and more.
Recent Comments This module shows you the five most recent comments submitted to your blog so you can review and respond to them accordingly, without having to navigate to the Comments section.
Incoming Links This module uses Google Blog Search to generate a list of the most recent links from other blogs to yours with the active URL the links came from, so you can visit those blogs.
Your Stuff This module shows a snapshot of your recent
WordPress.com activity, both on your own blog and any comments you’ve submitted to other WordPress. com-hosted blogs.
What’s Hot This module includes the same news and information from across
WordPress.com.
QuickPress If you want to write a rudimentary blog post, you can do so easily from this module.
Recent Drafts If you wrote any blog posts and saved them as drafts until you’re ready to publish them, they will be listed in this module.
Stats High-level statistics related to your blog’s performance are provided in this module with a link to View All. This leads you to the My Blog, Stats section, as discussed earlier in this chapter.
QUICK TIP
Over time, you’ll learn which modules of the dashboard you use most frequently and can configure your dashboard to look and work the way you want it to.
The Dashboard’s Left Menu
The left menu of your
WordPress.com dashboard gets the most use as you configure your blog and publish content. In this section, I introduce you to what you can find in the left menu so you can make sense of all those links!
The Dashboard
Many of the links available under the Dashboard section of the left menu are also available from the My Account link in the Admin Bar. The following links are not available through the Admin Bar:
Blog Surfer You can keep track of blogs you like using here.
My Comments Whenever you submit comments to
WordPress.com blogs, they’re also listed in this section.
Readomattic You can subscribe to the feeds of blogs you enjoy and read them without leaving your WordPress account. You can even subscribe to Twitter profile feeds and view them here.
Tag Surfer Enter keywords in this section’s text field to view posts related to those keywords published on other WordPress.com-hosted blogs.
Site Stats You can access high-level blog stats for your
WordPress.com blog here.
My Blogs This section gives you access to all the blogs you write for. Just click the
Register Another Blog button to add new blogs to your list. You can also change the order, hide, view statistics, or choose your primary blog from this list. If you have multiple
WordPress.com blogs that you registered here, you can also access them through the
My Dashboard link in the Admin Bar.
Subscriptions If you want to receive e-mail messages when specific WordPress. com-hosted blogs are updated with new posts, you can add and manage e-mail subscriptions in this section of your account. Site subscriptions can now be managed under the Subscriptions tab on the
WordPress.com home page.
Akismet Stats Akismet is a comment spam detector and blocker software that comes with
WordPress.com. You can view statistics related to the comment spam Akismet has detected on your blog here.
Upgrades
When you click on the Upgrades link in the left menu of your WordPress dashboard, you’re taken to a page that lists the types of upgrades you can purchase for your WordPress account, along with pricing.
This is the section in which you can add a domain name to your blog, and drop the .
wordpress.com extension on your blog’s URL. Click the
Domains link in the Upgrades section of the left menu to do this. (These features are discussed in more detail in Chapter 13.)
Posts
You can manage all your blog post activities from the Posts section of your WordPress dashboard left menu. You can add new posts, edit existing posts, add or delete categories, and add or delete tags. (These options are discussed in detail in Chapters 9 and 10.)
Media
The Media section provides access to the library of all the images you’ve uploaded to your
WordPress.com account to use in your blog posts or pages. You can also add new images by clicking on the
Add New link in the Media section of the left menu.
INSIDER SECRET
You can upload .jpg, .jpeg, .png, .gif, .pdf, .doc, .ppt, .odt, .pptx, and .docx files to your free WordPress account. You can’t upload video files unless you pay for an upgrade to your WordPress account. Audio files require a separate space upgrade as well.
Links
The Links section of the left menu is where you can manage lists of links to blogs and websites you like, including your blogroll. You can add new links, manage existing links, and create categories to group your links lists, which you can easily add to your blog’s sidebar, as discussed in Chapter 8.
Pages
You can add, edit, delete, and manage the pages included in your blog through the Pages section of the left menu. (Pages are explained in detail in Chapter 11.)
Comments
In the Comments section of the left menu, you can access, moderate, edit, and quickly reply to all comments submitted to your blog. (Comment settings are explained in Chapter 7, and comment management is discussed in Chapter 12.)
Ratings
Through the Ratings section of the left menu, you can allow visitors to your blog to rate your blog posts, pages, or comments using a star rating system or a voting (thumbs up or thumbs down) system. (Ratings are discussed in detail in Chapter 12.)
Polls
You can quickly and easily use the Polls section of the left menu to create custom polls to publish on your blog. (For details, be sure to read Chapter 12.)
Appearance
You’re likely to spend a lot of time using the Appearance section of your WordPress account, because it’s through these links that you can change your blog’s theme, header, sidebar, and so much more (as discussed in Chapter 8).
Users
From the Users section of the left menu, you can add new users to your
WordPress.com account. This enables them to access your blog to publish posts and perform other tasks you require of them. (You can learn to send invitations to join your blog and configure access settings in Chapter 12.)
Tools
You can access a number of features through the Tools section of the left menu of your WordPress dashboard. These features help you easily perform tasks like publishing content via e-mail, importing blogs to your WordPress account, or exporting blogs to another platform. You can even delete your entire site through the Tools section of your account. (Each of these capabilities is described in Chapter 12.)
Settings
The Settings section of your account is where you configure all your global WordPress account settings that affect multiple parts of your blog’s functionality. Configuring your blog settings is the first thing you should take time to do after you create your blog. (Each setting is discussed in detail in Chapter 7.)
The Least You Need to Know
• Creating a new
WordPress.com account and blog takes just a few minutes.
• You can use the links in the WordPress Admin Bar and WordPress dashboard to configure your blog, publish content, and network with the WordPress user community.
• Many of the same settings and features can be accessed from multiple links and sections of your WordPress account dashboard. It’s not as confusing as it might look at first.
• It’s unlikely that you’ll use every link and feature available through your
WordPress.com account and dashboard, so don’t feel like you have to memorize everything right now.
