Chapter 8
Modifying Your Blog’s Appearance
In This Chapter
• Choosing a WordPress theme
• Adding widgets to your blog
• Configuring your blog’s menus
• Changing your blog’s background and header
• Adding fonts and editing your blog’s style sheets
Your settings are configured, thanks to your work in Chapter 7, and your blog is ready to function the way you want it to. Now, it’s time to make your blog look the way you want it to by modifying its design and appearance.
This chapter shows you how to pick a theme for your WordPress blog, add additional widgets and menus to it, and make your header and background look great. I also introduce you to some of the more advanced design options available if you’re ready to take your blog to the next level of customization.
Themes
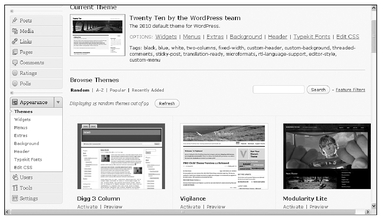
WordPress.com blogs are built from skeleton layouts called themes. You can access approximately 100 free themes through the Themes link in the Appearance section of your WordPress dashboard left menu, as shown in Figure 8-1.
At the top of the Manage Themes page, you see the theme that’s currently activated on your blog. To change your blog’s theme, you can browse through the various themes available using the links under the Browse Themes heading. You can list themes in random order, alphabetically by theme name, by popularity, or from newest to oldest based on when they were added to the directory. You can also enter keywords in the search bar on the right to search themes that have been keyword-tagged.
Figure 8-1 Select your blog’s theme from the Manage Themes page of your WordPress dashboard.
WordPress offers several primary theme layouts: 1 column, 2 column, and 3 column. When you preview different themes, take some time to click the different links and view how different pages, posts, and parts of your blog would look using that theme. You might fall in love with a particular WordPress theme’s home page layout, but you might not like the layout of the interior pages, posts, sidebars, or footer.
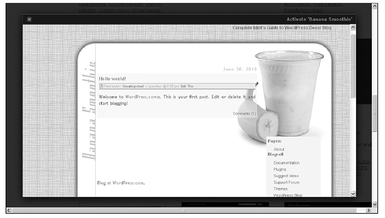
When you find a theme you like, click the Preview link beneath the thumbnail image of the theme to view it, as shown in Figure 8-2.
Figure 8-2 You can preview any theme before selecting and activating it on your blog.
QUICK TIP
Click the X in the upper-left corner of the preview window to close it and return to the Manage Themes page of your WordPress dashboard.
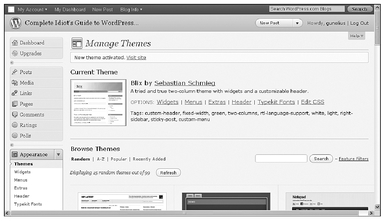
When you find the theme you want to use on your blog, click the Activate link under the theme’s thumbnail image. Once you activate a theme, it’s automatically live on your blog. When you visit your blog, a message appears at the top of the Manage Themes page of your WordPress account that says New theme activated. Visit site, as shown in Figure 8-3. Click the Visit site link to view your new blog look. Your newly activated theme is also displayed under the Current Theme heading on the Manage Themes page.
Figure 8-3 When you activate a new theme, it immediately appears as your Current Theme in your WordPress account.
Widgets
Depending on the WordPress theme you choose, you can add widgets to a variety of places on your blog. For example, some themes allow you to add widgets in multiple sidebars, while others only offer one sidebar. Furthermore, some themes provide widget-ready footers, but others do not.
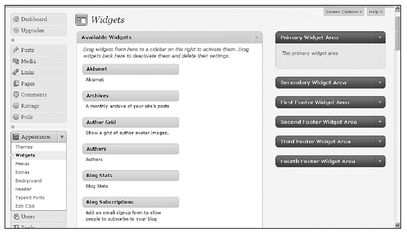
Regardless of what theme you use on your blog, the process of adding widgets to your blog is always the same, thanks to the easy drag-and-drop function you can access through the Widgets link in the Appearance section of your WordPress dashboard left menu, as shown in Figure 8-4.
Figure 8-4 Drag-and-drop widgets to add functionality to your blog.
The widgets available to you are shown in the center of the Widgets page, along with a brief description of what each does. To the right are the various widget-ready sections, referred to as widget modules throughout this book, of your blog. These are typically sidebar or footer areas.
To add widgets to the available widget modules, just click the drop-down arrow in the right corner of the widget module title bar where you want to add a widget. This expands that widget module and displays any widgets already active in that section of your blog. To add a new widget, click the widget title bar and drag it to the widget module where you want the widget to appear on your blog. You can change the order of your widgets by dragging and dropping them to new locations within the widget module.
Then you need to configure the new widget. For example, you can create custom titles on most widgets. For others, you can add links, images, and more.
INSIDER SECRET
Take some time to experiment with the various widgets available. You can’t break your blog by adding them, and you can always delete them if they don’t work for you and your blog.
To edit a widget that’s already active in a widget module, simply click the drop-down arrow in the right corner of the widget module title bar and then do the same on the specific widget title bar you want to edit. This expands it and reveals the available configuration options. After you make your changes, you must click Save for your edits to go into effect. You can also remove widgets by clicking the Delete link.
Sometimes you might want to remove a widget from your blog temporarily. To avoid re-creating the configurations of that widget again when you want to reactivate it later, simply drag and drop it from your active widget module to the Inactive Widgets section of your Widgets settings page, as shown in Figure 8-5. (You might have to scroll down to see this area of the page on your screen.) All your settings will be saved, and you can simply drag and drop the widget back to the appropriate widget module later to re-activate it.
Figure 8-5 Move widgets you don’t want to use but may want to re-activate later to the Inactive Widgets area.
The widgets you use on your blog are entirely up to you, but you can learn more about choosing widgets in Appendix B.
Menus
Some WordPress themes allow you to publish custom menus using the Menus link in the Appearances section of your WordPress left menu, as shown in Figure 8-6.
Figure 8-6 You can create custom menus for your WordPress blog.
If your chosen theme allows custom menus, the features on the Menus page of your WordPress dashboard will be active. Some themes even allow you to create primary and secondary menus!
Your blog’s menus are used in the navigation bar that typically appears at the top of your blog and most often includes links for visitors to quickly access the pages of your blog. Common navigation bar links include an About page and Contact page, as mentioned in Chapter 5.
Using the custom menus feature available through
WordPress.com, you can easily change the links included in your navigation bar, add or remove links, and even include links to pages on other websites.
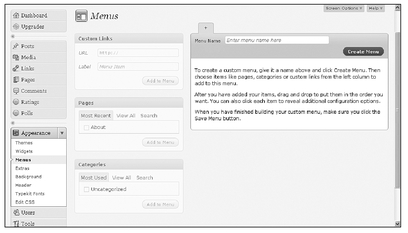
To create a custom menu for your blog, open the Menus page from your WordPress dashboard (shown in Figure 8-6), enter a name for your new menu in the Menu Name text box, and click the Create Menu button. Once your menu is created, you can access the various modules to configure it, as shown in Figure 8-7.
To add links to your menu, use the Custom Links, Pages, and Categories modules. Simply enter a URL and label for the new menu item in the Custom Links module to add a link to an external website in your menu. Click Add to Menu to add the link to your custom menu.
To add pages to your menu, click on the tabs in the Pages module to find the specific pages you want to add. Check the boxes next to pages you want to add to your menu, and click Add to Menu to add them to your custom menu.
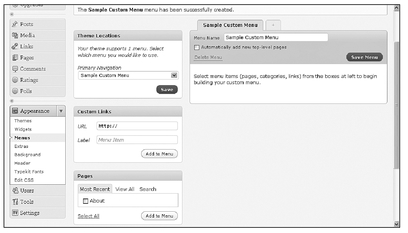
Figure 8-7 Once you create a new menu, you can customize it by adding links, pages, and more.
To add links to categories of posts on your blog, click on the tabs in the Categories module and check the boxes next to the categories you want to include in your menu. Click Add to Menu to add the selected category links to your menu.
If you want to change the label used for the link for an item in your menu, you can click on the drop-down arrow on the right side of the menu item’s title bar to expand it. Just enter the new label in the Navigation Label text box. The only place this new title will appear is in the actual navigation bar.
Once you have all the links added to your menu, you can drag and drop them to change the order they’ll appear in on your blog navigation bar. You can also drag and drop menu items to the left and right to create submenus within your navigation bar.
Extras
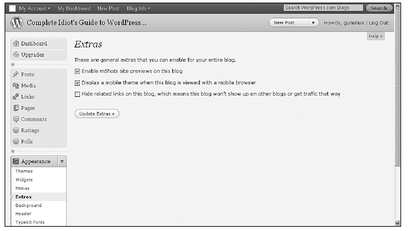
In the Extras link in the Appearance section of your WordPress dashboard, you have three settings you can configure for your blog, as shown in Figure 8-8.
The first option allows you to Enable mShots site previews on this blog. mShots are little pop-up preview windows that open when visitors to your blog hover their mouse arrow over links in your content.
Figure 8-8 Select your preferred options from the Extras settings page.
There are two disparate opinions about preview windows. Some people think they’re useful because they can eliminate the need to click through to visit sites people aren’t interested in. However, some people find them intrusive and annoying. It’s up to you to decide whether or not you want to use mShots on your blog.
QUICK TIP
To help you decide for or against mShots, enable them and then visit your blog to get an idea of how they affect the user experience. If you find you don’t like mShots, return to the Extras settings page in your WordPress account and uncheck this box.
The second option on the Extras page allows you to Display a mobile theme when this blog is viewed with a mobile browser. When this box is checked, people who view your blog through mobile devices will see it in a stripped-down, mobile-friendly layout, which increases load times and can make it easier for more people to easily view your blog on new and old mobile devices. If you want visitors to see your blog in its original online format when they access it from mobile devices, uncheck this option.
The final option on the Extras settings page allows you to show or
Hide related links on this blog, which means this blog won’t show up on other blogs or get traffic that way. When this option is unchecked, posts across the
WordPress.com user community that are automatically deemed to be related to your own blog post will be listed at the end of your post with links to visit those other blogs. Additionally, your own posts might appear as related links on other
WordPress.com blogs.
Whether you enable or disable this option depends on your goals for your blog. You can’t control the related links that are published on your blog, nor can you control where links to your blog posts are published across the
WordPress.com community of blogs. You might not like the related links published on your blog through this feature, and you might not like where links to your content are published on other sites. If you have those concerns, check this box. Related links will be hidden on your blog, and your blog links are not published on other blogs.
Be sure to click the Update Extras button to save the changes you make to your Extras settings.
Background
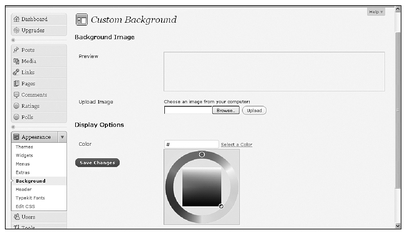
Some WordPress themes give you the option to change your blog’s background, or the area that appears on-screen to the left and right of your actual blog posts. To do this, select the Background link from the Appearance section of your WordPress dashboard left menu. This opens the Custom Background page of your WordPress account, as shown in Figure 8-9.
Figure 8-9 You can easily customize your blog’s background color or image.
You have two options to customize your blog’s background. You can either upload an image, or you can select a color. To upload an image, simply select the Browse button in the Upload Image section of the Custom Background page to find the image on your hard drive. Once you select the image file, click Upload to upload it to your WordPress account and set it as your blog background. You can see how your background will look in the Preview section of the Custom Background page.
QUICK TIP
Images must be in .jpg, .jpeg, .png, or .gif format and under 1GB in size.
To select a color for your blog background, click the Select a Color link in the Display Options section of the Custom Background page and use your mouse to select the color you want to use. Alternatively, you can type the HTML color code into the text box if you know it.
Click the Save Changes button to immediately activate your blog’s new background.
Header
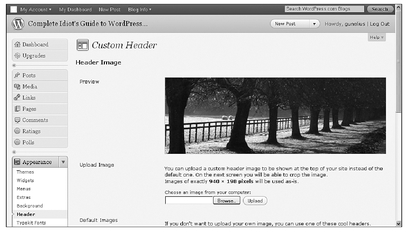
Some WordPress themes include an image in the header area, and you can change this default image to one of your choice. Changing your blog’s header is easy and can make a big difference in personalizing your blog. To do so, select the Header link from the Appearance section of your WordPress dashboard left menu to open the Custom Header page, as shown in Figure 8-10.
Figure 8-10 WordPress makes it easy to add a custom header image to your blog.
The Custom Header page is divided into several sections:
Preview In the preview area, you can view your selected blog header to get an idea of what it will look like on your live blog.
Upload Image If you want to upload an image from your computer to use as your blog’s header, you can click on the Browse button to find it on your hard drive. Then click Upload to load it to your WordPress account and activate it as your header.
INSIDER SECRET
Depending on your chosen theme, the perfect size for your header image can vary. Typically, that size is provided in the Upload Image area of the Custom Header page. However, you are given the option to crop your uploaded image if necessary.
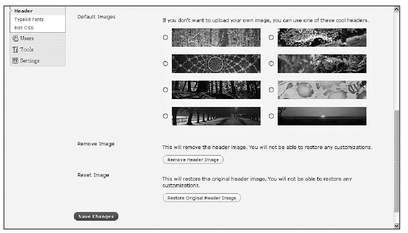
Default Images Some WordPress themes come with several different default images you can choose from to use in your blog’s header, as shown in Figure 8-11. To select a default image, just click on the radio button next to the image you want to use.
Figure 8-11 WordPress offers you several header images to customize your blog.
Remove Image If you want to remove an image from your header, you can do that by clicking Remove Header Image. When you remove a header image, any customization settings you created previously are deleted and cannot be restored unless you re-create them.
Reset Image If you want to restore the original header image and configurations that came with your chosen WordPress theme, click the Reset Image button. Keep in mind that you can’t restore any customization settings once you reset your header image.
Some themes might offer additional options you can configure. If so, you might find a Theme Options section or other links within the Appearance menu. If the theme you choose offers more personalization options, take some time to test them out and truly make your blog your own!
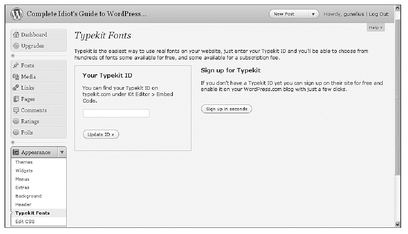
Typekit Fonts
The WordPress theme you choose to use for your blog comes with specific fonts by default. What if you want to change those fonts or add new ones? You’re limited in the amount of changes you can make to your blog’s design unless you pay for a CSS upgrade (discussed in Chapter 13), but you can add some fonts through the
Typekit Fonts link in the Appearance section of your WordPress dashboard left menu, shown in Figure 8-12. Click the
Sign up in seconds button to create your own free trial account at
Typekit.com.
Figure 8-12 It’s simple to access and add Typekit fonts to your blog.
Once you have a
Typekit.com account, you can enter your Typekit ID into the
Your Typekit ID text box and click
Update ID to link your
WordPress.com blog with your Typekit account. From there, you need to add your
WordPress.com account information into your Typekit account and configure settings from that site.
It’s important to point out that at the time of this book’s writing, the free version of Typekit only allows one site (or blog) and two fonts on that site. You also have to display the Typekit badge on your blog when you use it. To access more fonts or use Typekit on more than one site, you have to pay for a personal account, which currently costs $24.99 per year. It might be more economical to purchase a CSS upgrade for your WordPress account so you get access to modify far more than just fonts in your blog’s design. Take the time to research what’s available and what works best for you before you pursue either option.
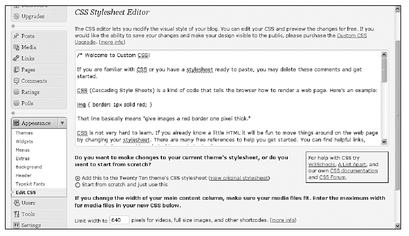
Edit CSS
You can access the CSS coding for your blog by selecting the Edit CSS link from the Appearance section of your WordPress dashboard left menu, as shown in Figure 8-13.
Figure 8-13 Make changes to your blog’s CSS style sheet to modify your blog design.
Unless you pay for the
Custom CSS Upgrade option from
WordPress.com (discussed in Chapter 13), any changes you make on this page can be previewed by selecting the
Preview button, but you can’t save or activate them on your live blog.
It’s important to point out that if you want to edit your blog’s CSS, you might want to consider using
WordPress.org, which offers complete CSS control and blog customization, rather than
WordPress.com. You can learn more about using
WordPress.org in Part 4.
The Least You Need to Know
• You can choose from approximately 100 free WordPress themes to make your blog look unique.
• Widget-ready themes make it easy to add more features to your blog.
• You can customize your blog’s navigation bar labels and settings using WordPress’s menus function.
• Some themes allow you to upload your own header and background images for additional customization.
• Extensive customization may require a monetary investment in additional functionality and features.