Chapter 9
Creating Blog Posts
In This Chapter
• Penning a new blog post
• Editing with the post editor
• Adding categories, tags, and excerpts
• Configuring your blog post functionality
• Scheduling and publishing blog posts
Once your blog is live on the web, it looks the way you want it to, and it’s configured to work the way you want it to, it’s time to start publishing content.
Your posts are the heart of your blog. When blogs first hit the scene, they were little more than online diaries, but today, you can write blog posts about anything you want.
WordPress.com makes it easy to be an online publisher because the process of writing and publishing blog posts takes a matter of minutes. If you can use a traditional word processing program like Microsoft Word, you can create and publish blog posts using
WordPress.com.
In this chapter, you learn how to create a very basic new blog post (you learn to add bells and whistles in Chapter 10) and what all the boxes, links, and buttons you see when you add a new post actually mean. As with most aspects of WordPress, you might find that you don’t even use some of the tools available to you, but they’re there if you need them. This chapter teaches you what to do with them when that day comes.
Writing a New Post
The first step to publishing a new blog post is to log in to your
WordPress.com account and click the
New Post link in your top navigation bar. Or you can navigate to any page within your WordPress dashboard and click the right drop-down arrow in the
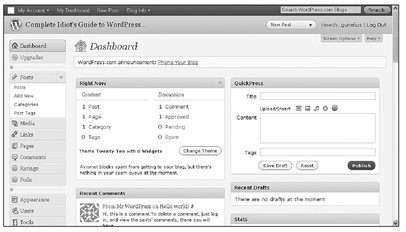
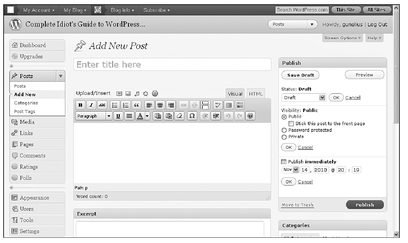
Posts section from the left menu to reveal the link options available to you, as shown in Figure 9-1. Click the
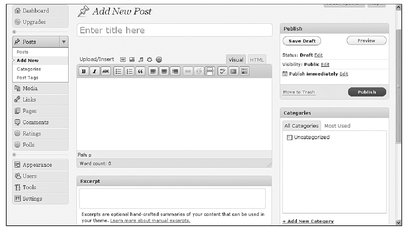
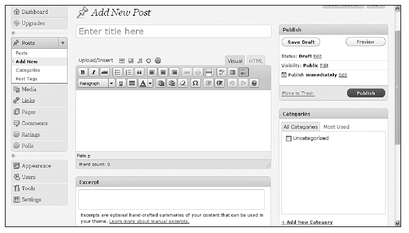
Add New link to open the Add New Post page, shown in Figures 9-2 and 9-3.
Figure 9-1 You can start a new blog post by clicking the New Post link or the Add New link.
The Add New Post page is where you create and publish new blog posts. Your screen is divided into a number of modules in which you can enter your post title and body as well as configure settings and options for that specific post.
Figure 9-2 You can create a new blog post on the Add New Post page.
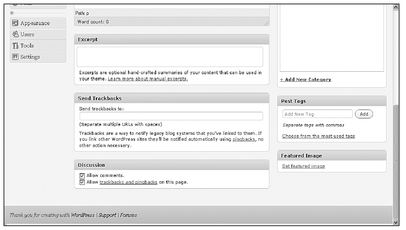
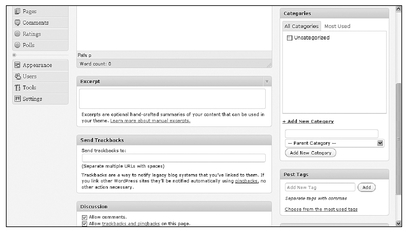
Figure 9-3 Scroll down to reveal more options on the Add New Post page.
INSIDER SECRET
Depending on your WordPress theme, you might see more modules on your screen than what’s shown in these screenshots, but the primary modules discussed here should always be visible.
The text box located directly beneath the Add New Posts heading is the title box, where you type the title of your blog post. Try to make the title interesting to entice readers to keep reading. Also, you can include keywords in your title to boost search engine rankings.
When you’ve added a title for your post, you can move on to the first module, located directly below the title box. This is your post editor, and it’s where you’ll enter the body of your new post.
Along the top of the post editor, you can see a number of icons and links. Each of these can help you create or modify your blog post. Hover your mouse over each icon to get a pop-up that tells you what that icon is for.
Choosing a Post Editor
In the upper-right side of the post editor you’ll see two tabs: Visual and HTML. When you click on these tabs, you switch back and forth between the Visual post editor mode and the HTML post editor mode. You can see how the Visual post editor mode looks in Figure 9-2. Notice that the various icons in the Visual editor toolbar look like icons you’re probably already familiar with from your word processing software—for example, bold, italics, bullets, alignment, and so on.
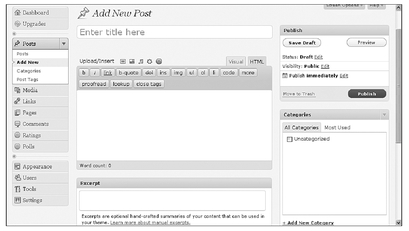
When you click on the HTML tab and switch to the HTML post editor (shown in Figure 9-4), the icons at the top of the post editor change and probably aren’t familiar to you unless you know some HTML. These icons help users quickly apply HTML codes to the text in their blog posts.
Figure 9-4 The HTML post editor is best for people who know some HTML.
Most people use the Visual editor, even if they know some HTML, because it’s faster. However, the HTML editor is extremely helpful in enabling you to add far more enhancements and customization to your blog post content than you can achieve with the Visual editor. That’s just one reason why learning some HTML can help you as a blogger. While it’s certainly not essential, it can make your life easier to know some HTML.
Entering Your Post Body Content
Click on the Visual tab on the Add New Post page to be sure you’re using the Visual post editor, as shown in Figure 9-2. It’s time to enter the content for your first blog post! Go ahead and start typing your content into the post editor. Use the icons in the menu bar to add text enhancements. To reveal additional icons, click on the icon with the various colored squares on it (when you hover over it, the pop-up says Show/Hide Kitchen Sink) to reveal even more icons, as shown in Figure 9-5.
Figure 9-5 Reveal the post editor “kitchen sink” for formatting options.
QUICK TIP
As you type your post, there’s always the possibility that your Internet connection could go down or your electricity could go out. You don’t want to lose your work.
WordPress.com does have an autosave feature, but it’s a good idea to get into the habit of clicking the
Save Draft button as you’re writing. Find it in the
Publish module located in the upper-right side of the Add New Post page.
As you’re typing your blog post, you can click the Preview button in the Publish module located in the upper-right side of your screen to see how your post will look on your blog when you publish it. This is a great way to be sure your posts look perfect before you publish them, because what you see in your post editor isn’t always exactly what you’ll see when your post is live on your blog.
Applying Categories
Once your post is written, you can assign a category to it to make it easier for visitors to find other content similar to this post in other posts in your archives. Locate the Categories module on the right side of your screen. To add a new category, click the + Add New Category link at the bottom of the module, as shown in Figure 9-6, and type a name for your new category. If you want the new category to be a subcategory of an existing category, click the drop-down menu and select that parent category. Click the Add New Category button to save that category to your existing list of categories.
Figure 9-6 You can add as many categories to your blog post as you want.
To add a post to an existing category, check the box to the left of that category in the category list to select it.
Tagging Posts
When you use WordPress as your blogging application, you have the option of adding tags to your posts, which helps drive search engine traffic to your blog. Take a few minutes to type in a series of keyword tags into the text box in the Tags module located on the right side of your screen, as shown in Figure 9-3.
You can add as many tags as you want, but avoid adding an overwhelming number of keyword tags because search engines might view that as a form of spam. Include a comma after each keyword tag, and click Add to attach them to your post.
INSIDER SECRET
Depending on the WordPress theme you’re using for your blog, the tags you add to posts may or may not be visible on your live blog. That’s okay. They’re saved with your blog post when you click the Add button.
Writing an Excerpt
Directly beneath the blog post editor module is the Excerpt module, shown in Figure 9-3, where you can enter a summary of your blog post.
Entering an excerpt in this text box is entirely up to you. The excerpt can be used as the description in search engine results pages, so it can be helpful to take a few minutes to write a well-crafted, intriguing excerpt to try to convince people who find your post via keyword searches to click through and visit your blog to read the complete post.
Sending Trackbacks
Trackbacks, introduced in Chapter 4, are virtual shoulder taps to other bloggers letting them know you linked to their content on your blog. When another blog accepts your trackback, a link to your post is published in the comments section of the other blogger’s post. Furthermore, when other bloggers link to your content and send a trackback to you, links to their posts are included in the comments section of your posts, if your blog is configured to accept trackbacks (as discussed in Chapter 7).
Trackbacks are a great way to increase potential traffic to your blog and get on the radar screens of other bloggers who accept trackbacks. With that in mind, it’s a good idea to send trackbacks to other bloggers when you link to their content by copying and pasting the URL for the page you linked to in your post in the Send Trackbacks box before you publish your blog post. If the other blogger accepts trackbacks, a link to your post will automatically be published in the comments section on that blogger’s post, giving your post additional exposure to a new audience.
QUICK TIP
If you’re linking to another
WordPress.com blog, you don’t need to enter the URL you linked to in the Send Trackbacks box. Trackbacks are automatically sent between
WordPress.com blogs.
Configuring Discussion Settings
The Discussion module, shown in Figure 9-3, is where you can make changes to your global discussion settings (discussed in Chapter 7) for a specific blog post. If you want to allow comments on your post, check the Allow comments box.
Similarly, if you want trackbacks from other blogs to be published in the comments section of your post, check the Allow trackbacks and pingbacks on this page box.
DEFINITION
A pingback, or ping, is an automated verification from one website to another, which typically happens behind the scenes and confirms that a site exists and accepts notifications (such as trackback notifications).
For maximum blog growth and exposure, check both of the boxes in the Discussion module.
Scheduling and Publishing
Your post is written, categorized, and tagged, and you’ve sent any trackbacks you want to send to other bloggers. The final step is to publish your post for the world to see! You can do that with a click of the mouse by selecting the Publish button from the Publish module in the upper right of your screen, as shown in Figure 9-2.
If you’re not ready to publish your post immediately, a few additional options are available in the Publish module, shown in Figure 9-7.
First, you can click the Edit link after Status: Draft to reveal the drop-down menu shown in Figure 9-7. Here you can select whether you want to save the post as a draft to finish later or as Pending Review, meaning it can’t be published until another person with access to your WordPress account approves it. Unless you write a blog for another person, it’s unlikely you’ll use the Pending Review status.
Figure 9-7 Expand the Publish module to reveal more options.
Next, you can adjust the privacy settings on specific posts by clicking the Edit link next to Visibility: Public to reveal the options available to you, as shown in Figure 9-7. Choose a setting that matches your requirements for that post. Selecting the Public radio button allows anyone who visits your blog to see your post in the natural order it was published.
Stick this post to the front page makes it a sticky post, which means it will always appear as the top post on your blog (typically at the top of the home page).
If you don’t want anyone with Internet access to be able to see your blog post, you can select the radio button next to Password protected and type in a password of your choice so only people you give the password to can see the post.
You can make the post completely private and visible to no one by choosing the radio button next to Private.
Once you’ve chosen the visibility settings for your post, you can click the Edit link next to Publish immediately to reveal additional options, as shown in Figure 9-7. These options allow you to set a future date and time for your post to go live on your blog rather than publishing immediately. For example, if you’re going to be away on vacation but want posts to publish automatically in your absence, this is where you can schedule them to go live at a later date. Just enter the date and time when you want your post to go live, and click OK. Notice the Publish button changes to Schedule. Click the Schedule button, and the status of your post shown at the top of the Publish module changes to Scheduled. The post will go live automatically on the date and time you entered. It’s that easy to schedule a post to publish at any time in the future!
PROCEED WITH CAUTION
Don’t click the Move to Trash link at the bottom of the Publish module unless you want to delete the blog post you’re working on.
Once your post is published, you can go to your live blog and see how it looks. Congratulations, you’re now officially a blogger!
The Least You Need to Know
• You can publish a blog post with
WordPress.com in minutes—literally!
• The visual blog post editor in
WordPress.com is similar to word processing software, making it easy for you to work with.
• You can change settings for specific blog posts so they’re different from the global settings you used to configure your overall blog functionality.
• You don’t have to use all the features available to you when you create and publish a new blog post.
