Chapter 11
Adding Pages to Your Blog
In This Chapter
• Comparing posts and pages
• Creating new pages
• Configuring page settings
• Changing or removing pages
Beyond blog posts,
WordPress.com allows you to add another layer to your blog to make it resemble a “real” website—pages. Of particular interest to many bloggers is the flexibility in terms of page navigation
WordPress.com offers.
After you learn about page navigation, page configuration, and page creation in this chapter, you’ll be able to take your blog to the next level of web publishing.
Pages Versus Posts
One of the biggest areas of confusion for new
WordPress.com users is the difference between pages and posts. In simplest terms, pages are typically used for static content, meaning content that doesn’t change often. For example, you can create an About Me page, a Contact page, a Products and Services page if you own a business, and so on. Pages are usually accessible through your blog’s top navigation bar and can be accessed through the Pages widget links, if you include that widget in your blog’s sidebar.
Additionally, pages do not offer categorizing or tagging. Page formatting might also differ from post formatting, depending on the WordPress theme you’re using. In fact, some WordPress themes allow you to have different sidebars for pages versus posts.
On the other hand, posts are published in reverse-chronological order and are usually accessible through archives that list posts by date or category. Sometimes, bloggers include links to tags in their blog sidebars, which is another way visitors can access archived posts. You can control how many posts are displayed on a single archive page—including your blog’s home page—by modifying the Reading settings for your blog (as discussed in Chapter 7).
Furthermore, your blog posts are included in your blog’s RSS feed, while pages are not. (Learn more about feeds and subscriptions in Chapter 19.)
Publishing a Page on Your Blog
Publishing pages on your blog is not that different from publishing posts. Some configuration options differ from post creation to page creation, but the post editor is the same as the page editor. If you can create posts, you can create pages.
Creating a New Page
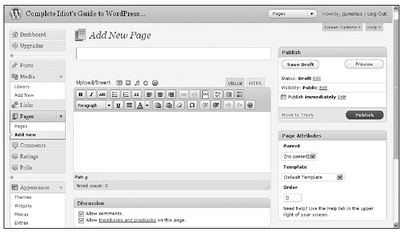
The first step to publishing a new page on your blog is to click on the drop-down arrow next to Pages in the left menu of your WordPress dashboard to reveal the links in that section. Next, click the Add New link to open the Add New Page screen, shown in Figure 11-1.
Figure 11-1 You can enter your page information in the Add New Page screen.
Start your page by entering a title for it in the Title text box, which is the text box located directly beneath the Add New Page heading. Next, enter the body text for your page into the page editor. All the icons available to you through the page editor toolbar are the same as those described in Chapter 10 for the post editor toolbar. As you enter text and images, you can see how your page will look on your live blog by clicking Preview in the Publish module located on the right side of your screen.
QUICK TIP
Be sure to click the
Save Draft button occasionally so you don’t lose your work if your power goes out or your Internet connection goes down.
WordPress.com does autosave your page, but it might not do it often enough for you, especially if you’re making lots of changes. It’s better to be safe than sorry.
In fact, all features in the Publish module work the same way for pages as they do for posts. You can modify the Status, Visibility, and scheduling settings for your page, just as you can modify them for posts (as discussed in Chapter 10).
Configuring Page Attributes
The Page Attributes module located on the right side of the Add New Page window offers you several options to configure the formatting and navigation of your page. If you want your new page to be a primary page on your blog (typically, primary pages appear in your navigation bar and other subpages can be published hierarchically beneath primary, parent pages), be sure the (no parent) option is selected. If you want your new page to be a child of an existing page, click on the drop-down menu and select the desired parent page from the list. Note that the parent page needs to be created first before you can make a new page a child of that parent page. Also, keep in mind that not all WordPress themes offer all these page attribute features.
For example, if you write a blog about making money online, you might want to offer a resources section made up of static pages. The parent page could be called “Resources” and include an explanation of the types of resources available to readers. Child pages could be called “Online Resources,” “Books,” “Seminars,” and “Organizations,” where you can provide specific links and details for different types of resources.
In the Template section of the Page Attributes module, you can select the drop-down menu to see if your WordPress theme offers more than one type of page template for you to choose from. For example, some themes offer specific Contact page templates or page templates with and without sidebars. Select the template you want to apply to your page from the drop-down menu.
The final section of the Page Attributes module is where you can set the order of your pages, which affects how they appear in your blog’s navigation bar. Typically, pages are listed in your navigation bar from left to right in the order they were published. If you want to change that order, you can do so by numbering your pages in your preferred order and entering the number of each specific page in the Order text box for that page.
INSIDER SECRET
You can also configure navigation settings for pages using the Menus link located in the Appearance section of your WordPress dashboard left menu. (See Chapter 8 for more.)
Choosing Discussion Settings
You can set up your pages to accept comments, trackbacks, and pings in the same way you configure those settings for your posts (as discussed in Chapter 10). Most blogs allow comments, trackbacks, and pings on posts to encourage discussion and interactivity—thereby growing their blogs—but allowing them on pages is a different story entirely.
If your blog pages are truly static content, you might not want to allow comments, trackbacks, and pings. For example, do you want people to leave comments on your Contact page? That might not be an appropriate place for conversations.
QUICK TIP
Many comments and trackbacks published on pages are spam. If you notice a lot of spam comments and trackbacks on your pages, you might want to disable discussion on some or all of your blog pages.
Depending on which WordPress theme you’re using on your blog, you may have additional modules available to you on the Add Page window of your WordPress dashboard. Click the Screen Options drop-down arrow in the upper right of the Add New Page screen to see all available modules. Check the box next to any modules that aren’t active to add them to your screen and experiment with them.
Remember, you can’t break your blog by testing out features. If additional options are available to you, try them out and see what they do. You can always remove them if you don’t like them.
Editing or Deleting Pages
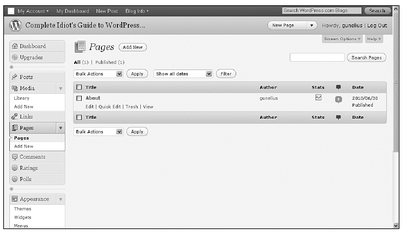
You can edit and delete pages in your blog similarly to how you edit and delete posts. Simply click on the Pages link located in the Pages section of the left menu of your WordPress dashboard. A directory of all of your published, draft, scheduled, and deleted pages is available through this screen, as shown in Figure 11-2.
Figure 11-2 You can access all your pages through the Pages directory.
Note that you’ll only be able to view links to pages identified as Published, Drafts, and Trash under the Pages heading if you have pages saved in those states of publication. If you have a lot of pages and have trouble finding a specific page, you can filter pages by status of publication or by date if you use the drop-down menu provided.
When you locate the page you want to edit, simply hover over the title to reveal links to Edit, Quick Edit, Trash, or View the page. When you click the Edit link, the Edit Page window opens, which looks just like the Add Page window. You can make changes to your post and click the Update link in the Publish module to update your page on your live blog.
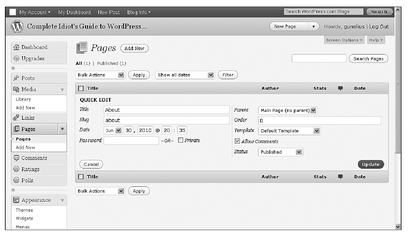
If you click on the Quick Edit link, your page directory screen expands to reveal several editing functions to make simple modifications to your post, as shown in Figure 11-3. Just make your edits and click the Update button to instantly update your page on your blog.
Figure 11-3 Make simple changes to a page with the Quick Edit function.
You can view your page live on your blog at any time by clicking the View link or delete it by clicking on the Trash link. Note your page isn’t completely deleted from your WordPress account until you click the Trash link at the top of the page directory screen (under the Pages heading) and click the Delete Permanently link for that page.
The Least You Need to Know
• Pages live outside the post chronology and archives on WordPress blogs.
• Creating a new page is very similar to creating a new post.
• You can change the navigation and hierarchy of your pages easily with WordPress.
• You can allow comments, trackbacks, and pings on pages or disable the function on specific pages to suit your needs.