Chapter 15
In This Chapter
• Assigning your domain
• Using handy tools to make WordPress installation a snap
• Doing the install the right way
• Considering other installation options
The first steps to using the self-hosted version of WordPress available through
WordPress.org are to assign your domain and install WordPress through your hosting account. That’s exactly what you learn to do in this chapter.
The process of uploading WordPress to your hosting account takes just seconds, thanks to easy-to-use tools most web hosts offer. These tools provide a control panel (or cPanel) and instant access to various software tools that turn previously painstaking tasks into painless ones. This chapter introduces you to a few of the most popular WordPress installation options, so you can choose the one that best matches your skill level and needs.
Note that all screenshots and step-by-step processes described in this chapter use
BlueHost.com as the hosting provider. If you use a different hosting provider, the screens and processes you’ll use might vary from the ones in this chapter. However, the basic concepts are the same. Contact your hosting provider if you have questions or problems with your specific service or account.
Assign Your Domain to Your Web Host cPanel
If you acquired a web hosting account through a provider that offers a cPanel, and you registered your new blog’s domain name through that provider (both are discussed in Chapter 14), you’re ready to assign your domain to your hosting account cPanel and start the WordPress installation process.
You can register as many domains as you’re willing to pay for, but until you assign a domain to your hosting account’s cPanel, you won’t be able to install WordPress to that domain using a one-click installation tool. And it’s a lot easier to install WordPress through your hosting account cPanel using a one-click installation tool rather than trying to do it manually, as you’ll learn later in this chapter.
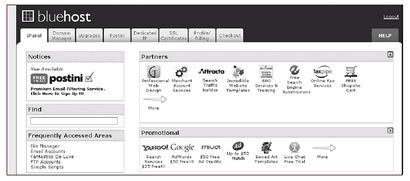
Let’s look at how to assign a domain to your cPanel. First, log in to your hosting account and navigate to the cPanel, as shown in Figure 15-1.
Figure 15-1 The cPanel in a web hosting account.
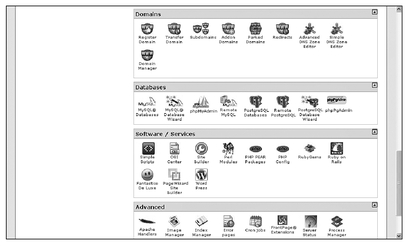
Scroll down to the Domains section, and click the Domain Manager icon, shown in Figure 15-2.
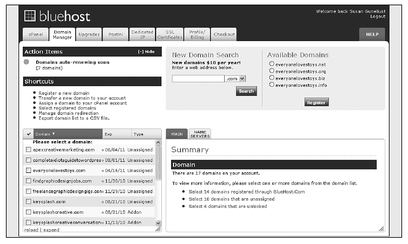
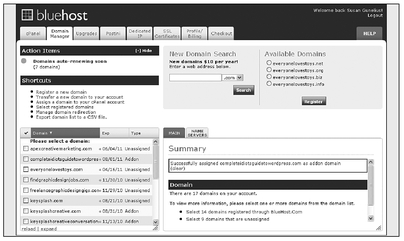
The Domain Management page opens, as shown in Figure 15-3. Here you can manage all the domains you registered through your hosting account.
Figure 15-2 The Domain Manager icon is accessible from the hosting account cPanel.
Figure 15-3 You can manage your domains from your hosting account.
Find the domain you already registered and want to use for your new WordPress blog. It will be listed in your list of domains as Unassigned. Click the Unassigned link next to that domain to open the Domain Assignment Page, shown in Figure 15-4.
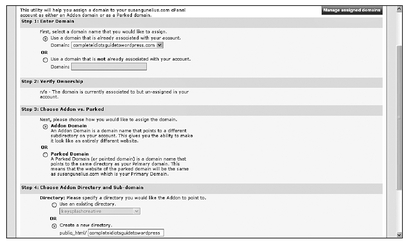
Figure 15-4 Complete the Domain Assignment form to assign your chosen domain to your cPanel.
In Step 1: Enter Domain, be sure the radio button next to Use a domain that is not already associated with your account is selected and confirm that the correct domain you want to use is entered into the Domain: text box. If not, you should change it to the correct domain.
You shouldn’t have to do anything in Step 2: Verify Ownership if you registered the domain through the same web host. You should see a message in this section that reads, n/a—The domain is currently associated to but un-assigned in your account.
In Step 3: Choose Addon vs. Parked, be sure the radio button next to Addon Domain is selected.
DEFINITION
An addon domain is one that points to a different subdirectory in your main hosting account, which enables you to make it look like an entirely new website, different from any others you already created in your hosting account for different domains. A parked domain is one that points to the same directory as your account’s primary domain, so the website for that domain is the same as the one for your primary domain.
In Step 4: Choose Addon Directory and Sub-domain, be sure the radio button next to Create a new directory is selected if you want this domain to act as its own separate site. If you want it to be a subdomain of another domain, you can choose the radio button next to Use an existing directory and choose the existing directory from the drop-down list. For our purposes, select the Create a new directory radio button.
Finally, click the
Add Domain button at the bottom of the page. This returns to the Manage Domains page, as shown in Figure 15-5, where you can see a new message that says, “Successfully assigned
yourdomainname.com as addon domain.” You’ll also see the link next to that domain in your list of domains has changed from Unassigned to Addon.
Figure 15-5 The Summary section of the Domain Management page indicates the domain has been assigned.
You’re now ready to install WordPress to that domain!
Installing WordPress with SimpleScripts
In recent years, SimpleScripts has bypassed Fantastico (discussed later in this chapter) as the preferred method for one-click WordPress installs. That’s because SimpleScripts allows users to upload newer versions of WordPress sooner than Fantastico has been able to offer those versions.
SimpleScripts guides you through the process of installing WordPress. You don’t have to download the WordPress software and then upload it to your WordPress account, as you have to when you do a manual install (discussed later in this chapter). In fact, it’s virtually unnecessary to do a manual WordPress installation, because tools like SimpleScripts can do it all for you!
The first step to using
WordPress.org as your blogging application is to install the WordPress software to your web hosting account. You can begin the WordPress installation process by logging in to your hosting account and navigating to your cPanel, as shown in Figure 15-1.
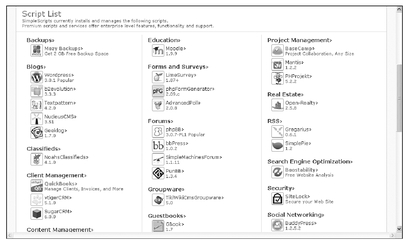
Scroll to the Software/Services section, and double-click the SimpleScripts icon, as shown in Figure 15-2. SimpleScripts opens within your hosting account, as shown in Figure 15-6.
Figure 15-6 The main SimpleScripts page offers access to a variety of applications.
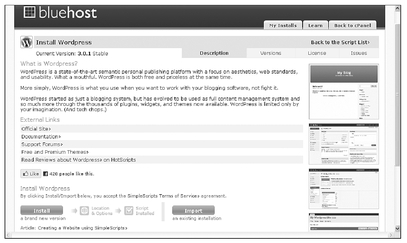
Click the WordPress link to open the main WordPress installation page, as shown in Figure 15-7.
Next, click the Install button to begin the installation process and open the Installation Setup Page, shown in Figure 15-8.
Figure 15-7 Here’s the main WordPress installation page in SimpleScripts.
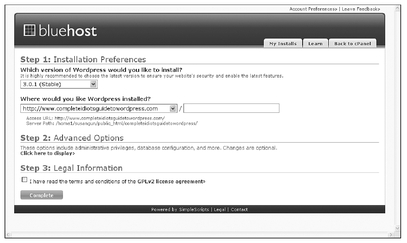
Figure 15-8 Choose where you want to install WordPress on the WordPress Installation Setup Page.
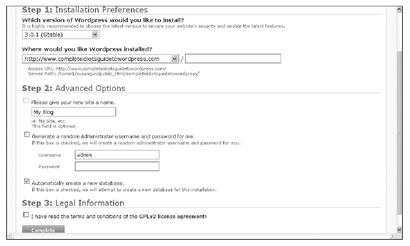
Click the Click here to display link under Step 2: Advanced Options to expand that section of the page, as shown in Figure 15-9.
Figure 15-9 Enter the requested information into the WordPress Installation Setup Page.
In Step 1: Installation Preferences, choose the most recent stable version of WordPress from the drop-down menu and then, in the second drop-down menu, select the domain where you want WordPress installed.
In Step 2: Advanced Options, you can enter the name of your blog, which will display in your live blog. (If you prefer, you can create a title later or change it later through your WordPress dashboard, as described in Chapter 16.) You can also change your WordPress account login username (if you’d like to) and enter a password you’ll use to log in to your WordPress account in the future. Or you can check the Generate a random Administrator username and password for me box. You can always change your password later and create a new user account at a later time through your WordPress dashboard.
In Step 3: Legal Information, check the I have read the terms and conditions of the GPLv2 license agreement box. You can click the link to read the agreement beforehand if you want.
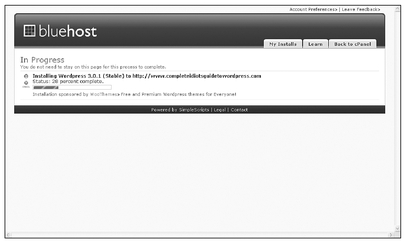
Finally, click Complete to start the installation, as shown in Figure 15-10.
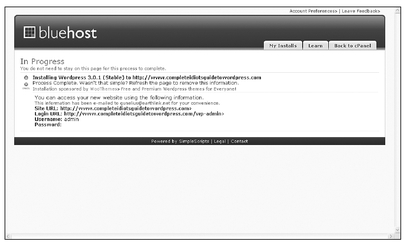
When the installation process is complete and WordPress is fully installed to the domain you chose, the installation In Progress page will update and provide you with links to access your new site live on the web, a link to access your new WordPress account login page, and a reminder of your username and password, as shown in Figure 15-11.
Figure 15-10 You can watch the status of your WordPress installation on the In Progress page.
Figure 15-11 Follow the links on the installation completion page to see your live WordPress blog or log in to your WordPress account.
QUICK TIP
Be sure to copy and save the link to your new blog, the link to log in to your WordPress account, and your username and password so you don’t forget them later. You’ll also receive an automated e-mail with this information from SimpleScripts to the e-mail address you have on file in your web hosting account. It’s also a good idea to bookmark the links in your browser.
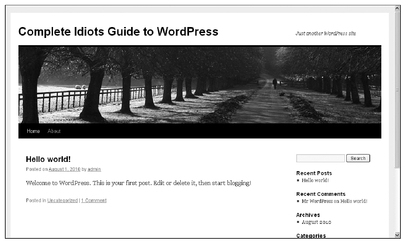
You can click on the Site URL link to see your new WordPress blog in its default form live on the web, as shown in Figure 15-12.
Figure 15-12 Your new blog is instantly accessible online.
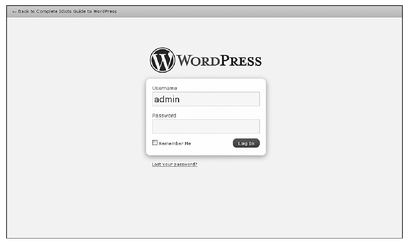
You can click on the Login URL link to access your WordPress account login page online, as shown in Figure 15-13.
Figure 15-13 You can log in to your new WordPress account immediately.
Just type in your username and password to log in to your new WordPress account! It really is that easy!
Other Installation Options
There are other ways to install WordPress, but SimpleScripts has become the most popular option among most users because it’s easy to use and up to date. However, if you’re not comfortable with SimpleScripts, in this section, I offer two other popular options. Be warned, though: they are either not as easy to use or not as current as SimpleScripts tends to be.
Fantastico De Luxe
Fantastico De Luxe is available through many web host cPanels and offers easy and automated WordPress installation in a process very similar to SimpleScripts. In fact, you’re likely to find the Fantastico icon located in the same section of your cPanel as the SimpleScripts icon, as shown in Figure 15-2.
To use, just click on the Fantastico icon in your cPanel and follow the step-by-step instructions to choose your domain and installation preferences. As with SimpleScripts, your new blog will be live online within minutes.
However, you might not be able to install the most current version of WordPress using Fantastico. The easiest process is to simply install the current version offered by Fantastico and then upgrade through your WordPress dashboard to the most current version.
Manual WordPress Installation
Installing WordPress manually takes a bit longer than using a one-click installation tool like SimpleScripts or Fantastico does. The process also requires more technical ability because you have to use an FTP service to upload the files (FTP is discussed in Chapter 14), and you need to set up MySQL databases (the databases WordPress runs on behind the scenes).
The vast majority of bloggers don’t know how to do those things and don’t have a reason or desire to learn. Unless you have goals to learn blog developing and designing, it’s unlikely you’ll need to learn how to install WordPress manually when far easier tools are available to get the job done.
However, if you decide you’d like to learn how to do a manual WordPress installation, you can access tutorials on the WordPress Codex site at
codex.wordpress.org/Installing_WordPress. The instructions are offered in multiple languages and provide varied processes depending on your needs.
The Least You Need to Know
• Once you register a domain, you still have to assign it to your web hosting account cPanel before you can install WordPress to that domain.
• SimpleScripts is the most popular one-click WordPress installation tool. You can access it through your web hosting account cPanel and use it to install WordPress in minutes.
• Fantastico used to be the top one-click installation tool but updates to offer new versions of WordPress were slow, causing the tool to lose some users.
• Most bloggers use one-click installation tools to install
WordPress.org software, but a manual installation process is available to developers, designers, and anyone else who understands or wants to learn the more technical aspects of the application.