Chapter 16
In This Chapter
The two versions of WordPress are extremely similar, but some features available through a
WordPress.com blog account dashboard are not available in a WordPress.org blog account dashboard. Likewise, some features
WordPress.org users can access and apply to their blogs,
WordPress.com bloggers cannot.
This chapter clears up the confusion and introduces you to the new features you can find in a
WordPress.org dashboard and any differences in features accessible through both WordPress dashboards. Note that all information included in this chapter is based on the most recent version of
WordPress.org available at the time of writing.
As discussed earlier in this book, it’s always a good idea to start a free blog with
WordPress.com so you can play around, experiment, and get to know the features of WordPress before you dive into using
WordPress.org. This makes the process of self-hosting a blog with
WordPress.org far less overwhelming.
WordPress.org and
WordPress.com are the same application. However, because
WordPress.com is hosted by WordPress, Automattic (the company that owns WordPress) includes features through the WordPress dashboard that enable users to readily access other Automattic-owned tools, test new tools, and create a sense of community among
WordPress.com users.
On the other hand,
WordPress.org enables users to take complete control of their sites because they’re hosted through third-party web hosts.
WordPress.org users have complete access to all the code that makes their blogs work, so the sky’s the limit.
The easiest way to see the differences between
WordPress.com and
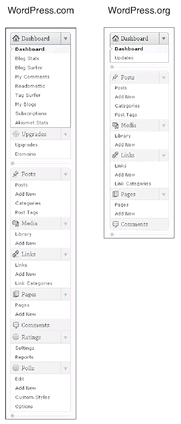
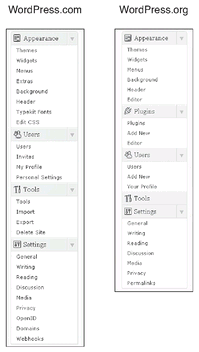
WordPress.org features is to look at the two default dashboards and compare them side by side. The biggest differences you’ll find are in the left menus, as shown side by side in Figures 16-1 and 16-2. I discuss these differences in detail in just a bit.
Figure 16-1 The top of the WordPress dashboard left menus.
Figure 16-2 The bottom of the WordPress dashboard left menus.
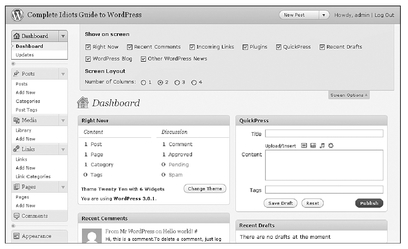
The layouts of the dashboards are the same. The left menu offers access to all areas of the WordPress configuration features and a variety of modules you can move by dragging and dropping them. You can also move, add, or remove modules by clicking the Screen Options button in the top right, as shown in Figure 16-3. (The dashboard layout is discussed in detail in Chapter 6.)
As mentioned earlier, the biggest differences between the
WordPress.com and
WordPress.org dashboards are in the left menus. If you click on the drop-down arrows to expand each section of the dashboard menus (as shown in Figures 16-1 and 16-2), you’ll notice
WordPress.com offers sections for Upgrades, Ratings, and Polls, which are not available in the
WordPress.org dashboard.
WordPress.org users have complete control over their blogs and don’t need to pay for any upgrades or domains through WordPress. They do all those tasks through their web hosts, if necessary. Furthermore, Ratings and Polls are options offered through Automattic’s Polldaddy services.
WordPress.org users aren’t limited to those services and can insert polls and more from any provider that allows WordPress integration.
Figure 16-3 Click the Screen Options button to change the modules visible on your dashboard.
The left dashboard menus also contain some other differences. For example, the Posts, Media, Links, and Pages sections look the same, but some of the features within those areas of your WordPress dashboard might be a bit different from what they were in
WordPres.org. (I discuss these differences more throughout this chapter.)
Configuring Your Options
You can use the links in the left menu of your
WordPress.org dashboard to configure all the options and settings related to your site, create and publish new content, and much more. The remainder of this chapter shows you what parts of
WordPress.org’s left menu differ from those in
WordPress.com and directs you to the appropriate chapter in this book to learn more about configuring specific settings.
Dashboard—Updates
Unlike the
WordPress.com dashboard, which offers a variety of
WordPress.com community tools, the Dashboard section of the
WordPress.org left menu offers just one feature: Updates. That’s because
WordPress.com users are automatically upgraded to the newest application release, but
WordPress.org users can wait and upgrade at their convenience.
If a newer version of WordPress is available, you’ll see a message across the top of your WordPress dashboard’s main page notifying you with a link to visit the WordPress Updates page to do the upgrade.
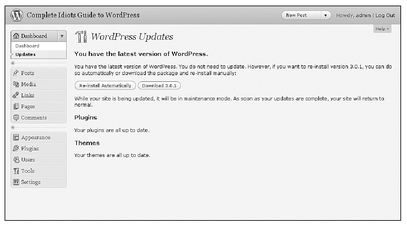
To update your WordPress installation to the newest version, click the Updates link in the Dashboard section of the left menu in your WordPress account, as shown in Figure 16-2. This opens the WordPress Updates window, shown in Figure 16-4. If a new version of WordPress is available, simply follow the instructions on this page to upgrade to that version with a click of the mouse!
Figure 16-4 Upgrade to the newest version of WordPress on the WordPress Updates page.
Note that when you upgrade, a message appears on your screen suggesting that you back up your WordPress database and files before you start the WordPress upgrade. In Chapter 18, I cover WordPress plug-ins that can help you automate backups so you won’t have to worry about it each time you upgrade WordPress.
You can also download the newest version of WordPress from the WordPress Updates page and manually upload and install it to your blog host, but most bloggers simply use the update links within WordPress to upgrade.
PROCEED WITH CAUTION
If you use plug-ins in your
WordPress.org blog (discussed in more detail in Chapter 18), you might want to wait to upgrade to the newest version of WordPress until all the plug-ins you use are upgraded to work with that new version. This ensures that your blog will continue to work without any problems due to incompatible plug-ins.
Posts
The process of writing, publishing, editing, and deleting posts is almost identical between
WordPress.com and
WordPress.org. However, in
WordPress.org, you have complete control over what you can publish on your blog. For example, while you can’t simply copy and paste embed code from a
YouTube.com video to a WordPress.com blog post, you can do so with
WordPress.org. Just be sure to paste the embed code into the HTML blog post editor. (Embedding YouTube videos is discussed in more detail in Appendix B.)
Just as you can publish a post in
WordPress.com, you can do it in
WordPress.org. Chapters 9 and 10 teach you how to create, publish, and enhance blog posts. The important thing to remember is that in
WordPress.org, you aren’t limited by the type of content you include in your posts. You can even include ads in your self-hosted WordPress blog posts if you want!
The process of adding, editing, and deleting categories and tags also works the same way in both
WordPress.com and
WordPress.org, as you learned in Chapter 9.
Media
The only file type and size upload limitations for your
WordPress.org blog are those set by your web host. Even if a file is too big to upload directly from your WordPress dashboard (meaning it’s over the 8MB upload threshold), you can still upload it to your hosting account using an FTP service, as discussed in Chapters 14 and 17.
Links
Creating links, categorizing them, and deleting them can be done using WordPress.org in the same way they’re done in
WordPress.com. There are no differences from what you learned in Chapter 12 about this section of your WordPress dashboard.
Pages
As with posts, pages work the same way in
WordPress.org as they do in WordPress.com. You have more flexibility in creating content for your
WordPress.org pages because you’re not limited by the type of media or coding you can put in those pages.
However, the process of creating, editing, publishing, and deleting pages is the same as the process discussed in Chapter 11.
Comments
The process of publishing and moderating comments doesn’t change from
WordPress.com to
WordPress.org. As long as you take the time to set up your preferences, as discussed in Chapter 7, you can publish, edit, or delete comments as described in Chapter 12.
However, there is one big difference you need to be aware of. The WordPress comment spam detection tool, Akismet, works automatically with
WordPress.com, but for
WordPress.org blogs, the Akismet plug-in must be activated before it begins to flag spam comments. Activate Akismet by clicking the
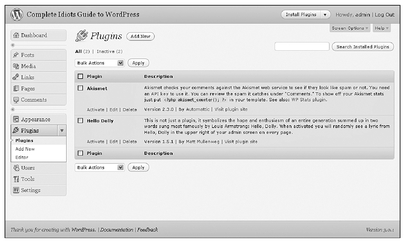
Plugins link in the Plugins section of your WordPress dashboard left menu. This opens the Plugins page, where the plug-ins that come preinstalled with
WordPress.org are listed, as shown in Figure 16-5. (Plug-ins are discussed in more detail in Chapter 18.)
Figure 16-5 Activate Akismet from the Plugins page.
Just click the Activate link under Akismet in the plug-ins list, and it will immediately begin scanning new comments for potential spam.
Appearance
The Appearance section of your
WordPress.org dashboard is where you can really see what sets
WordPress.org apart from
WordPress.com in terms of customization. When you click on the
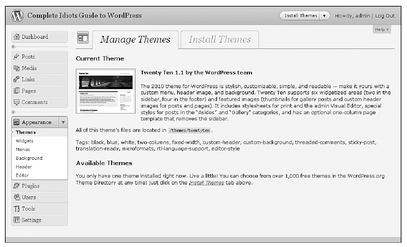
Themes link in the Appearance section of your WordPress Dashboard left menu, as shown in Figure 16-6, you notice that unlike
WordPress.com, which gives you access to many free themes for use on your blog,
WordPress.org offers only the default WordPress theme.
Figure 16-6 Only the default WordPress theme is available in the Manage Themes page.
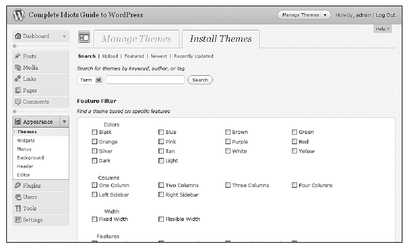
You can install other themes offered through WordPress by clicking the Install Themes tab near the top of the page. This opens a new page with a search feature, as shown in Figure 16-7.
Figure 16-7 You can search for available themes from the WordPress library.
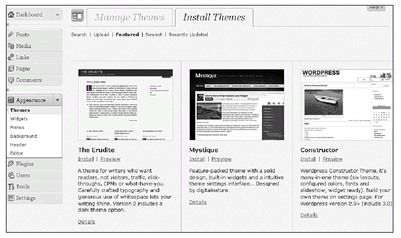
You can search for themes in the WordPress theme library by keyword, author, or tab. Simply enter your search words in the text box, and click the Search button. Or you can click on theme elements using the check boxes and click the Find Themes button at the bottom of the page. A new page opens with matching themes displayed, as shown in Figure 16-8. You can click the Install button under any theme to install it to your account. To see what your blog will look like (including your content) with the new theme applied to it before you commit to using it, click the Preview button.
Figure 16-8 Scroll through available themes to choose the one you want to use for your blog.
You can also use the links under the navigation tabs to upload a new theme (as discussed in Chapter 17) or browse through featured, new, or recently updated themes.
In the Appearance features of your WordPress dashboard, the Widgets section also works similarly to
WordPress.com. The widgets available depend on the theme you’re using. However,
WordPress.com users are limited by what they can put in their widgets.
WordPress.org users are only limited by how far they can extend the technology.
PROCEED WITH CAUTION
When you use
WordPress.org, you can put ads in your widgets, special coding such as JavaScript, and more. It’s up to you!
The Menus, Background, and Header sections of the Appearance features also in Chapter 8. Keep in mind, some of these functions depend on the theme you’re using for your blog.
Aside from themes, the Editor section within the Appearance features of your
WordPress.org left menu is where you find the biggest differences between WordPress.org and
WordPress.com.
WordPress.com users can only access the CSS files to edit their blog themes and functionality if they pay for an upgrade. Even with the upgrade, there are still limitations related to what
WordPress.com users can do to their blogs.
WordPress.org users are not subject to those restrictions. They can access all parts of their WordPress installation, including CSS files, to change anything and everything about their blog’s design. Clicking the
Editor link within the Appearance section of the
WordPress.org left dashboard menu opens the Edit Themes page, which is discussed in detail in Chapter 17.
Plug-Ins
Plug-ins are another area where
WordPress.org and
WordPress.com differ. By installing plug-ins, you can increase the functionality, efficiency, and features of your blog. Be sure to read Chapter 18 to learn all about plug-ins!
Users
The Users section of your
WordPress.org dashboard is also quite different from the
WordPress.com dashboard version. That’s because you’re not limited to “inviting” users to join your blog by first creating a
WordPress.com account. Anyone can get access to your
WordPress.org dashboard. You just need to click the
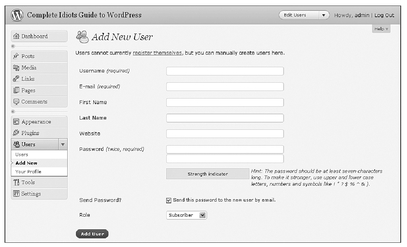
Add New link in the Users section of the left menu to open the Add New User page, shown in Figure 16-9.
Enter a username for the person you want to give access to your WordPress account (this is the username they’ll use to log in to WordPress) and an e-mail address (where their new account e-mail will be sent) into the Username and E-mail fields, respectively. Next, enter the user’s first and last name and a URL for your blog—or the user’s website, if you prefer. Follow the tips on screen to create a password for the new user, and be sure the box next to Send Password? is checked if you want the new user to receive an e-mail (sent to the address you entered into the E-mail field) with their new account information.
Figure 16-9 It takes just seconds to add new users to your WordPress.org blog.
PROCEED WITH CAUTION
Users can change any of the information you enter in this form when they log in to their new accounts. The only information they cannot change is their usernames and roles.
Finally, use the Role drop-down menu to determine what the new user will be allowed to do and access in your WordPress account (roles are discussed in Chapter 12). Click on the Add User button, and the new user is immediately added to your account and can perform the functions allowed based on the role you assigned him or her.
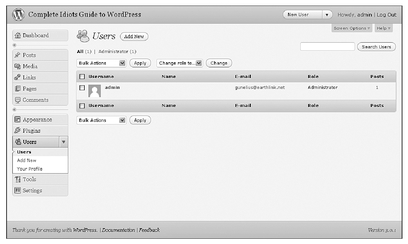
To edit users’ roles or information, simply click the Users link in the Users section of your dashboard left menu to open the Users page, shown in Figure 16-10.
Hover your mouse over a user’s name in the Users list, and an Edit link appears under that user’s name. Click the Edit link to open the user’s profile and make any necessary changes. You can also delete users from the Users page.
For quick user changes or to make the same change to multiple users at the same time, you can use the drop-down menus at the top of the Users list. Just select the boxes next to the users you want to modify, click the Bulk Actions drop-down menu, and click Delete to mark users for deletion from your WordPress account. Click the Apply button to make the deletions.
Figure 16-10 Edit users from the Users page in your WordPress account.
Similarly, you can select users using the checkboxes next to their names in the Users list, click the Change Role to… drop-down box, select a new role from the menu, and click the Change button to immediately change the selected users to a new role.
You can also modify your own WordPress profile from the Your Profile link in the Users section of your dashboard left menu. The process is the same as the one used to modify your profile in
WordPress.com, which you can read about in Chapter 7.
Tools
The tools available to you through the Tools section in your WordPress left menu work the same way in
WordPress.org as they do in
WordPress.com. You do have fewer options through this menu in
WordPress.org than you do in
WordPress.com. For example, when you click the
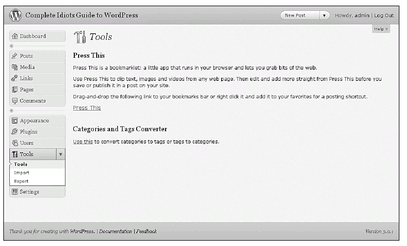
Tools link in the Tools menu, the Tools page opens, as shown in Figure 16-11. Here you can access the Press This bookmarklet and the Categories and Tags Converter, discussed in Chapter 12.
If you click the
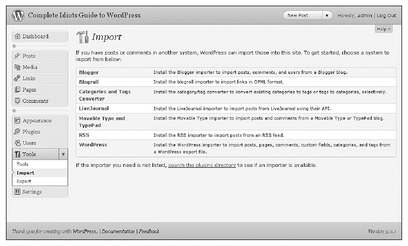
Import link in the Tools menu, the Import page opens, as shown in Figure 16-12. This works the same as the
WordPress.com import function, discussed in Chapter 12.
Figure 16-11 Access handy features on the Tools page.
Figure 16-12 WordPress makes it easy to import data from another site into WordPress.org.
Finally, if you click the
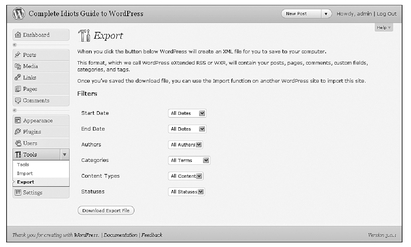
Export link in the Tools menu, the Exports page opens, as shown in Figure 16-13. Here you can export your
WordPress.org site data for use elsewhere. This is discussed in detail in Chapter 12, where the function works the same in
WordPress.com.
Figure 16-13 Prepare your blog for exporting by choosing your export settings.
Settings
The vast majority of features and configuration options available through the links in the Settings section of your
WordPress.org dashboard left menu are the same as those you find in
WordPress.com. However, there are some nuances, as discussed in the following sections.
Read about Settings configurations in Chapter 7 (note that some options available in
WordPress.com are not available in
WordPress.org, so don’t be surprised if some options aren’t included in the
WordPress.org Settings pages on your screen). Return to this chapter to learn about the additional options accessible through these settings pages in
WordPress.org.
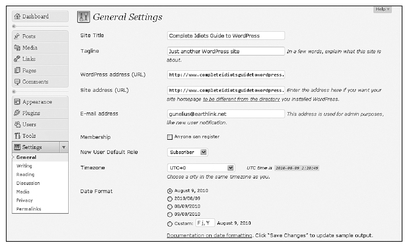
General The General Settings page for your
WordPress.org dashboard, shown in Figure 16-14, includes four sections that are not available through
WordPress.com:
WordPress address (URL): This is the URL of the site associated with your WordPress installation. It’s unlikely you’ll ever need to change this unless you move your core WordPress files in your hosting account.
Site address (URL): This is the URL of your site’s home page. If you want it to be different from the directory where you installed WordPress, you can enter the new address here, but you’ll need to create a subdirectory in your hosting account to do so. This is not common for most bloggers, but help is available if you want to try it:
codex.wordpress.org/Giving_WordPress_Its_Own_Directory.
Membership: You can check this box if you want anyone to be able to register an account on your site. This is not common for most bloggers.
New User Default Role: Click the drop-down arrow and choose the role you want all new users to default to if you forget to assign a role to them when you add them to your WordPress account.
PROCEED WITH CAUTION
You don’t want users to have too much access to your WordPress account unless you’re absolutely certain you want to give them that kind of power. Therefore, it’s a good idea to keep the New User Default Role setting set to Subscriber, so new users default to the role that gives them the least amount of access to your WordPress account.
Figure 16-14 Configure the general settings for your WordPress site.
Be sure to click the Save Changes button to save all your changes before you leave the General Settings page.
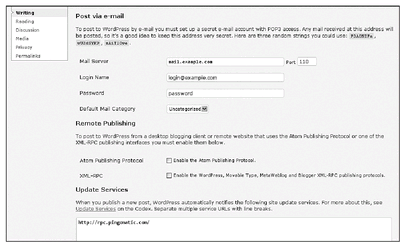
Writing The Writing Settings page of a
WordPress.org account, shown in Figure 16-15, has three configuration options the
WordPress.com version discussed in Chapter 7 does not:
Post via e-mail: The process to post via e-mail in
WordPress.org is a bit different from
WordPress.com. To set this up, you need to know your e-mail server URL address and port. (You can get this from your e-mail account or e-mail provider.) Next, enter a login name (the part of the e-mail address you want to use to post via e-mail that comes before the @ symbol) and password. Finally, choose the category you want e-mailed posts to publish in. That’s it!
Remote Publishing: This option allows you to post to your blog from a desktop blogging application or remote website that uses Atom or XML-RPC publishing interfaces. Just click on the appropriate check box to select it and enable the function. This is not common for most bloggers.
Update Services: When you publish blog posts, WordPress automatically notifies a variety of services through Ping-O-Matic (
pingomatic.com) that you have updated your blog. This automated service helps quickly index your new content on search engines and other directory sites that use ping services for updates. The default setting is adequate for most bloggers.
INSIDER SECRET
There was a time when bloggers had to manually enter a long list of ping services to ensure as many search engines and similar sites as possible were automatically notified of new posts on their blogs. Now, Ping-O-Matic automatically notifies the major ping services, so before you spend time adding new ones to the Update Services section of your
WordPress.org account, double-check that Ping-O-Matic isn’t already notifying them.
Figure 16-15 Modify settings related to writing your blog on the Writing Settings page.
Don’t forget to click the Save Changes button before you navigate away from the Writing Settings page.
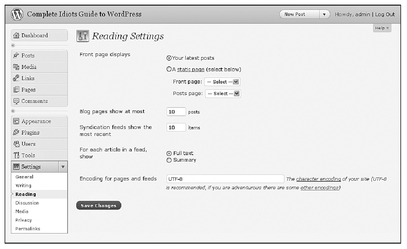
Reading The Reading Settings page of a
WordPress.org account, shown in Figure 16-16, is the same as the
WordPress.com Reading Settings page, minus a few elements that don’t apply to
WordPress.org readers. So follow the directions in Chapter 7 to configure your blog’s reading settings, and simply skip the sections of that chapter that don’t apply to your own
WordPress.org account.
Figure 16-16 Set up the reading options for your WordPress site on the Reading Settings page.
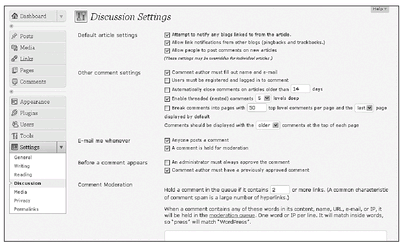
Discussion The Discussion Settings page of your
WordPress.org account, shown in Figure 16-17, is extremely similar to the Discussion Settings page for a WordPress. com account, as discussed in Chapter 7. A few options are not available in WordPress. org, but simply follow the steps in Chapter 7 to configure your discussion options, and your blog will be ready for comments and conversation in seconds!
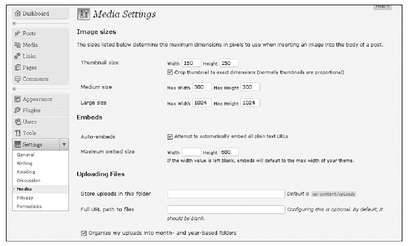
Media The big difference in the Media Settings page for a
WordPress.org account is the inclusion of the Uploading Files section, shown in Figure 16-18. This is not available in
WordPress.com. Read the configuration steps for the Media Settings page in Chapter 7, and return here to learn how to configure the Uploading Files section for
WordPress.org.
Figure 16-17 Configure your discussion settings for optimal blog commenting.
To open the Media Settings page, click the
Media link in the Settings section of your
WordPress.org dashboard’s left menu. In the Uploading Files section, you can enter a new folder where you want to store all the files you upload to your WordPress account. Typically, this defaults to wp-content/uploads, which identifies a folder called “uploads” within the wp-content section of your WordPress installation files in your hosting account. If you want to change that folder, enter the new directory in the
Store uploads in this folder text box.
If you want to change the URL to your uploaded files, you can enter a new URL in the Full URL path to files text box, but this is not common. Most bloggers leave this field blank and use the default configuration.
If you want to organize all your uploads by month and year to make it easier to find them later, be sure to check the Organize my uploads into month- and year-based folders box. Most bloggers leave this box checked.
Click the Save Changes button to ensure your edits go into effect.
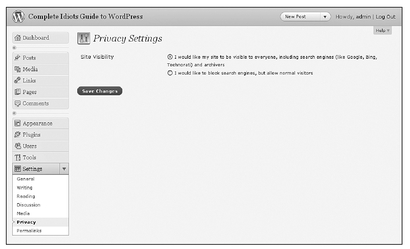
Privacy The Privacy Settings page of your
WordPress.org account, shown in Figure 16-19, includes just two options.
If you want your blog to grow, everyone needs to be able to find it, including search engines. Therefore, be sure the radio button next to I would like my site to be visible to everyone, including search engines (like Google, Bing, Technorati) and archivers is selected.
Figure 16-18 Determine how you want images and files to upload to your WordPress site on the Media Settings page.
Alternately, if you want people to be able to find your blog but you’re not interested in growth from search engines, you can select the radio button next to I would like to block search engines, but allow normal visitors.
Figure 16-19 Configure your site’s privacy settings.
Click the Save Changes button after you make your selection.
Permalinks You can change the way
permalinks are configured for your published content through the
Permalinks link in the Settings section of the left menu of your
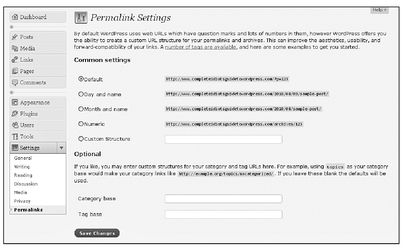
WordPress.org dashboard. Just click on that link to open the Permalinks Settings page, shown in Figure 16-20.
DEFINITION
Permalink is the fusion of permanent and link and refers to the URL to a specific web page that’s permanent. Even when content is archived, the permalink remains the same, so links to that content from other sites are not broken.
The default permalink structure for WordPress posts includes the number of the post as the extension after your site’s primary URL. This does nothing to help readers or you. In other words, by changing your permalink structure, you can help readers understand when the content was originally published and what the content is about. You can also help your site gain search traffic by structuring your permalinks to include post names or category names in an attempt to add keywords to your URLs.
To configure your permalink structure, click the radio button next to the structure you prefer in the Common settings list. The most common choices are Day and name or Month and name.
To create a custom structure, you can use any of the available tags accessible through the Number of tags are available link in the top paragraph on the Permalink Settings page. For example, in the Custom Structure text box, you could enter /%category%/%postname%/ to configure your post URLs to include the category and post name after the primary site URL. This would be great for search engine optimization!
In the Optional section of the Permalink Settings page, you can enter a new name for Category base and Tag base in the applicable text boxes. If you leave these fields blank, category and tag will be used in the link structure for category and tag links, respectively.
Figure 16-20 Configure the structure for your site’s permalinks.
As always, be sure to click the Save Changes button before you navigate away from the Permalink Settings page, or your changes won’t go into effect.
The Least You Need to Know
•
WordPress.org is installed to your hosting account as a series of files and folders, just as files and folders in your computer hard drive store your data. You have complete control over them and the content in them.
• The biggest functionality differences most users notice between WordPress. com and
WordPress.org are that
WordPress.org gives you total access to your blog’s CSS files, the ability to upload themes, and the use of plug-ins.
