Chapter 17
WordPress Themes Galore
In This Chapter
• A look at the WordPress Theme Editor
• Choosing a WordPress theme
• Working with a third-party theme
• Getting help from a blog designer
• Building a website with WordPress
One of the biggest benefits of choosing
WordPress.org as your blogging application is the level of customization available to you. Because you can access all the code that makes your self-hosted WordPress blog run, you can tweak even the tiniest aspects of your blog’s design and functionality. But you don’t have to be a programmer to make your WordPress blog look amazing!
Thanks to the many free, premium, and custom WordPress theme options, you can make your blog look unique and professional with no programming knowledge at all. This chapter teaches you how to do it!
Introducing the WordPress Theme Editor
When you create a new blog or website using the self-hosted version of WordPress from
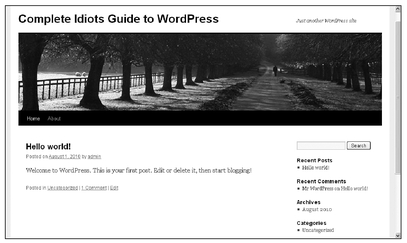
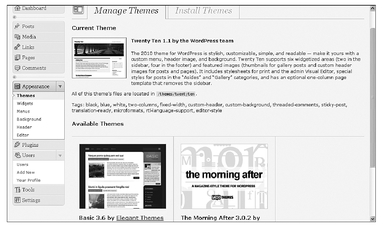
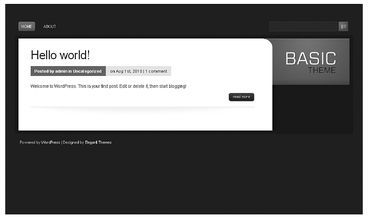
WordPress.org, you have complete access to the theme files your blog’s design is based upon. A new WordPress site uses the default WordPress theme, Twenty Ten, which you can see on a new blog in Figure 17-1.
Figure 17-1 Here’s a WordPress site with the default Twenty Ten theme.
As a
WordPress.org user, you have complete control over your blog’s design through the Appearance section of your WordPress dashboard’s left menu. You can install a new theme (discussed later in this chapter) or edit the theme you’re already using on your site by clicking on the
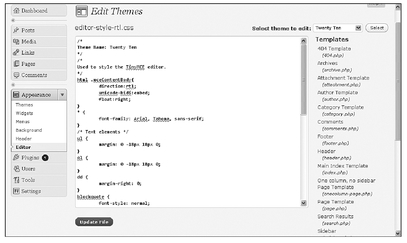
Editor link in the Appearance section of your WordPress dashboard left menu. This opens the Edit Themes page, shown in Figure 17-2.
Figure 17-2 You can edit your theme’s CSS files.
Your WordPress site design is built using Cascading Style Sheets (CSS), a programming language used to create the design of web pages. The content of your web pages published with WordPress are created using HTML, but the presentation of those pages is determined by the CSS coding working behind the scenes.
The editor box in the middle of the Edit Themes page includes the code that determines your WordPress site’s design. On the right side of the page is a list of links to the various files that include the CSS code for different sections of your site. The Stylesheet file includes the main code for your site design such as heading fonts, block quote font, margins, and so on. The individual page, post, footer, and other files accessible through the links on the right side of the Edit Themes page add specific information for those individual sections of your site.
PROCEED WITH CAUTION
Don’t make changes to your WordPress site’s CSS files through the Edit Themes text box without first copying and pasting all the content in that text box into another file. If you make a mistake, you can always revert to the original code and start again.
You can edit any part of your theme files through the Edit Themes page. Just be sure to click the Update File button to save your changes and make them go live on your site.
The Benefits of Learning CSS
CSS is not a difficult programming language to learn, and many WordPress users with minimal technical knowledge and abilities are able to learn CSS in a short amount of time. The benefits of learning even simple tasks in CSS can deliver big results. For example, if you don’t like the color or formatting of links in your blog posts, you can make a universal change to all the hyperlinks on your WordPress site in seconds through your theme’s Stylesheet file. You just need to know where to look for the code that formats links within the Stylesheet file and how to enter coding to change that formatting.
Many WordPress users are perfectly happy to never learn CSS. Fortunately, well-coded themes that look and perform the way WordPress users want them to are available for little or no cost. However, if you want to take your blog to the next level of uniqueness, you either need to know some CSS or you need to hire a blog designer to help you. Both choices are good ones, and it’s up to you to decide which route you prefer.
If you do take the time to learn some CSS, you’ll save time and money in the long run because you won’t have to struggle to figure out how to make changes to your WordPress site design. You won’t have to pay someone to help you either.
Where to Learn CSS
Many online and printed resources can help you learn CSS. Whether your goal is to learn just enough to make small changes to your WordPress site design or you want to learn enough to become a WordPress designer, you can do it without spending a fortune.
Appendix C’s “CSS and HTML Help Sites” section offers a few good websites to check out if you want to learn CSS. CSS: The Definitive Guide by Eric A. Meyer and CSS: The Missing Manual by David Sawyer McFarland are also good resources.
Types of WordPress Themes
In addition to the themes you can access through the WordPress themes library, themes are also available from many third-party WordPress theme designers. As you search the web for themes, you’ll find three primary types:
Free themes are easy to find through a simple web search for “free WordPress themes.” Anyone can download and use these themes without paying a penny.
Premium WordPress themes are typically available with a price tag, although the price is usually reasonable. For example, the majority of premium themes are priced anywhere from $49 to $99 for a single-site use license.
Custom WordPress themes are created by designers and are used only by the site they were specifically designed for. The price tag for a custom WordPress theme built from the ground up can cost thousands of dollars.
QUICK TIP
Custom themes are available directly through WordPress designers and are typically negotiated individually in terms of functionality, layout, and price.
If you’re thinking free and premium themes are more what you’re looking for, check out the “WordPress Theme Sites” section of Appendix C for several sites where you can find them.
Selecting the Best Theme for Your Blog
All three types of WordPress themes come with their own pros and cons, and you should understand them before you choose the theme for your blog or website. You don’t want to spend time installing a theme and setting up your header, footer, sidebars, and so on, only to learn that the theme doesn’t function well or lacks specific elements you need for your site.
It’s important to choose a theme that offers the number of columns you want in the positions you want, but you also need to be sure the theme allows you to customize the header and other elements with ease, if those customization options are important to you. Well-coded themes make it easy to do all this customization in minutes.
Here are some other considerations to keep in mind as you choose your WordPress theme:
Branding and individuality: Is it important that your site looks like no other site online? Do you need it to adhere to your brand standards and reflect a specific message to visitors? If you answered yes to these questions, you should choose a custom or premium theme.
Price: How much are you willing and able to invest in the unique design and functionality of your site? Your budget has a big impact on the type of theme you choose.
Support: If you don’t know CSS or HTML and are likely to need help installing and modifying your site once you choose a theme, be sure you choose a premium theme that comes with some form of support (a forum or e-mail contact), or work with a designer on a custom theme or on tweaking a premium theme who can give you support (for a fee) in the future.
Reputation: Not all WordPress theme designers are equal. Be sure the designer you work with has a reputation for creating well-coded themes.
Reviews: Read reviews of themes, and contact other bloggers who have used the theme you’re interested in to be sure it’s well coded and easy to use.
Gallery: Look through the gallery of sites using the theme you’re interested in to see what others have done with it. This is a great way to get new ideas and truly see how well a theme performs. Not all theme designers offer galleries, but if you can find one, do check it out.
Spam-free: Beware of free themes that are not offered by recognized sources. Some free themes can include viruses, spyware, or hidden code you don’t want!
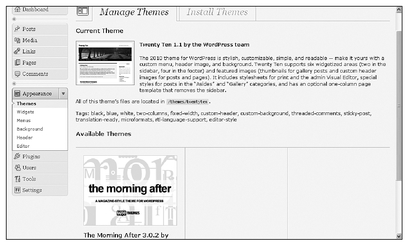
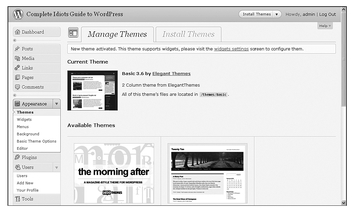
When you select the Themes link in the Appearance section of your WordPress dashboard’s left menu, the Manage Themes page opens, as shown in Figure 17-3 (and discussed more in Chapter 16). Here you can see all the themes you’ve installed to your WordPress account and which theme is currently active on your site.
You can also install themes available in the WordPress theme library by clicking on the Install Themes tab at the top of the Manage Themes page. Turn to Chapter 16 to learn how to install themes from the WordPress theme library.
Figure 17-3 You can see your active theme on the Manage Themes page.
Installing a Third-Party Theme
If you choose a third-party theme to use for your WordPress site, you need to install it to your WordPress account and activate it. Once it’s activated, you’ll need to go through your site (if you already have content published on it) to make sure your sidebars, header, footer, and other content look good. Often when you install a new theme, you’ll need to adjust some of your existing content and site setup to work well and look good with the new theme. For example, the width of your sidebar might change, which means you might need to resize images in your sidebar.
INSIDER SECRET
Don’t be surprised if you need to make a number of tweaks to your site after you change your theme.
To install a WordPress theme from a third party, you first need to download that theme to your computer hard drive. Most designers and theme providers offer a one-click download button. Just click on the download link or button for the theme you like and save it to your computer hard drive in a location where you can easily find it again. Note that the theme files will download in a single zipped file. That’s because a WordPress theme consists of many different folders and files, which you need to upload to your hosting account in order to use them on your blog or website. Make sure you remember where you saved the zip folder with your theme files in it.
Installing a Third-Party Theme from the WordPress Dashboard
Since WordPress 3.0 was introduced, the process of installing a new theme to use on your blog is easier than ever. In the past,
WordPress.org users had to upload theme files using an FTP server and save the files in specific folders within their hosting accounts before they could activate that theme on their WordPress blogs. Of course, you can still manually upload a theme that way, but with WordPress 3.0, you can upload a new theme directly from your WordPress dashboard.
PROCEED WITH CAUTION
Not all themes upload correctly using the one-click upload function available through your WordPress dashboard. If you encounter an error, you can upload your theme via FTP, as described later in this chapter.
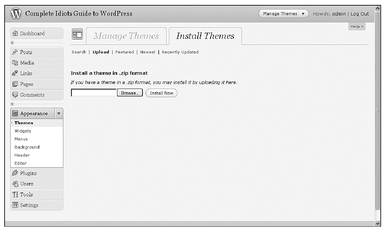
To upload a third-party theme through your WordPress dashboard, click the Themes link in the Appearance section of your WordPress dashboard’s left menu. This opens the Manage Themes page, shown in Figure 17-3. Click the Install Themes tab at the top of the page to open the Install Themes page, shown in Figure 17-4.
Figure 17-4 You can install third-party themes from your WordPress dashboard.
Click the Upload link near the top of the page and then click the Browse… button to locate the zip file for the theme you want to upload from your hard drive. (This is the zip file you downloaded to your computer when you downloaded the theme.) When you locate the zip file on your hard drive, select it (which could be a zip file included within the zip folder you downloaded), and click the Install Now button to begin the upload process.
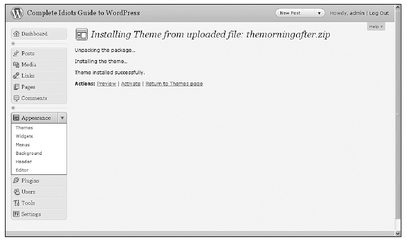
If the theme uploads successfully, you’ll see a window like the one shown in Figure 17-5. This tells you the theme installed successfully and gives you the option to preview the theme, activate it immediately on your live site, or return to the Manage Themes page in your WordPress dashboard.
Figure 17-5 If your theme installs successfully, you can activate it immediately.
Click the Return to Themes page link to return to the Manage Themes page, as shown in Figure 17-6. Here you can see your newly uploaded theme in the Available Themes section. As you can see, The Morning After theme (a free theme from WooThemes) has been added to the list of available themes.
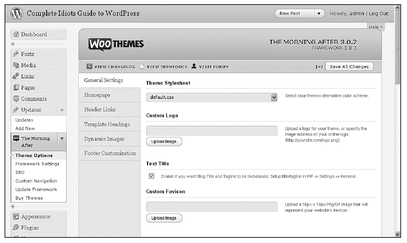
When you click the Activate link under your newly installed theme, that theme is instantly active on your live site. Note that some themes offer special point-and-click and click-and-drag configuration panels to make customizing your site with the new theme easier. The Morning After theme offers a special section in your WordPress dashboard left menu you can use to navigate through the various customization settings for your blog’s new theme, as shown in Figure 17-7.
Figure 17-6 Uploaded themes are added to your list of available themes.
Figure 17-7 You can customize some third-party themes through special dashboard menus.
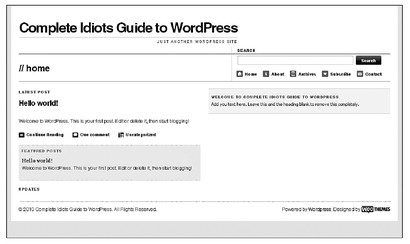
After you activate your newly installed theme, you can view it live on your blog and see how it looks to the world, as shown in Figure 17-8.
Figure 17-8 When you click the Activate link, your new theme is live instantly.
Installing a Third-Party WordPress Theme via FTP
Many third-party WordPress themes are very complex and include not just theme files but also plug-in files. (See Chapter 18 for more on plug-ins.) If a third-party theme is too complex to upload through your WordPress dashboard, you can use an FTP client (introduced in Chapter 14), such as the free Core FTP tool (
www.coreftp.com), to upload a theme to your hosting account and WordPress site.
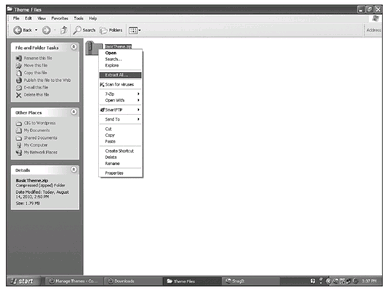
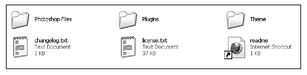
The first step to uploading a theme via FTP is to locate on your hard drive where you saved the theme’s zip file when you downloaded it from the theme provider. When you find it, right click on it and select Extract All… from the menu that opens, as shown in Figure 17-9. This will extract all the zipped files into individual files and folders.
When the files are extracted from the theme’s zip folder, you’ll see several folders and files that were used to create the theme. You need to upload the contents of the Theme folder and the Plugins folder if the theme you’re uploading comes with any plug-ins preinstalled, as shown in Figure 17-10. If the theme doesn’t include any plug-ins, this folder won’t be available, and you only need to upload the contents of the Theme folder.
Figure 17-9 To upload a theme via FTP, first extract the files from the zipped theme folder.
Figure 17-10 You must upload the contents of the Theme and Plugins folders to your hosting account.
INSIDER SECRET
It’s a good idea to open, print, and keep a copy of the ReadMe file that comes in your Theme files. It usually includes helpful installation and configuration instructions and tips that can make it easier to use and customize the theme.
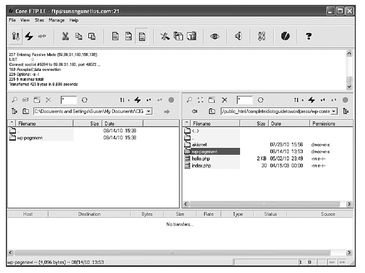
Once you’ve extracted your theme files, you’re ready to upload them to your hosting account. The fastest way to do this is by using an FTP client. You must download and install the FTP client of your choice on your computer before you can upload a third-party theme to your WordPress account. In the following steps, I used the free version of Core FTP (
www.coreftp.com) to upload the premium theme called “Basic” from ElegantThemes.
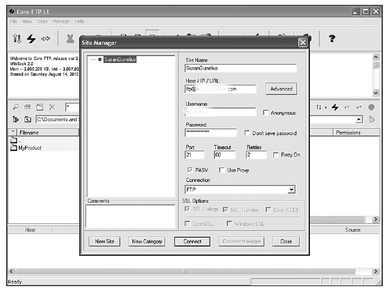
First, open Core FTP on your computer. Click File and then Connect to open the Site Manager window, shown in Figure 17-11.
Figure 17-11 Open Core FTP and connect to your hosting account.
In the
Host/IP/URL text box, enter your primary hosting account domain name, such as
mydomainname.com. Next, enter your hosting account username and password in the applicable text boxes, and click the
Connect button. This connects your computer hard drive to your hosting account file manager.
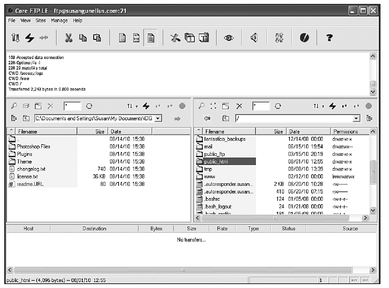
When you’re connected through your FTP client, you can see a window that’s split into two panes. The left side shows all the files in your computer hard drive. The right side shows all the files in your hosting account. Work on the right side first.
In the right-side panel, find the root directory, which is usually called public_html, as shown in Figure 17-12. If you can’t find this folder, contact your hosting company and ask what your root directory is called and where to find it. Once you find your root directory folder, double-click it to open it.
Figure 17-12 Locate your root public_html directory.
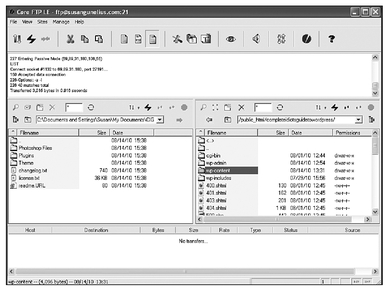
Next, find the wp-content folder, located in the folder where you installed WordPress, as shown in Figure 17-13.
Figure 17-13 Find the wp-content folder.
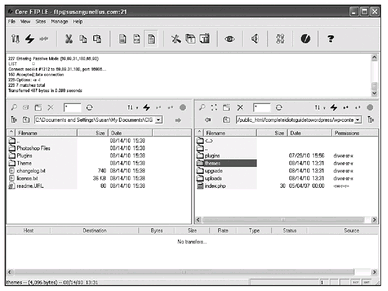
Double-click the wp-content folder to display its contents. You’re looking for the themes folder, as shown in Figure 17-14. This is where you want to install your new theme files.
Figure 17-14 Locate the themes folder in your hosting account.
Double-click the themes folder to view its contents. You should see the default Twenty Ten theme folder and any other theme folders you’ve already uploaded.
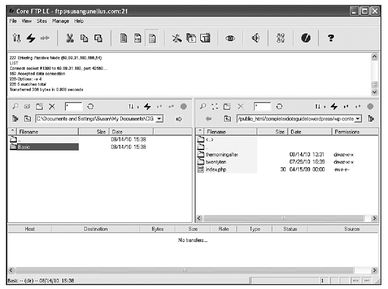
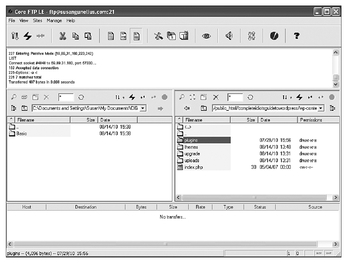
When the themes folder is open in the right panel of the FTP window, it’s time to focus on the left panel and find the theme files on your hard drive for the new theme you want to upload. In the left panel, navigate through the folders and files on your hard drive until you find the folder for your chosen theme, as shown in Figure 17-15. In this example, we’ll upload the Basic theme from ElegantThemes. This is a premium theme and includes theme files and plug-in files you need to upload. Open the Basic folder on the left-side panel and select the Theme folder within it to upload the theme files.
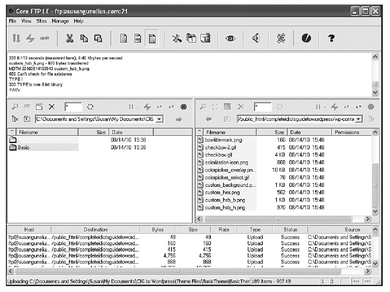
Click the Theme folder to select it, and click the Upload button (the blue arrow to the right of the location bar on the left panel) to transfer it to the themes folder you already opened in your hosting account on the right panel. You’ll see the files being transferred in the panel at the bottom of the FTP window, as shown in Figure 17-16.
Figure 17-15 On your hard drive (left panel), locate the theme folder you want to upload. In this example, it should be in the self-titled Basic folder.
Figure 17-16 You can watch the files being uploaded in the bottom of the FTP window.
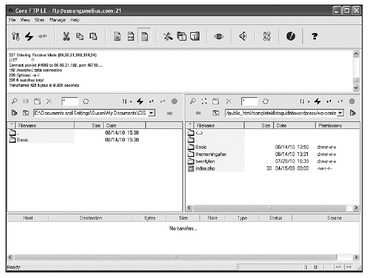
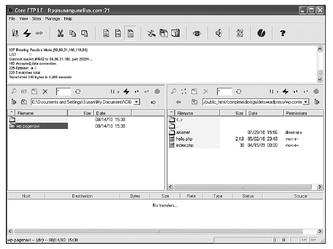
When the upload is complete, you’ll see a new Basic folder in the right panel within the themes folder. This indicates that the Basic theme has been uploaded successfully to the appropriate folder, as shown in Figure 17-17.
Figure 17-17 The uploaded Basic theme appears in the Themes folder in the right panel of the FTP window.
Now you need to upload the plug-ins that are preinstalled with your third-party theme.
QUICK TIP
Not all themes include preinstalled plug-ins. If the theme you want to use doesn’t have a plug-ins folder, your theme doesn’t have plug-ins for you to upload and you can skip that step.
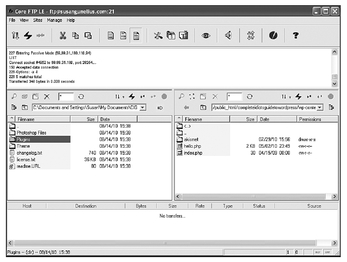
The Basic theme comes with one plug-in preinstalled. To upload the plug-in files, select the plugins folder within the wp-content folder in the right panel of your FTP window, as shown in Figure 17-18. Double-click the folder to open it.
Figure 17-18 Select the plugins folder in your hosting account.
Next, return to the left panel of your FTP window (the files on your hard drive) and navigate back to the main directory of the theme you’re uploading to reveal the Plugins folder, as shown in Figure 17-19.
Figure 17-19 Find the Plugins folder on your hard drive for the theme you just uploaded.
Double-click the Plugins folder in the left panel to reveal its contents, as shown in Figure 17-20. Holding down the Shift key, select all the contents of the Plugins folder (in this example, there’s only one item to select). You need to transfer all the files to your hosting account.
Figure 17-20 Select all contents of the Plugins folder from your hard drive.
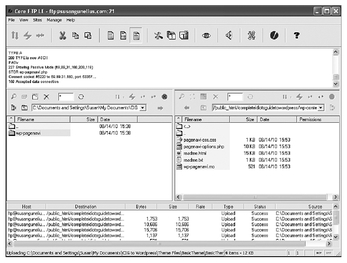
Once all the contents of the Plugins folder in the left panel are selected, click the Upload button to transfer those files to your hosting account. You can watch the files being transferred in the bottom panel of your FTP client window, as shown in Figure 17-21.
Figure 17-21 You can see files being transferred from your hard drive to your hosting account.
When the upload is complete, you can see the successfully transferred files in the right panel of your FTP window, as shown in Figure 17-22.
Figure 17-22 Uploaded plug-in files appear in your hosting account file directory.
After you have the theme and plug-in files uploaded, you can open the Manage Themes page in your WordPress dashboard again. You should see the newly uploaded theme immediately available, as shown in Figure 17-23.
Figure 17-23 You can see uploaded themes in your Manage Themes page instantly.
Click the Activate link under the newly installed theme on the Manage Themes page to move it up to the Current Theme section of the Manage Themes page, as shown in Figure 17-24.
Figure 17-24 Once activated, a theme appears in the Current Theme section of the Manage Themes page.
PROCEED WITH CAUTION
If your uploaded theme included preinstalled plug-ins, you need to activate those plug-ins from your WordPress dashboard or they won’t work.
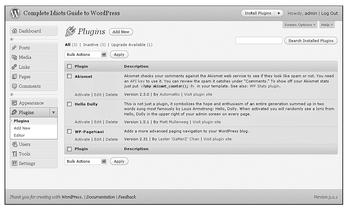
To activate the plug-ins installed with your theme, click the Plugins link in your WordPress dashboard’s left menu to open the Plugins page, shown in Figure 17-25.
Figure 17-25 You need to activate theme plug-ins or your theme might not work correctly.
Locate the plug-ins you uploaded with your theme, and click the Activate link under each one to make them functional immediately.
Your new theme is now live on your blog, as shown in Figure 17-26, and ready for tweaking and content!
Figure 17-26 An activated theme is immediately available on your live blog.
At any time, you can change your theme by visiting the Manage Themes section of your WordPress dashboard.
Hiring a Designer to Help You
If uploading themes, using FTP, learning CSS, and designing your own blog isn’t your idea of fun, you don’t have to concern yourself with those tasks. Fortunately, many WordPress designers can help you upload new themes, tweak your theme’s design, and completely customize your WordPress site. You can concentrate on creating content and pay someone else to take care of design and development.
WordPress design isn’t that difficult to learn, and tweaking designs doesn’t usually take very long, so after you start poking around, you’ll find many people to help you—without you needing to invest huge amounts of money.
Where to Find WordPress Designers
There are also blogs and websites that put designers and WordPress users in touch with each other. Check out
Bloggingpro.com and
Problogger.net, both of which offer job boards where you can post your design job.
Another great way to find blog designers is to search through galleries on premium theme provider websites. Find blogs and websites built on WordPress through those galleries or through your own trip across the web. Contact designers or site owners, and ask who did the design work for their blogs.
Or follow designers and WordPress gurus on Twitter. It’s highly likely that these people will follow WordPress designers. I know I do! If you check out the people I follow on Twitter (
www.twitter.com/susangunelius), you’ll find a number of WordPress designers!
QUICK TIP
Use a Twitter application like WeFollow (
wefollow.com) or Listorious (
listorious.com) to find Twitter users by keyword tag such as
wordpress or
wordpressdesigner.
How Much Should I Expect to Pay?
How much does it cost to get help with WordPress design? That depends on what you want to have done to your site’s design. If you’re looking for minimal tweaks to an existing WordPress theme, such as a color or font change, a header file uploaded, or another change that can be done in under an hour, you should be able to find a qualified designer to help you for under $100.
If you’re looking for more comprehensive tweaking of an existing WordPress theme to make your site more unique, you should expect to spend several hundred dollars.
If you want to get a highly customized site that looks like no other site, includes functionality and design elements unique to your site, and is a comprehensive project that will take weeks to complete, you can expect to pay several thousand dollars.
Of course, the more additional functionality and parts and pieces you need tweaked on your WordPress site, the more the design work will cost. Designers are likely to charge either by the project, for large-scale design work, or by the hour, for smaller tweaks and changes.
The investment you make in WordPress design is entirely up to you, your objectives, and your budget.
Choosing a Designer
Before you commit to working with a WordPress designer, get several estimates for your project as well as recommendations for a designer’s work before you commit to anything. Not all designers’ skill levels are equal. It’s important that you take the time to visit sites they’ve designed and ensure that those sites work well and meet your standards.
PROCEED WITH CAUTION
Keep in mind, one WordPress designer’s definition of a “custom” design might mean nothing more than tweaking a free WordPress theme with graphics and changing fonts. A custom WordPress theme is one that is coded from nothing. Therefore, the price for a truly custom WordPress design is much higher than the price of replacing a header graphic and changing font colors.
Be explicit with what you’re looking for. Find examples of other sites you like that you want to emulate with your own site design, and ask for estimates to complete your specific project, along with any other recommendations from the designer. This way, you can compare apples to apples and be sure you’re choosing the right designer to meet your needs.
When You Need a WordPress Developer
A WordPress designer is not the same thing as a WordPress developer. While many blog designers can do some development work, a designer works primarily with the CSS coding related to the presentation of content on your WordPress site. A developer, on the other hand, uses the databases and configures the functionality that make your WordPress site work. Think of it this way: an interior decorator makes a house look nice, but an architect puts together the parts and pieces that make the house stand and accommodate the design and other functionality inherent in that house.
So if you want to change something about the way your WordPress site works or functions, you probably need a WordPress developer rather than a designer. For example, a designer makes the front end of your WordPress site look good, while a developer makes the back end of your WordPress site work well.
WordPress for Websites
WordPress is so easy to use and customize that many large and small companies are using it for their business websites rather than simply for blogs. No longer do companies have to rely on programmers and web developers to make changes to their websites. Instead, they can log in to WordPress and allow employees with little technical knowledge to make edits to their websites within minutes. WordPress has moved from a simple blogging application to a powerful content management system.
You’d be amazed at how many of the websites you visit every day are built on WordPress. In fact, there’s a section on the
WordPress.org website that showcases sites built on WordPress, including those owned by well-known companies, nonprofit organizations, government agencies, universities, celebrities, and more. Visit
wordpress.org/showcase to take a look at some of the sites built using WordPress.
Want more examples? The following sites are also built on WordPress:
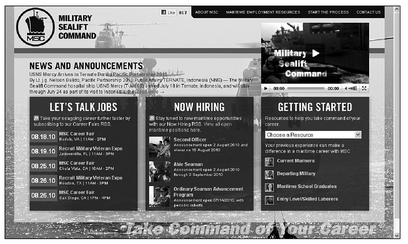
Even celebrities like Kobe Bryant, Jay-Z, Katy Perry, and Lance Armstrong (through his Livestrong project) use WordPress to power their branded online destinations. There’s something for everyone when it comes to WordPress. For example, check out the U.S. Navy’s Military Sealift Command website, shown in Figure 17-27, at
www.sealiftcommand.com. It’s built on WordPress!
Defining a Static Home Page
The easiest way to make a site built on WordPress look more like a traditional website than a blog is to choose a static home page to act as the main entry point to your site. Rather than displaying your blog posts on your site’s home page, a static page that doesn’t change is used as the welcome page, and blog posts are accessible through a link in your site’s navigation bar or sidebar.
Figure 17-27 You can find all kinds of websites that are built on WordPress.
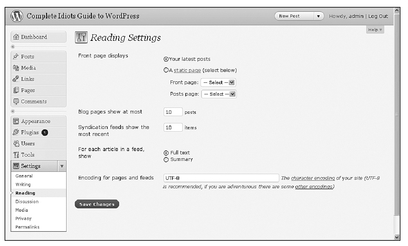
The specific layout of your site depends on the theme you’re using, but there’s almost always the option to choose a single page to act as your WordPress site’s static home page. Simply choose the Reading link in the Settings section of your WordPress dashboard left menu to open the Reading Settings page, shown in Figure 17-28.
Figure 17-28 Select a static home page from the Reading Settings page of your WordPress dashboard.
Near the top of the Reading Settings page is the Front page displays section. Here you’ll see two radio buttons for Your latest posts or A static page. To set your site’s home page to a static page, select the radio button next to A static page and use the drop-down menus to select the page you want to use as your site’s home page.
QUICK TIP
Note that the page must already be created for it to appear in the drop-down list in the Reading Settings page.
Click the Save Changes button, and your new static home page immediately appears as your site’s home page on your live site.
Choosing a Theme for Your Website
Another option is to choose a WordPress theme that looks like a traditional website. Both free and premium theme providers offer WordPress themes that look nothing like traditional blogs. In fact, many WordPress themes give you the option to include a traditional blog with your WordPress site or omit blog content entirely.
Check out the “WordPress Theme Sites” section of Appendix C for several premium WordPress theme providers that offer well-coded themes for businesses that can give your website a unique look without looking like a blog at all.
Remember, WordPress is an open source application, so you can take it as far as your creativity and technical ability (or budget to hire technical experts) can stretch. You’re not limited to a traditional blog with WordPress, so don’t be afraid to see what you can do with it!
The Least You Need to Know
• By learning some basic CSS, you can customize your WordPress site design yourself.
• You can upload a new WordPress theme to your blog and give it a completely new look in minutes.
• Finding technical help for WordPress design or development at a reasonable price isn’t difficult. Just be sure to get recommendations and compare prices and services.