Chapter 18
A WordPress Plug-In for Everything
In This Chapter
• Understanding what WordPress plug-ins can do
• Where to find WordPress plug-ins
• Installing plug-ins
• Managing your plug-ins
WordPress.org is an open source application, so the code behind it is available for anyone to edit. That means developers around the world work with that code to create enhanced functionality and features. That, in turn, enables
WordPress.org users to do amazing things with their self-hosted WordPress sites.
Plug-ins are just one of the things developers create so WordPress users can get added functionality from their sites. This chapter teaches you what plug-ins are, how they can help you, where you can find them, and what some of the most popular free WordPress plug-ins are. In a few pages, you’ll be able to start using plug-ins and take your WordPress site to a new level!
What Are WordPress Plug-Ins?
WordPress plug-ins are functions written in php (a scripting language) that can extend the capabilities of your WordPress blog or website. Developers create both free and paid WordPress plug-ins, and you can access a huge variety of WordPress plug-ins in the WordPress Plugin Directory at
wordpress.org/extend/plugins.
Some WordPress plug-ins come preinstalled with WordPress, but most must be uploaded individually to your WordPress plug-ins folder. Some might be included as part of a theme upload, as discussed in Chapter 17.
Plug-ins are what set WordPress apart from other blogging applications because they add so much more functionality above and beyond traditional blogging features, other blogging applications can’t compete. In short, no other blogging application lets users do so much without the need for advanced technical knowledge and skills as WordPress.
Preinstalled WordPress Plug-Ins
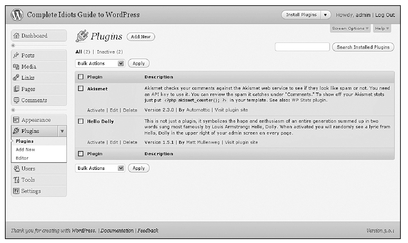
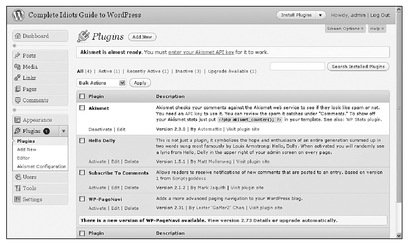
When you upload WordPress to your hosting account and log in to your WordPress dashboard, the default Twenty Ten theme discussed in Chapter 17 is automatically activated for you. Log in to your WordPress dashboard and select the Plugins link from the left menu to open the Plugins page, shown in Figure 18-1.
Figure 18-1 Some plug-ins come preinstalled with your new WordPress blog.
Here you’ll see two plug-ins already listed:
• Akismet, a comment spam detector and filter
• Hello Dolly, a just-for-fun plug-in that displays a random lyric from Louis Armstrong’s famous song by the same name at the top of every page of your WordPress dashboard
I highly recommend you activate the Akismet plug-in to help catch spam comments before they’re published on your blog and damage the user experience. It’s entirely up to you if you want to activate the Hello Dolly plug-in. Visitors to your blog are not affected by this plug-in. Only you see it.
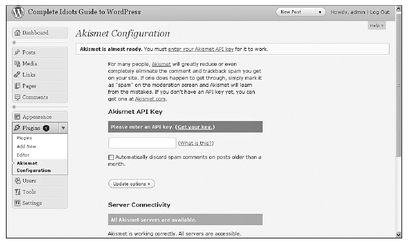
To activate the Akismet plug-in, click the Activate link under the Akismet listing on the Plugins page, shown in Figure 18-1. The plug-in is instantly activated on your blog, and a new option appears in the Plugins section of your WordPress dashboard left menu called Akismet Configuration. Click the Akismet Configuration link to open the Akismet Configuration page, shown in Figure 18-2. Here you can finish setting up Akismet to work on your blog.
Figure 18-2 You need an API key in order for Akismet to work on your WordPress blog.
First, you need to enter your API key. You can get it by clicking on the Get Your Key link, which takes you to the Akismet website. Here you can enter your e-mail address to create a free Akismet subscription (if you make less than $500 per month from your blog; otherwise, you need to pay for an Akismet API key). Once you provide your e-mail address, your API key is e-mailed to you. Just copy and paste it into the Please enter an API key text box on the Akismet Configuration page.
Next, check the box next to Automatically discard spam comments on posts older than a month if you want to automate the process of cleaning out your comment spam folder.
Finally, click the Update Options button to complete the Akismet configuration process and start redirecting comments flagged as spam to the spam queue in the Comment Moderation section of your WordPress dashboard.
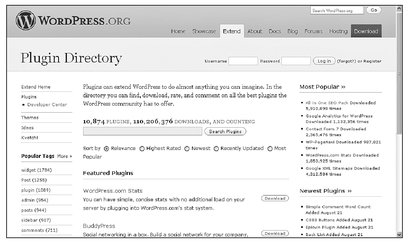
Where to Find WordPress Plug-Ins
The first place most WordPress users go to find plug-ins is the WordPress Plugin Directory, accessible at
wordpress.org/extend/plugins and shown in Figure 18-3.
Figure 18-3 More than 10,000 plug-ins are available for free download in the WordPress Plugin Directory.
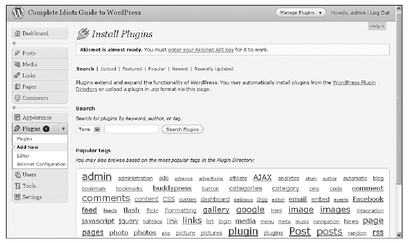
WordPress plug-in developers who want to make it easy for people to find and download their free plug-ins allow WordPress to host their plug-ins in the Plugin Directory. These plug-ins are also accessible directly through the search features found on the Install Plugins page of your WordPress dashboard (shown in Figure 18-4), which you can access by selecting the Add New link within the Plugins section of your WordPress dashboard’s left menu.
Figure 18-4 You can search for and install plug-ins from your WordPress dashboard.
You can search the WordPress Plugin Directory on the WordPress website by entering keywords into the search text box in the left sidebar; scrolling through the featured plug-ins listed on the main page of the Plugin Directory; or clicking through the Most Popular Plugins, Newest Plugins, and Recently Updated Plugins lists in the right sidebar. Similar search features are offered through the Install Plugins page within your WordPress dashboard.
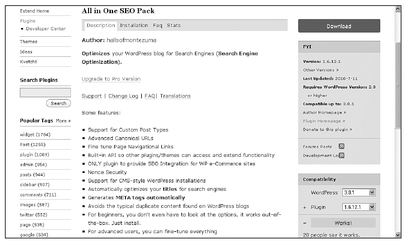
The WordPress Plugin Directory offers additional information about each plug-in. For example, Figure 18-5 shows the listing for one of the most popular WordPress plug-ins, All in One SEO Pack (discussed in more detail later in this chapter).
PROCEED WITH CAUTION
Most of the details in the WordPress Plugin Directory are submitted by the developers, so it’s not always as detailed as a user might like. But it can still be helpful in determining whether or not a plug-in will meet your needs.
Across the top of the listing is a navigation bar with several links. Each link offers more information about the listed plug-in, including a description, installation information, answers to frequently asked questions, screenshots, and statistics. Note that all plug-ins don’t offer information in each of these sections.
Figure 18-5 Listings in the WordPress Plugins Directory can be very detailed.
Along the right sidebar of the plug-in listing is even more information, including the most recent version of WordPress that the plug-in is compatible with, update information, links to the author’s web page and the plug-in’s home page, user reviews, and more.
You’ll also see a Download button on the top right. Click this to download the plug-in to your hard drive so you can then upload it to your hosting account. (I discuss this in more detail later in this chapter.)
WordPress plug-ins are also available outside the WordPress Plugin Directory. A quick Google search for “WordPress plug-ins” delivers hundreds of thousands of results. Many bloggers and online publishers write about and review WordPress plugins, which makes it easier to find the most useful plug-ins for your blog.
The “WordPress Plug-Ins and Reviews” section in Appendix C offers a few resources to find and learn about WordPress plug-ins.
Free Versus Paid Plug-Ins
The vast majority of WordPress plug-ins are offered for free. Some developers ask for donations, but most simply want to share their work with other WordPress users. However, some WordPress plug-ins are available for a fee. It takes time to create plug-ins, keep them up-to-date, continue to improve them, offer support to users, and more.
QUICK TIP
Some developers offer a free version and also more advanced versions for a fee, while other developers offer a single option with a price tag.
It takes a lot for me to pay for a plug-in. With so many free options, a plug-in with a price tag has to be truly amazing, useful, or time-saving for me to pay for it. I have been very happy to pay for some, including these:
•
Gravity Forms (
www.gravityforms.com): This is more than just a contact form, and you have to see what it can do to truly understand that it’s well worth the money.
•
OIOpublisher (
www.oiopublisher.com): If you want to sell ad space directly on your blog, this plug-in is worth the investment.
•
BackupBuddy (
pluginbuddy.com/purchase/backupbuddy): If the process of backing up your WordPress blog confuses you, this plug-in can make it easier and give you peace of mind that you won’t lose your data.
It’s always a good idea to do your research before you pay for a plug-in to ensure it offers the features you need, as well as support if you need help. Furthermore, be sure there’s not a free plug-in available that does the same thing as a plug-in you’re considering paying for. Visit some of the sites listed earlier in this chapter and leave a comment asking about plug-ins you have questions about. Alternately, post your question on your Twitter, Facebook, or other social media profile. You’d be surprised how many people will jump in to offer their opinions!
Installing WordPress Plug-Ins
Since WordPress 2.7 was released, the process of installing plug-ins to your blog from the WordPress Plugin Directory is easier than ever. With a few clicks of the mouse in your WordPress dashboard, you can have a new plug-in installed and activated within minutes. However, you must still manually upload plug-ins not available through the WordPress Plugin Directory. But don’t worry—the process is easy.
In Chapter 17, you learned how to upload plug-ins via FTP when we covered themes. In this chapter, you learn how to install plug-ins through your WordPress dashboard and how to manually upload plug-ins to your WordPress account without using an FTP service.
There are two ways to install plug-ins to your blog through your WordPress dashboard. You can automatically install plug-ins available in the WordPress Plugin Directory, or you can manually upload plug-ins not in the directory, as long as you have the original zipped plug-in folder saved on your computer hard drive. This section shows you how to do both installation methods.
Automatically Installing Plug-Ins from the WordPress Plugin Directory
If the plug-in you want to install to your WordPress account is available through the WordPress Plugin Directory, you can find it by searching for it on the Install Plugins page of your WordPress dashboard, shown in Figure 18-4. You can search by keyword term, tag, or plug-in author.
INSIDER SECRET
If you have trouble finding a plug-in through the Install Plugins page of your WordPress dashboard, visit the WordPress Plugin Directory at
wordpress.org/extend/plugins to conduct your search, learn who the plug-in author is, and get more information about it.
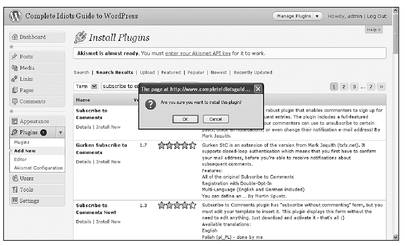
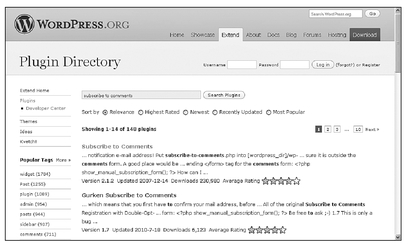
For example, a popular plug-in I use on my blogs is Subscribe to Comments, which allows people who leave comments on your blog posts to subscribe to those posts. By clicking on a button in the post comment form, they can sign up to receive e-mails whenever another comment is published on that post.
Type “subscribe to comments” into the text box in the Install Plugins page of your WordPress dashboard, and click the Search Plugins button to get the results shown in Figure 18-6.
Figure 18-6 Scroll through plug-in search results to get more information.
The Subscribe to Comments plug-in is first in the list of search results shown in Figure 18-6. You can install it to your blog by clicking the Install Now link beneath the plug-in title in the Name column. This opens a dialogue box, shown in Figure 18-7, that asks if you’re sure you want to install this plug-in.
Figure 18-7 Click OK to install your chosen plug-in.
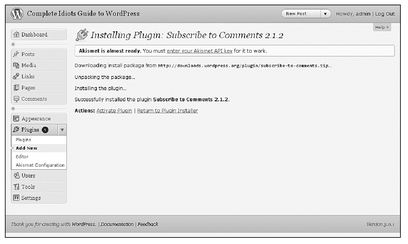
Click OK to start the installation process. When the plug-in is installed, you’ll see a page like the one shown in Figure 18-8, confirming that the plug-in installed successfully.
Figure 18-8 Once your plug-in is installed, you still have to activate it.
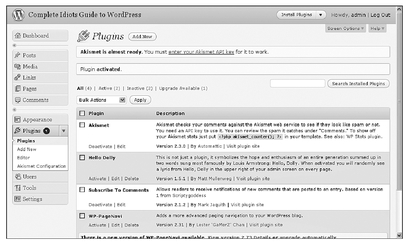
The final step is to click the Activate Plugin link to turn on the plug-in. Once you click on the activate link, you’re returned to the Plugins page of your WordPress dashboard, shown in Figure 18-9, where you can see the new plug-in included in your list of installed plug-ins. You’ll also see a Deactivate link beneath your new plug-in. That means it’s currently active on your blog.
Figure 18-9 Your newly installed plug-in now appears as an active plug-in.
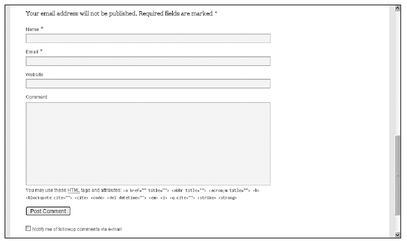
With the Subscribe to Comments plug-in active, you can visit any post in your live blog and see a Notify me of followup comments via e-mail check box at the bottom of the comment form section of your blog, as shown in Figure 18-10.
Figure 18-10 The Subscribe to Comments plug-in is live on your blog as soon as you upload and activate it.
Manually Uploading Plug-Ins Through the WordPress Dashboard
If the plug-in you want to install to your WordPress blog is not included in the WordPress Plugin Directory, you need to upload it manually to your WordPress account. You can do that through your WordPress dashboard.
PROCEED WITH CAUTION
If you try to manually upload a plug-in through your WordPress dashboard and get an error message telling you the plug-in did not install correctly, you’ll have to delete it and manually install it to your hosting account. (I explain how to do this later in this chapter.)
First, you need to find the plug-in you want to upload and download its zip file to your hard drive. For example, if you want to manually upload the Subscribe to Comments plug-in and install it through your WordPress dashboard, you can do so by searching for the plug-in in the WordPress Plugin Directory at
wordpress.org/extend/plugins, as shown in Figure 18-11.
Figure 18-11 Search for the plug-in you want to upload and install.
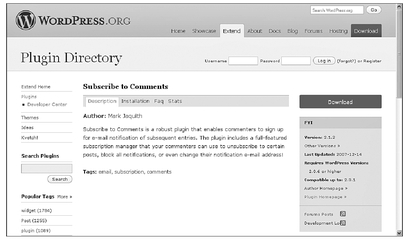
Click on the plug-in to visit its page in the WordPress Plugin Directory. The Subscribe to Comments page is shown in Figure 18-12.
Figure 18-12 Visit the main page of the plug-in you want to use in your WordPress blog.
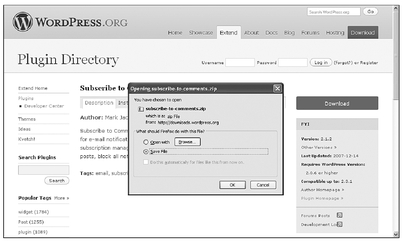
Click the Download button shown in Figure 18-12 (or on the plug-in web page if it’s not part of the WordPress Plugin Directory). This opens a dialogue box asking you if you want to open or save the file, as shown in Figure 18-13. Be sure the Save File radio button is selected, and click OK. Choose the location on your hard drive where you want to save the downloaded zip file so you can easily find it later.
Figure 18-13 Save the downloaded zip file to your hard drive.
QUICK TIP
Take note of the name of the zip folder you’re downloading. It’ll be easier to locate the folder later, when it’s time to upload it to your WordPress account.
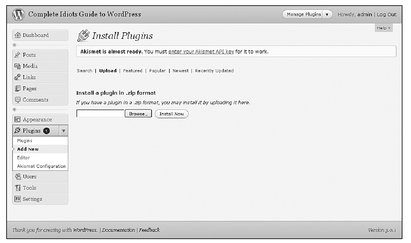
After the zip file has downloaded, you can upload it to your WordPress account by returning to the Install Plugins page, shown in Figure 18-4. Click the Upload link near the top of the page to open the Install Plugins page, shown in Figure 18-14, where you can upload your zip file.
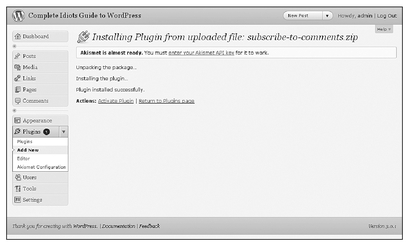
Click the Browse… button and locate the zip file for the plug-in you want to upload from your hard drive. (It will be in the location where you saved it during the previous download process.) Select the file, and click the Install Now button. A new page opens, telling you the plug-in installed successfully (if not, you’ll need to do a manual install through your hosting account, which is discussed in the next section), as shown in Figure 18-15.
Figure 18-14 Upload the zip file of your chosen plug-in.
Figure 18-15 After the plug-in has uploaded, you still need to activate it.
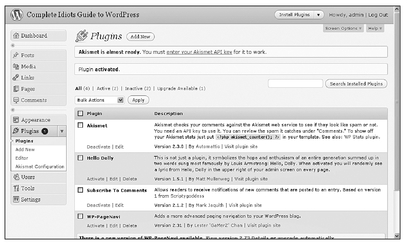
Finally, click the Activate Plugin link to turn on the plug-in. When the plug-in is activated, you are returned to your list of installed plug-ins where you can see the Subscribe to Comments plug-in has been added and is active, as shown in Figure 18-16.
Figure 18-16 Your uploaded plug-in is now active.
Manually Installing Plug-Ins Through Your Hosting Account
If you can’t install the plug-in you want to use through the automated or manual processes available in your WordPress dashboard, you need to upload the plug-in to your hosting account and then return to your WordPress account to activate it.
In Chapter 17, you learned how to upload plug-ins via FTP (the process is discussed as part of the steps to upload a third-party theme to your WordPress account). This section teaches you how to upload a plug-in to your hosting account without using an FTP service.
INSIDER SECRET
The steps in this section use
BlueHost.com, a hosting service that offers one-click extraction of uploaded zipped folders. If your hosting account does not allow you to extract zipped folders, you’ll need to manually upload individual files. In this case, using an FTP service might be faster and easier. Furthermore, your hosting account screenshots and uploading steps might differ from those used with BlueHost, but the basic process is the same.
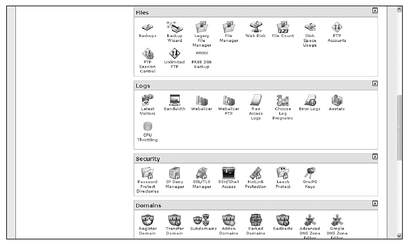
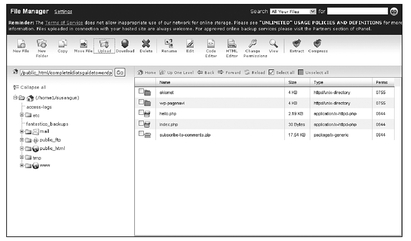
First, log in to your hosting account and navigate to your control panel (cPanel). In the Files section, double-click File Manager, as shown in Figure 18-17.
Figure 18-17 You use File Manager to access the files in your hosting account.
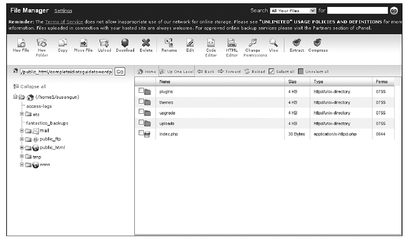
Navigate to your blog’s WordPress installation files and find the plugins folder, as shown in Figure 18-18.
Figure 18-18 Find the plugins folder in your hosting account WordPress installation files.
Double-click the plugins folder to reveal its contents, as shown in Figure 18-19.
Figure 18-19 Upload your zipped plug-in to the plugins folder in your hosting account.
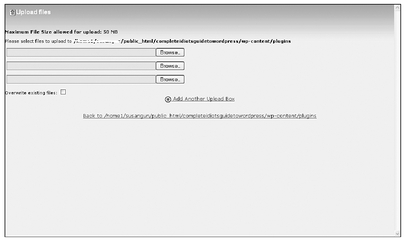
Click the Upload button to open the Upload File window, shown in Figure 18-20.
Figure 18-20 Choose the zipped folder you want to upload.
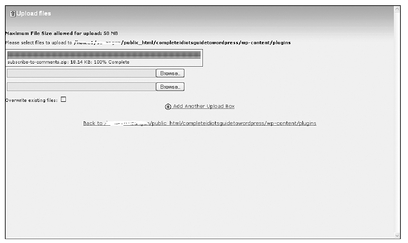
Click the Browse… button and locate the zipped folder for the plug-in you want to upload where you saved it on your hard drive during the download process. Select the file to begin the upload process. When the file is uploaded, you’ll see a message telling you it has been uploaded successfully, as shown in Figure 18-21.
Figure 18-21 When the zipped file is uploaded, you can return to File Manager.
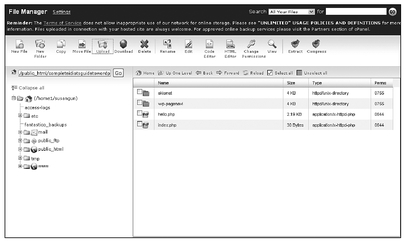
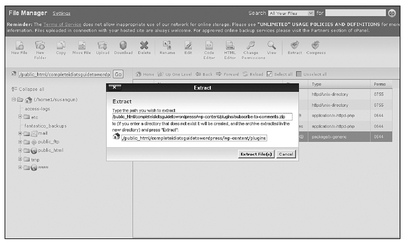
Click on the link to go back to File Manager or simply close the window to return. The zipped folder is now listed in the contents of the plugins folder in your hosting account, as shown in Figure 18-22.
Figure 18-22 After the zipped folder is uploaded, you have to extract the contents.
Click on the zipped folder to select it and then click the Extract button to extract the contents from the zipped folder into individual files. When you click on the Extract button, a dialogue box opens, shown in Figure 18-23, asking you to confirm the path where you want the files to be saved. Be sure your plugins folder is the extract location.
Figure 18-23 You want to extract the files to your plugins folder.
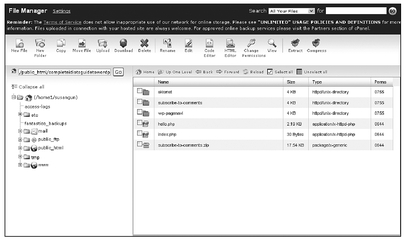
Finally, click the Extract File(s) button to extract the files. When the extraction is complete, you’re returned to the File Manager page, as shown in Figure 18-24, where you can now see that the Subscribe to Comments folder has been added.
QUICK TIP
After you extract the files, the zipped folder is still visible. You can delete that if you want to.
Figure 18-24 The extracted plugins folder is visible in your hosting account file manager.
Now that the plug-in has been uploaded to your hosting account, you can log in to your WordPress dashboard and navigate to your Plugins page. You should see the uploaded Subscribe to Comments plug-in added to your list of plug-ins, as shown in Figure 18-25.
Figure 18-25 The manually uploaded plug-in still needs to be activated.
You still need to activate the plug-in in order for it to work on your blog. Just click the Activate link under the plug-in’s name to immediately activate it on your blog. That’s all there is to it!
Managing Your WordPress Plug-Ins
One of the best things about plug-ins is the fact that they’re so flexible. You can turn them on or off with the click of a mouse, and many plug-ins offer a wide variety of configuration options.
In this section, I show you how to manage the basic functions of WordPress plug-ins so you can truly enjoy their flexibility.
Special Configuration Menus and Links
Some plug-ins offer advanced configuration options, which you can access in several different ways, depending on the plug-in. For example, some plug-ins offer a Settings link, visible next to the Activate or Deactivate link in the Plugins list in your
WordPress dashboard. Others add a Configuration link (although it might not be named “configuration”) in the Tools section of your WordPress dashboard left menu. There is no standard name. You just have to look for a new link that wasn’t there before. Highly advanced plug-ins add a completely new section to your WordPress dashboard left menu where you can access multiple configuration links.
INSIDER SECRET
When you activate a new plug-in, look around your WordPress dashboard, particularly in the left sidebar menus, to see if any configuration options were added.
Updates
Plug-in developers often update their WordPress plug-ins to add new features, fix problems, or be compatible with a newer version of WordPress. If an update is available for one of your installed plug-ins, you’ll likely see a message in one or more places.
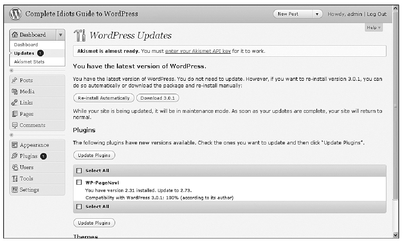
First, plug-in update notices can be found by clicking the Updates link in the Dashboard section of your WordPress dashboard’s left menu, as shown in Figure 18-26.
Figure 18-26 WordPress application, plug-in, and theme updates are shown on the WordPress Updates page.
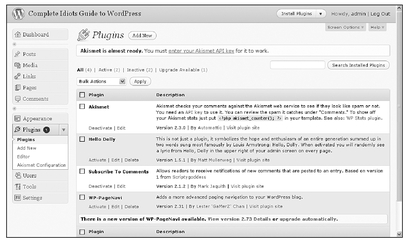
Second, you can see plug-in update notices across the top of most pages of your WordPress dashboard as well as beneath the specific plug-in’s listing in the Plugins page of your WordPress dashboard, as shown in Figure 18-27.
Figure 18-27 Plug-in update notices are visible on the Plugins page.
To update a plug-in when you find an update notice, just click the Update (or Upgrade) link. The plug-in updates immediately, and you’re taken to the Upgrade Plugin page, shown in Figure 18-28.
Figure 18-28 Once a plug-in is updated, you have to activate it again.
After a plug-in upgrade is completed, you have to reactivate the plug-in by clicking the Activate Plugin link.
Deactivating Plug-Ins
The time might come when you no longer want to use a plug-in. All it takes to deactivate a plug-in is one mouse click to turn it off.
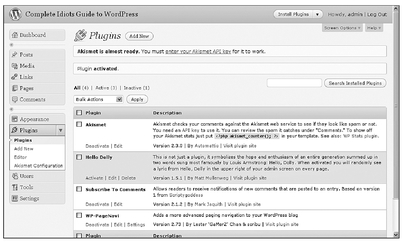
Visit the Plugins page in your WordPress dashboard, and click the Deactivate link beneath the plug-in you want to turn off. The Subscribe to Comments plug-in, shown in Figure 18-29, can easily be deactivated by clicking the Deactivate link.
Figure 18-29 Click the Deactivate link to turn off a plug-in.
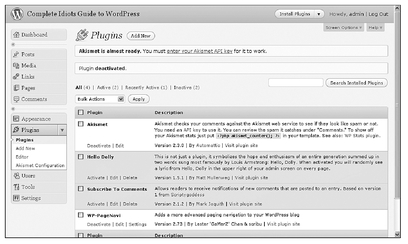
When the plug-in is deactivated, the Deactivate link disappears and an Activate link appears in its place. To turn the plug-in back on again, just click the Activate link.
INSIDER SECRET
If your blog is acting strangely or your theme looks odd, deactivate your plugins one by one and visit your blog between each deactivation to see if that fixes the problem. Sometimes plug-ins that have been working just fine suddenly cause problems. You can try to delete, reinstall, and reactivate them.
Deleting Plug-Ins
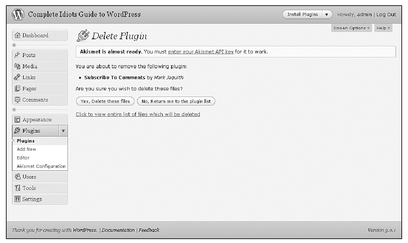
When you want to completely remove a plug-in from your WordPress installation, you can do it from your WordPress dashboard with a couple mouse clicks. Visit your Plugins page, shown in Figure 18-30, and click the Delete link under the name of the plug-in you want to delete. In this example, the Subscribe to Comments plug-in will be deleted.
Figure 18-30 Click the Delete link to delete a plug-in.
When you click the Delete link, a new page opens, shown in Figure 18-31, asking if you’re sure you want to delete the files associated with the selected plug-in. (You can view the files by clicking Click to view entire list of files which will be deleted.) Click the Yes, Delete these files button to complete the deletion.
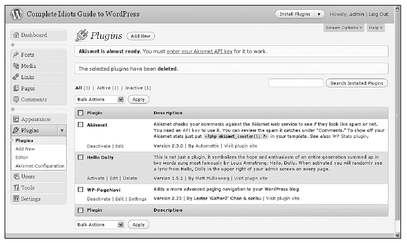
When you click the Yes button, you’re returned to your Plugins list where the selected plug-in (in this case, the Subscribe to Comments plug-in) is no longer listed, as shown in Figure 18-32.
Don’t worry if you change your mind. You can always reinstall a plug-in you deleted and reactivate it. Keep in mind that some plug-ins might require you to reconfigure your personal settings after you reinstall it.
Figure 18-31 Confirm that you want to delete the selected plug-in.
Figure 18-32 A deleted plug-in is removed from your list of installed plug-ins.
Popular Free WordPress Plug-Ins
Now that you know where to find plug-ins and how to install them, you’re probably itching to get moving. But where do you start? Thousands of plug-ins are out there!
You can browse through lists of popular WordPress plug-ins by visiting the Add New Plugins page in your WordPress dashboard and clicking the Popular link, or you can click the Most Popular link in the WordPress Plugins Directory.
If you’re still not sure where to begin, following are several useful and popular plugins to get you started. (Find more useful plug-ins listed in Appendix B.)
QUICK TIP
Before you install a plug-in, check the last time it was updated and the most recent version of WordPress it was tested on. You don’t want to install a plug-in that hasn’t been updated or tested in years.
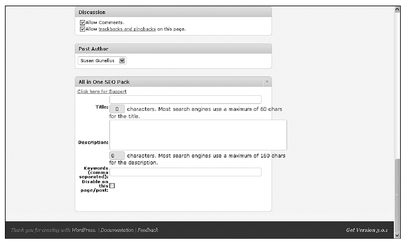
All in One SEO Pack
All in One SEO Pack is one of the most popular WordPress plug-ins. The plug-in, available at
wordpress.org/extend/plugins/all-in-one-seo-pack, allows you to enter a separate title, description, and keywords for search engines to index, which can help boost search engine traffic to your posts.
When you activate it on your blog, a new section appears when you create a new blog post, as shown in Figure 18-33.
Figure 18-33 All in One SEO Pack helps boost search engine traffic to your blog.
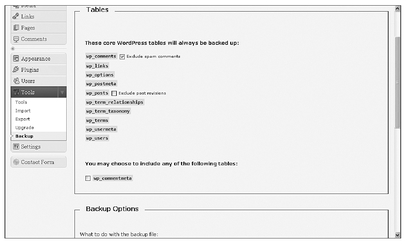
WP-DB (WordPress Database)-Backup
The WP-DB-Backup plug-in, available at
wordpress.org/extend/plugins/wp-db-backup, is an easy-to-configure plug-in that enables you to automate the process of backing up your WordPress database files. You can choose what gets backed up, when, and how once you install and activate this plug-in, as shown in part in Figure 18-34.
Figure 18-34 You can configure WP-DB-Backup so you receive a weekly e-mail with your backup file attached.
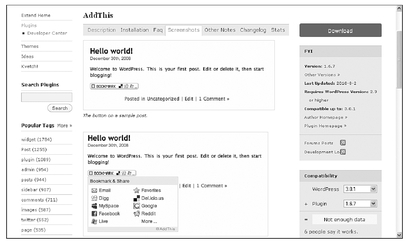
AddThis
AddThis, available at
wordpress.org/extend/plugins/addthis/, enables you to add an icon in your blog posts that visitors can click so they can share your post through the social media profile or site of their choice (nearly 300 options are available), as shown in Figure 18-35.
The AddThis plug-in is very helpful in increasing traffic to your blog because it makes it easy for people to share your posts with their own audiences across the social web.
Figure 18-35 The AddThis plug-in makes it easy for people to share your blog posts with larger audiences.
Subscribe to Comments
Subscribe to Comments, at
wordpress.org/extend/plugins/subscribe-to-comments, has been used as an example throughout this chapter. It’s easy to install and lets people who visit your blog stay on top of conversations that interest them, so they can return and comment again. It’s a great plug-in to help build relationships with readers and keep conversations going longer than they normally would without it. You can see Subscribe to Comments on a live blog post in Figure 18-10.
Yet Another Related Posts Plugin (YARPP)
A number of plug-ins out there add related posts to the end of your blog posts, but Yet Another Related Posts Plugin (YARPP), available at
wordpress.org/extend/plugins/yet-another-related-posts-plugin, is one of the most popular. When you install and activate this plug-in, contextually related posts appear at the end of each of your published blog posts for visitors to click and read, as shown in Figure 18-36.
YARPP is highly customizable and can help you boost the length of time people spend on your blog by making it easy to find more relevant content they’re interested in. It also helps boost page views, which is important to bloggers who want to make money by selling ad space on their blogs, as discussed in Chapters 23 and 24.
Figure 18-36 YARPP automatically adds links to related posts at the end of each of your blog posts.
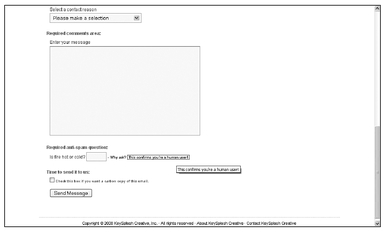
Contact Form 7
If you want to make it easy for people to get in touch with you through your blog but you don’t want to publish your e-mail address, you can use a contact form. A number of plug-ins make it easy to create contact forms, and Contact Form 7, available at
wordpress.org/extend/plugins/contact-form-7, is one of the best free options. It’s flexible and easy to configure, and you can create highly customizable contact forms within a few minutes of installing and activating it. You can see an example of a partial live form in Figure 18-37.
Figure 18-37 You can create a form with a wide variety of required and optional fields with the Contact Form 7 plug-in.
TweetMeme Button
Figure 18-38 Make it easy for people to retweet your blog posts with the TweetMeme button.
You can choose where the Retweet button appears in your posts and what it looks like. Visitors who link their Twitter accounts to free TweetMeme accounts can simply click on the Retweet button to tweet your blog post to their audiences of followers. It’s a great way to drive traffic from Twitter to your blog and expose your content to a much wider audience.
The Least You Need to Know
• WordPress plug-ins allow you to extend your site into far more than a simple blog.
• There are free WordPress plug-ins and WordPress plug-ins that cost money. The WordPress Plugin Directory offers over 10,000 free plug-ins.
• You can install, activate, deactivate, delete, or reinstall plug-ins within minutes and at any time. They are completely flexible!