Chapter 20
Feeds and Subscriptions
In This Chapter
• The basics of feeds and subscriptions
• Getting started with a WordPress blog feed
• Adding a feed subscription option to your blog
• Promoting your feed and attracting subscribers
A web feed is a format for providing data from a frequently updated content source, like a blog, to users. Rather than manually visiting your blog every day to see if you’ve published new content, people who subscribe to your blog’s feed can see your new content in their e-mail inboxes or their feed reader, depending on how they subscribe to receive content from your blog.
Feeds and subscriptions can be confusing, and this chapter teaches you the basics, in simple terms, so you can understand why people subscribe to feeds, how to set up your feed, and how to promote your feed and get more subscribers.
Understanding Feeds and Subscriptions
Feeds are typically created in RSS (Really Simple Syndication) or Atom format. Both are data formats that allow people to subscribe and receive updates when you publish new blog content, either in a feed reader like Google Reader or via e-mail. WordPress blogs most frequently use RSS feeds, which are easy to create using a tool like Google’s FeedBurner, discussed later in this chapter.
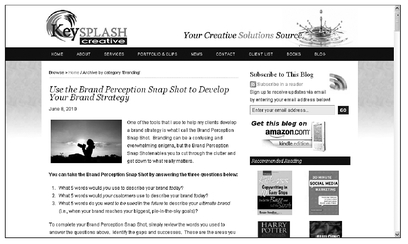
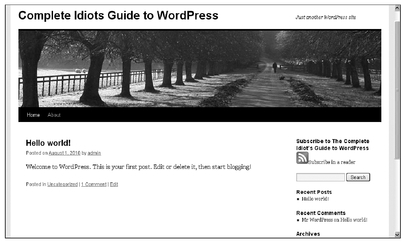
In order to receive a feed and read the content within that feed, you need to subscribe to it. As you travel around the blogosphere, you’re likely to notice the RSS feed icon, shown in the sidebar in Figure 20-1. This icon makes it easy for visitors to subscribe to a site’s feed.
Figure 20-1 The RSS icon makes it easy for people to subscribe to your blog.
People subscribe to blogs primarily to save time. Rather than visiting every blog they like multiple times throughout the day, they can simply log in to their feed reader accounts and see the updates to all the blogs and websites they’re subscribed to, all in one convenient place. If they subscribe by e-mail, they’ll receive e-mail messages when new content is published at the time and frequency they choose when they subscribe.
QUICK TIP
Feed readers gather together all the feeds a user is subscribed to and presents them in one handy place, either on the computer or online. Most readers are available for free, but some do come with a price tag or offer premium features for a fee. Popular feed readers include Google Reader (
www.google.com/reader) and FeedDemon (
feeddemon.com).
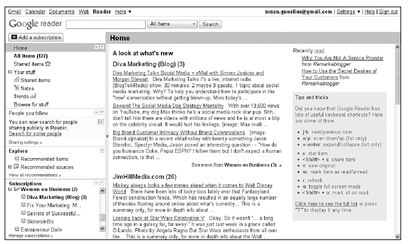
Feed readers allow you to quickly and easily scroll through new updates, subscribe to new feeds, delete feeds, and more. The Google Reader account shown in Figure 20-2 shows how your feeds look in a feed reader.
Figure 20-2 Feeds are easy to manage in Google Reader.
Setting Up Your WordPress Blog Feed
You can set up your WordPress blog’s feed within a few minutes, and adding subscription links to your blog’s sidebar takes just a few minutes more. Using a tool like Google’s FeedBurner (
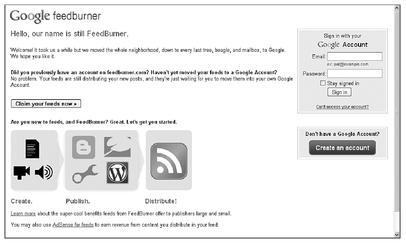
feedburner.google.com), shown in Figure 20-3, you can create (or
burn) your blog’s feed for free.
Figure 20-3 Log in to your Google account or create a new account to burn a feed.
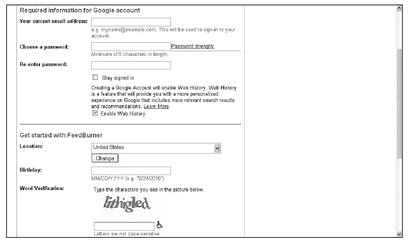
If you have a Google account, sign in. If you don’t have a Google account, click the Create an account button to open the Google Create an Account page, shown in Figure 20-4.
Figure 20-4 Complete the form to create a Google account and get started with FeedBurner.
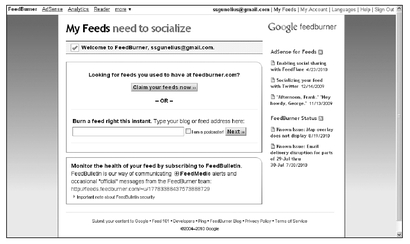
Enter your information in the Required information for Google account and Get started with FeedBurner fields, read the Terms of Service, and click I accept. Create my account. to create your new Google account and open your new FeedBurner account page, as shown in Figure 20-5.
Figure 20-5 Enter your WordPress blog’s URL in the text box to burn its feed.
To burn your WordPress blog’s feed, enter your blog’s URL (in
www.myblogname.com format) in the
Burn a feed right this instant field and click the
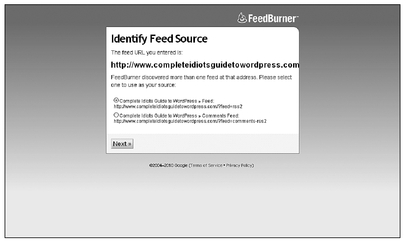
Next button. A new Identify Feed Source page opens where you might be asked to select a feed source, as shown in Figure 20-6.
Figure 20-6 Select your blog’s main feed to burn a feed of your post content.
Figure 20-6 shows that WordPress blogs typically have two feeds you can burn, one for your blog post content and one for comment content.
INSIDER SECRET
You can offer post and comment subscriptions on your blog if you want, but post subscriptions are much more popular than comment subscriptions.
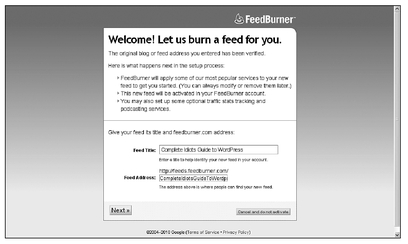
To burn the feed for your post content, select the radio button next to >> Feed and click the Next button to give your feed a title, as shown in Figure 20-7.
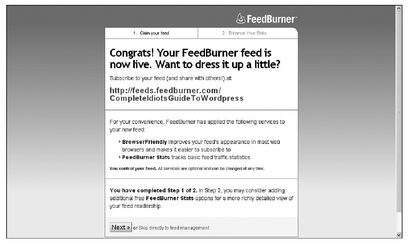
Type in the title you want to use for your feed in the field provided, and click Next to burn your feed. A new page opens, as shown in Figure 20-8, where you can see your blog feed URL.
Figure 20-7 Type the title you want to use for your feed.
Figure 20-8 Congratulations! Your feed has been burned!
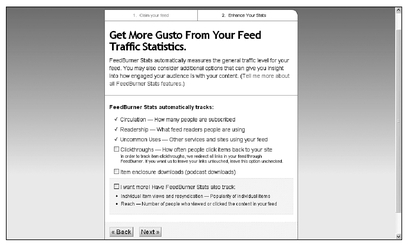
Click Next to configure additional FeedBurner stats, as shown in Figure 20-9.
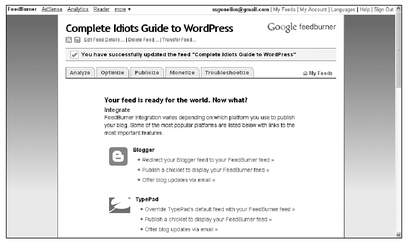
If you want to set up your FeedBurner account to track some of the additional statistics related to your feed shown in Figure 20-9, check the boxes next to those options now. If not, you can always add the options later. Click Next to finish configuring your feed and open the page shown in Figure 20-10, where you can start the process to integrate your feed into your blog.
Figure 20-9 Check the boxes for additional stats you want to track.
Figure 20-10 Once your feed is configured, you can publicize it on your blog.
You can take time now or in the future to review the various options available through the tabs across the top of the FeedBurner feed page. For example, you can review analytics, configure additional settings, add Google AdSense ads to your feed to make money, and more.
There’s a lot more you can do with your feeds—too much to cover in these pages—to truly leverage them as marketing and monetization tools. Don’t be afraid to try out the various features available to you through your FeedBurner account.
Inviting Feed Subscriptions
The easiest way to integrate your blog’s feed into your WordPress blog is to add subscription links into your blog’s sidebar. All you need to do is get the correct HTML code, copy it, and paste it into a text widget in your blog’s sidebar. That’s all available at your fingertips through your FeedBurner account and WordPress dashboard and takes just a few minutes to set up.
QUICK TIP
There are various ways to integrate your blog’s feed into your WordPress blog. Some WordPress themes even offer features that simplify the process. Learn some tricks to make your subscription links look visually appealing in Appendix B.
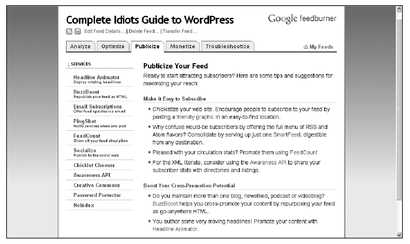
First, click the Publicize tab at the top of your FeedBurner account page, shown in Figure 20-10. (If you’ve burned multiple feeds through this account, be sure you selected the correct feed when you first logged in to FeedBurner.) This opens the Publicize Your Feed page, shown in Figure 20-11.
Figure 20-11 You can create links, forms, and buttons to enable visitors to subscribe to your blog with just a few easy clicks.
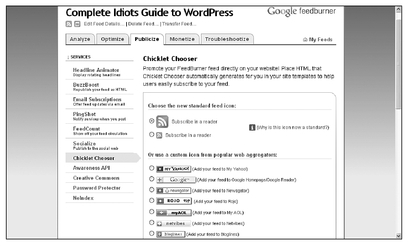
To create a link inviting people to subscribe to your blog’s feed in their preferred feed readers, click the Chicklet Chooser link in the left menu. This opens the Chicklet Chooser page, shown in Figure 20-12.
Figure 20-12 Choose the link and RSS icon you want to display on your blog.
In the Choose the new standard feed icon section of the Chicklet Chooser page, select the radio button next to the RSS icon size (large or small) you prefer.
INSIDER SECRET
Choosing one of the first two options showing the standard RSS feed icon enables visitors to choose their preferred feed readers from a list. The custom icons from popular web aggregators listed below the standard feed icon options in Figure 20-12 allow visitors to subscribe only via the feed readers whose icons are shown. The standard icons are recommended to give readers maximum flexibility in viewing your content.
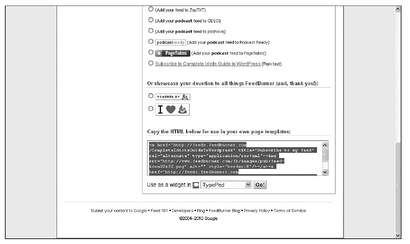
Once you select your feed icon, scroll down to the bottom of the page and use your mouse to highlight and copy everything in the Copy the HTML below for use in your own page templates text box, as shown in Figure 20-13.
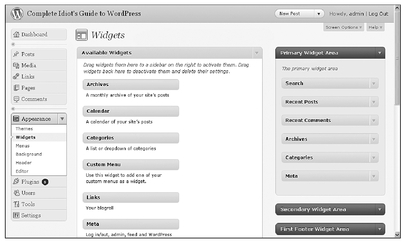
With the HTML code copied, log in to your WordPress dashboard and click the Widgets link in the Appearance section of your dashboard’s left menu. This opens the Widgets page, shown in Figure 20-14.
Figure 20-13 Copy the HTML code for your feed icon so you can paste it into your WordPress sidebar.
Figure 20-14 You first need to add a widget to your blog’s sidebar before you can paste your feed icon code into it.
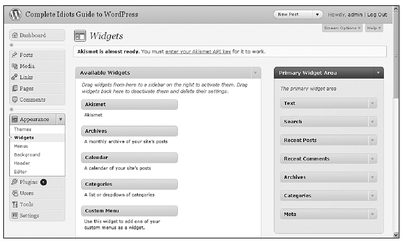
Find the Text widget in the Available Widgets list in the middle of the page. Click and drag the Text widget into the Primary Widget Area on the right side of the page (these are the widget areas available to you on your blog), as shown in Figure 20-15.
Figure 20-15 Add a text widget to your blog’s sidebar, where you can paste your feed icon’s HTML code.
QUICK TIP
If you can only see the titles of the widget areas on the right side of your blog, you can reveal the contents of each widget by clicking the drop-down arrows in the top-right corners of each.
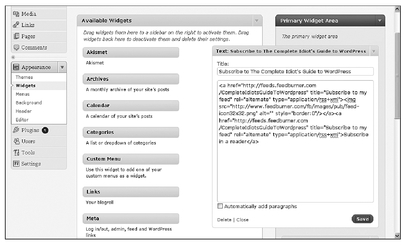
Click the drop-down arrow in the upper-right corner of the new text widget you just added to the widget area to expand it, as shown in Figure 20-16. You can type a title for the widget into the Title field and then paste the HTML code you copied from FeedBurner into the larger field.
Click the Save button in the text widget, and you’re finished! You can visit your blog to see the new text widget with your feed subscription icon and link added to it, as shown in Figure 20-17.
PROCEED WITH CAUTION
If your new text widget and subscription link don’t appear on your live blog, refresh your browser page to be sure you’re viewing the most recent version of the page. Also, be sure you clicked the Save button in the text widget, or your changes won’t go live on your blog.
Figure 20-16 Paste the HTML code from FeedBurner into the text widget on your blog.
Figure 20-17 Visitors can click Subscribe in a reader to subscribe to your blog’s feed.
Inviting E-Mail Subscriptions
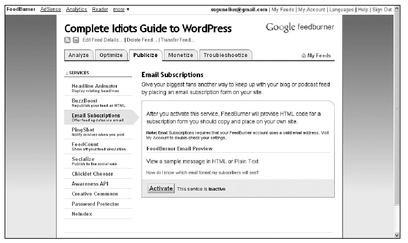
Adding an e-mail subscription option to your blog’s sidebar is also very easy. Navigate to the Publicize tab within your FeedBurner account, and click the Email Subscriptions link to open the Email Subscriptions page, shown in Figure 20-18.
Figure 20-18 Activate e-mail subscriptions for your blog’s feed on the Email Subscriptions page.
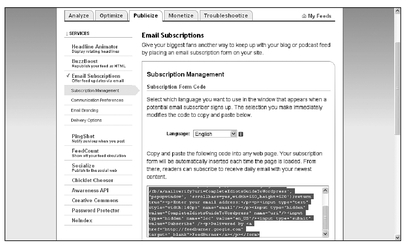
Click the Activate button to enable the e-mail subscription service for your feed. This opens a page where you can access the HTML code to paste into your blog’s sidebar and also add an e-mail subscription form, as shown in Figure 20-19.
Figure 20-19 Copy the HTML code for your feed’s e-mail subscription form.
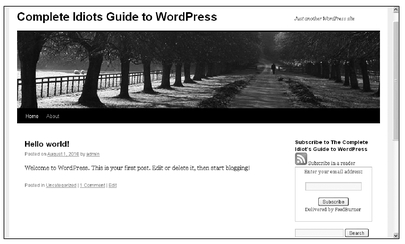
Using your mouse, highlight everything in the text box on the Subscription Management page and copy that code. Return to your WordPress dashboard Widgets page, where you can paste that code into a text widget. Typically, e-mail subscriptions are included directly beneath feed reader subscription links, as shown in Figure 20-20.
Figure 20-20 An e-mail subscription form works well directly beneath the feed reader subscription link.
Keeping It Simple
Instead of including the entire e-mail subscription form in your blog’s sidebar, you can just offer a link that invites visitors to subscribe by e-mail. When they click on that link, a new page opens where they can complete and submit the e-mail subscription form.
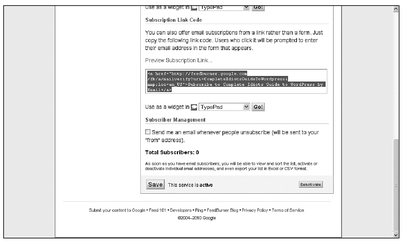
If you’d prefer to include a subscription link rather than a form, you can get the HTML code for the e-mail subscription link by scrolling down the Subscription Management page shown in Figure 20-19 until you find the Subscription Link Code section, shown in Figure 20-21.
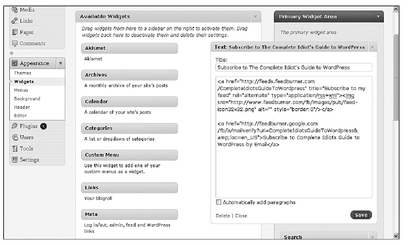
Using your mouse, highlight everything in the text box in the Subscription Link Code section and copy that code. Next, return to the Widgets section of your WordPress dashboard, and paste the code into a text widget. In Figure 20-22, you can see that code pasted directly beneath the RSS icon subscription link code already in use.
Figure 20-21 Copy the Subscription Link Code HTML to paste into your blog’s sidebar.
Figure 20-22 Paste the Subscription Link Code HTML into a text widget in your blog’s sidebar.
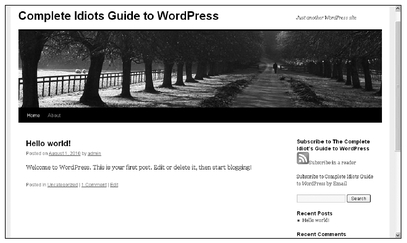
Click the Save button in the Text widget, and view your changes on your live blog, as shown in Figure 20-23. Notice both the RSS icon subscription link and the new e-mail subscription link are both included in the Subscribe to the Complete Idiot’s Guide to WordPress widget on the live blog.
Figure 20-23 Feed icon and e-mail subscription links take up little space in your blog’s sidebar.
That’s all there is to it! Your blog is now ready for subscribers via feed reader and e-mail.
Customizing Your Blog’s E-Mail Subscriptions
One more thing we need to cover before moving on, and that’s configuring the e-mail messages people receive when they subscribe to your blog via e-mail.
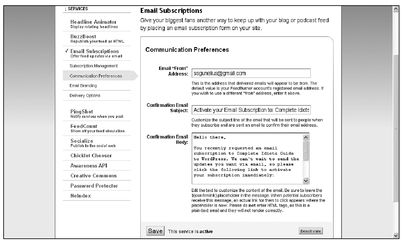
First, visit the Email Subscriptions section of your FeedBurner account and click the Communication Preferences link in the left menu. This opens the Communications Preferences page shown in Figure 20-24.
In the Email “From” Address field, be sure the e-mail address shown is the one you want subscribers to see your feed e-mails come from.
The Confirmation Email Subject field includes the text that will appear in the e-mail subject line people receive after they subscribe to your blog. This e-mail is sent primarily to confirm that the e-mail address entered in the subscription form is the correct one for sending feed update e-mails. You can change this text to say anything you want.
PROCEED WITH CAUTION
The primary purpose of the e-mail is to confirm the subscriber’s e-mail address. Be sure your e-mail subject and body don’t detract from that purpose.
Figure 20-24 Set up your e-mail subscription communications preferences right away.
Finally, the Confirmation Email Body field is where you can enter the text you want to send within the confirmation e-mail. You can change this to say anything you want.
When you’re finished editing these fields, click the Save button.
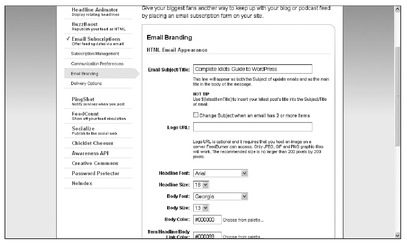
Next, click the Email Branding link in the Email Subscriptions section of your FeedBurner account left menu to open the Email Branding page, shown in Figure 20-25.
Figure 20-25 You can edit the appearance of the e-mails subscribers receive from your feed.
You can change the Email Subject/Title of the feed update e-mails subscribers receive, and you can even add a logo (which must have already been uploaded online, for example, through your WordPress account) to your feed e-mails. Just enter the URL where the logo was uploaded into the Logo URL field.
Also, take some time to review the fonts, font sizes, and font colors used in your subscription e-mails. You can change each of these elements to make your e-mails easier to read or match your blog’s color palette for consistent branding. Just scroll down to the bottom of the page to see how your changes will look in your feed e-mails. Be sure to click the Save button when you’re finished.
QUICK TIP
Subscribe to your blog via e-mail and take a look at the e-mails you receive to ensure they look just the way you want them to when subscribers receive them.
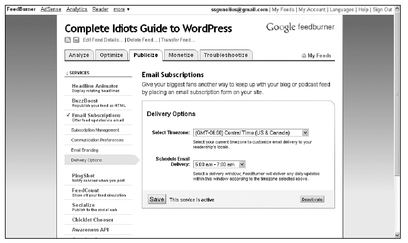
The last Email Subscriptions settings you need to configure can be found by selecting the Delivery Options link in the Email Subscriptions section of your FeedBurner account. This opens the Delivery Options page in Figure 20-26.
Figure 20-26 Configure when your feed update e-mails are sent each day.
The first thing you should do is choose your time zone using the drop-down menu in the Select Timezone section. Then use the drop-down menu in Schedule Email Delivery to select the time of day you want your subscription e-mails to go out. If there are updates to your blog, FeedBurner will send an e-mail with those content updates to e-mail subscribers during the time frame you select in this section.
As always, click the Save button to put your changes into effect, and you’re done!
Tips to Boost Subscribers
Aside from the most obvious tip to boost subscribers to your blog—write great content that people want to read—there are other tricks you can use to remind and encourage people to subscribe. Following are a few easy and effective suggestions.
Make It Easy to Subscribe
Be sure to include links to subscribe to your blog via feed reader or e-mail in an easy-to-see space on your blog, such as at the top of your sidebar. You can use the subscription links and forms discussed earlier in this chapter or use creative icons and graphics, as discussed in Appendix B.
Ask People to Subscribe
Include a closing at the end of your blog posts that invites subscribers such as, “If you liked this blog post, why not subscribe to my blog via feed reader or e-mail?”
Be sure to link both “feed reader” and “e-mail” to the same URLs people land on if they click both sign-up links in your blog’s sidebar.
Get Some Help from a Plug-In
A WordPress plug-in called What Would Seth Godin Do (WWSGD) can help you get more subscribers to your blog. Seth Godin is a marketing professional who advocates using browser cookies to identify new versus returning visitors to a website for marketing purposes. The WWSGD plug-in uses that same idea to identify new versus returning visitors to your blog.
Once installed, you can write a custom message for new visitors and a separate custom message for returning visitors, which you can position at the beginning or end of your blog posts. You can even configure how many times a new visitor will see the “new visitor” message before he or she will receive the “returning” visitor message.
DEFINITION
A cookie is a piece of text data stored on the computer of an Internet user’s web browser. Websites store cookies on people’s computers to keep track of their browsing activities on that site. For example, cookies might be used to store username and password data so you don’t have to retype that information into a login page every time you visit it. You can delete cookies through the web browser at any time. Web browsers also offer an option to turn off cookies entirely, so they’re never stored.
For example, you could configure a message for new visitors that says, “If you’re new here, you may want to subscribe to the RSS feed. Thanks for visiting.” The words “RSS feed” should link to your subscription page.
Offer a Freebie to New Subscribers
You can offer a special report, an e-book, or another useful resource or tool you create to all new subscribers, or you can offer a special gift that’s simply a desirable giveaway. You could even tie the special gift to a contest on your blog where all new subscribers are entered into a random drawing to receive a great prize!
The choice is yours, but experiment a little to see what tactics your readers respond to when it comes to boosting subscribers. Don’t be shocked to see the number of subscribers to your blog fluctuate significantly. The key to success is to remember that long-term sustainable growth is most effective, so try not to sweat the numbers. Your subscribers will grow in time.
The Least You Need to Know
• You can set up your blog’s feed and publicize it on your blog within minutes.
• FeedBurner is the most popular tool for burning feeds and analyzing feed statistics.
• Visitors to your blog can subscribe to your blog’s feed via feed reader or e-mail.
• Don’t sweat the numbers. Feed subscriptions are likely to rise and fall sporadically. Growth over time should be your primary goal.
