Chapter 22
Web Analytics
In This Chapter
• Introducing web analytics
• Knowing what to track on your blog
• Testing, tweaking, and trying again
• Popular web analytics tools
If you want your blog’s audience to grow, you need to do more than publish great content, network, and build relationships. You also need to keep track of what is and what isn’t working on your blog. In other words, by analyzing traffic trends and the behavior of the users when they visit your blog, you can create more of the content they want, continually meet their expectations, and build your audience.
The type of data you track, how frequently you do so, and what you do with that information is entirely up to you and depends on your blogging goals. This chapter teaches you what kind of data is available for you to track and introduces you to some of the most popular web analytics tools so you can get started tracking immediately.
What to Track and Measure
If you create an account with a web analytics tool, you’re likely to be overwhelmed at first by the amount of data available to you. Don’t worry! You don’t need to look at all the numbers immediately. In fact, depending on your blogging goals, there’s likely to be a lot of data you’ll never look at, and that’s absolutely fine. The key is knowing that just because all this data is available, doesn’t mean you have to use it.
Sit down and think about your blogging objectives. Are you just blogging for fun and have no goals for building an audience? Are you hoping to build a highly successful and popular site? Do you want to make money from your blog? Your answers to these questions, along with your ultimate blogging objectives, will determine what data you should begin tracking.
For example, if you want to build a successful blog and make money from it, you need to work on growing your blog’s audience of new and repeat visitors. With that in mind, you’ll want to track three things:
• The keywords people are typing into their preferred search engines that lead them to your blog
• What sites other than search engines are sending traffic to your blog
• Which of your blog posts are getting the most views
Starting with just these three areas will keep you from getting overwhelmed with mountains of data. You can add additional tracking efforts as you get more comfortable tracking and analyzing the data.
What Am I Looking At?
Most web analytics tools offer similar types of data for you to track. In fact, when you create a new account with a web analytics tool, you’ll be bombarded with links, tabs, and data overflowing with terminology you may not be familiar with.
Here are some of the most common terms you should be aware of as you start analyzing your blog’s performance statistics:
hit Web analytics tools count a hit to your blog every time a file downloads from your site, including image files, flash files, data files, and more. Hits cause an inflated view of your blog’s popularity and are no longer used as a reliable measure of a site’s traffic patterns.
visit A visit is counted each time your blog is accessed. If a person accesses your blog more than once, two visits are counted.
visitor Anyone who visits your blog at any time is considered a visitor. Visitors can be counted multiple times if they visit your blog more than once.
unique visitor Unique visitors are counted only once, regardless of how many times they visit your blog.
return visitor Visitors who access your blog more than once are called return visitors.
page view Each time a visitor views an individual page on your blog (including blog posts), a page view is counted.
INSIDER SECRET
The page views metric is most commonly viewed to determine the true popularity of a website or blog in comparison to others. Advertisers also use it to compare apples to apples when purchasing online ad space because page views tell them exactly how many times their ads will be displayed to visitors.
referrers The search engines, websites, blogs, or other online destinations that lead a visitor to your blog via a link to your blog content.
keywords, keyword phrases The word or words visitors typed into their preferred search engines that produced the search results that brought them to your blog.
top pages viewed The pages within your blog that have been viewed the most.
bounce rate The percentage of visitors to your blog who leave immediately after arriving at it.
What’s Working … and What Needs to Change?
It’s important to understand that traffic spikes might appear in your web analytics data. There are many reasons why your blog might suddenly get a burst of traffic, and it’s important to determine what the catalyst was. Doing so helps you determine if the traffic spike can be replicated (assuming it came from a positive source and reason).
For example, if one of your blog posts is linked to from a highly popular website or blog, you might see a huge spike in traffic for a day or more. You’d be able to identify this by reviewing the top pages viewed and referrers statistics in your web analytics data.
Alternately, if you see a jump in a keyword that doesn’t usually drive significant traffic to your blog and an increase in traffic to a specific post, you may have written a post about a hot topic that became a form of link bait, driving traffic from a variety of sources to your blog. (See Chapter 19 for more on link baiting.)
QUICK TIP
A traffic spike is usually significant and very noticeable. Take a few minutes to determine what changed during the time traffic increased to your blog so you can adjust your content and promotional strategies in the future.
Just as you want to keep track of surprising changes to your blog’s performance, you should also look for trends that will help you create a better long-term blogging strategy. For example, if you see specific keywords start to pick up more traffic, older posts staying strong and continuing to perform well into the future, or continual traffic from a specific referrer, shift your attention to those areas and leverage them. Something is clearly working to cause these trends, and those are activities you want to continue doing.
Similarly, if you see negative trends, those are activities you need to change. For example, if links at the top of your sidebar lead to pages or posts that get very little traffic over time, move those links and put other content into that prominent spot in your sidebar. Or delete those links entirely if they’re getting very little activity.
When you make changes to your blog, be sure to track the results. Part of developing a successful blog is testing new layouts, links, designs, content, and so on. Fortunately, many web analytics tools can help you determine if those changes are helping or hurting your blog.
Tools to Track Your Blog’s Performance
As mentioned earlier, many free and low-cost tools enable you to track a wide variety of statistics related to your blog’s performance. As always, analyze your goals and your budget and confirm that a web analytics tool will work with the version of WordPress you’re using before you pay for an account. Appendix C’s “Web Analytics Tools” section lists some of the most popular options.
PROCEED WITH CAUTION
Some web analytics tools, like Site Meter, use JavaScript coding to work.
WordPress.com does not allow JavaScript, so these tools might not work on your blog. Be sure you check the most recent WordPress rules and offerings as well as the current documentation for web analytics tools before you pay for a web analytics account.
If you try multiple web analytics tools, don’t be surprised to see different statistical data for your blog from tool to tool. No web analytics tool is perfect. I’ve used many of the tools in this chapter (both free and paid versions), and I’ve been happiest with Google Analytics for tracking the performance of my personal blogs and websites. Of course, it’s always best to test tools on your own blog and choose the tool that works best for you.
Adding Google Analytics to Your WordPress Blog
Google Analytics is the most comprehensive free web analytics tool. Not only does the Google-owned analytics tool offer tons of data, but it’s also easy to insert the necessary tracking code into your WordPress blog. Furthermore, you can access Google Analytics along with all other Google tools, such as FeedBurner (discussed in Chapter 20), Google AdSense (discussed in Chapter 24), and more, all with the same user account.
The process of adding the necessary code to your
WordPress.org blog so a web analytics tool can begin tracking your blog’s traffic and performance is fairly similar from one tool to the next. Typically, you have to create an account, provide some configuration information (such as your blog’s URL), and copy and paste some provided code into your blog. As an example, the following directions teach you how to create and copy Google Analytics tracking code into your self-hosted WordPress blog.
QUICK TIP
Some WordPress themes offer special features that make it very easy to insert your Google Analytics tracking code into your blog. If the option exists in your theme, go ahead and use it! Usually, themes that offer this feature provide a special text box within your WordPress dashboard configuration settings where you can simply paste the requested information related to your Google Analytics account.
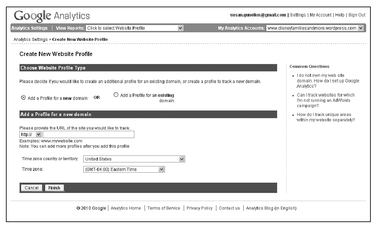
First, you need to sign in to your Google Analytics account, which takes you to your Account Overview page. Here your new account is shown in the list of accounts at the center of the page. Click on your account link to open it, scroll to the bottom of the page, and click the Add Website Profile link to open the Create New Website Profile page, which is shown in Figure 22-1. Note that the Add Website Profile link is also available to the right of your account listing.
Figure 22-1 Enter the information for your blog into the Create New Website Profile form.
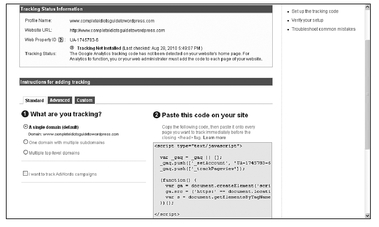
When you’re done entering the required information, click the Finish button to proceed to the Tracking Code page, shown in Figure 22-2.
Figure 22-2 Copy the tracking code so you can paste it into your WordPress theme.
Scroll down to the tracking code listed under #2 on the right side of the Tracking Code page. Highlight and copy all the text within the box. This is the code you need to paste into your
WordPress.org theme.
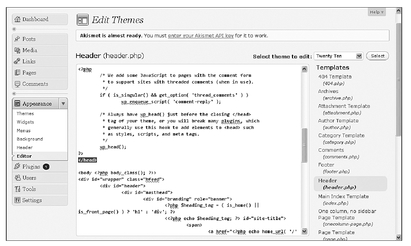
Next, log in to your WordPress account and click the Editor link in the Appearance section of your dashboard’s left menu to open the Edit Themes page. This is the area of your dashboard where you can make changes to your blog’s CSS files. Click the Header link in the Templates list on the right side of your screen to open the header. php file for editing, as shown in Figure 22-3.
Figure 22-3 Paste your tracking code before the </head> tag in your theme’s header file.
Google recommends that you paste the tracking code immediately before the </head> tag in the
header.php file. Just place your cursor immediately before the </head> tag and paste the code you copied from your Google Analytics account in that position. Click the
Save button to save your changes.
That’s all you have to do! Google will begin tracking your blog’s statistics, and you should be able to view data in your Google Analytics account within a day or two.
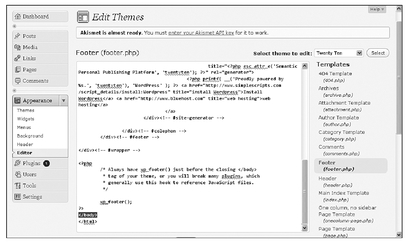
Many bloggers prefer to insert their tracking code in their WordPress theme’s footer file. You can do the same by clicking on the
Footer link in the Templates list on the right side of the Edit Templates page in your WordPress account. This opens the
footer.php file for editing, as shown in Figure 22-4.
Figure 22-4 Paste your tracking code before the </body> tag in your theme’s footer file.
Just place your cursor immediately before the </body> tag and paste the tracking code you copied from your Google Analytics account in that position. Click the Save button to save your changes.
QUICK TIP
The tracking code you paste into your WordPress theme’s header or footer files is invisible on your live blog unless you view the source page on your browser. If you scroll through the source HTML, you’ll find your tracking code exactly where you pasted it in your WordPress dashboard.
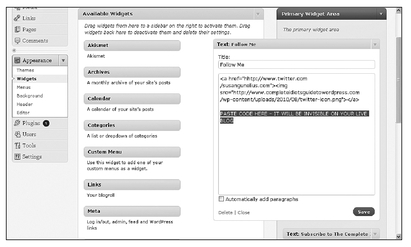
If you’re not comfortable editing your blog’s CSS files, some other alternatives are available to insert your Google Analytics code. For example, if your sidebar appears on every page of your blog, you could insert the code at the bottom of an existing text widget, as shown in Figure 22-5. The code will be invisible on your live blog.
Wherever you decide to paste your Google Analytics tracking code, be sure you don’t paste it in more than one place on your blog or your statistics will be skewed.
Figure 22-5 Paste your tracking code into a sidebar text widget.
Finally, don’t sweat the numbers. Spend more time creating great content, engaging your audience with conversation, and building relationships, and you’ll find your blog continuing to grow consistently over time.
The Least You Need to Know
• Web analytics tools offer a lot of data most bloggers don’t use immediately or ever use.
• No web analytics tool is perfect, and no two tools will give you the exact same data.
• Many free tools are available for you to use. If you choose a fee-based tool, always be sure the tool works with your version of WordPress before you invest any money.
• Adding web analytics tracking code to your WordPress blog usually takes just a few minutes and is as easy as copying and pasting some code into your web analytics account.