A mulch or path of light stones reflects sunlight on the plants and helps prevent fungus disease.
A mulch or path of light stones reflects sunlight on the plants and helps prevent fungus disease.

Growing Lavender
Lavender needs full sun; don’t even think of planting it in your shade garden. But I know some gardeners who are determined to force their own stubborn will on a garden design regardless of the needs of the plants. I’ve seen stunted lavenders sparsely blooming under large trees, their spikes straining toward a stray beam of light. But life is hard enough without placing such a burden on your plants. If shrubs in mixed borders have grown up to shade the lavender almost completely, dig up the lavender and move it to a sunnier location.
Lavenders can stand a brief summer drought if they are established but should be watered if the drought is prolonged. Root rot is one of the few hazards of growing lavender. Plants won’t tolerate standing in wet soil, and it’s helpful to plant them in a raised bed, on a slope, or in a rock garden. In an herb garden bordered by bricks, the beds are often raised at least 6 inches to achieve better drainage. In general, the soil must be well drained and light so that the roots don’t sit for a prolonged time in water. Add sand or pebbles to heavy clay or rich soils to lighten them. Lavender is considered to be moderately droughttolerant and is one of the plants recommended for xeriscaping. It grows beautifully in many areas of the Southwest.
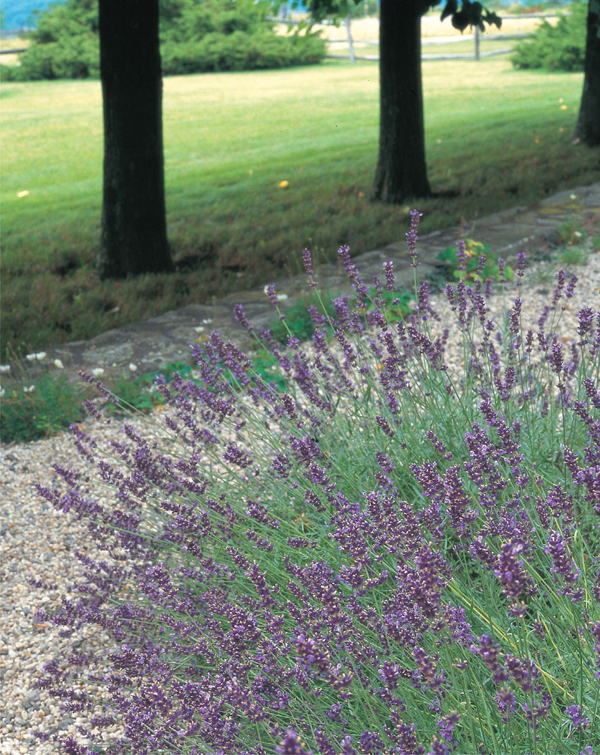
Shade from the tree in a private garden is less than helpful to the lavender underneath. A border of lavenders at Alloway Creek Gardens and Herb Farm (bottom) enjoys full sun.

Soil should be on the alkaline side, though there is latitude of pH 6.5 to 8.3. Some gardeners side-dress with pelletized lime in the spring. Recommendations are for average— not too rich—soil. An addition of compost or well-rotted manure to the top of the bed should be enough fertilizer for the year.
Fungus problems may occur if leaves remain damp. Keep young plants 2 to 3 feet apart to allow for good air circulation between them; they will soon grow to fill in the space. Water in the mornings rather than the evenings so that the sun will dry off the leaves.
Lavenders are described as either hardy or tender. These categories refer to the ability of a plant to withstand frost. You can find out your horticultural zone by looking at the map appearing in most catalogs or by calling your county extension agent. If you want a perennial, select a plant that is hardy in your area. If you have a yen for one that is listed as tender, or you are north of the hardiness zone, treat the plant like an annual by planting it directly in the garden and saying good-bye at the end of the season, or planting in a container that you overwinter indoors and set out again the next summer.
With global warming, horticultural zones are changing. My zone in New York, once listed as 6 is now listed as 7. On newer maps, yours may have changed as well, and one of the few selfish benefits may be that we in the North can grow some species that were always too tender for us.
What a horticultural map can’t tell you is the particular microclimate where you want to plant. In San Antonio, Texas, there is a difference of one whole zone between those plants growing aside the famous river walk and those growing at street level, a few flights of steps above the river. The protection of the stone walls and the reflection of the warmth from the water make different plantings possible at the two levels.

The triple crown of lavenders—blue, pink and white—growing at Purple Haze Lavender Farm.
You always wanted a bed of lavender? Here’s your chance at Lost Mountain Lavender.
If I wasn’t sure of the hardiness of a plant, I placed it in a bed on the east side of my old stone farmhouse, where it was protected from the ever-present westerly winds and warmed by the radiation from the stone. South would be even better, but that’s where my driveway was.
Zones are based on average temperatures, and some winters are above or below average in temperature and rainfall. During a recent mild winter, the warmest on record in northeastern Pennsylvania, some of the tender lavenders I had decided to treat as annuals survived. Snow may protect plants from heavy winds and from drying out. One extra dry winter, I lost some azaleas that had done well for many years. Another winter, my perennial verbena decided to call it quits after several weeks of extraordinarily low temperatures. If you take a philosophical attitude when you lose a plant and view the loss as an opportunity for a design change rather than a tragedy, you can experiment with some plants on the borderline of your hardiness zone.
Attack the catalogs with a sense of humor and the attitude of a scientist performing an experiment, because there is often inconsistency between labels of seeds and plants, and even among catalogs. Lavender ‘Lady’ is listed as hardy in zones 5 to 8 in one catalog, 5 to 9 in another. Catalog copy, which slipped past the editor’s eye, lists ‘Lady’ as hardy in zones 6 to 10 on one page and 5 to 9 on another. Still another catalog lists ‘Lady’ as tender. It can be confusing. But if you are in zone 3 or 4 and want perennial lavender, try L. angustifolia ‘Hidcote’ or ‘Munstead’ in a sheltered location and insulate with deep mulch. Toorich soil tends to make the plants less winter hardy, so go easy on the fertilizer during the growing season.
Humidity is more of a threat than heat, as lavender may succumb to fungus disease as one of its few problems. In extremely hot, humid areas, treat even hardy lavenders as annuals, and be prepared to replant every year as you would your tulip bulbs.
If you want to mulch your lavender beds, avoid bark, hay, and pine needle mulches, which might retain too much moisture. The best mulch is a 2-inch cover of white sand, white pebbles, or oyster shells, any of which will reflect the sunlight back on the plant, hasten drying of rain or dew, and thus help prevent fungus diseases. You can also help prevent fungus problems by leaving some room for air circulation around your plants. The distance between plants will of course depend on the ultimate size of the plant; some shrubs will grow to as much as 5 feet across if they are happy with their situations. With a dwarf species, perhaps 12 to 18 inches across is the expected diameter. When you look carefully at photographs of the purple haze that represents commercial lavender beds, you realize that while the shrubs may be touching down the row, they are mostly planted on raised beds and there might be 3 feet of air space between the rows.
Few insects in the North America affect lavender, and gardeners on both coasts report that deer and gophers ignore the lavender plants as they enjoy the rest of the garden cafeteria. In fact, some gardeners believe that interplantings of lavender among more tasty species may help ward off deer.
Root rot is the other common problem that your garden lavenders may face. Help prevent this problem by not overwatering and by waiting in the spring until the soil has warmed before setting out new seedlings.
Occasionally Alpha Mosaic Virus (AMV) may attack plants, resulting in bright yellow patches on the leaves. AMV won’t kill the plant but reduces vigor and appearance. Affected plants should be dug and burned.
One disease common in Europe is a fungus called shab. Spores on the stem produce black spots; this eventually kills the plant. It causes the stems to wilt, wither, and die. If you notice this happening, pull it up and burn the plant, as there is no cure, and the spores can easily infect other plants. Use alcohol to wipe gardening clippers or other tools you have used on sick lavenders before working your way around a garden bed, in order to avoid spreading infections.
Prune in fall or spring after danger of hard frost each year, shaping the plant into a mound and lopping off about one-third of the top and sides. This process will encourage new growth and prevent the growth of woody and gnarled stems that make a five-year-old plant look ancient.
Drastically cutting an old plant back to the heavy wood may kill the plant, so it’s better to be faithful about pruning from the first spring after planting. If you do have an older plant that hasn’t yet been pruned, approach the lavender with sharp clippers and a three-year plan. In spring when the first new growth is evident, cut about one-third of the stems back to within a few inches of where the woody part starts. Trim the rest of the stems back about one-third of the way. For the next two years, cut another third of the stems back near the wood and just trim all the remaining stems. In this way, you will prune the whole plant in three years without causing too drastic a shock to its system.
Both seedlings and mature plants are available from local garden centers, on the Internet, and by mail, from 4-inch pots to 1-gallon containers. Some sources are listed on page 133. Experienced gardeners know that no matter how reliable the source, varieties may get mixed up or mislabeled. If your purchase is growing much taller than it should, or the leaves are wider than usual, you may have a mislabeled variety. Nevertheless, you can still enjoy the plant for what it is.
Lavender shrubs are pruned with a gently rounded shape, leaving some room for air circulation in between.
You will pay more for larger plants than for seedlings, but you may decide it’s worth it to get well-established plants, as young plants grow slowly. Since plants are usually propagated from cuttings in the nursery trade, check that there are roots established in a 4-inch pot and that you are not just buying a cutting freshly poked into the soil. Gently turn over the container and tap out the plant into your hand to check for visible roots. If there are none, wait a few weeks and try again, looking for plants that show growth at the tip of the branches.
Equally bad are seedlings with so many roots that when you take them out of the pot, the soil is completely covered with a mass of white threads. Pot-bound seedlings that have been left in the container too long are stressed and will have a difficult time when transplanted to the garden. If you do find yourself with such a plant, take a pencil tip and gently tease out some of the roots before planting in the garden.
Even though I plant seeds of L. angustifolia under grow lights, they look rather pathetic until the second year. By then they’re as sturdy as anything I can buy.

Mail-order nurseries sell uncommon cultivars that you may not find at local garden centers.
If you buy herbs or other plants at a supermarket, hardware store, or big box store, you may get a bargain if healthy plants were delivered to the store within the past day or two. Plants tend to be poorly cared for in such settings, however, and become very stressed after a couple of days. Ask when the next delivery of herb plants comes in, and be there that day.
L. angustifolia can be grown from seed, but most seed companies warn customers that the results are somewhat variable. One packet of seeds will result in plants that are not totally uniform. If you want some plants to fill a few spots in your perennial beds, this may not be a problem, but if you want to plant a hedge, it might be best to keep the plants in a holding bed for a year to see what you’ve got before investing your efforts in what turns out to be an irregular border. Examine your plants after a year, and select those that are most similar to each other.
To confuse the issue, L. angustifolia seeds are also sold under the names English lavender, true lavender, L. spica (or spike lavender), L. officinalis, and L. vera. I asked one seed company why they were using old names on the seed packets, and the head horticulturist replied that they had an overabundance of printed packets and wanted to use them up before changing the name. No wonder gardeners are confused! If you want one of the cultivars, look for ‘Hidcote’, ‘Munstead’, or ‘Lady’.
‘Lady’ earned the coveted All-America Winner award for 1994. It was touted as blooming the first year from seed, with a compact height of 12 inches, compared with the straight species listed at 30 inches, and appropriate for zones 5 to 9. I planted the seeds in doing my research for this book, and although the plants were small, they did indeed bloom in September of the first year, one or two stems per plant.
Seeds should be started in flats in a soilless mix eight to ten weeks before the last frost date in your area. Sprinkle on the surface and tamp down without adding more soil. Stratify for three weeks by covering with plastic wrap and putting in a cold frame. Lacking a cold frame, I put some in an old refrigerator in my basement and some outside right next to a south-facing stone wall, covering the flat with boughs cut from a discarded Christmas tree. Both methods seemed to work, as the seeds showed a high rate of germination. After being removed from the cold frame, the seeds need light to germinate. I put mine on a windowsill. One tray that got overwatered did not tolerate the experience well and ended up on the compost heap.
After hardening off, plant hardy species in midspring, clustering plants with bulbs or perennials.
As with all seedlings, harden them off by placing in a protected location out of full sun for about five days before planting out in the garden. Wait to plant until after the last frost date, and until the soil has warmed up a bit. Continue to water the first year, but make sure the drainage is good at the planting site so that the seedlings don’t sit with wet feet for a prolonged period. Some experts suggest cutting off all flower spikes the first year as they start to develop, and long before full bloom, to put more strength back into the plant, but I confess that I let my lavender spikes bloom the first year, even if it takes more time for the plant to become fully established.
L. x intermedia cannot be grown from seed because it is a hybrid and is sterile. If you have visions of growing masses of ‘Grosso’, don’t look for seed but plan on either taking cuttings from a friend or layering from a plant already in your garden.
When you take cuttings, you know you will get plants identical to the mother plant, a cloning process. Another advantage is that you don’t even have to own the mother. It’s a rare friend or neighbor who won’t generously offer you several pieces from his or her prized specimen if you make your wishes known. To sweeten the pot, why not offer some prize of your own in trade? Taking cuttings surreptitiously from a garden center or herb farm is not fair game, however tempting. Gardeners are among the most generous people, unless you swoop down in a public garden or on a home garden tour and pinch a piece into a plastic bag. A gardener who observes such behavior may come at you with hoe in hand.
To take a cutting, find a nice, small branch—approximately 6 inches—grasp the tip, and gently pull down to break off. The cutting must have a piece of the union or heel from the trunk of the plant in order to grow, so it’s better to break off the piece than to cut it with clippers. Take off the lower leaves, but leave the upper ones. Stick the end in water, then dip in rooting powder. Make a hole in the ground with a dowel or fat twig, and stick the cutting in the hole, leaving only about 1 inch above ground.
Lavender farmer Pauline Pettitt-Palenik, in zone 7, likes to take cuttings in the fall, when most of her other garden work is done. She places her cuttings in pots in a cold frame and covers them on days of hard frost. Roots will develop and will continue their growth at the first signs of spring. At the end of the summer, her one-year-old plants are full and robust.
Those without cold frames, and lazy gardeners such as myself, prefer to take cuttings in mid- to late spring, when there is little chance of heavy frost. Keep watered but well drained until established. By the end of the summer, the plants will be smaller than those propagated from the same mother in the fall, but still viable.
In spring, start with one mother plant well established in your garden. Water the soil around the plant. Select an outside branch of pliable wood, and bend it gently to the ground. Measure 8 to 12 inches from the growing tip, and mark the spot on the ground where this point touches the earth. Strip the leaves and side branches off the branch you have chosen, leaving only about 6 inches of leaves at the tip. With a trowel, dig a small trench 3 to 4 inches deep at the site you have marked. Rodale’s Encyclopedia of Gardening suggests wounding the stem at the burial point by making a small cut and inserting a toothpick at the wound site to keep it open. Dust the wound with rooting powder. Pin the wounded stem into the hole with a wire pin, and cover the area with soil. Stake the remaining branch tip so that it stands upright. Water thoroughly, and keep watered and weeded. Check in the fall for root growth by gently removing soil from the area. Remove the anchoring pin and gently pull to feel if there is resistance from roots. If there is, cut from the mother plant but leave in place till the next spring, when it can be transplanted to a new site. If the branch hasn’t rooted, don’t make the cut, and recheck in the spring.
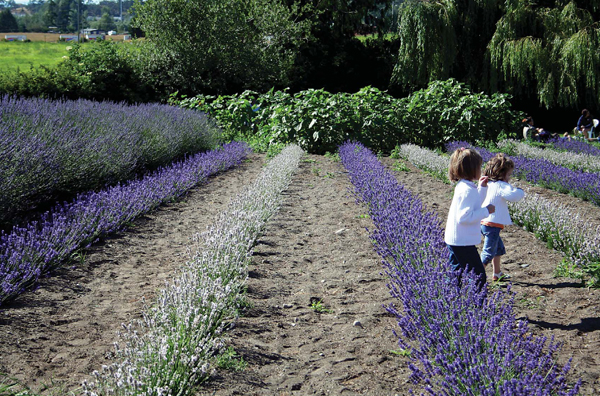
Sandy soil works best, especially when leaving lots of room between rows of young plantings for later growth.
Layering can be successful simply by bending down a branch and burying the middle part in dirt, without the wounding, dusting, and staking. In fact, some sprawling plants will layer themselves naturally and root without any assistance. These can be cut from the mother plant, left in place over winter, and transplanted in spring.
While you are layering and have all the materials at hand, it makes sense to try the technique with five or six branches. Think what a wonderful supply of new plants you’ll have come spring.