A simple lavender bundle wrapped in lace can be displayed on a powder room shelf or used to scent a drawer.
A simple lavender bundle wrapped in lace can be displayed on a powder room shelf or used to scent a drawer.

Lavender Projects
Traditional lavender wands use fresh lavender and weave ribbons in and out among the stems in such a way as to encase the flowers among the ribbons— a tidy way to have the scent without risking the dried buds dropping onto your linens. These bundles display dried lavender and are easier to make. I love to see the purple-blue flower heads rather than hide them. Place the bundle where it won’t be frequently moved or handled, and you’ll enjoy it for many years.
WHAT YOU NEED
two clusters dried lavender
two rubber bands
8-inch round lace doily
small bow
clippers
glue gun and glue sticks, thick white craft glue, or needle and thread
1. Put a rubber band around each cluster of dried lavender, and lay the clusters in the center of the doily, stems end to end. Trim the stems with clippers if they obscure the flowers on the other side. A bundle about 9 inches long should do nicely.
2. Bring up the two sides of the doily to make a tight wrap, and fold the edges back. Secure the center of the doily with a few drops of hot glue, craft glue, or a few stitches with needle and thread.
3. Attach a small bow in the center in the same way.
A hand-crafted lavender wand makes a delightful hostess gift. Even better, keep it to enjoy yourself! ALAN AND LINDA DETRICK
Use fresh lavender to create this traditional craft. Nestle lavender wands among your cherished linens or your best lingerie to gently scent your favorites. Each time you open the drawer you’ll be treated to the fragrance. Renew the scent after some months by gently squeezing the wand to release more of the aromatic oils. Years later, your wand will still be giving pleasure. Or you may prefer to leave the wand out on a shelf in the bathroom where the color and patterns can delight the eye. Here, the aroma rises when the room gets steamy.
WHAT YOU NEED
fresh lavender with long stems, (35 stems used here)
four yards narrow ribbon, 1/8 to ¼ inch
scissors and clippers
1. Cut off 24 inches of ribbon and set aside.
2. Run your fingers along each stem of lavender to strip off all the leaves.
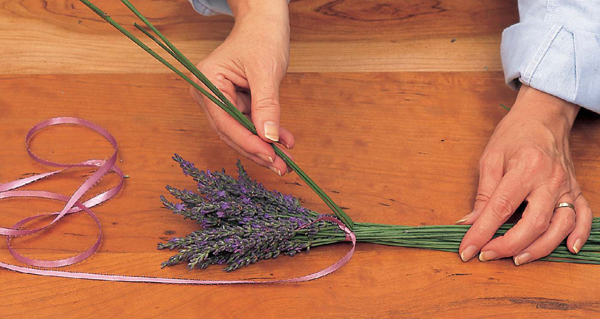
3. Bunch all of the stems together and tie with a knot just under the blossoms. Use one end of the long ribbon to do this, leaving the rest of the piece dangling.
4. You will be weaving the ribbon in and out among groups of stems. You must have an uneven number of groups. I started with 35 stems and divided them into 7 groups of 5 stems each.
Use only fresh cut lavender to construct a wand, so the stems don’t break as you bend them back to encase the flowers. ALAN AND LINDA DETRICK
Weave the ribbon under and over groups of stems until all the flowers are hidden. ALAN AND LINDA DETRICK
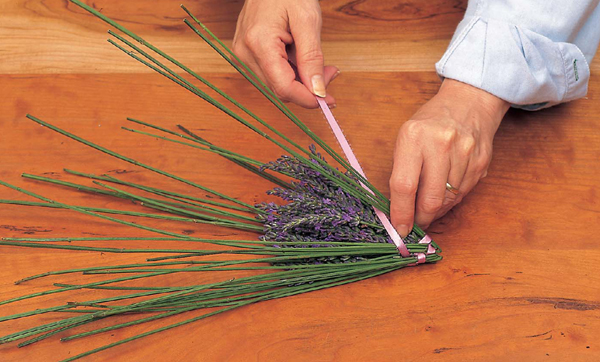
5. Grasp 5 stems that are near each other and gently bend them down over the flowers as shown. Take the ribbon at the knot and place over this group. Now bend down another group of 5 and weave the ribbon under. This start is the only tricky part of making the wand.
6. Continue bending down the rest of the stems in groups of 5, weaving the ribbon under and over each group. Because you have an uneven number of groups you can keep weaving over and under in a regular pattern until you have formed a nice checkered pattern with the ribbon and have totally encased the flowers in a woven cage. Pull the ribbon tautly as you weave because the lavender shrinks as it dries.
7. Tie the wand at the base of the weaving with the reserved piece of ribbon. Tie the woven piece into the bow as well for a third streamer.
8. Trim the ends of the ribbon and the ends of the stems.
9. Leave out in a warm, dark, dry spot. The wand will dry in about a week. Then place in a drawer or on a shelf as desired.
You can make bigger or smaller wands by starting with more or fewer stems, but the total number of stems must always divide into an uneven number of groups. If you want a bigger wand you could use 49 stems divided into 7 groups of 7 stems. For a small wand use 15 stems—5 groups of 3 stems each. Naturally, the length of ribbon needed will vary with the size of your bunch.
Lavenders vary in color from white, pink, and pale lilac to darkest purple. For the wand, since the flower color will be hidden, it matters little. The length of the stems, however, is critical if you want a nice big wand. The varieties of Lavandula x intermedia, intermedia, to 40-inch stems, making them perfect for this project. Be sure to make the wand within a day of cutting so the stems won’t break as you bend them to form the cage.
Make this lavender as long and as full as you wish, and because its base is a wire, you can make it any shape: an elongated S curve to hang over a bed, an inverted U to drape over a mirror or picture, an L-shaped corner piece to frame the molding on a door or window, or a small M such as shown here. Modify the instructions below to suit the shape of your garland.
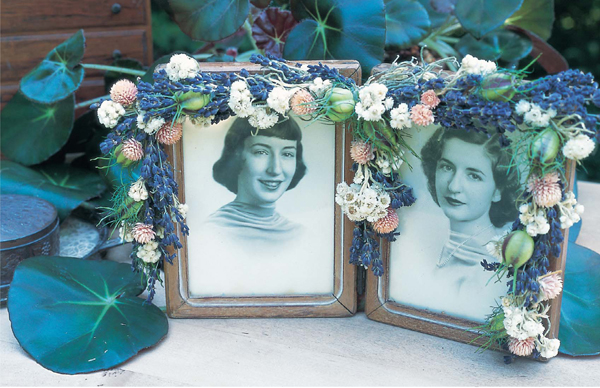
This garland, used to adorn the graduation photos of two sisters, is small and delicate, but the same technique can be used to make massive arrangements.
WHAT YOU NEED
16-gauge wire (from any hardware store)
wire cutters
hand clippers
florist’s reel wire
lavender and other dried flowers, such as pearly everlasting globe amaranth and love-in-a-mist
glue gun and glue sticks or thick white craft glue
bow (optional)
1. Cut the 16-gauge wire to the desired length, taking into account the extra wire needed for any curves, and bend it into the desired shape.
2. Plan ahead! For most shapes, start making the garland at one end of the frame and work toward the center. Upon reaching the center, bind off and start at the other end, again working toward the center. A bow or extra flowers will form the focal point at the center of the garland. If you want a continuous piece, start at one end and work all the way to the other.
3. For the small M shape shown here, tie the florist’s reel wire to the bottom of one leg of the M. Take a small cluster of mixed flowers and lay them on the frame with the stems pointed upward, heads just past the bottom of the leg. Wrap tightly with reel wire once or twice to bind them in place.
4. Take another cluster of flowers and lay them on top of the stems of the first, hiding the stems, and bind them in place with wire. Continue this process, working up the leg of the M.
5. As you reach the corner, cut the stems shorter. Keep working across the top and down to the middle point. After binding the last bunch, tie the wire securely in the back of the garland and cut off.
6. Tie the reel wire to the bottom of the other leg and repeat the above steps, meeting the other flowers at the top center.
7. Glue on extra flowers where necessary to hide stems and add fullness.
In sunny Provence, France, where vast fields of lavender are planted to supply the perfume industry, bright blues and yellows are a traditional favorite in home decor. The delicate wreath on the next page uses dried buttercups and wild mustard from the meadows near my home in Pennsylvania to complement the lavender-blue L. angustifolia. The base is made from wire, which means that you can make the wreath any size and shape, and for minimal cost.
WHAT YOU NEED
16-gauge wire (from any hardware store) florist’s reel wire, 22- to 26-gauge hand clippers
wire cutter
dried lavender and other flowers
1. To form the wreath base, measure enough 16-gauge wire to make a circle about 12 inches in diameter, and cut it from the roll. If you have a modest supply of flowers, start with a smaller wreath base.
2. Bend one end back 1 inch to make a hook. Slip the other end through and bend back to secure the circle.
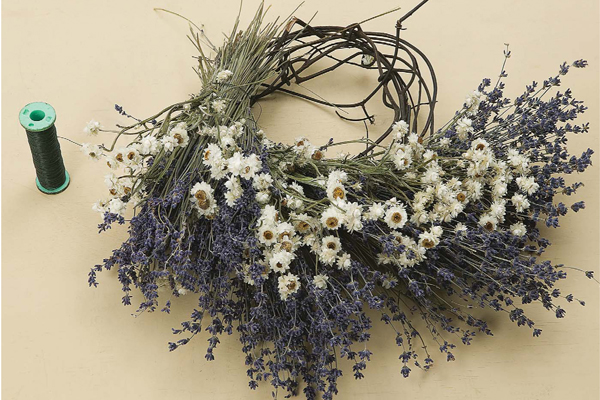
3. Make small bundles of dried lavender and other flowers, cutting the stems 8 to 10 inches long. Tie a piece of florist’s reel wire to the wire frame; then start wrapping the bundles of flowers to the frame with the reel wire. The number of bundles you use will determine the fullness of the wreath.
This wreath is similar to the Meadow Sweet Wreath just described. However, the base is of vine that you can easily form yourself or purchase at a craft store. Here I’ve chosen two different dried flowers to accompany the lavender, replacing the buttercups and wild mustard with winged everlasting (Ammobium) and roses. Glue the roses on at the end rather than wrapping them on with the other two flowers. That way they’ll be more visible and receive star billing.
WHAT YOU NEED
10-inch vine wreath base
Dried lavender and winged everlasting, stems cut 6 to 8 inches long
dried roses, stems cut 1 to 2 inches long
florist reel wire
garden shears or clippers
hot glue gun and glue sticks
1. Buy a vine wreath base or make one by wrapping long strands of any woody vine like grape, bittersweet, or wisteria around itself. If you start with a 10-inch base, the finished wreath will be about 15 inches in diameter.
2. Tie on the end of the reel wire to the wreath base.
3. Take a small handful of lavender, lay the stems along the wreath with the flowers pointing out at an angle, and wrap the stems tightly to the base. Then add a small bundle of winged everlasting on top of the lavender stems and wrap the wire around to hold them.
4. Continue to alternate bundles of the two flowers until you’ve covered the wreath.
5. Hang the wreath over a hook and examine it carefully. Glue on any extra flowers to fill in bare spaces; then glue on the roses.
Pull the reel wire snugly as you work, covering each group of stems with a new bundle of flowers. ALAN AND LINDA DETRICK
WREATH MAKER’S MAGIC
After constructing any wreath, hang from a nail or hook and check it out. Give the wreath a quarter turn, then another, and another. Keep looking. You will notice that the wreath looks better in one certain position. Often the best ‘bottom’ is where you have inadvertently made the wreath just a little fuller. So never despair that your wreath is uneven when you make it—this little magic trick will make it look balanced.
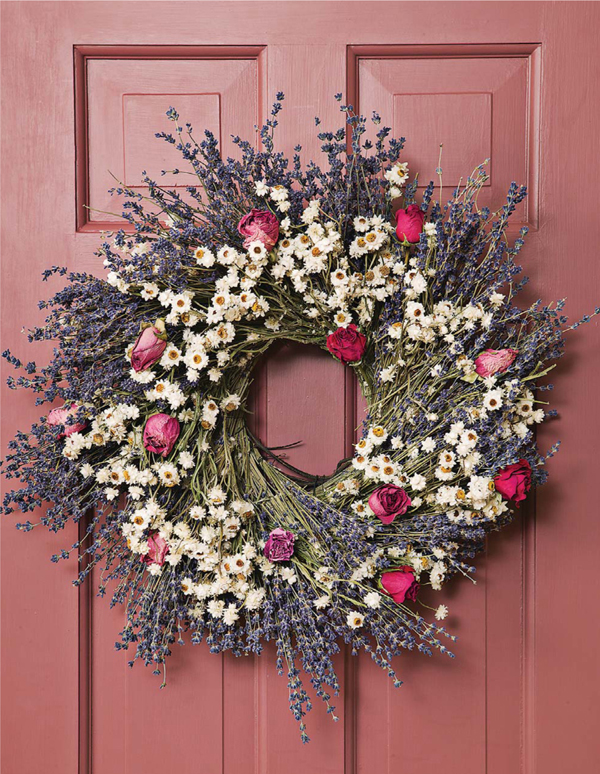
The dried roses here add a colorful touch. You may also substitute any other flower that you have on hand for a different look. ALAN AND LINDA DETRICK
French-Style Stacked Arrangement
The long, straight stems of lavender ‘Grosso’ give you just what you need for making a stacked arrangement. I have clustered the lavender to give it visual prominence, so that it doesn’t disappear among the bold forms of the cockscomb and the cobra lily (Saracenia). Those two flowers are striking as single stems. Note that cobra lily is a protected wildflower in some marshy areas—so either grow your own or buy fresh or dried from a reliable commercial source that is growing it for resale. It dries from the fresh state in about three days if bunched and hung in a warm, dark dry spot. Other flowers with straight, sturdy stems work well in stacked arrangements, including larkspur, roses, globe thistle, yarrow, and safflower. For this design, use a container without a handle. Here I use a 9-inch-square bamboo basket, but a square or rectangular china bowl also looks wonderful.
WHAT YOU NEED
basket or china bowl
one or two blocks of green floral foam (not Styrofoam, which is too stiff)
paring knife
hand clippers
green sheet moss
dried flowers, here lavender, cockscomb, cobra lily, and Queen Anne’s lace
1. Fill the basket or bowl with foam from edge to edge, cutting and trimming as necessary with a paring knife, and cover the foam with sheet moss.
2. Start placing the flowers in the back row, four lilies and a cockscomb, all the stems cut to about 14 inches. Insert into the foam about 2 inches, spacing the flowers evenly.
3. In the next row, place four clusters of lavender. Each cluster has eight to ten stems and is slightly shorter than the back row.
4. Continue forward, each row an inch or so shorter than the row behind. Note that though I have varied the number of cobra lilies and cockscombs in a row, each of the rows of lavender has four clusters. Suit yourself in your design.
5. Finish off the edges with short flowers. Here I’ve used the delicate heads of Queen Anne’s lace, which have been dried flat on a window screen.
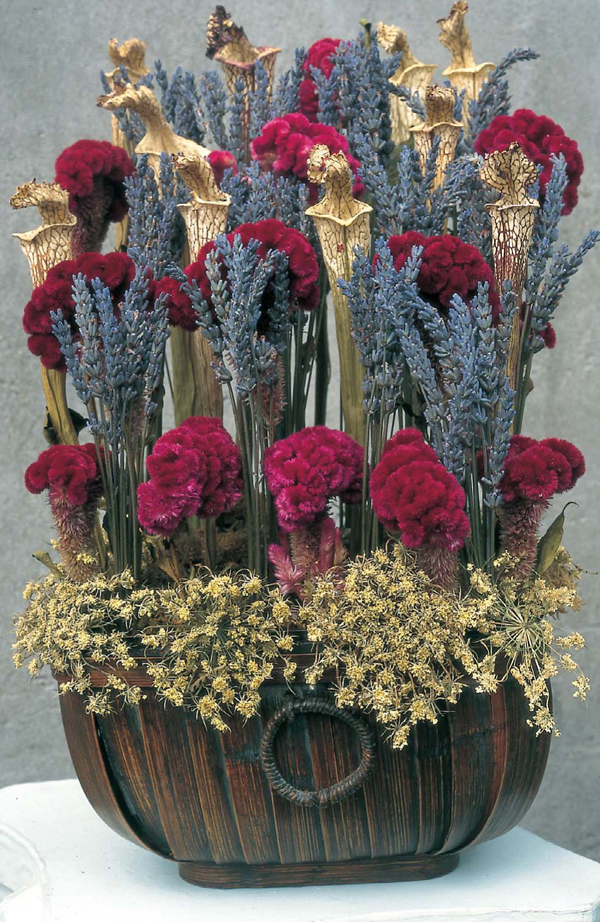
This stacked, French-style arrangement is suitable for a most contemporary setting.
This topiary tower, which can be used as a table arrangement or centerpiece, can be made with lavender alone or with a mix of dried flowers. What I have on hand dictates my design. Here I was in danger of using up my whole lavender supply, so I added pink and purple larkspur and golden touches of air-dried button mums.
WHAT YOU NEED
14-inch Styrofoam cone
floral pins
green sheet moss
sturdy rubber band
raffia or ribbon
dried lavender and other flowers glue gun and glue sticks
1. To make an impressive, 17-inch tower, start with a 14-inch tall cone and cover with green sheet moss. Use floral pins to attach the moss onto the cone. Leave the bottom bare so that the tower will be stable.
2. Start pinning small clusters of lavender, with the stems cut to about 8 inches, at the top of the tower. Allow the flower heads to extend above the point of the cone by 2 inches. Each cluster will have about ten stems. If you try to pin too many at one time, the pin will come loose.
3. Keep turning the tower as you go, working downward. When you reach 8 inches from the bottom, stop. Slip a sturdy rubber band over the cone, 3 inches from the bottom. Now, instead of pinning the clusters of lavender, slip the stems under the rubber band to hold them in place.
4. Tie several strands of raffia or a ribbon over the rubber band to hide it and give extra holding strength.
5. Now add extra stems of larkspur, mums, or other flowers in among the lavender, wherever it looks a little sparse. If you cut the stems fairly short, they need no extra pinning, as the lavender will hold them in place. Glue them in with hot glue if you desire.

A lavender tower can be used on a mantel or table, or wherever some drama is called for.
Decorate a Christmas tree with nosegays of dried flowers and glass ornaments and bows to compliment the color theme. Since I’m building the display around my lavender harvest I use purples, blues, and hot pinks wherever I can.
Select a very fresh tree with dense branches, not a white pine that is too wispy for this project. Stick single stems of hydrangea among the needles all around the tree. Add bunches of other flowers, still wrapped in their original rubber bands, among the branches. Here are purple statice, cockscomb, and globe amaranth. Add some cones that will hold a bunch of lavender in each. Lastly, decorate with your collection of glass ornaments and bows. Stand back and admire the view

Dried hydrangea flowers are an important element on this lavender tree because of their volume. ALAN AND LINDA DETRICK
This much-admired lavender tree, actually a recycled Christmas tree, was beautiful and fragrant. Surprise a visitor by removing a cone of lavender from the tree and giving it as a gift.
Visitors to Meadow Lark Flower & Herb Farm were surprised to learn that this was the previous year’s Christmas tree decked out in a new fashion. The tree had been left in a corner of the yard for almost a year, and all the needles had dropped off. Flat white spray paint completed the transformation.
Use your tree stand or, as here, insert the trunk into an old plastic pot weighted with rocks. Use foam insulator spray from the hardware store, following the directions on the can, to fill in the spaces between the rocks. This will harden completely in about an hour. Put the pot in a decorative jardinière, and cover the base with green sheet moss.
The tree is decorated with posies of lavender tied with ribbon and tucked between the branches and with lavender displayed in cones. Add some bows in a similar ribbon, as well as some traditional tree ornaments in blues and lavenders. Here I tucked rose-colored statice between the branches to add more color.
You can buy metal cones or make your own using ice cream sugar cones from the supermarket. Spray with silver or gold paint, and glue on a small ribbon to serve as the handle.
If properly stored enclosed in a black plastic bag, the tree will last well from year to year. The dried lavender, statice, and sugar cones will also keep one year if carefully packed away. When removing from storage the next year, mist the dried flowers with water and let them sit for thirty minutes to make them less fragile to handle.
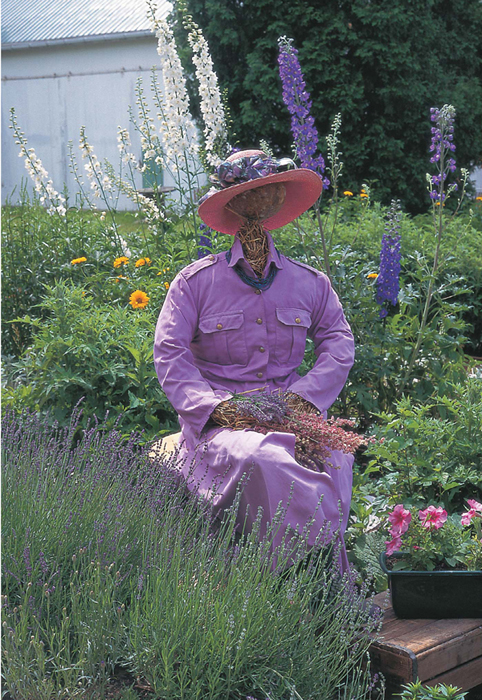
My garden displays usually included a scarecrow, more for decoration than utility, as they actually seem to encourage crows and other birds to make a feast of my scattered seeds. Nevertheless, they do enchant visitors to the garden, both big and small, and maintain a long tradition. This scarecrow was named for Burpee’s ‘Lady’, a variety of L. angustifolia that blooms from seed the first year.
My Lavender Lady sports a dress dyed for the occasion, and if her head seems rather small, it’s because the drought year kept my gourds from achieving the size I aimed for. She must spend the summer minding the lavender patch and thinking small thoughts. This lady was designed to sit on a hay bale or an old wooden reel. The wooden reels that once held electric cable are often free for the taking. Call your local electric company to find out.
WHAT YOU NEED
two broomsticks or dowels
twine
hay
gourd
saw
hand clippers clothing: long-sleeved dress, tights, man’s T-shirt, hat, boots
1. Measure the width of the dress across the shoulders, and cut one broomstick or dowel to that size.
2. Place the cut shoulder piece across the uncut broomstick, 12 inches down from the top, to form a cross. Use some twine to bind the two broomsticks together securely.
3. Put the T-shirt over the shoulders and stuff with hay. Slip on the tights and stuff with hay. Make a small hole in the tights so that the stick can poke down through them as the legs bend into a sitting position. Tie the tights to the T-shirt at the waist with twine.
4. Put on the dress and stuff the sleeves with more hay. Bind the wrists with twine.
5. Cut a hole in the gourd and put it over the top stick to form the head. You may want to add a neck scarf to cover the exposed stick.
6. Slip on the boots and hat. Does a lavender lady carry a purse? These and other fashion questions you must decide yourself.
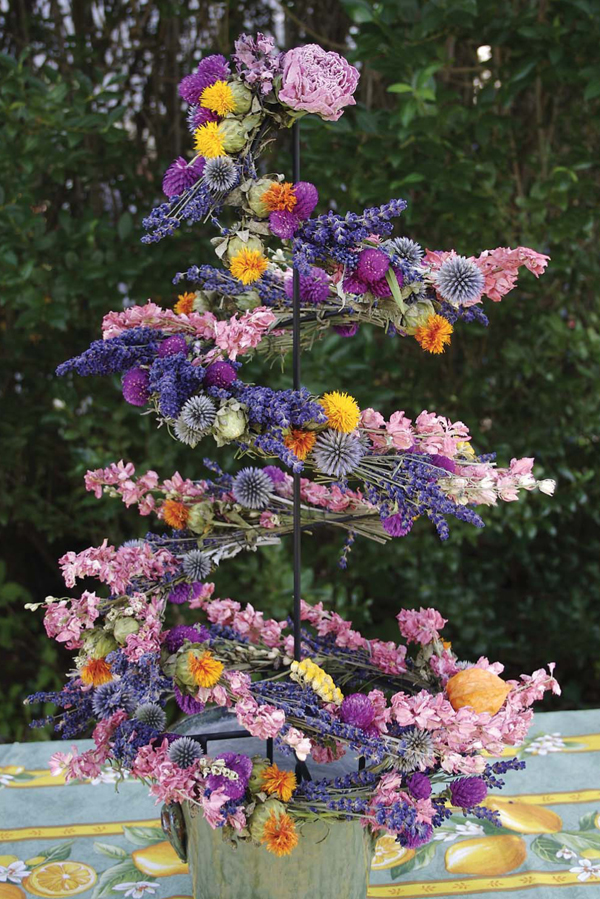
A spiral wire topiary form makes the perfect base for this colorful tree. It’s also a way to use any flower or herb you’re growing in abundance. One autumn I made such a tree of all tansy, decorated with a few sunflowers and brown pods and cones.
Here it’s the early summer version with lavender as the base.
WHAT YOU NEED
dried flowers like lavender, safflower, larkspur, globe thistle, globe amaranth, and golden ageratum, cut about 6 inches long (the size of the frame determines the number of flowers)
one dried peony, rose, or other special flower for the top
spiral wire topiary form
1 block of floral foam
any attractive jardinière, 8-12 inches tall
floral reel wire
wire cutters
hot glue and glue sticks
paring knife
garden shears or clippers
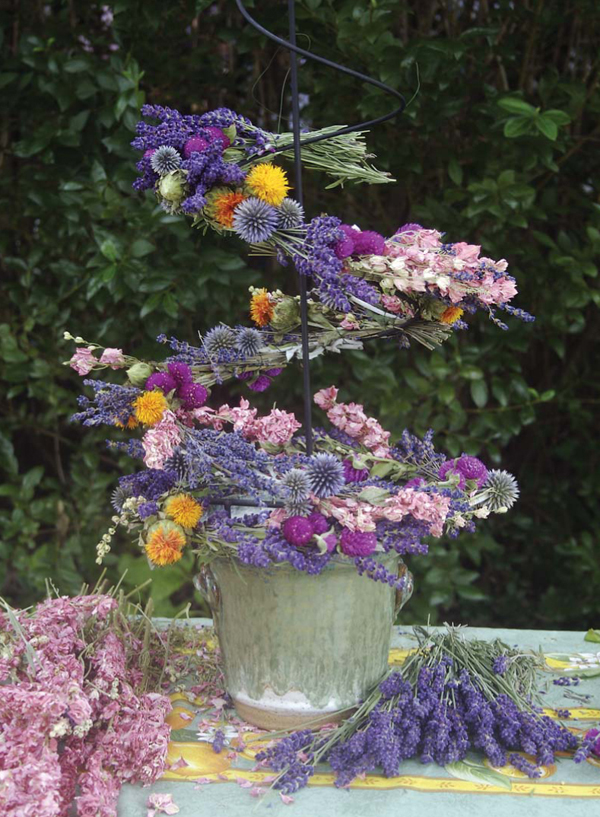
1. Tie the reel wire to the bottom of the topiary form.
2. Start with a small handful of lavender. Lay the bundle at the bottom of the spiral, stems pointing upward, and wrap once or twice very tightly with the reel wire.
This is a spiral, but other simple topiary forms also lend themselves to this same wrapping technique.
3. Add another bundle of flowers covering the stems of the first bundle and wrap in place.
4. Continuing placing the flowers and wrapping in the same direction, turning the spiral as you work, until you reach the top of the form.
5. When you are at the top, cut the stems shorter and tie off the wire.
6. Cut the foam to fit snugly in the container, but not show above the rim.
7. Stand the topiary in the foam, pushing down at the base.
8. Fill in any bare spots on the frame by gluing on a few extra dried flowers. Here I used a few bright orange Japanese lanterns cut off the stem for additional pizzazz. Save a special flower and glue it on the top to finish off.
9. Use the finished design as a centerpiece, on a side table, on the floor at an entryway, or anywhere you like to have a lovely sight and aroma.
Tip: Buy the topiary form at a craft store or garden center. Many forms come with a green coating. Spray with matte black spray paint if desired.
Start from the bottom, wrap to the top, and end with a showy flower or pod.
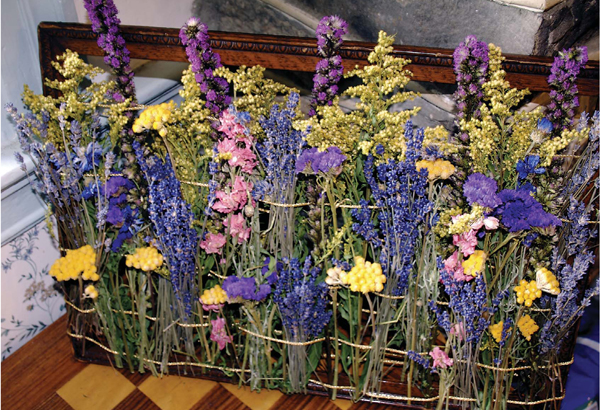
Remember weaving potholders on a small metal loom as a child? You gave them to Mother, Grandma, and your favorite aunts until there was no cook left without this colorful gift, and the loom got buried under newer toys in the back of your closet.
This project is just as easy as potholders and just as much fun to do now that you’re all grown up. It uses the same simple weaving technique, on a loom you make yourself. Simply weave under and over with long stemmed herbs and flowers until the very end, when you can slip short stemmed flowers among the others. Here I chose lavender as the main flower, and added other flowers listed below.
WHAT YOU NEED
picture frame with the glass, wire and mat removed and discarded (this frame measures 10 by 14 inches)
cord or very narrow ribbon
scissors or floral shears
assortment of dried flowers and fresh flowers that you know will dry readily in place (here, goldenrod, gayfeather, lavender, purple statice, pink larkspur, golden ageratum, and a few bachelor’s buttons)
flat picture hanger with two tiny brads
1. Decide which way you want your weaving to hang. Nail the picture hanger to the back of the frame now, when you won’t be damaging a lot of dried materials.
2. Tie the cord to the top left corner of the frame and wrap horizontally, leaving about two inches between strands. Here I have five strands to form the warp of the loom. The flowers and herbs are the weft.
3. Cut the cord and tie tightly in the lower right corner. Use your fingers to even out the spaces between the cord.
4. Take the stem end of one piece of goldenrod and position it at the top. Weave under and over each of the five strands on the top layer. Ignore the strands wrapping in the back. Pull until the tip of the flowers reaches the inner edge of the frame.
5. Trim off any extra stem now or wait until later and trim all the stems at once. Don’t measure and cut in advance because you use a little more than the edge-to-edge measurement for the weaving process.
6. Take the next stem, perhaps the gayfeather, and start weaving over and under. Remember that if the previous stem started with an “over,” start with an “under.”
7. Keep alternating until you have a base which is not too tightly packed. In this design I used dried goldenrod and fresh gayfeather because I had them on hand at the time.
8. What you weave next is a matter of taste, how much you have of each variety, and how long the stems are. I always save special flowers for last because I want them to show. Here the bachelor’s buttons were saved because I had the least of that.
9. Towards the end, survey your weaving. As the loom gets full it is much harder to pull stems all the way through without damaging other material. Now there is no need; the loom is full enough. You can cut stems short and tuck some under one strand of cord and they will stay in place. If all else fails, there’s always the glue gun, but purists will want to keep strictly to weaving on this project.
10. Do a last trimming of stem ends near the frame to tidy up the picture.
11. Hang in place or stand on a shelf away from direct sunlight which will fade flowers fast.
Tip: Selecting a Frame. If the frame is attractive, I like to have it showing, cutting the stems to fit the inside. If the frame is ugly, spray paint it black to cover; then cut the stems to reach to its outer edge. The frame will thus support the flowers and herbs but will be largely invisible.
Select a frame of a moderate size which can accommodate the length of common flowers. If you want a bigger weaving, you’ll have to use two or more stems to reach across the frame.