
Colorful, lacy, plain or fancy, ruled or straight, small and delicate or large and bold — crocheted borders can be all of these things and more. You find them everywhere: on towels, sweaters, afghans, and handkerchiefs, and, increasingly, on the fashion runways. A great border can fulfill a number of roles beautifully. Simple and purely functional borders tidy up an edge, hide yarn ends, control unruly selvedges, hold buttons, and provide button bands. On the other hand, a decorative edging can serve as a focal point of a design or complement the look of whatever it is attached to; a fancy border can make even the most basic afghan something special.
The law in many published edging patterns is that they assume you’re working straight across, with no corners or other impediments, whereas, in reality, a right-angled corner is often involved. Think about it: An afghan has four sides, each of which is usually edged. What to do at the corners?
Corners demand special attention. Because they often act as the focal point of the border, they should be an intentional design element, not an afterthought. In addition, you need to consider the geometry of the corner by arranging for increases of some sort, so that the border lies flat. You now have no worries on that score — all the borders in this book have had the corner turned for you!

You’ll soon discover more ways to stitch a crocheted edging than you’ve ever imagined. Here, we present a variety of edging styles, all worked lengthwise directly onto an existing fabric. These edgings can be worked onto any kind of fabric: crocheted, knitted, or woven. Many are easy enough for even brand-new crocheters to accomplish; a few require a bit more stitching experience.
We present each pattern as both text and chart worked in the round from the right side, as well as alternate directions in chart form for working each border back and forth, omitting corner stitches (see page 16). If you’re new to crochet, or new to chart-reading, don’t be afraid! With a little bit of time, and with the help you’ll get in this section, you’ll soon be stitching like a pro.
Let’s start by exploring some general rules for applying edgings on crocheted and knitted fabrics. (For working a crocheted edging on a woven fabric, see page 18.)
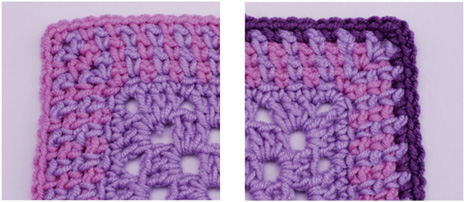
A good foundation is necessary for a successful edging. Working a base round stabilizes the edge and creates a foundation onto which to work the border stitches. A round of single crochet usually works well for this purpose. Take care to work the base-round stitches evenly. If you work the base round in the main color of the piece, any uneven spacing or stitching will be minimized (see example B at right). You can always add another round of stitches in a contrasting color before stitching the edging, if desired.
The instructions in this book give a stitch count for the base round, assuming that the base round is the round immediately preceding the border design you are about to stitch. The instructions don’t spell out the base round or indicate where to start and end that round, but you can see the single crochet base round in each photographed sample.

Contrasting color base round (A). The single crochet base round in this example was worked in a different color from the main piece. While the second round of stitches is even, the initial round looks somewhat uneven due to the nature of working into the selvedge edge.
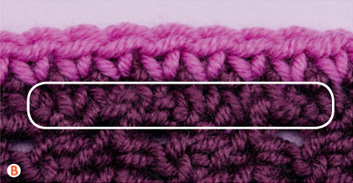
Main color base round (B).In this example, the single crochet base round was worked in the main color, allowing it to blend into the main piece. As in example A above, the second round of stitches looks perfectly even.

On a crocheted piece.Insert hook under both loops of stitches on last row of a crocheted piece.
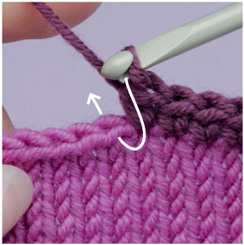
On the bound-off edge of a knitted piece.Insert hook under both loops of bound-off stitches on a knitted piece.
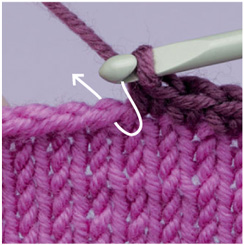
For the cast-on edge of a knitted piece.Work into each cast-on stitch.
Working along horizontal rows. Let’s assume that you want your base round to be worked in single crochet. Depending on the gauge of your piece and the gauge of the border, you will probably work 1 single crochet stitch into each stitch along the horizontal edges, putting the hook under both loops of the stitches in the top of the last row. However, this is not a hard-and-fast rule; you may need to make adjustments to fit your situation.
Working into chains and cast-on knit stitches. As a rule of thumb, work 1 stitch into each free side of the chain along the first row (crochet) or each cast-on stitch (knit), making adjustments as needed.
Working along vertical edges. Stitching along a vertical selvedge is a bit more challenging. You first need to determine the optimal ratio of foundation stitches to (vertical) rows. You may find that you need to work 1 single crochet in every single crochet row or knit row, or you may need another ratio, such as 3 single crochet stitches into every 2 double crochet rows. Curved or uneven edges require a bit more experimentation to achieve the correct proportion of stitches to rows.

For a double crochet piece. In this example, the hook goes into the selvedge stitch approximately three times for every 2 double crochet rows along the edge.
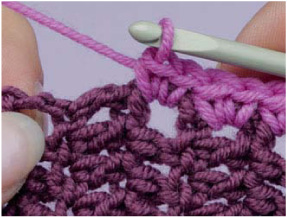
Avoid the spaces! Don’t be tempted to work into the space between the stitches along the selvedge. While it’s easier to get the hook into that space, the result will be problematic holes.
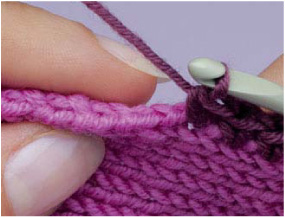
For a knitted selvedge. In order to maintain a consistent distance from a knitted edge, choose a column of stitches and work into that column throughout the entire edge.
When stitching a vertical edge, you have to figure out how far into the fabric to work your stitch. Usually the base stitch goes into the stitch closest to the side edge (the selvedge stitch). On crocheted pieces, be sure to work into the actual selvedge stitches, not into the spaces between the stitches. On knitted pieces, work the stitches either ½ stitch or 1 full stitch into the edge, staying along the same vertical column of stitches.
Luckily, single crochet is easy to rip out and do over! The important thing is to keep the stitching as evenly spaced as possible.
You need to make sure that you’ve stitched evenly along each edge and that your base round lies flat. To do this, you will need to make several stitches at each corner of the fabric to ensure that the corner remains flat. With a single crochet base round, work 3 single crochets into the same corner stitch, then continue stitching along the next edge. Double crochet corners require 5 double crochet stitches into the corner stitch. As you work, place a removable marker in the center stitch of the 3 single crochet (or 5 double crochet) stitches. This marker indicates the corner stitch, which will be referenced on the first round of the border. Until you’re comfortable identifying corner stitches by sight, it’s wise to continue using a marker in each corner stitch or space, moving it up each round as you work.

Draw-in and ruffling problems. The base round of the sample on the left has too few stitches and thus pulls inward. The right-hand sample has too many stitches for the base round and thus flares out, or ruffles.
As you work, stitch a few inches at a time, then step back and take a critical look at what you’ve done so far. Does the fabric pucker or ruffle? If so, rip out that section and begin again, adding more stitches to correct puckering or using fewer stitches to correct ruffling. Once you’re happy with the results, make a note of your rate of stitches-to-rows and stitches-to-stitches, and refer to that as a guide as you complete the base round.
Many border patterns require a certain number of stitches across an edge to ensure that any special corner treatment actually ends up at the corner. A pattern repeat is the number of stitches required to complete one full unit of the design. This number is expressed as a stitch multiple:
Base round: Multiple of x + y + corner stitches
If you’re working in the round with four corners, do a little simple math. For example, if the pattern says “Multiple of 4 + 3 + corner stitches,” the total number of base stitches along each side, not including the 4 corner stitches, should be a multiple of 4 stitches, with a remainder of 3 stitches. For example:

This base round has a multiple of 4 + 3 + corner stitches.
4 × 8 = 32, plus 3 = 35 sts
4 × 25 = 100, plus 3 = 103 sts
To confirm that your stitch count works, after you’ve picked up stitches evenly along the edges, count the stitches along one side, not including the corner stitches. From that number, subtract the “plus” number, then divide by the stitch multiple. If the answer is a whole number, the stitch multiple works. If not, you must make adjustments (see page 8).
Let’s look at an example of a rectangular afghan with 80 base stitches along each short edge, 120 base stitches along each long edge, 4 corner stitches, and a stitch multiple of 6 + 5 + corner stitches.
80 sts – 5 sts = 75 sts
75 ÷ 6 = 12.5 (number of times the 6-stitch multiple fits)
Because 12.5 is not a whole number, we know that the stitch multiple doesn’t work with the stitch pattern, and also that the number of times the 6-stitch repeat fits along that edge is between 12 and 13. We therefore try one of the following two possibilities:
6 sts × 12 = 72 sts, plus 5 = 77 sts
77 works as a base stitch count with this pattern.
OR
6 sts × 13 = 78 sts, plus 5 = 83
sts 83 also works as a base stitch count with this pattern.
If it’s possible to stitch the base round with either 77 or 83 stitches between the marked corner stitches and still have the edge lie flat, go ahead and re-stitch it. If not, you’ll need to make an adjustment on the first round of the border to allow the stitch multiple to fit.
Now, here’s the math for the other edge:
120 sts – 5 sts = 115 sts
115 ÷ 6 = 19.17 (number of times the 6-stitch multiple fits)
The 6-stitch repeat will fit along this edge just over 19 times, so try this formula:
19 sts × 6 = 114 sts, plus 5 = 119 sts
Instead of 120 stitches, use 119 stitches along this edge. Either re-stitch the edge to result in 119 stitches between the marked corner stitches, or make an adjustment on the first round of the border.
Slip-stitch method. Many crocheters are familiar with joining a new yarn with a slip stitch in the top of the previous round, then working a chain-1 (for single crochet) or a chain-3 (for double crochet). The purpose of the chain is to bring the hook and yarn up to the level of the next round. With single crochet, the first single crochet stitch of the new round will go in the same stitch as the slip stitch. With double crochet, the chain-3 usually counts as a stitch. In other words, it takes the place of the first double crochet stitch.

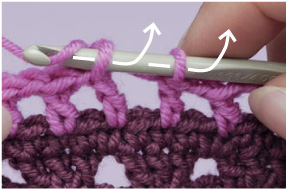
For double crochet. A double crochet chainless start begins with a slip knot on the hook. Yarn over and insert hook into the stitch, then complete a double crochet.
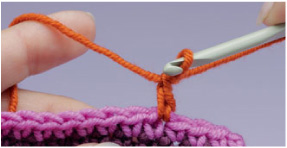
Double crochet complete. The completed double crochet looks just like any other double crochet stitch — no unsightly chains!
Chainless start. This other method of joining a new yarn works just as well and eliminates the sometimes unsightly chain start.
Here’s how to do it:
1. Fasten off at the beginning of the completed round.
2. Place a slip knot on the hook.
3. For single crochet, insert hook into appropriate stitch and pull up a loop, yarn over, and pull through both loops on hook to complete the stitch.
OR
3. For double crochet, yarn over hook, insert hook into appropriate stitch and pull up a loop, (yarn over, and pull through two loops on hook) two times to complete the stitch. (See photos above.)
If you use the chainless start, ignore the instructions to work a beginning-of-round chain, and instead simply work the first stitch as indicated.
Because right-handed crocheters work from right to left, that’s the way we count throughout the book. Left-handed crocheters work from left to right.
The photo below (left) shows how to count stitches from the corner for right-handed stitchers. The marker is in the corner stitch; the stitch immediately to the left of the corner stitch is #1, the next stitch to the left is #2, and so on.
If you are a left-handed stitcher, whenever an instruction says “to right of “ or “to left of,” substitute the words “left” for “right” and “right” for “left.”
In the photo below (right), the marked stitch is the corner stitch; the stitch to the right of the corner stitch is #1, the next stitch to the right is #2, and so on.

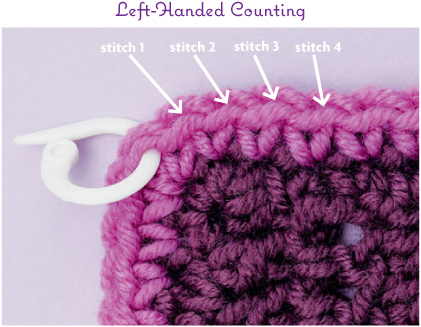
In order for the corners to end up at the appropriate place, the round has to begin at a certain point. Note that in the example shown below, the first stitch of the first round is made in the fourth stitch to the left of the corner stitch. Beginning and ending the round slightly away from the corner in this way makes the join inconspicuous and allows the corner to shine! Each set of pattern instructions indicates where to join the yarn for the first round. Begin the first round in the stitch indicated, using your preferred method of joining a new stitch. (SeeTwo Ways to Join New Yarn, page 9.)
Adjusting the number of stitches. If the base round was a few stitches too long or too short for the multiple you need for the pattern, the first round is a good place to do a little fudging to make the stitch count come out right. Take a look at the first round of the pattern stitch.
Using the chart is perhaps the easiest way to visualize this technique. If the first round includes skipped stitches, skip one more or less along each edge as needed to end up with the correct number. If several stitches’ worth of fudging is necessary, space the adjustments over the entire edge. If the first round of the pattern requires working into every stitch of the base round, however, you’ll probably be better off adjusting the stitch count on the base round.
Repeating sections of stitches. Each pattern instruction includes a repeated group of stitches and/or chains that is repeated across the edge as many times as needed. In the text, the repeated units are indicated by the instructions in [brackets]. In the charts, the repeated unit is shaded. If you are comparing the repeated stitches in the text to the shaded section in the chart, you may find that they do not correspond exactly; just be consistent and follow either the text or the chart throughout a project. (See illustration on page 11.)
Working to the corner. The instructions direct you to work the repeated section “to corner stitch,” “to corner group,” “to corner space,” or perhaps “to 2 stitches before corner stitch.” The instructions within the brackets bring you right up to that point. The instructions immediately following include the special treatment needed in order for the corner to lie flat.
While the corner stitch or corner space is self-evident, a corner may also be represented by a “corner group” — a combination of stitches or stitches and spaces that form the corner. Each corner group is defined in the instructions just after it is worked, so in each instance it’s clear which stitches represent the corner group when it is referenced in the following round. Be aware that even within a corner group, there is a single center stitch or center space that represents the “corner.”
Since the corner treatments are so important, it is essential that you understand where the corner is. Don’t hesitate to use stitch markers to keep track of your corners. As you become more experienced, you’ll be able to identify corners without the aid of markers.
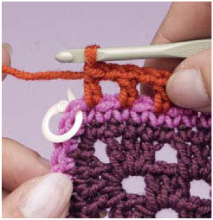
Working to the corner stitch. On Round 1 of Border #117, the group of repeated stitches is worked “to corner stitch.” When the dc is complete, the next stitch available to be worked is the marked corner stitch.
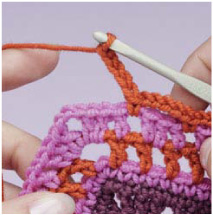
Working to the corner space. On Round 3 of Border #117, [sc in next ch-1 space, ch 5] is worked “to corner space.” Because you have only been working in chain spaces on this round, the “skip 3 dc” is assumed. So, this is what it looks like when you have worked those repeats “to corner space.”
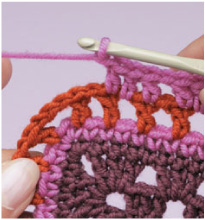
Working to 1 stitch before the corner. On Round 2 of Border #117, the repeated groups of [dc in next dc, dc in next ch-space, dc in next dc, ch 1, skip 1 ch] are worked “to 1 dc before corner.” This is what it looks like when you have worked those repeats.
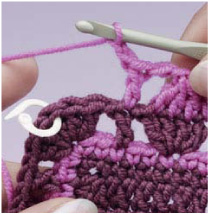
Working to the corner group. Groups of repeated stitches on Round 2 of Border #3 are worked “to corner group,” as shown here. Note that although the 5 double crochet stitches were defined in Round 1 as the “corner group,” there is still a single center stitch that is the corner stitch.
Most rounds end with a slip stitch in the first stitch to close the round, leaving the hook in position ready to begin the next round on top of the first stitch of the previous round. Sometimes, however, the round ends with a chain stitch or two, then a single crochet, half-double, or double crochet into the first stitch. This method places the hook somewhere to the right of the beginning of the previous round, ready to begin the next round.
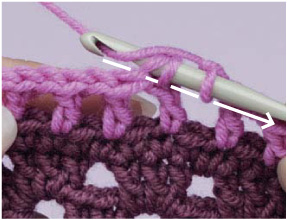
A slip stitch closes most rounds.
A single crochet can be used in place of a chain-1/slip-stitch join to position the hook 1 stitch to the right in preparation to begin the next round.
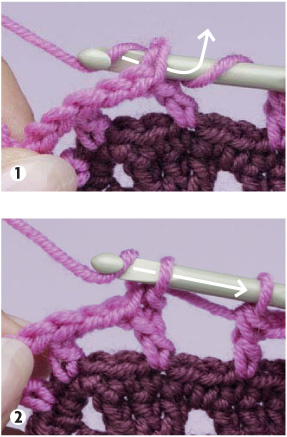
DC join. Shown here in two steps, a double crochet join can take the place of a chain-3/slip-stitch join to position the hook 3 stitches to the right in preparation to begin the next round.
On the final round, you’ll want your join to be as tidy as possible so the final edge will be smooth.
A tapestry-needle join can be among the tidiest ways to join a round. This example shows how to use a tapestry-needle join in place of a chain-1/slip-stitch join.
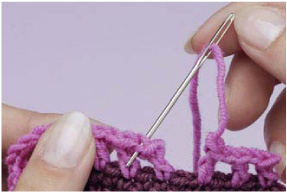
Step 1. Complete the round, omitting the final (chain 1, slip stitch to join). Cut the yarn, leaving a tail. Pull tail through the final stitch, then thread the tail onto a blunt-tip tapestry needle. Insert the needle from back to front under both loops at the top of the first stitch of the yarn and pull the yarn through.
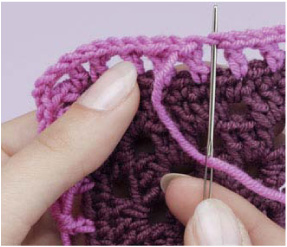
Step 2. Insert the needle from front to back into the top of the last stitch of the round, in the same spot where the tail came from. Pull yarn through.
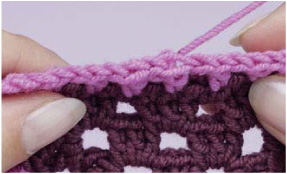
Step 3. The joined stitch may be a bit loose. Adjust the tension of the final stitch to create a seamless line across the top of the stitches.
Although the samples here may be stitched in multiple colors, most instructions in this book assume that you are working each border in a single color. As much as possible, we’ve written the instructions to minimize stopping and restarting the yarn. If you choose to work in multiple colors, it’s almost always better to completely finish off the old color before joining in a new color yarn.
All the border pattern text in this book assumes that you are working in the round and that, with few exceptions, the right side of the work is facing you. It is quite possible, however, to work the borders back and forth, and for this reason we have provided an alternate chart for each border.
To help understand how these alternate charts work in relation to the charts written for crocheting in the round, familiarize yourself with the instructions for working in the round and chart reading. Work a base row with the appropriate number of stitches for working back and forth (these are given under the chart). Because you will be turning your work, the beginning and ending of the rows may be somewhat different from the beginning and ending of rounds.
Note that when you’re working back and forth, both the “right side” and the “wrong side” of the stitches show alternately on the right side of your border. While it won’t look exactly like the borders shown on the following pages, it’s still correct. If you find you don’t like the way the wrong side of the stitches looks, try working Row 1 as a wrong-side row, then continue to work back and forth. This will switch the right and wrong sides of the border and may provide you with a more pleasing design. Alternately, you could start every row with a new length of yarn, beginning on the right edge of each row (left edge for lefties), to maintain all rows as right-side rows. Some charts actually call for this method (see #43, for example).
Border #18 worked in the round. This requires a base round with a multiple of 6 stitches plus 4, plus the corner stitches. All of these stitches appear with their right sides showing.
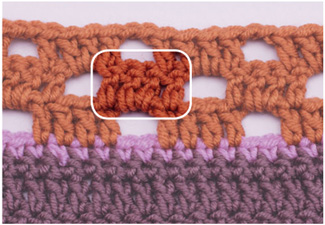
Border #18 worked in rows. Note that in the alternate chart for rows, the base row requires a multiple of 6 stitches. The beginning and ending of the rows are not exactly like the beginning and ending of the rounds but are balanced on either end. Also note the difference in appearance of the Row 2 stitches, where the wrong side of the stitch is showing.
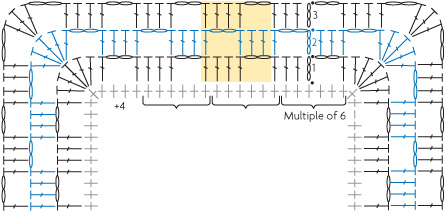
CHART FOR WORKING IN THE ROUND
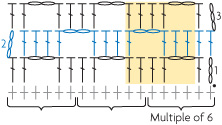
CHART FOR WORKING IN ROWS
Prepare your woven fabric by washing, hemming, and ironing it to make a tidy edge. In order to determine the ideal size to make the chain stitches, it’s a good idea to practice both the embroidery and the single crochet base round on a swatch before working the final piece. If the fabric is woven loosely enough, and the yarn is small enough, you may be able to work the crochet stitches directly into the fabric.
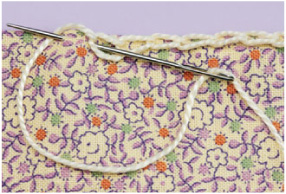
Step 1. Working the embroidery. Thread an embroidery needle with cotton loss or perle cotton. Work a round of embroidered chain stitches evenly around the edge of the fabric, taking care to end up with the correct number of stitches to match the stitch multiple for your chosen design. In order to ease the base-round single crochet stitches around the corner, sew 2 fewer stitches than you need on each side, then put 3 corner stitches into each corner stitch on the base round.
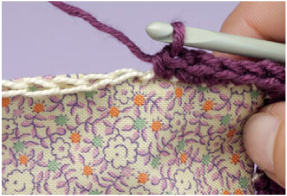
Step 2. Working the crochet. Work a single crochet in each embroidered chain stitch, placing 3 single crochet stitches in each corner stitch. The single crochet round is your base round. Check once more to ensure that you have the correct starting number for the base round of your chosen border.
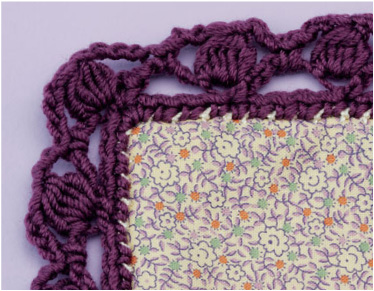
Completed edging. If the embroidered stitches had been made in a color to match the base round, they would not show as they do in this example.
Depending on the strength and density of the felt, you may be able to use the method for woven fabric just described.
After the edging round is complete, you can trim the felt closer to the border, as desired.
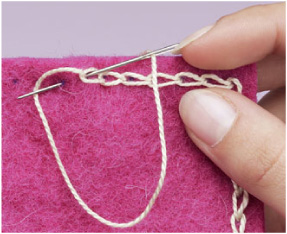
Working embroidered chain stitch on felt. Embroider the chain stitch evenly along felted fabric. To ensure evenly spaced chains, use a permanent marker and a ruler to measure out and mark the stitches.
Although crochet instructions may at first look like a foreign language, they can be easy to interpret once you understand how they are written. Abbreviations are necessary. After all, you don’t get confused when your recipe calls for “1 c. sugar” because you know that in that context “c” stands for “cup.” Crochet punctuation is explained on page 304; crochet terms are defined and abbreviations are listed on page 308. Any special stitches are defined right next to the pattern where they are used.
While I’ve done my best to make it clear where to put your hook for each stitch, you may find it necessary to refer to the chart for help in figuring out the relationship of stitches to each other. Crochet is much easier when you learn to “read” your stitches. Because you can put your crochet hook just about anywhere (and because you will be asked to put it just about everywhere), it helps to recognize what the various crochet stitches look like.
You probably don’t realize how often we use symbols in our daily life. Each of these icons represents something significant and immediately recognizable, without the use of words:

Symbol crochet takes this idea and applies it to crochet instructions. Each symbol is a graphic representation of a stitch and makes a certain kind of sense all by itself. Symbol charts offer a number of advantages over text alone. A quick look at a symbol chart tells you several things:
• The shape of the finished item
• The types of stitches used
• The relationship of stitches to each other
• The right side of the fabric.
Most of the borders in this book are worked in the round, so the right side is almost always facing.
In this book, we have presented each chart in two or more colors to make it easy for you to track the rounds visually as you stitch. The yellow-shaded sections are the stitches that are repeated across the round to the corner. If you find yourself distracted by viewing the entire chart, use a piece of paper (or a couple of pieces of paper) to mask the portion of the chart that you are not currently stitching. This makes it easier to focus only on the section immediately before you. A few borders may be represented by layers of stitches worked on top of each other or into an unexpected spot. In those instances, you may find it easier to refer to the written text to help you decipher a chart. You may find charts easier to read if you use your scanner or copier to enlarge them. Don’t worry if you see a symbol you don’t recognize; you’ll find more information in the Appendix on page 306 and a helpful Stitch Key on page 315. You’ll soon find that you understand new symbols without the help of the key.
Perhaps 150 borders are not enough, and you haven’t found the perfect one for your project. You should design your own! Here are some design tips to get you thinking:
Simple borders. Although the following pages include some simple edgings, we wouldn’t want to forget the very simplest ones. Sometimes these tiny edgings are all you need to complete a piece. (Don’t forget to put extra stitches in any corners.) The reverse single crochet (or crab stitch) makes a lovely, corded-looking finish on any edge. The simple picot is another versatile stitch: Experiment with spacing of the picots to get the ideal results.
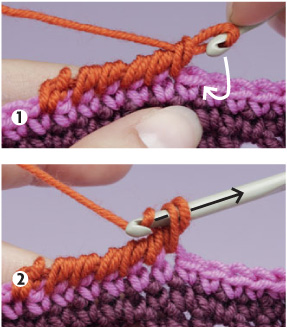
Reverse single crochet, step 1. With the right side facing and working from left to right (or, for left handers, from right to left), insert hook into next stitch and pull up a loop.
Step 2. Yarn over and pull through both loops on hook. Continue working around, placing 2 or 3 stitches in each corner stitch as needed for piece to lie flat.
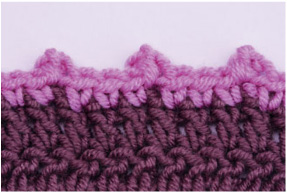
Simple picot. Make this simple picot by working a picot-3 (ch 3, slip st in 3rd ch from hook) separated by 3 plain single crochet stitches.
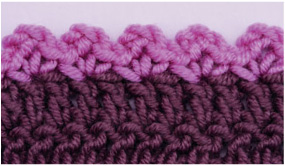
Simple edging. This pretty little edging places (sc, ch 3, sc) in every other stitch.
American and British crocheters use different terminology for the same stitches. This can cause confusion if you aren’t aware of the differences! In effect, the British terms are “one step up” from the American terms, so the stitch that Americans call “single crochet” is called a “double crochet” in the UK.
The symbols in the stitch charts remain the same on either side of the Atlantic, as they represent the way the stitch is made, not what it is named. However, UK stitchers referring to the symbol key should keep in mind that the terminology used in the key is American and “translate” it accordingly.
| U.S. TERM | UK TERM |
Slip stitch | Single crochet |
Single crochet | Double crochet |
Half double crochet | Half treble crochet |
Double crochet | Treble crochet |
Double treble crochet | Triple treble crochet |
Proportion and scale. Pay attention to the scale of your border as it relates to the thing you are attaching it to. A wide, bold border may overwhelm a small washcloth, while it might be just the thing for a large afghan. However, you might decide that a wide lacy border is perfect to add interest and style to an otherwise plain baby blanket. The best way to determine how your finished item will look with a particular border is to work a sample of the border onto a swatch, then hold it up beside the piece that needs the edging. How does it look? Too wide? Too narrow? Just right?
Another way to play with scale is to draw a proportionally correct sketch of your finished piece on graph paper, having each square represent one inch. Next, draw a border around your sketch, choosing a width that looks best to you. Count the depth of the graph-paper squares you used for the border: That is a good depth (in inches) for your border.
Graph-paper plans. You can use graph paper to help determine the ideal depth of your border. In this example, each of the light pink rectangles is the same size.
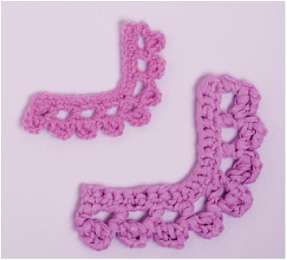
Yarn weight affects scale. The same edging worked in baby-weight (left), and chunky-weight (right) yarns yields quite different results, as you can see in these examples.
Colorways. The same border can look quite different when you change colors. While entire books have been written on color theory, you can learn a lot by simply experimenting to see which color arrangements look best on a particular project.
Minor change, major effect. Changing just one element of a border (in this case, the color of the final round) can make a big difference!
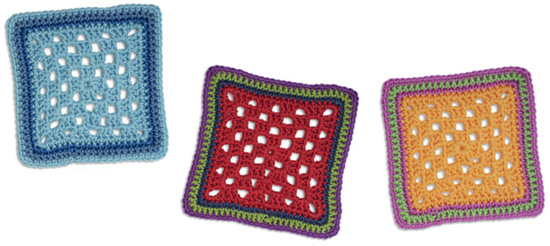
What a difference a color makes. These three borders look quite different when worked in different colorways!
Troubleshooting flatness problems. Variations in the way a particular stitcher holds his or her yarn and hook and the way that the yarn flows through the fingers will affect the final outcome of the border. What works as a “flat” border for one stitcher may not lie flat for another. One border might be perfectly fine in one yarn and troublesome in a different yarn, even for the same stitcher.
If you are having trouble getting a particular border to lie flat, first check to make sure you have followed the instructions correctly and that the base round lay flat when you started. If those parts are fine, it’s still easy to make adjustments to correct a problem. If the border is curling in on the sides or on the corners, can you loosen your stitches somewhat? Make sure any spike stitches were made at the level of the current round and not pulled too tightly. Can you add a chain or two on either side of the corner treatment or between repeats across a side? Alternatively, can you skip fewer stitches along the base round? Can you put two additional stitches in the corner?
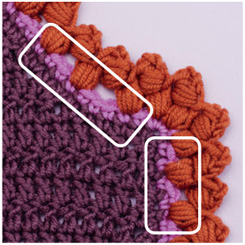
Adjusting for curves. The stitches are more widely spaced around the curve to allow this neckline border to lie flat. Depending on the border chosen, picking up stitches and working in for the neckline may require decreases to allow the border to lie flat.
If the edge is rippling (and it’s not meant to be a ruffle), can you omit a chain or two on either side of the corner treatment or along each side? Or can you use a smaller hook? Or crochet a bit more tightly?
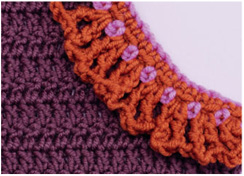
Adjusting for an outside curve. This ruffled edge works well on an outside curve. Work a normal base round, as the final ruffled edge fills out the longer circumference of the outside of the curve. Other border choices might require increases to accommodate the longer circumference.
If you just can’t wait to start and are too impatient to read the instructions in this section, take a few seconds to read this:
• Work a single crochet foundation onto your fabric to serve as a foundation for the border. In each of the patterns in this book there is a contrasting base round upon which you’ll build your border and corners. Your base round should match your project.
• Make sure that the base round has the appropriate number of stitches along each edge, as indicated in the instructions.
• Begin the round in the base round stitch indicated. This will ensure that you reach the corner stitches at the right point.
• If you are working back and forth, use the alternative charts.

PHOTO NOTE: The borders on the following pages are not all shown to scale. Some of the larger borders have been reduced in size to fit on the page; some of the narrower ones have been enlarged.