This chapter is about making a garden without expensive gear and about how gardening with manual labor is neither exhausting nor difficult. It is rather easy, however, to fool a novice into believing he or she needs a powerful tiller. If you purchase any kind of shovel or spade and an ordinary hoe and try working some hard soil with these tools exactly as they came from the store, digging will instantly seem the most exhausting thing a person ever tried to do. You will conclude that anyone who can make a ditch with a shovel has to be the strongest man that ever walked the earth. Try chopping weeds with that new hoe and after two minutes you’ll be dripping buckets of sweat, tired out for the rest of the day.
The reason:When you bring them home from the store, the tools are never sharp.Worse, most gardeners never properly sharpen their tools after buying them. I know this for a fact. Once a year, in spring, I teach a veggie gardening course, and for one session I ask everyone to bring in their hoes and shovels and we sharpen them. This turns out to be the second-most-popular thing that happens in my class. (The event participants think is the most useful is the morning spent in my own garden, when I demonstrate how to prepare a raised bed with those tools and how to sow seeds so they’ll come up.)
To handle a garden up to a quarter acre (1,000 square meters) in size, if you are minimally fit (I said “minimally fit”; I did not say male, nor did I say huge), only four tools are essential: an ordinary combination shovel, a common hoe, a bow rake, and a 10- to 12-inch-long (25- to 30-centimeter) metal file (with handle) to periodically sharpen the shovel and hoe. If you are not fit, then you’ll probably want to get someone else to work the earth for you the first time it is dug (or have it rototilled). If you are physically unable to shovel or hoe, you’ll probably have to consider the second-rate practice of mulch gardening. I do not recommend permanent mulching unless, because of infirmity, there is no choice.
Please do not buy cheap discount store tools. If you are what Australians call “skint,” (broke), you will do better pawing through secondhand shops until you find good ones.Where can you find quality new tools? I suggest a visit to a commercial hardware store, landscaper’s or nursery supply company, or contractor’s supply store and inspect what they sell to tradespeople. People working with such tools all day long can’t afford to be resharpening one every half hour, breaking one every other day, or wearing them out every few months. Quality tools aren’t cheap, but they work out to be the least costly in the long run.
On the other hand, in some mail-order catalogs you’ll find tools, supposedly of extraordinary quality, offered at extraordinary prices.These status symbols are usually no more effective or long-lasting than the ordinary tradespersons’ gear.
The shovel
There are different kinds of shovels and spades, each designed for a different task. Industrial hardware stores and landscapers’ have makers’ catalogs on hand showing each design, weight, and size. I suggest you ask to study the catalog — and take your time with this.
Some shovels are designed to move piles of loose material from one place to another — for example, to fill a wheelbarrow with sand or small gravel that is spooned up from a heap of loose material. Blades on these kinds of shovels are broad and deeply curved so as to hold a lot, like a soup spoon.This tool is designed to be thrust into a heap of soft material with the strength of the arms and upper body and then to lift out a large measure, so the blade rarely has a rolled-over top (to cushion the foot pressing it into the earth). It is not easy to dig into the earth with one of these.
The spade, on the other hand, is designed to dig straight down efficiently and loosen compacted soil. Usually the foot-long (30-centimeter) flat blade is only six to eight inches (15 to 20 centimeters) wide, so it doesn’t take too much weight to push it into the earth. I’ve seen this sort of shovel made with a short blade, as though for children, but I would never buy one with a blade less than ten inches (25 centimeters) long; a foot long is best. The blade is pressed straight down into the earth by one foot, with the gardener applying the whole weight of the body, so the top edge is rolled over to avoid bruising the foot pressing it into the earth. Spades are marvelous tools for loosening soil; of all digging implements they will penetrate harder earth with the least force or weight atop them. The limitation with a spade is that because the blade is flat and narrow, it is inefficient when it comes to turning over or moving the earth. Spades are best for working compacted new ground for the first time, but after that they are entirely outclassed by the ordinary combination shovel (see below).
I own a special long-handled spade, locally called a “plumber’s friend.”This one has a slightly pointed cutting edge on a rather narrow and strong slightly curved blade that is as effective at penetrating compacted earth as an ordinary spade, but will move soil better than a flat blade. It is ideal when you’re trying to unearth a leaking pipe. I use it only to break new ground.Most of the time it sits unused in the garden shed. But when I have occasion to use it, the plumber’s friend is my friend, too, because it saves me a lot of work compared to doing that job with a combination shovel.
The combination shovel, as its name implies, does what both the spade and the shovel do, but in one tool.The blade is a bit wider than a spade’s, but still narrow enough that it doesn’t take an unreasonable amount of weight to press it into uncompacted earth. The blade is curved enough that it can pick up loose material and toss it somewhere. Because its design is a compromise — allowing it to dig firm but not rock-hard soil and toss loose stuff — it is not ideally efficient at either task.When you are buying a combination shovel, make sure the top of the blade is rolled over to facilitate pressing down with the sole of the shoe. It should be a long-handled tool so that if the soil is a bit resistant to penetration, you can wiggle the handle as you put most of your body’s weight on the blade, standing on it balanced on one foot. Once the blade has been inserted, the curve of the shovel allows you to lift a fair amount of earth and easily flip it over. But if you should have a wheelbarrow full of compost or manure, the combination shovel also allows you to lift that loose stuff and spread it by tossing it considerable distances.You can’t do this effectively with a spade.
Short-handled shovels and spades are for people under five feet (1.5 meters) tall. Bending over while working a shovel or spade is exhausting and soon becomes painful unless your back is extremely strong. Short-handled tools are good to take camping or to toss in the trunk to use in an emergency. And maybe they’re good for children. But for regular garden use, there is no way I would ever have one.
Spading forks are designed to act like a spade, but they also rapidly break up soil when they are levered back after being inserted because the earth can pass between the tines. They are easier to push into the earth than a spade. Spading forks work effectively only on naturally loose (sandy) soil.The tool is worse than a spade at picking up soil to flip it over. And the tines will bend when used with enough force to work fairly heavy ground.
In my opinion short-handled spading forks are an instrument of torture, but I am nearly six feet (1.8 meters) tall.
All things being equal, I recommend the combination shovel.
Sharpening the shovel
It is highly unlikely that any shovel (or hoe) will be sharp when you purchase it. In fact, it will almost certainly be entirely blunt — squared off instead of honed into an acute bevel like a chisel’s edge. Sadly, as is also the case with knives and a lot of other tools that have to be sharp to be effective, the only way you can find out if you purchased a good piece of steel is to sharpen it, use it, and find out how long it stays sharp.One indicator: the slower the stone or file cuts the metal, the better the steel probably is.
Making tool steel inevitably involves compromise.The harder the steel is, the sharper it’ll become and the longer it’ll stay sharp. Usually. However, the harder the steel is, the more brittle it is and the more likely the edge will chip or the blade will snap when twisted or bent. Old-fashioned straight razors are extremely brittle, made of the hardest possible steel. Axes smack into things with a great deal of force; they must be made of much softer metal or else they’d shatter when hitting a knot. Garden implements may encounter stones and be on the receiving end of a lot of bending stress; they need an intermediate grade of tool-quality steel.
In my opinion, making something of cheap material that only resembles a working tool is dishonest and takes advantage of ignorance. Tool steel is costly to buy and costly to work. I know of no way to tell with reasonable certainty if I’m about to buy a good shovel or a piece of junk, other than to select a brand name used by tradespeople. I also look for a few indications. Is the handle solidly attached; is the tool light and well balanced, yet strong. If it is a combination shovel or spade, is the top of the blade rolled over so you can press hard with your foot without pain. And, of course, you can attempt to sharpen it. If the stone or file cuts the metal rapidly with little pressure applied, it is soft metal that will rapidly get dull with use.
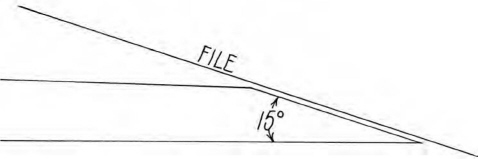
To sharpen a shovel, place it on the edge of a porch or on the earth. Put one foot on the handle, just behind where it sockets into the blade, and press down with enough weight to hold it still while you file it, or do it the easy way — have someone else hold it for you.Then, while leaning over the blade, hold the file so that the angle between the blade and the file is about 15°.Maintain that angle firmly. Do not let the file change its angle. Now stroke the file along the edge, pressing down firmly but not so hard that you lose control of the unchanging angle of the file. If the cutting edge is curved, always start the stroke in the center of the blade and work out toward one side. Do a few strokes from center to one side and then do a few strokes going to the other side from the center.After a few hundred strokes (it may seem an endless task the first time you sharpen a new tool), you will have removed enough metal to produce a chisel-like bevel, and the shovel will have a sharp edge, nearly sharp enough to cut your finger on. If you want the edge to be really sharp, the bevel must have no variations in it, no changes of angle, and the entire cutting edge must have the exact same angle of bevel.
It is not necessary to make a bevel that goes all the way up the rounded sides because when the shovel is cutting its way into the earth, most of the effort of cutting is done within four inches (ten centimeters) of each side of the center.
As the bevel is being created, a “wire” will form on the opposite side. The action of filing forms a thin sheet of metal that wraps around the edge of the blade. This wire prevents the edge from being really sharp and should be removed. It is easy and quick to do this. Just flip the shovel over and, holding the file at about a 5° angle, make a few light strokes.Not many, just a few.You want to remove the wire, not make a matching bevel on the back more acute than the one on the front.
Figure 3.1: The shovel’s bevelled edge. Hoes should not be ground to an angle this acute; 20° is correct for them.
A quality shovel will dig all summer and not get dull unless you blunt the edge striking a good many rocks. It does not take an impossible amount of effort or weight to push a sharp combination shovel or spade into the soil. A fit woman weighing over 100 pounds (45 kilograms) should be able to manage it just fine. Someone weighing even less can do it in soil that has been spaded up once and has then received small yearly additions of manure or compost, which keeps the soil loose and friable. Someone who weighs under a hundred pounds can still push in a spade that is a bit narrower than the usual.
If I were shopping for a second-hand shovel I’d take my own file to the Salvation Army thrift store and tell the clerk when I came in that this was my file and I had brought it to test some shovels (and hoes).Then I’d make a few strokes on the edge of any likely-looking tool. The speed at which the file cut would reveal everything about the tool except how strongly the handle was attached. Cuts fast: junk. Cuts slow: probably good steel. Stroke a few with a new sharp file and you’ll instantly see the differences.
If you don’t abuse it, a shovel should be a long-lasting tool, but even quality shovels wear out. How fast they wear out depends on how much they are used and the nature of the soil they are being used in. If the soil is sandy, then repeatedly pushing the blade into that soil is a bit like rubbing it with sandpaper. The blade gets steadily thinner (and weaker) and eventually will break. (The same thing happens to rototiller tines; they’ll wear down to nubbins.) Expected life of a shovel that digs a 2,000-square-foot (200-square-meter) garden several times every year: 10 to 20 years.
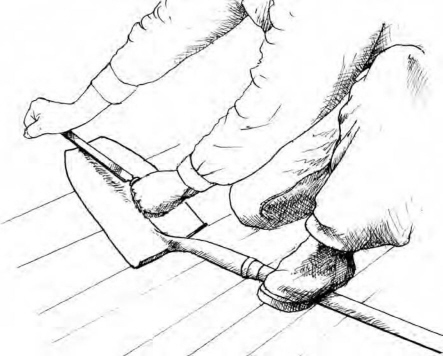
Figure 3.2: Sharpening a shovel.
If I were shopping for a used shovel, I’d inspect the blade closely for fine cracks, an indication that the steel has worn too thin. The presence of those cracks indicates the shovel’s useful life is over.
The file
Files are made of extremely hard steel, but do get dull with use. Once a file has dulled (or rusted), it takes forever to remove much metal with it. Start out with a new one, ten inches (25 centimeters) long with a solid handle attached. When filing seems to need more time than it used to take, get another file. They don’t cost much. And keep a light coat of oil on yours if it’ll be sitting around unused for months on end.
New gardens are almost always made in a place that had been growing grasses, often mixed with other low-growing plants. Grass makes an especially dense network of tough roots, called sod, that holds soil together firmly. If the grass grew thickly, the soil will not immediately break up after hand-digging. It won’t break up until the sod rots. And grass is tough, a survivor. It won’t die and rot just because it has been turned over once; it’ll attempt to regrow, so you’ve got to work to kill it.
In the Deep South of the United States, in most of California, and Down Under, this task can be done at any time of year that the earth is at the right moisture for digging. In harsher climates, the best season for this task is not spring, when many acquire a passion for gardening, but at the end of summer in anticipation of next spring.Whichever season it turns out to be for you, first mow the grass as close to the ground as possible — scalp it right down to the growing points if doing so won’t damage your mowing gear. Mow until you expose patches of nearly bare soil.
If the clippings are short, let them rest in place. If it was such tall grass that you had to cut it with a weed whacker, scythe, or sickle, it would be a good idea to rake the grass up and remove it to make compost; your shovel won’t cut through it easily.You also don’t want to be paying the hourly rental on a walk-behind rotary cultivator that repeatedly gets its tines tangled up.
This done, spread the basic amendments to enrich your soil the first time — lime(s), complete organic fertilizer, manure and/or compost — in the amounts recommended in Chapter 2.
No matter which way you choose to do the job, rototill or hand-dig, or when, summer’s end, autumn, or spring, do it only when the soil moisture is right. If the soil is too dry, the ground will be so hard that the task will take at least three times as long.Wait for rain or irrigate first. If you dig wet soil that contains much clay, you’ll likely make a lot of hard lumps, called clods.When these clods dry out, they become almost rock-like and won’t break down for months, maybe not until they’ve gone through the next winter. It can be extremely difficult to get seeds to come up in cloddy soil, and plants won’t grow as well in it either. If it is spring, wait until the soil has dried enough to work. If it is autumn, making a few clods is not such a problem as they’ll break down over the winter.
The “ready-to-till test.” Take a small handful of soil and mold it as firmly as you can into a round ball about the size of a golf ball. Pack it hard. Then, cradling that ball in your palm, press firmly on it with your thumb. If it breaks apart easily and crumbles, the soil is just right to work. If the ball won’t crumble, and your thumb merely makes a dent in the ball’s gooey side, it is too wet. If the soil would not form a ball that sticks together, it is either too dry or contains no clay. A clayless soil may feel damp in your hand but will not form a ball no matter how firmly you mold it. That means you have a soil that won’t form clods no matter what you do, so feel free to work this soil at any time, wet or dry. (You also have a soil that won’t hold much moisture, and unless there is a second layer of soil located not too far below the surface that will hold a lot of moisture, this site is going to make a droughty garden that probably won’t do well unless you can regularly irrigate it.)
Killing sod by rotary cultivation
The fastest way to kill a grass sod without using herbicides is with a rototiller. In one afternoon you can change an area of sod into something resembling a ready-to-plant seedbed, with fluffy loose soil that extends down about five inches (12 centimeters). I’ve had much experience with tilling. I have hired men owning large tractors do it for me by the hour; I did my variety trials ground myself using a self-propelled seven-horsepower rototiller. Before that I owned a “front-end” tiller.Now that I am old and weak (and wiser), I prefer digging with a shovel, a somewhat slower approach that requires no gas, makes no noise, and actually takes little more effort (but is spread over more time) than tilling does.
Rototilling is pleasing when you are in a hurry. Even if you’re flush with money, I suggest, when starting a new garden, that you hire a machine or hire someone who owns one to come in and only rototill on that one occasion.The last thing you want to do is own one because you’ll get far better results using a shovel.
Do not try to eliminate grass/sod with a “front-end” rototiller, which will prove several times more exhausting (and little faster) than doing it by hand. Use only a self-propelled rear-tined tiller of at least seven or eight horsepower, or hire someone.To estimate what tiller hire will cost, an effective walk-behind rear-end tiller can eliminate about 1,000 square feet (90 square meters) of grass per hour, digging to about five inches (12 centimeters). If the soil is dry or particularly hard, or if the sod is particularly tough, you might double that estimate. It would take me about 20 hours to dig that much new land by hand the first time, but I would do it to 12 inches (30 centimeters) deep. If you sprayed that area first with the herbicide glyphosate and allowed enough time to pass for the sod to die and most of it to rot (four to eight weeks of warm weather, or over winter if you spray in early autumn), the digging or tilling would go at least twice as fast. (This assumes you are not gardening strictly organically.)
Here are a few hints for tilling. My instructions may seem unclear, but, believe me, this information will make sense as soon as you actually start.
I am assuming the plot is a rectangle. Make the first pass straight down the center the long way. Why the long way? Because turning around is an effort and wastes time; the less often you have to do it, the better.Try hard to hold the first pass exactly straight. There will be a drag bar that controls how deeply the tines cut. Set it so you dig only one inch (2.5 centimeters) below the surface; otherwise the machine will tend to skip and jump in all directions. Do not rent a walk-behind tiller that doesn’t have a functioning drag bar.
Okay, you’ve done one pass the long way. Unless this particular soil and sod is softer and more tender than any I’ve ever met, it will seem to you that almost nothing has happened.Turn around and make another pass going the opposite direction, exactly down that same row you’ve already tilled.After you have made two or four or five such passes, each right on top of the previous ones, you’ll start to see some soil; the grass will seem damaged. If you don’t see soil, set the drag bar a step deeper.
When you start seeing soil, move over half the width of the tines and do another pass. The tiller will tilt to the side, leaning into the area you have tilled already. That is good; it’ll do some more damage there and begin to damage a new half-row of sod. Somehow keep it going straight! At this point you might also try raising the drag bar another notch and see if the machine is still controllable when you try to cut deeper. If you’ve never done it before, tilling sod will be a lot more work than you expected, based on the pictures in garden magazines showing smiling people strolling along behind a tiller that is cruising through soft, recently tilled soil.
When you get to the end of the row, swing around and start down the other side of the first row you made.Your tiller will now tilt into the other half of the first row. Keep to that pattern, slowly widening the tilled area. If the plot is more than 50 feet (15 meters) wide, you will soon see it would have been cheaper to hire someone with a powerful tractor pulling a massively heavy four-foot-wide tiller.
This is important: If you’re using a walk-behind tiller, do not expect to till deeply at first. If you work the whole area only two inches deep the first time over, you’ve done well! The result of that will be to kill almost all of the grass. The wisest thing to do at this point is to quit. Let your tingling hands and throbbing ears have a break. Let the sun and the passage of a few days help you kill off the grass you so valiantly damaged. If you should till that plot deeper now, you’ll likely relocate some fragments of the grass into soil that’ll stay moist enough for it to start growing again.My advice is to take the tiller back to the rental yard and come back in three to seven days and attack the plot again, this time with a spade or combination shovel.
However, I know many of you are not going to take my advice. So be it. In that case, the second-wisest action is to cross-till. Make another set of passes over the ground, this time across the ones you made first. If you tilled east to west the first time, now do it north to south. Use the same pattern; start in the center and work outward to the edges. If the soil seems a bit softer now that you are below the thickest of the grass roots, lift the drag bar a notch and see if you can’t get down two or three inches (five to eight centimeters) farther on these cross-passes.This time, with luck and a powerful machine in front of you, you’ll end up maybe four to five inches (10 to 13 centimeters) deep.
You should quit here; you’ll be tired for sure. But unless your thin wallet is counting every second of rental time, I know you’ll want to go on and try to make a seedbed out of the entire garden. If so, cross-till again. Go back to the direction you made your first passes in (the long way) and do it all over again. This time lift the drag bar another inch or so and go for it ... as deep as you can. If the tiller has a handle that will swing from side to side, offset it a bit so your footprints are on the ground that will be tilled the next pass after the one you are doing now.With a bit of luck you’ll proudly end up with a fluffy-looking patch of soil that contains only a few footprints.
I want you to notice those footprints. They should have a lesson to teach you. Immediately after you till, all the soil will be damp. But after the sun dries out the surface, it will change to a lighter color. Early the next morning, before the sun shines intensely on the soil, visit your plot and look at those footprints. If it hasn’t rained, the whole tilled surface should still be dry except for the bottom of those footprints. They will be damp. Why? Because your weight pressed the soil particles together firmly enough to allow moisture from deeper layers to rise up. There is a term for this movement of water — capillarity flow. Understanding capillarity will help you sprout seeds more effectively and also grow a garden without irrigating it at all (or at least watering it far less frequently), so I’ll have more to say about it in Chapters 5 and 6.
One more thing I want you to notice if you have elected to use a walk-behind rototiller.How deep did it actually go? If you managed to get the tines in as far as they would go, push your hand into this freshly fluffed-up earth and measure. Seems like eight inches (20 centimeters), doesn’t it? Well, wait a few days for the soil to settle back down to a more normal compaction and check again. Now how deep did you till? If it was a walk-behind tiller, not more than five inches (12 centimeters). If it was a big tractor sporting a heavy rotary cultivator run by an experienced operator doing honest work, seven inches (18 centimeters).Maybe.
And that is the trouble with rototilling. Loosening soil six or seven inches deep is not enough. Vegetables do not like their root systems to be so confined. Even worse, if the soil has much clay in it, the bent-over ends of the rotating tines will have compressed a layer of soil located at the farthest depth they reached. Immediately after tilling, if you’ll push away the just-tilled fluff over a spot, you’ll see the shiny polished “plow pan” I’m referring to. The pan is more compacted than the original soil was before you started tilling. The plow pan acts as an effective barrier to root penetration and tends to limit the depth of most vegetables’ root systems to the soil above it. This is not good!
To grow a really great garden you need loose soil to a depth of at least one foot (30 centimeters), and you do not need any major barriers in the way of your crops’ roots penetrating several feet farther down.The only practical way to do this on a garden scale is with a spade or combination shovel, or with a spading fork if you’ve got light soil. And that’s why a few paragraphs above I twice gently suggested — after the first tilling and then again after the first cross-tilling — that you quit tilling.At that point you have already done most of the good that can be done with rototilling: the grass is pretty much destroyed without resorting to glyphosate; and the hardest, most compacted soil of the top three inches (eight centimeters) is pretty well broken up.
From this point the rest of the job — working the earth to a foot deep and making seedbeds — can be done by hand with a lot less effort. After tilling the first time, you can treat the ground as though you had an established garden going, follow my suggestions for restoring beds, and do what I soon will suggest for making hills and wide rows for a new planting season. It’ll all be a whole lot easier.
I do need to say one more thing about a plow pan. It is called that because a far thicker and longer-lasting compacted layer than a rototiller will make is routinely created by the common moldboard plow. The plow’s bottom, or “sole,” slides across the unplowed soil about seven inches (18 centimeters) down, resting heavily on the soil and pressing down at the same depth every single time the field is turned over. Repeat plowing over a few dozen years creates a hard layer several inches thick that starts seven inches below the surface. This layer forms an effective barrier to root penetration. The consequence is that the crop tends to grow in the top seven inches of the field.The existence of more soil below the pan is of little use to the crop. Take a look at some of the drawings of root systems in Chapter 9 and try to imagine how poorly a vegetable will grow if it ideally has a root system four feet (120 centimeters) deep, but is largely restricted to seven inches (18 centimeters). (For more on this, I suggest you read Plowman’s Folly, listed in the Bibliography.)
Why am I going on about plow pans in a garden book? Because if your garden is on land that once was a farm field, it is likely to have a plow pan. That compacted layer will not go away simply because plowing has ceased. A plow pan may persist for half a century.The only way to get rid of it for a garden is to dig through it with a shovel or fork.
Even if you have created the illusion of loose soil with a rototiller, there is the tiller “pan” and maybe a plow pan, so you still need to deeply hand-dig the rows and beds.However, once you have eliminated the sod, hand-digging goes much easier.
Killing sod by hand-digging
After you’ve mowed the plot closely (and removed the mowings for composting if they make a thick mulch) and spread soil amendments, as described at the beginning of this section, you start to eliminate the sod. Basically you dig up chunks of earth and turn them on their side or, better, upside down (if the chunks are not too big and you have the strength to do so).This damages the grass and will cause quite a bit of it to die.Then, about a week later, just before the sod starts growing again, turn it over once more, cutting through the chunks while making the second turn, to reduce their size. This second turn will finally kill most of the grass and blend in the amendments more effectively, and you’ll also dig deeper, quicker, and with much less effort. On the third turn, after yet another week passes, enough of the sod will have decomposed that you’ll be well on your way to having fine, crumbly soil nearly to the depth of the blade. Any preexisting plow pan will be gone.
Here are some tips.While spading, the bigger the chunks that you try to bite off, the harder you’ll work. Be methodical and precise; nibble off bits of a size and weight you can comfortably handle. Large tasks like making a new garden can seem too daunting if you contemplate doing the whole thing at once, so I suggest that you divide your garden into beds of 100 square feet (ten square meters) and dig one bed (and one between-bed path) at a time. Using corner pegs, mark out strips about 5 feet (1.5 meters) wide (which is the length of an ordinary shovel, tip of handle to tip of blade) and 25 feet (eight meters) long. Start out standing at one end of that strip. Put the shovel’s blade only one inch (2.5 centimeters) back from the end of the strip and push it in as far as you can manage. If the sod is strong, this first nibble probably will go in only an inch or two. Lever out this bit of soil and roots and put it into a wheelbarrow. Then move the blade back only an inch or so and push it in again.This time it should go in a bit deeper. Lever out that bit of soil and put it in the wheelbarrow. Repeat. By the time you have worked back five or six inches (12 to 15 centimeters) from the end of the bed and across its full five foot width, there will be a small ditch and you will probably be able to insert the blade to half its length. And the wheelbarrow should be full.
Continue digging back and forth across the bed the five-foot way, lifting small chunks and placing them on their sides or upside down in the depression you made while nibbling out the previous row of chunks. The softer the earth naturally is and the bigger the digger, the larger the chunks you can move and the deeper you can go. But big or small, deep or shallow, even if you’re only moving back an inch or so with each effort, gradually the whole bed will have been broken into chunks six or seven inches (15 to 18 centimeters) deep and turned over. When you get to the end of the bed, put the contents of the wheelbarrow into the hole left from turning the last row.
If you dig to kill the sod in the spring, there will be a few weeks’ lag between the first dig and the start of planting. If you start this preparation in the autumn (including incorporation of amendments), you’ll be all ready to go in spring as soon as the ground can be worked. Another advantage of digging in autumn is that there’s always the odd bit of grass that isn’t killed. To prepare the autumn-dug beds for sowing in spring, you’re going to dig yet again and this time you can yank out any resistant clump of still-living sod and toss it onto the compost heap. Yet one more advantage of autumn digging: A new garden is usually full of weed seeds.When you turn it over in late summer, a lot of those weeds sprout in autumn; the next spring, a lot more of them sprout. But before they have a chance to get large, you dig again and kill them off wholesale.
Turning over sod the first time is hard work. I am 63 years old, but I have been doing garden work for 33 years and consequently am reasonably fit. Still, I find that after turning new sod for about 90 minutes I am getting tired.And 90 minutes is about the time it takes me now to spade up an area of sod of about 5 feet by 25 feet (125 square feet or 11.5 square meters). So when I’m starting a new plot from sod, every day I dig one bed (and one path).After six days I will have dug 725 square feet (70 square meters) of new sod for the first time, a goodly area. And in consequence I am also in better shape than I was a week previously! I give myself one day of rest, and the next week, if there is more new ground to dig, I dig another 125 square feet each day.After digging that, I also re-dig the bed I first dug the previous week. This second digging doesn’t take nearly as much work as the first time and goes deeper. I continue this pattern until the entire garden is dug up. Even if I were starting afresh with a fairly large plot that will contain 2,000 square feet (200 square meters) of growing beds and/or wide rows, I can have nearly the whole thing made into seedbeds in less than a month by working six days a week for about two hours a day.
If there is no sod, everything gets much easier. If I have recently done the area with a rototiller, even shallowly, then I can go back in with a shovel/ spade/fork and in about 45 minutes break up 125 square feet to the full depth of the shovel’s blade and not get particularly tired from the effort. Restoring an established bed or wide row for replanting only takes me about 30 minutes of moderate effort per 100 square feet (10 square meters). So why would I ever want to own a rototiller and experience the noise and vibration, use the gasoline, pay for the regular maintenance (or do it myself ) on a touchy small engine, slowly march the tiller back into a shed when finished with it, etc.?
By making a single choice, you can avoid much unnecessary garden work.You could remove weeds slowly and painstakingly by hand with dull fingers or rapidly and with little effort using a sharp hoe. Making small seeds come up in their growing beds could seem nearly impossible, forcing you to buy or raise transplants, or you could grow seeds sown directly in their final growing positions — easy as pie.You could spend hours getting a just-harvested area ready to replant or accomplish that task in minutes, with little effort. You could become a slave to a thirsty garden that needs watering after only one hot sunny day, or your garden could pretty much tend to its watering needs itself.
To garden the hard way, believe Everybody Else, who states that closely spaced, deeply and doubly dug raised beds, with vegetables painstakingly transplanted in precise hexagonal interplanted patterns, is the way to go.That authority may also tell you that you’ll get a much higher yield, with the added bonus of putting less water in per unit of production out.None of these statements is exactly true.
As a novice I used that difficult intensive manner I just defamed. Gradually I learned that there are easier methods that allow you to harvest three quarters as much food (of higher quality) from a given area while doing a third as much work and irrigating a quarter as often — or not at all. I’m describing a system our ancestors used before every household had water under pressure coming out of pipes.
I now believe there is no one best way to arrange plantings. Raised beds are useful for some crops where and when there is irrigation water. Sprawling vine crops and sweet corn grow far better “on the flat” or in hills. Unirrigated gardens should mainly use hills and single rows except, perhaps, for small-sized vegetables.
Most intensivites say raised beds need to be double-dug to a depth of 24 inches (60 centimeters). I don’t agree.Digging 12 inches (30 centimeters) deep is plenty; loosening the second foot produces little additional benefit in exchange for a heap of effort. Besides, over time the second foot will become looser without any extra effort on your part as worms transport the organic matter you put into the surface, and as plant nutrients leach into the subsoil (which chemically loosens clay — this phenomenon is called “flocculation”).
It is far easier to get small seeds to sprout if the planting areas are raised slightly. Not because the seeds care about their position relative to the paths; they haven’t a clue about anything except temperature, humidity, and the total frustration they must feel when a big heavy lump of impenetrable stuff sits above them. In that case, the seed dies. Large seeds like beans, peas, and corn can push harder against obstacles, and if you sow extra seeds, enough of them will usually emerge to make a row even in rough ground.However, tiny seeds like carrots, lettuce, and cabbage-family crops can’t fight their way past a lump. They need what is termed a “fine seedbed” to come up in. After elevating the growing beds a few inches, you can make a finer seedbed with much less effort.
To understand what I mean, use a rake and try to make a zone of fine soil on flat ground after spading it up. After much time and effort you’ll end up with a valley of fine soil, edged on both sides by ridges of clods trying to roll back down into it and smother your emerging seedlings. But if you first raise the beds a few inches, you can rapidly rake the clods and lumps out of the bed’s surface and put them down into the paths, where your feet will break them up over the next months as you walk around the garden.
Note that you can only rake away the lumps if you have not put retaining walls around the outsides of the beds. Perimeter boards, railroad ties, elevated cinder block structures — all these attractive edgings eliminate the raised bed’s two main advantages. The first big advantage — making a highly effective seed-sprouting medium — can be a piece of cake with a rake. Advantage two — keeping the weeds under control — can be done almost entirely with a sharp hoe, but you can’t hoe right to the edges if the edges are made of something unhoeable. And grasses and other weeds that happen to come up along these retaining walls can get such a good grip that you will hardly be able to yank them out by hand.
Raising the growing areas a few inches also reminds people to keep their feet off.One reason raised beds grow better plants is that they tend to stay looser when feet aren’t tromping on them.Walking on the root systems of growing vegetables harms them significantly and should be avoided.Walking on loosened ground before the vegetables put roots into that area compacts it and thus makes it much more difficult for the vegetables to develop roots in the first place.
Small-sized vegetables — beets, carrots, lettuce, bush beans, bush peas — grow best in raised beds or raised wide rows. Larger plants such as Swiss chard, broccoli, less-aggressive varieties of cucumber, cabbage, kale, and Brussels sprouts can also be grown atop raised beds and in wide raised single rows.The exceptions are all species that have large, vigorously sprouting seeds or that grow big, widely sprawling plants, such as squash, melons, and some kinds of tomatoes. Sweet corn, which needs to grow in a large cluster to pollinate, also does better “on the flat.”

Figure 3.3: From left to right, this illustration shows hills, two slightly raised single rows (the single wide raised row on the right has a double row of plants on it), and two raised beds. The raised bed on the left has two rows of large plants arranged on it, running lengthwise, and, farther down, a single row down the center. When doing this, a small, highly fertilized “hill” can be created in the raised bed, one for each plant. The raised bed on the far right has short rows arranged across it.
Making slightly raised beds
Raised beds should not be so wide that a person who is standing on the path next to them has trouble reaching to the center while bending over or squatting. For most people, four feet (120 centimeters) wide is about the limit. If you are inflexible or have short arms, the width can get down to as little as three feet (90 centimeters). But the narrower the beds become, the less efficiently the overall space will be used because there will be more paths.Also, if the bed gets much narrower than four feet, it is no longer possible to have two parallel rows of large plants running down it lengthwise. For someone who is quite flexible, with long arms, a bed might be 4½ feet (140 centimeters) wide. The paths between beds are about one foot (30 centimeters) wide.
Raised wide rows are better when gardening without any (or much) irrigation. These are actually just narrow raised beds, usually about two shovel-blades wide, or 20 to 24 inches (50 to 60 centimeters). There will be a one-foot-wide path between them, making the centers of the rows about 36 inches (90 centimeters) apart. The spacing between the rows should be increased if there may be long periods without rain.When I lived in western Oregon, where it almost never rains in summer, I used row centers of four feet and sometimes five feet (120 to 150 centimeters), depending on the crop.
Unless you have become so inflexible that you can no longer squat or bend over, there is no point in raising the beds or rows more than two to three inches (five to eight centimeters). This is easily accomplished.
Immediately after digging a new garden, using a combination shovel, move along what will be the paths, scoop up about two inches (five centimeters) of soil, and toss it atop what will be the growing bed or row. That’s all there is to it. Stretching string lines or pegging the corners might help the first time these beds are made. In following years you simply redo the existing beds. Make wide raised rows the same way.
Making hills
Hills are best for growing pumpkins, winter squash, melons, tomato vines of an aggressively sprawling variety, and sometimes cucumber vines. I have also grown slightly smaller plants like kale, cabbage, Brussels sprouts, and broccoli in smaller hills made on top of a four-foot-wide (120-centimeter) raised bed, spaced 24 by 30 inches (60 by 75 centimeters) or even 24 by 24 inches. The traditional Native American spacing of hills is usually four feet from center to center but can increase to five or six feet (150 to 180 centimeters) when dry gardening where rainfall is low in the growing season. In the case of winter squash, hills could be as far apart as eight by ten feet (2.5 by 3 meters) because the plants grow so aggressively.
The best way to lay out part or all of a garden in hills is to first prepare the whole area for growing medium-demand plants. Spread lime, compost or manure, and COF, then dig the whole area. Then where the hills are to be, place a heaping cupful of COF or a pint or two (0.5 to 1 liter) of chicken manure and a heaping shovelful or two of low-potency manure or compost in a little pile. Then dig these amendments in, going down the full depth of the blade, working up a circular spot about 12 to 18 inches (30 to 45 centimeters) in diameter, thoroughly blending the amendments. You should end up with a little mound of highly fertile soil. If there isn’t much of a mound when you’re done,mark the spot by taking a bit of the earth surrounding the fertilized area and toss it on top of the hill. For smaller plants on raised beds, give the hills about half as much fertility and dig a smaller mound, maybe ten inches (25 centimeters) in diameter.
Plants started out in hills get off to a fast start because of the high fertility created immediately below where the seeds are sown. Hills are frugal; it would not be practical to try to turn the whole garden into soil that fertile. In Chapter 9,where I discuss how to grow various crops, I will suggest using hills when that method is appropriate.
Hills and survival gardening
Imagine this: It is spring planting time, but nothing has been dug and you urgently need to make a garden. There is sod. You have a shovel, some seeds, and not much else.What to do? Garden like the Native Americans taught us when we first arrived in North America. Don’t even consider growing any demanding vegetables.You’ll grow easy stuff: winter squash, corn, sunflowers, zucchini, melons, kale, large-framed late-maturing cabbages, indeterminate tomatoes, Swiss chard.
First, mark out the hills, usually on four-foot (120-centimeter) centers. Dig up an 18-inch-diameter (45-centimeter) circle as deeply as possible at each proposed hill center. A person could dig a lot of those spots in one day. The sod in those hills won’t be dead yet, but you’ll have damaged it.
Next, go find some fertilizer.When the English first came to Massachusetts Bay, the locals there taught them to grow corn by digging a hill and putting a fish in it. So spend a lot of the next week going fishing (do it when you’re tired out from digging hills). Collect road kills. Have the kids gather cow pats. Or your own pats. Be creative.
What you’ll have to use for fertilizer may need to decompose a bit before the seedlings will be comfortable being too close to it, so put it deep in the center of the hill and sow the seeds around the outside of that hill.The fertilizer will also have to be strong stuff; there isn’t time to wait for a lot of low-power vegetation to rot. At the same time you’re incorporating fertilizer, you’ll be giving those hills another digging. This time remove any surviving clumps of sod, shake off the soil, and toss the roots aside to shrivel in the sun.
In less than ten days you will have started a garden consisting of fertilized hills surrounded by un-dug (as yet) ground. Now sow seeds; put in plants. While you wait for the seeds to germinate, there are four main gardening tasks: kill the grass still growing between the hills by spading the area up, make more hills for sowing autumn-harvested crops, collect more fertilizer, and dig in that fertilizer in ever-widening circles around the hills. Keep digging in fertilizer in ever-expanding circles, keeping ahead of the growing plants so you don’t disturb their expanding roots. By the time the season is half over, you’ll have dug the entire plot and fertilized most of it.
Except for potatoes. There is a better way to grow survivalist spuds. Dig rows about 12 inches (30 centimeters) wide with the row centers three to four feet (90 to 120 centimeters) apart.The between-row spacing depends on how much rainfall you’re anticipating (spacing of spuds will be discussed at length in Chapter 9). Fertilize the rows as best you can and then plant the seed potatoes down the rows. Before the vines emerge, turn over the sod beside those rows extending out about another 6 to 12 inches (15 to 30 centimeters) on each side. If possible, fertilize that soil too, so the spuds will be growing in a loose fertile strip 18 to 24 inches (45 to 60 centimeters) wide.With the rest of the between-row space, dig or chop (with hoe or mattock) enough to kill the grass. As the vines grow, you’ll be pulling soil and weeds up against them using an ordinary hoe, gradually hilling up the growing vines. You’ll likely end up with a surprisingly large crop, and all the ground in the potato bed will have been cleaned of grass and weeds, ready to use for something else next spring.
Once things are going, there’ll be time to start a compost pile and to think about growing more-demanding veggies the next year.
I don’t think I could start small-sized, delicately sprouting seeds directly in their growing beds unless I had a bow rake. (I could do it with a “T” rake, also, but for some reason the “T” doesn’t seem to balance as well or work as effectively, so if you’ve any choice in the matter, get yourself the bow pattern.)
Raking levels the surface and creates seedbeds out of already loosened soil, and that is gentle work. The rake handle should be long and slender because the less the rake weighs, the slower your arms will tire. You want the head of the rake to be at least a foot (30 centimeters) wide, otherwise you’ll be pushing it back and forth too often to accomplish the same task. Don’t get a child’s rake with a narrow head and a short handle. At the other extreme, I suspect if a rake were over 16 inches (40 centimeters) wide, it would be too hard to control.
There is a Zen to raking that is not so different from what athletes refer to as “being in the zone.”Raking is a meditative action you’ll get better at over many years. Raking beautifully requires the same sort of absolute concentration it takes to hit a golf ball, tennis ball, or baseball or to give a good haircut. Your complete attention has to be where the teeth are combing through the soil. Your upper body has to be balanced, your stance as perfect as a martial artist’s.That’s because the weight that the rake’s head is putting on the bed has to be precisely controlled so the teeth comb out the lumps. A rake with teeth longer than two inches (five centimeters) will endlessly be lifting up new lumps to remove. There is nothing wrong with having lumps in your bed if they are not located in the top inch.
Making a seedbed
When a dry seed is placed in moist earth, it swells and begins sprouting after a few days. Any seeds that take more than three to four days to get going are either in soil that is far too cold for them, are in soil that is far too dry to pass the ready-to-till test, or are a slow-germinating species, usually one with a hard seed coat that resists moisture penetration.
By “sprouting” I do not mean that you’ll see the leaf emerging at three to four days. In each seed resides an embryo, a miniature, living, breathing plant that is alive, resting in a state of dormancy (in other words, sleeping).When it is moistened, the embryo starts producing complex chemicals called enzymes that convert the dried food surrounding it into water-soluble sugars and amino acids.This is just like digestion in your stomach.The embryo begins to assimilate this nutrition and grows, forming a complete plant with it.
Because drying out is one of the biggest dangers the new plant faces, the first thing that a clever embryo does is to send down a root.With a root system working, there is less chance that the seed will die from lack of moisture before it can emerge.Once the root is extending downward, there is no longer any reason to water the seedbed and a lot of reasons not to.
A sprouting seedling needs a lot more oxygen than it did in dormancy; the embryo will die if there is no oxygen in the soil, which is what happens if the soil is waterlogged for more than a few hours.And like all other biological processes, the speed at which the embryo grows and develops is determined by temperature. If the soil is too cold, the seedling, slowed by the chill, will be attacked by fungi and other soil-dwelling diseases that thrive in cold conditions, and it will die.Watering lowers the soil temperature.
Only after the root is descending does the embryo begin to form what is called the “shoot,” the part that emerges into the light. Rarely is this shoot capable of exerting much mechanical force. It does have quite an ability to wriggle its way between larger soil particles, but it can’t push aside a heavy lump, much less break through concrete.
Two similar soil phenomena,“crust formation” and “puddling,” commonly prevent shoots from reaching the light. Puddling happens when it rains or the gardener waters after the seed is planted, and the soil particles, previously light and fluffy, slump into a solid, nearly airless mass. Puddling usually happens only to soils made up of the finest sorts of silt, or of clay that also lacks organic matter.
Crust formation happens on soils that contain some clay, and since most soils contain at least some clay, crusts can form on almost any land. A crust develops in exactly the same way a cement finisher puts a smooth surface on a concrete slab. Concrete is a mixture of smallish gravel, coarse sand, and cement. While it is still plastic (liquid) the finisher rubs the surface with a trowel or board.This rubbing causes the gravel to sink into the mixture, while the finest sand particles and cement rise to the surface. A thin skin of nearly pure cement blended into the finest sand is formed on the surface.When this dries it feels perfectly smooth.
Soil particles are smaller than the aggregates making up concrete, but they blend much as sand, gravel, and cement are mixed in concrete. Think of the sand in the soil as being similar to the gravel in concrete; the silt in the soil like the coarse sand; and the clay in the soil like the cement in the concrete.
Pounding rain (or sprinkler) droplets hitting the soil act exactly like the cement finisher’s trowel, separating the clay/silt from the sand. The sand settles a fraction of an inch, leaving clay and silt on top that dries into a tough impenetrable skin.
It is essential that the gardener do something to prevent puddling and crusting from happening. Fortunately this is not difficult to accomplish — simply increase the amount of decomposed organic matter, called humus, in the soil.When enough humus is mixed into the equation, the particles of sand and silt and clay become more firmly cemented into stable, irregularly shaped chunks or “crumbs” of larger size, sometimes as large as grains of uncooked rice.The crumbs don’t easily separate into sand and silt and clay, so the soil won’t crust over or slump after a rain or irrigation. They also create more air spaces in the soil, greatly improving root development and, thus, plant growth. Soil with an obvious crumb structure is said to have good tilth.
The trouble is that to rapidly change the entire top foot of a poor soil into one that has good tilth can mean blending in as much as two to three inches (five to eight centimeters) of compost or well-rotted manure. That is a heap of compost!
To cover a 100-square-foot (10-square-meter) growing bed three inches (eight centimeters) deep takes one cubic yard (0.75 cubic meter) of material. A long-bed half-ton pickup truck holds one cubic yard — even more if you build up the sides with retaining walls and have strong springs and tires. It could take 18 pickup-truck loads to convert an average 2,000-square-foot (200-square-meter) garden into soil of good tilth one foot (30 centimeters) deep. 
Fortunately it is not necessary to turn the entire top foot of a garden into the highest-quality topsoil to get a good growing result. Instead it is only necessary to focus on the “seedbed.”Most small garden seeds, the ones that have the hardest time germinating outdoors, are placed about half an inch (1.25 centimeters) deep. A few of the larger small seeds, such as beet, radish, or spinach, are sown about three quarters of an inch (2 centimeters) below the surface. So what I propose is that you make only the top inch (2.5 centimeters) of your growing beds into friable soil with excellent tilth.Accomplishing that takes a layer of manure or compost only a quarter inch (six millimeters) thick.Most gardeners find it hard to spread that little. One pickup-truck load would cover fourteen 100-square-foot growing beds a quarter inch deep. Finding and transporting that amount is manageable, even if it must be done with a wheelbarrow.
Once you have your bed covered with a quarter inch of well-rotted manure or compost, use the rake to accomplish four things at once: (1) level the surface precisely; (2) uniformly blend the manure/compost into the top inch, using the action of the rake’s teeth passing through the soil repeatedly as (3) the rake also breaks up some of the less solidly cemented clods and (4) combs out most of the lumps in the surface layer. The rake will pull these resistant lumps to the edge of the bed, where they roll down the side and harmlessly await the gardener’s feet to crush them.
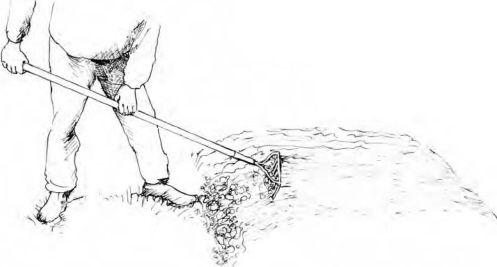
Figure 3.4: The clods raked down out of a raised bed come along with a bit of compost. These are mixed together as the gardener’s feet crush the clods over the coming months. When the bed is reformed for the next crop, this improved soil is tossed atop the bed and will be unlikely to form clods again.
Restoring a raised bed for planting again
After a raised bed or a raised wide row has grown a crop, you will need to rebuild, fertilize, and fit it to grow another. This is the easiest procedure:
• Remove remnants of vegetation to the compost area.
• If the bed or wide row is going to grow medium- or high-demand crops, fertilize it. Fairly uniformly spread four to six quarts (four to six liters) of COF per 100 square feet (10 square meters) of bed or 50 lineal feet (15 meters) of wide row. Otherwise cover the area about an eighth of an inch (three millimeters) deep with strong chicken manure compost (containing over 3 percent nitrogen).
• With the shovel, scoop up about an inch (2.5 centimeters) of soil from the paths around the bed or between wide rows.Toss that soil atop the bed. If the paths have gotten a bit weedy, this action will clean them. A sharp shovel wielded by a pair of strong arms can cut off weeds as the soil is lifted. Otherwise, scrape the path with a hoe first and then lift the soil. The hoeing will also loosen the soil in especially compacted paths, making the rest of the task easier.
• Roughly turn the bed over to the depth of the shovel’s blade.This mixing need not be thorough. It is okay to stand on the undug part of the bed while doing this. At all other times keep your feet off the bed to avoid compacting the growing area.
• If much soil ends up back in the paths from this digging, scoop it up and toss it onto the bed again.
• With a rake, roughly level the bed.
Measuring soil amendments
• A 100-square-foot (10-square meter) raised bed is 4 x 25 feet (120 x 760 centimeters) or 40 inches x 30 feet (100 x 900 centimeters).
• 50 lineal feet (15 meters) of wide row (two shovel blades wide) is 100 square feet.
• It takes one cubic foot to cover 100 square feet (20 liters per 10 square meters) an eighth of an inch (three millimeters) deep.
• To cover 100 square feet a quarter of an inch (six millimeters) deep takes two cubic feet.
• To cover 100 square feet half an inch (12 millimeters) deep takes 4 ¼ cubic feet.
• Five gallons (20 liters) equals one cubic foot. The large plastic pail that contains bulk foodstuffs usually holds five gallons.
• A cubic yard is 27 cubic feet (0.765 cubic meters). A long-bed pickup truck can carry the weight of a cubic yard of manure or compost with no problems.
• Fifty pounds (25 kilograms) of lime per 1,000 square feet (100 square meters) is about a quart-jar full (one liter) per 100 square feet.
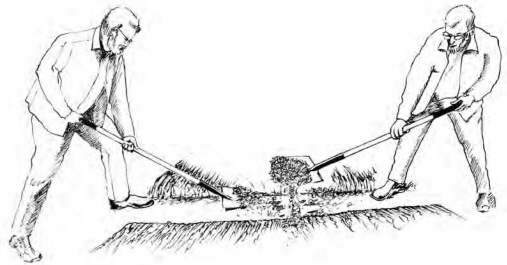
Figure 3.5: Restoring a raised bed for planting.

Figure 3.6: Screening compost to separate the fine from the not fully decomposed material. A large sieve like this is one of the most useful homemade tools a gardener can make.
• If you are going to sow small-sized seed, cover the bed with a quarter inch (six millimeters) of well-decomposed manure or fine compost. Do not use clumpy half-rotted compost; the texture must be fine. Some gardeners have a screen to sieve out fine compost for this purpose. If you’re going to sow large seed, using rough compost will serve just as well.
• Now take a rake and perfectly level the bed, pull the clods out of the surface inch and down into the paths, and make a seedbed ready for sowing. If you aren’t going to sow fine seed, this last step can be done quite carelessly.
It takes me about one pleasant hour to accomplish this task on a bed of 100 square feet (10 square meters) — spreading potent manure, compost and/or COF, spading the bed, scraping the paths, sieving compost, hauling it to the bed and spreading it, and raking out a seedbed.
I have a tool collection in my tool shed, with a variety of hoes that are extraordinarily efficient for doing one particular task. But only one of my hoes is good for everything — naturally, this one is the most common design. Most people call it a “garden hoe.”The rectangular blade is attached to a swansneck, so called because when held in a vise, and with the application of a fair amount of force, this rod of mild steel can be bent to adjust the angle of the blade so it matches the height of the user. The swansneck should be bent so the blade is parallel to the soil when the handle is held in a comfortable position with the user standing upright. At this angle a sharp blade can rapidly and easily cut off weeds just below the soil’s surface, while at the same time loosening up the surface and breaking any crust that may have formed. This loosening action is called “cultivation.” If the angle is wrong, so that the hoe wants to dig itself into the earth when pulled toward you, then you can’t efficiently work the tool because you will have to hold the handle too far from your body in order to correct the angle of the blade, which makes you tired. If the blade wants to lift itself out of the earth when pulled toward you, then you will have to bend over to adjust the angle of attack, which also makes you tired. Once the swansneck has been bent to suit the user, it never has to be adjusted again.
Sharpening the hoe. File the outside of the blade so it makes a sharp, uniform, chisel-like bevel of about 20 degrees.To sharpen it the first time, put the hoe on the ground or on a porch so the blade is at the edge of the porch.With one foot placed close to the socket, press down with enough weight to hold the blade still while you file the outside of the blade, holding the file with both hands and bending your body over it. If this is too difficult, have someone else stand on the handle or else put the blade into a bench vise.
After a proper bevel has been created the first time, you may be able to resharpen the hoe by filing one-handed. With the bottom of the handle wedged into the ground and restrained by the edge of your shoe, lean the blade against a stout post at least four feet (120 centimeters) tall and with one hand press the back corner of the blade firmly against the support. File. It shouldn’t take a sharp file more than ten or so strokes to restore the edge.
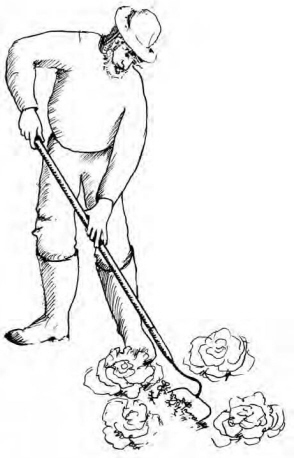
Figure 3.7: Hoeing technique for weeding soft ground.
With a sharp garden hoe, you can perform the following tasks:
•Weed soft ground. Pull the blade toward you, half an inch (1.25 centimeters) below the surface. This cuts off weeds as though with a knife.Most weeds will die within hours of being cut. The odd one that does not die because it was not completely separated from its root system will almost surely die when you cut it again a week later.Weeds that come back from tubers or bulblets may require cutting six or eight times over six or eight weeks. But there is no weed in Creation that won’t die if its leaves are repetitively removed before they can make much food — even horseradish or comfrey eventually succumbs.
•Weed compacted soil — including paths.When weeding compacted earth, you hold the hoe entirely differently. Keep the handle slightly below your waist. Place one hand about halfway down the handle and use this hand to press the blade down while the other hand pulls the sharp blade toward you. The blade scrapes across the earth; because it is sharp, it cuts off small weeds. If your hoe is truly sharp, you’ll be surprised how quickly this can go. This action tends to dull a hoe faster than any other use.When I have a lot of paths to scrape, I take my file to the garden.
• Chop out resistant clumps of grass and large weeds.When doing this, use the corner of the blade. Swing the hoe like a mattock or axe; the corner penetrates the hard earth, chopping off tough stems. This only works well when the corner is also more or less a proper right angle and the working edge is kept sharp. Even then, this task is exhausting hard work. If the garden is weeded once a week during the growing season, there will never be large, resistant weeds to chop out. All of them will be killed rapidly and with little effort when they are small and tender. I can weed 2,000 square feet (200 square meters) of growing beds and the paths between them in about one concentrated hour. I do this about once a week during the height of the growing season, and less often as summer wanes because everything, including the weeds, grows more slowly then. Spring is the most critical time to hoe weeds because that is when they are growing rapidly and because unsettled weather often keeps the gardener out of action while weeds grow to the size that demands exhausting chopping rather than easy scraping.

Figure 3.8: Hoeing technique for weeding compacted ground or scraping paths.
• Perform other tasks. The ordinary garden hoe can do a few other things. A corner of the blade can be used to make furrows by pulling it through soft soil.With a bit of practice, the depth of that furrow — a factor critical to successful germination — can be held quite uniform. Then, with seeds in the furrow, you can use the flat of the blade, front or back, to shove some soil back into the furrow, either on the push or on the pull stroke. (In Chapter 5 I will suggest a better way to use the hoe for making shallow furrows.) This ordinary hoe can also pull earth toward the gardener, which is useful for hilling up potatoes.However, if a large plot of spuds is to be grown, using a larger, heavier version of this hoe will save a lot of time.
Hoe quality
I once foolishly purchased a cheap hoe. I still owned that disgusting thing when I went into the seed business, and because I had no extra money during my first few years in business, I used it to weed the trials ground.The steel was so poor that by the time I reached the end of each 100-foot (30-meter) row it was dull. It takes at least three times the effort to weed with a slightly dull hoe; the effort it takes to weed with a really dull one can’t be described in polite English. So I took to carrying a file in my back pocket, and when I completed each row I would lean the hoe against a fence post and resharpen it.After two years there wasn’t much blade left to sharpen.
Then I got a much better-quality implement. Same general appearance; totally different tool. The quality hoe gets sharpened each spring and stays sharp for about half the summer unless I am scraping a lot of paths with it.
Hoes have a fairly reliable quality indicator you can see before you purchase. The tool is intended to occasionally chop resistant weeds. This action exerts a big shock on the point where the swansneck attaches to the handle. There are two ways to attach a swansneck. The cheap way is to simply push the rod into a hole in the handle and then reinforce that basically weak joint with a sleeve or collar of thin metal (a ferrule) that fits tightly around the wood so that (the manufacturer hopes) the handle won’t split when some real stress is applied. But even if the first powerful shocks don’t split the end, they do gradually enlarge the hole so the swansneck loosens up in its socket and the hoe head starts wobbling or rotating. The owner then inserts all sorts of wedges or carries out make-do improvisations to tighten up the tool. Eventually he or she has to get a new handle.
There is a better way.The end of the swansneck can be forged (or welded) into a strong, slightly tapered socket that is slid over the end of the handle and affixed with one or two screws or by a bolt that goes through the whole thing.Any manufacturer with the integrity to make a forged metal socket to attach its hoe to the handle is almost certainly going to use quality metal for the blade.
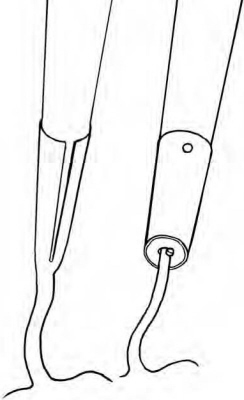
Figure 3.9: Notice that the swansneck on the right has loosened and a nail has been driven into the hole to function like a wedge in the handle of an axe.
Push-pull hoes
There is one special hoe design well worth having. The push-pull hoe works by gliding back and forth through soft soil, cutting weeds off just below the surface on both the push and the pull stroke.There are two common designs: the stirrup hoe (or “hula hoe”) and the propeller hoe (or “glide and groom”). These hoes are available through mail-order seed companies or other mail-order garden gear suppliers. I’ve owned both sorts with equal satisfaction.
If run over the beds once a week, this kind of hoe will keep even a large garden beautifully manicured in little time and with little effort. The design protects your plants from being accidentally cut off while allowing the cutting edge to pass close to the vegetables. This is especially true of the stirrup design. However, the stirrup design attaches to the handle about four inches (10 centimeters) above the top of the cutting edge, making it harder to pass this hoe under overhanging leaves. The propeller type will slide better between rows whose leaves are getting close to forming a canopy. Every design of every tool involves compromise.
Weeding and plant spacing
Eliminating weeds with a sharp hoe is much quicker and easier than yanking them with dull fingers.You’re standing up instead of bending over.You’re eliminating little ones by the dozen per motion instead of one by one.When you routinely cultivate the entire bed, you’re killing many of them before they’ve even grown large enough to see. The catch is that to do it this way, the rows must be far enough apart for the hoe to pass graciously between them. That means a minimum 12 inches (30 centimeters) between-row spacing.
When I am growing small plants like radishes, finger-sized carrots, or salad turnips intended to be pulled hardly larger than radishes, then the rows are 12 inches apart with the plants thinned to one to three inches (2.5 to 8 centimeters) apart in the row.The rows are made across a wide raised bed, so each row is 3½ to 4½ feet (100 to 140 centimeters) long. For a single sowing I might start one or more such rows. Larger plants like beets, storage carrots, and parsnips grow better in rows separated by 18 inches (45 centimeters). With this spacing I can keep the weeds conveniently hoed until the leaves of one row begin to touch and interpenetrate the leaves of the next row. Then it is no longer possible to slide any sort of hoe between the rows. Once a leaf canopy forms, it strongly shades the soil below. Even if a weed should sprout, the canopy prevents it from growing much. Only the odd weed will show itself above a crop canopy, and this one you can yank out by hand.
If I were without irrigation, dependent on rainfall, and needing to be able to get the garden through rainless periods lasting several weeks, I’d increase the between-row spacing and thin the plants a little further apart in the row. In that event I can continue hoeing through the entire growing season. And with a push-pull hoe, especially of the propeller design, I can usually get right up to the vegetables’ stems.Thus there need be next to no hand-weeding in a garden.
Chapter 6, on watering, will give you plant-spacing charts for all these circumstances.
There are myriad garden tools and gizmos offered for sale, but the other items you really can’t do without are a wheelbarrow, a sprayer, knives, and buckets.
Wheelbarrow
Garden magazine advertisements tell you how labor-saving it is to have an expensive two-wheeled garden cart instead of an “old-fashioned”wheelbarrow. Unless you are practicing no-dig gardening, there is no need to be hauling dozens of pickup-truck loads of organic matter around the veggie garden. A large wheelbarrow holds enough compost or aged manure to adequately restore a bed of 100 square feet (10 square meters) — plenty of hauling capacity. The wheelbarrow also maneuvers neatly down narrow paths between beds that a two-wheeler couldn’t manage. And a wheelbarrow costs a lot less money.
But do get a good one, with strong wooden handles and a broad pneumatic tire (with inner tube) on a steel rim, turning on ball bearings.No plastic! Get the largest barrow of the best quality you can barely afford. To find it you’ll probably have to visit a farm supplier or commercial hardware, not the local branch of a national discount chain.Make sure that the handles are high enough for your body.When you lift the handles and hold the “barrel” so it barely tips forward, your arms should be only slightly bent at the elbows and your back nearly straight.There should be room for you to stand between the handles and walk forward without risking your knees. A proper fit to your body is essential! Otherwise you can’t control the barrow when it is heavily loaded, and if you have to bend over to push the barrow, you’ll make your back sore.There can be a lot of difference from one make to another; try several and find one that fits your body.
Don’t scrimp on this purchase. Once you have a wheelbarrow, you’re probably set for the next 20 years if you keep it painted so it won’t rust away.
One other thing: Builders’ supply companies sell specialist wheelbarrows designed to carry concrete. These have a rather deep, rounded chamber and thick-walled tubular metal handles instead of wood, are super-strong, and are too heavy for gardening. This design will make you unnecessarily tired if you use it much. The style you want will be capacious but lightweight. Most of what you’re going to carry is not dense like concrete or gravel, and you’ll want to be able to carry as much volume as possible.
Sprayer
There will be times that you’ll want to spray — liquid fertilizer on leaves; compost tea to fight disease; Bacillus thuringiensis (Bt, an organically approved pesticide) against corn earworms or cabbageworms; assorted home remedies like soapy water, rhubarb leaf juice; etc.
The sprayer you buy should not be a cheap one, should hold up to five or six quarts (five or six liters), and should be the sort you pump up and then carry around by the pump handle. As an indication of quality, take a look at the nozzle. The best sprayers use interchangeable, inexpensive nozzle inserts, small in size and usually made of brass, so that different volumes and patterns of spray can be selected. The sprayer that has a built-in, adjustable cone nozzle made of plastic is usually a cheapie — but not always. Ask if the seller stocks any spare parts, like pump pads and o-rings.Also look at the pump rod. If it’s made of plastic, it may become brittle after a few years and snap. It’s better if it’s made of metal.
But most sprayers these days, even the better ones, are made of plastic. Protected from the sun, a plastic sprayer might last a decade, but one left in the sun will survive two or three years, tops. It’s sad.We could be building gear to last. Maybe when we seriously run short of oil, plastics will start costing more than metal. And we’ll again have equipment that’ll last a lifetime.
One last tip about sprayers:Make sure the stuff you put in them is free of particles and that no grit is lurking around the pump’s seal before you open the tank. Rinse it off/wipe it off before unscrewing the pump to fill the spray tank. If particles get into the tank, the dratted thing will likely get plugged up.
And finally, whatever you spray won’t do much good if it doesn’t stay on the leaves.Many plants have waxy leaves that make water bead up and run off.To keep your spray on the leaf until it dries or penetrates, always use a surfactant, which is a fancy name for a water softener.The cheapest effective one is a quarter teaspoonful (1.5 milliliter) of ordinary mild liquid dishwashing soap per quart (liter) of spray. I’ve never had this quantity burn or otherwise damage leaves. Don’t mix a strongly antiseptic detergent with Bt.
Small kitchen knife and medium-coarse stone
I keep two identical thin-bladed, sharp, pointed, kitchen paring knives stuck into the top of a short wooden stake in the garden.Next to the stake is an inexpensive large, double-sided (medium/ coarse) sharpening stone. The knives have bright red plastic (highly visible) handles because I’m always trying to remember where I last put one down.The stone stays in the garden because knife steel isn’t made for running through the earth while thinning tiny seedlings or weeding close to nearly emerged rows. I resharpen a knife after every five or ten minutes of use.The stone will, in an emergency, also hone a dull hoe.

Figure 3.10: Using a paring knife for thinning or weeding.
A thin pointy knife will slip between crowded seedlings, allowing me to cut some off, permitting others to grow. If I tried to do this sort of close work with my fingers, it would take three times as long. The knife will snick off the odd weed just below the surface should I notice it while doing other things. I also use the knife for harvesting.
I could make a garden without a hoe. I wouldn’t want to make one without a rake. I couldn’t make a good one without a shovel and definitely not without a small sharp knife.
Buckets
Buckets do more than carry things; I use them for fertigation. I’ll have much to say about fertigation in Chapter 6 on watering. A few cheap plastic ten-quart (ten-liter) laundry buckets or, better, some recycled five-gallon (20-liter) ones that once contained institutional kitchen bulk goods are essential around the garden. It seems one can never have too many.
Once tools were expensive, valued, and cared for.Then we created a consumer society in which nearly everything is designed to decompose so another will be purchased.Maybe once resources become more scarce we’ll go back to the old ways. But in the meantime, people have forgotten how to care for valuable tools.
Two things go wrong with every shovel, rake, and hoe. The metal bits rust; the wooden bits dry out, crack, and split.
Rust. In the old days, there was usually a wooden box on the floor of the garden shed filled with coarse sand. The sand was saturated with used crankcase oil.When the garden tools were put away for the day, their working ends were first wirebrushed clean and then stuck into that sand so they came out lightly coated with oil. These days people sometimes have a convenient spray can of lightweight oil that serves nearly as well for this purpose.
Handles, wood. I have a dusty pint (half liter) jar half full of coconut oil in the shed. At the end of the season, when everything is being put away for the winter, I bring that jar into the house to warm it so it becomes liquid. Then I thickly coat my wooden tool handles with this oil, making sure plenty gets into the sockets where blades attach to the handles, and hang the oily tools up on the wall, suspended between pairs of large nails. It takes a while for all that oil to sink in.This once-a-year treatment seems sufficient; the handles don’t roughen and/or split and/or shrink unduly. No other common vegetable oil works as well as coconut oil, which I buy at a health food store. I’ve seen some fancy preparations made for protecting tool handles, but basically they’re a more-or-less-equal mixture of coconut or linseed oil and beeswax.
Handles, composite. One of my shovels has a composite handle, which is lighter in weight and stronger than wood.However, composites don’t much like being exposed to ultraviolet light. Keeping it out of the sun when it’s not in use does help the handle outlast the blade.