
In Chapter 2 I suggested using a soil-improvement program based on purchased amendments. But isn’t this a book about raising food without spending much money? I have three reasons for saying what I did in Chapter 2: (1) because as I write these words in 2005, these materials are still inexpensive and readily available; (2) because when people first start a garden they likely won’t have had time to make compost; and (3) because even with an ongoing composting operation in place, using complete organic fertilizer (COF) or something like it is still an excellent practice.
I repeat: feedlot manures and composted chicken manure are widely available and seem inexpensive to most people right now, and industrial agricultural wastes like seedmeals and slaughterhouse wastes are also cheap. But if present trends — peak oil, climate change, irresponsible monetary manipulations by central banks, competition over resources — result in the least desirable outcomes, then ordinary people will find it ever more difficult to afford to eat healthfully. It seems almost inevitable to me that the real (inflation-adjusted) cost of soil amendments is going to increase substantially. Composting is the alternative to purchasing. It allows small-scale food growers to make their own fertilizer, to manufacture “well-rotted manure” without the need to own livestock.
I need to make three brief apologies before getting into the substance of this chapter. I write by speaking intimately to imaginary people sitting in invisible chairs next to my computer monitor. I always envision these people as friendly, accepting, understanding.And for this book most of my imaginary listeners are new, inexperienced gardeners, feeling a bit bewildered. Up to this chapter I have tried to keep it simple, starting them off on the right foot so they’ll discover by observation the rest of what they need to know. But the subject of composting is different. Making low-grade compost suitable for mulching ornamentals or fruit trees is not difficult. But producing compost that will effectively grow vegetables is a highly skilled activity requiring hard work, close attention, and a desire to “see” what is happening inside the heap. This chapter cannot be “made simple,” and for that I apologize.
And the second apology.The subject of composting is a huge one. Fifteen years ago I wrote a book as big as this one that was only about composting. There is no way I can talk about every aspect of composting in one brief chapter. The techniques I am going to describe in this chapter are the ones most likely to result in success for the new composter. If you want to learn the whole of compost making, there are heaps of books in print on the subject, but be prepared to sort out a lot of contradictory data.
Finally, please accept my apology for not lying to you.Many garden writers present every kind of composting as being inevitably successful and easy, portraying the result, always, as effective fertilizer.This is not actually the case. There are many composting pitfalls. If you can’t afford to have your food gardening efforts fall far short of your hopes, if you can’t afford to just shrug off this year’s catastrophe and hope it’ll be better next time, you need the truth.
For all these reasons I suggest that you read this chapter more than once.
I compost only to recycle garden and kitchen waste. Because I never end up with enough of my own compost to satisfy my garden’s need for humus, I also use well-decomposed feedlot manure, which is another form of compost. I buy feedlot manure because, like my own compost, it gives the soil better tilth and provides food for a healthy, stable ecology of worms, tiny soil animals, and microorganisms, whose activities are essential to keep my plants healthy. Compost also supplies plant nutrients, making the soil more fertile. (This last function could be performed by fertilizer instead.) Since neither my own compost nor the feedlot manure I purchase supply enough plant nutrients to grow a really abundant garden, I also feed my veggies COF.
This approach seems inexpensive and practical at this time. Each year my garden goes through about three 50-pound (25-kilogram) sacks of seedmeal, one sack of meatmeal, one of kelpmeal (and the price of that always makes me wince), one or two hefty little sacks of high-phosphate Peruvian guano, about 25 pounds (10 kilograms) of ordinary agricultural lime, the same amount of gypsum, and 50 pounds of dolomitic lime. In 2005, the cost of all that came in under $300. This expenditure grew about $4,000 worth of veggies if their value is calculated according to what I would pay for them at the supermarket at the exact time I harvest them, which is an entirely unfair comparison. Still, spending $300 to produce an underpriced $4,000 seems a great exchange.
So each year I cheerfully pay out that $300 to maximize the nutritional qualities (and output) of my garden. But if my local farm supply store could not obtain the ingredients for COF, or if I could not afford them, I am glad to know I could grow almost as good a garden, producing nearly as nutritious an outcome, by putting out the effort to make high-quality compost and buying only a couple of bags of lime that would, at current prices, cost me about $20.
Nature recycles. Everything that grows will eventually die, fall to earth, and rot or will be eaten by large animals whose manure falls to earth and rots.Eventually the animals themselves fall to earth, and their bodies rot. The only example of a natural process I can think of that doesn’t seem like recycling is when dissolved mineral nutrients end up in the ocean, which seems to be a huge permanent sink for nutrients. But even oceanic minerals recycle over geologic time.
Nature has designed wild plants to be capable of growing lustily in soil whose rather low fertility is stably maintained by organic materials rotting on its surface. I discussed in Chapter 2 how vegetables, lacking the vigor of wild plants, have come to require higher levels of nutrients in their soil and, often, higher than natural levels of organic matter. Early farming in all English-speaking countries consisted of clearing the forest and then turning under the duff, a thick, half-rotted layer of leaves, bark, and other organic matter.The duff is the forest’s capital accumulation of centuries. Dug in, it decomposes far more rapidly, resulting in a huge but temporary increase in fertility. Abundant harvests could be enjoyed — for a while. But without the annual nutrient addition from the forest’s falling leaves, with the export of soil nutrients as crops were sent to market, and without the addition of the manure produced by all the animals (including the humans) eating that food, soil fertility decreased, and all too soon the land was “worn out.”
Why do I say my veggies are “underpriced” at $4,000? Because I am not growing stale, flavorless vegetables. And no allowance is made for the superior nutritional qualities of my food. Over the last two decades, according to official US government statistics, the average nutritional content of industrial vegetables has declined about 30 percent. And 20 years ago supermarket veggies still weren’t the equal of home-garden stuff. I have no doubt that what I grow is at least twice as nutritious as the stuff in the supermarket and is easily worth $8,000.
That figure is still an understatement. Because I have been well-nourished for several decades, I need little medical attention, even though my body has arrived at its mid-60s. Entirely disregarding the dollar cost of sickness, I do not disregard the cost of the suffering. Add that to the value of my garden’s output! 
In this industrial era, exhausted land has been temporarily restored to heavy production by the use of chemical fertilizers.Were it not for the use of fertilizers, most of our croplands would be considered “worn out,” and almost any soil a vegetable gardener uses these days may be too infertile to grow most kinds of vegetables. So increasing soil fertility is the gardener’s main concern.
Mulch gardening
Since nature maintains fertility through the slow surface decomposition of organic materials and does not dig (except if you count the slow activities of worms),why not copy it: spread organic matter on top of the soil and let it rot. Will doing that grow a veggie garden? The answer is a qualified yes. It will grow veggies in climates where the soil freezes solid in winter and where summers are hot enough to rot the mulch rapidly. To get the best possible result you have to mulch with something rich in plant nutrients like alfalfa (lucerne) hay or pea straw, or else fortify infertile spoiled hay and autumn leaves with strong manure or heavy sprinklings of the same seedmeals that make up COF. Here are some more negatives.
• The mulch is always in your way. It tangles the hoe but fails to completely prevent weeds from emerging. If you’re mulching on the cheap, with spoiled hay, then you are simultaneously sowing huge quantities of grass seed. You’ll end up spending more time patrolling for weeds than you would do if you’d not mulched and learned instead how to properly sharpen a hoe.
• Mulching keeps the surface moist but does not, as claimed by mulching enthusiasts, significantly reduce moisture loss. Soil moisture is mainly lost as plants transpire water, not as the sun shines on bare earth.
• Mulched gardens are slow to warm up in the spring.
• With permanent mulching, so much leaf and straw residue is being brought into the garden that the soil’s nutrient ratios are inevitably put far out of balance. Consequently, the nutritional content of your veggies is hugely degraded.
• If your garden is larger than a postage stamp in the middle of a big lawn that easily supplies heaps of grass clippings, you will have to haul in a great deal of bulk to maintain the mulch.You’ll do so much hauling, in fact, that it almost becomes a necessity to own, fuel, licence, maintain, and pay the insurance on a pickup truck. If you don’t own one, then someone willing to haul for you has to own and use one on your behalf.
• And in mild-winter climates, after a year under permanent mulch the garden becomes home to plague levels of small animals that proceed to eat most kinds of vegetables, especially seedlings. I tried mulching in two different mild climates, which is why I do not recommend this method where the soil doesn’t freeze solid in winter.
It works out to be less effort and far more effective to heap-compost enough organic material to maintain soil humus at healthy levels and then use something like COF or poultry manure compost as fertilizer, when needed, on medium- and high-demand vegetables.Mulch gardening does make sense for someone who is weak or whose physical mobility is restricted, someone like 70-year-old Ruth Stout, the author of Gardening Without Work, which started the whole mulching mania, someone too frail to wield a shovel or hoe but who can manage to carry a flake of hay to throw atop a weed coming through and who can afford to get someone to haul in and stack multiple truckloads of spoiled hay bales for her.
Mulching? I’ve been there, done that! If you want to reinvent the wheel, well, a lot of gardeners do. I reinvented quite a few wheels myself.
Carbon to nitrogen ratios
You can predict how any particular material will behave when being composted, and how well it can fertilize plants after decomposition, by knowing how much carbon (carbohydrate) it contains in relation to the amount of nitrogen (protein) it contains (see Figure 7.1). This is called its carbon-nitrogen ratio, sometimes written C/N or C:N.Not only can every decomposable material be compared with every other by its C/N, but there also is an absolute standard of comparison — the C/N of soil.
Except in the driest hottest deserts, where the earth contains no organic matter, all soil contains humus, the stable residue of decomposed organic matter. Humus is a complex substance highly resistant to further decomposition. It does eventually break down completely and vanish from the soil, but that happens very slowly.
Soil humus has a carbon-nitrogen ratio of around 12:1 in every climate, in every soil. Amend soil with something decomposable and the amendment will be converted into a far smaller quantity of humus. If the original C/N of that material is higher than 12:1, the soil microbial population will “burn” its carbon for fuel while preserving the nitrogen until the C/N lowers to match that of the surrounding soil. At the end of this burning off there will probably be a higher level of humus in the soil then there had been before the soil was amended. In simple terms, the soil becomes healthier and will have better tilth. Also, once the average C/N (soil plus amendment) comes close to 12:1, the plant nutrients that had been contained in the undecomposed organic matter become available to plants growing in the earth; again in simple terms, the soil becomes more fertile.Why did the soil not become more fertile immediately? Because until all the amendment is eaten, the soil microbes assimilate the nutrients and withhold them from the plants.
Carbon-nitrogen ratios
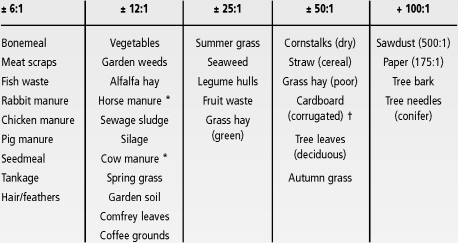
* Containing no bedding
† The glues used contain a lot of nitrogen, lowering the C/N compared to paper.
Figure 7.1
If soil is amended with organic material having a C/N lower than 12:1, the opposite happens.To increase the C/N to match that of the surrounding soil, different sorts of bacteria will convert the surplus nitrogen to ammonia gas.This reduction of nitrogen content continues until the stable desired ratio of humus, 12:1, is reached. The ammonia is almost instantly converted by other soil-dwelling bacteria into water-soluble nitrates, first-class fertilizer that makes plants grow fast.The resulting higher soil nitrate level also encourages soil microbes to multiply. More of them means they more aggressively attack humus.The end result is a soil with a slightly lower quantity of organic matter than there was before this low C/N material was mixed in. This loss of humus is also what happens when chemical fertilizers are added to soil, which is why organicists are so strongly opposed to the use of chemicals.
This deserves to be said again. If we put something into the soil with a C/N below 12:1, whether it is chemical or “organic,” the consequence is the immediate formation of nitrates. The plants rapidly start growing faster, but when it is all over we have slightly reduced the soil’s humus content, meaning a less-healthy microbial population and poorer tilth. If we decompose high C/N organic matter in soil, the result is that soil microbes co-opt nitrates and other plant nutrients present in the soil in order to eat that organic matter. For a time the plants grow less well. But when things settle back down, we have increased the soil’s humus level and its fertility. And after the main decomposition, the plants grow better than before.
Finally, the higher the C/N of the amendment, the longer it takes to decompose; the longer the soil chemistry is disordered, the longer we have to wait before our vegetables grow well.That wait can be ruinous.Many gardens have been wrecked for an entire growing season or even longer because they were heavily amended with high C/N materials.
Sheet composting
Here’s another good idea: Fertilize by spreading a layer of nutrient-rich, decomposable, organic matter atop the soil and then shallowly digging it in. Things rot much faster when they’re mixed into well-oxygenated soil than when they’re merely spread on the surface. This method, called “sheet composting,” will grow a good vegetable garden — if you do it far enough in advance that there is time for it to decompose before planting time. And if you are sheet-composting fresh animal manure, it only works well as fertilizer if you spread fresh manure and, in hot sunny weather, incorporate it immediately after spreading it. In a personal e-mail, a Texas farming consultant I am acquainted with said of this:
Throw manure on the top of the ground on a cool day without wind and the values might hold for several days. Put the same manure on the ground in 98 degree sunshine on a windy day and you will lose 25 percent of the nutritional values by sundown. The best with manure is to put it under the soil as quickly as possible — the shortest dwell time between the cow and the soil means the highest efficiency of conversion.
Farmers raising livestock frequently sheet-compost.They haul a few days’ accumulation from the barn or loafing area to a field, spread it over a small part of that land, and immediately disc or rototill it in. Over the course of a month or so, they fertilize an entire field.
In the North American garden, you can bring in a load of fresh manure just after the first frost, spread it, and shallowly dig it in. At this cool season there wouldn’t be a huge loss of nitrogen if it took a few days to finish turning it under. You can sheet-compost with other things than manure, but it is mighty difficult to spade in grass hay; alfalfameal is diggable but mighty expensive. Short grass clippings and leaves can be dug in. But if you’re thinking of digging in high C/N vegetation, keep in mind that the length of time needed to decompose it depends on the following things:
• The thickness of the layer
• The average C/N of the material at the start of the process
• The preexisting fertility of the soil
• The amount of time the soil will be reasonably warm before you need to plant it.
Immediately after the blanket of decomposable material is dug in, the soil ecology begins to consume it.Microorganisms multiply incredibly rapidly on this new food supply. If the soil is warm, in a few days they’ll be going at the material in much the same way yeast fills a brewing vat. These microbes obtain the raw materials to construct their bodies by gobbling up almost all the available mineral nutrients in the soil around them, nutrients that plants would otherwise use to grow with. The microbes especially need nitrogen compounds to form proteins, but they also need all the other usual plant nutrients: phosphorus, potassium, calcium, magnesium, etc. In other words, when undecomposed organic matter is mixed into soil, even though that organic matter contains a lot of plant nutrients that will become available after decomposition, these nutrients are not soluble, are potential, are not available yet. But the organic matter creates a microbial bloom whose need for nutrients is so great that plants growing there are deprived of nutrients.
Strange, isn’t it! You sheet-compost to fertilize, but for a time the soil becomes less fertile. As the microorganism population busily “burns” the carbon, they also incorporate plant nutrients contained in the organic matter into their bodies.Microorganisms are more aggressive than plants in this respect. They get what they need first. Only when this new food supply has been almost entirely consumed does the population of decomposers begin to die for lack of fuel. At this point the plant nutrients held in bacterial bodies are released back into the soil for the plants to use. Some of these nutrients will be simple water-soluble chemicals,much like those that are applied as fertilizer. But some of them will be in the form of complex organic chelates that nourish the plants much as vitamins nourish humans. To be fully healthy, to achieve the highest nutritional quality for the humans using them as food, vegetables need to assimilate a goodly portion of their nutrients from decomposing microorganisms.
Like every other organic chemical or enzymatic reaction, the speed of sheet composting depends on soil temperature. In moderate or short-season climates it goes slowly in autumn, does not happen at all during winter, resumes in spring, and by the time the land has warmed up enough to start heat-loving crops, the decomposition process will almost certainly have been completed — unless the material being sheet-composted started with an extremely high C/N. In early spring, because massive decomposition is still going on, chill-tolerant spring crops may not grow well, so in regions with freezing winters, avoid autumnal sheet composting on beds where spring crops will be going in unless you’re using low C/N material — and not too much of it.Where the soil does not freeze or chill too severely during winter, sheet composting goes on much more rapidly, unless there is sawdust (incredibly high C/N) mixed into the manure.
You can sheet-compost in spring or summer if you can afford to have some land out of production during the prime growing season. In warm soil it usually takes around six weeks for decomposition to proceed to the point where vegetables get the benefits of all the nutrients added.That’s six weeks if the average starting C/N of what was turned in was no higher than 30:1 and the layer being amended isn’t over an inch (2.5 centimeters) thick.
A few more cautions:
• Gardeners in well-rained-on regions who depend on sheet composting as their main or only method of soil improvement should spread lime along with their compost material. Fifty pounds (25 kilograms) of ordinary agricultural lime per 1,000 square feet (100 square meters) will not cause overliming. It’s even better to spread 50 pounds of an equal mixture of agricultural lime and dolomitic lime per 1,000 square feet. Add lime at that rate every year, or at least every time you sheet-compost. However, beware if the manure is not from your own animals: it may have already been mixed with quite a bit of lime for odor control, and the result may be too much lime for safety.
• The soil in new garden sites will not contain enough nutrients to build the enormous microbial population needed to rapidly decompose a lot of material. If you’re sheet-composting to start a new garden, don’t spread low-potency horse/cow/sheep manure more than an inch (2.5 centimeters) thick. Avoid having much bedding material in the manure (Figure 7.1 explains why). Don’t sheet-compost a thick layer of autumn leaves and woody grasses of late summer on a brand-new piece of infertile ground. These materials also have a high C/N (consult the table). Do lime. Calcium and magnesium are just as vital to the formation of microbial protein as they are to making plant protein. I wouldn’t like to have my readers discover in spring that their sheet composting had not finished and that nothing would grow well until midsummer. This is a common catastrophe.
• It is not wise to sheet-compost with poultry or rabbit manure; these strong, low C/N materials are best used as fertilizers.Plants will grow better immediately after low C/N materials are mixed into soil — if you don’t mix in too much and end up poisoning the plants. However, if you are sheet-composting leaves and dried vegetation or old dried manure, and the average C/N of this stuff is high, the average can be lowered a lot (and the whole composting speeded up considerably) by including a thin layer of poultry or rabbit manure. It is the average C/N that determines the outcome.
Sheet composting is risky. Before you incorporate organic matter into soil, it is safer, and the outcome more certain, if you decompose it first so its C/N is lowered until it approaches 12:1.This is done with heap composting, which will be explained later in this chapter.
Temperature and decomposition
I have already mentioned that the speed at which organic chemical and enzymatic reactions go on is determined by temperature. To repeat: The rule is that for every 10°F (5°C) increase in temperature, the speed of the reaction doubles. This increase is geometric (with each 10° F increase, the speed goes from 2 to 4, 8, 16, 32, 64, 128, 256), not linear (the speed goes from 2 to 4, 6, 8, 10, 12). It is not quite that simple, however, because organic chemicals and enzymes are not able to withstand high temperatures. Enzymes are usually destroyed at around 120°F (50°C); a few, such as the enzyme that converts brewer’s malt into a sugary wort or the enzymes that can work in a steaming hot compost heap, can handle temperatures as high as 155°F (68°C). If it’s hotter than that, the enzymatic reaction instantly and permanently ceases.
The temperature at the soil’s surface under a thick mulch during summer is cooler than the air temperature. In summer in the northern United States, for example, mulched soil might be no more than 75°F (24°C) averaged over 24 hours. Decomposition is slow at that temperature, so the release of nutrients in the mulch is slow.A six-inch-thick (15-centimeter) layer of spoiled hay or grain straw might take a year to decompose at the average year-round temperature of temperate climates, both because of low average temperatures and also because only the material in direct contact with the soil is decomposing at any significant speed.There will not be many plant nutrients being released.
But suppose you took the same amount of hay before it spoiled, passed it through a cow’s gut, and then spread the cow’s manure (and urine) and sheet-composted it.All that material is now in close contact with the soil. It was also thoroughly mixed with the cow’s digestive enzymes and inoculated with all sorts of intestinal microoganisms. In this case, the process of decomposition is pretty much completed in only a few months, even in the chilly soil of spring. The nutrients are released much faster and the soil becomes much more fertile.
What is this thing called compost?
Composting decomposes organic materials before they are put into the soil so they have become instant plant food. Compost contains large quantities of recently deceased soil microbes, whose nutrient-rich bodies are virtually water soluble. It resembles loose, dark brown soil. With luck, it is mostly humus. This sort of compost only forms during an intentional, controlled, microbial ferment, much the same process used to make beer, wine, yogurt, sauerkraut, vinegar, aged cheeses, or tempeh. Food fermentations are delicious, but only when made with precision. Ferments can also be done casually, with highly erratic results. It is the same with compost.
For the ultimate in “erratic,” take my grandmother Anna’s Rosh Ha’shanna wine.Grandma Anna always made a batch of kosher grape wine for the High Holy Days. A month before the big event she would buy a few pounds of fresh purple Concord grapes and crush them between her hands into a big mixing bowl. Then everything — skins, seeds, twigs, juice, bowl — was covered with a piece of cheesecloth to keep the fruit flies out. The bowl sat on the kitchen counter. It was too early in the year to start firing the coal furnace, so unless the oven was going, the temperature in the kitchen was pretty much the same as whatever the temperature outside was that year. Wild yeast arrived on the skins of the grapes themselves, so, of course, the yeast was different every year. The sugar content of the grapes fluctuated wildly from year to year because sometimes they were purchased before they were fully ripe (the date of Rosh Ha’shanna was calculated on the Jewish lunar calendar, so it could be any time from mid-September to mid-October). If the juice seemed a bit tart, Anna might add a cup of white sugar. And of course nothing was sterilized before she started, so all sorts of other microorganisms contributed to the fermentation, including the ones that make vinegar. The mash would bubble away for a few weeks, and then Anna would pour it through a strainer. With most of the sediment removed, she would pour the raw wine through a few layers of cheesecloth to remove the fine particles, then pour it into an old whiskey bottle. If this wine sat around for only a week or two before the big Holy Day meal, it wouldn’t be too vinegary when we sipped it in tiny glasses.You may be sure that no one drank more than the required minimum to sanctify the event.
Serious winemakers would never do as my grandmother did.They precisely regulate every aspect of the process — the temperature of the fermentation, the exact sugar content, the sterility of every utensil. They would carefully select a pure strain of yeast to suit the type of wine being made. And despite all those controls, the result still varies, which is why we have gourmet magazines and wine experts.
People who make homebrewed beer know exactly what I mean. Some homebrew is really foul. Oh, if you raise the octane high enough with table sugar it’ll get you drunk, but it’ll have a sour aftertaste, like hard cider does when it is made with baking yeast, and if you drink more than one bottle you’ll have a splitting head the next morning. But homebrew made skilfully with the best ingredients, then aged for a few months on the shelf before you pop the cap, can be so superior to most industrial beer that you can hardly stand to buy the ordinary stuff.
Let me underscore the two essential differences between a talented vintner’s wine or a proper homebrew and what my grandma Anna did. (1) Complete control of the conditions. (2) Standardization of materials — regulation of sugar content, the correct pure strain of yeast to inoculate the ferment. The same is true of making compost. If you avoid a few big mistakes while tossing almost any material that is handy into a heap, get it damp, and let it work, you’ll end up with compost of a sort. But if you want high-quality compost that grows magnificent things, you have to be actively and intelligently in charge of every part of the process.
This reality has been hidden from home gardeners to a degree. That’s because the organic farming and gardening movement was fomenting a social revolution when it first started in the 1940s. For propaganda purposes it was made to seem that all compost was good compost, and that any compost would do a great job at growing food.The lie was told so many times that those telling it came to believe it themselves. But if compost is going to noticeably improve the growth of most kinds of vegetable crops, it has to have a nitrogen content in excess of 1.5 percent and a C/N no higher than 15:1, and it must contain significant amounts of phosphorus, potassium, calcium, magnesium, and trace minerals, all in the right proportions.Not all composts do; most, in fact, don’t, as shown in Figure 7.2.
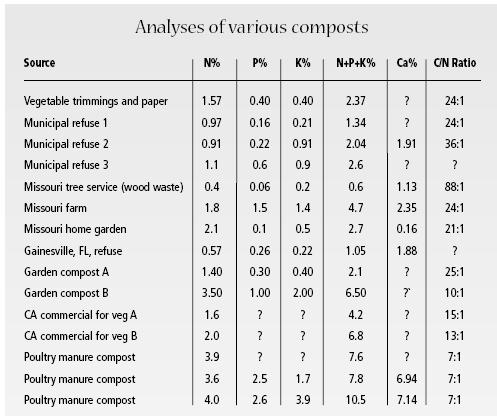
Note: These figures have been gathered from various sources over many years; not all sources provided data for all columns.
The column “N+P+K%” is a useful gauge of overall mineralization.
Figure 7.2
Please notice in the table that municipal refuse compost isn’t potent enough for vegetable growing.That’s because much of the material going into the heap is paper and cardboard, chipped tree trimmings, and other woody waste. All these materials have a high C/N, and the average C/N of the heap when composting starts exceeds 50:1. After much heating and watering and turning and shrinking and rewatering and turning some more, the C/N drops to about 25:1. In other words, far more than half the carbon has disappeared. Why “far more” and not exactly half the carbon as those numbers might suggest? Because the way municipal compost is made causes most of the nitrogen to disappear as well. The final weight of compost will be only a tiny fraction of the starting weight.Thus municipal composting, portrayed as socially positive, actually is a huge contributor to greenhouse gasses.
Municipal composting operations find it impossible to get market gardeners to accept their product. Ultimately its destiny is to be mulch along roadsides, under ornamentals in parks, and sometimes in homeowners’ yards and gardens. Those who foolishly try to use it to grow vegetables are sorely disappointed.
What I would classify as low-grade compost, barely suitable for a garden, contains around 1.5 percent nitrogen, its carbon-nitrogen ratio is around 20:1, and its total of N+P+K is under 3 percent. In climates where the soil gets warm if you shallowly rake in a small amount (maybe a layer a quarter to a half inch thick — 6 to 12 millimeters), this low-grade stuff will barely feed the sort of vegetables I call “low demand” (see the sidebar in Chapter 2).
To modestly grow healthy medium-demand vegetables in most climates and soils, what I would classify as medium-quality compost needs to be added to the soil at about the same rate noted in the previous paragraph. Medium-quality compost contains more like 2 percent nitrogen, has a N+P+K of around 4+ percent, and has a C/N no higher than 15:1.
To grow high-demand vegetables in almost any soil and climate, using compost as the sole source of fertility, the high-quality compost you’d need would have a nitrogen content exceeding 3 percent, an N+P+K exceeding 6 percent (with a fair amount of phosphorus in that 6 percent), and a C/N no higher than 12:1.
Did you notice that I kept qualifying my statements in the three preceding paragraphs by saying “most soils and climates”? That’s because, as with every other chemical reaction, the release of nutrients from compost depends on the soil’s temperature. Some places, particularly maritime climates, have rather cool summers; their soils never do get warm. There, you need to use somewhat larger quantities of more potent compost to provide the high levels of nutrients required by high-demand vegetables. If you are compost-gardening in a cool climate, the spring and early summer garden tends to get going rather slowly because the soil hasn’t warmed up enough to begin cooking the nutrients out of decaying organic matter. In situations like this, you will do better using concentrated nutrient sources like COF in addition to amending compost or well-decomposed manure if you want to enjoy a good result with high-demand vegetables.
In hot climates organic matter rots quickly. In really warm soil it is possible to get an acceptable result growing high-demand vegetables with only medium-quality compost.
It is difficult for a vegetable gardener to avoid making a compost heap. Composting was once prohibited in many cities because it can breed vermin when done carelessly, but now municipal governments encourage it. If the goal is not high-quality compost, the practice is thrifty and almost foolproof. Almost no matter what a gardener does or doesn’t do, a heap of plant waste will eventually recycle itself into something resembling soil. Even a huge heap of sawdust beside a defunct sawmill will decompose — given about half a century.
Composting in bins
Mainly for aesthetic reasons, most city-dwelling and suburban homeowners compost in some kind of container. There are various prefabricated designs; many are simply an open-bottomed plastic cylinder, four to five feet (120 to 150 centimeters) across, at least three feet (90 centimeters) high, sometimes bigger, and usually with a vermin-proof lid.The best of these have an opening at the bottom large enough to insert a shovel so the process can go on continuously. Lawn and garden waste and kitchen garbage are tossed on top as they appear. Sometimes water is added if the contents get dry.The container heats up, a little or a lot depending on what is put in, but it never heats all the way through unless the whole thing is filled all at once with a uniformly low C/N mixture. The contents usually shrink and settle rapidly enough that there is room on top for the next batch of yard waste. From time to time a bit of well-rotted material can be shovelled out of the access port at the bottom. If it is done right, the box keeps rats and mice out and there is next to no offensive odor except, perhaps, for the few moments the cover is removed to add new material.
Is the product of one of these bins effective enough to grow a great veggie garden all by itself? Rarely. But it will grow nice flowers and shrubs. Usually too much woody, decomposition-resistant stuff goes in. Even if the user has sense to avoid putting in woody wastes, the whole heap doesn’t heat uniformly. There’s usually a temporary hot spot just below where the newer materials are added. This area then cools too quickly to ferment properly. It is awkward to turn the material in order to loosen it and allow in sufficient air. The final result lacks potency and may lack mineral balance. Gardeners making this kind of compost and using it in the veggie garden will do far better if they also use COF or sacked chicken manure, as described in Chapter 2.
Tumblers
Another device sold to conscientious city and suburb gardeners is the compost tumbler. You’re not told in the propaganda for these expensive gadgets that the drum may rust out. But the most negative thing about compost tumblers is promoted as their most positive feature — their speed.The idea is that every time you visit the garden you (almost effortlessly, so they say) crank the handle half a dozen times, which rotates the barrel once around. One rotation daily loosens, lightens, mixes, aerates. This makes the decomposition process go quickly, taking just a few weeks instead of months. All that seems a good idea ... when you read the advertisement.The tumbler also makes compost in small batches,which is how most gardeners accumulate compostable materials. So what am I grumbling about?
Research has shown conclusively that the more frequently a compost heap is turned (beyond the minimum necessary), the lower its value as fertilizer. Until I receive different data, I will consider a tumbler to be a convenient, high-speed recycling machine that replicates the municipal composting yard, not a producer of the finest garden fertilizer. And should you compute the ethics of recycling with one, then add to the cost of buying a tumbler the pollution and nonrenewability of the resources used to make the short-lived thing.
Grinders and fast compost
When I was a novice gardener, I read and believed glowing reports about UC Fast Compost in the Rodale Company’s magazine. I purchased what I divined (from the magazine ads) was the best shredder-grinder. It wasn’t cheap. It never occurred to me at the time that maybe the reason the magazine was promoting fast composting was because it had so many advertisers selling grinders. Maybe you, reading the next paragraphs, won’t buy one. As I said earlier, my father told me the cheapest experience people can get comes secondhand — if they’ll buy it.
The idea behind grinding is that the smaller the size of particles in the heap, the faster it’ll decompose and the hotter it’ll get — if turned frequently. And it’s a lot easier turning a heap of fine stuff than it is to fork over a heap of stringy material. However, one of my Internet acquaintances, who once ran a commercial composting operation, told me,“Research has shown conclusively that compost heaps that get hotter than about 150°F [65°C] lose heaps of valuable nitrates and burn out too much carbon. If the material has been cured at about 155°F [68°C] for several weeks it off-gases methane, ammonia, and carbon dioxide.These gases contain the bulk of the nutrients.What is left is little more than ash. Think about putting what you eat for lunch into an oven for the same time period at the same temperature as occurs with this kind of compost pile — what you get will be ash.” Imagine how efficiently you could dispose of organic wastes by combining a grinder with a tumbler!
Home-garden-sized grinders need hefty, fuel-hogging engines. Grinding is hard, brutal work for both machine and operator. The machines need a lot of maintenance and parts replacement. I never found grinding to be pleasant: the operator needs to wear goggles, gloves, and ear protectors, and may breathe a lot of dust. Instead, why not take it easy? Save the gasoline. Don’t contribute to the unnecessary manufacture of short-lived machinery. Let the microbes in an ordinary heap do all the work for you at a slower pace, at a temperature that doesn’t ruin the value of your product.
Medium-quality compost: The once-a-year heap
It is far better to compost with the intention of making something I would call “medium-quality.” If you have no livestock (except perhaps a few chickens), and if your garden is under 3,000 or 4,000 square feet (280 to 370 square meters), you’ll have better results if you build only one large compost heap a year. In temperate climates, the most convenient season for this is early autumn, just after the summer crops have been cleaned up and the deciduous trees (if you have them) have dropped their leaves. (If you have livestock and a larger garden, or a big lawn contributing a lot of grass clippings, it might be best to start a new heap every time you’ve accumulated sufficient material.) (However, you’ll have a far healthier lawn if you allow the clippings to rot in place instead of removing them.)
Here’s what I do. Starting in late autumn, I steadily accumulate all new vegetative wastes and kitchen garbage into one great stack of plant material that I encourage to dry out over the following eleven months. If anything is more than a foot (30 centimeters) long, I use a sharp machete to chop it up into smaller bits while it is still green and tender.This is because long stringy pieces will later be painfully awkward to turn over. This material, topped off by a large addition from the autumn garden cleanup, is what gets composted. I am a country gardener with no neighbors complaining about my untidy heap of dry vegetation, so I can spread all the new stuff on top of the vegetation pile in the order that it appears — pea vines; the contents of the kitchen compost bucket; trimmings, like outer leaves of lettuce or carrot and beet tops, that appear when I harvest; old cabbage and cauliflower plants;weeds; and straw from producing my own vegetable seeds.This material rapidly dries out in the sun.
City or suburban gardeners, or those with a greater need for tidiness than I have,might wish to make some sort of corral for these materials.These folks probably will also be adding grass clippings. (I have no lawn; my house is surrounded by native vegetation kept roughly mowed by wild grazing animals.) If you are accumulating grass clippings, it is far better to allow them to dry for 24 hours before you rake them up and spread them thinly atop the pile to fully dry out. By making “hay” in this way, you prevent the clippings from heating up (and losing nitrogen) before they dry out. .
After the first frost comes, and after the autumn garden cleanup, I have built a large heap of well-mixed dry material, the result of months of layering fresh vegetation and kitchen garbage.When I make the compost heap, I attack the dry material stack from one end, uniformly blending everything. This is important because when this stuff is made into compost, I want the average C/N of the initial heap to be fairly uniform and, I hope, below 25:1.
To keep the average C/N down, I put in nothing woody, nothing with even thin bark on it: no tree trimmings, no hedge trimmings.Trust me on this; you don’t want wood in your compost! The C/N of woody materials is way too high and will degrade your compost quality. For the same reason, don’t put in any sawdust if you want your end product to have much fertilizing power. If you seem to accumulate a lot of woody plant residues, make a separate compost heap of them outside the vegetable garden. Follow the same directions I am about to give you for composting the better-quality, lower C/N, dry vegetative wastes.The wood compost pile will be a slow-working, low-temperature heap, and it might be several years before it seems done.When it does seem finished, do not put it in the vegetable patch. Spread it as mulch under ornamentals or under fruit trees.
Some of the worst pests overwinter on or in the dead vegetation of your garden. If you till it in before autumn, you reduce their population, but you also leave the earth bare over winter. This is not a good practice! Burning the dead vegetation is also a poor practice because it destroys organic matter that the soil needs. However, in the high heat of a properly made compost heap, these insects will be destroyed.This is one more reason to compost — and to compost properly and thoroughly.
Composting procedure
In autumn, my year’s accumulation of dried garden vegetation and kitchen garbage becomes a compost heap.The heap is built right beside the dried vegetation. I need the following additional material:
Water. I need enough water to thoroughly moisten the entire mass of dry vegetation.The easiest way to get it is to have a hose and nozzle handy. If running water is not available, about 100 gallons (400 liters) of water should be enough to moisten a year’s accumulation from a garden of about 2,000 square feet (200 square meters). If you lack running water, and spreading a barrel of water with a watering can is not to your taste, you could spread the dry material out like a mulch and wait until it gets well rained on, then gather it back up and meld the damp vegetation into a composting heap.
Soil. Soil in a compost heap fills the same function as moderator rods in a nuclear reactor. It slows the process down a bit and captures the radiation — not of neutrons, as in the case of a reactor, but of nitrates.When the heap starts working, proteins in the decomposing vegetation will be broken down into ammonia, a gas.Without soil close by, ammonia will escape into the atmosphere and be lost, to the enormous detriment of your compost.However, soil commonly contains a type of bacteria that rapidly converts ammonia into nitrates, which are not gasses. Putting enough soil in the heap to support these bacteria is more important than putting in manure or other strong sources of nitrogen.When composting a heap composed mostly of vegetation, use enough soil so that it makes up a generous 5 percent by volume of the initial heap. (Two wheelbarrow-loads of soil are sufficient to moderate my garden’s annual vegetation collection.) Too much soil is far better than too little. It will be best if you use fertile soil from your garden, and it’s especially wise to take some of it from the spot where the previous year’s compost heap was cooked. This way the heap is also inoculated with appropriate microorganisms.
Strong stuff. You’ll want something with a C/N much lower than that of the dry vegetation.And enough of this strong stuff that it will lower the average C/N of the entire heap well below 25:1.
The finest thing to use for this purpose is truly fresh ruminant manure without any bedding.Horse and cow manure is usually not high in nitrogen, so a large quantity of it is needed to bring the heap’s average C/N low enough, which means that including manure of this sort will significantly increase the amount of finished compost you get. If it is fresh, it also contains large quantities of still-active digestive enzymes that help speed the initial breakdown of the vegetation.How much should you use? That depends on how much bedding is mixed into the manure. If there is little or no bedding, you could add a volume about a third as much as the heap of dry vegetation. If bedding makes up more than half the manure’s volume, there is no quantity that will be large enough. Manure plus bedding in equal quantities should be composted by itself with soil; its own average C/N probably exceeds 25:1. If manure plus much bedding is mixed into a pile of dry garden vegetation, you’ll need to incorporate some other highly potent material to lower the average C/N enough.
The next best material is dried poultry manure without bedding. If you have a chicken coop, you should collect and store their droppings in used feed sacks. Accumulate this dry manure for the annual compost heap.How much should you mix in? Assuming that the average C/N of the vegetation heap, before any chicken manure is put in, is around 30:1, then an addition of about 5 to 10 percent by volume of the entire heap would be about right.
Least best is seedmeal, such as I suggest for making COF. Seedmeal is about twice the potency of chicken manure. I need a single 50-pound (25-kilogram) sack for my year’s accumulation of dry vegetation.This is what I use because these days I have no chickens.
Once I have the materials, I take the following steps:
Building it. Starting at one end of the heap of dry vegetation, use a pitchfork (and/or your hands) to pull vegetation out of the end of the pile of dry stuff and spread it in a layer on the ground. Make a rectangle at least five to seven feet (150 to 210 centimeters) across, at least five feet long, and about eight inches (20 centimeters) thick. The heap needs oxygen to work, and if you build it too wide or too high, the core will be relatively airless, so make it no wider than seven feet, but as long as you like. Cover this rectangle with about a half-inch-thick (1.25-centimeter) layer of soil. Cover that with about three quarts (three liters) of seedmeal or two gallons (8 liters) of chicken manure or an inch-thick (2.5-centimeters) layer of horse or cow manure. Then water the whole mass long enough that the vegetation on the bottom is thoroughly damp.
Now repeat the process. Spread another eight-inch-thick layer of dry stuff, then more soil, then more strong stuff, then water. Repeat this layering again and again until the entire pile of dry vegetation has been layered into a new heap.What you are building will inevitably taper as it goes up. If you estimated width and length correctly, then the height when you are finished will exceed four feet (120 centimeters). It’s better if it is five feet (150 centimeters) high, but should not exceed six feet (180 centimeters).
Spread a thin layer of soil over the entire outside of this heap.Don’t attempt to thickly frost the heap with so much soil that you cover every last bit sticking out, but this final layer of soil will greatly help the outside of the heap to decompose more effectively and will also capture ammonia that might otherwise escape.
Heating it.Within two days the pile should be heating up. In the chill of early morning you should see some steam coming out.You may have read that heaps must be very hot to be effective. It’s not true. You’ll end up with more potent compost if the core temperatures are only 125°F to 135°F (50°C to 57°C), although if you’ve erred on the side of making the average C/N too low, the temperature can exceed 155°F (68°C). If you’ve not lowered the C/N enough, the heap will not heat or will heat only slightly.To check this temperature, push your hand deep into the heap. It should be uncomfortably hot but not so intense that you can’t tolerate if for five or ten seconds. If you made it get too hot, you’re going to end up with less volume than you could have achieved and it may not be quite as potent as it might have been; vow to do better next year. If it isn’t heating much, it would be a good idea, when you turn the heap the first time, to blend in some more strong stuff or some stronger stuff than you used the first time.
Cooking it.Within a few weeks the fermenting heap should sag quite a bit. The fermentation should be so vigorous that even if there are autumn rains, the heap’s core will dry out.Also, as it sags, the core temperature should start dropping.
The first turn. If you live where winter is severe, turn the heap before there is any chance that things will freeze solid.No matter where you live, certainly turn it by the time five weeks have passed. Next to the heap there should be a bare area where the original stack of dry vegetation sat. Using a hay fork and/or shovel, move the pile onto that spot. Start by peeling off the outsides.These should end up in the core of the new heap because these materials will not have decomposed much.The core of the existing heap got hot; it will have decomposed the most. This original core material should end up toward the outside of the new heap.
While turning it, remoisten the material. Get it good and damp again, but don’t make it so soggy that if you squeeze some in your fist, water squirts out. The new heap will be smaller.Make its outside dimensions so that it is at least four feet (120 centimeters) high.When it heats back up, it won’t get as hot as it did the first time, nor will it stay hot quite as long.
Subsequent turns. If you garden where there is a hard winter, the heap will probably freeze and stop working shortly after the first turn. When it thaws out, wait a month, turn it again, and moisten it if necessary. The heap should promptly heat back up.Wait another month and see if it’s done. If not, give it one more turn.
I live where winter consists of some hard frosts; some cold, windy, rainy days; and some lovely, sunny, autumn-like days. In my climate I give the heap a second turn about the time the apple trees are blossoming. Some years it does not need a third turn.
I think the difference between needing two or needing three turns depends on how much strong stuff and how much soil I put in.More of either results in fewer turns and a quicker process. Each turn is easier to accomplish than the previous one because the material has broken down more, so you can do more with a shovel and less with a fork  and the heap has shrunk.My compost is ready for use before hot-weather crops like tomatoes are put in.
Doneness. A compost heap that did not contain bark, twigs, or sawdust will be done enough to use when it is dark brown in color, is crumbly and loose, has a pleasant odor, and contains nothing that resembles the stuff it was originally made from. It will probably contain some worms.
A compost heap that contained bark, twigs, or sawdust might be cool and look done after three turns, but it will still have a high C/N and might not grow vegetables well until another entire year (and several more turns) has passed. There will be little volume left after that, and almost all the value will have off-gassed (see Figure 7.2).
The garden is not a closed system
The waste from my own garden, roughly twenty 100-square-foot (10-square-meter) vegetable beds, plus the kitchen compost bucket will build an annual heap of loose, dry material about six feet (180 centimeters) wide by seven feet (210 centimeters) long at the base and roughly five feet (150 centimeters) high.That includes the autumn cleanup. Late the next spring,when this material has fully composted into a much smaller volume, I discover that I have made only enough to cover a third of my beds about a quarter inch (six millimeters) deep. But to maintain the proper level of soil organic matter, all my beds should be amended each year with compost or well-decomposed manure about a quarter inch deep.
I apologize again for being the one to give you more bad news, but no vegetable garden can operate as a closed system that, all by itself, sustainably generates enough organic matter to maintain itself unless it is cover-cropped at every opportunity and unless every bit of the organic material it generates is recycled — and that includes your own humanure. A farm sagely run on sound biological principles and endowed with reasonably fertile soil can slowly increase its overall level of soil organic matter and can even export a fraction of the organic matter it produces (in other words, the crops sold to market) without loss of fertility. But a garden? Never!
If you recycle everything from the garden (except humanure) back into it via the compost heap, and if, in addition, you import lawn clippings and a large autumn accumulation of deciduous leaves (neither of which I have) into the garden’s system, would that be enough organic matter and fertility? It depends on how much material you have and how rich it is. For me, in my climate, on my soil, with my lifestyle, I must import and compost a heap of dry organic matter at least twice the volume of my own garden’s output. That import could be ruminant (horse/cow/sheep) manure, spoiled hay, autumn leaves, or used coffee grounds from the espresso shop.Whatever it is, it should have an average C/N of about 25:1, more or less the same as the annual heap of dry vegetation I save up from my gardening and compost.
What I actually do to eliminate this deficit is use the services of a neighbor who makes his living hauling spent brewer’s malt from the local brewery to a feedlot about 30 miles (50 kilometers) from my home. Instead of coming home empty, he fills his large dump truck with well-rotted feedlot manure and offloads the manure at my garden gate for a small sum plus the cost of the material itself, which is not high at all. One load tops up my garden’s organic-matter deficit for about two years.
Someone with an extra piece of deep, well-drained soil about the same size as their vegetable garden could grow a comfrey patch.The enormous output of mineral-rich biomass from the patch can make the entire household operation become a closed biological system. Comfrey is an extraordinarily deeply rooting and aggressively growing plant whose leaves can be cut repeatedly during spring and summer. The leaves may be fed to livestock (after they have wilted into “hay”), included in compost heaps, and used to make effective fertigation tea. Once it’s established, you can keep the patch growing vigorously by running chickens in it, so long as the poultry are also fed grain. The comfrey patch might also be the ideal place for sheet-composting humanure.
Constraints on the final size of my book do not give me the space to discuss the fine points of establishing and managing a comfrey patch, but if you have some extra land and are interested in maximum self-sufficiency, I suggest a respectful reading of Russian Comfrey: A Hundred Tons an Acre of Stock Feed or Compost for Farm, Garden or Small-holding by Lawrence Hills (see the Bibliography).
To make the best comfrey tea, loosely pack a barrel three-quarters full of freshly cut leaves and then fill it to the brim with water. Allow to steep for a week or two. Comfrey tea is often sprayed on plants as a foliar fertilizer and general tonic to prevent disease. Filter it first. In either case, whether you’re using it in a spray or for fertiga-tion, dilute it half and half with water. After steeping, drain the barrel. The solids may be dug into the earth or composted.
Composting manure
If you own livestock, you’ll need more information than this book could contain. However, if you know people who own livestock and are foolish enough to sell or give away their animals’ manure, I can set you up to handle it effectively.
One thing you do not want to do with any raw manure is incorporate it in your garden just before starting a vegetable crop whose edible parts will have contact with the soil. Some manures are contaminated with antibiotics, hormones, disease organisms, and pesticides. Composting will go a long way toward eliminating these. Certified organic growers are not allowed to use uncomposted manures on any vegetable crop unless more than 120 days have passed between incorporation of the manure into soil and harvest. Raw manures decomposing in soil can adversely affect the flavor of vegetables. Raw manure is best used on cover crops (see the section later in this chapter) or sheet-composted immediately after the growing season to overwinter and fertilize the next year’s growing effort.
Ruminant manure compost.Manure (except for poultry manure) comes in two parts: solid and liquid.They are equally valuable. Often the urine goes to waste, which is most unfortunate. If the animals are penned or stabled and bedded on straw that soaks up much of their urine, be sure to compost this too. If the urine has soaked into sawdust, forget about using it to make a compost that’ll grow veggies unless you live where the soil gets mighty hot in summer.
The C/N of the solid fraction of animal waste varies, depending on what the animals are fed.Horse/cow/sheep solids could run anywhere from 10:1 to 15:1. It could contain a lot of valuable minerals in addition to nitrogen and potassium, or it might not. Urine-soaked grain straw might have a C/N of 30:1. Urine/straw and solids mixed together in more or less equal quantities provide the basis for a fine compost pile, so long as enough soil is added to make up 5 to 10 percent of the total starting volume.
If there is no bedding straw, the next best thing is to mix the solids with a more or less equal quantity of dried vegetation, such as chopped corn stalks, spoiled hay, leaves, garden waste, etc. It is probably okay to use up to half again more volume of dry matter than manure in the heap. Don’t forget the soil, and don’t forget to adjust the moisture content so it is nicely damp.
Compost and turn as usual. If you start out with a heap whose C/N is close to 30:1, and if you do your part turning and keeping it moist, then you can expect the resulting compost to adequately grow medium-demand vegetables.
If you have neither vegetation nor bedding straw to mix into the solid manure, mix it with soil. Use about a quarter soil by starting volume. It will still heat quite a bit. If it gets too hot to insert your hand and/or if it starts smelling like ammonia, then break down the heap and mix in more soil.Turn this kind of heap every two weeks. It won’t take long to compost. You’ll know it’s done when it stops heating up more than a little bit, even though it’s still moist. Because its ingredients started out with a much lower C/N, this compost will probably end up being more potent than the stuff made with vegetation or bedding, and it may be good enough to grow high-demand vegetables. (In the old market-gardening books, this was called well-aged “short manure,” because “long” manure had the straw.)
Poultry or rabbit manure compost. Poultry have no urine to be wasted, so their manure is naturally more complete. Poultry are usually fed grain, and productive free-ranging chickens usually supplement their grain with food that contains even higher amounts of protein — tender green grass and insects, for example. As a result, their manure is highly potent.
Rabbits are almost always caged and fed mainly on pellets made of alfalfa and grain, though sometimes they are given garden trimmings. Their droppings fall below the cages and are mixed with their urine. Rabbit manure is also potent stuff. If you keep rabbits, you can improve the compost you’ll make by spreading a thick-enough layer of grain straw under the cages to soak up the urine.When you start smelling ammonia around the cages, it is time to rake up the whole accumulation, compost it with soil, and spread new straw to start the next batch.
Compost poultry and rabbit manure just as you would other forms of manure, except for two things.The C/N of the manure is well under 10:1, so you’ll want to prevent huge losses of nitrogen by mixing it with enough vegetation to bring the starting C/N of the heap to about 20:1.Also, for the same reason, it’s even more essential to include soil in the heap when you’re composting strong manure.
Do beware of allowing the heap to overheat. If that happens you’ll be losing a lot of valuable nitrogen. Any time you can’t insert your hand into the heap and keep it there for a short time, the heap must be cooled down. If you have a long probe thermometer, make sure the heap doesn’t exceed 140°F (60°C) at the core.The best way to moderate a too-hot reaction is to turn the heap and mix more soil into it as you turn it.
Properly composted poultry or rabbit manure will end up with a C/N of close to 10:1. It will contain at least 3 percent nitrogen. Poultry manure will also contain lots of phosphorus (the seeds chickens eat are phosphorus rich). This stuff will grow high-demand vegetables.
However, be leery of commercially prepared chicken manure compost or pelletized chicken manure products. Usually these are made by blending manure with sawdust.After a brief initial heating, the material cools and a laboratory analysis will show a high NPK, but the sawdust’s decomposition process will have barely begun. The material is then dried and sacked or pelletized.
However, when you put it in the soil, some of the nitrates in the chicken manure are locked up as the soil life decomposes the sawdust. The result obtained with nitrogen-demanding vegetables is not what you might expect. It will work okay, but only if you use larger quantities than would be indicated by the lab analysis. Measured by result for dollar spent, you will often have better results using seedmeal or other organic concentrates like feathermeal, fishmeal, or tankage. And of course I am convinced that the best result of all comes from using COF.
Making the highest-quality compost
I have not mastered the art of making the highest-quality compost. I have read about it at length. I have attempted it and never quite succeeded.My conclusion is that a home gardener cannot realistically aspire to making the finest possible compost because to succeed, one must use large quantities of the freshest manure (before any nitrate losses occur) of the most potent sorts. Therefore, the composter must own a barn full of livestock or a large coop of chickens and must also institute management systems that effectively capture all the urine. I well remember the ammonia smell that developed under my rabbit cages when I raised rabbits. This odor proved that the manure I had accumulated had already degraded. To make really first-class compost out of bunny manure, you’d have to process it about once a week, before any smell developed.And to do that and come up with enough material to make a heap of minimum size, you would have to have a great many rabbits and be operating on a scale far greater than the average homesteader would want.You would be in the rabbit business, and you’d be making a new compost heap each week, year-round. So you’d have to be selling compost as well as rabbits. And you’d have to have plenty of dry vegetation, with a not-too-high C/N, to mix into the brew. Every time I consider the subject, I conclude that making high-quality compost is only for the small farmer who possesses a great deal of energy.
The most illuminating information I ever read about composting was in one of the earliest books written on the subject: The Waste Products of Agriculture, by Sir Albert Howard, the founder of the organic farming movement. It is cited in the Bibliography and is easily obtainable as an e-book if you have online access. It is also an interesting read that illuminates conditions in British-ruled India during the early 1930s.
The biodynamic agriculturalists also know a great deal about composting. There are books by Koepf and Pfeiffer listed in the Bibliography, and I recommend them highly.
It has never pleased me to write book reports, even of great books. So let me simply say of Joseph Jenkins’ The Humanure Handbook that it fully explores the possibilities and techniques of recycling human waste. All the data in this book is the product of a family’s actual longstanding practice. The Humanure Handbook can be purchased in print through the usual channels of retail trade or downloaded at no cost from many websites. If you’ll consider the subject without preconception or revulsion, you’ll see that, other than the relative inconvenience when compared to the prevailing system, there is no reason not to compost your own family’s humanure and use it to grow vegetables.However, to avoid having your currently healthy family pick up humanure-transmitted diseases (mainly parasitic ones), it might be a good idea to segregate the huma-nure of visitors and houseguests.
My wife, Muriel, and I have thoroughly discussed restoring this type of waste management to our own household. Restore? Muriel was a Tasmanian child in the early 1940s. She grew up in a low-income family on a self-sufficient, rural, half-acre homestead.The family’s meager water supply came from small tanks that captured rainwater off their roof. It is a small joke between us that in Tasmanian folk culture, all vegetable gardens were fertilized exclusively with animal manure — except in those places that had no flush toilets. Muriel’s family garden depended on humanure, as did the gardens of most of her neighbors. Our chats have led to a thorough look at the chores and methods needed to prevent the “dunny” (the bucket containing humanure, or the outhouse in which the bucket was placed) from odorizing the entire place. Muriel insists that a crudely built and extremely well-ventilated outdoor cubicle is the best kind of dunny, meaning one goes outside to poop (though the house has chamber pots for use at night, during stormy weather, etc.). As we do not live where the soil freezes solid for months on end, it seems that to try recycling humanure where the snow flies for months on end would be particularly daunting. However, the author of The Humanure Handbook lives in Pennsylvania, where there is some real winter, and he says otherwise.
If times got tough enough that I could not afford to spend a few hundred dollars each year on maintaining the garden’s fertility, or if the materials to do so got so scarce that there was little choice, then we would definitely start using humanure. We owe thanks to Joseph Jenkins for having so bravely opened this discussion at a time when those in industrialized countries may really need to master the recycling of this valuable resource.
People visiting my veggie garden in midsummer will marvel at a dinner-plate-sized head of broccoli from a three-foot-tall (90-centimeter) by four-foot-diameter (120-centimeter) plant, or at the vibrancy of some other crop that seems to exceed their skill.They will decide this proves what a skilled grower I must be. But these same visitors usually miss the even greater significance of a few thick patches of waist-high buckwheat scattered here and there. To me these bits of cover cropping offer far better proof of what they imagine me to be. Green manuring/cover cropping is a skill I’d like you to have, too. But practicing it can be tricky and a bit hazardous.
For those who are unfamiliar with the words, green manures and cover crops are interchangeable terms for growing something whose sole purpose is enriching the soil. On a farm scale, a cover crop is plowed in or knocked down and allowed to rot on the soil’s surface. On a garden scale, it may be mowed, the tops hauled to the compost heap, the stubble and root systems dug in. In the garden, a few cover-cropping species can be conveniently yanked out of the ground by hand, en masse, and the whole plant composted.
Why do it?
If a plot of land is put to work growing as much biomass as can be formed during every day of the year that biomass will grow, and if almost all that biomass is recycled back into the land, then that bit of earth will arrive at a relatively stable and high organic matter content and will maintain it indefinitely. In that condition of maximum organic matter content, the soil will have good tilth and grow good crops (unless it is an infertile bit of earth).
An example of what I am describing is a pasture growing a carefully selected mixture of grasses and clovers.There is a thick sward of grasses catching every bit of sunlight and converting it to biomass every possible moment. No hay is removed and no animals graze there. Suppose that land were merely mowed once or twice a year and the clippings allowed to rot in place. Over a few years of such treatment, the fertility (soil organic matter level) would build up to a climax level and stay there indefinitely.
An extreme opposite would be a vegetable garden. In the garden, just at the time of year when the plants would be growing their fastest, we till the land bare and plant little seedlings or sow seeds in rows far apart. By the time our vegetables’ leaves again thickly cover the ground (have formed what is termed a “crop canopy”), much of the growing season has already passed. Usually the crop comes to maturity and dies back before the growing season is over. Considerable growth could happen between the time of the first frost and the hard freezing of winter, but the veggie garden, which grows mainly frost-tender species, is bare then, too.
Cover cropping means making sure the ground produces more biomass by covering it with a crop canopy for as much of the growing season as possible.
The downside
How-to books extolling cover cropping rarely indicate the risks. So let me start by listing the negatives.
Green-manuring practices have filtered down to vegetable growers from farmers.We gardeners use shovels and sometimes light powered equipment. Farmers use big tractors. Before tractors, they used horses and oxen, sometimes several at once ganged to pull heavy plows. Farmers using (horse)power could grow cover crops that were mechanically tough, but the home gardener can be overwhelmed trying to handle a six-foot-tall (180-centimeter) stand of woody-stalked grain rye. I know. I have grown small-scale cereal rye by hand. My point? If we gardeners are going to green-manure, we had best use types of crops that match our strength. So beware of advice from holistic farming books. And doubly beware of blindly following advice found in holistic gardening books and in government agricultural extension or ministry of agriculture publications aimed at the home gardener. A lot of this information was cribbed from half-understood farming books but was never practiced by the author; many young extension agents are faced with publishing or perishing, but haven’t more than a taste of practical hands-on experience.
Using the wrong species of green-manure plant, or green-manuring on clayey soils, combined with a bit of bad luck in spring, can ruin all chances of having a timely planting. In early spring, all overwintering green-manure crops are tender, their vegetation contains a great deal of nitrogen (in other words, their C/N is low), and they will decompose rapidly in soil.However, if you let the crop continue to grow until it starts forming seeds (or until flowers appear), the vegetation rapidly becomes woody and the C/N increases markedly.This is significant! When you dig tender, low C/N, green material shallowly into warm earth, where there is lots of moisture present, it will decompose almost completely, roots and all, in two weeks.However, if you give that vegetation a few more growing weeks, time to get woody, and dig it in — if your shovel and strength can still dig it in — it will now take four or five weeks to decompose enough to allow seeds to sprout.Why do I say “allow”? Because (as discussed earlier in this chapter) when a great deal of decomposition is going on in the soil, and when the microbial population has enormously increased (that’s what decomposition is), then these microcritters are breathing in heaps of oxygen and exhaling heaps of carbon dioxide gas, and the soil atmosphere becomes so filled with CO2 that seeds cannot even germinate. At the same time, if transplanted seedlings don’t die outright because their roots are suffocated by too much CO2, they will not be allowed to grow.All this settles back to normal as soon as most of the decomposition has finished.
To summarize: If you turn in tender, high-nitrogen material, you have a two-week wait. If you allow it to get what the farmers call “forward,” you are looking at a four- to five-week wait before you can plant.
Why do I make such an agonizingly detailed point of this? Well, imagine having heavy soil and a thriving overwintered green crop, say a stand of rye grass or winter wheat coming out of the snow. Spring weather goes against you and it rains more than you’d expect.When the time comes to dig in the knee-high grass, the soil is too wet to work. If you go ahead and dig, you’ll make such a mess of clods that no seedbed will be possible, maybe not all summer. If you wait for the land to dry out, the grass will be waist high (if it’s rye, it may be chest high) and forming seeds before the earth has dried enough to permit tillage. So the weather has already made you late to prepare the soil, and now you’ll have an additional four or five weeks to wait after you dig in the cover crop. That land might not be ready to plant until it is time to start your cool-weather crops for autumn.
Wintering over a cover crop is much safer on sandy soils that won’t form clods if you have to dig them in when the soil is wet. But it’s not that much safer. Light soils can quickly dry out in a rainless spring.Dig a cover crop into dry soil and it won’t decompose. Now how do you work up a seedbed? And when rain comes and it does start to decompose, nothing will grow well for a few weeks.
It is much safer for gardeners in areas with harsh winters to use autumn-sown cover crops that will certainly be killed by winter. Their roots will decompose in early spring.Then in spring, when you can dig the garden, there is a much higher chance of ending up with fine, loose seedbeds.
If you are gardening in semi-arid country and don’t have much irrigation, and if it turns out to be a relatively dry winter followed by a rainless spring, the green-manure crop might suck so much moisture out of the soil before you turn it in that the ground will be deprived of the moisture you need to get the garden going.
One last warning: Beware of a phenomenon called “alleopathy.”The term means that one crop puts residues into the soil that harm the growth of the crop that follows after it. There is a possibility that the green manure/cover crop you select could prevent some of your garden crops from growing well, which is the opposite of the effect you hoped to achieve.
The upsides
And what are the positives of green manures/cover cropping if all goes well?
• The soil is thickly filled with rapidly decomposing roots, leaving the land loose, airy, and totally open to rapid penetration by your crops.
• Beneficial insects have had a place to overwinter.
• If the green manure was a legume, it will have put some nitrogen and organic matter into the soil. If it wasn’t a legume, it still put organic matter into the soil.
• As an autumn or overwintering cover crop grew, it incorporated a great many plant nutrients that might otherwise have leached out of your garden during heavy rains.Now these nutrients are part of the decomposing biomass, to be slowly and steadily released to your growing crops.
Specific suggestions
The best book I ever read about this practice is Using Cover Crops Profitably (see the Bibliography). It was written by a committee of American horticulturalists because every district, every climate, needs to use different species, on a different schedule. One person could not possibly grasp and convey all that detail with any real experience. Each kind of cover crop has a different freeze-out point, which limits its range. In one place it dies in autumn; in another it reliably carries over into spring.And in North America, as one goes poleward there is less and less time to establish a crop before the soil freezes.
Cover cropping is something that gardeners must work out for themselves — with guidance in the beginning. It takes a few years to develop an intuitive sense of how to use the crops that will work for you. The practice is of great interest to horticultural advisers; your local agency will have a good deal to tell you about what farmers in your area do. Ask them. A mail-order vegetable-garden seed company is not the most affordable source for cover-cropping seeds and may not sell the species best suited to your area; your local farm supplier is probably the best source.
Summer green manures. Buckwheat is the only summer cover crop I can recommend without hesitation, knowing it will work almost anywhere and not get any gardener into trouble. It grows best during early summer, and there are local varieties adapted to your situation. In the northern hemisphere, buckwheat sown thickly before the solstice will grow waist high in less than five weeks and then begin blooming. Seedmaking puts an end to vegetative growth. At that point it should be dug in (or yanked from the ground and dried for later composting).The stalks are both tender and brittle, so they are easily dug in or rototilled without tangling in a light tiller’s tines.They decompose in just one week if the crop is dug into moist soil before more than the first few flowers have appeared. A buckwheat cover crop puts the soil into magnificent, fine-textured condition, a perfect seedbed for any following crop. Any time you harvest an early spring sowing (peas, spring salads, radishes, mustards) before midsummer and there is nothing scheduled to fill that space for at least five weeks, scatter the fast-germinating seeds so they are about one inch (2.5 centimeters) apart and chop them in shallowly with a hoe.
One warning: Buckwheat’s flowering seems to be determined by photope-riod, so it is important to use seed that was grown in more or less the same latitude you live in.What do I mean? Once I used seed from the bulk bin at the local health-food shop. I live at 41°S latitude.The seed had been produced in semi-tropical Queensland, grown during the “winter” cool season at 25°S latitude.The consequence was that it hardly got to a foot (30 centimeters) tall in my garden before it went into full bloom and stopped growing. This may not be such a problem for North Americans.
In hot climates, southern peas will function in much the same way as buckwheat does. They have the additional benefit of being a legume, which means there will be nitrate formation. Promptly till in or yank out the crop when seed formation begins.
In the spring I have planted whole beds with ordinary garden peas as a green-manure crop. This practice has the benefit of filling our freezer with peas. If the beds are needed sooner than the peas mature, the green manure can be yanked and composted anytime. Peas leave the soil in the most beautiful condition!
Crude brassicas. Brassicas like fodder kale, oilseed radish, tyfon (a turnip x Chinese cabbage hybrid), rape, and field turnips make excellent autumn green manures. In cold climates they will certainly freeze out, not posing any problem in spring. Where winters are milder, they may overwinter. In maritime climates and other areas with mild winters they will almost certainly overwinter and will make lush spring growth that blooms early. In those areas, don’t over-winter brassicas on clayey soils unless you can yank them out by hand when blooming begins. Be sure to sow them at least 40 days before the end of their autumn growing season. Their leaves protect the ground in autumn; if they fail to survive winter, their residues still continue to protect the ground even though the plants are dead. Their huge taproots will really open up the soil.
Annual legumes. Annual legumes are the mainstay for overwintering in maritime climates and anywhere else they won’t freeze out. Beware of using perennial legumes; these tend to grow more slowly their first year and may be hard to get rid of (this is particularly true of red clover). In Oregon, my favorite winter-hardy annual was crimson clover.Hairy vetch is a popular one in eastern North America. I’ve been experimenting with lupins, small-seeded fava beans, Persian clovers, and seridilla; all these are eminently suited to maritime climates, and they might suit the middle states in the United States (note that I said “might”). I know for a fact that crimson clover is widely grown over winter as far north as southern Kansas. Ask your local experts — governmental or else the feed and grain dealer — for the best prospects in your area.
Cereals and grasses.Avoid using cereals and grasses unless you own heavy power equipment and garden on light soil that dries out quickly in spring.
As I prepared to write this book, I discovered the new practice of no-till transplanting (of, say, a tomato crop) into a mulch made from overwintered grain rye grown right on the site (sometimes the rye is mixed with hairy vetch). Beware: I’ve never done it.Apparently the rye is cut off at ground level just after it has formed seed heads. The dead vegetation is allowed to remain lying in place as a thick mulch. A gardener prepared to mow (by hand with sickle or scythe) an incredibly thick six-foot-tall (180-centimeter) stand of rye might find this just the thing. It works because the decomposing rye secretes a chemical that blocks the sprouting of weed seeds. The process is not apple-pie simple, however. The decomposing vegetation will be rather woody, so unless some strong source of nitrates (COF or chicken manure, for example) is sprinkled on the earth before the rye is cut, its presence may tie up nutrients, resulting in retarded growth during the beginning of the season.
I suggest you Google “cover cropping vegetables” and see what turns up. Best you search this topic for yourself; I am reluctant to include URLs in a book because they change so rapidly. (I wonder. Will someone reading this book a century from now have even a clue about what I mean by “URL” and “Googling” something?)