Chapter 6
Putting: The Final Frontier
In This Chapter
![]() Acknowledging the magnitude of the putt
Acknowledging the magnitude of the putt
![]() Choosing the right putter
Choosing the right putter
![]() Finding your own putting style
Finding your own putting style
![]() Visualizing putts
Visualizing putts
![]() Working on putting fundamentals
Working on putting fundamentals
Players at all levels of golf often overlook putting as an integral part of golf. Seems ridiculous, right? For most people, the mention of golf conjures up visions of long tee shots and powerful ball striking long before it provokes images of elegant putting.
But you can’t score well if you can’t putt — it’s that simple. Putting is the culmination of every golf hole. You can hit a far, straight tee shot and then hit the green, even from the rough, with an expertly played approach shot, but if you can’t master that funny-looking club to finish the job, your score will creep up.
 Statistically, putting is 68 percent of the game of golf, so you may want to take notes. You’d be smart to keep a “reminder book” of putting tips from this chapter.
Appreciating the Putt
Putting is the most important part of the game of golf in terms of scoring. You need precision, speed, nerve, and confidence, along with an ability to handle misses (because they happen often). The challenge is to temper the enthusiasm for scoring with the soft touch you need to be accurate.
Doing the math
 Think about it in logical terms: You can pull out your giant Big Bobby driver and sail the ball 300 yards, but that giant shot counts the same on the scorecard as a lil’ 1-foot putt! So, simple math tells you that putting is important. You need only one shot (assuming you can handle that Big Bobby with some success) to hit your drive 300 yards, but if you don’t have confidence in your putting, it may take you three shots to end the hole. The numbers, in this case, don’t lie.
Crunching another set of numbers, putting is important because it requires the most precision of any shot you hit. You typically bang your drives toward a fairway that measures about 40 or more yards wide and a playing corridor sometimes 80 yards wide. You have plenty of room for error when you drive the ball, and no one really expects you to hit your drive with laser precision. When you hit your approach shot, you aim for the green, a target that can be as big as 10,000 square feet. But when you putt, from no matter how long a distance, you aim at a circle that measures 4.25 inches wide. Now that’s pressure! The margin for error in putting is comparatively tiny.
Preparing for putting’s mind games
In putting, visualization is everything. You can visualize the hole in two ways: You see it either as a pinpoint or as a crater so big any fool could drop the ball in. The former, of course, is infinitely more hazardous to your mental health. When you picture a small hole, the ball doesn’t seem to fit into it. You can keep telling yourself that the ball is 1.68 inches in diameter and the hole is 4.25 inches across, but the fact remains that the ball is too big.
And on other days, happily, the hole is so big that putting is like stroking a marble into the Grand Canyon. Simply hit the ball, and boom, it goes in. When this sensation happens to you, savor it. Drink in the feeling and bathe in it so you don’t forget it, because you may not take another bath like that for a long time.
Getting in your opponent’s head
Putting is just as important in a competitive sense. If your competitor in a match thinks of you as a good putter, that knowledge puts more pressure on her. She knows she can’t make a mistake on the green because you’ll surely seize the moment and take her down.
Using superior putting to apply direct pressure to your opponent is an invaluable asset in competitive play. Say your ball is 30 feet from the hole, and your opponent’s putt spans only 15 feet. She has the clear advantage, right? Well, that advantage may swing your way if you lag your long putt to inches from the hole for a certain 2-putt while she waits to putt her 15-footer (for more on lag putting, see Chapter 8 of Book III). Suddenly, she has something to think about. Should she try to make her 15-footer to win the hole? Should she be conservative and make sure she doesn’t hit it too far by the hole, because a 3-putt means she takes a loss? She watched your ball break 2 feet. Will her ball break that much? Even though you didn’t sink your long putt, your proficiency has tightened her collar a bit and stretched her putt out. Conversely, if you miss your putt by 6 feet, your opponent’s job becomes much easier. She knows that she can safely (and rather easily) 2-putt from 15 feet and have a good opportunity to win the hole.
Setting Putting Goals and Expectations
For every golf shot you hit, you should have both goals and expectations for the result in mind. Knowing how goals and expectations differ and how to push and prepare yourself for each shot allows you to start lowering your scores (and maybe your blood pressure). What do you want to accomplish with each putt? What’s an acceptable result? A reasonable expectation?
Holing putts in two: A good goal
If you want to lower your score to become a better player and have more fun, you need to avoid 3- or 4-putting a hole. You can hit good shots straight down the fairway and land the green in regulation, but if you take three strokes to hole the ball from a comparatively tiny distance, you’ll forget your good shots instantly. This type of ending is positively criminal and will frustrate you endlessly.
Your initial goal — not your expectation — is to roll 36 or fewer putts in an 18-hole round of golf. That means hitting two or fewer putts on every green. Naturally, this goal becomes easy to achieve when you hit the ball close to the hole. But when you land it 40 feet away, 2-putting is a major feat. Accomplishing your goal requires you to focus on the first putt every time — especially the long ones.
It can be too easy to approach a long putt and not think about the consequences of your stroke. You may think that you can’t possibly make the long one, so you get lazy and your mind wanders. You make a halfhearted pass at it. On the opposite end of the spectrum, you may get too aggressive with the long putt, trying to make a heroic bomber. Be smart and careful with the first putt. If your goal is to roll no more than two putts per green, 2-putting is a success and 1-putting is a smashing success!
You may be thinking that the goal of 2-putting every green doesn’t sound terribly ambitious, but take a look at the PGA Tour professionals — the 200 or so finest players in the world. As of this writing, Andres Gonzales led the Putting Average category for 2011 with an average of 1.411 putts per green.
So if the greatest players in the world can beat the goal of 2-putting each green by just percentage points, you shouldn’t hesitate to make it your goal to 2-putt each green. Your scores will improve and stay consistently good.
Meeting your expectations
In principle, you can raise your expectations the more you practice — to a point. Be excited by good results, but try not to fret over missed putts. You can control your performance when it comes to 2-foot putts, but you can only improve your performance with the 10-footers.
Sinking every 2-footer
You should never miss 1- or 2-foot putts — your “money-making” putts. They provide wiggle room as you try to reach the goal of two-putting over the entire round. If you practice 2-footers and focus on every putt during a round, you should make them every time. Sinking 2-footers is at first a goal, and if you put any amount of time into your short game at all, it becomes a realistic expectation. Missing a short putt is a terrible way to waste a stroke.
 Many club golfers and weekend golfers, in the interest of speedy play and sportsmanship, concede 2-foot putts. Although conceding 2-foot putts is fine in match, skins, or casual recreational play (gimmes are against the rules in stroke-play tournaments), it means you may never have the opportunity to practice and make them consistently for when you really need to.
Whenever possible, hole out all your putts. And practice 2-footers, no matter how boring or remedial it may seem — especially if you often play with folks who treat them as gimmes on the course. Sometime, either in a stroke-play tournament or when your partners decide not to concede it to avoid losing a match, you’ll need to make a 2-footer. Short putts are as valuable as the longest drive, and you should never, ever miss them. (Check out Chapter 3 of Book V for ways to insert a bit of variety into your putting practice.)
A subtle gamesmanship trick your opponent may employ is to concede 2-foot putts to you throughout the round and then make you take the putt when you need it and expect him to concede it. This trick affects you in two ways. First, it unnerves you and perhaps annoys you that he doesn’t concede it. Second, it forces you to make a 2-foot putt when you haven’t hit one all day and you haven’t developed a rhythm for making them.
Looking at longer putts
You know you should make 1- and 2-foot putts all the time. But what’s a reasonable expectation for longer putts? Consider that PGA Tour players make 10-foot putts 50 percent of the time. And though you may think tour players can make 3-footers all the time, the best players in the world make putts from 3 feet about 70 percent of the time. Surprised?
If you consider yourself to be an average player, you should be prepared to miss many long putts. If you’re like most average Joes, though, your expectations are probably higher than reality allows. You may expect to make the longer putts as often — or more often — than the pros do. But by having extremely high expectations, you put added pressure on yourself to make hard, long putts. Don’t beat yourself up mentally, or you may find your scores increasing and your confidence falling as the pressure mounts.
Now, you don’t want to throw strokes away. Missing a 5-footer after you traverse 500 yards in 3 shots is disappointing, but you must be realistic. Statistically and realistically speaking, missing longer putts is a part of the game. When you miss, don’t get angry and make a negative imprint on your self-image. If you beat yourself up for missing a putt, the next time you stand over a tough putt, you won’t think you have a chance. You have a chance to make every putt, but even the greatest putters of all time didn’t make them all.
Turn a missed-putt negative into a positive: If you miss, make sure that you miss by a little. Keep the ball close enough to the hole to leave yourself a tap-in putt — giving yourself a shot at achieving your goal of hitting only 36 putts per round (see the section “Holing putts in two: a good goal” earlier in this chapter).
Letting go of the misses
Longer putts are difficult to make regularly because despite your best efforts, sometimes putts just don’t fall. And sometimes the miss just isn’t your fault. You didn’t mishit the putt. It just didn’t go in. Many variables affect your putting, and you encounter factors that you may not be able to account for when you stroke a putt.
So sometimes you hit the absolute perfect putt, with a perfect grip, a perfect line, and the perfect speed, but when the ball approaches the hole, it takes an ungodly turn, hits the corner of the hole, or spins out. In the following sections, we cover some of the factors that can knock even the most perfectly struck putt off course. Find some comfort here (and turn to Chapter 2 of Book V for information on the mental aspects of the short game).
Blowin’ in the wind
Wind is difficult to factor into your putting game. Putting requires such precision that a stiff wind can affect a ball’s path toward the hole. Although you know how the wind affects a long-iron shot, most players don’t think about how the wind affects their putting.
But can you realistically factor in the wind when you line up your putt? Not likely. Wind mainly gusts and blows, and you can’t depend on it. The only thing that you can do is safeguard yourself against an inadvertent penalty. If you address the ball by resting your putter behind the ball, and the wind blows your ball before the stroke, you incur a one-stroke penalty. In heavy winds, therefore, don’t dawdle when you ground your putterhead behind the ball. Wait to ground your putterhead until the last possible moment — when you’re truly ready to make the stroke.
Grinding it out on the green
Other course players and the green itself provide some bumps in the road, literally, that you often can’t factor in during putts:
 Growing grass: Although the slick and smooth surface of the green may seem constant and unchanging to you, you’re still putting on grass, which is a living, growing organism. A crew mows the green before the day’s play, and a green that no one has played on is much different than a green at 2:00 after 20 foursomes. The grass is cut so short that you can’t see the growth, but it grows all the time.
Footprints: Your fellow players should be polite and careful not to step in your line when you’re on the green. But what about all the players who trotted across the turf before you? You may not see all the footprints of all the golfers that have played before you, but their impressions are there.
The unstepped-on zone: When golfers walk on the green, read putts, talk, hit putts, walk to their next putt, and leave the green, they never (hopefully) step exactly right next to the hole. Even when players remove the ball from the hole, the closest they step is within 6 to 12 inches. So, after so many players have been on the green, the area within 6 to 12 inches of the hole ends up higher than the next 12 inches because people haven’t stepped on it and pressed it down. And as you get away from the 6- to 12-inch area, the green begins to get lumpier.
Other imperfections: Greens also fall victim to other imperfections that come from nature, players’ spike marks, ball marks, and loose impediments (such as rocks and grass clippings) tracked on by golfers’ shoes.
Picking Your Perfect Putter
Because putting is such a crucial part of golf, your putter is the most important weapon you’ve got. Club makers seem to have noticed: In recent years, they’ve brought out a dizzying array of high-tech putters. Some are as sleek as a sports car, while others look more like anvils or spaceships. One new model has been likened to “a fire hydrant on a stick.” How can you choose the putter that’s best for your game? It’s not as tricky as you may think.
Your stroke shape dictates your putter
Although you have many putters to choose from (see Chapter 1 of Book I), you can eliminate most of them by knowing the type of putter you are. In other words, the shape of your stroke is the main factor in choosing a putter.
Noted teaching professional Peter Kostis explains that almost all putting strokes fall into one of two shapes. They either move “straight back and straight through,” with the blade staying square, or “inside to inside,” with the blade doing a mini-version of the rotation in a full swing. Conveniently, most putters are designed to suit one of those stroke shapes. The two main types (see Figure 6-1) are
Face-balanced, center-shafted putters
Putters that aren’t face-balanced, such as heel-shafted blades
Figure 6-1: Heel-shafted and center-shafted putters.

If keeping the blade square throughout the putting stroke is your style, get a face-balanced, center-shafted model. You can test to see whether a putter is face-balanced by resting the shaft on your finger. If the putterface stays parallel to the ground, it’s face-balanced. The inside-to-inside stroke is easier to make on a consistent basis with a heel-shafted putter. It hangs toe-down while resting on your finger. (The toe is the end of the putter, the part farthest from the shaft.)
Be warned, though. Some putters hang at an angle of 45 degrees. They’re equally good — or bad! — for either stroke.
Thinking about fit
In the wide world of putters, choosing the flatstick that best suits you can be as daunting as courting a spouse. After all, you have to spend about as much time with your putter as you do your spouse if you want to get better. You use your putter for more strokes than any other club in your bag, so it must be dependable through the good times and the bad. Confidence is a hugely important aspect of your putting game, and you must have total confidence that the putter in your hand is capable of getting the job done.
We know of a fellow who had three putters in his bag that he rotated through, even during the round. He couldn’t understand why his putting failed him on a regular basis. Every time he missed a putt he felt he should have made, he switched putters. In total frustration, he finally took all the putters out of his bag and bought the most expensive putter he could find at his local golf shop. Now, in his mind, he’d eliminated all the variables that hampered his putting performance. Because he’d bought an expensive, name-brand putter, he could no longer blame the putter. This mindset caused him to focus on the weaknesses in his technique and, perhaps more importantly, allowed him to putt with more confidence. His putting improved immediately.
Most people don’t choose a putter based on the expense, but as the story illustrates, you should choose a putter (not three) that you’re comfortable with and that you can count on. Commit and simplify.
But how to choose among the spectrum of bold mallets, shiny blades, and snazzy gunmetal putters? Try and try again. Many golf-specific retail shops have an artificial putting surface, and the larger ones may even have a real-grass outdoor practice green. The golf shop at your local public golf course or country club, often referred to as a green grass shop, is ideal because you can grab a handful of putters and spend an afternoon on the practice green trying each of them out. What should you look for during your practice sessions with probable putting weapons? Go through the following points:
Decide which putters fit your look and idea of style (operating on the “look good, play good” theory).
Give each putter a fair shake by making some long and short putts of similar lengths.
Don’t necessarily judge a putter by how many putts you sink. Don’t even worry about making the putts — just get a feel for each of the putters and how the ball rolls.
Hit some putts with your eyes closed to get a feel for the weight of the putter and how it feels when it makes contact with the ball.
Ultimately, choosing your putter comes down to a combination of physical and psychological factors: how the putter feels and how you feel about it. After you make your decision, run with it and don’t look back. The best way to have confidence in your new putter and help it perform well is to spend as much time as possible practicing with it.
Meeting MOI
Don’t be confused by all the high-tech (and high-priced) new putters on the market. Although they appear as colorful and as different as new cars, most offer only one or two features — features that may seem confusing at first.
One term that puzzles most beginners is MOI, which is short for moment of inertia. It sounds scientific, and MOI putters do in fact have a lot of science behind them, but don’t worry about that. All you need to know is that MOI putters resist twisting on off-center hits. That means your bad putts turn out better than they would otherwise. How much better? That’s hard to say, but a study cited in Golf Digest suggested that an MOI putter may make a 4-foot difference on a 22-foot putt. That’s a massive difference — almost as massive as some of these putters.
Many modern putters also feature alignment aids, like the white circles behind the face of Odyssey’s putters. Other manufacturers put bold lines or arrows on their weapons to help golfers start the ball on the target line. (For more on alignment, see “Addressing the Art of Aiming” later in this chapter.) Another new wrinkle is adding an insert to the face of the putter — often a panel of urethane, the same stuff golf balls are made of — for a softer feel when the putter strikes the ball.
As with other technological fixes, from titanium drivers to graphite shafts to super-comfy golf shoes, such features have their benefits — especially if you believe they can help your game. Because, as you know by now (or will soon figure out), this game is as much mental as it is anything.
Building Your Putting Stroke
You can putt well using any number of methods or clubs. But at this stage, you should putt in as orthodox a manner as possible. That way, when something goes wrong — which it will — the fault is easier to fix. The trouble with being unorthodox is that finding order in the chaos is more difficult. The following sections help you set up your putting foundation.
Getting a putting grip
The putting grip isn’t like the full-swing grip (which we cover in Chapter 1 of Book III). The full-swing grip is more in the fingers, which encourages your wrists to hinge and unhinge. Your putting grip’s purpose is exactly the opposite.
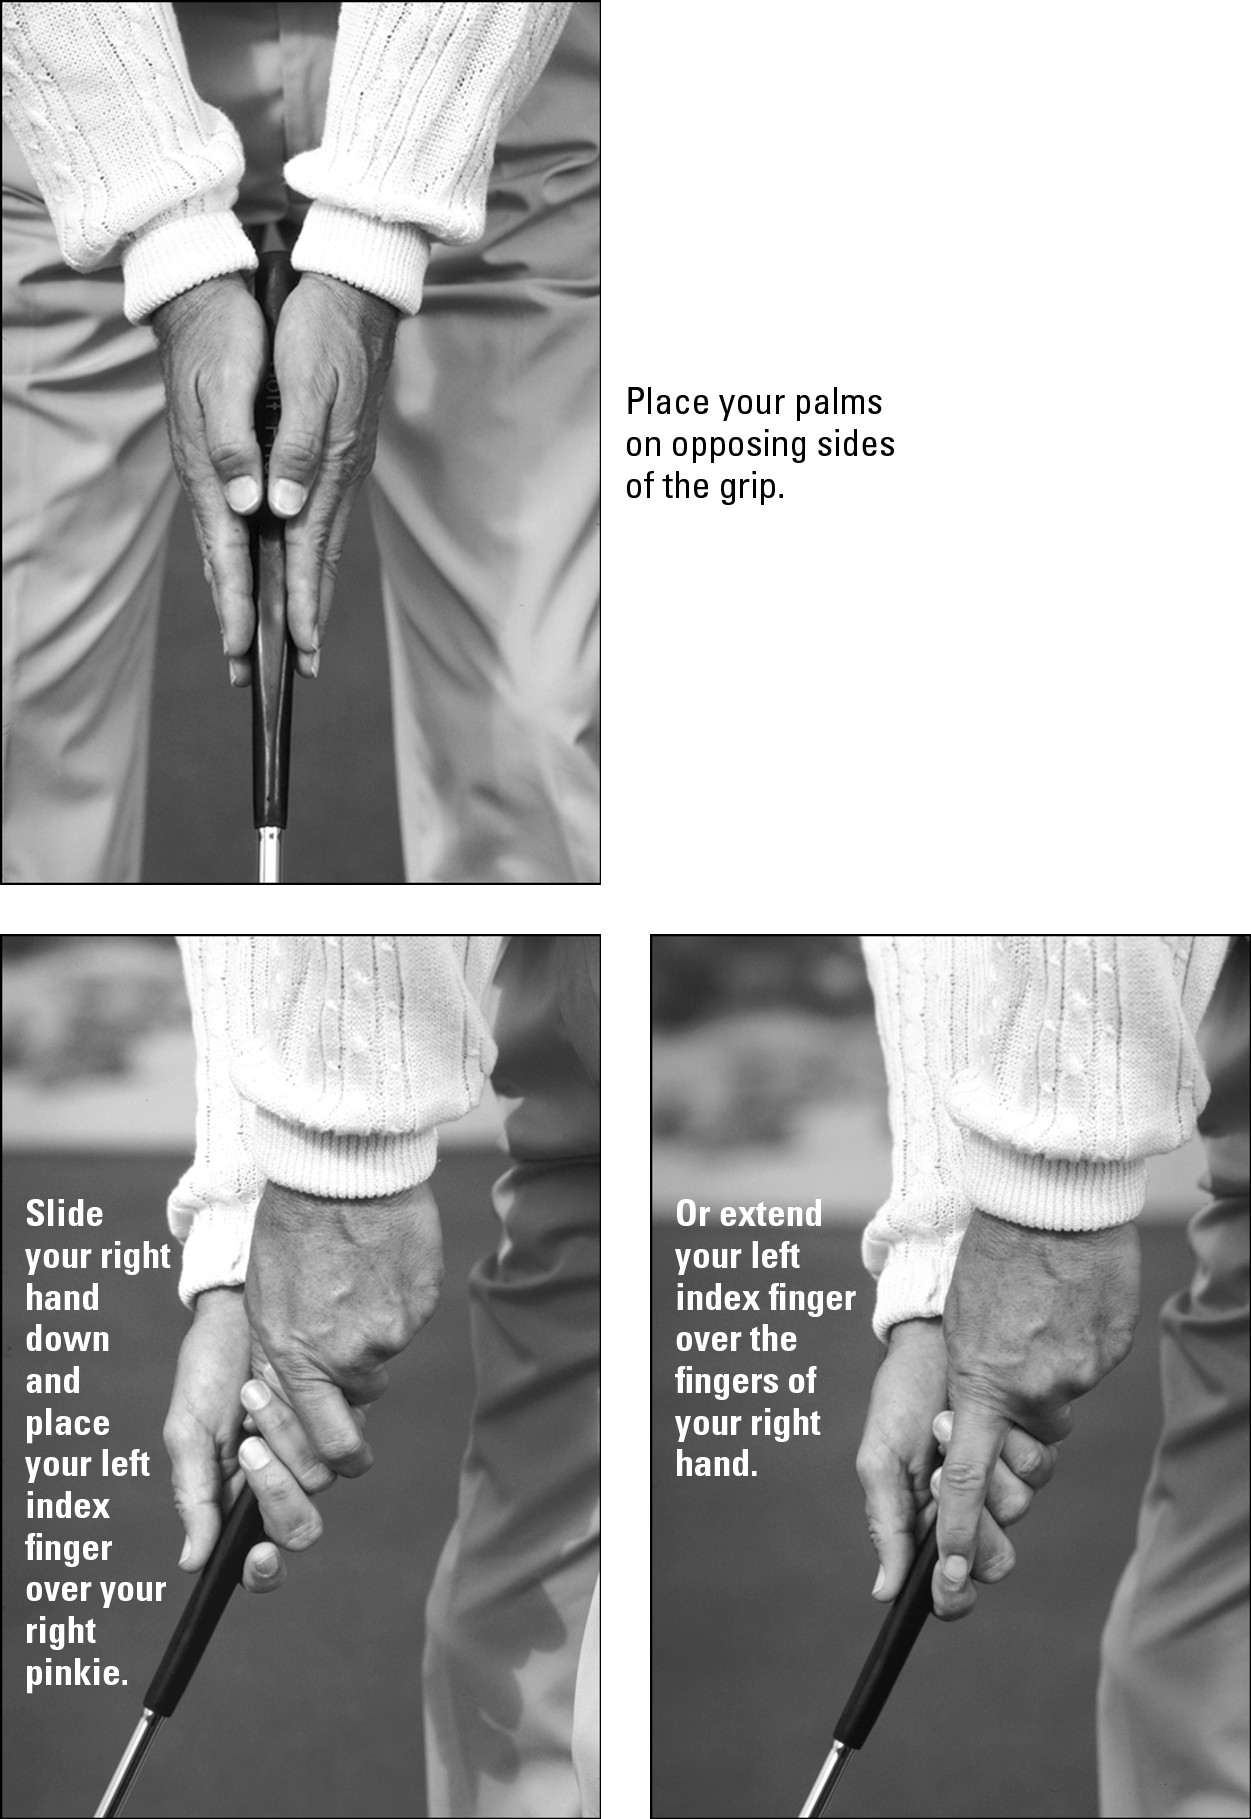
Not all putting grips are the same — not even those grips where you place your right hand below the left in conventional fashion. But what almost all putting grips have in common is that the palms of both hands face each other so that your hands can work together. The last thing you want is your hands fighting one another. Too much of either hand, and your ball has a bad experience. If your left hand dominates, your right hand sues for nonsupport. Both hands need to work together.
In the conventional grip, your hands can work together in one of two ways, as shown in Figure 6-2. Start by placing the palms of your hands on either side of the club’s grip. Slide your right hand down a little so that you can place both hands on the club. You should feel like you’re going to adopt the ten-finger grip (refer to Chapter 1 of Book III). Then do one of the following, depending on which grip you prefer:
Place your left index finger over the little finger of your right hand. Known as the reverse overlap, this putting grip is probably the most popular option on the PGA and LPGA tours.
Extend your left index finger past the fingers of your right hand until the tip touches your right index finger. Call this grip the extended reverse overlap. The left index finger, when extended, provides stability to the putting stroke.
Go with the grip that feels most comfortable. We describe other methods of gripping the putter in the following sections.
Your grip pressure on your putter needs to be consistent and comfortable. You shouldn’t squeeze the putter grip too tightly. You can sense the weight and position of the clubhead better this way, and developing a feel for the putterhead is essential to keeping putts around the hole. You can grip the putter any way you like, but keep the grip pressure light and your left wrist still through impact.
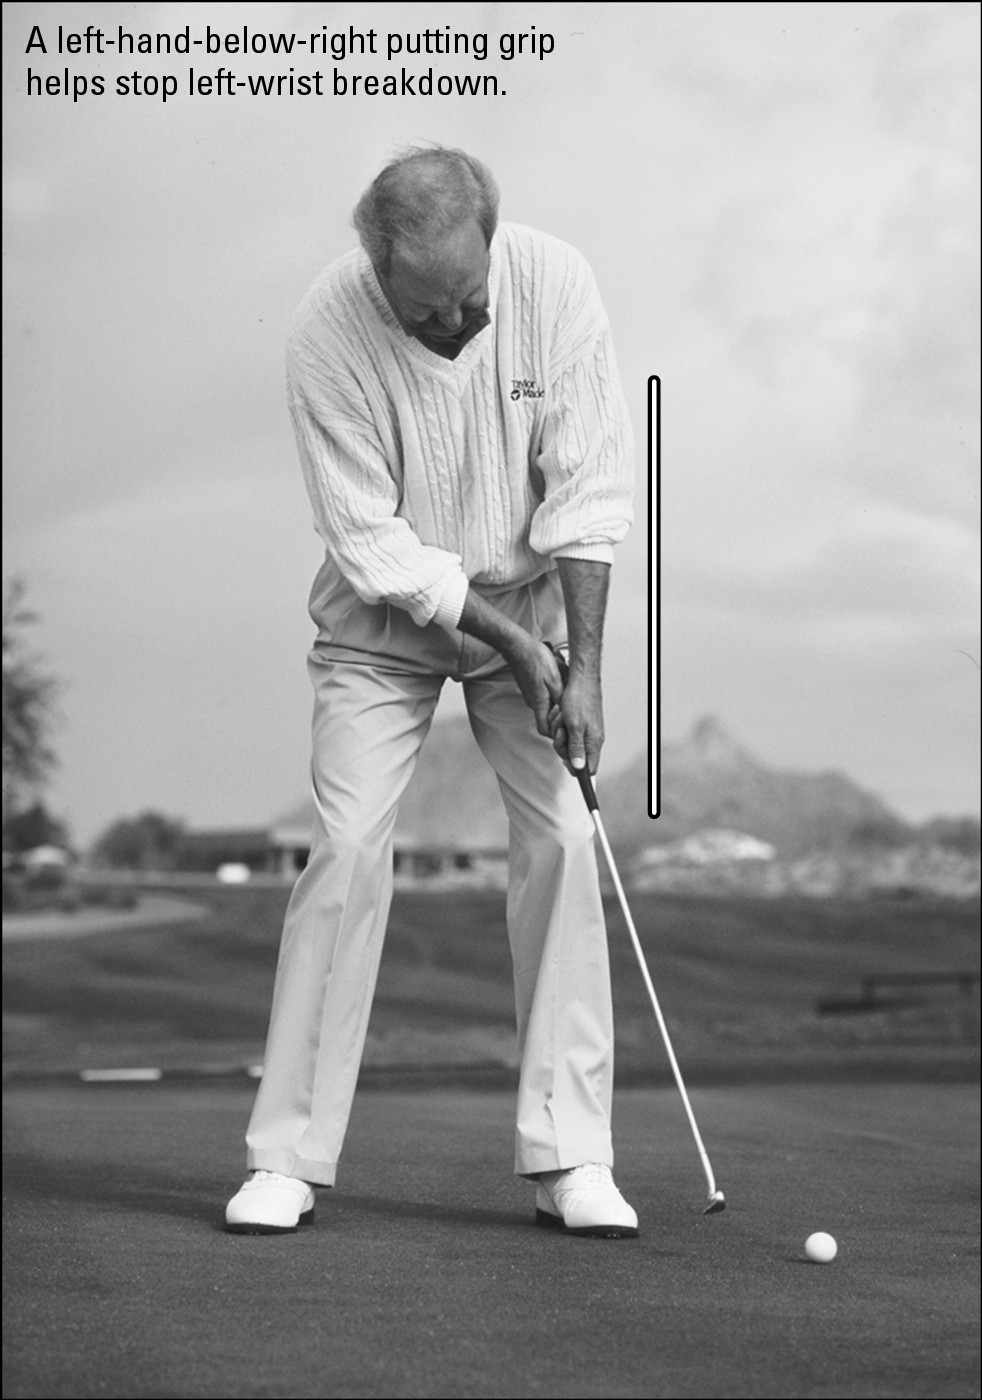
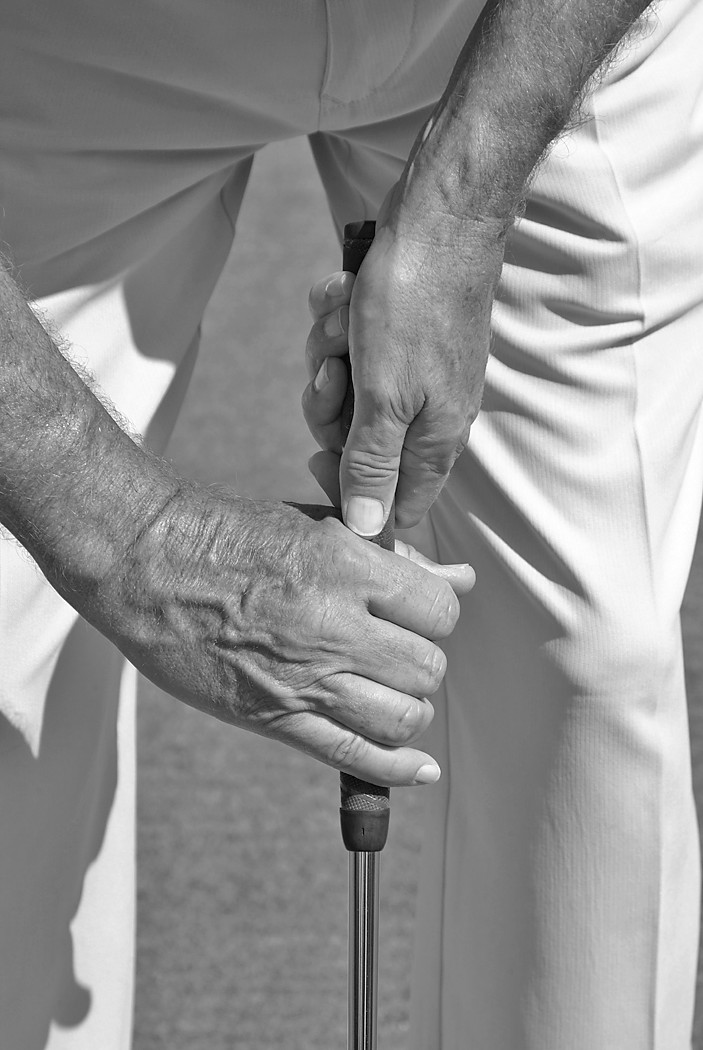
Left hand low
This method is commonly referred to as cross-handed. The left hand hangs below the right with the putter (or vice versa if you’re a lefty). Many players use this method today because it helps keep the lead hand (the left, in this case) from bending at the wrist as you hit the ball. (See Figure 6-3.)
Figure 6-2: A gripping start.
One of the biggest causes of missed putts is the breakdown of the left wrist through impact. When the left wrist bends, the putter blade twists. This twisting causes the ball to wobble off-line, even if you’ve got an MOI putter. That’s why you should maintain the bend of your left wrist from the address position all the way through the stroke.
Figure 6-3: Keep that left wrist firm.
The cross-handed grip can make maintaining that wrist position easier. PGA Tour stars — including Jim Furyk and Stuart Appleby — have won with this type of grip.
Another reason you see many of today’s pros using a cross-handed grip is that, with the left arm lower on the shaft, you pull the left shoulder more square to your target line. Pulling your left shoulder happens automatically with this grip.
The claw
This weird-looking grip got a boost at the 2005 Masters, where claw-gripper Chris DiMarco took eventual winner Tiger Woods into a thrilling playoff. To try the claw, start with a standard putting grip. Turn your right palm toward you and bring it to the putter’s handle so the handle touches the spot between your thumb and index finger. Now bring your index and middle fingers to the shaft, leaving your ring finger and pinkie off, as shown in Figure 6-4.
Figure 6-4: The claw grip — another option.
DiMarco had gone through a spell of such terrible putting that he nearly gave up hope; with this grip, he rejuvenated his career and clawed his way to the top.
Putting posture: Stand and deliver
As you crouch over the ball to putt, your knees should flex slightly. If your knees are locked, you’re straining your back too much. Don’t bend those knees too much, though, or you may start to look like a golf geek!
Bend from your waist so your arms hang straight down. This position allows your arms to swing back and forth from a fixed point in a pendulum motion. Hold your arms straight out from your body. Bend down with those arms outstretched from the waist until your arms are pointing to the ground. Now flex your knees a little, and you’re in the correct putting posture.
You can break a lot of rules in how you stand to hit a putt (see Figure 6-5). Ben Crenshaw, one of the best putters ever, always stood open to the target line, his left foot drawn back. Gary Player did the opposite: He set up closed, his right foot farther from the target line than his left. But that’s their style.
Toeing the line
As in a full swing (see Chapter 1 of Book III), the line of your toes is the key. Regardless of which stance you choose, your toe line should always be parallel to your target line. Be aware that the target line isn’t always a straight line from the ball to the hole — if only putting were that simple! Few greens are flat, so putts break or bend from right to left or from left to right. (See “Reading the Break of the Greens” later in this chapter.) So sometimes you aim, say, 5 inches to the right of the hole, and other times maybe a foot to the left. Whatever you decide, your toe line must be parallel to your target line.
On breaking putts, aim your feet parallel to the line you’ve chosen, not toward the hole (see Figure 6-6). In effect, you make every putt straight. Applying a curve to your putts is way too complicated and affects your stroke. Imagine how you’d have to adjust if you aimed at the hole and then tried to push the ball out to the right because of a slope on the green. You’d have no way to be consistent.
Standing just right
Okay, now what about width of stance? Again, you have margin for error, but your heels need to be about shoulder-width apart at address, as shown in Figure 6-7.
Figure 6-5: Putting stances vary.
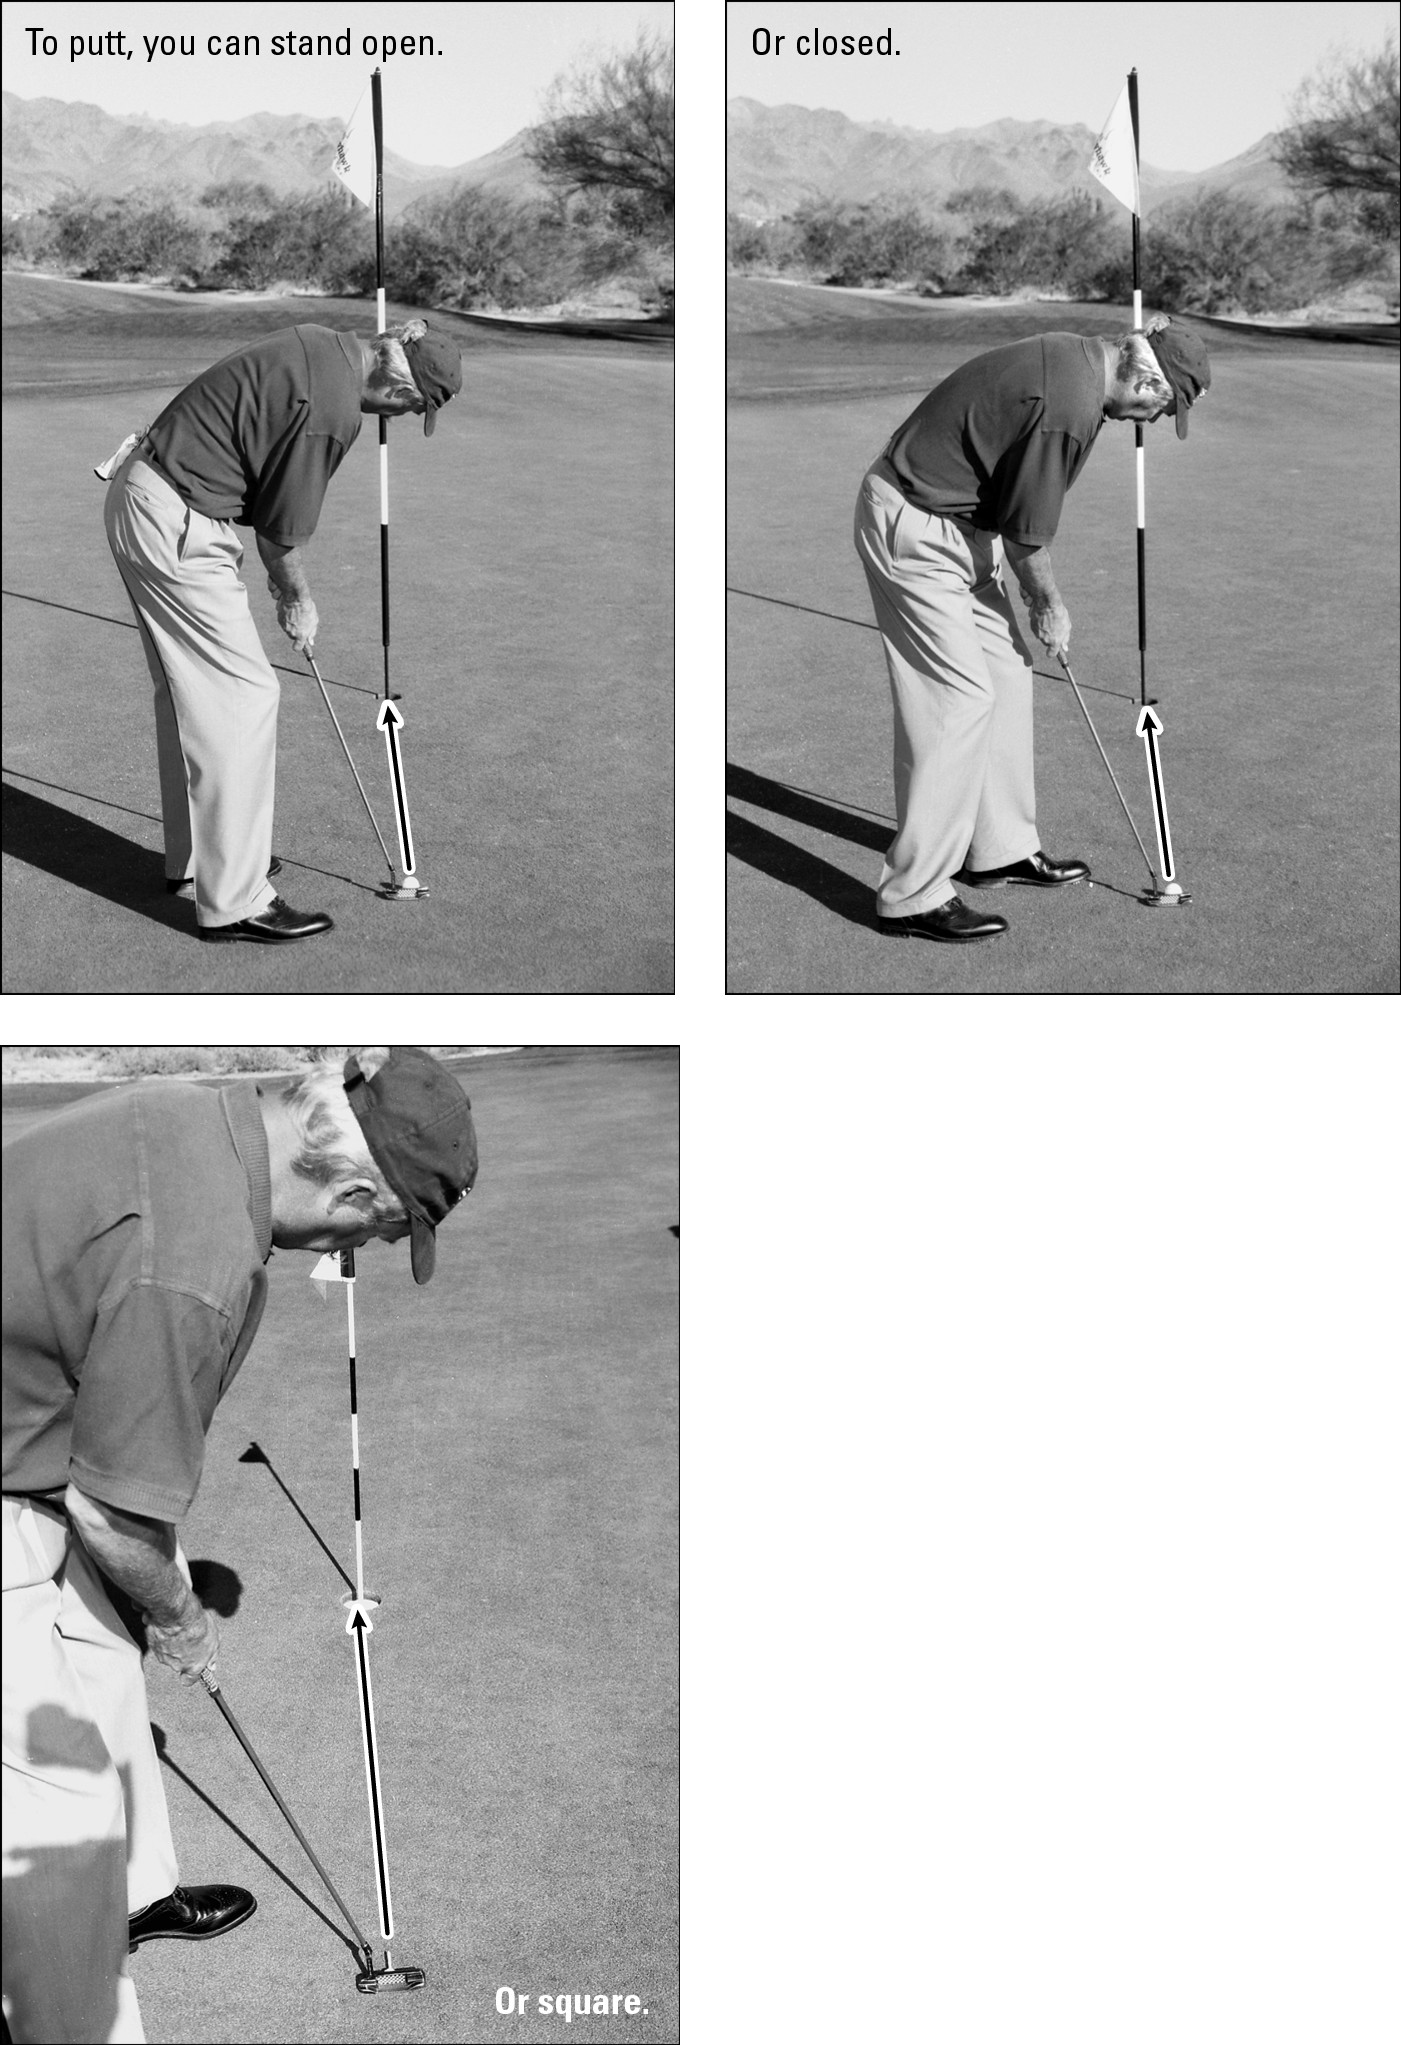
Figure 6-6: Place your feet parallel to your putting line.

Figure 6-7: While putting, your heels should be shoulder-width apart.
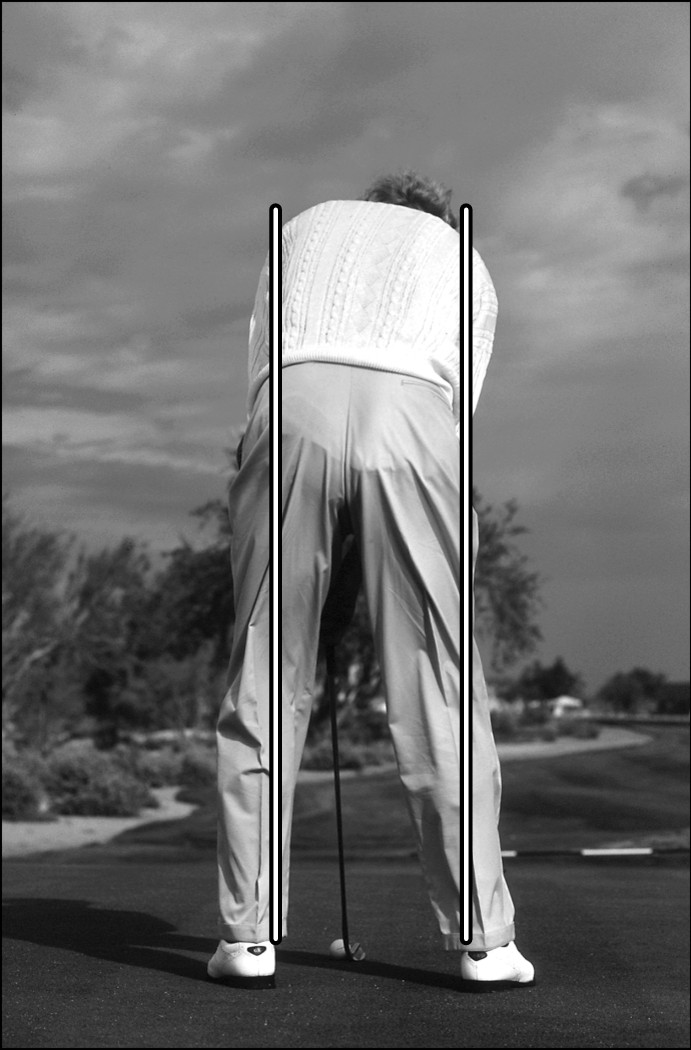
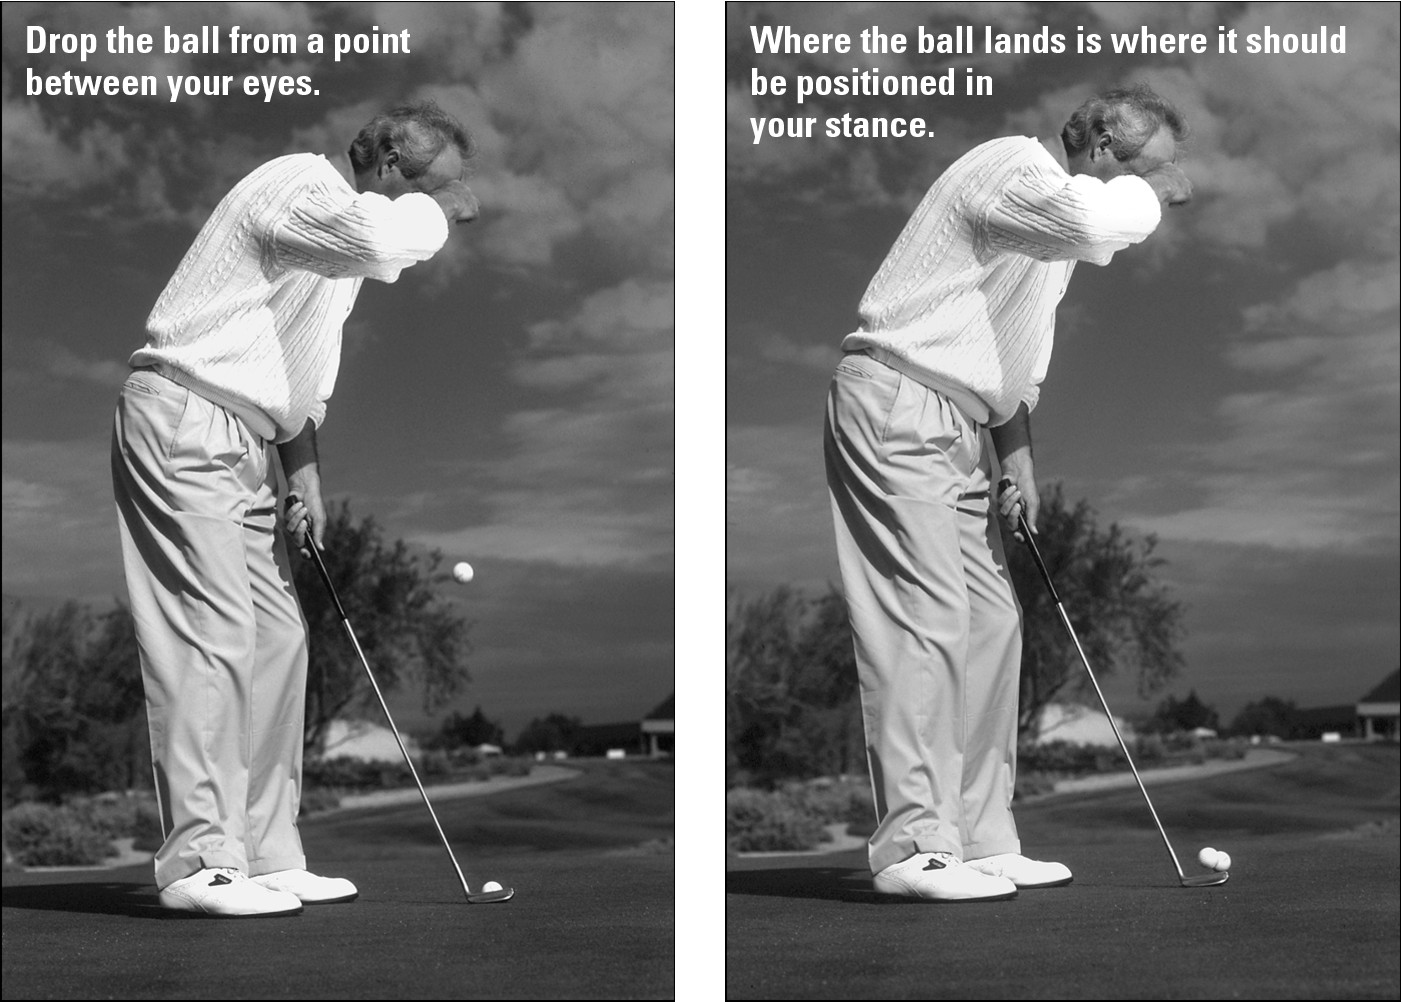
You have to bend over to place the putter behind the ball. How far should you bend? Just far enough to get your eye line (the direction of your gaze — a much-neglected part of putting) directly over the ball. To find that position in practice, place a ball against your forehead between your eyes, bend over, and let the ball drop, as shown in Figure 6-8. Where does the ball hit the ground? That’s where the ball should be in relation to your body. It shouldn’t be to the inside, the outside, behind, or in front of that point. It should be right there, dead center. This alignment places your eyes not just over the ball but also over the line that you want the ball to ride.
Figure 6-8: Your eyes should be over the ball.
Perfecting Your Putt
In putting, you practice fundamentals and incorporate personal preferences. Your putting style is the most personal of your golf swings, but players who execute the putting stroke according to the proven fundamentals experience better results. How you make yourself feel comfortable and confident enough to get the putterhead through the ball is a matter of preference.
More than having technique, putting is all about having feel. Success comes with developing a feel for the weight of the putter, the speed of the green, and the roll of the ball. How do you develop feel? Practice, practice, and more practice.
You can find helpful tips and advice on long putts, short putts, and yips in Chapter 8 of Book III, which covers a host of short-game strategies.
Matching your putt to your full swing
One basic rule for a beginning golfer is to match the length of your golf swing to your putting stroke. That is, if you have a short swing (your left arm, if you’re right-handed, doesn’t get too far up in the air on your backswing), make sure that your putting stroke is a short one, too. If your full swing is long, make your putting stroke long. This way, you’re not contradicting yourself.
Look at two of the greatest putters in history: Ben Crenshaw and Phil Mickelson. Both have long, slow swings, and their putting strokes are — you guessed it — long and slow. On the other hand, major champions Nick Price and Lanny Wadkins have quick swings and quick putting strokes.
Your swing tells a lot about your personality. If your golf swing is long and slow, you’re probably an easygoing person. If your swing is short and fast, you’re probably the type who walks around with his hair on fire.
Getting up to speed
 In my decades in pro golf, I’ve seen players of all shapes and sizes with a lot of different putting methods. Some putted in what could be termed mysterious ways, and others were totally conventional. So analyzing different putting methods is no help. The best way to look at putting is to break it down to its simplest level. The hole. The ball. The ball fits into the hole. Now get the ball into the hole in the fewest possible strokes.
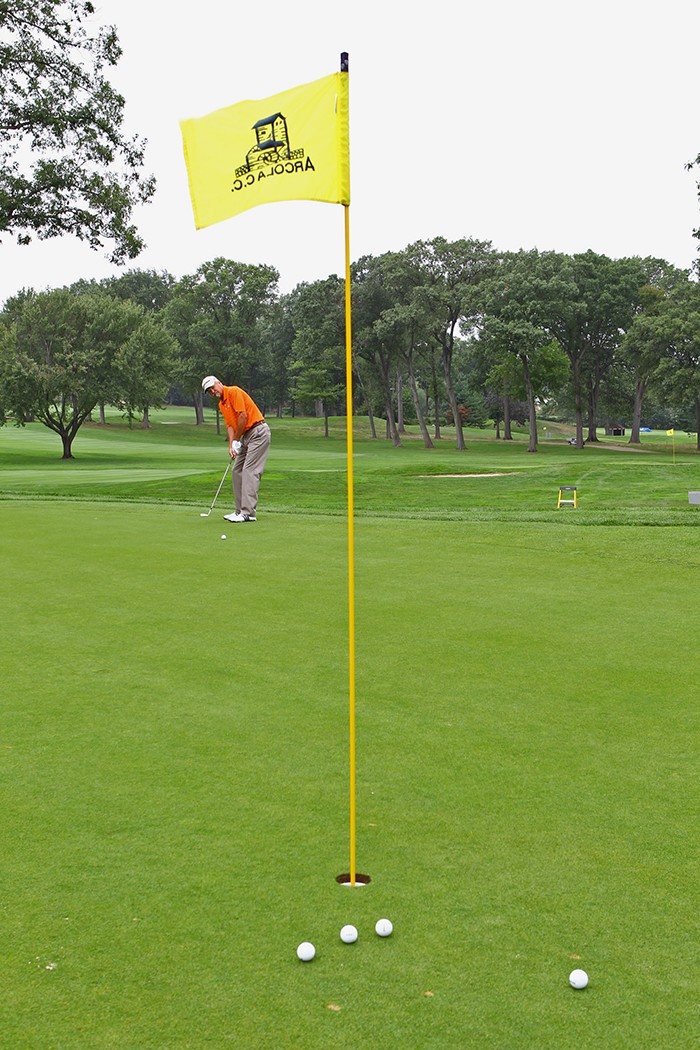
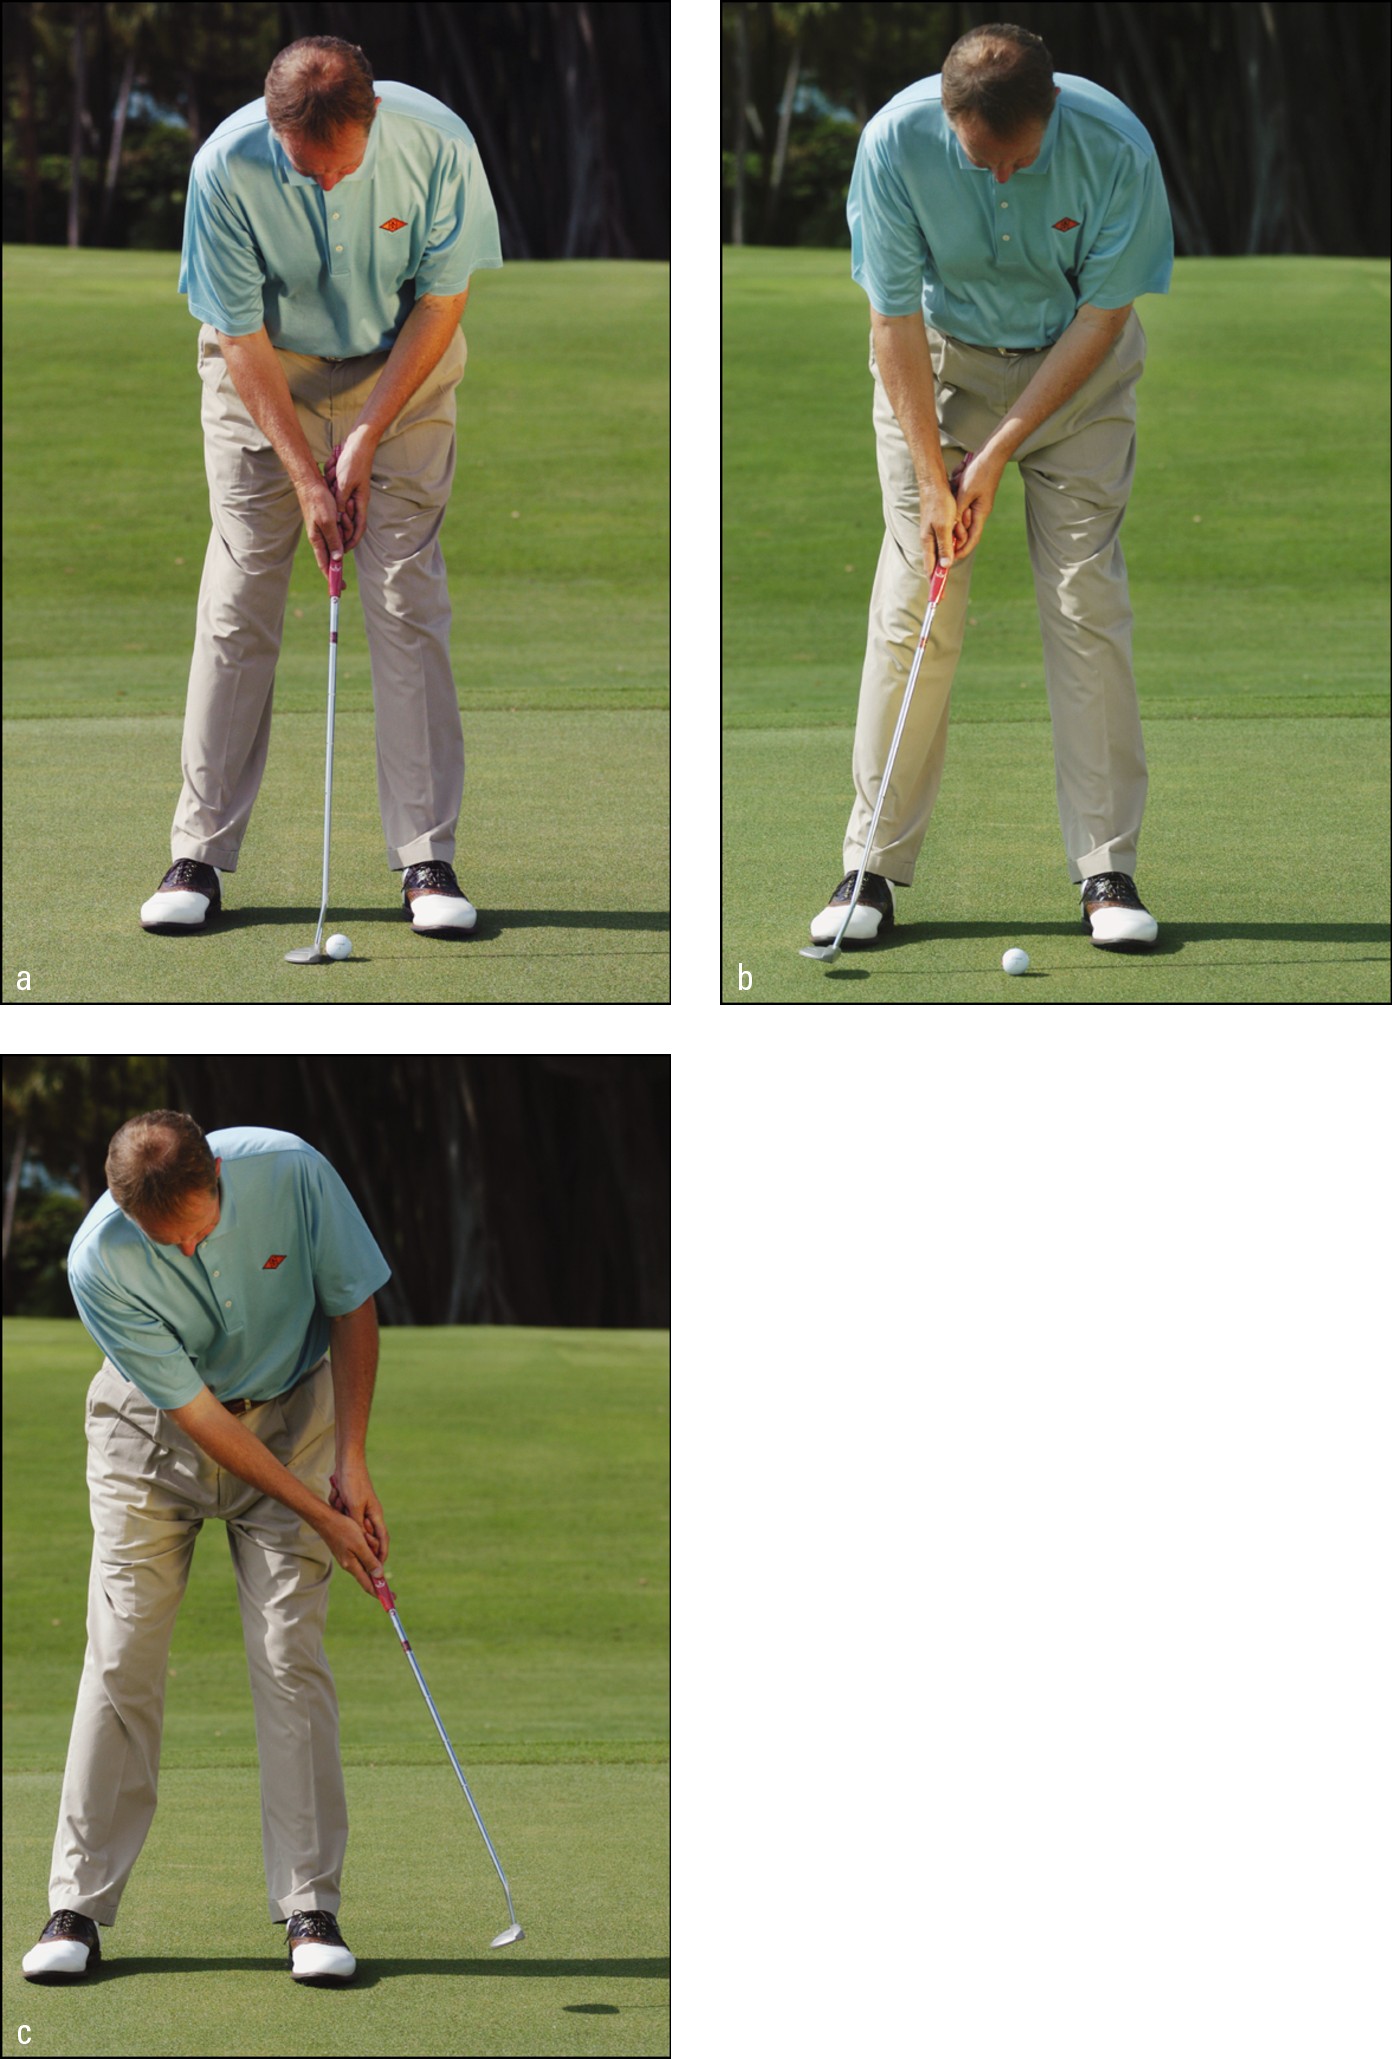
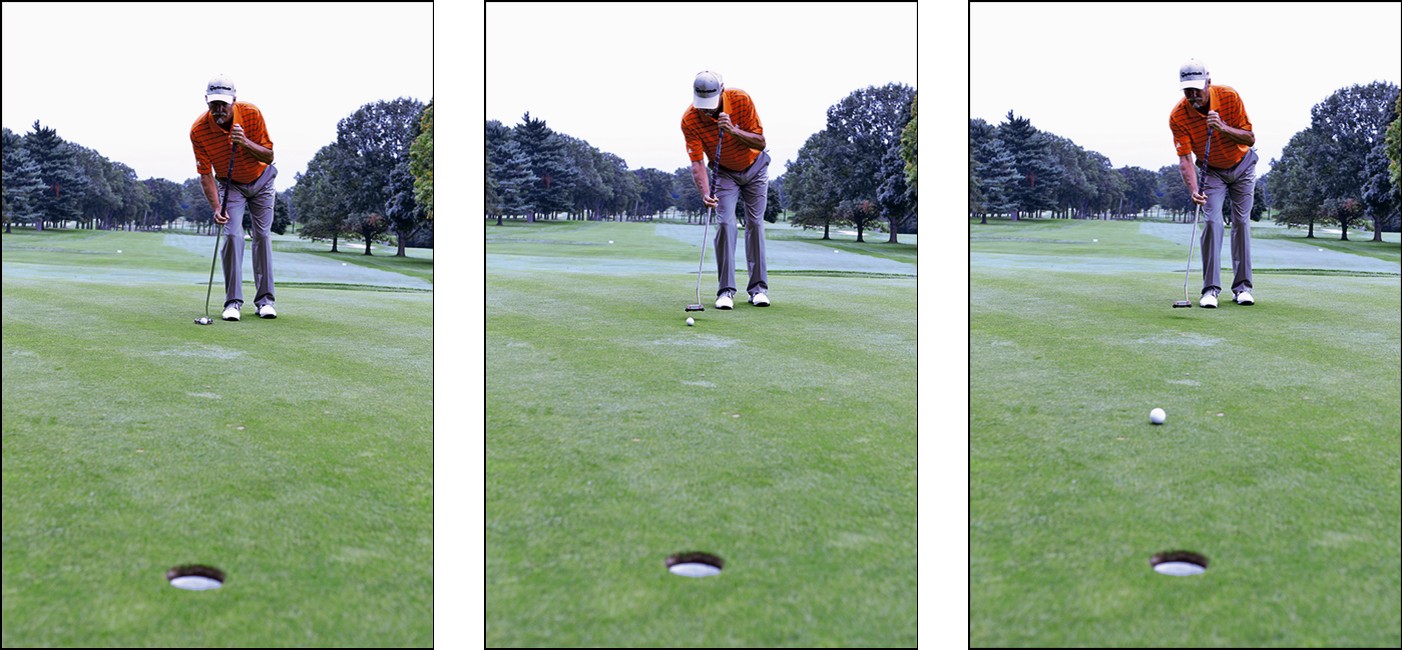
You want to get the ball rolling at the right speed. That means hitting a putt so that if the ball misses the cup, it finishes 14 to 18 inches past the hole, as shown in Figure 6-9. This distance is true no matter the length of the putt. Two feet or 40 feet, your aim must be to hit the ball at a pace that has it finish 14 to 18 inches beyond the hole. If it doesn’t go in, that is.
You’re probably wondering why your ball needs the right speed. Well, the right speed gives the ball the greatest chance of going into the hole. Think about it: If the ball rolls toward the middle of the cup, you don’t want it moving so fast that it rolls right over the hole. If it touches either side of the cup, it may drop in. Your goal is to give the ball every chance to drop in, from any angle — front, back, or side. You want that hole to seem as big as possible.
Figure 6-9: Hit your putt hard enough to get it just past the hole.
The only putts that never drop are the ones you leave short of the hole. If you’ve played golf for any length of time, you’ve heard the phrase “never up, never in.” The cliché is annoying but true. As the Irish say, “Ninety-nine percent of all putts that come up short don’t go in, and the other 1 percent never get there.” Remember that saying! Also remember that you should try to sink every putt from ten feet or closer.
Targeting a line
Every putt you hit should be a straight putt. “You wish,” you say? We mean that you should stroke every putt straight down a target line, in the direction of the amount of break you need to play to make the putt roll into or near the hole (see the section “Reading the Break of the Greens” later in this chapter). You read the break of the green and determine the line the putt needs to go on and roll the ball straight on that line. You don’t try to hook or bend a putt or put English on it. Choose your line. Keep it straight and simple.
To hit a straight putt, imagine a straight line that goes from the back of the ball straight down your target line. The straight line should stretch to the hole or to a point you selected so the ball breaks to the hole (see Figure 6-10). (Check out Chapter 3 of Book V for a straight-line putting drill.)
Figure 6-10: Playing the break.
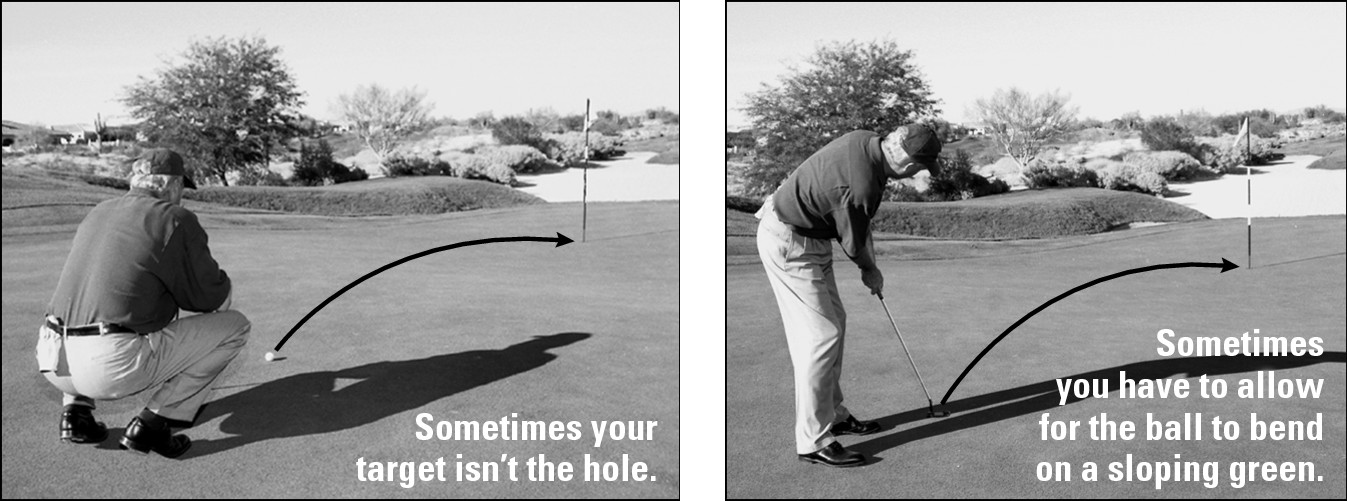
To increase your chance of success, pick a spot on the target line to aim for. The target isn’t necessarily the hole; the target is the point you need to focus on in order to get your ball rolling down the proper target line and toward the hole. The spot may be a few feet in front of you, or it may be 10 feet in front of you. It depends on the length of your putt. Choose a spot somewhere between your ball and the hole on the target line.
Imagine a bowling lane, which has a foul line and arrows that serve as aiming devices. Same concept (but without the curves or embarrassing gutter balls).
Swinging the flatstick
After you read the break of the green (see the section “Reading the Break of the Greens” later in this chapter), find your target line, pick a spot, and get your eyes over the line, you need to concentrate on swinging the putter back and forward along the line, keeping the following fundamentals in mind:
Keep your putterhead on line through its entire movement. The putter needs to travel straight back on the target line and then straight forward on the target line. Keeping your legs, head, and shoulders still helps you swing the putter with your arms and hands.
Keep the putterhead square and aimed straight to the target. The face of the blade should be perpendicular to the target (see Figure 6-11) and remain so throughout the stroke. The direction the blade faces shouldn’t wobble; it should remain true to the arc of the putterhead. Keeping your wrists solid and firm helps you maintain the direction of the putterface.
Never decelerate the putter during the swing. This putting-scared style kills your putting stroke and your score. Accelerate an equal amount through the backswing and the downswing.
Figure 6-11: Keep your clubface square to the target line.
Putting is about rolling the ball, not hitting the ball. You want to think about tumbling the ball end over end.
You could be anyone and go out on that putting green with Tiger Woods or Brad Faxon or the best putter in the world and putt 10-footers competitively. You can be 100 years old and frail as can be and still have enough strength to make the putter go back and through at the right speed to roll the ball. That’s really all putting is about. You shouldn’t do anything that takes away from the simple act of making the putter swing.
Playing in the subconscious is the best way to enjoy success, especially in putting. You practice and prepare in the conscious state, and you can turn it all off and go to the subconscious during your round.
Staying low and level
When you swing the putter back and forward along the target line, keep the putter as low to the ground as you can without scraping the grass. It should feel more like you’re letting the putter hang; you don’t want to push it down. If you swing the blade close to the ground, you can stay level.
You need to stay level. When you hit your driver, your shoulders should stay level when you turn. The same thing goes for putting. After you take your stance and put your eyes over the target line, you want to keep the putterhead close to the ground and level. Take it back as low to the ground as you can, using your level shoulders to propel the club, and follow through as low to the ground as you can.
Stilling your legs
Your legs should stay quiet throughout the putting stroke. Putting is about moving the putterhead at a specific speed to allow the ball to die within 18 inches of the hole. In order to do that, you need to feel the putterhead as you swing it. You don’t need to make a bunch of shoulder and body turns or use any powerful leg action.
Stiffening your wrists
Another key to rolling the ball, bringing the putter back on line, sweeping the club low to the ground, and maintaining good speed is keeping your wrists firm and inactive during the putting stroke. You want your arms and hands working as one unit rather than independent of each other.
If your wrists get ahead of your arms as they guide the putter through the stroke, the direction of the putterhead or angle of the face can change.
Freezing your head and eyes
After you complete the putting stroke and send the ball toward the hole, keep your eyes focused on the spot the ball occupied (see Figure 6-12c). If you keep your eyes trained on the spot where the ball was, you’re more likely to let the putter swing through to its completion and not interrupt it or swing it offline by looking up too early and decelerating.
You don’t need to watch the ball go into the hole or miss the hole, other than to satisfy your curiosity and excitement. Instead, try listening for the sound of the ball falling into the hole. What a wonderful sound to hear! Try it and see immediately how much more solidly you roll the ball.
Following through and holding your finish
After your putter strikes the ball, the follow-through is extremely important. You wonder, “What sense does it make to follow through when the ball has already left the putterface?” Letting the putterhead follow through and swing naturally ensures that you’ll accelerate through the ball. The natural “fall” of the putterhead into the ball initiates the ball’s forward roll along the target line. Any effort to slow the putterhead or stop it after the ball is gone causes the putterhead to wobble off-line, pulling or pushing the putt awry.
As the putterhead follows through toward the conclusion of the stroke, let it swing freely through and then hold your finish with the putterhead pointing toward the hole as if you’re posing for a picture.
Mediocre and poor putters recoil their blade after the stroke. We’ve all done it. To recoil, you need to slow down your putter as it comes through the ball, and if you do that, your blade wanders off-line and hits the ball at the wrong speed.
You can’t recoil without slowing down. Finish with the putterhead low to the ground on the target line and hold the finish — you become a better putter because you give the putterhead the opportunity to roll the ball end over end.
Figure 6-12: Form a triangle with your shoulders, arms, and grip, and keep your sight line directly over the ball.
Addressing the Art of Aiming
Golf requires an assortment of physical skills and techniques. It also requires you to use your mind, which makes the final decisions and tells your motor system where and when things will happen, hopefully in some sort of harmony. For putting, all that stuff starts with alignment.
Some golfers aim at a spot a few feet in front of the ball. When they place their putters behind the ball, they aim the face of the putter or the lines on the putter at that spot. Aligning to a spot a foot or so in front of the ball is easier than aligning to the hole, which may be much farther away.
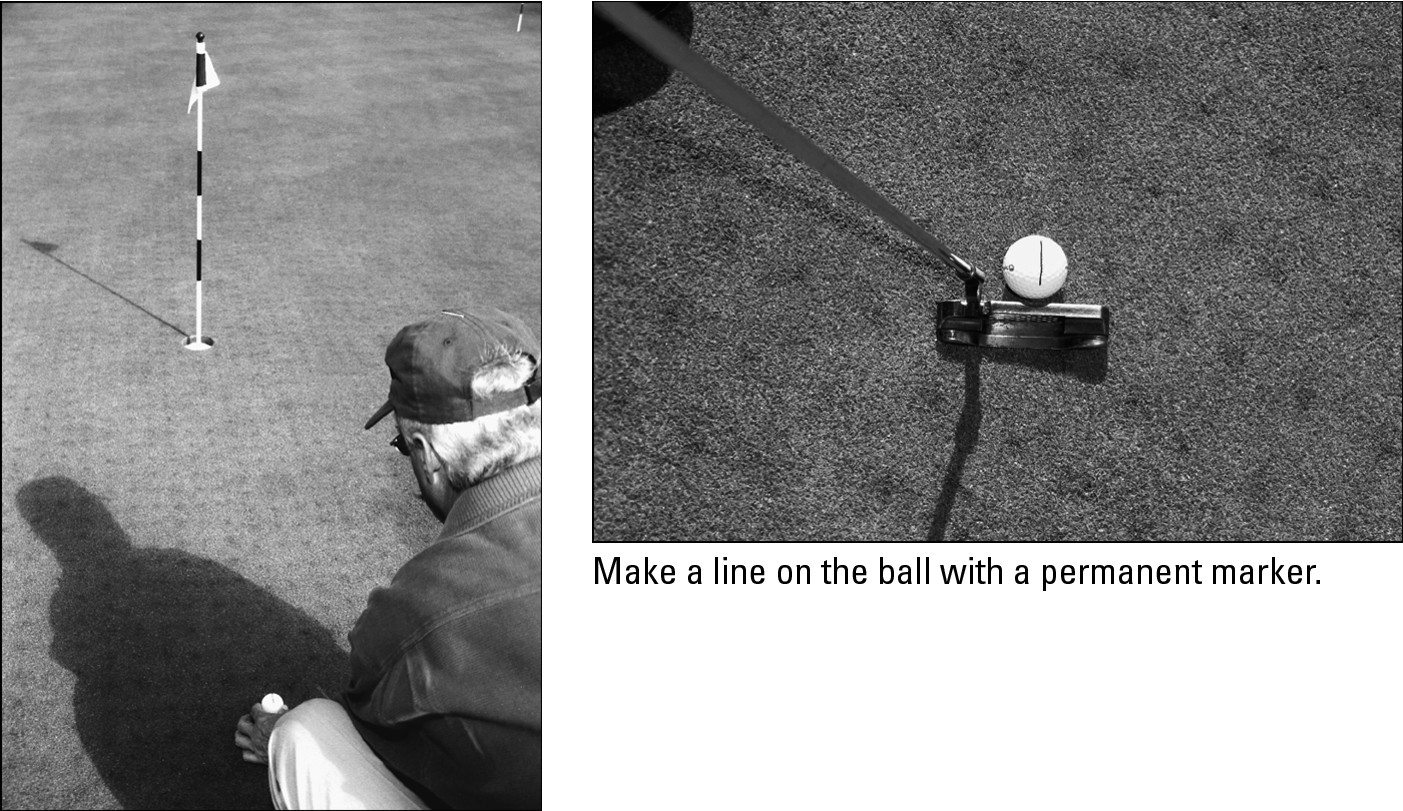
You can also use other strategies to help with alignment. One is to take the logo of the golf ball and set it along the line that you want the putt to follow. This method can help you get a better visual reference to the line. Some players, such as Tiger Woods, use a permanent marker to make a line about an inch long on the ball (see Figure 6-13) for the same reason: to achieve a better visual reference for directing the ball down the intended path. When you stand over the putt, the ball is already aimed.
Figure 6-13: Aim the logo of the ball or a drawn line toward the target.
The eyes like lines
Players say they putt better when they “see the line” of the putt. Sometimes this visualization is easy, but most of the time golfers have to concentrate to see the line.
Another set of lines that can help your optics are the lines of your feet, knees, and shoulders. By keeping them square (at a right angle) to the target line, you help your eyes appreciate what is straight — and keep your stroke on line.
To help you keep the clubface square to your target line, use tape or a yardstick on the floor. Aim the tape at a distant target, like a baby grand piano at the far end of your ballroom. Now set up at the end of the tape as if you were going to hit an imaginary ball straight down the tape line. You’re practicing visual alignment. Give this drill a chance — it can really help your perception of straight lines.
When I’m having alignment problems, I take some of the gum that I’ve been chewing for the last three days and attach a tee to the putter with the fat end flush to the face, as shown in Figure 6-14. Then I aim that tee at the hole from about 3 feet away.
Figure 6-14: Stick a tee to the face of your putter to help align with your target.

This drill trains your eyes to square the clubface. You can use this exercise to visually process what a square clubface looks like as you look down the attached tee to the hole. Spend a couple of minutes appreciating this perspective. If it looks okay to you on your first try, you’re in line for your Bachelor of Alignment degree. If not, repeat the drill daily until it looks okay the first time you place the club down.
The need for speed
One of the best ways to develop a touch for the speed at which putts should roll is to imagine things happening before they really do.
You must optically preview the putt’s roll from its stationary point to a resting place near the hole — a tap-in is really nice. This optical preview activates the motor system to respond with the right amount of energy to hit the putt. You’d do the same thing if we told you to throw a ball over a bush and make it land no more than 5 feet beyond the bush. You’d decide at what arc and speed to toss the ball, and your mind’s eye would relay this information to your muscles.
View a putt from a point off to the side of the target line, midway between the ball and the hole, as shown in Figure 6-15. This technique can give you a better feel for the distance. Some professionals swear they can visualize the proper speed of a putt twice as well from the side.
Figure 6-15: Viewing a putt from the side can help you judge distance and speed.
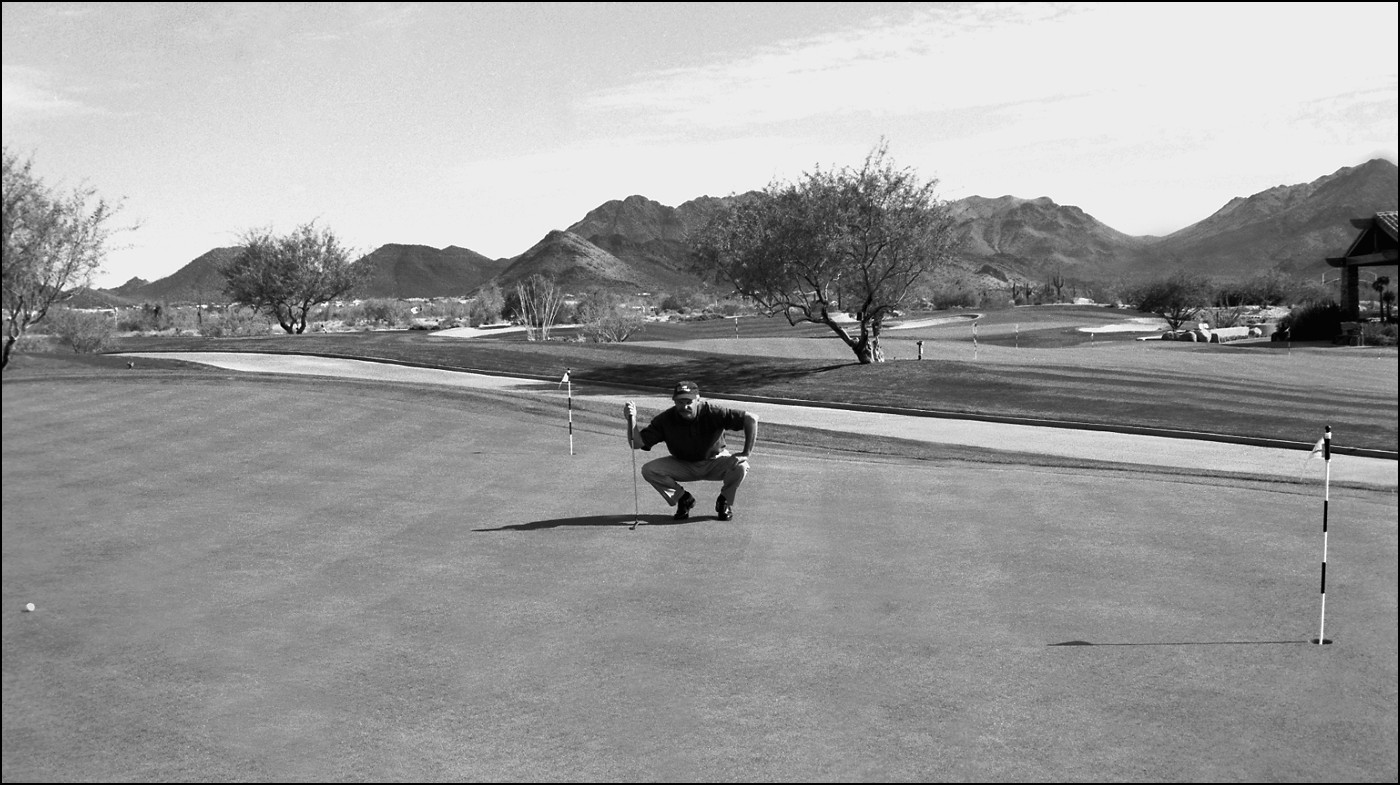
A good rule of thumb: Don’t change your mind while you’re over a putt. For one thing, putts look different from above than from the side! For another, the ground you stand on may not be sloped the same as it is near the hole. And unless the putt is all downhill, the ball does most of its curving during the last third of the putt. (That’s another reason to stand to the side of the putt — assessing the last third of the putt is easier from there.)
Some quick tips you may want to scrawl in your reminder book:
Fast greens break more, so don’t hit the ball too hard. But keep in mind that hitting the ball softly means that the slope affects it more.
Downhill putts act like fast greens because the slope affects the roll of the ball for more than the last few feet.
Slow greens break less, so you have to hit the ball harder. That initial burst of speed keeps the ball from breaking as much.
Uphill putts act like putts on slow greens. Your challenge is to figure out how much uphill slope you’re dealing with, and adjust your putt accordingly — the steeper the slope, the more power it takes. Try imagining that the hole is farther away than it really is.
Points of the roll
This chapter covers some complicated stuff, so keep in mind some key points:
Keep your alignment parallel to the target line. All the following parts of you stay parallel to that line:
• Feet
• Knees
• Shoulders
• Eye line
Know what your putter blade looks like when it’s square to the line.
Use the ball’s logo or a line marked on the ball to help you align putts.
Follow the line of your intended putt with your eyes at the speed that you think the ball will roll.
Stare at the line of your putt longer than you look at the golf ball.
Good putting takes practice. And then more practice. The boys at the club practice their putting less than anything else, and then they wonder why they lose bets!
More than half the strokes you make in this silly game may be putts. Create games on the putting green to make putting practice more fun. Your scorecard will thank you.
Reading the Break of the Greens
After you have the distance control of your stroke, you can work on the second half of the putting equation: reading the break. The break is the amount a putt moves from right to left or left to right. Slope, the grain of the grass (see this chapter’s “Reading the grain”), topographical features such as water and mountains, and, perhaps most important, how hard you hit the ball dictate the break. For example, an aggressive player who routinely hits putts 5 feet past the cup isn’t going to play as much break as someone with a softer touch. (Remember: You should hit your putts no more than 14 to 18 inches past the cup.)
The more firmly you hit a putt, the less the ball breaks on even the steepest gradient. So don’t be fooled into thinking that you can hole a putt one way only. On, say, a 20-footer, you probably have about five possibilities. How hard you hit the ball is one factor.
The first thing I do when I arrive at a golf course is to find the natural slope of the terrain. If the course is near mountains, finding the natural slope is easy. Say the mountains are off to the right on the first hole. Any slope on that hole runs from right to left. In fact, the slope on every green is going to be “from” the mountain (unless, of course, a particularly humorless architect has decided to bank some holes toward the mountain). So I take that into account on every putt I hit.
Look at each green in detail. If you’re on an older course, the greens probably slope from back to front to aid drainage. Greens nowadays have more humps and undulations than ever and are surrounded by more bunkers. And the sand tells a tale: Most courses are designed so that water runs past a bunker and not into it. Take that insight into account when you line up a putt.
Reading the break of a green is an art and a gift. It all seems so simple — you look at the ground and decide which way the surface of the green tilts, and then you adjust the line of your putt accordingly.
Sometimes, however, the break and slope can be tricky to see. Sometimes you may face more than one break in a putt. It takes patience and imagination to envision the path the ball may naturally take as it rolls along. We do have, however, a few ways that you can help yourself read the break — clues that help you forecast the way the ball will roll. (Check out Chapter 8 of Book III for more in-depth putting strategies, including ways to deal with particularly difficult breaks.)
Examining all angles
Don’t hold up play, but do look at the putt from all angles. As you walk up to the green or while the other players putt, move discreetly around and look at your putt from behind the ball and from behind the hole back toward the ball. Look at the putt from the side. If you can, get down low and look at the ball from a worm’s-eye view. (You can do so easily on raised greens or from bunkers.) The more information you can process, the better the result.
Closing your eyes
If you have trouble seeing the break, close your eyes and stand at the hole or behind your ball with your hands at your sides. Closing your eyes causes your other senses to come alive to maintain your sense of balance. You feel yourself being pulled by gravity one way or another and your body naturally corrects that pull. Take these clues to heart.
Spilling a bucket of water
To help yourself read the break of a green, you can stand at the hole and imagine that you’ve spilled a huge bucket of water on top of the hole. Which way would all that water run after you fill up the hole and it overflows? Would it run off the front of the green? Would it stream to the back or off the side? Adjust your line accordingly. If you have trouble imagining, don’t go for realism and dump water in . . . unless you think you can outrun the greenskeeper and the cops.
Looking into the hole
Looking down into the hole can provide a sloping clue. Because a plastic cup lines the actual hole after the greenskeeper cuts it, you can see the discrepancy in the earth that rings around the top of the cup if the hole sits on a rise or a hill. The side with more dirt is the lower side of the hole, and the side with less dirt is higher. Therefore, if you putt the ball toward the higher side, it rolls and slides down toward the lower side.
Watching other players’ putts
The break of another player’s putt isn’t proprietary information. Pay attention to your playing partners and competitors when they putt and watch how their putts react to the break of the green. Sometimes you get lucky and someone has the exact same line as you. In the 2004 Masters, Phil Mickelson caught a break when Chris DiMarco’s bunker shot rolled behind Mickelson’s ball, giving him a great view of the break of his winning putt. But even putts stroked from another angle can tell you something about the beak of the green.
Sidesaddling Up: Face-on Putting
Here’s another alternative that’s starting to surface in the wonderful world of golf. It’s called face-on or sidesaddle putting. If you’ve been struggling with your putter, this stroke may be the cure.
It starts with common sense: Think about how you’d putt without a putter: You’d roll the ball into the hole. Everyone, from Ben Crenshaw to the greenest golf novice, would face the hole and roll the ball underhand. Nobody would turn sideways first. Why? Because facing your target is more natural. Impractical for full swings, but perfectly practical for putting, if you know how to do it.
If you adopt the face-on method shown in Figure 6-16, you need a putter designed for it. (They’re becoming more common but can still be hard to find. For information on ordering putters and other equipment from websites, see Chapter 1 of Book I.) You can get a feel for this putting with a regular long putter, but remember: To do it right, you need a face-on putter.
Figure 6-16: Face-on putting.
Here’s how to try face-on putting:
1. Use the same posture as if you were rolling a ball by hand: Face the target, knees flexed, with the ball slightly to your right, just ahead of your right foot.
2. Place your left hand at the top of your putter’s grip; keep the face of your putter square to the line of your putt.
The left hand acts as the fulcrum for your putting stroke.
3. With your eyes on the ball, bring the putter straight back with your right hand, and then straight through along your putting line.
4. Let your head come up naturally as you follow the ball on its merry way into the hole.
For more on face-on putting, check out Puttmagic.com.