Chapter 1
Solving Common Problems
In This Chapter
![]() Coming to terms with everyday swing flaws
Coming to terms with everyday swing flaws
![]() Conquering errant tee shots
Conquering errant tee shots
![]() Focusing on ball contact and direction
Focusing on ball contact and direction
![]() Dealing with the scary shank
Dealing with the scary shank
The old saying is true in golf, as in life: Nobody’s perfect. In golf, nobody’s even close. Even the best players have some little hitches in their methods that bedevil them, especially under pressure. Greg Norman once had a tendency to hit the ball well to the right of the target on the closing holes of big tournaments. Phil Mickelson and Tiger Woods have gone through periods when they drove the ball crookedly at the worst possible times. Watch your playing companions when they get a little nervous; you can see all sorts of unfortunate events. They leave putts short and take longer to play even simple shots. Conversation all but stops. Any flaws in their swings are cruelly exposed.
No matter how far you progress in this game, you’re going to develop faults of your own. They’re a given. The trick is catching your faults before they get worse. Faults left unattended often turn into major problems and ruin your game. In this chapter, we show you how to head off (pun intended) many faults by controlling your head position. Then we discuss the most common faults you’re likely to develop, with cures for each one. After you figure out what you tend to do wrong, you can refer to this chapter regularly to get help.
Using Your Head for Better Golf
The root cause of most faults is your head position. Your noggin’s position relative to the ball as you strike it dictates where the bottom of your swing is. If you don’t believe that, try this: Shift your weight and your head toward the target onto your left side while leaving the ball in its regular position. Now make your normal swing with, say, a 6-iron. The divot the club makes is more in front of the ball. The bottom of your swing moves toward the target along with your head. The opposite is also true. Shift your weight and head to the right, and the bottom of your swing moves that way.
The bottom line: If your head moves too much during the swing, you have little chance to correct things before impact, and the result is usually poor contact — and a poor shot.
But don’t get the idea that excessive head movement is responsible for absolutely every bad shot. Other poor plays can stem from improper use of your hands, arms, or body. But try to keep your head as steady as possible.
Swinging Into Action: Swing Faults
Most bad shots result from a handful of common swing errors. Fortunately, they’re fixable. Here’s how to beat back the gremlins that can creep into your game.
Slicing and hooking
Most golfers slice the ball, which means that it starts moving toward the left of the target and finishes well to the right. Slices don’t go very far. They’re horrible, weak shots that affect your DNA for generations to come.
In general, slicers use too much body action, especially upper body, and not enough hand action in their swings. Slicing likely stems from the fact that most players tend to aim to the right of their target. When they do so, their swings have to compensate so the resulting shots can finish close to the target. In most cases, that compensation starts when your brain realizes that if you swing along your aim, the ball will fly way to the right. The resulting flurry of arms and legs isn’t pretty — and invariably, neither is the shot. Soon this weak, left-to-right ball flight makes your life a slicing hell.
 If you’re a slicer, you need to get your hands working in the swing. Here’s how:
1. Address a ball as you normally do.
Address is the position of your body just before you begin to swing.
2. Turn your whole body until your butt is toward the target and your feet are perpendicular to the target line.
3. Twist your upper body to the left so you can again place the clubhead behind the ball.
Don’t move your feet, however. From this position, you have in effect made turning your body to your left on the through-swing impossible (see Figure 1-1).
Figure 1-1: Extra hand action cures the slice.

Try it. The only way you can swing the club through the ball is by using your hands and arms.
4. Hit a few balls.
Focus on letting the toe of the clubhead pass your heel through impact. Quite a change in your ball flight, eh? Because your hands and arms are doing so much of the rotating work in your new swing, the clubhead is doing the same. The clubhead is now closing as it swings through the impact area. The spin imparted on the ball now causes a slight right-to-left flight — something you probably thought you’d never see.
After you’ve hit about 20 shots by using this drill, switch to your normal stance and try to reproduce the feel you had standing in that strange but correct way. You’ll soon be hitting hard, raking draws (slight hooks) far up the fairway.
Golfers prone to hooks (shots that start right and finish left) have the opposite problem of slicers — too much hand action and not enough body. Here’s a variation on the earlier drill if you tend to hook the ball:
1. Adopt your regular stance.
2. Turn your whole body until you’re looking directly at the target.
3. Twist your upper body to the right — don’t move your feet — until you can set the clubhead behind the ball (see Figure 1-2).
4. Hit some shots.
Solid contact is easiest to achieve when you turn your body hard to the left, which prevents your hands from becoming overactive. Your ball flight will soon be a gentle fade (slight slice).
After about 20 shots, hit some balls from your normal stance, practicing the technique in the exercise. Reproduce the feel of this drill, and you’re that much closer to a successful swing.
Hitting from the top
When you start cocking the wrist in your golf swing, the thumb of your right hand (if you’re a right-handed golfer) points at your right shoulder on the backswing. That’s good! When you start the downswing, try to keep that thumb pointing at your right shoulder for as long as you can, thus maintaining the angle. That’s golfspeak for keeping the shaft of the club as close to the left arm on the downswing as possible. If your right thumb starts pointing away from your right shoulder on the downswing, not good! That’s known as hitting from the top. In essence, you’re uncocking the wrist on the downswing.
Figure 1-2: Extra body action straightens your hook.

The reverse pivot
A reverse pivot occurs when you put all your weight on your left foot on the backswing (shown in Figure 1-4) and all your weight on your right foot during the downswing. That’s the opposite of what you want to do!
Picture a baseball pitcher. Pitchers have all their weight on the right foot at the top of the windup, the left foot is in the air (for a right-hander), and on the follow-through, all the weight goes to the left foot. (The right foot is now in the air.) That’s the weight transfer you need. Here’s how you can achieve it:
1. Start your backswing; at the top of your swing, lift your left foot off the ground.
Now you can’t put any weight on that foot! You’ll feel your whole body resist placing your weight over your right foot.
2. Take your time and let your weight transfer to your right foot.
3. Start the downswing by placing your left foot back where it was and then transfer all your weight over during the swing.
4. When you’ve made contact with the ball (hopefully), put all your weight on your left foot and lift your right foot off the ground.
5. Stand there for a short time, feeling the balance.
This rocking-chair transfer drill lets you feel the proper weight shift in the golf swing. Take it easy at first. Practice short shots until you get the feel, and then work your way up to your driver.
Another good way to avoid a reverse pivot is to keep the right knee flexed through the swing. This tweak will help keep weight on the right side.
Figure 1-3: Don’t hit from the top!

Figure 1-4: The dreaded reverse pivot.
Swaying off the ball
In a sway, your hips and shoulders don’t turn on the backswing but simply slide back in a straight line, which moves your head away from the ball, as shown in Figure 1-5. Here’s a good drill to help you stop swaying:
1. Find a bare wall.
2. Place a 5-iron on the ground with the clubhead touching the wall and the shaft extending straight into the room.
3. Place your right foot against the end of the shaft with the little toe of your right shoe hitting the end of the club.
Now you’re standing exactly one club length from the wall.
4. Put your left foot in the normal address position for the 5-iron and, without moving your feet, bend over and pick up the club.
5. Take a backswing.
If you sway with your hips 1 inch to the right on your backswing, you hit the wall immediately with the club.
Figure 1-5: The sway ain’t the way.

Practice this setup until you can do it without hitting the wall.
We suggest practicing this drill in your garage at first to save the walls at home. You may want to use an old club, too.
The belly-button twist
Another common fault is doing the belly-button twist: sliding your hips too far toward the target at the start of the downswing. How far should your hips slide before they start turning left? They must slide until your left hip and left knee are over your left foot. Then those hips turn left in a hurry!
Here’s how to improve your hip position at the downswing:
1. Get a broken club that has just a shaft and a grip on it.
You can find broken clubs in lost-and-found barrels, or just ask somebody at a driving range. Your golf pro can also help you find one. You can also use a broom handle or alignment stick — any stick you can plant in the ground.
2. Stick the broken club into the ground just outside your left foot; the top of the grip should be no higher than your hip.
3. Now hit a few shots.
When you swing, your left hip should not hit the club stuck in the ground. It should turn to the left of the shaft. The key here is to straighten the left leg in your follow-through. To help you stay balanced, try to “hold” your finish at the end of the follow-through.
A swing that’s too short
In most cases, a short swing comes from too little shoulder turn. Turn your left shoulder over your right foot at the top of your backswing. If you can’t, lift your left heel off the ground until you can. Many players with short swings also keep their right elbows against their rib cages at the top of the swing. The right elbow should be 6 inches away from the rib cage to allow some freedom in the swing and give the needed length to your swing arc.
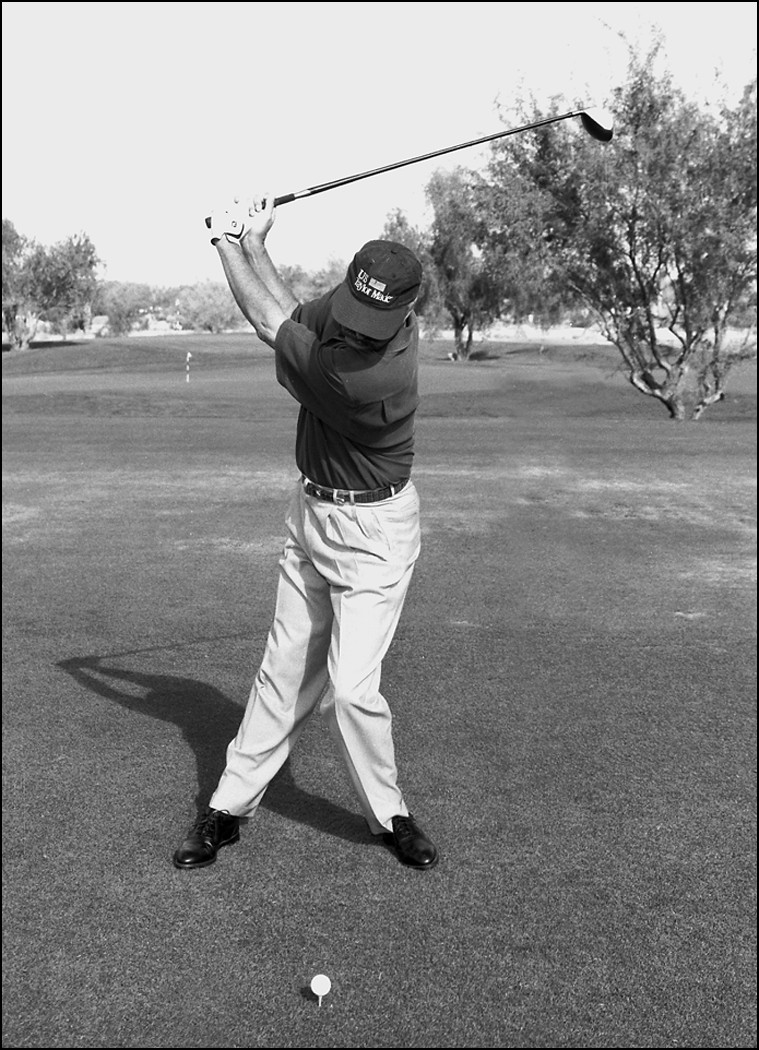
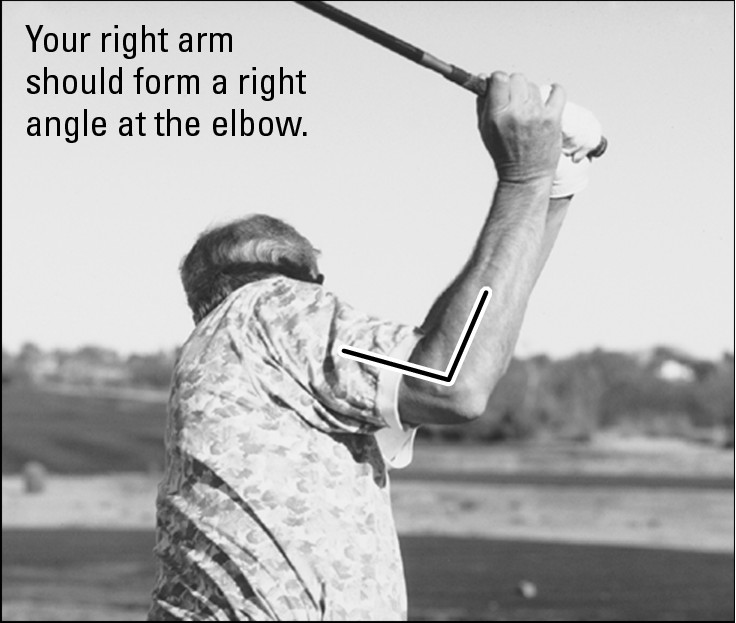
A swing that’s too long
If your swing is too long and sloppy (going beyond parallel to the ground at the top of the swing), here are two positions to work on:
 The right arm in the backswing (for a right-handed golfer) must not bend more than 90 degrees. It must stay at a right angle (see Figure 1-6).
The right elbow must not get more than 6 inches away from your rib cage at the top of the backswing.
If you can maintain these two simple positions at the top of your swing, you don’t overswing.
Figure 1-6: Do the right (angle) thing in your backswing.
Tackling Tee Trouble
What’s worse than starting a hole with a pitiful bloop or a screamer into uncharted lands? That’s trouble with a capital tee! To get well off the tee, you need to avoid the common blunders in the following sections.
Popping up your tee shots
One of the most common sights on the first tee of a pro-am or member-guest tournament is the skied tee shot — the ball goes higher than it goes forward. The golfer usually hits the ball on the top part of the driver, causing an ugly mark to appear, which is one reason a tour player never lets an amateur use his driver. If the amateur hits such a fountain ball (a skied tee shot that has the same trajectory as one of those fountains in Italy) with another player’s driver, he has a lot of apologizing to do.
If you’re hitting the ball on the top side of your driver, you’re swinging the club on too much of a downward arc. What’s that mean, you ask? It means that your head is too far in front of the ball (toward the target side of the ball) and your left shoulder is too low at impact.
Here’s what to do:
1. Go find an upslope.
2. Stand so your left foot (if you’re right-handed) is higher than your right.
3. Tee the ball up and hit drivers or 3-woods until you get the feeling of staying back and under the shot.
The uphill lie promotes this feeling.
Here’s a secret: People who hit down on their drivers want to kill the ball in front of their buddies. These golfers have a tremendous shift of weight to the left side on the downswing. If you hit balls from an upslope, you can’t get your weight to the left side as quickly. Consequently, you keep your head behind the ball, and your left shoulder goes up at impact. Practice on an upslope until you get a feel and then proceed to level ground. You’ll turn your pop-ups into line drives.
Suffering from a power outage
Every golfer in the world wants more distance. Tiger Woods and Michelle Wie want more distance. We want more distance, and we’re sure you do, too. For that, you need more power. Here’s how to make it happen:
Turn your shoulders on the backswing. The more you turn your shoulders on the backswing, the better chance you have to hit the ball longer. So really stretch that torso on the backswing — try to put your left shoulder over your right foot at the top of your swing. Thinking that you’re turning your back to the target may help.
If you’re having difficulty moving your shoulders enough on the backswing, try turning your left knee clockwise until it’s pointing behind the ball during your backswing. This setup frees up your hips, and subsequently your shoulders, to turn. A big turn starts from the ground up.
Get the tension out of your grip. Hold the club loosely; you should grip it with the pressure of holding a spotted owl’s egg. If you have too much tension in your hands, your forearms and chest tighten up, and you lose that valuable flexibility that helps with the speed of your arms and hands.
1. Tee up your driver in the normal position.
2. Place the ball off your left heel and/or opposite your left armpit.
3. Now reach down, not moving your stance, and move the ball toward the target the length of the grip.
4. Tee up the ball there; it should be about a foot closer to the hole.
5. Address the ball where the normal position was and swing at the ball that’s now teed up.
To hit that ball, you have to move your hips to the left so your arms can reach the ball, thereby causing you to extend your right arm.
Practice this drill 20 times. Then put the ball back in the normal position. You should feel faster with the hips and feel a tremendous extension of your right arm.
Getting Solid Ball Contact
Less-than-solid contact is the payoff you get for a bad day’s work on fundamentals. It happens to everyone. The cure is to review — and apply — a few reliable swing basics.
Topping the ball
Topping isn’t much fun. Plus, it’s a lot of effort for very little return. Topping is when you make a full-blooded, nostrils-flaring swipe at the ball only to tick the top and send the ball a few feeble yards. Topping occurs because your head is moving up and down during your swing. A rising head during your downswing pulls your shoulders, arms, hands, and the clubhead up with it. Whoops!
To whip topping, you must keep your head from lifting. The best way to do that is to establish a reference for your eyes before you start the club back. Stick an umbrella in the ground just beyond the golf ball, as shown in Figure 1-7. Focus your eyes on the umbrella throughout your swing. As long as you stay focused on the umbrella, your head and upper torso can’t lift, which ends topped shots.
Figure 1-7: The umbrella drill can help you avoid topped shots.

Avoiding the worm burner
Do worms fear your dreaded worm-burner drives? Does your drive look like a scared cat skittering along the ground? If you’re having this problem with your driver, make sure your head stays behind the ball at address and at impact. Moving your head back and forth along with your driver can cause too low a shot.
Drivers come in different lofts. If you’re hitting the ball too low, try a driver that has 11 to 12 degrees of loft.

Duffing and thinning chip shots
Duffing and thinning are exact opposites, yet, like the slice and the hook we describe earlier in the chapter, they have their roots in a single swing flaw (see Figure 1-8).
When you duff a chip (also called a chili-dip), your swing is bottoming out behind the ball. You’re hitting too much ground and not enough ball (also called hitting it fat), which means that the shot falls painfully short of the target and your playing partners laugh outrageously. Duffing a chip is the one shot in golf that can get you so mad that you can’t spell your mother’s name.
If you continually hit duffs, jam an alignment stick or old club shaft into the ground. Get your nose to the left of the stick, which moves the bottom of your swing forward. Doing so allows you to hit down on the ball from the right position. Make sure that your head stays forward in this shot. Most people who hit an occasional duff move their heads backward as they start their downswings, which means that they hit behind the ball.
Thinned chips (skulls, as they call it on tour) are the opposite of duffs. You aren’t hitting enough ground. In fact, you don’t hit the ground at all. The club strikes the ball above the equator, sending the shot speeding on its merry way, past the hole into all sorts of evil places. You need to hit the ground slightly so the ball hits the clubface and not the front end of the club.
If you’re prone to hit an occasional skull, set up with your nose behind or to the right of the ball, which moves the bottom of your swing back. When you find the right spot, you hit the ball and the ground at the same time, which is good. We’ve found that most people who hit their shots thin tend to raise their entire bodies up immediately before impact. Concentrate on keeping your upper torso bent the same way throughout the swing.
Figure 1-8: The cure for chipping nightmares.


Worrying about backspin
How can you back up the ball like the pros on the tour? People ask this question all the time. The answer: The more steeply you hit down on the ball and the faster you swing, the more spin you generate. People who play golf for a living hit short irons with a very steep angle of descent into the ball, which creates a lot of spin. Their swings get the clubhead moving quickly, creating force that adds more spin. They also tend to play three-piece golf balls with relatively soft covers — balls that spin more than the two-piece ball most people play. (Chapter 1 of Book I explains the different types of golf balls.)
They also play on grass that’s manicured and very short so they can get a clean hit with the club off these fairways. All these considerations help when you’re trying to spin the ball.
The good news: You don’t need to spin the ball like the pros. Spin is simply a way of controlling the distance a ball goes. All you need is a consistent swing that hits the ball predictable distances. Whether the ball backs up or rolls forward to get to the target doesn’t matter.
So there: Do you like how we made that swing fault disappear?
Missing the Target
Why doesn’t the ball go where you aim it? Maybe it wants to, but you’re giving it bad directions like a busted GPS. Here are three common directional maladies, with remedies.
Pushing
The push is a shot that starts right of the target and just keeps going. It’s not like a slice, which curves to the right (see “Slicing and hooking” earlier in the chapter); the push just goes right. This shot happens when the body doesn’t rotate through to the left on the downswing and the arms hopelessly swing to the right, pushing the ball in that direction.
Hitting a push is like standing at home plate, aiming at the pitcher, and then swinging your arms at the first baseman. If this scenario sounds like you, here’s how to hit one up the middle: Place an alignment stick or a wooden 2-by-4 parallel to the target line and about 2 inches beyond the golf ball. If your arms go off to the right now, splinters are going to fly. Naturally, you don’t want to hit the stick, so you swing your hips left on the downswing, which pulls your arms left and cures the push.
Pulling
The pull is a shot that starts left and stays left, unlike a hook, which curves to the left. (Check out the earlier section “Slicing and hooking” for more on fixing hooks.) The pull is caused when the club comes from outside the target line on the downswing and you pull across your body.
Hitting a pull is like standing at home plate and aiming at the pitcher but swinging the club toward the third baseman, which is where the ball would go. This swing malady is a little more complicated than a push, and picking out one exercise to cure it is more difficult, so stay with us.
Pulls happen when your shoulders open too quickly in the downswing. For the proper sequence, your shoulders should remain as close to parallel to the target line as possible at impact. Here’s a checklist that can help you cure your pull:
Check your alignment. If you’re aimed too far to the right, your body slows down on the downswing and allows your shoulders to open at impact to bring the club back to the target.
Check your weight shift. If you don’t shift your weight to your left side on the downswing, you spin your hips out of the way too quickly, causing your shoulders to open up too quickly and hit a putrid pull. So shift those hips toward the target on the downswing until your weight is on your left side after impact.
Check your grip pressure. Too tight a grip on the club causes you to tense up on the downswing and come over the top for a pull.
Check your distance from the ball. If you’re too close, you instinctively pull inward on your forward swing — which means pulling to the left.
Spraying the ball
If your shots spray (take off in more directions than the compass has to offer), check your alignment and ball position. Choose the direction you’re going and then put your feet, knees, and shoulders on a line parallel to the target line. Be very specific with your alignment.
Ball position can play a major part in spraying shots. If the ball is too far forward, you can easily push it to the right. If the ball is too far back in your stance, you can easily hit pushes and pulls. The driver is played opposite your left armpit. (Flip to Chapter 1 of Book III for more on ball placement.)
Here’s a check-up for your ball position: Get into your stance — with the driver, for example — and then undo your shoelaces. Step out of your shoes, leaving them right where they were at address. Now take a look: Is the ball where it’s supposed to be in your stance? Two suggestions: If it’s a wet day, don’t try this exercise. And if your socks have holes in them, make sure nobody is watching.
Avoiding Shanks and Point-Blank Misses
They’re two of the most-feared mishaps in the game: the short putt and the shank. Shanks can strike when you least expect, sending the ball squirting sideways while you shake your fist at the golf gods. Short, point-blank putts that somehow miss the hole can be just as aggravating — or more aggravating, if you just lost a match by missing one.
But don’t despair! The following sections offer simple fixes to these vexing visitations.
Shanking
Flash back a few centuries: Alone with his sheep in a quiet moment of reflection, a shepherd swings his carved crook at a rather round rock toward a distant half-dead, low-growing vine. The rock peels off the old crook, and instead of lurching forward toward the vine, it careens off at an angle 90 degrees to the right of the target. “Zounds! What was that?!” cries the shocked shepherd. “That was a shaaank, you idiot!” cries a sheep. “Now release the toe of that stick, or this game will never get off the ground!”
This story has been fabricated to help with the tension of a despicable disease: the shanks. A shank (also called a pitchout, a Chinese hook, El Hosel, a scud, or a snake killer) occurs when the ball strikes the hosel of the club and goes 90 degrees to right of your intended target. (The hosel is the neck of the club, where the shaft attaches to the clubhead.) The shanks are a virus that attacks the very soul of a golfer. They come unannounced and invade the decorum of a well-played round. They leave with equal haste and lurk in the mind of the golfer, dwelling until the brain reaches critical mass. Then you have meltdown. The shanks sound like one of those diseases Hollywood folks make movies about. And to a golfer, no other word strikes terror and dread like shank.
Can you cure the shanks? Yes!
Shankers almost always set up too close to the ball, with their weight back on their heels. As they shift forward during the swing, their weight comes off their heels, moving the club even closer to the ball, so the hosel hits the ball.
When you shank, the heel of your club (the closest part of the clubhead to you) continues toward the target and ends up right of the target. To eliminate shanks, you need the toe of the club to go toward the target and end up left of the target.
Here’s an easy exercise (shown in Figure 1-9) that helps cure the shanks:
1. Get a 2-by-4 and align it along your target line.
You can also use a cardboard box.
2. Put the ball 2 inches from the near edge of the board and try to hit the ball.
If you shank the shot, your club wants to hit the board. If you swing properly, the club comes from the inside and hits the ball. Then the toe of the club goes left of the target, the ball goes straight, and your woes are over (the shanking ones, at least).
Missing too many short putts
Some people argue that putting is more mental than physical. But before you resort to séances with your local psychic, check your alignment. You can often trace missed putts to poor aim.
You can work on alignment in many ways, but my colleague Peter Kostis invented a device called The Putting Professor to help straighten out troubled putters. It’s similar to an old, tried-and-true putting aid, the string between two rods, which helped golfers keep the putter going straight back and straight through impact toward the hole. Straight as a string, get it?
Figure 1-9: Just say, “No shanks!”

But Peter had a better idea. The Putting Professor features a plexiglass panel and a metal bar that attaches to your putter (see Figure 1-10). Keep the bar in contact with the plexiglass as you practice, and you groove a smooth stroke that keeps the face of your putter square to the target. This stroke is particularly important on those knee-knocking short putts.
Figure 1-10: The Putting Professor keeps a putter’s face square to the target.

Of course, you can’t use such a device during a round of golf. But after you develop the right stroke on the practice green, you can repeat it on the course — and watch those putts roll straight and true.
An important lesson you can learn with devices like The Putting Professor is the crucial relationship between the putter’s face and the target line. Putting takes imagination: If you can picture the line and keep the face of your putter square to it, stroking the ball along that line to the hole is easy.