CHAPTER 4
Classic Pilates Mat Exercises
It's time to dive into your Pilates practice. I've put together the original 34 classic Pilates mat exercises to get you on the mat and moving right now. This list includes full descriptions with pictures and key points to ensure you have all the study materials you need to properly perform, practice, and master your Pilates training.
In addition to the classic mat exercises, I've included modifications and add-ons for each exercise. Depending on your skill level, you may choose to begin practicing and mastering the modifications, honing the original exercises before moving on to the add-ons.
The add-ons increase the challenge and difficulty level of each exercise by incorporating more core stability, movement, focus, flexibility and strength. I have added an“Intensity Meter”, and so each add-on is listed in order of difficulty (Level 1, Level 2, Level 3, and occasionally the dreaded Master), giving you a clear ladder of progression. As your mind and body build, so do your exercises and flows. Remember: Pilates always meets you where you are.
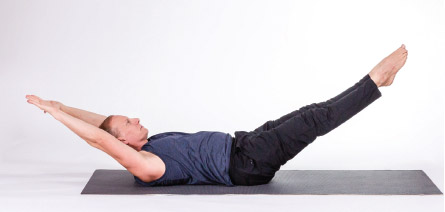
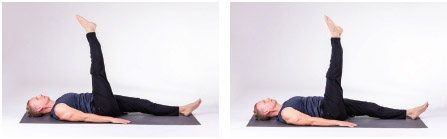
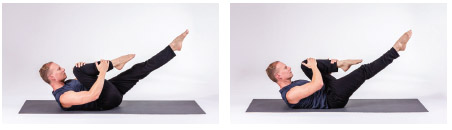
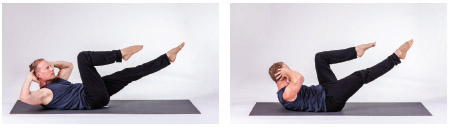
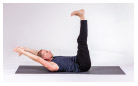
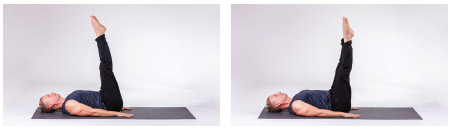
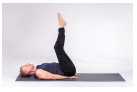
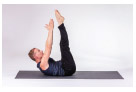
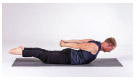
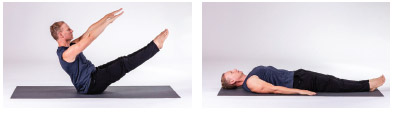
▇ PILATES 100
AREAS TARGETED: Core, shoulders, adductors and quads

This exercise signals the official start of your Pilates workout—and we're starting with a bang that puts your muscles on notice!
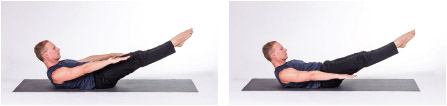
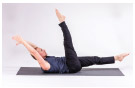
- Lie on your back, draw your legs to tabletop position and peel the head and shoulder off the mat while raising your arms to the sides. Make sure your low back is imprinted against the mat.
- Extend the legs and zip them up into Pilates stance (page 23) with the heels together and feet pointed. Deepen the pull of your abdominals to prepare for the incoming movement.
- While breathing in for 5 counts and out for 5, pump the arms up and down together about 4-6 inches while sinking the shoulders down and back and expanding the chest. Keep the abdominals pulling into the spine on the exhales. The pumping of the arms is in unison with your breath and will last for 100 counts—hence the name of the exercise.
Key Points
- The Pilates 100 is a beautiful demonstration of core stability in action. The core must work extra hard to stabilize the body against the vigorous movement of the arms. Focus on using your center as an anchor against those pumping arms. You can increase the difficulty by lowering your legs closer to the floor, making your core work harder.
- Keep the chin tucked down towards the chest with enough space in between for a small apple. You will feel a nice stretch in the back of your neck and avoid any undue strain. You may also keep your head on the floor (or use a pillow or rolled up towel) if the strain of lifting your head off the floor is too much. (This applies for all the exercises in this book.)
- All the pumping married with the staccato breaths saturates your muscles with oxygen and strengthens the lungs.
Add-ons
LEVEL 1
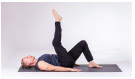
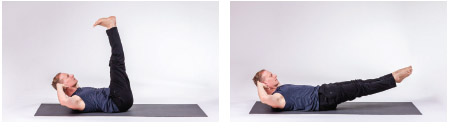
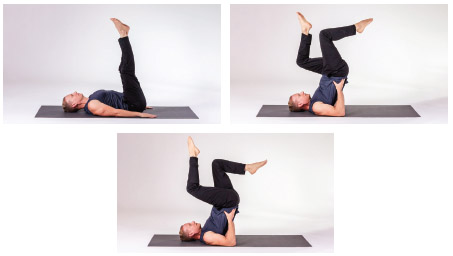
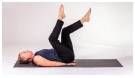
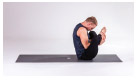
Single Leg Stretch 100: This is an addition to the Single Leg Stretch exercise which you'll learn shortly in the classic 40. Keeping the 100 arm position, draw your right knee in at a 90 degree angle and extend your left leg 45 degrees off the ground or lower (as long as the lower back stays flat). The chin is tucked the same way as the 100 as you inhale for 5 while you pump your arms 4-6 inches and switch your legs in a controlled, smooth movement. Exhale for 5, continuing to pump the arms and return to the starting position. Repeat for 100 breaths. Force the muscles to strengthen with movement and constant disruption.
LEVEL 2
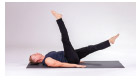
Scissors 100: From Single Leg Stretch 100, simply extend the legs and point the feet. Now you're in a position for the Scissors, which adds more weight and inertia to the movements. Scissor the legs with the constant 5 breaths in and 5 breaths out, all while pumping the arms in a controlled manner. Repeat for 100 breaths. The calibration of the movement between the arms and legs takes practice; Pilates has a lot of moving parts which must synchronize in order for the flow to ignite. Just remember that practice makes the master. When you feel confident with the precision of this exercise, it's time to move on.
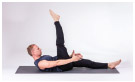
LEVEL 3:
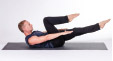
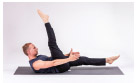
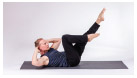
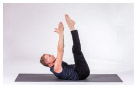
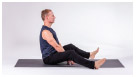
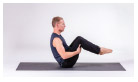
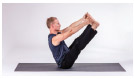
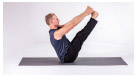
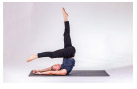
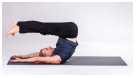
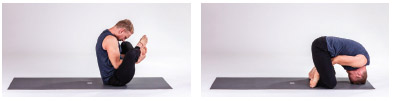
Boat 100: Pop your body up to Boat position. Boat is a classic yoga pose and one which is going to ramp up the core stability, balance and intensity of the 100 exercise, in addition to strengthening the hip flexors which attach the inner thigh bones to the front of the spine. From a seated position, bring your legs to tabletop position (you can also extend your legs to full boat pose, which is brutal) sitting on your sit bones and tailbone. Keep the same chin and arm position as the standard 100 as you once again pump the arms 4-6 inches, palms down and to the precise rhythm of 5 counts in and 5 counts out, in the nose and out the mouth for 100 pulses. It's always in the nose and out the mouth in Pilates; we perform so much better and more efficiently with a constant reinforcement of deep, focused breaths.
You will find the core stability to be rather severe in this pose due to the extra balance adding to the disruption of the core. Just holding Boat is demanding and with the glorious intrusion of the pumping arms, it forces your body and mind to dig deeper and maintain the movement without falling over. You may also extend your legs out on the 5-count inhale and draw them back to Boat with the 5-count exhale.
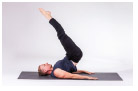
MASTER
Arms Overhead 100: Now we come to the final variation in the 100 series. We could almost base an entire workout on just this progression of exercises; they are such a dynamic demonstration of discovering, building and putting into practice the eight principles of Pilates listed in Chapter 1. Movement which progressively builds on itself develops the body naturally with very minimal side effects to hinder our practice. That is why this exercise is listed at “Master” intensity level. It enables you to work your way up and master not only the exercise but the movement. Your goal as an athlete is to always perform better, move better, react faster.
Lying on your back, extend the arms overhead and the legs extended in Pilates stance. Imprint your low back into the mat with a strong pelvic tilt. Pump your arms up and down palms up with the 5 count in and 5 count out. Your core will explode in all directions as it works overtime to anchor the body against the weight of the extended arms and legs. Repeat 100 times.
You may also direct the legs as in Single Leg Stretch or the Scissors. Work your way outward from the core and experience your body strengthening in real time towards effortless movement on the field, court and snow hill.
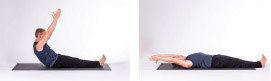
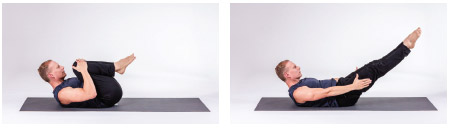
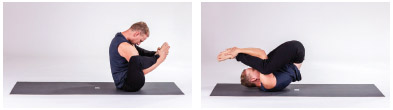
▇ THE ROLL UP
AREAS TARGETED: Core, spine and legs

This exercise forces you to get to know your spine and integrate fluidity.

- Begin seated, with legs extended together. Inhale and reach your arms overhead.
- Exhale, flex your feet and hinge up and over the legs, bringing your hands to both sides of your heels. Inhale and reverse the exercise as if you're stacking your spine against a wall.
- Inhale and reverse the exercise as if you're stacking your spine against a wall.
- Exhale, tuck your chin to your chest and roll down one vertebra at a time, squeezing the legs together.
- Finish exhaling and extend your arms overhead.
- Inhale, lift your arms to the ceiling, exhale, and peel your spine off the mat one vertebra at a time. Repeat the exercise 5-10 times.
Key Points
- The roll up needs to be performed at the same speed through the entire exercise. Someone watching you perform it should not be able to perceive where the exercise begins, but rather should see a constant flow. There will be an urge (or necessity) to use momentum at certain points, but practice smoothing those “jerky” movements out. The key word is control.
- Use the “C-Curve” in this exercise, which is the rounding of the back and spine like a wheel (or the letter “C”) for the smoothest, healthiest roll down and roll up. You want to fully articulate the spine from top to bottom of the movement. This also means tucking your chin to your chest on the roll up and roll down. This exercise requires a flexible, durable spine.
- Squeeze your legs together for the entire evolution of the exercise to create more stability and add some extra leg work.
- Focus on the contraction of the abdominals to prevent your feet from lifting off the mat. I call it “flying feet”. If focus is taken away from the abdominal engagement, the feet will rise and disrupt the flow. Keep your belly button to your spine on the exhales, and keep the foundation in your center.
Modification
I call this the Half Roll Back. It has all the mechanics of the roll up, but you only roll down about halfway, keeping the C-Curve in the spine. Then, reverse and continue, practicing control the entire time.
Add-ons
LEVEL 1
Roll Up Twist: Clasp your hands together with your index finger and thumb pointed out and add a seated twist with your arms extended forward. Do 4 twists (2 to each side) keeping the shoulders down, the upper body tall and the chest open. Continue the exercise with spine stretch forward, etc. Repeat 5-10 times.
LEVEL 2
Roll Up Saw: Adding the Saw (page 78) to the roll up builds rotational power, plus adds an extra challenge to the core traveling through the movement with the legs placed wider. Perform the entire roll up exercise with your feet at the edge of the mat. When you arrive at the seated position after rolling up, twist and dive the left hand so the pinky finger slices the pinky toe for two pulses with two breaths. Inhale tall to the center and repeat on the other side, then continue with the spine stretch forward. Repeat 5-10 times.
LEVEL 3

Roll Up Mudra: The mudra adds an intense shoulder and chest stretch to the roll up. As you roll up, bring your arms behind you and lace your fingers togethers into a bind. Keep hinging forward into the spine stretch, leading with the crown of your head and drawing your hands and arms behind you. Inhale, release the bind, raise your arms overhead as you return to sitting and continue the exercise. Practice 5-10 repetitions.
MASTER

Roll Up Boat: As you roll up, skip the seated position and cruise smoothly into Boat pose with your knees bent, feet off the mat and arms to the sides. Other options include extending your legs into full Boat or extending the legs and grabbing your ankles/feet for extended Boat. Any of these options provides the opportunity for more core engagement, flexibility training and balance practice. Coming out of Boat, slide the legs forward and continue into spine stretch. Repeat 5-10 times.
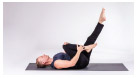
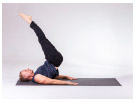
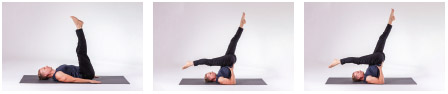
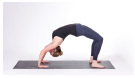
▇ THE ROLL OVER
AREAS TARGETED: Core, hamstrings, calves and spine

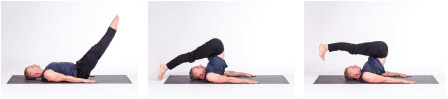
- Lie on your back, arms against your sides, palms down and legs extended about 45 degrees off the mat. The toes should be pointed, heels together and legs zipped together in Pilates stance.
- With an electrifying exhale, activate your deep and powerful abdominal muscles to lift your legs up and over your head while smoothly peeling your spine off the mat like a wheel. Touch your toes to the floor.
- Inhale, lift your toes off the floor and flex your feet, sending a deep stretch down the back of the legs. Continue squeezing the legs together.
- Exhale, contract the abdominals (belly button to spine) and slowly roll down with extreme control and return to the starting position. Repeat 4-8 times.
Key Points
- Eliminating the use of momentum is key in this exercise. The roll over needs to be fluid and under constant control, which protects the spine from any undue stress and utilizes the core muscles. The arms act as extra support and offer some assistance with the movement, but the emphasis is centered in the powerhouse (core).
- The hips stay evenly aligned and lifted through the movement with the weight of the legs not crushing your chest and stomach. Minimal weight on the head and neck is preferred. Your neck should not feel sore. I teach that the jaw and face are in a neutral, relaxed position. You'd be amazed at how much stress the face can hold and transfer downward through the body.
Modification

The roll over is not for everyone, so you can practice this exercise with the knees bent and rocking forward and back, keeping your low back on the mat. Inhale, rock the legs away and exhale as you draw them towards the face. Repeat 5-10 times.
Add-ons
LEVEL 1

Open/Close Legs Roll Over: This variation adds an open leg posture as you roll over and then seals the legs together on the roll back. Or, you may reverse it with legs closed rolling over and open on the roll back. Keep the same strict control on the rolling of the spine. Do 4-8 times.
LEVEL 2
Spine Massage: At the end of the roll over, bend the knees and bring the toes to the ground so your legs are framing your face. Hold it here for 1-2 extra breaths for a deeper back and spine stretch. Roll down to original position. Repeat 4-8 times.
LEVEL 3

Roll Over to Boat: That pesky Boat keeps making an appearance. This variation deftly challenges your ability to control the body while flowing through a continuous movement from the roll back, up into a stable, balanced Boat pose. Exhale as you lower the upper body down first, followed by the legs, to the original roll over starting position. You are using a mixture of control and a pinch of momentum on the journey from roll over to Boat—just a pinch. Eventually you will achieve 100 percent fluidity.
MASTER
Arms Overhead Roll Over: The add-on portion here is simply placing the arms overhead, but the magnitude of the exercise will almost double. Extend your arms overhead, either on the mat or off, and perform the complete roll over. No longer do you have the strong foundation of the arms on the floor so the core becomes the motor and guide from top to bottom. This variation requires constant practice adhering to the eight Pilates principles.
▇ ONE LEG CIRCLES
AREAS TARGETED: Core, hamstrings and hips

- Begin lying on your back and arms to your sides on the floor. Extend the right leg to the ceiling and extend the left leg forward onto the ground.
- Inhale and circle the right leg in a full circle the size of a frisbee to the right and exhale as it returns to the 12:00 position (starting position). Pause for a moment and continue doing 10 circles before reversing the direction for 10 more. Perform on both sides.
Key Points
- Sink both hips down into the mat to avoid needless jostling, which interferes with the flow. Nothing should move except for the leg which is circling. Stabilize the body against that circular movement.
- Sink the shoulders down and away from the ears. Your upper body posture remains solid while sinking the low back into the mat.
- Men may have more of a struggle with this exercise because of a tightness in their hamstrings and low back. Place your hands under your hips, and bend the circling leg or bend the bottom leg with your foot flat on the ground to lower the intensity.
Modification
You have two options to quickly modify this exercise: Perform the circles with your knees bent, or bend the bottom leg and place your foot flat on the ground. You may also place your hands under your hips for more low back support. All smooth options which will keep your circles sailing onward.
Add-ons
LEVEL 1

Full Circles: From the same position, increase the size of the circle in both directions to a complete circle. This means creating a wide arc which circles outward, crosses the other leg, and swings around to the starting position. This extra range of motion will increase the pull on your lower back so be cautious. You may steadily expand the size of your circles over time as your body adapts. Do 5-10 repetitions in both directions and with both legs.
LEVEL 2
Arms Elevated One Leg Circles: From the starting position, either lift your arms off the mat, keeping them by your side, or else extend them over your head. This will eliminate arm support and force the core to work harder to compensate and stabilize your center. Do 5-10 repetitions in both directions and with both legs.
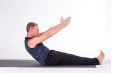
▇ ROLLING LIKE A BALL
AREAS TARGETED: Core, spine and lungs

We're putting your Pilates “C-Curve” proficiency to the test.

- Begin in a seated position and draw your knees towards you, lifting your feet off the mat and placing your hands on your ankles or knees. Tuck your chin and round the upper back in a “C-Curve”.
- Inhale and roll back one vertebra at a time until you make contact with your shoulders.
- Keeping your chin tucked and back rounded, exhale and reverse the roll back to starting position. Hold and balance that position for a breath before resuming the exercise. Do 4-6 repetitions.
Key Points
- Your goal for this exercise is to do it as slowly and effortlessly as possible.
- In addition to rolling back to the shoulders, your butt and feet need to be pointed towards the ceiling to ensure good posture. Allow your shoulders and arms to be relaxed through the movement.
- Think small. Imagine your body is a very small ball rolling up and down. This visual will help with the flow. Keep your head close to your knees and stay in a straight line up and down. No momentum, no jerky motions; smooth and fluid is healthy for the spine.
Modification
Rolling like a ball is a very tricky and unique exercise, so leaving it out of your training is fine. Rolling is not for everyone and if your spine is not rolling fluidly up and down, it's definitely not for you. Practice balancing in the original position or move into Boat pose. Hold for a solid 5-10 breaths.
Add-ons
LEVEL 1
Rolling Like a Ball to Extended Boat: Continue rolling up and transition into Extended Boat pose. Hold for 1-3 breaths, return to starting position and continue. The transition requires a lot of control, balance and precision and stretches the backs of the legs while giving your core an extra blast. Do 4-6 repetitions.
▇ CLASSIC BIG FIVE #1: THE ONE LEG STRETCH
AREAS TARGETED: Core, hips, low back and legs
ALL SPORTS
This marks the first of five powerful abdominal exercises, popular as a sequence and even useable as a standalone workout. The One Leg Stretch teaches precise balance and coordination through motion and moving from your center.
- Rolling onto your back, place your hands on your knee and pull it to your chest. Extend the other leg away and slightly off the ground. Lift your head, neck and shoulders off the mat and contract the abdominals while exhaling. Point your toes.
- Inhale, switch the legs and pull your left knee into your chest while exhaling, keeping a straight line without swaying left or right. Do 10-20 repetitions.
Key Points
- Being the first exercise in the “Big 5”, you must focus on moving at a steady rhythm and with energy.
- Pull your knee towards your face and down into your chest with a burst of force. You should feel a stretch in your knee and low back.
- The closer the extended leg is to the floor, the more challenge it places on your core to anchor your low back to the floor.
- Your hands may be placed either on the knee, or else have the outside hand on the ankle and the other on the inside of the knee.
Modification
Reach the extended leg towards the ceiling to lessen the weight on the low back. You may also keep your head on the ground or place it on a pillow, rolled up towel or yoga block. This applies to all exercises performed in a supine (on your back) position.
Add-on
LEVEL 1
Take the Legs Lower: Lower the leg closer to the ground for more core overload. You may also add a chest lift each time the knee is brought close.
▇ CLASSIC BIG FIVE #2: SINGLE STRAIGHT LEG STRETCH
AREAS TARGETED: Core, hamstrings and low back
ALL SPORTS
My go-to exercise for an unbeatable combo of explosive and effortless movement, core strength and flexibility training.

- Lying on your back, extend your right leg to the ceiling and lengthen your left leg in front of you off the mat. Peel your head and shoulders off the mat while gently grabbing your right ankle or calf. Exhale twice as you pulse the leg towards you twice and contract the abdominals.
- Inhale and switch (scissors) the legs and grasp the left leg for two pulses with the breath. Stabilize against the movement of the legs. Perform 5-10 repetitions.
Key Points
- This exercise moves at a brisk pace with quick changes of leg direction. Infuse that movement with breath and work on having zero strain in your core. Feel the lungs working with each exhale.
- Add an extra chest lift as you bring your leg towards you for a deeper contraction. Think of delivering your nose to the knee.
- Keep your spine flat on the mat during the duration of the movement and your elbows facing outward for more room to move.
Modification

Keep the knees bent and grab lower on the legs. You may also keep your head on the mat to avoid neck strain.
Add-ons
LEVEL 1
Arms to the Sides: Pull your arms to the sides the palms facing inward and perform the same leg movements. Now you are scissoring the legs and pulsing twice, all without the support of the hands. More work is designated to the core, hamstrings and hip flexors. Repeat 10-20 times.
LEVEL 2
Arms Overhead: Extend your arms overhead with palms facing inward and perform the exercise. This further destabilizes the body as it struggles to adapt to the movement while you remove more methods of support. Repeat 10-20 times.
LEVEL 3

Tornado Single Straight Leg Stretch: Either with your arms to the sides, overhead, or with your hands grasping your right leg, begin this challenging variation on a classic. Inhale and circle your legs around, bringing the left leg towards your chest as you would in the original variation. Exhale as the leg is pulled close, inhale and circle back. Exhale, drawing the right leg to the starting position. Repeat 10-12 times.
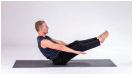
▇ CLASSIC BIG FIVE #3: THE DOUBLE LEG STRETCH
AREAS TARGETED: Core, glutes, hips, shoulders and back
ALL SPORTS
Extends the limbs away and back to your powerhouse.
- Draw your knees close to the body and place your right hand on your right knee and your left hand on your left knee. Lift your head, neck and shoulders off the mat, chin tucked.
- Inhale and extend your legs with toes pointed and arms to the sides.
- Exhale and return to the starting position with your hands pulling your knees towards you and into your chest. Repeat 5-10 times.
Key Points
- Ignite the movement from the core and stretch your arms and legs completely with a slight softness in the joints.
- Use a good amount of force when pulling the knees into the chest. It needs to be a powerful, controlled stretch—no arching of the lower back.
- Practice applying a forceful inhale and exhale, completely filling and emptying the lungs. This is a great way to pump extra oxygen into your system and clean out leftover debris in the lungs.
Modification

Extend the legs on an angle higher to the ceiling for less pull on the core. You may also place your hands under your hips for more low back support.
Add-ons
LEVEL 1

Arm Extensions: Add in arms extending behind the head to create more work for the core. Inhale as you extend them overhead and exhale as you circle them back to the starting position, pulling the knees into the chest. Extend your legs closer to the ground for more core disruption. Repeat 5-10 times.
LEVEL 2
Star Extensions: This time, inhale and extend the arms and legs out into an “X” shape while reinforcing the low back imprint. Exhale and return to starting position, pulling the knees into the chest. Repeat 5-10 times.
▇ CLASSIC BIG FIVE #4: CRISSCROSS
AREAS TARGETED: Core (especially the obliques)
ALL SPORTS
Sometimes called the bicycle, this exercise is much more intense than it looks.
- Lying on your back, place your fingers lightly on the back of your head so they are not touching. Your elbows should be relaxed to the sides. Draw your right knee towards you at a 90-degree angle and extend your left leg so it's slightly off the floor. With an exhale, bring your head, neck and shoulders off the mat, lifting your chest towards your right knee, creating a twist.
- Inhale as you switch the legs and exhale as you activate the abdominals to bring the chest towards the left knee. Keep your elbows relaxed and out to the sides. Repeat 10-20 times.
Key Points
- Never, never, never bring your elbow to the opposite knee. I see this done all the time and it drives me crazy because it pulls the emphasis out of core and places it on reaching an elbow to a knee. This torques the neck, causing undue strain and pressure. So don't do it!
- Avoid dipping your upper body in the center while moving side to side. This disengages the core and pushes into your lower back. Keep your upper body lifted through the entire exercise.
- Keep the thigh on your bent leg pointed upward. This forces the core to work harder to lift the chest. There'll be an urge to bring the knees fully into the chest—resist it!
Modification

Place your feet flat on the ground with your knees bent. Place your fingers lightly on the back of your head and exhale as you lift the chest to the right knee while simultaneously bringing that knee towards the chest at a right angle. Perform 5-10 repetitions.
Add-ons
LEVEL 1

Double Pulse: Add an extra pulse to the Crisscross. Perform the exercise as is, but with two exhales as you quickly pulse the chest towards the knee twice. This deepens the abdominal contraction and increases lung strength. Do 10-20 repetitions.
LEVEL 2
Leg Lift Crisscross: This rachets up your core's ability to anchor your body. While performing Crisscross, lift the chest towards the knee, inhale, lift the opposite leg, exhale, and return it to the original position. Repeat on the other side. Do 10-20 repetitions.
LEVEL 3
Scissors: From Crisscross, extend the bent leg towards the ceiling. Then, scissor the legs while still lifting the chest to the opposite knee. The added weight of the extended legs will disrupt the core's ability to keep your body from moving, making for a fun challenge! Do 10-20 repetitions.
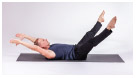
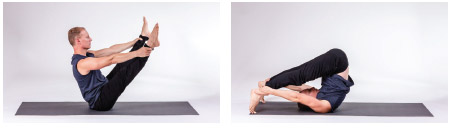
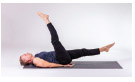
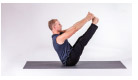
▇ CLASSIC BIG FIVE #5: DOUBLE STRAIGHT LEG STRETCH
AREAS TARGETED: Core and hamstrings
ALL SPORTS
The big finale of the classic Big 5 series!
- Beginning on your back, inhale as you extend both legs vertically. Curl your head, neck and shoulders off the mat and place your fingers gently on the back of your head with your elbows opened wide.
- Inhale, flex your feet and lower your legs together as far as possible while anchoring your low back into the ground.
- Exhale, point your feet and return them up to the starting position. Repeat 5-10 times.
Key Points
- This exercise is very intense on the low back, so don't hesitate to modify.
- The legs are in Pilates stance (page 23) here, so squeeze the legs together through the entire exercise.
- Begin and end with your legs at a perpendicular angle to the floor.
Modification

Bend both knees to decrease tension on the hamstrings and low back. You may also place your hands under your hips for more support and decease the range of motion of the exercise.
Add-ons
LEVEL 1
Arms Overhead: Extend your arms overhead by the ears to increase the intensity. Repeat 5-10 times.
LEVEL 2
Arms Overhead with Reach: As you lower your legs, extend your arms overhead and when your legs raise up, reach your hands towards your feet on the exhale. It's still a chest lift, but now the arms are along for the ride. Do 5-10 repetitions.
LEVEL 3
Tailbone Lift: At the top of the leg raise, squeeze deeper into your abdominals and lift your tail bone off the mat while keeping your legs extended towards the sky (it can be a very small lift). Exhale as you gently and with control lower your tail bone to the mat and continue lowering your legs. You may also pause for a split second before lifting your tail bone to ensure there's no momentum. Do 5-10 repetitions.
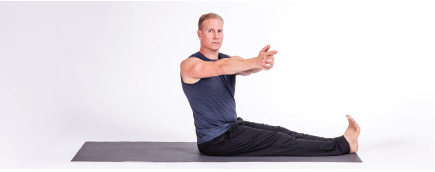
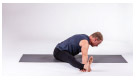
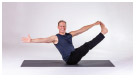
▇ SPINE STRETCH
AREAS TARGETED: Abdominals, calves, hamstrings and back

This exercise is a wonderful example of dynamic stretching: active stretching in which the muscles and joints are moved through a full range of motion.
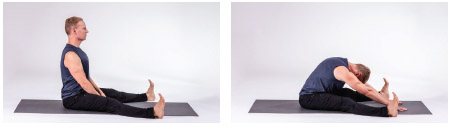
- From a seated position, extend and open your legs so your heels are on the edges of the mat and your knees are rotated towards the sky. Draw your toes towards you and sit up tall with your shoulders back and down, chest open and chin slightly tucked. Inhale.
- Exhale, chin to your chest, and place your fingertips on the ground. Hinge forward (into a C-curve) to the end of your range of motion.
- Inhale and return to the starting position as if you were imprinting your spine against a wall behind you, one vertebra at a time. Repeat 5-8 times.
Key Points
- When hinging forward, imagine lifting your abdominals up and over a beach ball. This visual will reinforce moving your abs up and in towards the spine. Vacuum out the breath on the exhale. Squeeze out every drop.
- If cramping in the leg occurs, relax and wiggle your ankles and feet.
- Imagine someone pulling you forward from your hands to ensure maximum stretch and spinal articulation in the spine and back. Press the backs of your knees down to ignite the hamstrings and calves in a stretch for the ages.
Modification
Bend the knees to release tension in your low back and hamstrings.
Add-ons
LEVEL 1
Mudra Spine Stretch: When hinging forward, circle your arms behind you into the mudra bind and lead with the crown of your head. Continue pulling your arms back and up the further forward you hinge. Release the hands to the floor in front of you, inhale and return to the original position.
LEVEL 2
Hands Under Ankles: This requires an added supply of flexibility. Don't force the movement, use the breath. As you exhale forward, snake your hands under your ankles, tucking the chin and hinging the crown of your head forward. It's a much deeper stretch in the back. Inhale and return to the original position.
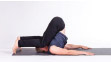
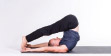
▇ OPEN LEG ROCKER
AREAS TARGETED: Core, hamstrings, spine and back

The natural, more challenging extension of Rolling like a Ball.
- From a seated position, grasp your ankles and lengthen them up so they are a little wider than shoulder-width. Make a “V” shape and point your feet. Sink your shoulders down and open the chest. Find the balance of this position before moving forward.
- Inhale as you tuck your chin to the chest and round the back into our beloved C-curve once again, and roll back to the shoulder blades. Keep your arms straight.
- Exhale, activate the abdominals for the journey back, and roll the spine until you return to the starting position of the exercise. Find the balance for a breath and continue. Do 4-8 repetitions.
Key Points
- Without deep core strength and control, this exercise will not succeed. This exercise can be intimidating so modify as needed.
- Keep a strong grip on the ankles because if you let go halfway through . . . well, you don't want that.
- Do not roll onto the back of your head and neck! Roll onto the backs of your shoulders.
Modification
You may also grab the calves, shins or hamstrings and bring the legs wider. Open Leg Rocker is an advanced move, so there's no shame in leaving it out until you build the proper strength and control.
Add-ons
LEVEL 1
Grasping the Feet: Instead of holding the ankles, grab your feet as you perform the exercise. This supplies more weight to the rolling and forces you to control and slow down the movement.
LEVEL 2
Legs Together: Grasping your ankles, feet or toes, bring your legs and feet together for the exercise. This takes tremendously more balance and control.
▇ CORKSCREW
AREAS TARGETED: Core and legs

- Lie on your back and extend your legs to the ceiling. Zip your legs into Pilates stance with heels together and feet pointed. Your head is down and arms on the ground against your sides.
- Inhale and move your legs to the right in a full circle (the size of a frisbee).
- Exhale as you return to the starting position (the 12 o'clock position) and pause for a second. Repeat 5-10 repetitions in both directions.
Key Points
- This exercise ripples intensely across the abdominals: rectus abdominis, transversus abdominis and the obliques. Even with a small circle, the intensity can be unbearably challenging. Corkscrew the circles with precision and control.
- Even with the big leg movement happening, the rest of your body is relaxed and aligned. Avoid the shoulders creeping into the ears and stabilize the core.
- Eliminate momentum by slowing it down, especially your toughest spots. Test this by creating larger circles.
Modification
Bend your knees to release tension on the hamstrings and low back. You may also place your hands under your hips for more support.
Add-ons
LEVEL 1

Arm Lift: Lift your arms off the ground a couple inches and perform the exercise. Note that lots of instability has now been added. You may also extend your arms overhead for more instability.
LEVEL 2
Reach to the Sky: Curl your head, neck and shoulders off the mat and reach your hands to your feet after each time you complete a circle. The lift comes from the abdominals.
LEVEL 3
Tail Bone Lift: After the circle, continue inhaling, squeeze deep in the abdominals and lift your tail bone slightly off the ground. Exhale as you gently and with control lower yourself down. Keep your legs straight and work to transfer the motor out of your arms and place it exclusively in the core. The core moves and anchors the lift.
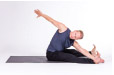
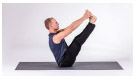
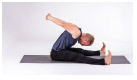
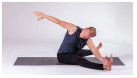
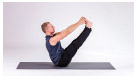
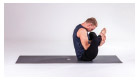
▇ THE SAW
AREAS TARGETED: Core, hamstrings and calves

This was my dear dad's favorite exercise and I always do it in honor of him.

- Sit tall with your arms side to side and open your legs so your heels are on the edges of the mat. Draw your toes towards you.
- Inhale and twist to the right from the waist. Stay tall in your posture.
- Exhale twice as you hinge forward and pulse your left pinky finger across your right pinky toe. Slice the toe with your finger! Do two pulses connected to the breath. Turn your head to look at your right arm. Inhale and return tall to the center and flow to the other side. Do 5 pulses on each side.
Key Points
- The Saw has the honor of twisting and stretching at the same time, which has the effect of “wringing” out your lungs.
- You have an opportunity to master the Pilates breathing technique with this exercise. The inhales help lift your upper body and the exhales assist in lengthening up and over the leg. Let the second breath on the pulse completely empty the lungs of air.
- The arms are always extended, straight and reaching in opposite directions.
Modification

Bring the legs closer together and bend the knees.
Add-on
LEVEL 1
Straddle Saw: The Saw is almost a perfect exercise, so I don't like to meddle with it much. The one add-on I do teach is to open the legs wider in a straddle stretch. This only works if you are very flexible and can maintain precision and good form throughout.
▇ SWAN DIVE
AREAS TARGETED: Spine, core, back and glutes

The workout takes an abrupt change with the Swan Dive.

- Turn yourself over onto your stomach and place your hands under your shoulders. Draw your shoulders back and place your forehead on the ground.
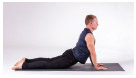
- Inhale as you press up into an upward facing dog (see page 184) position with the chest tall and elbows hugging the ribs.
- Exhale and explode as your arms swing back behind you and your legs lift off the ground in a rolling motion. The rolling is similar to what we've done on your spine, but this time onto the ribs and stomach.
- Inhale and roll back to the upward facing dog position. Catch yourself for a second and continue. Repeat 4-6 times.
Key Points
- This exercise takes a tremendous amount of precision, control and flow. If any (or all) of these three aren't happening, do the modification or simply leave it out of your routine.
- When in upward facing dog, contract your glutes and the tops of your thighs to protect your low back and increase the lift of the position.
- Allow your eyes to naturally follow the movement from beginning to end. Please don't let your chin slam into the mat on the forward dive—you won't like that. Also be aware of parts of the male anatomy and adjust accordingly.
Modification
The Swan Dive is an advanced and dynamic exercise, and you might not be ready for it at the start of your Pilates journey. Practice lifting to the upward facing dog position (you may also widen the hand position) and slowly lowering back down while gently massaging the front of the body. Focus on lengthening on the negative side of the exercise (the lowering); this will build a lot of flexibility in the spine and control in the body.
Add-ons
LEVEL 1
Dive and Catch: Instead of reaching your arms back on the dive, extend them in front of you in a Superman variation to add more weight to the exercise. Do 4-6 repetitions.
LEVEL 2

See Saw: You're going to conquer inertia with this advanced variation. From the Dive and Catch add-on, continue seesawing forward and back without placing your hands down in between. This takes a lot of core power and control to ensure the front rolling is smooth. Are you ready? Do 4-6 repetitions.
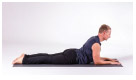
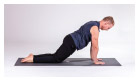
▇ SINGLE LEG KICK
AREAS TARGETED: Core, back, hamstrings, quads, calves and arms

Improve uppper body posture while stretching the legs. There are no add-ons for this exercise, because why mess with (near) perfection?

- Place your elbows under your arms with your forearms pointed forward and hands flat. Extend your legs back with the tops of the feet on the floor.
- Exhale twice as you kick the right leg from the knee joint twice. Point your foot on the first breath and flex on the second.
- Deliver your foot to the mat and repeat with the left leg. Maintain a tall chest with your shoulders back and down. Repeat 4-6 times on each side.
Key Points
- Add an extra arm and forearm blast by actively pressing the forearms into the ground.
- Keep abs up and in, even before you begin the kicking. It is easy to disengage the abs in this exercise.
- Keep your eyes focused directly ahead to avoid unnecessary strain on the neck. The jaw is loose.
Modification
If it's too strenuous on your back and legs, hold the first position and focus on opening the chest and stretching the low back. You may also perform only one kick.
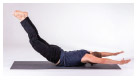
▇ DOUBLE LEG KICK
AREAS TARGETED: Core, hamstrings, calves, shoulders, quads, back and glutes

We're adding a double kick for a burst of energy.

- Lower onto your stomach, place your hands on your low back and set your right cheek on the floor. Keep your elbows wide.
- Kick both legs twice (point/flex) with two exhales.
- Inhale and lift your body off the mat while straightening your legs. Extend your arms behind you. Hold for an extra breath.
- Return to the floor with your left cheek on the ground and repeat. Do 4-8 repetitions.
Key Points
- There are a lot of moving parts in this exercise, so I recommend breaking them down before attempting to rush through them.
- Be gentle with your head and neck as you continue to place each cheek on the mat. Use control to avoid undue neck stress . . . or giving yourself a black eye.
- When pumping the legs, you may touch your heels on your glutes, but work your way up to that. Allow the legs and low back to loosen up at their own pace.
Modification

Double Leg Kick: Leave out the upper body lift and only perform the two kicks with your arms bent and placed to the sides. You can place your forehead on the mat or alternate the cheeks side-to-side as before.
Add-ons
LEVEL 1
Mudra Double Kick: Instead of reaching the arms behind you, lace the fingers together and draw back for a deeper shoulder, chest, and forearm stretch. It takes more precision to grasp your hands and fingers while keeping a strong flow in the exercise. The hands will return to the low back after the mudra as in the original version.
LEVEL 2

Superman Double Kick: For more on the lift, extend the arms forward to a Superman pose and then place them on the lower back. This is a much larger movement and the Superman pose creates wonderful havoc on your core's ability to anchor the flow. The hands will return to the low back after the mudra like the original version.
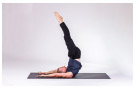
▇ SCISSORS
Testing the limits of core and hamstring flexibility.

AREAS TARGETED: Hamstrings, core and shoulders
- Flip over and lie on your back with your legs extended tall to the ceiling and arms at your sides.
- Activate the abdominals and lift your glutes off the mat while placing your hands on your low back for support. Separate your legs into a wide and long scissors. Relax the neck and focus your gaze at the ceiling. Your facial tension must be non-existent.
- Inhale, scissors the legs and exhale as you scissors again. Repeat 10-20 times total.
Key Points
- If you're a first timer, slow down the movement to avoid tipping and falling on your butt. The combo of the glutes and low back lifting off the floor and legs wildly scissoring back and forth can throw off your balance quickly.
- Don't move your head or neck during the exercise to avoid strain and injury.
- Those of you who practice yoga will recognize the position of the body is similar to shoulder stand pose. There's a little more of a tilt to this one as the shoulder stand is lifted straight to the ceiling.
Modification
Perform this exercise lying on your back with the hands under your hips. You still receive the benefits and joy of the scissors without the heavy lifting.
Add-ons
LEVEL 1
Arms Overhead: Place your arms overhead on or off the mat to remove the support of the hands on the back. This is a similar Pilates exercise to the upcoming Control Balance (page 114) but without the hands grabbing the feet. Do 10-20 repetitions.
LEVEL 2
Double Pulse Scissors: Do two pulses and two matching exhales to throw a challenge to your balance. Do 10-20 repetitions.
▇ BICYCLE
AREAS TARGETED: Core, quads and shoulders

Easy on the knees and hard on the core.
- Begin in the same position we used for Scissors (page 85) and bicycle the legs forward for 10 revolutions and then backward for 10. The movement perfectly mimics the revolutions on a bicycle, so it's easy on the knees.
Key Points
- See Key Points from the previous exercise (Scissors, page 85).
- Keep a healthy bend in the knees and add an abdominal flex on the exhales.
Modification
Perform this exercise lying on your back with the hands under your hips. You still receive the benefits and joy of the cycling without the heavy lifting.
Add-ons
LEVEL 1

Arms Overhead: Place your arms overhead on or off the mat to remove the support of the hands on the back. Do 10-20 revolutions.
LEVEL 2

Boat Bicycle: Lift up to Boat pose and perform the cycling leg movement 10 times forward and 10 times backwards. Keep arms to the sides or, for more of a challenge, extend them to the sky. On the exhales, pull the abs up and in.
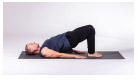
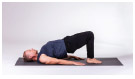
▇ SHOULDER BRIDGE
AREAS TARGETED: Core, quads and glutes

To build a sturdy bridge, we need a strong foundation.

- Lying on your back, bend your knees and place your feet below the knees. Your feet should be hip-width apart with your arms at your sides against your body.
- Inhale, tuck your tailbone under your body and lift your spine off the mat one vertebra at a time until the weight has shifted to your shoulders.
- Extend your right leg so it's in line with the top part of the left and the weight shifts to the left foot. Point that foot.
- Inhale and lift your right leg to a vertical position.
- Exhale, flex your foot and pull it back to the original position (Step 3). Repeat 10 times on each side.
Key Points
- Maintain a strong, lifted posture in the bridge through the entire exercise, and maintain a lengthened spine.
- Tuck your chin and relax your neck and face. You should feel a nice stretch down the back of the neck.

Modification
Lift and hold the bridge—with optional hands on the low back for support—while leaving out the leg lifts. Inhale and rise, exhale and stretch the back and spine. Hold for 5-10 breaths.
Add-ons
LEVEL 1

Hands Underneath: Walk your shoulders under your body and lace your fingers together. Perform the leg lifts as in the original version while arching the back to emphasize the natural curve in your spine. Do 10 leg lifts with each side.
LEVEL 2
Legs and Feet Together: Squeeze your legs and feet together for an extra challenge. You'll also be making it harder to balance. Perform the leg lifts as in the original version. Do 10 leg lifts on each side.
MASTER
Wheel Pose: The wheel pose option really ratchets up your bridge challenge! This is gymnastics territory. Place your hands under your shoulders and lift your hips high into the air while straightening your arms. Stay lifted in your core. Now, perform the leg lifts while holding your wheel steady. Do 10 times on each side. If 10 is too much, try 5.
▇ SPINE TWIST
AREAS TARGETED: Core and shoulders

We're really wringing out the lungs now.

- Sit up tall and extend your legs straight in front of you. Extend the arms out to your sides in a straight line with your shoulders back and down, chest open and lifting up in the waist. Pull your shoulders blades together in the back. Inhale to prep.
- Exhale twice as you pulse your upper body to the right 2 times. The first pulse takes you part way into the twist and the second brings you to the farthest possible point of the twist. The second exhale also squeezes every ounce of breath from the lungs. Keep your tall posture.
- Inhale, return to the center and continue on the other side. Do 5-10 repetitions.
Key Points
- The head and neck stay in line with the spine in this exercise and the crown of the head is lifting upward. The chest is expanded through the exercise.
- Imagine squeezing a dollar bill between the shoulder blades to reinforce a tall, proud posture.
- Minimize the movement of the legs while twisting. This is a full body exercise with all the parts working together in unison.
Modification

Take tension off your back and hamstrings by bending your elbows and knees.
Add-ons
LEVEL 1

Three Pulse Twist: Add an extra pulse, for 3 in total. First pulse is partway, second is almost all the way, and third is to your rotational threshold. Practice rhythm and control. Do 5-10 repetitions.
LEVEL 2

Boat Twist: Anytime we add Boat, you know you're going to have to work overtime to maintain the pose, breath and balance. From Boat, extend your arms outward, shoulders down and back and chest open. Perform two pulses in each direction while stabilizing the integrity of the Boat. You can also extend your legs forward on every twist. Coordinate the movement. Whew! Keep the rhythm slow and deliberate so your body doesn't miss a thing. Perform 5-10 repetitions.
LEVEL 3
Extreme Boat Twist: This variation might just be a Sean Vigue original. From Boat, extend your legs, keeping them together, grab your toes with your left hand and twist your upper body to the right with your right arm extended. Hold for a breath. Inhale, return to center, switch the hands on your toes and twist to the left. Inhale center, exhale twist. Stay balanced. Repeat 5-10 times maintaining your balance, flow and precision.
▇ JACKKNIFE
AREAS TARGETED: Core, spine, back and hamstrings

Jackknife is an advanced Pilates exercise. Proceed with caution.

- Lie flat on your back with your arms to your sides and chin tucked. Inhale and lift your legs about a foot off the ground.
- Exhale, contract the abdominals and lift your legs up and over your head with your toes touching the ground as in the Rollover (page 56).
- Inhale, press your arms into the mat, activate the hip flexors and extend your legs to the ceiling. Relax your head, neck and shoulders and keep your gaze on your toes. You are balancing on the shoulder blades. Hold for a breath or two to solidify your balance and control.
- Exhale and slowly roll down vertebra by vertebra until your feet are about one foot off the ground. Your spine needs to articulate on the journey back to starting position. Think of it as a spine massage. Repeat 3-6 times.
Key Points
- Focus on opening and decompressing the spine during the exercise. The spine is always lengthening and expanding in Pilates.
- Work a nice balance between the core and arms for moving the body in this exercise. With practice, the core takes over and the arms are used as extra support for balance and foundation.
- Slow this one down to demonstrate the incredibly focused strength needed to maintain a precise rhythmic pace. You will have an urge to throw yourself through parts of the Jack-knife. Resist that urge, continue smoothing the flow with practice, and reap the powerful benefits.
Modification

Since this is an advanced exercise, you may leave it out or bend the knees and rock the legs forward and back from a supine position.
Add-ons
LEVEL 1
Overhead Jackknife: Extend your arms overhead on the floor and perform the exercise. Do 3-6 repetitions.
MASTER

Arms off the Mat Jackknife: Oh boy . . . this variation will take all the strength, precision and balance in your arsenal, so take things slow and practice, practice, practice. Extend your arms overhead and slightly off the ground and do the Jackknife. Do 3-6 repetitions with the utmost control.
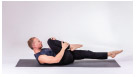
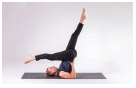
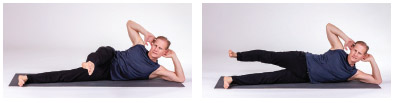
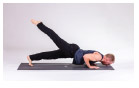
▇ SIDE KICKS
AREAS TARGETED: Core, hips, glutes and hamstrings

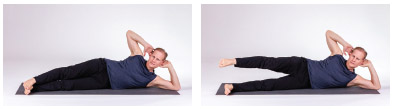
- Roll onto your right side while maintaining your balance. Bring your legs slightly in front of your upper body for balance (you can increase the difficulty by placing your upper and lower body in a straight line) and stack them. Either place the right forearm on the mat with your hand on the back of your head and your left hand on the floor in front of you, or else bring both hands to the back of the head. Keep your head in line with your spine.
- Lift the top leg (left) slightly, keeping it straight and plugged into your powerhouse.
- Inhale, point your foot and kick the leg forward to the edge of your range.
- Exhale, flex your foot and pull the leg back behind you to the edge of your range. Repeat 5-10 times and perform on the other side of your body.
Key Points
- Kick your legs forward and back in a straight line to activate the quads, hamstrings and glutes, and protect the knees. The leg kicks should be quick and controlled.
- Minimize the movement of your pelvis, spine and core as the leg travels back and forth.
- Maintain an open chest throughout the movement.
Modification

Minimize the distance of the kicks until you are better able to control the full movement and stabilize the core.
Add-ons
LEVEL 1

Up Kicks: Inhale, point your foot and kick your leg upward to the sky. Exhale, flex your foot and pull it down to the starting position. Repeat 10 times on each side.
LEVEL 2
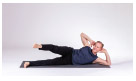
Circles: These are very deceptive, so proceed with caution . . . and copious amounts of breath. Extend your top leg a few inches off the bottom leg and circle it forward 10 times. Inhale on the circle and exhale at 12 o'clock. You may pause at 12 o'clock or circle continuously. The circle should be the size of a frisbee. Pause for a breath and circle backwards 10 times.
▇ TEASER
AREAS TARGETED: Core

Tease your core and boost your ability to produce quick force with the Teaser.
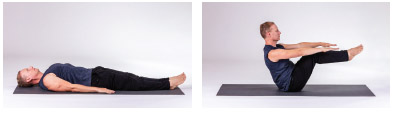
- Lie on your back with your arms to your sides and your low back imprinted into the ground.
- Exhale, activate the abs and peel off the mat, lifting into Boat pose.
- Continue exhaling and extend your legs into full Boat. Hold for a beat.
- Inhale, prep and exhale as you lower down with extreme control, imprinting each vertebra gently into the mat. Return to the original position. Repeat 4-6 times.
Key Points
- Teaser is a very challenging core exercise and you'll be tempted to add momentum on the lift up to Boat. Practice smoothing out the up and down of the movement and placing the driving force in the core. The spine needs to roll like a wheel (C-Curve) to eliminate any undue impact.
- The higher you lift your arms and further you extend your legs in Boat, the more the difficult of the exercise with increase—progressive destabilization at its finest.
- When lifting, coordinate the movement so your upper and lower body move at the same time. When lowering, let your upper body go first followed by your legs.
Modification

Roll up to extreme Boat instead.
Add-ons
LEVEL 1

Arms Overhead: Begin with your arms overhead and lift into Teaser. Repeat 4-6 times.
LEVEL 2
Extended Boat Teaser: After lifting into Boat, extend your legs and grab your ankles or feet. This is Extended Boat pose. Hold for a breath or two, release back to Boat and roll down to the starting position. Repeat 4-6 times.
▇ HIP TWIST WITH STRETCHED ARMS
AREAS TARGETED: Core and hips


- Sit up tall and draw your legs into a right angle with your hands extended far behind you, palms down. Relax the shoulders, open the chest and point your feet.
- Inhale, extend your legs and circle them to the left, bringing them all the way around.
- Exhale and flex the abdominals as you return to the original position. Pause for a moment and continue. Do 3-6 circles in each direction.
Key Points
- Practice drawing your knees closer to your head with each circle.
- Your upper body needs to be stagnant with the chest open and shoulders back and down while the legs are in motion.
- Stay deeply engaged to your core muscles to avoid arching the back and spine. Zip the legs up into Pilates stance.
Modification

Practice holding the starting position for 5-10 breaths. This will help develop the core strength, posture and balance needed to effectively do the exercise.
Add-ons
LEVEL 2

Full Circles: Begin the exercise with the legs extended and perform the circles. The weight generated by straight legs will sufficiently overload and strain your core. Inhale as you draw the circle and exhale returning to the original position. Perform 3-6 repetitions in each direction.
LEVEL 3
Hands Off: Start the exercise in our beloved Boat position and circle with either bent or straight legs. This option challenges our ability to balance through the movement.
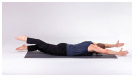
▇ SWIMMING
AREAS TARGETED: Core, spine, shoulders, glutes and back

Dry endurance swimming at its finest.

- Lie down on your stomach with your arms extended long in front, palms facing each other, and legs stretching back. Place your arms shoulder-width and legs hip-width apart. Place your forehead on the mat and point your feet. Lift your hands and feet off the mat.
- Inhale and lift your right arm and left leg.
- Exhale and lower them down but not so far as to touch the mat.
- Inhale and lift your left arm and right leg. Continue alternating the arms and legs for 10-12 repetitions.
Key Points
- Keep your pubic bone pressed into the mat during the exercise and let your eyes focus about one foot in front of the mat.
- Avoid any sort of compression in the spine by continually lengthening into the movement. This includes your low back. Reach your fingers and toes in opposite directions. Allow the crown of your head to stretch forward and lengthen the back of your neck.
- Find the rhythm between the breath and the rising/lowering of your arms and legs.
Modification

A wonderful exercise to ease you into Swimming is the Birddog. From hands and knees position, inhale and extend your right arm and left leg. Exhale as you return them to the mat. Repeat on the other side 10-20 times.
Add-ons
LEVEL 1
High Speed Swimming: Speed up the movement by chopping your arms and legs and breathing in a 5 count in, 5 count out rhythm. This is the same breath/movement pattern as the Pilates 100 (page 51). Align the breath and movement and perform for 50-100 counts.
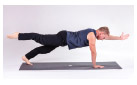
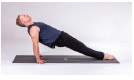
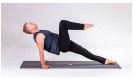
▇ LEG PULL FRONT
AREAS TARGETED: Core, glutes, shoulders and arms

Give your bum a kicking while stabilizing the rest of your body.
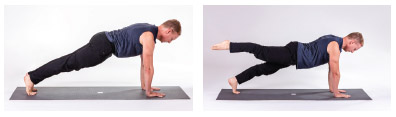
- Assume a plank position with your hands under your shoulders, shoulders drawn back and chin tucked. Press your heels back for a leg stretch and pull your navel into your spine.
- Inhale as you lift your right leg.
- Exhale as you lower the right leg down. Repeat 10-20 times alternating the legs.
Key Points
- Do not allow your pelvis or stomach to dip during the exercise.
- Your legs need to be the only part of your body which moves. Avoid lifting your pelvis, glutes and low back up and down with your legs.
- Maintain a long, decompressed spine and back during the exercise.
Modification
Leave out the leg lifts and either hold the plank or practice a modified plank variation with your knees on the ground slightly behind your hips. Hold your body parallel to the floor.
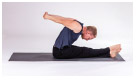
Add-ons
LEVEL 1
Forward and Back Press: This variation adds an extra shoulder burn. Inhale, lift your right leg and press forward using the left foot, bringing your shoulders in front of your hands. Continue inhaling as you pull back to the original position and exhale while lowering your leg. Repeat on the other side and do 10-20 repetitions.
LEVEL 2

Push-Up Pulls: After completing two alternating leg lifts, perform 1-3 triceps push-ups. Hug your elbows into your sides and maintain a lengthened body parallel to the ground. Practice to failure.
MASTER
Tabletop Pull Backs: Alternate raising and lowering your opposite arm and leg. Sound fun? I have something even more fun for you! Include a push-up (or three) after every two arm/leg raises. You have no limits! Perform 10-20 repetitions.
▇ LEG PULL
AREAS TARGETED: Core, glutes, shoulders, triceps and hips

It's called a pull, but we're really kicking it!
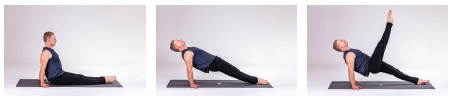
- Sit upright and tall with your legs extended out in front of you. Bring your heels together and point your feet while zipping up your legs in Pilates stance. Place your hands under your shoulders with the hands positioned in your favored position (I prefer to point the fingers outward but I used to be a fingers pointed towards my butt kind of guy).
- Press into your hands and lift your hips until your body is in a long diagonal line from your shoulders to the heels. Draw your shoulders back and down and expand the chest. Activate your glutes.
- Inhale as you kick the right leg up, keeping your body stable and not letting your glutes drop.
- Exhale, lower the right leg with control, and inhale while kicking the left leg as high as possible. Repeat 6-10 times in total.
Key Points
- The goal with the legs is to kick and raise them higher and higher each repetition while pressing your hands into the ground.
- Your hips and pelvis remain square during the exercise and continue to lengthen the spine and back.
- Beware of collapsing into your chest and shoulders. Focus on opening them to the ceiling to maintain strong posture and open breath.
Modification
Hold the starting reverse plank position (Step 2) while actively squeezing the legs together, opening the chest and lifting the core. Hold for 3-6 breaths at a time.
Add-on
LEVEL 1
Leg Pull Mountain Climbers: From reverse plank position, exhale and pull your right knee into your chest. Inhale and deliver the leg to the original position. Alternate both legs for 5-10 repetitions.
▇ BOOMERANG
AREAS TARGETED: Core, spine, legs and shoulders


- Sit up tall with your hands under your shoulders and cross your left leg over the right with your feet pointed.
- Exhale, press into your hands, lift your legs as one and roll back, massaging the spine into the mat as a wheel until your legs are overhead and your arms are pressing into the mat.
- Inhale as you switch the legs with a quick leg scissors.
- Exhale as you roll up into a full Boat position with the legs crossed.
- Inhale as you reach your arms behind you and begin to lower your legs to the ground.
- Exhale while reaching your arms forward and diving up and over the legs. Repeat 4-6 times.
Key Points
- Use your hands to assist with the rollover and roll up with help from the core. Practice smoothing out the rolling motions (C-Curve) making it effortless and without momentum.
- Hit the open and close scissors quickly for an extra jolt to the inner thighs. The legs are lengthened and lifted off the upper body, while the hips are activated.
- This is a full, complex exercise comprising of many moving parts. Break it down; study it. Practice it in segments and then put them all together.

Modification

Reducing the Boomerang to a modification is futile because all the parts connect together so fluidly. Two options which come to mind are to hold the cross-legged Boat pose for 4-6 breaths, or to leave the exercise out of your training entirely. Once you have mastered the Roll Up, Teaser and Rollover, the Boomerang can be your next fitness challenge.
Add-ons
LEVEL 1
Mudra Boomerang: As you exhale and dive over the legs, reach back and lace your fingers together into mudra pose. Pull your arms up and behind you. Inhale while circling your arms around and exhale when reaching your arms up and over your legs.
LEVEL 3
Overhead Boomerang: Extend your arms overhead on the roll back and roll up. This will remove that blessed hand support. Make sure your core is up to the challenge and the movements are supremely controlled.
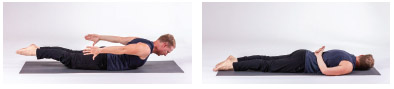
▇ THE SEAL
AREAS TARGETED: Core and spine

What a wonderful, strange and unexpected exercise.
- From a seated position, bring the bottoms of your feet together and reach your arms under and between your legs in a hug. With your hands placed on the outside of your ankles, lift your feet off the mat and tuck your chin to prepare the C-Curve in the spine. Tap your heels together twice.
- Inhale, roll back to the backs of your shoulders while maintaining the C-Curve and tap the heels together twice again while holding the position.
- Inhale, reverse gears and roll back up as if your spine is a wheel. Perform two heel beats again to finish the movement. Perform 4-6 repetitions.
Key Points
- Seal is a serious spine agitator. The rolling movement, lifted legs and tapping heels will challenge your ability to maintain the C-Curve.
- The biggest challenge is keeping your spine/leg relationship during the roll. Practice keeping the shape of the spine while holding your legs in a set position. There's going to be an urge to shift your legs up and down and side to side. Work on eliminating unnecessary leg movement.
- The heel taps/beats originate from your hip joint.
- Never allow the weight of the exercise to push into your neck! Practice stopping and reversing with efficiency and accuracy.
Modification
You have two options for pulling back on the full force of the Seal: one is to leave out the heel beats, and the other is to hold the original position and leave out the rolling. Your body will let you know when it's ready to move out of the modifications and into the full exercise.
Add-on
LEVEL 1
Extended Boat Seal: Roll up, do two heel beats and then lift even higher into extended Boat position with your hands on your hamstrings, ankles or feet. Hold for a breath, return to Seal starting position and continue the exercise. Do 4-6 repetitions.
▇ THE CRAB
AREAS TARGETED: Core, spine and back

The Crab takes the Seal to a higher level of training.
- Stay in a seated position and cross the ankles to grab onto your feet, right hand on left foot and left hand on right foot. Tuck your chin to your chest and round your spine into the C-Curve.
- Inhale, deepen your abdominal focus and roll back to your rear shoulders/upper back.
- When you're securely balanced, switch the legs and grab the feet.
- Exhale, roll up and place the crown of your head on the mat. Stay in control so momentum doesn't push you too far and cause undue stress to the head and neck. Repeat 4-6 times.
Key Points
- When rolling, continue lifting the ribs and abdominals.
- I understand that if this is your first Crab rodeo it's going to feel very unusual and awkward. Fret not; I felt the same way, but after some consistent practice I began to develop a rhythm which rolled me smoothly through.
- Beware of putting too much weight on the crown of your head. Control the roll up so it's a very light tap of the head on the mat. Maintain a strong and lengthened neck.
Modification
I must admit that the Crab is not for everyone . . . it's definitely an acquired taste. You may leave out the rolling and focus on the starting position. The crown of the head tap may also be eliminated if you have any neck issues or simply don't feel comfortable with that part of the exercise.
▇ ROCKING
AREAS TARGETED: Abdominals, chest, shoulders, low back, quads and hips

We take a classic yoga pose (Bow) and add a little movement.

- Roll onto your stomach, place your forehead on the mat, bend your knees and reach back to grab your feet or ankles. Your elbows should be pointing outward as you keep your knees about hip-width.
- Lift your upper body as you press your toes towards the ceiling and sink your pubic bone into the mat. You will feel the whole front of your body open and expand. Maintain length in the spine.
- Exhale and rock your body forward as you keep the arched shape in the spine and legs. Rock until you reach the chest area.
- Inhale and rock back to the starting position. Repeat 5-10 times.
Key Points
- This is a wonderful exercise to open the front of the body after so many exercises with flexing and hinging. The word I like to use is “expansion”. Allow your chest, abdominals, shoulders and hips to expand in this movement. Press your pubic bone into the mat.
- Your head and neck stay in line with the spine. To work opposition in this pose, press your hands and feet back with energy.
- Press your legs up as you rock forward and press your legs away while rocking back.
- Men, if this movement is uncomfortable, proceed with caution or leave out the rocking.
Modification

Either hold the Bow pose without rocking or bend your knees and reach your hands back into a bind/mudra. I call this pose “Shark pose” and it opens the front of the body effectively without having to grab the feet or ankles.
Add-ons
LEVEL 2

Side Bow: Want a challenge but need to avoid the rocking movement? Test drive the Side Bow—a very popular variation in my live classes. From Bow position, press your heels into your glutes and exhale while rolling onto your side. Keep the knees no wider than hip-width. Inhale, return to Bow, exhale and continue to the other side. Do 5-10 repetitions.
LEVEL 3

Bow Superman: This is a super strong back builder. Start in Bow position with a long spine, open chest and pulled back shoulders. Inhale and extend your arms forward and legs back into Superman pose. Don't let your hands and feet touch the ground. Return to Bow with an exhale. Repeat 5-10 times.
▇ CONTROL BALANCE
AREAS TARGETED: Core, hips, back and hamstrings

Is the most challenging of all the Pilates exercises. You make the call.

- Roll onto your back with your legs extended to the ceiling and arms overhead on the floor.
- Exhale, engage the abs and lift your legs up and over the body. Come to a resting place on your rear shoulders/upper back.
- Bring your left leg to your hands so you're grasping the ankle and pulling it to the floor. The right leg is lifting to the ceiling with a healthy extension from your hip flexors. Keep your feet pointed.
- Inhale as you switch legs and grab onto the right leg. Work on separating the legs as far away as possible with strong balance. Exhale as you switch the legs again. Continue for 5-10 repetitions.
Key Points
- As you take hold of the ankles, give them a good pull to maximize the length of the legs. Engage the hip flexors to also stretch the legs.
- Avoid compression by lifting and extending the legs away from the spine.
- Do not place the weight on the back of your head and neck, but rather on the larger, stronger upper back and shoulders. Do not move your head or neck during the exercise. Relax your jaw.
- Slow down the scissors and address any spots in the movement that feel rushed or uneven.
Modification
You may return to a previous modification, which is lying on your back with your arms at your sides and scissoring the legs. Perform 10-20 repetitions.
Add-ons
LEVEL 3

Slight Arm Lift: Lift your arms a couple inches off the mat to alleviate that extra balance. Perform the exercise 6-10 times.
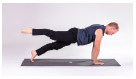
▇ PILATES PUSH-UP
AREAS TARGETED: Core, hamstrings, back, spine, shoulders, chest and triceps
ALL SPORTS
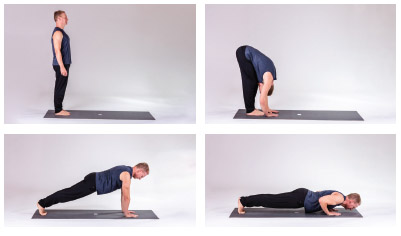
- Stand on the back part of your mat with your arms to the sides and feet hip-width apart.
- Inhale and stand taller while sinking your shoulders back and down.
- Exhale, tuck your chin and dive downward into a forward fold. Lead with the crown of your head and allow your spine to decompress.
- Continue exhaling as you walk your hands out into plank position, with your hands under your shoulders, elbows turned in and shoulders pulled back and away from your ear.
- Inhale as you lower into a push-up, keeping your body straight and elbows hugging the sides.
- Exhale and press back to plank. Continue exhaling and walk your hands back to forward fold while lifting your tailbone high.
- Inhale, tuck your chin and roll up to a standing position with a rounded back.
- Continue inhaling as you stand tall, relax your shoulders and open the chest.
- Exhale, tuck your chin, dive forward and down and continue the exercise. Repeat 5-10 times.
Key Points
- The roll down into forward fold is a golden opportunity to lengthen and strengthen the spine while bringing some fresh, oxygen-filled blood to the brain. Focus on articulating the spine vertebra by vertebra on the roll down and roll up.
- A structured and aligned push-up is parallel to the ground. Add a little extra on your push-up by brushing the chest on the ground on the way down.
Modification
You may leave out the push-ups and hold the plank for a breath before walking the hands back. Your knees may also drop down on the walk out and back.

Add-ons
LEVEL 1

Multiple Push-Ups: Do 1-5 push-ups (or 10-20 if you want a challenge) from plank position. Stay engaged in your core and relax your elbows to your sides to engage the triceps and chest. Repeat 5-10 times.
LEVEL 2

Superman Push-Ups: Get lower to the ground in your push-up and extend your arms and legs out into Superman pose. Hold for 1-3 breaths, place your hands under your shoulders and press back to plank. Continue the exercise.
LEVEL 3
One Legged Flow: From standing position, pull your right leg back so your right foot is off the ground and all the weight is on your left leg. Complete the entire exercise with your right foot off the ground, even when rolling back up to standing from forward fold. When you return to standing position, set your foot down. When diving back down, lift your left foot off the mat. Repeat 6-10 times.