Planting Techniques
Whether you’re potting up a single specimen or a selection of different plants, the technique for planting a container is identical. The techniques for hanging baskets and window boxes are slightly different.
Planting Pots and Planters
If you have bought a new container, you can start planting without any preparation. However, if you are reusing old containers, then I advise washing these thoroughly in case fungal or other diseases, or sometimes the eggs of certain pests, are lurking in the residues of old potting mix.
- Soak the plant (or plants) for about 10–20 minutes, depending on their size. This consolidates the potting mix around the root ball, which makes the plant easier to handle. Allow to drain.
- Cover the hole in the bottom of the container (there may be more than one) with a few drainage crocks. This improves drainage and prevents the potting mix being washed out of the container when you water.
- If you wish, you can also add a few scoops of gravel to the bottom of the container to improve drainage.
- Although not essential, adding some vermiculite to the potting mix can also help to improve drainage.
- Add a few scoops of potting mix to the bottom of the container. I like to use a special container potting mix that already has a good supply of fertiliser and water-storing granules.
- Mix the vermiculite (if using) into the layer of potting mix with your fingers.
- Fill the container with potting mix until it is about two-thirds full and firm down gently with your hands.
- Tease out the roots of the plant gently with your fingers. Sit the plant in the container to check the planting depth. Once the container is planted up, the surface of the potting mix should be an inch or so below the rim to allow for watering. Add or remove potting mix to adjust the level, as required. If you are using more than one plant, arrange the other plants around the first, ensuring all the root balls are level.
- Add scoops of potting mix to fill the gap between the plant and the sides of the container, or between the selection of plants.
- Firm in gently and level off. Be careful not to press too firmly because this can compact the surface of the potting mix and stop water draining.
- Once the potting mix has settled, check whether you need to add more potting mix to create a level surface. If you wish, you can add a layer of fine gravel or other decorative trim. This adds a nice finishing touch, while also providing a mulch that slows down the evaporation of water from the container.
- Position the container then water well, ideally using a watering can fitted with a fine rose attachment. Allow it to drain.

Tip — From experience, I have found it’s best to plant containers in the early morning or late afternoon, when it’s a little cooler. I always make sure the plants have plenty of water when they are planted along with some plant fertiliser.
Planting Window Boxes and Troughs
Window boxes are ideal if you don’t have a garden – they can be used on balconies and roof gardens – and add instant kerb appeal to any property. Remember that window boxes on the upper levels of a building need to be properly secured to avoid accidents. Also bear in mind that a window box will be heavy, especially when filled with potting mix and watered.
- Plant a window box in the same way as a container, but remember that it is usually only seen from one side. Imagine that the box is a tiny garden border, or even a theatre stage, and arrange the plants accordingly.
- Start with the larger plants towards the back and add smaller plants at the front. Trailing plants such as ivy can be used to cascade over the edges and soften the effect. Repeating plants in the box can also be useful for creating a sense of unity.
How to Make a Hanging Planter
(see Hanging and Ground Turquoise Planters p. 149)
- Drill 4 holes in either corner of the planter.
- Take 4 lengths of chain with a key ring secured on each end and feed through so the key ring is secured underneath the rim of the planter.
- Take 2 lengths at one end and secure with another key ring so you can hang the planter.
- Repeat on the other end.

SECURING A WINDOW BOX
It is vital that the window box is fixed securely in place. Either add two nails or hook eyes on either side and attach pieces of wire to stop the window box falling, or use special window box brackets to screw it to a window sill, wall or railings. You can get adjustable brackets that can take different weights: small brackets can support 20 kg (44 lb) and large brackets 40 kg (80 lb). Balcony hooks, for both normal and wider balcony ledges, are also available.
Planting Hanging Baskets
Perfect for providing a splash of colour throughout the summer, hanging baskets are usually flamboyant and filled with flowers, many of which cascade over the edge and trail down.
- Place your containers on a clean, flat surface.
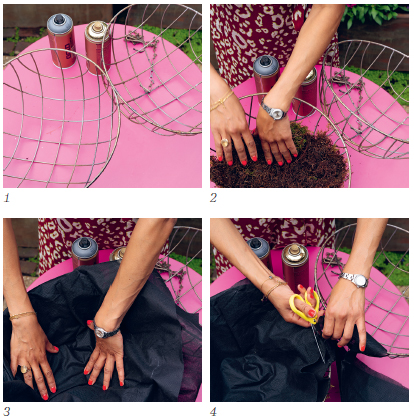
- Start by lining the basket with moss or a hanging basket liner.
- If you are using moss, you’ll need to use some black plastic sheeting or other suitable liner to retain the potting mix. Use scissors to cut a large circle that will fit inside the moss lining. Cut a few small holes or slits in the plastic or liner at the base for drainage.
- Cut a few small holes or slits in the plastic or liner at the base for drainage. Fill the basket about one-third full with potting mix, then firm in gently with your fingers.
- Start by planting the sides of the basket. Make slits in the moss/liner and push through the root balls of the plants so they are resting on the surface of the potting mix. Cover the root balls of the plants with more potting mix.
- Next, plant the top of the basket. It is advisable to have one main plant in the middle and then add smaller, trailing plants around the edge.
- Suspend the hanging basket using S-hooks and metal chains.
Creating a Suspended Sphere
Prepare the lower half of the sphere as you would a conventional hanging basket, then use galvanised metal wire to secure a second basket to the first to create a striking plant sphere. If you wish, you can spray-paint the hanging baskets first. See Suspended Spheres, for advice on fixing the together and suspending the sphere.
Tips — Place the unplanted basket on the rim of a bucket or old container to make planting easier.
Use a lightweight potting mix in baskets because they will be heavy once planted and watered.
As hanging baskets are usually less accessible than conventional containers, add some all-purpose fertiliser granules to the potting mix before planting up.