If you or your buddies smoked an eighth a day, every day, all year long, you would need an ounce of weed every eight days. This was the thought that started it all for me. I did the math: I was spending $60 a day for a sack that lasted me 24 hours. I figured that if I could grow a pound of weed in eight to nine weeks, I would have more than I could, would, or should smoke for more than four months.
My first attempt at growing 20 years ago was dismal. I was so eager to get started that I failed to do any homework. I’ve learned a great deal since then.
The intro that you are reading now is the longest section of this book. I have made it so that you can tackle the setup of the garden and its maintenance in short, simple steps. The set up is simple, yet one level more involved than shown in Marijuana Buds for Less, where only energy-efficient compact fluorescent bulbs were used in the garden.
Today, the would-be grower wants a pound of the finest herb using the easiest, fastest, most affordable method. In this book we follow two parallel grows, both using HPS (high pressure sodium) lights: Editor Ed Rosenthal challenged me to supplement the garden with CO2 and compare the results. With the right equipment assembly I went ahead, laying the groundwork for you to follow along.
Hundreds of pounds have been grown and smoked by CEOs, pro athletes, and Fortune-500 executives, using the same methods you see in this book. And some of the weed you see in Let’s Grow A Pound has actually been smoked by these high-level performers. They don’t settle for second-rate weed, and neither should you.
Each time you do this grow it will be easier and more successful. By the third cycle, it will seem effortless. Take a deep breath and dig in. There is no easier method to growing a pound of the world’s finest chronic.
~SeeMoreBuds

The first step is to select a location for your garden. Choose a safe, low traffic spot with convenient access to water, air and electricity. In this book you will see a closet location used for the garden. Each growing location is unique and will require some modifications, ingenuity, and imagination. Minimum space to grow a pound of chronic is 20 square feet, which is the size of our closet (2.6 × 8 feet). A 5 × 6-foot closet (30 sq. feet) would be ideal, providing greater access to the plants.
You will need to find your breaker box and make sure you have a free 15-amp breaker to run your 1000-watt garden. Only garden equipment should be plugged into outlets designated to the “garden” breaker. The 1000-watt HPS (High Pressure Sodium) bulb will use 9.5 amps, giving the garden another 5.5 amps for accessories (fan, etc.). All electrical items have a sticker on them that discloses the number of amps used by the product.
The first step is to gather materials to build the garden. Here is my list:
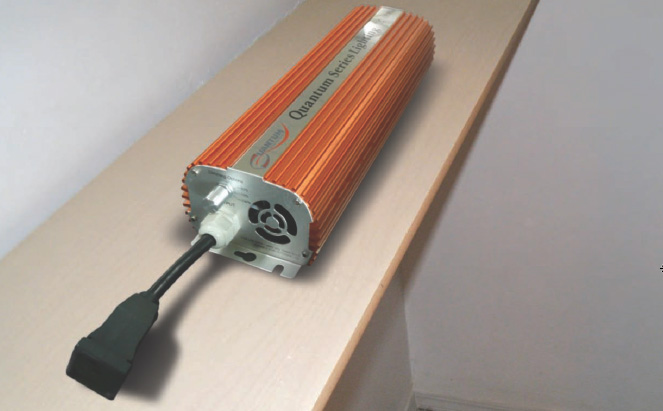
A.C.A.P. 1000-watt Quantum digital ballast
B.C.A.P. Xtreme LumenAire 6" air-cooled reflector
C.C.A.P. 6" inline fan for carbon filter
D.1000-watt HPS bulb (DigiLux brand pictured)
E.Soil: three 64-quart bags of nutrient-supplemented mix for vegetables
F.Carbon air filter that fits inline fan; here both fan and filter are 6" wide
G.Lamp/appliance timer, with at least one “on/off” per 24 hours
H.Thermometer
I. Cloning tray
J. Rockwool cubes
K.pH tester and pH Up and pH Down
These supplies are not pictured but should also be collected:
•18 3-gallon containers with drainage holes, and water trays to place the containers in
•Plastic tarp to line trays and protect floors from overflow
•Watering can
•Oscillating fan or centrifugal fan mounted to wall
•Panda white/black poly film, or other reflective material
•Ducting 6" wide to connect light reflector to fan
•Light mover (optional)
To supplement your garden with CO2 you’ll need this equipment (more details on pages 7 and 26):
•Second lamp/appliance timer
•20-pound tank of CO2
•CO2 controller
•CO2 regulator
•Drilled CO2 tubing with micro holes (3-10 feet), and a plastic tubing T-connector
•Reflective foil or insulation to seal grow room
Recommended Lighting Equipment
C.A.P. Quantum Digital Ballast
Ballasts convert house current to the appropriate voltage for high intensity lights. Digital ballasts offer significant advantages over magnetic ballasts, as they are more power efficient, generate greater lumens, are lightweight, are silent, and emit less heat. The Quantum digital ballast is a 1000-watt dimmable ballast with three separate power settings (50, 75, or 100 percent) for maximum lighting control.

C.A.P. LumenAire Air-Cooled Reflector
HPS and other high intensity bulbs emit intense heat that can build to lethal temperatures (for the plants) if left unattended. Air-cooled lights keep the garden from overheating by removing much of the heat before it reaches the grow room. Otherwise you need an air conditioner, which uses more electricity. The LumenAire reflector has 6-inch flanges for air cooling that attach to the air hose and inline fan. Its tempered hinged glass bottom allows for easy cleaning and bulb replacement.
Recommended CO2 Equipment
C.A.P. Fuzzy Logic™ PPM-2A CO2 Controller
I opted for a top-of-the-line CO2 controller. Like a good driver who gradually slows down before getting to a stop sign, the Fuzzy Logic controls the level of CO2 without overshooting its target. It automatically dials in exact parameters for your area, learns how your garden uses CO2, and adapts to keep levels constant.

C.A.P. PPM-4 CO2 Monitor/Controller
When economy and simplicity are a priority, this is a great alternative. Mount the PPM-4 monitor to a wall, plug the PPM–4 meter into the power interface, then plug the CO2 regulator into the PPM-4 meter. The LED monitor shows CO2 levels at a glance—the indicator lights show the current level of CO2 in your grow area.

C.A.P. REG-1 Regulator/Emitter
The regulator screws on to the CO2 tank, and comes with an easy-adjust flow meter that allows you to preset your CO2 flow level to meet room-size requirements. Each unit comes with 10 feet of undrilled micro tubing to disperse CO2 throughout your room.
Cover the floor of the grow area with tarp and place water “catch trays” under the containers; this will reduce problems from overwatering, leaks, or unexpected water spills. The grow containers are arranged in rows three pots deep and six pots across. You can choose any configuration based on the number of plants you wish to grow.
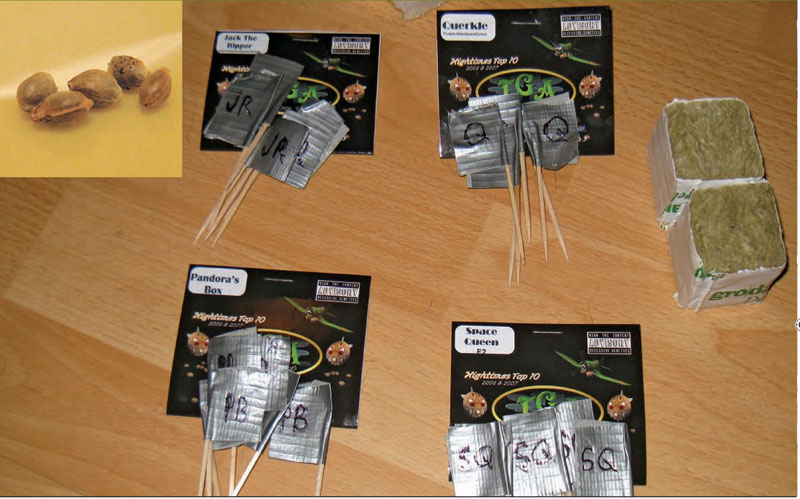
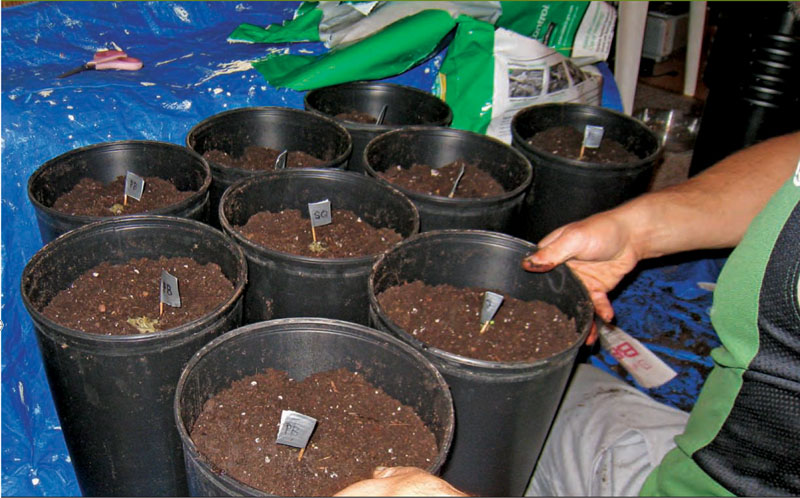
It is important to pick quality strains. You are going to put real time, effort, and care into this grow. Choose a strain that you know will provide your desired results. The seeds used here are four well-known and easy-to-grow strains from TGA Seeds. You can also start with clones. The flags are made using permanent marker, duct tape, and toothpicks. They allow for quick and easy tracking of the strains. This is important, as you will see later.
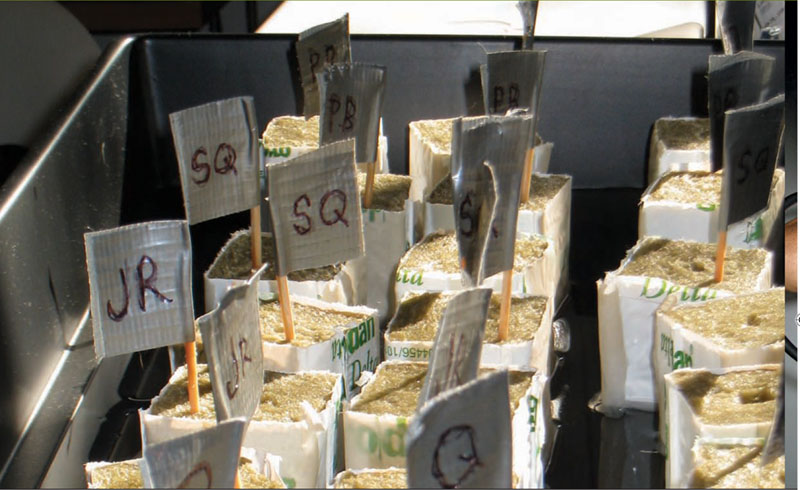
Whether you are starting with seeds or clones, rockwool cubes provide an ideal moisture and oxygen-mixed medium, ideal for root growth. Before using the cubes, adjust their pH by soaking them in a large container with water, and add pH up or pH down until the water has a pH level of 5.0. Later, when plants are ready for soil, the water pH will be adjusted to 6.8 to 7.0. Being comfortable with pH adjustments is a cornerstone of successful gardening (more information on page 136).
Allow the rockwool cubes to soak for a minimum of one hour. Once the cubes are adequately soaked, gently place one seed in the center of each cube. Push the seed about a quarter-inch below the surface.
Use the toothpick flags to label the strains. Later, you will be able to accurately clone your favorite strains. Keep the rockwool cubes in an area that stays between 70 to 85 °F and receives light at least 16 hours a day. A single 20-watt compact fluorescent light 8 to 12 inches from the cubes is ideal.
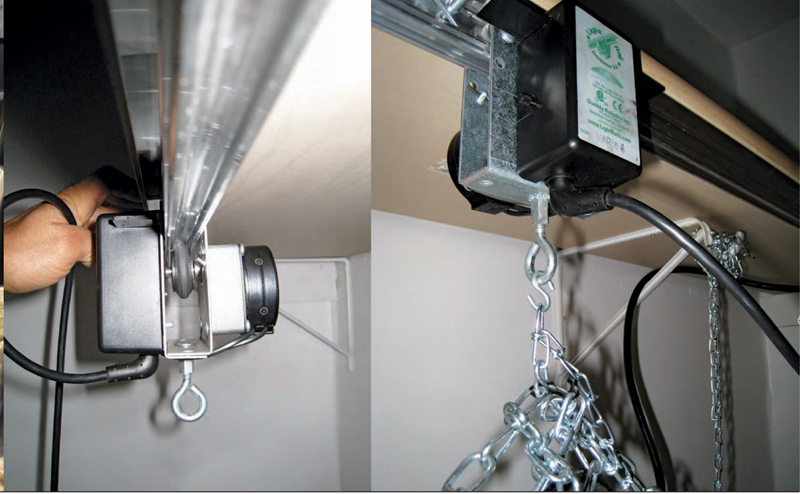
An optional light mover spreads light evenly around the room. A light mover slowly moves the light using a small electric motor which is attached to a steel rail. Most light movers can be installed in two positions, depending on which side you want the electrical cord. Here you can see the wheel running on the rail and the eyelet that the light hangs on. With this model you can adjust the distance the light travels.
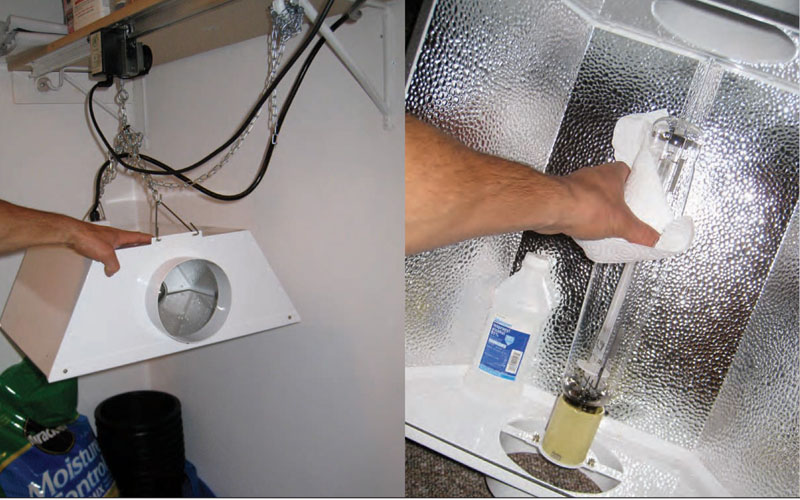
A shelf in the closet is tested to make sure it can hold the ballast and the light. The shelf is strenghtened using ample support. Before turning on the HPS bulb, clean it with alcohol and a cloth to remove all fingerprint smudges. A dirty bulb is in danger of getting “hot spots,” reducing the bulb life.
The reinforced shelf is perfect for the ballast to sit on, out of danger of water spills. To tally the electrical usage running through the breaker, add the amps of each electric product. This should total no more than 80 percent of the load your breaker can handle: 80 percent of 15 amps = 12 amps. Some breakers can handle 20 amps. This concept also is applicable to extension cords and outlet multipliers. Make sure all extension cords and outlet multipliers are rated for 15-plus amps. Usually, 12- or 14-gauge cords are adequate.
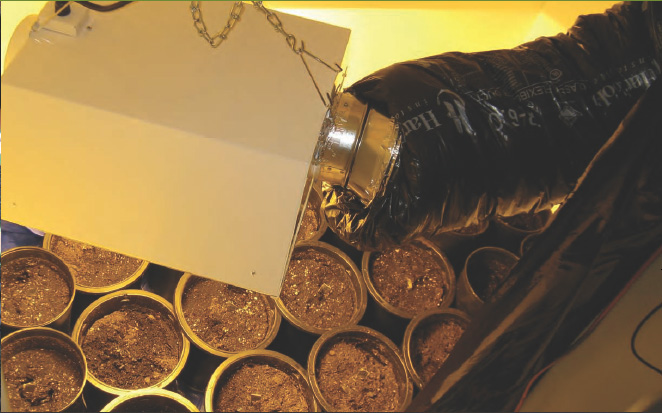
To start, the hood can hang from the existing clothing rod or the unplugged light mover. There should be at least 3 feet between the ground and the bottom of the hood.
Attach the carbon filter to the light hood using insulated ducting. Pass the ducting through a piece of Panda film to stop light leakage. The purpose of the Panda film will become clearer as we move forward. Ducting can be purchased at any hardware store. Ideally, you will use insulated ducting to significantly reduce fan sound levels. Special foil tape should be used to attach ducting to the light and fan.
The insulated ducting passes through a hole in the Panda film, which is cut with pair of scissors. Tape the Panda film to the ducting to prevent light passing in or out of the grow room, white side in. Attach the inline fan to the ducting and place on the filter. The inline fan is placed so that the air is pulled from the grow room and blows into the carbon filter. The carbon filter will eliminate potent garden odors that could otherwise be detected blocks away.
Place seedlings under the HPS light, at least 36 to 48 inches from the light source, and covered with an object or material that will filter the light. The wicker domes shown are usually used to keep flies off food and work great to protect the plants. Alternatively, you can raise the light to about 50 to 60 inches above the plants, uncovered. Keep the medium moist, and watch seedlings closely for signs of stress during first the few hours under any new light source.
After two to 14 days all the seedlings should be visible (five to seven days is typical). The seedlings should be treated with care, and not touched or handled directly. The cubes should remain moist at all times. The cubes should not be soaked, completely saturated, or sitting directly in water. Remember: Roots need water and oxygen.
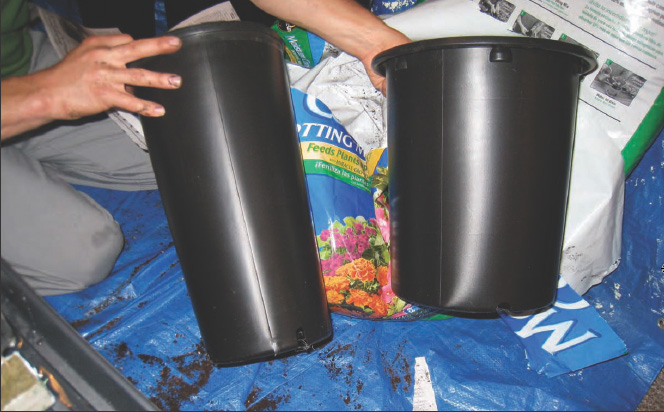
This garden is using 3-gallon containers. Both tall and short 3-gallon containers will be used to determine if one is better than the other.
Put a sheet newspaper at the bottom of containers to cover drainage holes. Fill the containers with soil, leaving 2 inches of space at the top. This garden is using Miracle-Gro soil, which has been premixed with nutrients by the manufacturer. After the first couple waterings, the soil will recede another 2 to 4 inches. Leaving this space at the top of the container provides space for watering and avoids messy overflows.
Gently remove the plastic from rockwool cubes before planting the seedling, and then bury the cube so that the top is flush with the soil.
If you use an organic or an un-supplemented soil, you will need to feed your soil with third-party nutrients. Start slowly and use moderation. It is easy to add nutrients as you go, and problematic to deal with nutrient overdose. Pay close attention to your plants and take careful notes. Balancing optimal levels of nutrients and optimal pH levels will secure you a large yield. Soil is a forgiving medium, which allows you a range of experimentation and correction.
After the seedlings have been placed in containers, put them under the light and water each container with a half-gallon of pH 7.0 water. Always use water with a pH of 6.8 to 7.0. The light should be no closer than 24 inches from the plants. Check on the plants frequently during the first 18-hour light period. If you are concerned that the light is too powerful and is injuring the seedlings, raise the height of the light. A gentle oscillating fan blowing between the light and plants will reduce stress on seedlings.
To increase yield, you can increase the number of lights, plants, and square footage of your garden. This will cost more in space, time, money, effort, and involve greater risk.
You can also increase your yield by adding CO2 to your existing grow room, and watch your buds swell to the next level. Supplementing your garden with CO2 is a bit more in cost and work but is by far the most efficient way to increase yield without buying more lights, plants, and space.
The CO2 setup in this book includes the following equipment:
•20 pound tank of CO2
•C.A.P. Fuzzy Logic CO2 controller (see page 7 for more info)
•CO2 regulator (see page 7 for more info)
•Oscillating fan, or centrifugal fan mounted to wall
•Drilled CO2 tubing with micro holes (3-10 feet), and a plastic tubing T-connector
•Lamp/appliance timer
|
Whenever you see this icon, you will find information pertinent to a grow supplemented by CO2. We did a parallel grow with the CO2 setup, and where relevant you will see notes on the CO2 garden that tracks along with the day-to-day guide. |
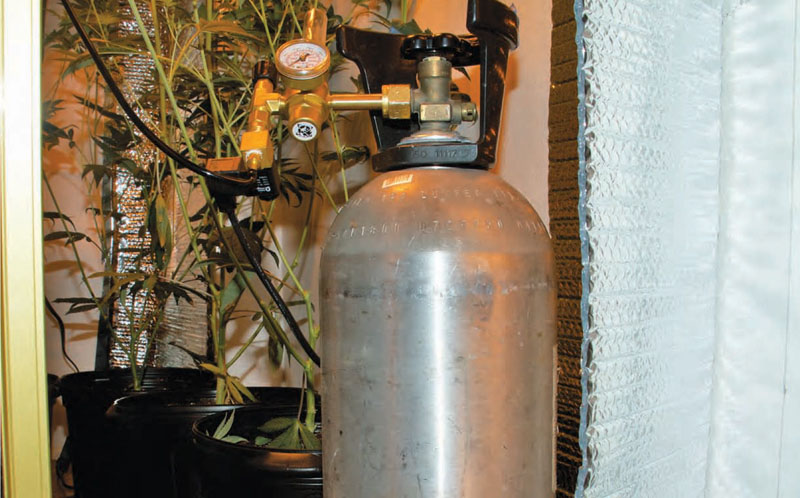
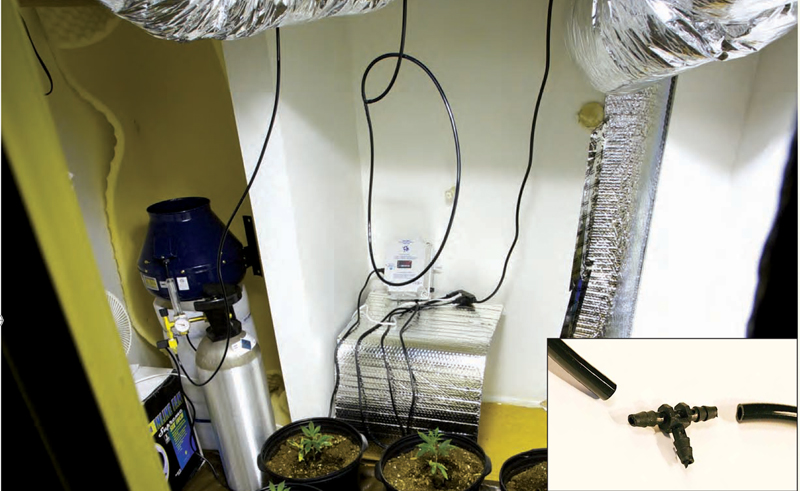
Place the CO2 tank where it is easily accessed, as it will need to be refilled in about a month. It does not need to be in the closet. Attach the CO2 regulator to the tank (screwed on). This is then attached to the CO2 controller. Attach a length of CO2 tubing to the tank’s emitter (CO2 regulator).
Make a loop with the drilled tubing with micro holes, and connect ends to the T-connector as shown above. Then attach the T-connector to the CO2 tubing that runs from the regulator. Hang the loop 2 to 20 inches above the plants; it can be hung over the ducting or from the ceiling. The black tubing gradually emits CO2 through its micro holes. As CO2 is heavier than air, it will settle into the canopy of the garden.
Plug the Fuzzy Logic Controller power cord into a timer, which should be set on the same time cycle as the lights. Plants utilize CO2 only when the lights are on. The light timer and the timer for the CO2 controller should always be on the same cycle. Use a fan set to "low" to disperse the CO2 around the room. You want elevated CO2 levels, 1000 to 1300 ppm, to increase yield and shorten harvest cycles!
The trickiest part of using CO2 is maintaining a sealed room. Sealing your garden allows you to easily control CO2 levels. However, you then face another problem: A sealed room has no place for heat to escape. A 1000-watt HPS bulb can cause temperatures to soar above 115 °F, killing your plants. One way to handle this excessive and fatal heat is to add an air conditioner unit, which offers superior temperature control. However, this consumes a lot of electricity.
We use another method: an air-cooled light. The light hood is sealed and exhausted using ducting and an inline fan. Ducting brings fresh air from outside into the grow room; this air passes through the sealed light hood and exits the room through another piece of ducting. The hot air created by the bulb is removed.
It is vital that the ducting and the light hood have an air-tight seal; any leaks in the exhaust sytem venting heat from the light could pull CO2 from the room, depleting the CO2 in several hours. Remember, the intention is to cool the bulb by bringing fresh air from outside the grow room, pass it over the bulb, and exit without mixing with the air in the grow room. This lessens the threat of overheating by removing the heat caused by the 1000-watt HPS bulb before it reaches the garden.
CO2 can be introduced as soon as the seedlings appear. This book includes steps for both CO2 and non-CO2 growing. In either case, each garden will have its unique intricacies and quirks. Don’t be intimidated: Once you take the first steps, stay patient, alert, and learn to make minor adjustments. Success is around the corner.