
INTRODUCTION
The process of building your own dream house should be one of the most exciting times of your life, but more often than not it turns out to be the biggest nightmare. On the website, inhouseplans.com, we specialise in being your online architect and your online building consultant. You will find all you need to build your dream house. This book provides the general guidelines of the process to be followed when planning to build a new house and the majority of the plans contained in it are available on the inhouseplans.com website.
Homeownership
When the need arises for a new roof over your and your family’s heads, you need to consider three options – renting, buying, or building a house – and each option has its own merits and drawbacks.
When renting accommodation, it may be true that you don’t need much of a capital outlay, and that you can relocate quite easily, but it also means that you don’t own a place of your own. Every rand you pay in rent simply goes into somebody else’s pocket, and your dream of owning your own place keeps slipping further and further away. Any escalation in property prices is to the benefit of the property owner, while you as the tenant simply have to pay a higher rent.
On the other hand, whether you buy an existing house or build a house from scratch, some initial capital of your own will be required, but all price escalations in the housing market will be for your own benefit.
For many years in South Africa it has been cheaper to buy an existing house than to build a new one, especially if you have been fortunate enough to find the house of your dreams with an established garden, paving and a pool, located in the area in which you want to live. However, you are very fortunate if you find a place that complies with all your requirements!
The only sure way to get everything you want or need from a home is to find an appropriate stand and to build it.
Site selection and purchase
Before buying a stand on which to build your own house (or, for that matter, before buying an existing house), there are many aspects you should consider carefully. Remember, a house will always be a major investment – by far the single biggest investment many people will ever make. Take care when considering that, in addition to the physical aspects of a stand such as trees, geological issues and water, landownership also includes legal rights. These include the right to sell, lease, build, mortgage, use, enjoy, occupy, and so on. These rights are tied to the land and therefore benefit successive owners.
Always be sure to consider the following aspects and make your own decision on the importance of each aspect:
• Ascertain what future development is being considered in the area, such as roads and industrial development.
• Determine the location of shopping areas, schools, churches, bus routes, etc.
• Check the extent of pedestrian traffic and heavy vehicle flow in the vicinity.
• Investigate the condition of the soil – be careful of dolomite and clay conditions – and the extent and condition of the topsoil.
• Find out from the local authority about possible restrictions in the town’s Conditions of Establishment, the stand’s title deed or the local authority’s Town Planning Scheme (see the section on Statutory information on page 10). Also make sure that the township has been proclaimed and serviced by the developer.
• Is there a pleasant view? Do you need a view?
• Where is north and how will it influence the living conditions on the stand?
• If the stand is situated on a slope, what becomes of the storm water from higher lying properties?
• What taxes are payable? What municipal services are available, and what are the costs?
• What is the size? Can subdivision or a second dwelling or granny flat be accommodated?
Building plans
One of the basic statutory requirements of the National Building Regulations (discussed under Statutory information on page 10) is that no-one may start building a house without having had the building plans of the house approved beforehand by the relevant local authority. This requirement is applicable to ALL buildings erected within the boundaries of jurisdiction of all local authorities in South Africa.
Every prospective house owner MUST therefore submit a full set of building plans for approval to the local authority before building may commence. Since 1 July 2006, all persons practising architecture or submitting building plans to local authorities within South Africa are obliged to register with the South African Council for the Architectural Profession (SACAP) and certify the plans.
All building plans must comply with a minimum standard, and include the following information:
• a floor plan
• elevations
• at least one cross-section of the building
• the layout of the sewerage system
• a site plan, which is that part of the building plan that links the building to the owner’s specific stand. Stand-specific information such as the slope of the land, the direction of north and the sewerage connection point will therefore be indicated on the site plan.
You may assume that the higher the qualifications of, and the more experienced the person is who will be responsible for drawing up the building plans, the higher the standard will be, and unfortunately this also applies to the price!
With plans from inhouseplans, however, a person will be submitting building plans to his/her local authority that are of the highest standard, drawn up by a professional architect, and which comply with all the relevant National Building Regulations!
Since it is not possible for inhouseplans to be aware of the particulars of each customer’s stand, a site plan is not included in the set of building plans provided. Each customer is therefore responsible for his/her own site plan, which can easily be drawn up according to the generic site plan included as an example with the acquired building plans. A site plan incorporates town-planning requirements. Should a customer not be able to draw up his/her own site plan, the owner can of course refer this to any local draughtsperson or architect.
Building plan approval
Local authorities have different requirements regarding the format in which building plans must be submitted. The number of copies required also differs amongst authorities. Please note that inhouseplans provides paper copies only (as many as required by the owner), and each customer should find out from his/her local authority which format is required.
Customers should also take note that most local authorities have a plan scrutiny fee payable. These scrutiny fee structures vary amongst the different authorities, but are usually based on the floor area of the building and in some cases on the number of sanitary fittings in the building.
Conditions of Establishment
When the township developer of a residential township establishes the town, one of the legal processes he/she must comply with is a list of special conditions of establishment. This procedure enables the developer to specify certain conditions to which all property buyers must adhere. In a particular township, for instance, it may be specifed that no house will have a corrugated iron roof, or that no house should be smaller than 200 square metres.
It is therefore clear that conditions of establishment may (and will) vary for each township proclaimed, depending on the needs of the particular developer. It is therefore not possible to list such conditions here.
However, the conditions of establishment of every single township ever proclaimed are stored at the Town Planning Department of the relevant local authority. All prospective house builders should therefore check with their local authorities before making a final decision regarding the building plans for a future house.
The local authority may, under special circumstances, relax the conditions of establishment of a particular township once the township developer has agreed to such a relaxation. Applications should be submitted to the relevant local authority.
Title deeds
Each and every urban stand in South Africa situated in a proclaimed township has a title deed document stored at the central Deeds Office. Title deeds may, amongst others, impose general or specific conditions or restrictions of which the prospective homeowner should be aware. Such restrictions may, for instance, limit the height of a building in relation to its distance from a boundary fence, or may impose a building line on a specific property to prevent the building from being built too close to the stand boundary.
Restrictions laid down in a title deed are usually more difficult to relax, but the local authority may warrant relaxation in certain instances once approval has been obtained from the relevant provincial authority.
Town planning schemes
A town planning scheme is a document adopted by a local authority which governs any development under the jurisdiction of the authority. This may include broader issues such as land use (zonings) and the density of a development, or issues focused on the individual stand, including coverage, height restrictions, building lines, servitudes, and so on. Restrictions imposed by an authority’s town planning scheme are very specific to the relevant local authority, and may usually be relaxed by such an authority.
It is important to note that no local authority will approve a building plan or allow building work to commence, if the owner’s building plans show a contravention of ANY restriction imposed by ANY of the above-mentioned documents. After selecting a suitable building plan from the inhouseplans.com catalogue, a prospective homeowner, therefore, should first make sure that his/her proposed house does not contravene any restriction as described above.
National Building Regulations
The National Building Regulations are a set of regulations appended to the National Building Regulations and Building Standards Act (Act 103 of 1977) as amended. These regulations are applicable to all buildings erected anywhere in South Africa, and were promulgated to prevent various local authorities from announcing their own set of building regulations.
Although the National Building Regulations are perceived by many as being extremely confusing and involved, this is really not the case. They comprise two mainstream regulation types, namely functional regulations and deemed-to-satisfy rules.
In its simplest interpretation, the functional regulations simply state that every building must be suited for its intended purpose!
To achieve this simple requirement, any building is regarded as compliant with these regulations if a competent and suitably qualifed person has performed a rational design. Therefore an owner can do whatever he/she wishes to do, as long as all the decisions are based on a rational design. This is done to encourage innovative designs and the use of innovative building materials.
Because not all designers may be interested in implementing innovative methods and/or materials, and because such methods and materials may not always be practical or economical, the act provides for a complete set of deemed-to-satisfy rules, by means of which any part of any building may be judged for compliance to the regulations. In the House-building guide section (page 13), frequent reference is made to the relevant deemed-to-satisfy rules of the National Building Regulations.
Customers of inhouseplans may rest assured that all building plans sold on the inhouseplans website fully comply with the relevant National Building Regulations. Because these regulations are national, they are applicable to every local authority in South Africa, ensuring that all local authorities in South Africa will accept all building plans available from inhouseplans.
National Home Builders Registration Council
The promulgation of the Housing Consumers Protection Measures Act (Act 95 of 1998) took place in June 1999. This made the National Home Builders Registration Council (NHBRC) a statutory body, and since 1 December 1999 it is compulsory for all home builders operational in the home-building industry to be registered with the NHBRC. This act provides protection against so-called ‘fly-by-night’ builders, that is, either builders who build to an unacceptable quality standard or builders who refuse to get involved in the rectification of built-in defects in the home. The council is mainly established to protect the interest of housing consumers, and to regulate the home-building industry. For more information on the NHBRC, please visit their website on www.nhbrc.org.
Building costs
Determining the costs involved in building a house is no easy task, simply because of economic phenomena such as inflation and price escalation. The prospective house owner should therefore at least be aware of the various costs involved when building a house:
• The cost of the property itself may vary considerably and many factors may play a role, including location, slope, view, zoning, etc. The fact of the matter is you pay for what you get.
• Apart from the stand’s purchase price, the property must be registered in the buyer’s name. The central authority in the Deeds Office registers all property in South Africa, and transfer of ownership must also be registered there by means of a transfer deed. A competent person, usually a lawyer, does this and a transfer fee is payable, as well as a fee to the lawyer. If a prospective landowner cannot afford to pay cash for the property, he/she may apply for a bank loan, called a mortgage bond, because the financial institution offering the loan will take the property as security if the owner is in default of payment. This mortgage bond must also be registered with the Deeds Office as a mortgage deed, and a mortgage registration fee is payable.
• Before building can commence, the stand must be provided with services connection points. These include points for water, sewerage and electricity. The costs for these connections vary amongst local authorities, and will be provided on request by the local authority.
• The next cost is that of the building plans and their approval. The prospective home builder may appoint and pay a professional person to do it, or opt for the easiest, most cost-effective and quickest way, namely buying a full set of building plans of a dream house from inhouseplans.
• The actual building costs are by far the main component of the total costs. These usually consist of material costs and labour costs, and may vary from city to city. They will also vary depending on the degree and quality of finishing required.
• During the building process, you may also be required to make use of other professional disciplines that involve professional fees. For instance, an owner may have to use the services of a professional engineer to design and supervise a reinforced concrete slab, or a land surveyor to point out the exact stand boundaries.
• Final costs may include extras such as fencing, landscaping, a pool and paving.
Apart from the actual building costs, and the above-mentioned extras, all other costs are mostly fixed. The only variable element where an owner can save is in the actual building costs. Even here the materials component is pretty much fixed, and you can possibly save on the labour element and the portion reserved as profit for the builder.
If an owner wishes to use the services of a building contractor, a profit margin will most likely be added to all material and labour costs. Although this is a safe way to go for the layperson, it is also more expensive. The safest way is to appoint an architect or building consultant to oversee the building process, but then the owner must be prepared to pay another mark-up on all costs.
If the owner has the necessary knowledge and skills, he/she can become an owner-builder and appoint subcontractors to do the job. By going this route, the owner cuts out all proft taken by somebody else, and only has to pay the material and labour costs of the subcontractors.
House-building guide
Different building methods and materials
As briefly discussed under the heading National Building Regulations (page 11), a prospective homeowner or designer is actually encouraged by these regulations to use innovative designs and alternative building materials.
The promulgation of the National Building Regulations and Building Standards Act has therefore seen the conception of an extended series of alternative building materials, including timber products and many different prefabricated systems.
Since a detailed discussion of the various innovative or alternative building methods is way beyond the scope of this book, we will focus solely on building plans for houses built from old-fashioned, tried and tested (and economical) bricks and mortar.
Site cleaning and stripping
Before any foundation excavations can be undertaken, a site must be properly prepared and cleared by removing all rubble and plant material such as grass and shrubs. If the site is saturated with groundwater, or if a natural flow of rainwater occurs across the site, a proper drainage system must be incorporated to drain the water to the municipal storm-water system. Care must also be taken not to generate unnecessary dust and noise pollution.
Anybody building a house is allowed to erect a temporary builder’s shed on the stand, and is obliged to provide the necessary sanitary facilities for the workers on the site.
Bulk earthworks and excavations
The owner must ensure that all earthworks and excavations are safe and stable. Excavations deeper than 3 m must be designed by a competent person, and must be approved by the local authority.
All excavations for strip foundations must be level (horizontal). Where an excavation runs across a slope in the land, it must be stepped into horizontal sections. All excavations for strip foundations must be at least 300 mm deep.
It is recommended that a land surveyor be appointed to ensure that the house is set out correctly within boundaries and statutory building lines.
On completion of all foundation excavations, and before any concrete is placed, a building inspector from the local authority must be called out for a compulsory foundation inspection. During this inspection the dimensions and level of the excavations will be scrutinised. It will also be ascertained whether the builder has kept to the approved building plan, and whether the layout is positioned as indicated on the plan.
Foundations
The foundation of a building must be designed in such a way that it can easily transfer the weight of a wall and roof to the ground. In order to achieve this functional regulation, the deemed-to-satisfy rules include the following specifications.
Concrete mix to be poured into the excavation must produce strength of at least 10 MPa after 28 days. This is obtained by mixing one part cement, four parts sand and five parts aggregate (usually 20 mm stone). The thickness of the foundation must be at least 200 mm, and when a step is formed, the top layer must overlap the bottom layer by 200 mm (the thickness of the layer). The width of the foundation strip must be at least 600 mm for load-bearing (usually all outer) walls, and 400 mm for non-load-bearing (usually all inner) walls. In the case of non-load-bearing inner walls, it is also permissible to provide a thickening in the floor slab instead of a foundation strip. If this option is preferred, the thickening in the floor slab should be 200 mm.
Building of foundation walls
A foundation wall is the wall built on top of the concrete foundation strip to the height of the floor slab. All foundation walls must be 230 mm (two bricks) wide. If a foundation wall is going to be higher than 1.5 m, the house should be stepped to accommodate the slope of the land. If such a foundation wall is also used as a retaining wall, it is advisable to build it 345 mm (three bricks) wide.
Backfill of foundation walls and damp-proofing
Once the foundation walls have been built to floor level (also called the plinth), the inside of the house must be filled up (backfilled) to floor level. It is usually possible to use the same material that was excavated for the foundation strips, so always try to leave this material close by.
In order to prevent sagging beneath the floors, it is important to compact this backfilled material to closely resemble the natural density before excavation.
This is easily accomplished by replacing the filling in layers of 150 mm and compacting each layer properly with a mechanical or hand compactor. This process will be improved if the layers are sprayed with water to dampen them. Always take care, however, not to soak the material completely as this will wash out all the fine material that is supposed to fill the smaller openings.
Continue backfilling until the final level is one brick below the final floor level, which will also be the thickness of the concrete floor slab. Try to make this top layer as level as possible.
Pouring of floor slabs
The concrete floor slab must be 75 mm thick (one-brick course thick) and should consist of 10 MPa concrete, mixed from one part cement, four parts sand and five parts 20 mm aggregate.
In areas where groundwater is a problem, it is advisable to place a suitable plastic waterproofing membrane of 0.25 mm on the filling prior to pouring the concrete. This membrane must be folded upwards to the thickness of the slab around the perimeter. An overlap in the membrane must be at least 150 mm.
It is advisable at this point to consult with your plumber and electrician to ascertain whether any services such as electricity conduit or drainage pipes should be placed in position before concrete is cast. This will save time and cost by eliminating chiselling and breaking out parts of the concrete slab at a later stage.
Brick walls
On completion of the floor slabs, the walls of the house must be bricked up to roof height, securing all door- and window frames in place in the process.
Always place door- and window frames on an exact vertical plane, and make sure you provide horizontal support for doorframes to prevent them from bending inwards from the pressure of the surrounding walls. Once again, this will be the last opportunity to make minor alterations. For instance, you cannot request a new load-bearing wall if a proper foundation has not been provided for it.
Before laying the first brick, a damp-proof course (DPC) should be provided in the form of a continuous waterproof layer the width of the brick wall. DPC is placed beneath ALL walls to prevent damp from the earth from rising into the walls.
It is good building practice to brick up the walls of the entire building simultaneously.
All window frames and openings for wider types of doors like sliding doors must be provided with a reinforced layer along the top of the opening to carry the weight of the wall above the opening. This can be done either by using a prefabricated concrete beam called a lintel, or by physically building a lintel using bricks and a kind of wire reinforcement called brickforce. It is also advisable to build a layer of brickforce into a wall on approximately every sixth layer of brickwork.
All outer (load-bearing) walls are built 230 mm wide (two bricks placed alongside one another), while most non-load-bearing (inner) walls are built 115 mm wide. If an inner wall is higher than 3.3 m, it must also be 230 mm wide.
It is standard building practice to build roof ties into the top six layers of outer walls. Wire or hoop ties can be used, and the purpose is to tie the roof structure to the walls.
Remember the following deemed-to-satisfy rules when considering the layout of the various rooms of the house:
• No habitable room (excluding a kitchen, scullery and bathroom) shall have a floor area of less than 6 m, with no linear dimension of less than 2 m. The floor-to-ceiling height of all habitable rooms shall be no less than 2.4 m over a floor area of 70% of the room. The floor-to-ceiling height of all other rooms, including the kitchen, scullery, bathrooms, passage and foyer, shall be no less than 2.1 m.
• To facilitate natural lighting and ventilation, all habitable rooms shall have a window opening comprising at least 10% of the floor area of that room, of which at least 50% must be able to open.
• It is not necessary to finish off the brickwork of walls that will be plastered, but all unplastered face-brick walls must be grooved out properly between the bricks to create a neat appearance.
• Apart from carrying the roof of the house, the second main purpose of an outer wall is to keep the interior of the house dry. Always use proper hard-burnt clay bricks (clinker bricks or face bricks) if you don’t intend plastering the exterior of the house. If you do intend plastering the exterior, the layer of plaster and the paint layer will keep the water out.
Backfill and waterproofing
If the house is built on a slope that has been excavated and backfill is needed on the outside of the house against the wall, such a wall must be 345 mm (three bricks placed alongside one another) wide. A thick plastic sheeting of 0.25 mm should be built into the wall vertically, to prevent moisture from penetrating the building. This sheet is added in-between the outer and central layer of bricks. Backfilling is done in 150 mm layers and compacted thoroughly.
It is advisable that a structural engineer be appointed to design a retaining wall.
The roof
On completion of all the walls, a carpenter can erect the roof structure, comprising either beams for a flat roof or roof trusses for a pitched roof. Since the roof is an extremely important structural element of a house, it is vital that a competent person do the design. Remember, a roof is subjected to its own weight, which can be considerable in the case of a heavy concrete tile roof, and to wind forces, which can be considerable in the case of a lighter, sheet-metal roof. It is therefore always advisable to have the roof structure properly designed and constructed.
These days it is much easier and safer to make use of the services of one of many prefabricated roof companies that take the exact measurements, create a computer-aided, engineered design, assemble the trusses in the factory, and erect them on site according to specifcation. Local authorities require an engineer’s certificate for the design and erection of a roof structure.
The minimum slope of a fat, sheet-metal roof is 5°, but this may be decreased to 3° if long, single-span plates are used. The minimum slope of a pitched concrete tile roof is 26° without waterproofing, and 17° with an under-tile waterproofing membrane.
During roof construction, it is the plumber’s job to fit drainage valleys and flashings on walls, chimneys and ventilation pipes that run through the roof. Please note that some local authorities require a roof-structure inspection as well.
Once the roof cover has been completed, the fitting of rainwater gutters and down-pipes as well as fascia boards is optional.
The owner-builder should take note of the fact that, on average, once the roof is completed, about 50% of the building costs should have been spent.
Plumbing and electrical work
Once the walls have been bricked up, it is the plumber’s responsibility to install water and drainage pipes in the walls and floors. Underground waste-water drainage pipes should also have been installed by now and inspected by the local authority. This is called the open-drainage inspection, and is conducted by the building inspector once the pipes have been installed, but before they are covered with soil. This must be done by a qualifed plumber.
The entire water reticulation system is connected to the municipal water connection point on the stand boundary. At this stage the owner will be requested to indicate the position of all garden taps. Since it will be difficult to change these positions later on, due consideration should be given at this point.
Simultaneously, an electrician will install conduit pipes in the walls and roof structure to accommodate all the electrical cables for the house’s electrical system. All electrical wiring starts off from a central point, called a distribution box, which again is connected via an underground cable to the municipal electrical connection point on the stand boundary.
Both the water pipes and electrical conduit pipes are installed in the walls by chasing grooves into the brick walls and mounting the pipes inside these grooves. Please note that unplastered inner face-brick walls require much more ingenuity from the bricklayer because all the pipe work must then be built into the brickwork.
Plasterwork
Once the electrician and plumber have fitted the pipes into the walls, plasterwork may commence. This is a specialised trade to be performed by an accomplished tradesman. Always make sure you use proper plaster sand.
It should be pointed out here that there are, in fact, three types of sand used in the building trade, which vary in their degree of fineness: concrete sand is the coarsest, followed by dagha or mortar sand, and plaster sand which is the finest.
Ceilings and cornices
On completion of the plasterwork, a ceiling contractor can move in to fit the ceilings, which are usually suspended from the roof structure, and may be made of gypsum board, fbre-cement board or even timber planking such as pine or meranti. The edges of the ceiling are usually rounded off against the walls with some kind of cleat or a prefabricated ouarter-round of gypsum board, called a cornice.
Please note: it will be easier for the plumber to fit the geysers before the ceilings are installed.
Floor screeds
Once the ceilings have been fitted, the plasterer may move in again to do the finishing layer on the concrete floor slabs, called the screed. This is a thin layer of sand and cement mix, and is used to make the floor absolutely level. The floor tiles or carpets will be fitted on top of the screed later.
Finishing trades and outside work
At this stage the building site becomes very busy as many different tradesmen hurry around to finish their jobs. The tiler will be laying wall and floor tiles where specifed, the glazers installing windowpanes, and the carpenter hanging all the doors and fitting the locks, as well as installing the built-in cupboards and curtain rails. Once the house can be closed and locked up at night, it is time to install the kitchen cupboards and appliances such as the stove and oven. The electrician will now complete his job by fitting the wall plugs, light switches and light fittings, while the plumber will be installing the bathroom fittings, baths, basins, toilets and showers.
At some point during this stage, the electrician will request a final electrical-installation inspection from the local authority, while the builder and plumber will request final building and drainage inspections. Once all the disciplines have moved out of the house, it is time to install the carpets and skirting boards to finish everything off.
Before the final inspection, all building rubble must be cleared and removed. Landscaping and gardening may then commence, including paving where needed, as well as garden and screen walls. Although gardening and paving may commence earlier, care should be taken not to jeopardise building work on the house.
Sources: The South African Institute of Architects Practice Manual, June 1999; National Building Regulations and Building Standards Act, Act 103 of 1977, as amended; the National Home Builders Registration Council (NHBRC) website.
The lush tropical climate of Bali has resulted in a very distinct architecture, which makes use of large, pitched-roof overhangs, and lots of wood and bamboo finishes. These traditional elements have been reinterpreted in modern dwellings by means of tropical landscape settings, courtyards, swimming pools and koi ponds. The combination of stone and plastered and painted walls in earthy colours blends well with clay and concrete roof tiles, and even thatched roofs. Detailed plasterwork such as a plinth and bands around window openings painted in contrasting colours adds some substance to the design. Floor finishes range from wood and terracotta to stone and tinted cement. The Bali style is equally suitable for the South African climate and has been growing in popularity.
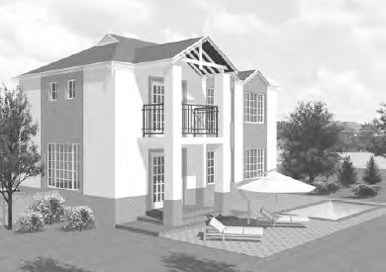
The term ‘colonial’ refers to an extended period in the history of several countries throughout the world that were affected by a number of mostly European influences. Architecture was one of these influences. The Colonial floor plan normally has a classically symmetrical shape, but various styles have developed. The house, with a dark green, pitched metal roof, white fascias, red face brick with white plaster surrounds and decorative steel balustrades, is a prime example of one of the Colonial styles from the Victorian era. Wooden or steel window frames are usually painted white.
After the Postmodern and Deconstructivist movements of the seventies and eighties, a different kind of dynamic modern style developed that can best be described as Contemporary. More expressive in terms of form, function and the use of materials, this style features a diversity of materials and finishes, such as pitched sheet metal or concrete roof tiles in combination with flat concrete roofs. Walls are a combination of glass, brick or stone panels alternating to express a functional interaction between internal and external spaces. The clever interaction of the structure sometimes creates the effect of a floating balcony floor or a floating roof, extracted from the solid structure by seemingly invisible glass panels, which in turn create variable internal volumes. Solid wall panels can be pierced with small windows to create a rhythm of light holes in a wall. The use of either wood or aluminium successfully completes the intricate combination of materials used in this style.

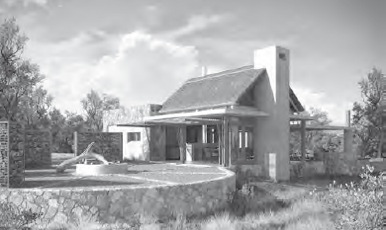
The growing interest in ecotourism in South Africa has led to substantial growth in the demand for accommodation in privately owned nature reserves, as well as in national parks. Many interesting designs, ranging from the popular thatched roof to stunning contemporary designs, have been erected. However, the designs displayed here are mostly suitable for smaller enterprises. They feature a central entertainment area and chalets, which have en suite bathrooms and private patios, and can be scattered at random in the bush depending on the topography. The style is thatched roof or sheet metal with a combination of stone and textured-plaster wall finishes and wooden window and doorframes.
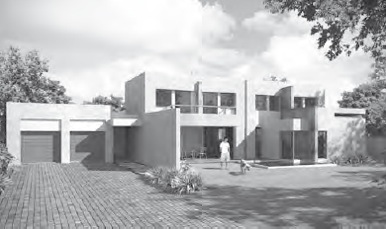
The modern era started as early as the 1920s with the rise of the Bauhaus movement in Germany. This style has evolved progressively over many years and is still popular in South Africa. Distinctive elements of the Modern style are the flat roof, white plastered and painted wall finishes, and relatively large window openings with aluminium frames. Structures are cube-shaped with varying roof heights that result in a variety of internal volumes. Flat roofs also allow the plans to take any form, thus creating interesting external spaces and courtyards.
The design of townhouses is very site specific. The number of units, density and height restrictions vary from property to property. Important considerations include size, in terms of floor area, and the positioning of parking bays and garages. To a large extent, demands in the property market also determine styles. The plans in this book, as well as on the website, are of double units combined in a single structure, in either double or single storey. These plans are suitable for a single stand with zoning rights to permit two units per stand. However, they can be combined in multiple clusters on larger stands. The designs are not style specific, but consist of tiled roofs with plastered and painted walls.
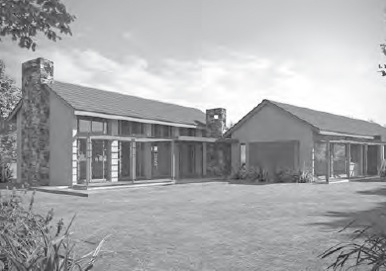
The Traditional style is a plain, economic, conservative style with pitched, tile or sheet-metal roofing, a combination of face-brick and plastered wall finishes, and steel, wood or aluminium window frames. The plan is usually quite simple to allow for an economical roof design.
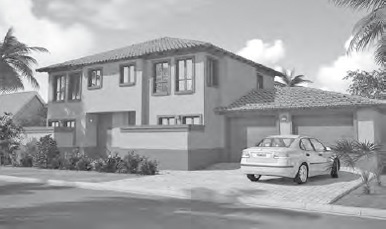
The Tuscan style has borrowed certain elements from the romantic and rustic building styles of the Tuscan countryside in Italy, and has been adapted in various versions for the South African market. The essence of the style comprises a pitched, tiled roof in a multi-coloured clay or concrete roof tile, with minimum overhangs with some decorative brick corbel work. Detailed plasterwork, such as a plinth and bands around window openings painted in a darker colour, add a classical feel to the design. The external walls are painted in ochre colours that blend well with wooden or dark aluminium window frames. Structural columns with classical designs serve as decorative elements at entrances and on balconies. Balustrades are often in ornate steel to enhance the classical feeling of the structure.
