Once you have mastered the basics of knitting, you can go on to develop your skills and start making more challenging projects.
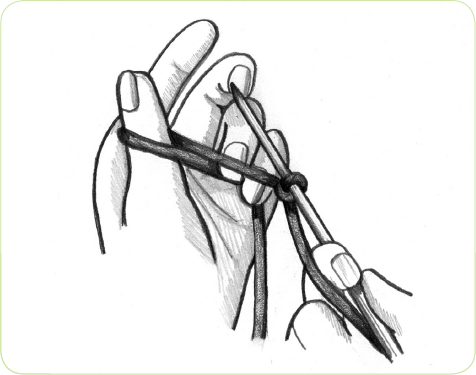
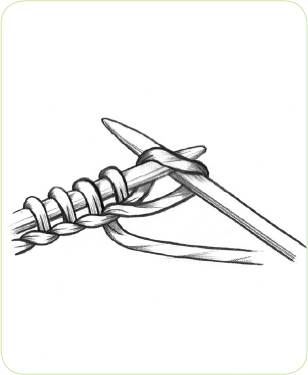
1 Make a slip knot 1m (39in) from the end of the yarn. Hold the needle in your right hand, with the ball end of the yarn over your index finger. Wind the loose end of the yarn around your left thumb from front to back.
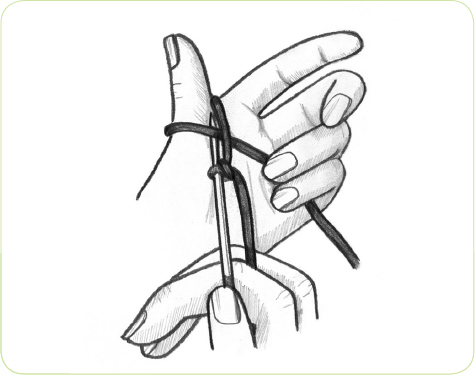
2 Insert the point of the needle under the first strand of yarn on your thumb.
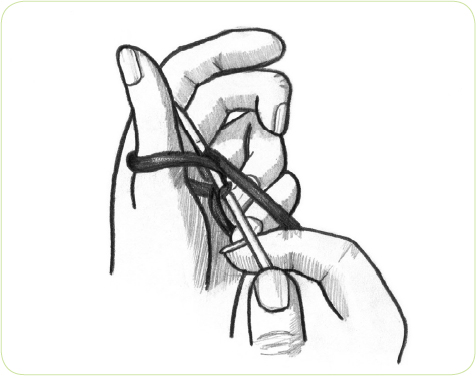
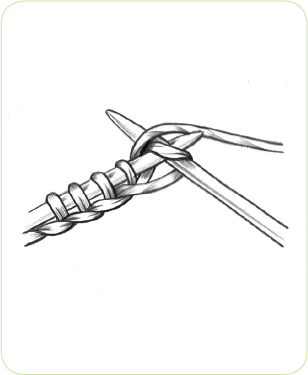
3 With your right index finger, take the ball end of the yarn over the point of the needle.
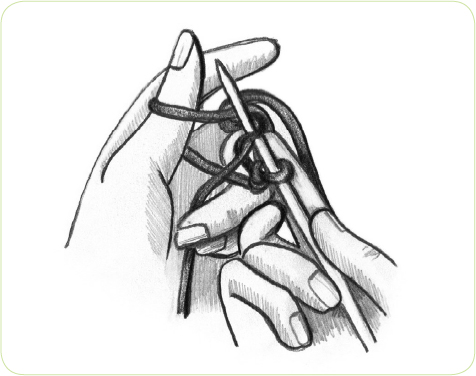
4 Pull a loop through to form the first stitch. Remove your left thumb from the yarn. Pull the loose end to secure the stitch. Repeat until all stitches have been cast on.
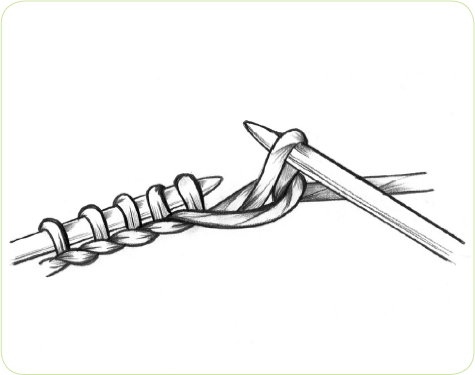
1 Hold the needle with the cast-on stitches in your left hand, with the loose yarn at the back of the work. Insert the right-hand needle from left to right through the front of the first stitch on the left-hand needle.
2 Wind the yarn from left to right over the point of the right-hand needle.

3 Draw the yarn through the stitch, thus forming a new stitch on the right-hand needle.
4 Slip the original stitch off the left-hand needle, keeping the new stitch on the right-hand needle.
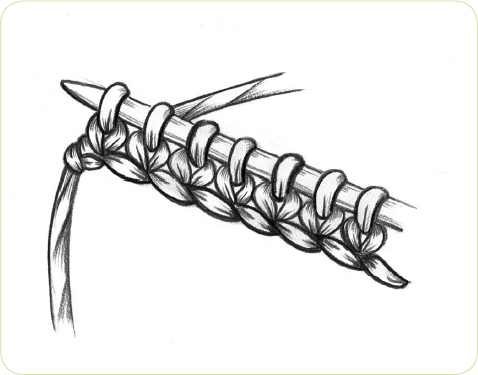
5 To knit a row, repeat steps 1 to 4 until all the stitches have been transferred from the left-hand needle to the right-hand needle. Turn the work, transferring the needle that holds the stitches to your left hand to work the next row.
1 Hold the needle with the stitches in your left hand with the loose yarn at the front of the work. Insert the right-hand needle from right to left into the front of the first stitch on the left-hand needle.
2 Wind the yarn from right to left over the point of the right-hand needle.
3 Draw the yarn through the stitch, thus forming a new stitch on the right-hand needle.

4 Slip the original stitch off the left-hand needle, keeping the new stitch on the right-hand needle.

5 To purl a row, repeat steps 1 to 4 until all the stitches have been transferred from the left-hand needle to the right-hand needle. Turn the work, transferring the needle that holds the stitches into your left hand to work the next row.
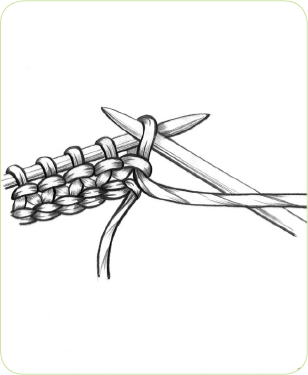
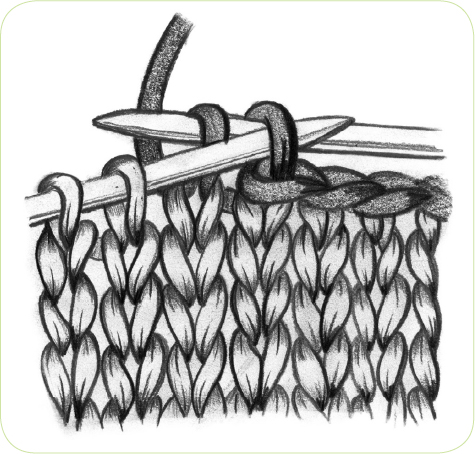
There is one simple, most commonly used method of securing stitches once you have finished a piece of knitting – casting off. The cast-off edge should always have the same ‘give’ or elasticity as the fabric and you should always cast off in the stitch pattern used for the main fabric unless the pattern directs otherwise.
Knitwise
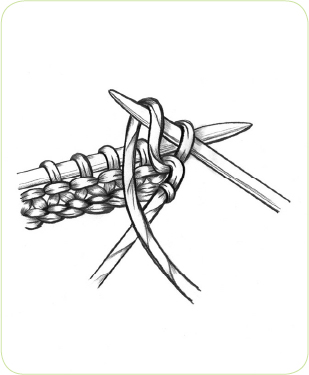
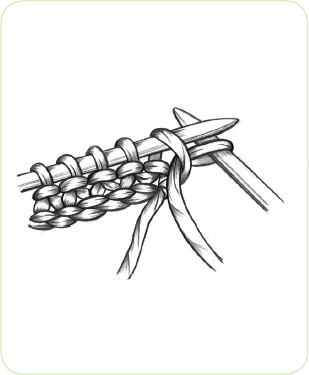
Knit two stitches. *Using the point of the left-hand needle, lift the first stitch on the right-hand needle over the second, then drop it off the needle. Knit the next stitch and repeat from * until all stitches have been worked off the left-hand needle and only one stitch remains on the right-hand needle. Cut the yarn (leaving enough to sew in the end), thread the end through the stitch, and then slip it off the needle. Draw the yarn up firmly to fasten off.

Purlwise
Purl two stitches. *Using the point of the left-hand needle, lift the first stitch on the right-hand needle over the second and drop it off the needle. Purl the next stitch and repeat from * until all the stitches have been worked off the left-hand needle and only one stitch remains on the right-hand needle. Secure the last stitch as described for casting off knitwise.
The simplest method of increasing one stitch is to work into the front and back of the same stitch.
On a knit row
Knit into the front of the stitch to be increased into; then, before slipping it off the needle, place the right-hand needle behind the left-hand needle and knit again into the back of the same stitch. Slip the original stitch off the left-hand needle.

On a purl row
Purl into the front of the stitch to be increased into; then, before slipping it off the needle, purl again into the back of the same stitch. Slip the original stitch off the left-hand needle.

Tip
In this book, you will most often find that increases and decreases are used to create the lace and eyelet patterns. With lace stitches, it is commonplace for sets of increases and decreases to be paired together. This creates the open, ‘holey’ nature of the pattern while keeping the overall stitch count consistent.
The simplest method of decreasing one stitch is to work two stitches together.
On a knit row
Insert the right-hand needle from left to right through two stitches instead of one, then knit them together as one stitch. This is called knit two together (k2tog).
On a purl row
Insert the right-hand needle from right to left through two stitches instead of one, then purl them together as one stitch. This is called purl two together (p2tog).
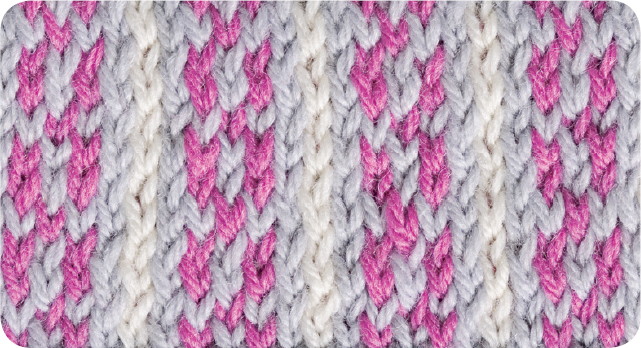
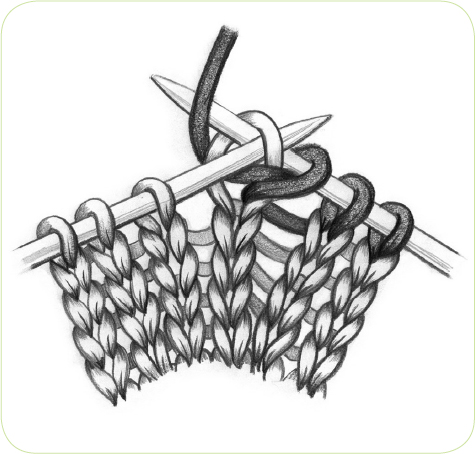
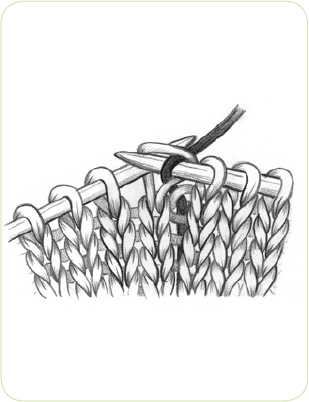
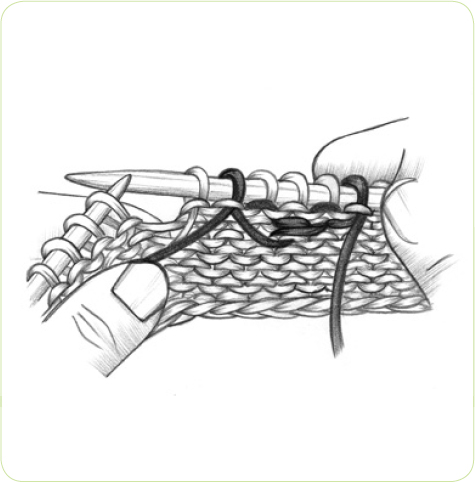
The Ploughed furrows design requires you to join yarn in the middle of a row
When working Fair Isle, it is better to join in a new colour at the beginning of a row, but in some cases, you may have to join in the middle of a row. This is how you join in a new colour mid-row on a knit row.
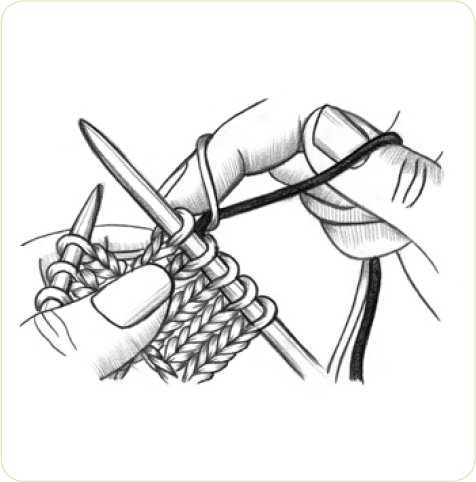
1 Lay the new colour (B) over the original colour (A). Twist the yarns over themselves and hold them in place.

2 Knit with the new colour (B). You can always go back and tighten the join after a couple of stitches.
This is how you join in a new colour mid-row on a purl row.

1 Lay the new colour (B) over the original colour (A). Twist the yarns over themselves and hold them in place.
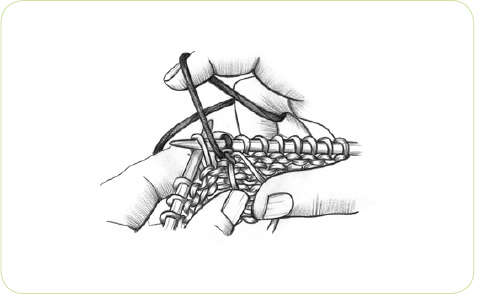
2 Purl with the new colour (B).
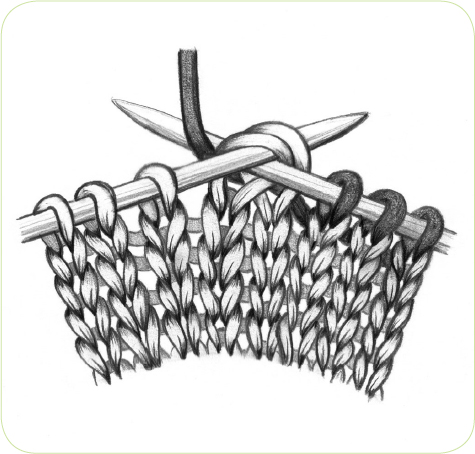
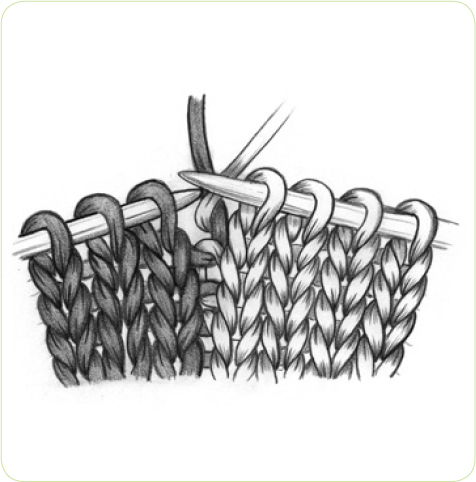
When working in intarsia you will find yourself needing to join in a new colour in the middle of a row.
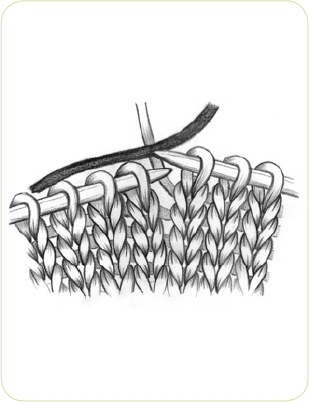
1 On a knit row, knit to the change in colour. Lay the new colour over the existing colour and between the two needles, with the tail to the left.
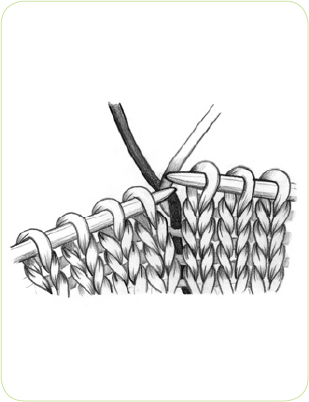
2 Bring the new colour under and then over the existing colour.
3 Knit the stitch with the new colour. Go back and pull gently on the tail to tighten up the first stitch in the new colour after you have knitted a couple more stitches.
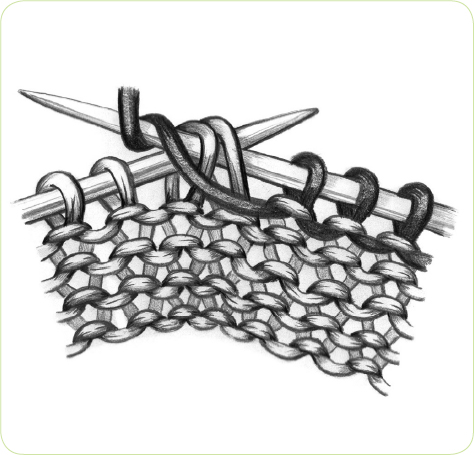
Once you have joined in a new colour you may need to work for a number of rows, changing these colours on both the knit rows and purl rows. This is often confusingly referred to as ‘twisting’ the yarns but it is a link rather than a twist. It is a common mistake to over-twist the yarns at this point, with the result that the fabric will not lie flat.
1 On a knit row, knit to the change in colour. Bring the new colour up from under the old colour and drop the old colour so that the new colour is ready to work with.
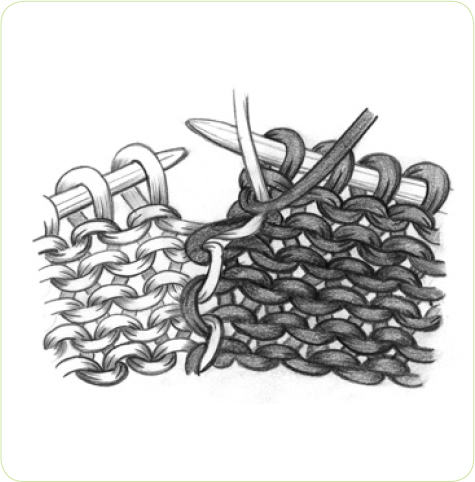
2 On a purl row, knit to the change in colour. Bring the new colour from the left under the old colour and up to the top. Drop the old colour and continue with the new colour.
Tip
When working blocks of colour in an intarsia pattern you may find it easiest to wind a small skein of yarn, called a bobbin, for each colour section, rather than working off a full ball of yarn. This makes the process less fiddly and is less likely to get your various yarns tangled.
If you are working a complex design it is always best to look for ways of eliminating ends so that you can cut down the amount of time that will be needed to sew them all in. Look for shapes that perhaps have an outline, as with a diamond motif.
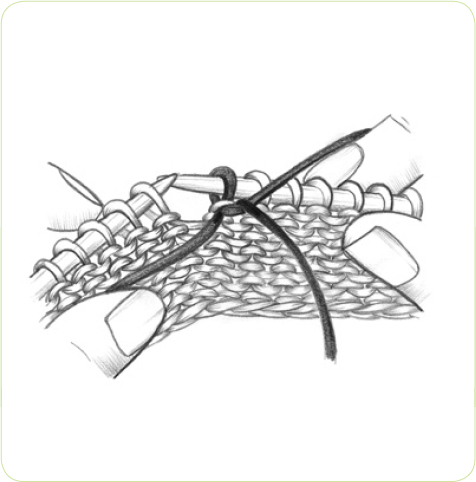
1 Take a length of the yarn required to work the whole motif and fold it in half. On the centre stitch of the motif, loop the fold over the right-hand needle.
2 On the next row, take one end of the yarn to the right and the other to the left, linking the outline and background colours on each row. If the motif is very small and the background colour remains the same, it is best to carry the background colour across the back of the motif, weaving it in if necessary.
Charts are featured in many of the instructions for the cable and aran stitches (see here) and for the colourwork designs (see here).
Charts are read exactly as the knitting is worked – from the bottom to the top. After the last row at the top has been worked, repeat the sequence from row 1 if required.
Each symbol represents an instruction. Symbols have been designed to resemble the actual appearance of the knitting. This is more difficult to do with multicolour slip-stitch patterns, which have to be knitted before the mosaic effects become obvious.
Before starting to knit, look up all the symbols on your chosen chart (see here for a key to the stitch diagrams) so that you are familiar with the techniques involved. These may be shown with the pattern as a special abbreviation. The most common abbreviations that are not shown as special abbreviations are listed here. Make sure that you understand the difference between working similar symbols on a right-side and on a wrong-side row.
Each square represents a stitch and each horizontal line represents a row. Place a ruler above the line you are working and work the symbols one by one. If you are new to reading charts, try comparing the charted instructions with the written ones.
For knitters who wish to follow the written directions, it is still a good idea to look at the chart (where one is available) before starting, to see what the repeat looks like and how the pattern has been balanced.
Right-side and wrong-side rows
‘Right-side rows’ are where the right side of the fabric is facing you when you work; ‘wrong-side rows’ are where the wrong side is facing you when you work. Row numbers are shown at the side of the charts at the beginning of the row. Right-side rows are always read from right to left. Wrong-side rows are always read from left to right.
Symbols on charts are shown as they appear from the right side of the work. Therefore, a horizontal dash stands for a purl ‘bump’ on the right side, regardless of whether it was achieved by purling on a right-side row or by knitting on a wrong-side row. To make things clearer, symbols on right-side rows are slightly darker than those on wrong-side rows.
Pattern repeats and multiples
The ‘multiple’ or repeat of the pattern is given with each set of instructions – for example, ‘multiple of 7 + 4’. This means you can cast on any number of stitches that is a multiple of 7, plus 4 balancing stitches – for instance, 14 + 4, 21 + 4, 28 + 4, and so on.
In written instructions, the 7 stitches are shown in parentheses or follow an asterisk *. These stitches are repeated across the row the required number of times. In charted instructions, the pattern repeat is contained between heavier vertical lines. The extra stitches not included in the pattern repeat are there to ‘balance’ the row or make it symmetrical and are only worked once.
Some patterns require a foundation row that is worked once before commencing the pattern but does not form part of the repeat. On charts, this row is marked by a letter ‘F’ and is separated from the pattern repeat by a heavier horizontal line.
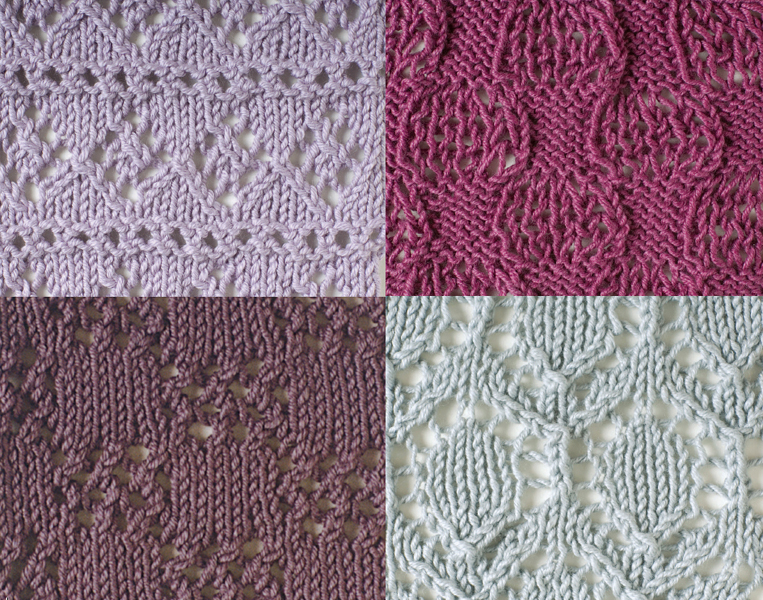
Lace knitting can be used in many different ways – as an allover pattern, a horizontal or vertical panel, or as single or random motifs. Lace stitch patterns are most effective when worked in plain yarns, as fluffy or textured yarns do not show the detail of the pattern. Finer yarns are also more suitable than bulky yarns, as they give the stitch a more delicate appearance. Lace knitting is especially popular for baby garments such as heirloom shawls and christening blankets.
Lace patterns are produced by using the eyelet method of increasing. These increases are usually worked in conjunction with decreases, so that the number of stitches remains constant at the end of each row. However, some of the most beautiful lace effects are achieved by increasing stitches on one or more rows and decreasing the extra stitches on subsequent rows. Circular shawls are produced by continually increasing stitches on every round (or every alternate round), while working the increases into the lace pattern.
The eyelet method of increasing is used in lace patterns to form a hole. The exact way that the yarn is taken over the needle depends on the stitches at either side of the eyelet – whether they are knitted, purled or a combination of both. They are then accompanied by one of the decrease methods, depending on whether the slant is to be towards the left or the right.
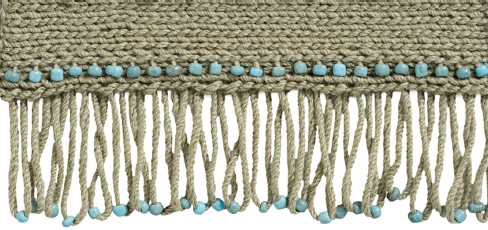
If an edging is worked lengthways then the instruction at the start of the pattern will say, for example, ‘Worked lengthways over 10 sts’. This means that you cast on 10 stitches to work the first row. Once you have worked all the pattern rows, you simply repeat them until the edging is the required length.
The instructions may tell you to finish the final repeat on a particular row. This is usually so that if the ends of the knitted edging are joined to form a circle, the pattern will run as evenly as possible across the join. If a particular row is not given, end the last repeat with the last pattern row.
Depending on the pattern, the number of stitches on the needle may vary on rows. When the number changes, a stitch count is given in brackets at the end of the row. This count includes all loops on the needle, whether they are full stitches or yarnovers. If no stitch count is given then the number of stitches has not changed since the last count. So, a lengthways pattern with no stitch counts at all has the same number of stitches on every row as originally cast on.
Some patterns need a foundation row that does not form part of the repeat. These are marked as such in the patterns.
Edgings that are worked from the top down or bottom up have different instructions. The ‘multiple’ or repeat of the pattern is given at the start – for example, ‘Starts with multiple of 7 sts + 4 sts’. This means you can cast on any number of stitches that is a multiple of 7, plus 4 balancing stitches – for instance, 14 + 4, 21 + 4, 28 + 4, and so on. These patterns do not have stitch counts at the ends of the rows, so you will need to follow the increases and decreases carefully to keep the pattern correct.
The number of times the pattern rows need to be repeated to make the edging shown in the swatch will be specified, though on many of the patterns you could work the repeat more often to create a deeper edging if required.
If you are going to work a bottom-up edging and then continue knitting the project, you need to make sure that the number of stitches the edging finishes with – for example, ‘Ends with multiple of 6 sts + 2 sts’ – can be multiplied to make the correct number of stitches for the first row of the project. So, in this example, the first row of the project needs to be any multiple of 6 stitches, plus 2 balancing stitches.
For a top-down edging worked on the lower edge of a project, check the multiple the edging starts with. Edging patterns won’t work without the correct multiple, so you will usually need to adjust the number of project stitches.
However, if the number of project stitches is just one or two more than is needed for the edging, then you can add one or two selvedge stitches to the end of the edging pattern, but remember they are there and don’t try to work them into the pattern. Make careful notes of any changes and consider how they might affect other areas of the project. Of course, both bottom-up and top-down edgings can be worked as strips and sewn on afterwards if preferred.
Attaching edgings
Lengthways edgings need to be sewn to the finished project. Usually it is best to use a tapestry needle and matching yarn and whip stitch the top edge of the edging to the knitted fabric. To attach an edging to cloth fabric, use a sewing needle and matching sewing thread.
