
ASTERISK (*): Repeat directions contained between asterisks, often across the row. For example, if you have 12 stitches and the directions say, “*Knit 2, knit 2 together; repeat from * to end of row,” you will work the sequence “knit 2, knit 2 together” three times.
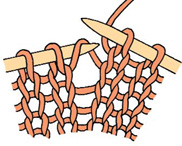
CAST OFF: Casting off (sometimes called binding off) is a technique for taking the stitches off the needle so that the knitting does not unravel. Here’s a general-purpose cast-off: Knit 2 stitches, then draw the first stitch over the second and slip it off the needle. Knit the next stitch and draw the second stitch over it. Repeat until all stitches are bound off. Cut the tail of yarn and thread it through the remaining stitch and tighten it. (See also Three-Needle Cast Off.)
Casting Off
CAST ON: The long-tail cast on makes a neat, firm, but elastic edge: Estimate length of “tail” by wrapping yarn around needle one time for each cast-on stitch you need. Make a slip knot right here, and slide knot over a knitting needle. Hold needle in your right hand; hold tail over thumb and working end of yarn over index finger of your left hand (Step 1). Insert needle under front loop of tail on your thumb. Bring needle over and behind working yarn on index finger (Step 2). Use needle to draw working yarn through loop on your thumb; release loop. Place thumb under tail, and draw yarns toward you holding both firmly.

Casting on Step 1
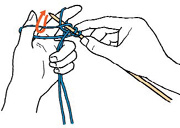
Casting on Step 2
DECREASE: A decrease reduces the total stitch number by one. For the purposes of this book, a decrease is worked by knitting (or purling) 2 stitches together.

Decreasing by knitting 2 together.
FAIR ISLE KNITTING: Fair Isle (also known as stranded) knitting creates patterns by using more than one color in a row. Traditional patterns usually have no more than two colors in a single row. The color sequence is indicated by a chart on which each stitch is represented by a colored square. Follow the charts, line by line, beginning at the bottom right. For projects worked in the round, read each line of the chart from right to left. For projects worked on straight needles in stockinette stitch, read right-side (knit) rows from right to left, and wrong-side (purl) rows from left to right. Carry unused yarn loosely across back of work. It is especially important to keep loose tension on non-working yarn when you are knitting projects to be felted, since yarns that are carried too tightly shrink disproportionately and distort the shape of felted items. Never carry yarn more than three stitches without catching it with working yarn.

Carrying a second color.
I-CORD: An I-cord is a narrow tube knitted with two double point needles on 3 or 4 stitches. Your pattern will tell you how many stitches to use. If you knit the cord separately from the main item, you will cast on these stitches. In some cases (on purses, for example) you may be asked to pick up stitches from the finished knitting (the top edge, for instance) to begin the I-cord. This makes a stronger join than simply sewing the cord to the item. To make an I-cord, cast on (or pick up) 3 (or 4) stitches; knit 3 (or 4). Do not turn, but move the needle holding the stitches to your left hand. Slide the stitches to the right end of the needle, so that the first cast-on stitch is the first stitch at the tip of the left needle. Insert the right needle, knitwise, into that stitch, bring the yarn from the left to the right across the back of the knitting, and knit the stitch in the usual manner. Make sure you knit the first stitch tightly. Knit the remaining stitches on the needle. Repeat this procedure until the I-cord is the desired length.

I–Cord
INCREASE: An increase adds one stitch to the total stitch number. Some projects, use the increase method known as “make 1.” (See drawing at left). Look for the horizontal bar between the first stitch on your left needle and the last stitch on your right needle. With the tip of your left needle, pick up this bar from back to front. Knit into the bar from the front, which twists the new stitch and gives it a slant to the right. Even though it may seem a bit tricky to get your needle into the bar from front to back, it’s important to do so in order to avoid creating a small hole in the fabric.
Increase by “make 1.”
Increase by knitting into front and back of stitch.
Some patterns suggest increasing by knitting first into the front and then into the back of the same stitch before dropping it off the needle (see drawing, bottom left).
INTARSIA: To prepare for intarsia knitting, wind several small bobbins (available at yarn shops) with the yarn you’ll be using. When you begin each new color, wrap the new yarn around the old before leaving the old behind. This locks the yarns neatly together and creates a strong, smooth join with no gaps. Be sure to make the interlock on the wrong side of the work on both knit and purl rows.
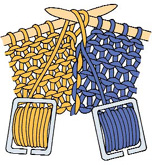
Intarsia.
JOIN NEW YARN: When you need to change colors for stripes or Fair Isle patterns or to begin a new ball of yarn, you’ll find that every knitter has a favorite way of making the join. We recommend working the new tail in on the wrong side of the piece for the last 6 or 7 stitches before it’s needed, by catching it under the working yarn. Then, when you change yarns, leave a 3-inch (7.5 cm) tail of the old yarn that you can work in in the same manner. If you wish, you can also just leave the tails hanging and weave them in later, before felting.

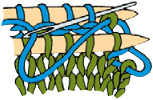
Joining a strand of new yarn (turquoise strand).
KITCHENER STITCH: This clever technique allows you to join two knitted pieces almost invisibly. With stitches on needles, hold two fabric layers together with wrong sides together. Using a yarn needle, draw yarn through first stitch of front needle as if to knit; slip stitch off (step 1). Draw yarn through second stitch of front needle as if to purl; leave stitch on needle (step 2). Draw yarn through first stitch of back needle as if to purl; slip stitch off (step 3). Draw yarn through second stitch of back needle as if to knit; leave stitch on (step 4). Repeat steps until no stitches remain on needles.
Kitchener Stitch, Step 1

Kitchener Stitch, Step 2

Kitchener Stitch, Step 3
Kitchener Stitch, Step 4
KNITTING IN THE ROUND: In order to knit a seamless tube (for some slippers, hats, and bags, for instance), you must join a row of stitches in to a circle and knit “in the round” on double point or circular needles.
When using double point needles, divide the stitches evenly among three needles. Form the needles into a triangle, making sure that the stitches are not twisted on the needles. With a fourth needle and the yarn from the third needle, knit the first stitch on the first needle. When you have knitted all the stitches on one needle, use the newly empty needle to knit the stitches on the next needle. Never turn and work in the opposite direction.
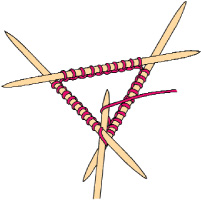
Joining in the round on double point needles.
When knitting on a circular needle, use the working yarn from the right needle to knit the first stitch on the left needle. Slide the stitches around on the cable as you knit. It is a good idea to slip a stitch marker on the needle at the beginning of the round, so that you can easily see where the next round begins.
PICK UP STITCHES: Slide the point of the left needle into an existing loop. Knit that loop as a stitch. You will need to pick up stitches along the base edges of a bag and along the heel flap to form the gusset of a slipper and to close the gap between the thumb and the rest of the oven mitt (page 161).

Using a crochet needle to pick up stitches.
ROUND: All stitches worked once when you are knitting circularly on double point or circular needles.
ROW: All stitches worked once across a straight needle.
STOCKINETTE STITCH: When working “flat,” stockinette stitch is formed by knitting all of the stitches on the right side of the work, and purling all of the stitches on the wrong side of the work. When working in the round, stockinette stitch is formed by knitting all the stitches (the work is not turned).
TAIL: The excess yarn left when stitches are cast on, or the excess yarn left when stitches are bound off. The tail is often used to weave stitches together or to sew openings closed. Weave tails in on inside of work.
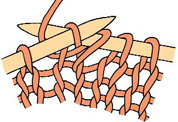
THREE-NEEDLE CAST OFF: This is a useful technique if you want to cast off and at the same time join two pieces in an invisible seam, such as at the bottom of a purse. Place half the stitches on one needle and half on a second needle. If you are using straight, single-point needles, make sure their tips are pointing in the same direction. Bring the two pieces, or two halves, together with the right sides facing. Beginning at the outer edge, insert a third needle through the first stitch on the front and back needles and knit them together. Make a second stitch in the same way. Pass the first stitch over the second one. Continue in this manner until all stitches are cast off. Draw the tail of yarn through the remaining stitch and fasten securely.

Three-needle cast off.
TURN: Turn needle around and work across the other side of the work. When knitting with straight needles, turn work at the end of every row. When knitting with double point needles, turn work only when specifically instructed (when knitting the heel flap or turning the heel on a slipper, for example).
WEAVE ENDS IN: Thread the tail in a yarn needle and sew the end through a few stitches on the back of the work. Cut the excess tail.
WHIPSTITCH: An overcast stitch used to sew the outside edges of two pieces of fabric together.
YARN OVER: Wrap the yarn completely around the needle before working the next stitch. For the purposes of this book, a “yarn over” forms an eyelet.
Without Stacey Glick’s unflagging support, and Gwen Steege’s guidance, this book would not have come to be.
I am happy to have this opportunity to thank them both.
I am deeply grateful for the continued support of the usual cheerleading staff, joined this time around by Knitters Etc., and the Prairie Arts Fiber Guild, who weathered the ups and downs along with me.
And as always, I am thankful for Terry, who cheerfully endured months in a house full of wet wool.
IN APPRECIATION OF THEIR ADVICE AND ENCOURAGEMENT, THANKS TO:
Leslie Voiers, color consulting
Barbara Elkins and the staff at WEBS, Northampton, MA
Rae Yurek and the staff at Harrisville Designs, Harrisville, NH
AND MANY THANKS TO:
The yarn companies who supplied yarn:
Brown Sheep Company, Mitchell, NE (www.brownsheep.com)
Classic Elite, Lowell, MA
Halcyon Yarn, Bath, ME (www.halcyonyarn.com)
Harrisville Designs, Harrisville, NH (www.harrisville.com)
Morehouse Farm, Milan, NY (www.morehousemerino.com)
Nordic Fiber Arts, Durham, NH (www.nordicfiberarts.com)
The profiled artists:
Crispina ffrench (www.crispina.com), Beverly Galeskas (www.fibertrends.com), Heather Kerner, Kristiane Kristensen, Cindy Walker (www.stonyhillfiberarts.com)
The knitters:
Gigi Bass, Rebecca Bien, Kathleen Case, Colleen Conlan, Leslie Reed Evans, Diana Foster, Lissa Greenough, Mary Johnson, Alison Kolesar, Ruth Ann Myers, Kathy Oliverson, Carolynn Vincent
