SHADES AND BLINDS
There are many styles of shades: Roman, balloon, London, and more. Even though they have completely different looks, they all share one similarity. Shades operate vertically, raised up and lowered down, instead of traversing across the window like curtains. This offers more design options for your windows.
Shades and blinds are commonly paired with curtains for complete coverage of the window. A superior window covering for insulating the window and because they can be made with a small projection, they are a good choice for inside mounting and layering.
Even though styles like Roman shades are very useful, many times shades are purely decorative and set in a fixed position, especially balloon and London shades, which require dressing.
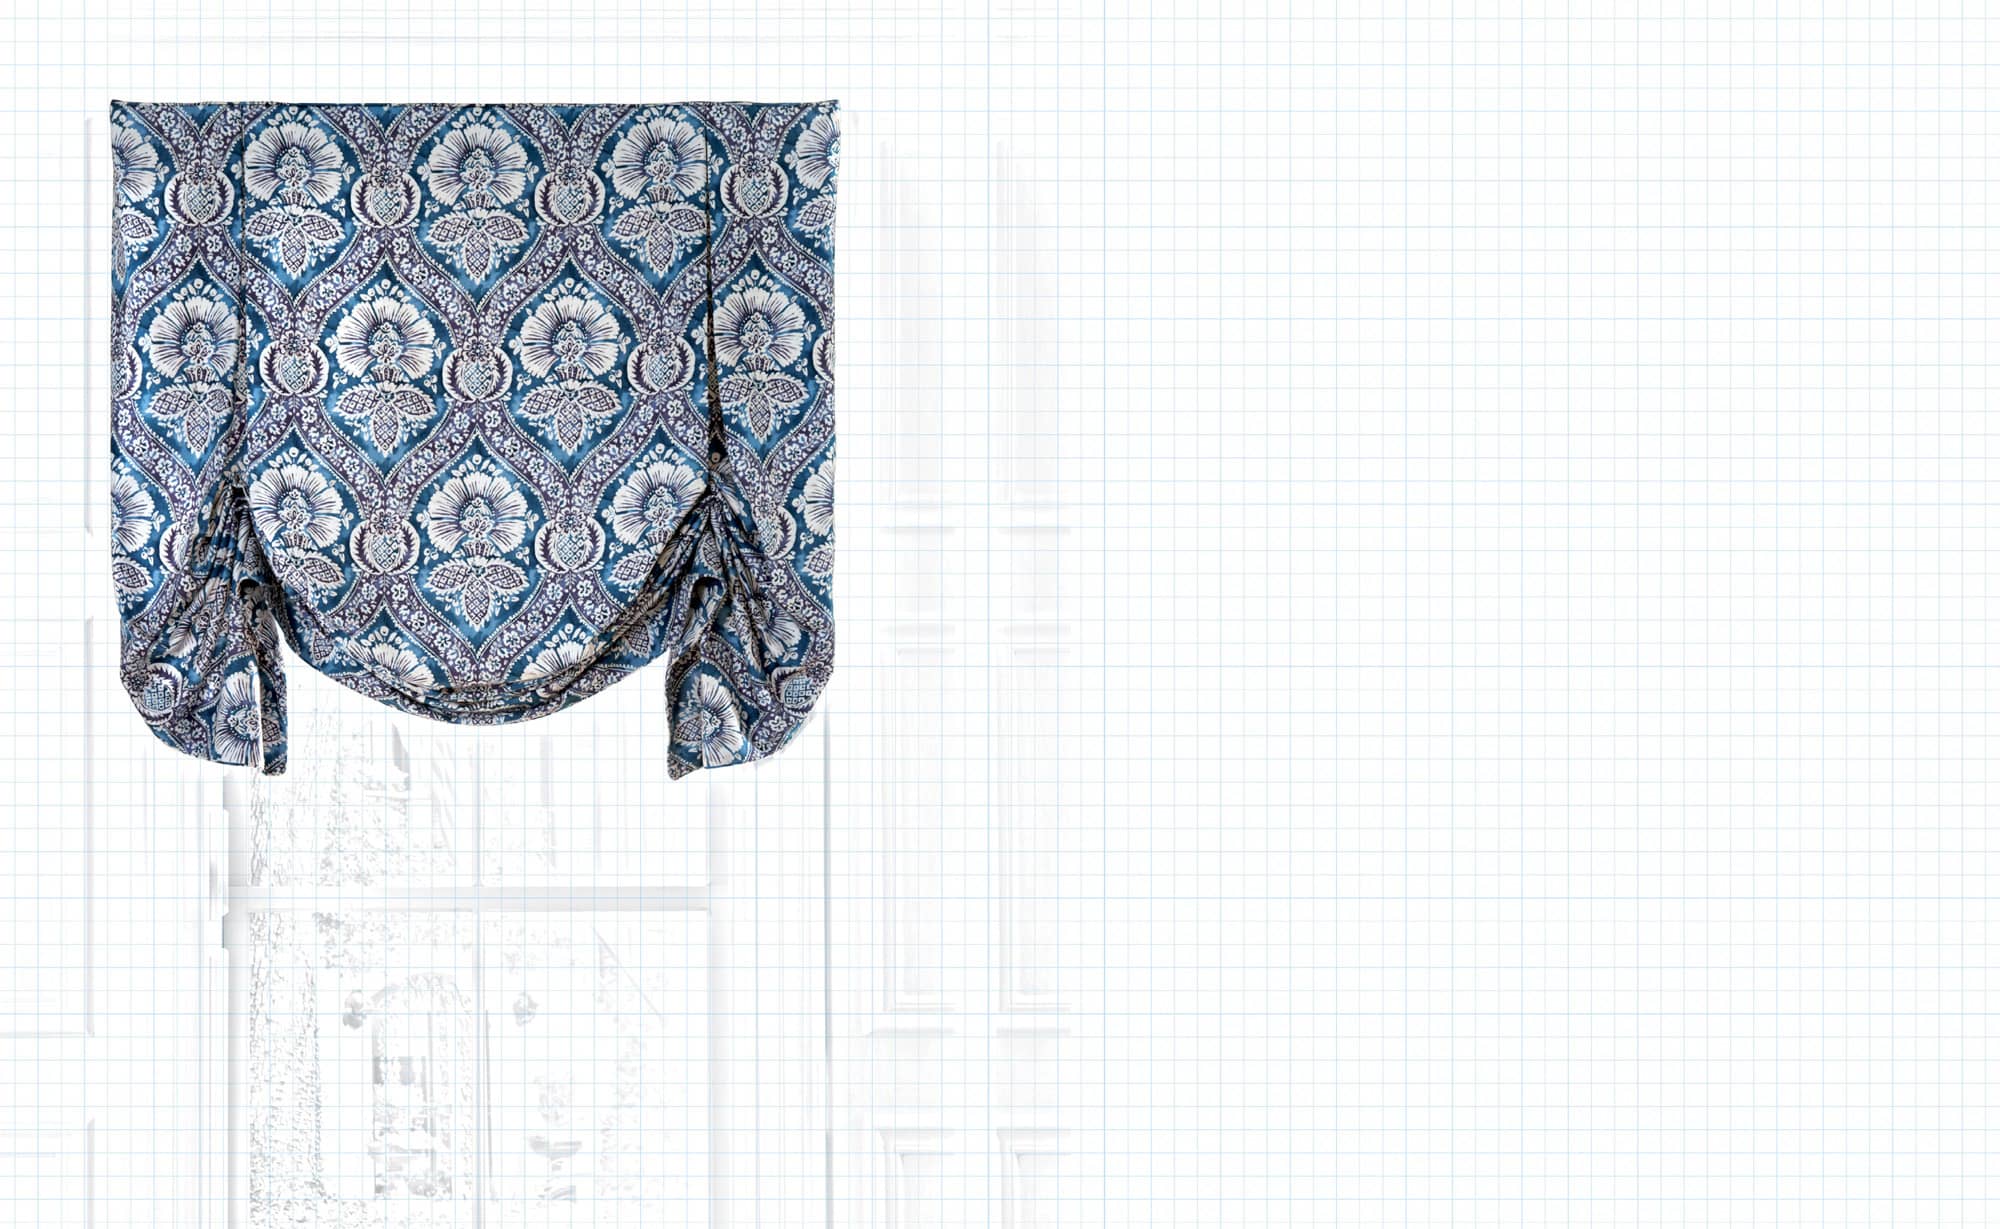
Roman Shades
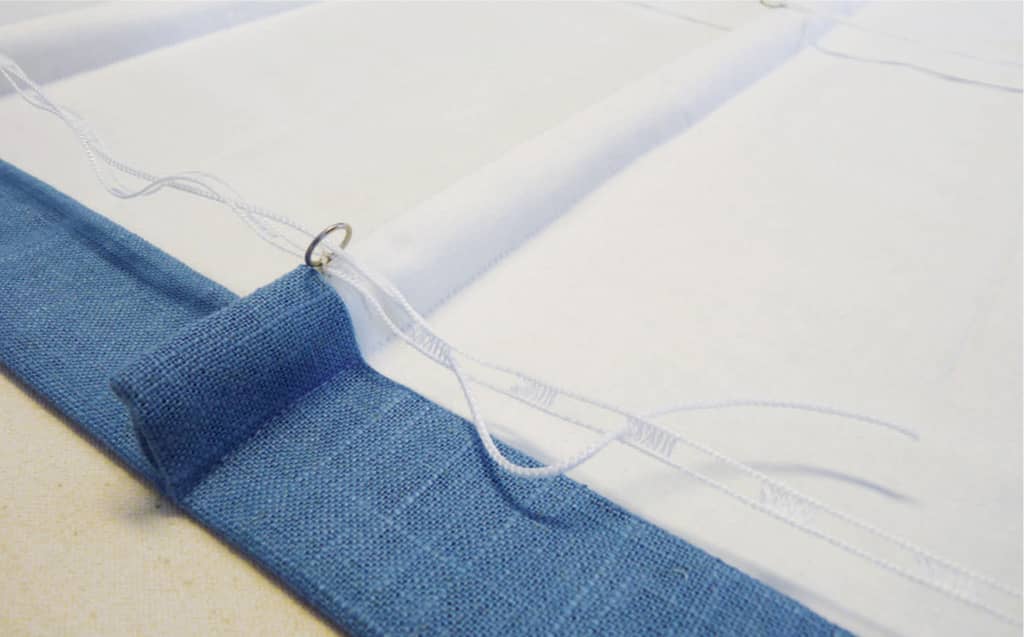
Roman shades are made from flat panels of fabric with rings sewn to the back in columns. Cord is threaded through the rings, and when pulled, the fabric is lifted into even, horizontal folds. Once you learn the basic steps, other shades will be easy to accomplish. Choose stable home décor fabrics that do not stretch and preshrink fabrics by pressing with a steam iron prior to cutting and sewing. Roman shades can be functional and lifted up and down, but because they require cords you will want to familiarize yourself with important cord safety information found in Chapter 3: Fundamental Techniques. Best practice is to use only cord-free window treatments in homes with small children.

The basic, flat Roman shade is simple in style, and simple to make.

Back view of a basic Roman shade. Cord is threaded through columns of rings and into the lifting system.
BASIC ROMAN SHADE
Roman shades are made from flat panels of fabric with rings sewn to the back in columns. Cord is threaded through the rings and when it is pulled, the fabric is lifted into even, horizontal folds. Shades made today use safety products and cord shrouds to control hazardous cord loops. Once you learn the basic steps, other shades will be easy to accomplish.
Shade rings are available in metal or plastic. They all perform the same so you can select the style you prefer. If using plastic rings, make sure they are UV stable and designed for use on window treatments.
Nylon lift cord is available in different diameters such as 0.9 mm or 1.4 mm. Some shade systems require a specific size of cord. You can also purchase nylon-braided cord (also called “line”) in the cord and rope aisle of your local home improvement store.
To meet safety standards, special products such a cord shrouds and RingLocks are used on the back of the shade to control how far the cord can be pulled away from the fabric, making it safer because the size of the combined loop of fabric and cord is minimized. Most cord control products are interchangeable with different lift systems but check with the supplier first to see if there are special requirements. You will see different options used for the projects in this section.
Getting Started
There are a wide variety of systems used for operating blinds and shades, from tracks with interior spools to roller tubes with a clutch, spring, or motors. No matter which system you use, the process for making a basic shade applies, but it’s a good idea to purchase the system first, to determine if any special processes or supplies are needed.
When mounting Roman shades on the wall outside of the window frame or opening, plan to extend 1 inch (2.5 cm) beyond each side of the window and several inches above if you can, to expose more window view when the shade is lifted. For inside-mounted Roman shades, allow 1/4 inch (6 mm) clearance on each side.

Shade cord is woven in and out of a cord shroud to prevent it from being pulled away from the back of the shade.
Roman shades look best when made slightly wider and several inches taller than the window.

An assortment of shade rings in metal and plastic.

An example of two different lifting systems: track with interior spools and roller tube.
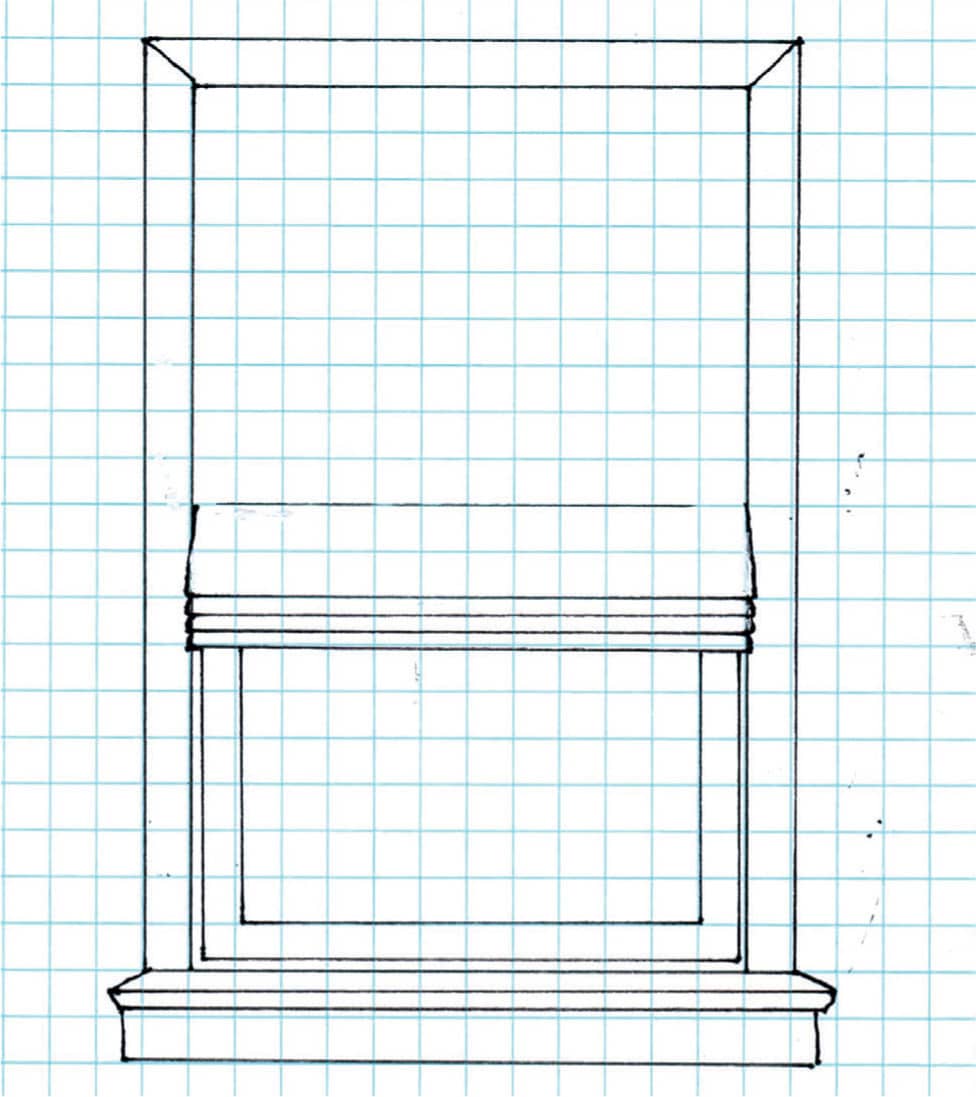
A Roman shade mounted inside the window opening.
What You Will Need
• decorator fabric
• lining
• mounting board
• metal rod or wooden dowel
• heavy-duty stapler and staples
• sew-on Roman shade rings
• Safe-T-Shade RingLocks or cord shroud
• shade cord
• cord adjusting orbs
• lifting system
• tools and hardware for installation
Yardage Requirements
To determine yardage, add allowances to the finished size as outlined below.
MAIN FABRIC
Measure your window and determine the finished width and length of your shade.
A. Finished length of shade ___ + 6 inches (15.2 cm) = ___ ÷ 36 inches (91.4 cm) = ___ yards (meters) of fabric
B. Finished width ___ + 8 inches (20.3 cm) = ___ ÷ fabric width = ___. If this number is greater than 1, double the amount from Step A.
If using more than one width of a print fabric, you may need to match the pattern motif, which could require additional fabric.
Finished length of shade = ___ + 6 inches (15.2 cm) = ___ ÷ pattern repeat = ___ (round up). This is how many of pattern repeats you will need for each cut.
Pattern repeat ___ × number of pattern repeats needed ÷ 36 inches (91.4 cm) = ___ yards (meters)
LINING FABRIC
A. Finished length of shade ___ + 2 inches (5 cm) = ___ ÷ 36 inches (91.4 cm) = ___ yards (meters)
B. Finished shade width = ___ ÷ fabric width = ___. If this number is greater than 1, double the amount from Step A.
When sewing multiple widths together, you may want to split widths in half lengthwise for a whole piece in the center, with sew half widths to each side. Study the pattern motif to determine what is best. For shades with a short length, you can railroad fabrics and linings. This will allow you to have a wide shade without any seams.
Making a Basic Roman Shade
1. Cut the main fabric the finished width plus 8 inches (20.3 cm) wide and the finished length plus 6 inches (15.2 cm) long. For a large shade, seam together the fabric cuts and press seams open before cutting to size.
2. Place the main fabric face down, and fold over 4 inches (10.2 cm) along one side, iron in a crease, and then fold the cut edge under and press, creating a 2-inch (5 cm) doubled hem. Repeat for the other side and bottom hem, double-checking the measurement across the width of the shade.
3. At the bottom left and right corners, sew a mitered seam. This is optional; you can leave the bottom corners square. To create the mitered corner seam, unfold the pressed hems and measure 6 inches (15.2 cm) from the edge on one corner, making a mark at the center of the fold. (A) Draw a line from the inside corner to the outer corner, creating a right angle. (B) Fold the corner on the bias, pin, and stitch on the line. (C) Trim off excess fabric (D), turn right sides out, and press. (E)

Unfold the pressed hems at the corner. You will see the creases from pressing the hems. Measure 6 inches (15.2 cm) from the edge and mark in the center of the hem.
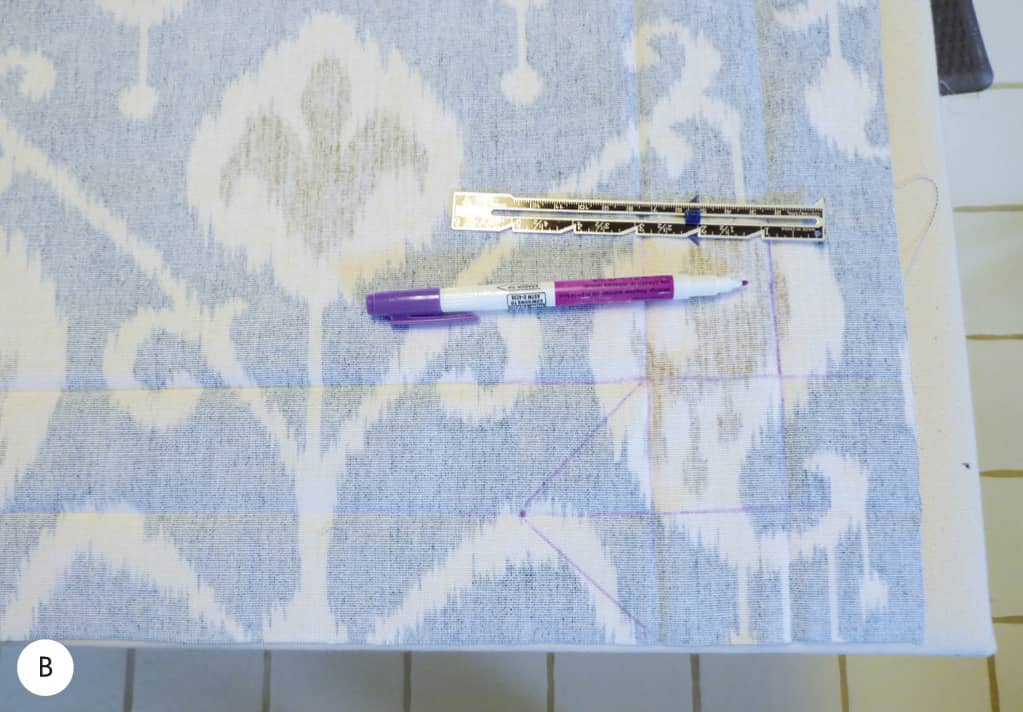
Draw a line, creating a right angle from the inside corner to the mark and out to the edge.

Fold the corner on the bias, lining up the cut edges and pinning together. Sew on the marked line.

Cut off excess fabric.

Turn right sides out and press.

The finished corner is neat and has less bulk than the double-folded square corner.
4. Place the hemmed fabric face down and top with the lining face up, smoothing it out neatly. Trim off excess lining even with the side and bottom edges and tuck the edges under the hems. Secure the hems with pins. Hand sew the hems around all three sides or finish using your preferred method. (See Chapter 3: Fundamental Techniques.) Secure the top edge with pins. (F)

Cut the lining to the exact finished width and place it under the hems.
5. With the shade face down, fold over 4 inches (10.2 cm) at the bottom and press. Draw a line 1 inch (2.5 cm) from the folded edge, pin, and straight stitch to create a rod pocket. (G)
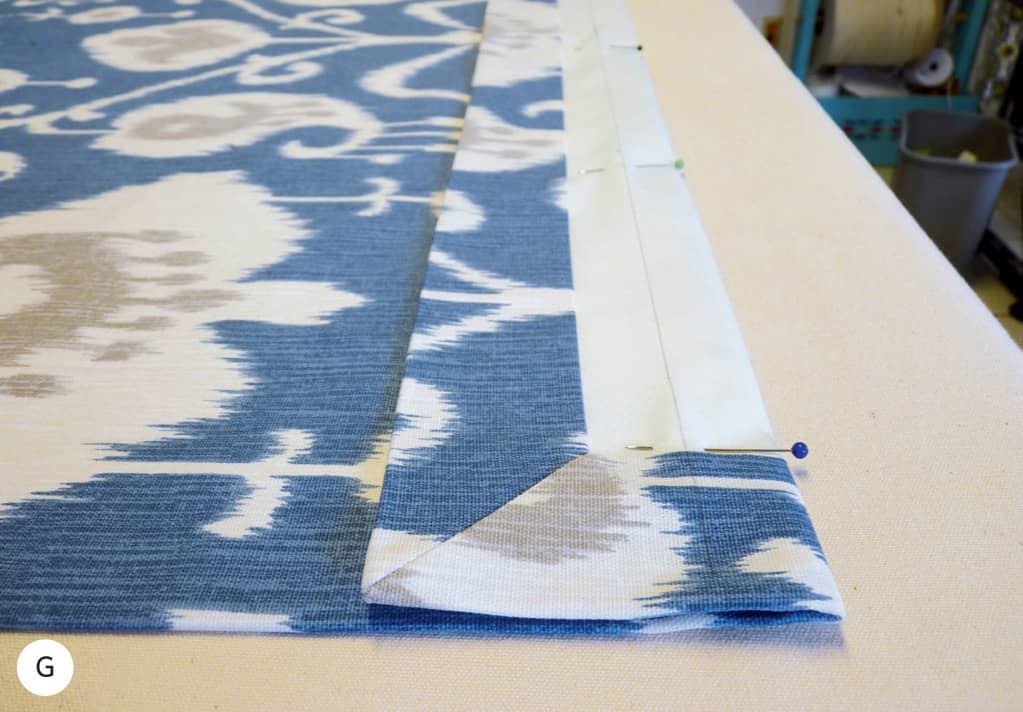
A rod pocket is sewn above the bottom hem.
6. Mark for the rings on the back of the shade. Begin with the vertical spacing by measuring along the inside edge of the side hem, beginning at the rod pocket stitch line and measuring 7 inches (17.8 cm). Make a small mark on the lining next to the side hem. Measure from that mark up toward the top, spacing marks 8 inches (20.3 cm) apart, until you are within 12 inches (20.3 cm) or less of the finished length. Repeat for the opposite side. This will create 4-inch (10.2 cm) folds as the shade is lifted. You can adjust the vertical spacing. For example, if using 3-inch (7.6 cm) folds with the rings spaced 6 inches (15.2 cm) apart vertically, subtract 1 inch (2.5 cm) from the instructions above. (H)
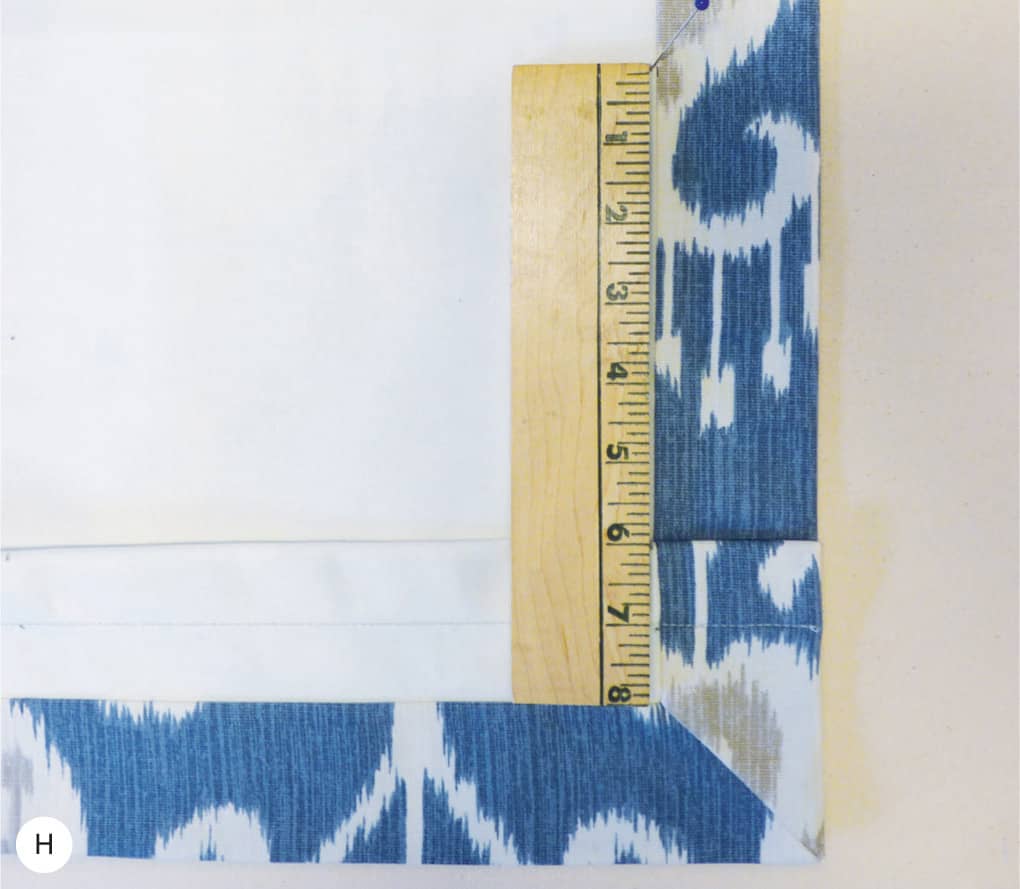
Mark 7 inches (17.8 cm) from the rod pocket stitch line and then continue marking every 8 inches (20.3 cm) to the top of the shade.
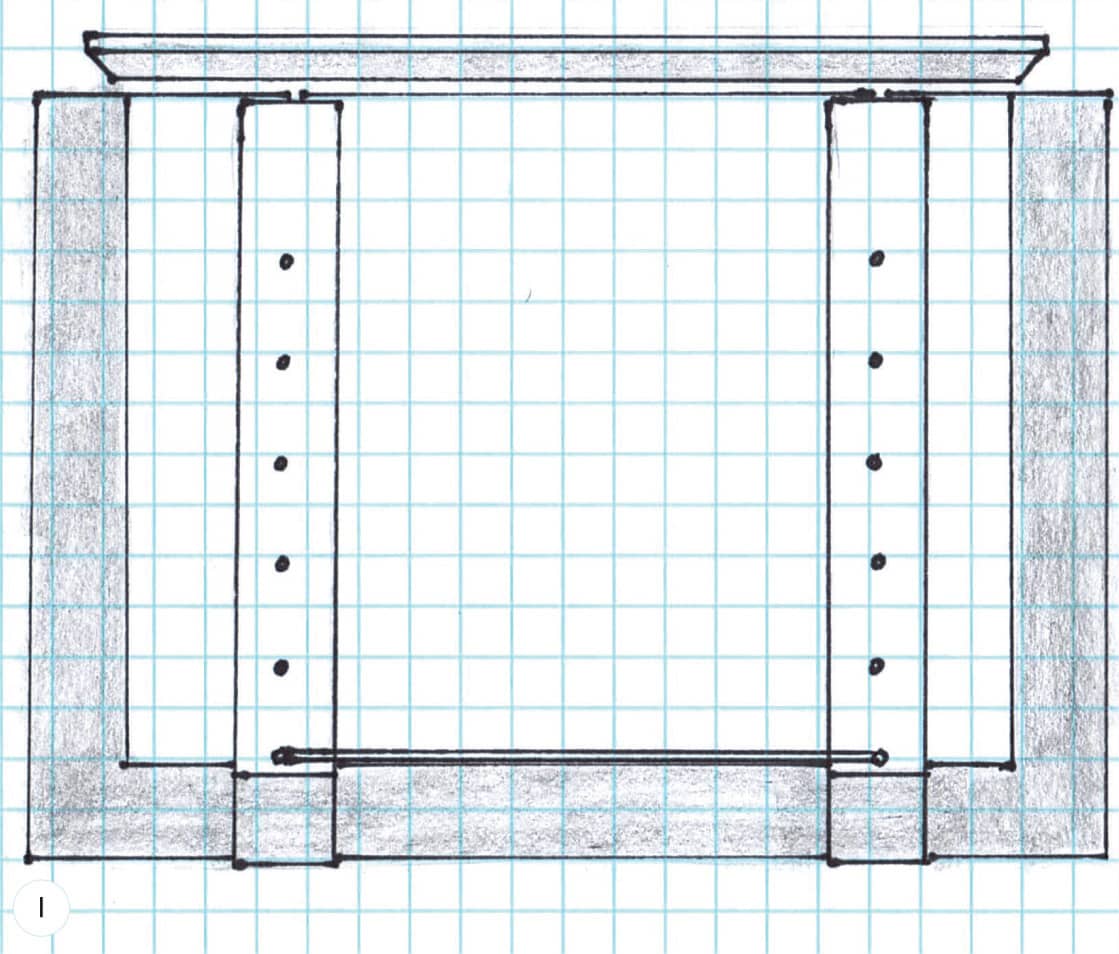
7. Next, mark for horizontal spacing of the rings across the shade. Measure between the outer marks at the side hems and divide by a number that will result in 9 inches (22.9 cm) or less. Mark across the top edge of the rod pocket and continue from the bottom to the top marks. (I)
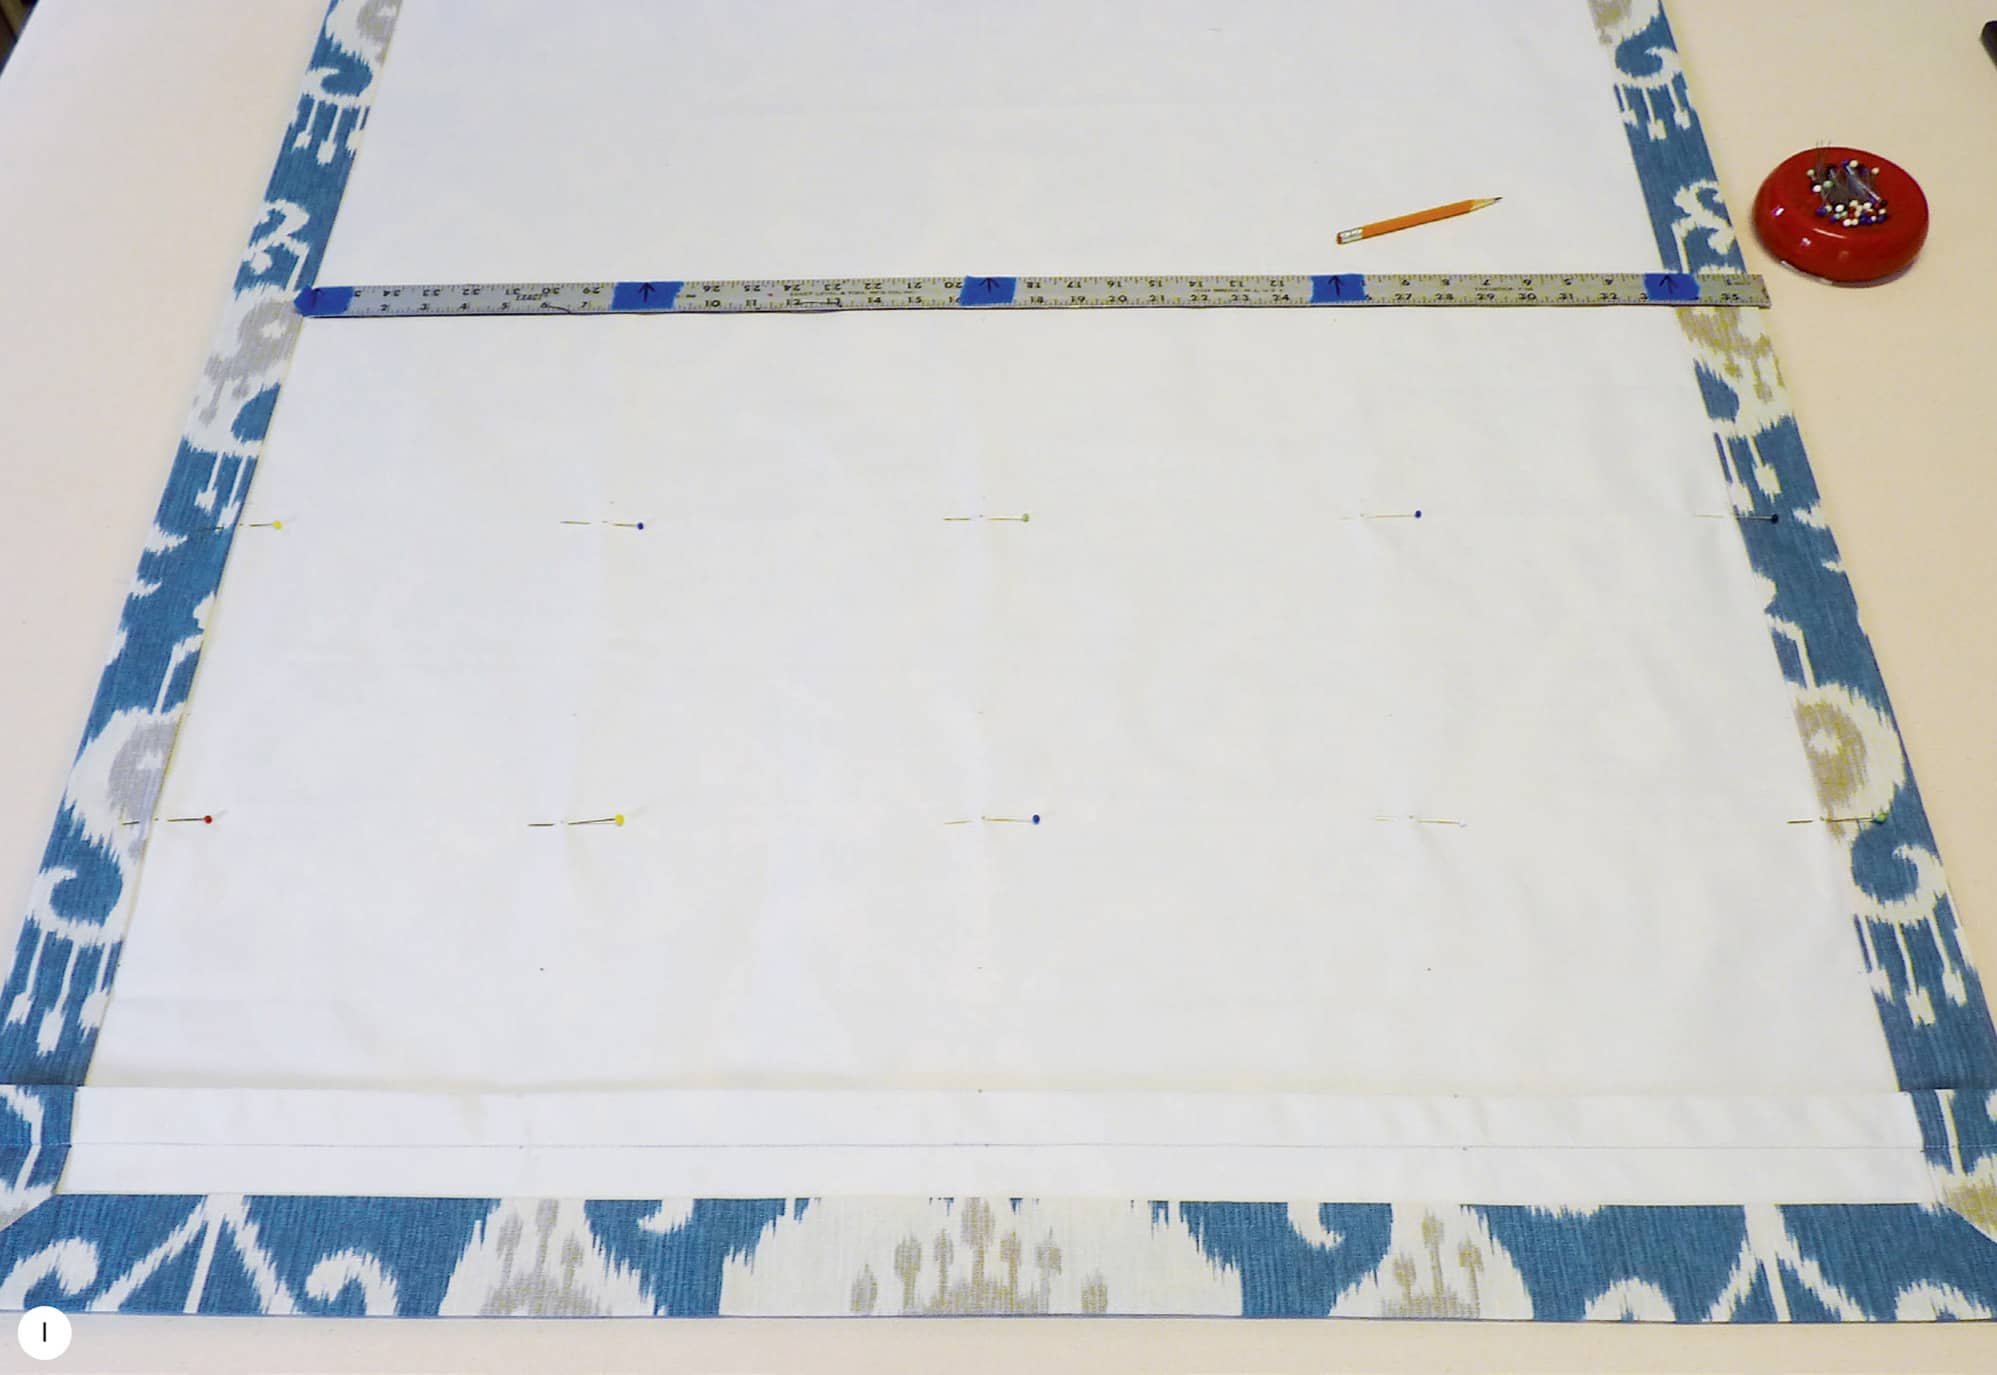
Create a template for ring spacing on a straight edge or ruler with marked pieces of tape. Move the template from row to row. This will save time!
8. Pin together the face fabric and lining at each mark to hold the layers together. Sew a shade ring at each mark using a thread to match the face, sewing all the way through to the front and removing the pins. Rings can be hand sewn or machine sewn using a button-sewing attachment. The rings should be sewn so that they are parallel with the top and bottom. Make sure the bottom rings sewn to the rod pocket are secure, as they will bear the weight of the shade. (J)
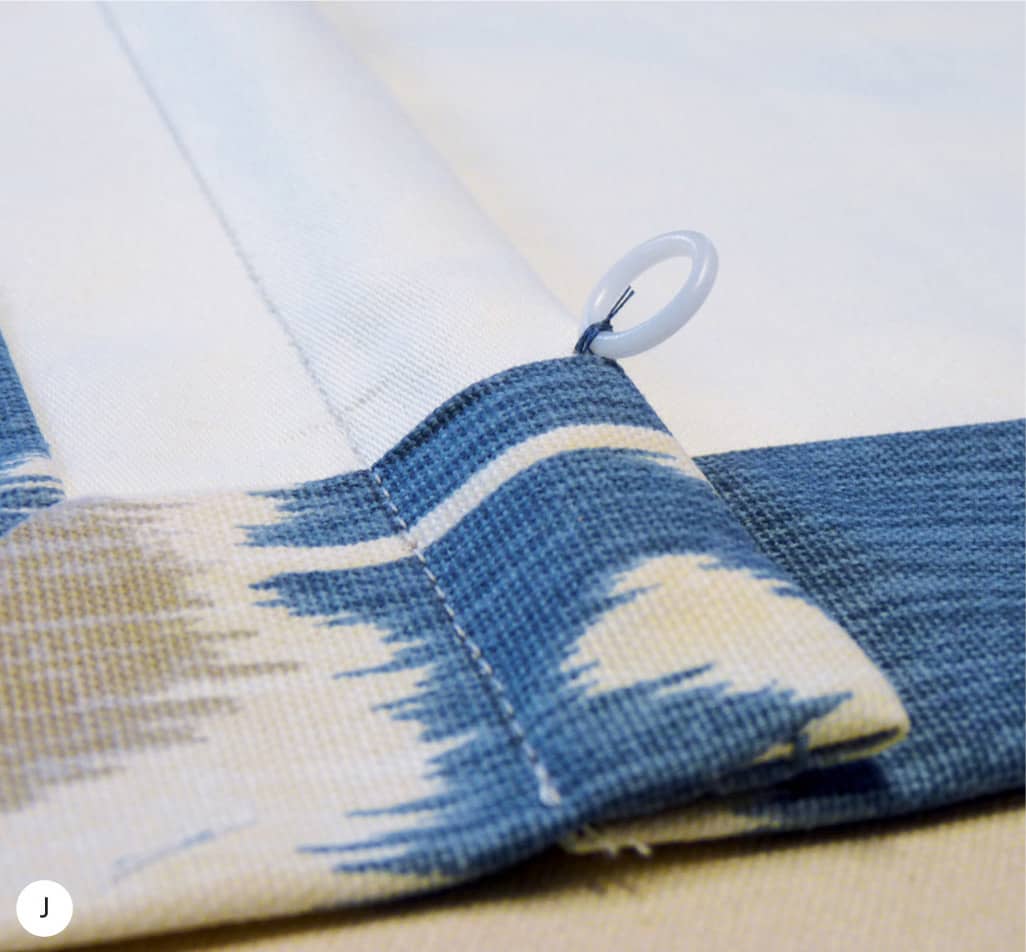
Make sure the bottom rings sewn to the rod pocket are secure, as they will bear the weight of the shade.
9. Cut a metal rod or wooden dowel 1 inch (2.5 cm) less than the finished width and insert inside the rod pocket. Sew or glue the ends of the pocket closed. (K)
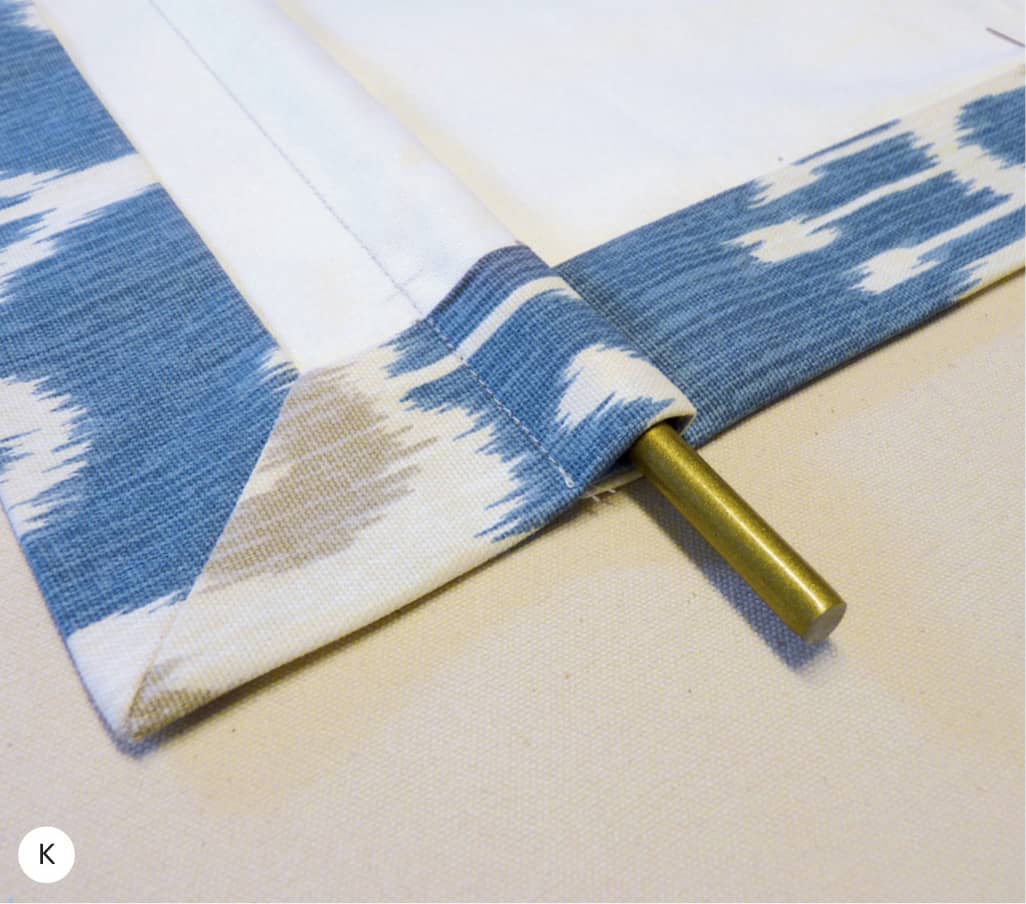
A painted steel rod is needed for some lift systems. The extra weight creates tension needed for the system to engage. Otherwise, an aluminum rod or wooden dowel will work just fine.
10. With the shade face down, measure from the bottom to the top, folding over at the finished length and pressing to create a crease. Cut off excess fabric, allowing for 2 inches (5 cm) past the crease line for attaching to the board. (L)

For the most accurate length, measure after the rings are sewn and the rod is inserted in the pocket.
This shade uses a cord shroud tube to meet safety standards. The tube is stitched in place at each ring. (M) You can sew rings and shroud all at the same time. Tie-off the shroud to the top and bottom rings. The cord within the tube is fished out at the bottom and fastened with a cord-adjusting orb. (N) At the top ring, the cord is fished out of the shroud tube and threaded into the lifting system.
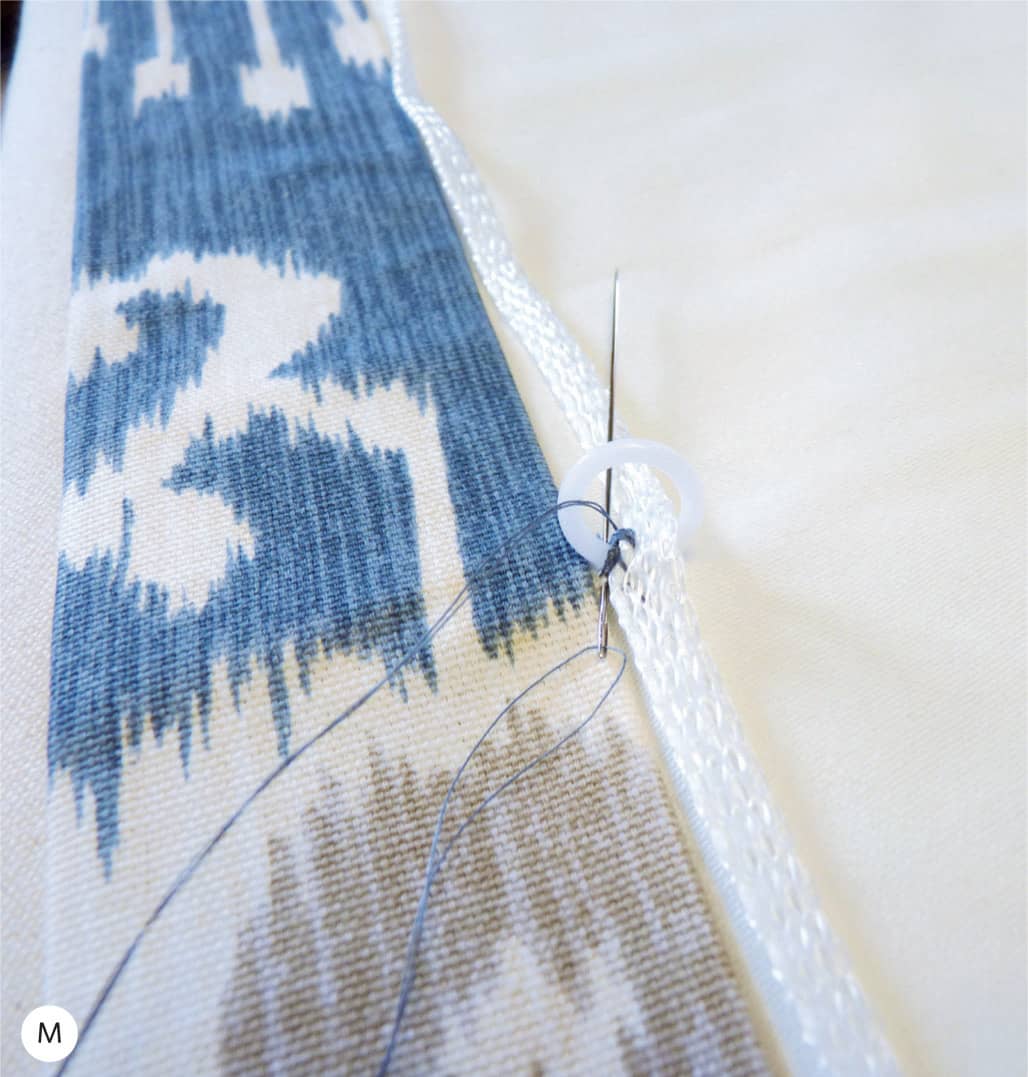
Sew the cord shroud at each ring. Do not stitch over the cord within.
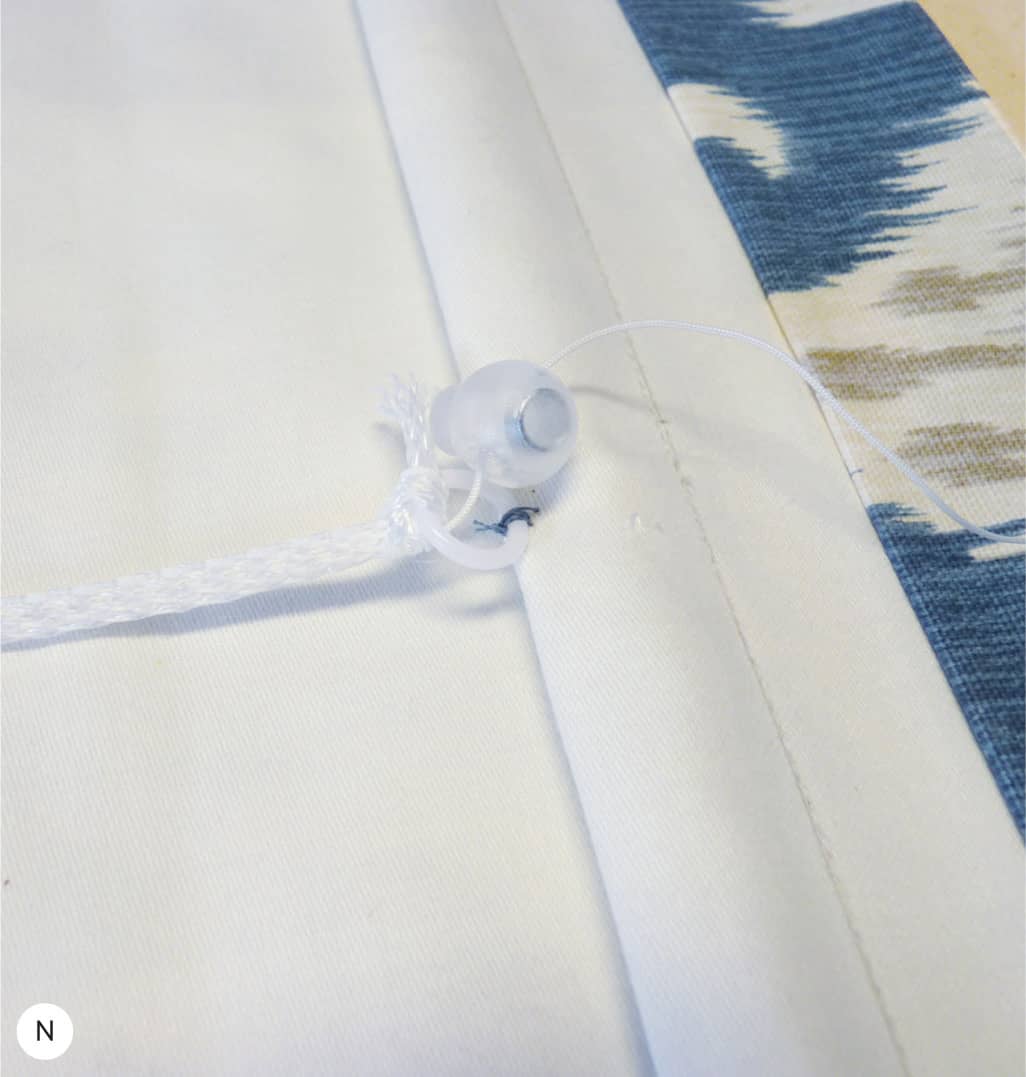
Fish the cord from the shroud and secure with an orb.
Note: Some cord shrouds are made without the cord and you will thread the cord into the shroud.
11. Cut the board to the finished width. Cover the ends of the board with the face fabric. Draw a line on top of the board 2 inches (5 cm)from the edge and staple the shade to the board at the line. Continue covering the board, hiding cut edges and staples. (See here.)
12. Attach the shade lifting system to the board and thread the cords into the system.
13. Install the shade to the wall using angle irons or the brackets supplied with the lifting system. (See Chapter 7: Installing Window Treatments.) Some fabrics require training to fall into neat folds. To do this, pull the shade to the highest position and steam. Smooth over the fabrics, creasing with your hands along the horizontal folds.

Cords run from the bottom to the top within the shroud, lifting the shade.
BLACKOUT ROMAN SHADE WITH RIBS
When making Roman shades in the usual way, there is stitching to the front where the rings are sewn. This is an important step because it connects the face fabric to the rings so that the shade folds up evenly when it is lifted. When blackout lining is used, the holes created when sewing the rings make pinholes of light when the sun is shining. This can be very distracting, and a disappointment after so much work sewing a custom shade. This project will show you how to avoid this problem.
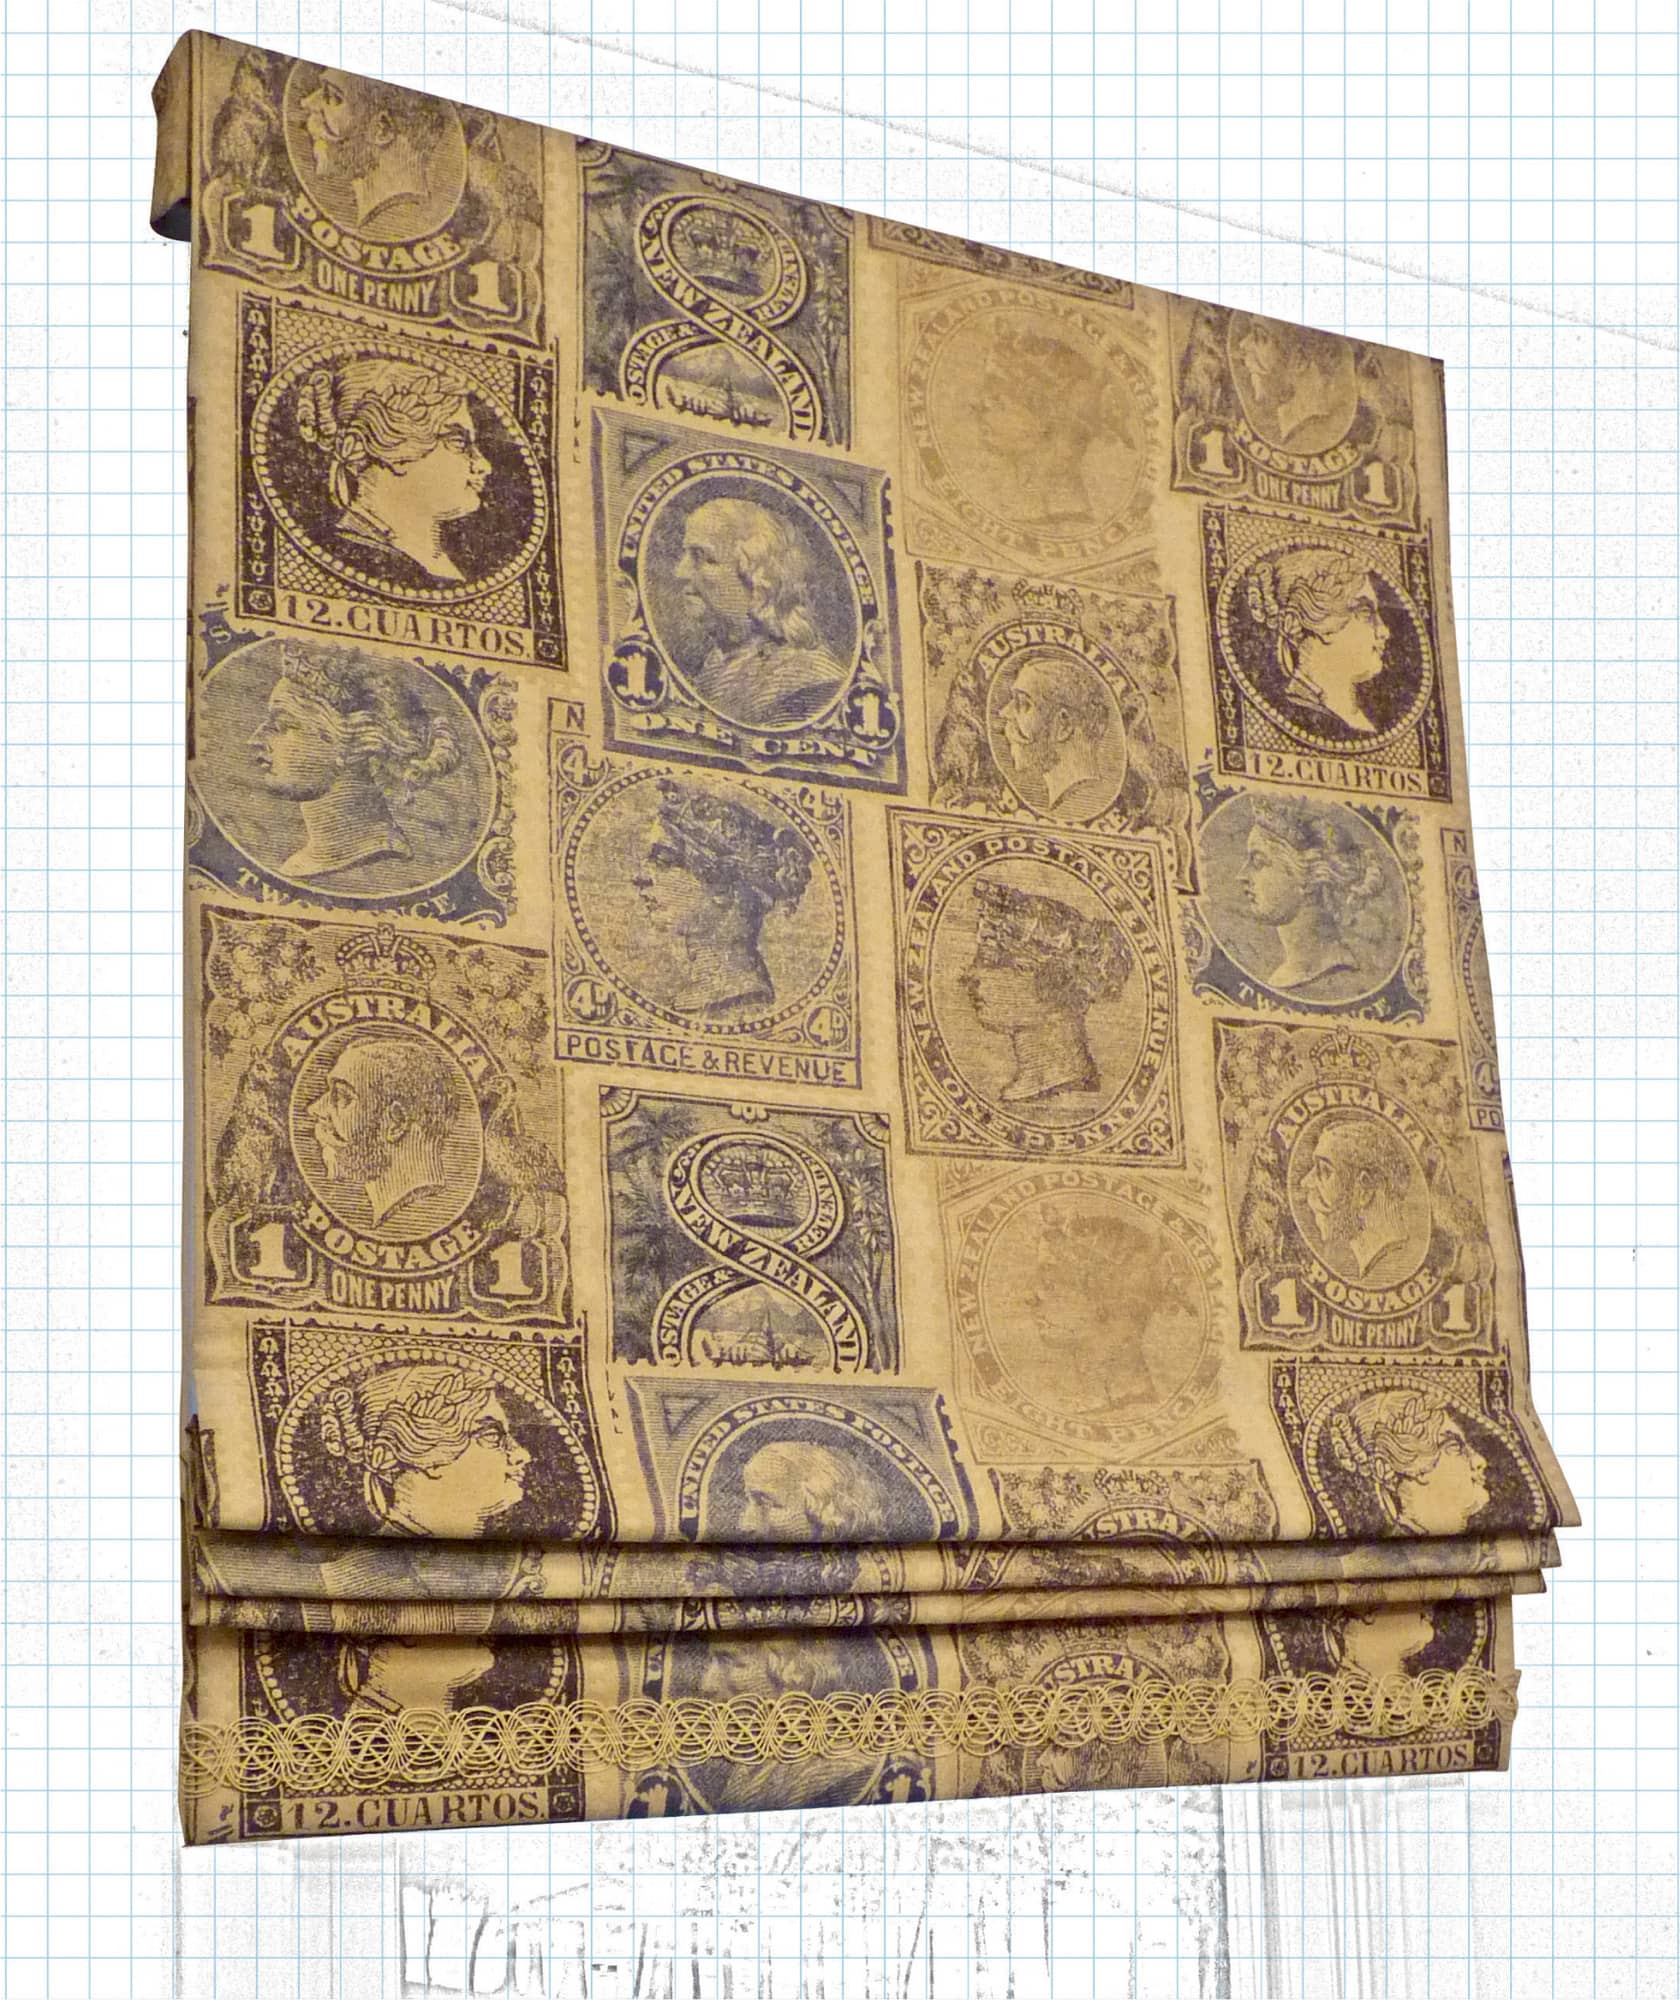
This shade is made with ribs for even folds when lifted and blackout lining for light control.
Getting Started
With this method, the interlining is attached to the face fabric first and then the blackout lining is sewn with the rings to the back of the rib pockets. The extra steps are worth it! You’ll be pleased with the expert quality of the finished shade and there will be no pesky pinholes of light!
What You Will Need
• decorator fabric
• flannel interlining
• blackout lining
• plastic shade ribs
• sew-on Roman shade rings
• shade cord and cord shroud
• cord-adjusting orbs
• mounting board
• heavy-duty stapler and staples
• lifting system
• Flat aluminium bar (1 inch [2.5 cm])
• tools and hardware for installation
Yardage Requirements
Roman shades are a flat style of window treatment without any fullness. To determine yardage, add allowances to the finished size as outlined below.
MAIN FABRIC
Measure your window and determine the finished width and length of your shade.
A. Finished length of shade ___ + 6 inches (15.2 cm) = ___ ÷ 36 inches (91.4 cm) = ___ yards (meters) of fabric
B. Finished width ___ + 8 inches (20.3 cm) = ___ ÷ fabric width = ___. If this number is greater than 1, double the amount from Step A.
If using more than one width of a print fabric, you may need to match the pattern motif, which could require additional fabric.
Finished length of shade = ___ + 6 inches (15.2 cm) = ___ ÷ pattern repeat = ___ (round up)
This is how many pattern repeats you will need for each cut.
Pattern repeat ___ × number of pattern repeats needed ÷ 36 inches (91.4 cm) = ___ yards (meters)
LINING FABRIC
A. Finished length of shade ___ + 2 inches (5 cm) = ___ ÷ 36 inches (91.4 cm) = ___ yards (meters)
B. Finished shade width = ___ ÷ fabric width = ___. If this number is greater than 1, double the amount from Step A.
INTERLINING FABRIC
A. Finished length of shade ___ + 4 inches (10.2 cm) for every 12 inches (30.5 cm) of length ÷ 36 inches (91.4 cm) = ___ yards (meters). For example, if the shade is finished 60 inches (152.4 cm) long, add 20 inches (50.8 cm).
When sewing multiple widths together, you may want to split widths in half lengthwise for a whole piece in the center, and sew half widths to each side. Study the pattern motif to determine what is best. For shades with a short length, you can railroad fabrics and linings. This will allow you to have a wide shade without any seams.
Making a Blackout Roman Shade with Ribs
1. Follow instructions for making a basic Roman shade, to the point of adding the lining.
2. Cut the interlining a few inches (7.6 cm) wider than the finished width. For the length, allow 4 inches (10.2 cm) extra per 12 inches (30.5 cm) of length. Starting at the bottom, measure and sew rib pockets across the width of the interlining. The spacing between the pockets should be 8 inches (20.3 cm) or less. Choose the best spacing for your fabric and finished length.

Rib pockets are spaced equally from the bottom to the top.
3. The first pocket should be sewn above the bottom edge, half the size of the rib spacing. If using 8-inch (20.3 cm) spacing, the first rib pocket will be 4 inches (10.2 cm) above the bottom. This will allow the bottom edge of the shade to be even with the folds. This can be adjusted if you want more of the hem to show. For this shade, the first rib pocket was sewn 8 inches (20.3 cm) from the bottom, to allow the bottom hem and trim to show. Make a muslin template if you are unsure of the spacing, before cutting fabrics.
4. Measure the circumference of the plastic rib to determine what size to make the pockets. You do not want the pockets to be too tight. This shade used 1/2-inch (1.3 cm) pockets. Sew the first rib pocket by folding over the fabric, measuring, pressing a crease, and pinning together. Draw a line, or mark the machine with blue low-tack tape for sewing an even seam.
5. After the first pocket is sewn, measure to the next rib pocket and continue sewing. Make sure all rib pockets are sewn on the same side of the interlining. After all the pockets are sewn, iron the entire piece, pressing the pockets all facing toward the top. (A)

Cut off excess interlining even and square to fit the shade.
6. Place the shade with pressed hems face down and place the interlining with rib pockets evenly over the back. Line up the bottom edge of the interlining with the bottom of the shade. Smooth the interlining neatly in place. Measure to make sure the rib pockets are even and square. (B)

With the shade face down, place the interlining over the back with rib pockets facing up.
7. Cut off the side edges of the interlining even with the shade. Tuck the interlining under the hems on all three sides. Add pins horizontally under the rib pockets. (C)

Pin the interlining to the back of the face fabric, under each rib pocket.
8. Secure the interlining to the face fabric by hand sewing under each rib pocket. (D) Use strong thread, matching the color to the face fabric. Starting at the side hem, make a stitch through the interlining to the front and back out, secure the thread with a stitched knot (E), and then continue across to make another small stitch under the rib pocket. Space the stitches about a hand’s width apart. You do not need to line up the stitches in rows or clip the threads between each stitch.

Sew the interlining to the face fabric under each rib pocket with a small stitch spaced 5 to 6 inches (12.7 to 15.2 cm) apart. Knot the thread before moving to the next stitch.
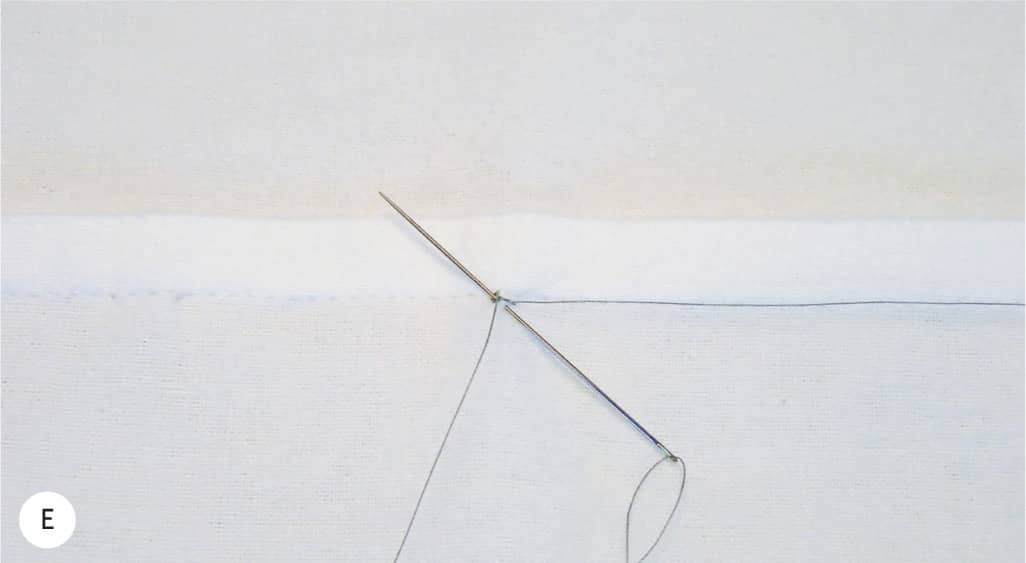
Stitch a secure knot on the back at each tack point.
9. Continue sewing the interlining to the face fabric under each rib pocket. After the hand stitching is completed, add the ribs.
10. Cut the plastic ribs 1 inch (2.5 cm) less than the finished width. Fold back the side hem and slide the ribs into the pockets. (F) (G)
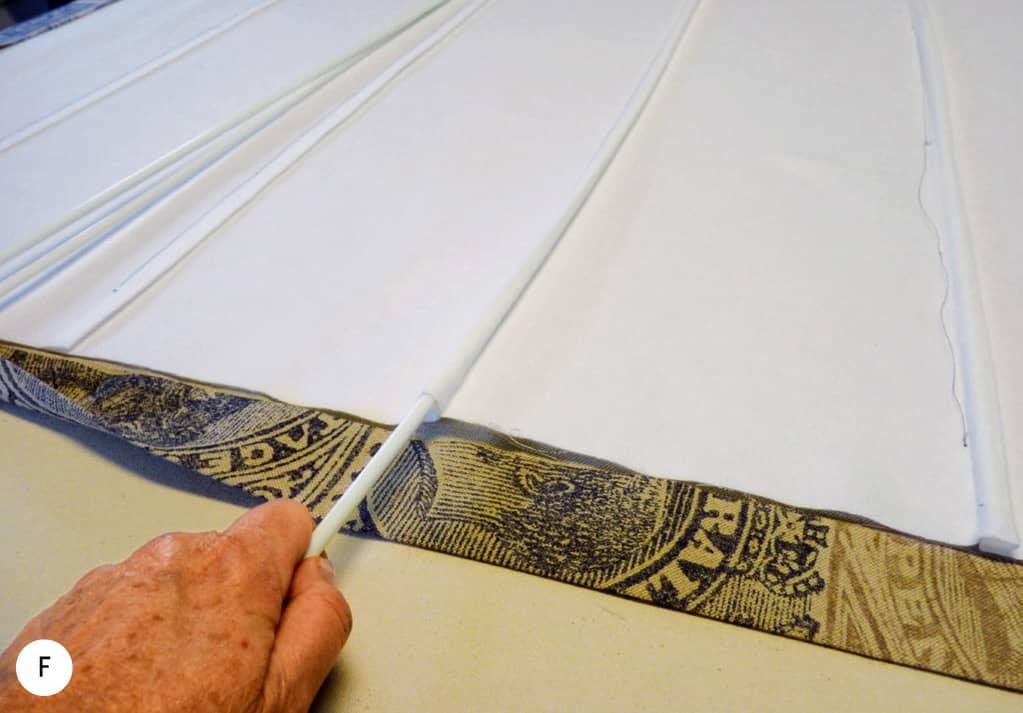
Slide a plastic rib into each pocket.

The ribs are in place.
11. Cover the back with blackout lining. You can precut the lining to the finished size, or place a larger piece over the back and cut to fit. Tuck the blackout under the bottom and side hems. Pin the hems for hand sewing.
12. Mark for placement of the shade rings on the back of each rib pocket in even columns, 9 to 12 inches (22.9 to 30.5 cm) apart horizontally. (H)

Mark for the shade rings on top of each rib pocket.
13. Hand tack shade rings to the back at each mark. The stitching will be on top of a rib pocket, catching the blackout lining and interlining over the plastic rib. (I)

Sew shade rings to the back of the shade, over each rib.
14. Cut a flat aluminum bar 1 inch (2.5 cm) less than the finished width and place it in the bottom hem. Hand sew the side and bottom hems. (J)

Place a flat aluminum bar in the bottom hem.
15. Sew the side and bottom hems, catching the blackout lining and interlining but not stitching all the way through to the front. (K)
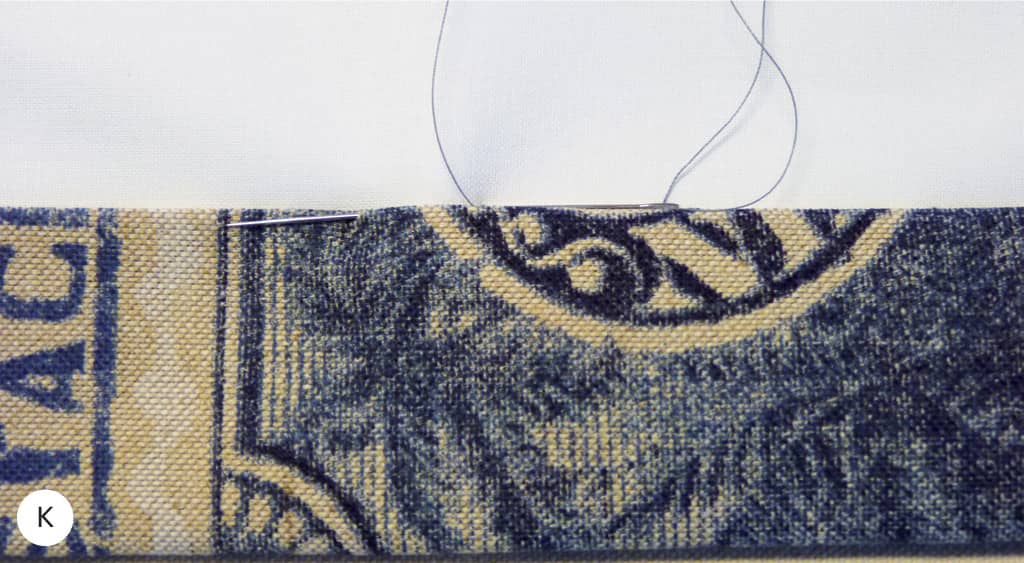
Sew the hems, catching the lining and interlining only.
16. Measure from the bottom to the top, folding over excess fabric and marking for the finished length. Leave extra at the top for board mounting. (L)
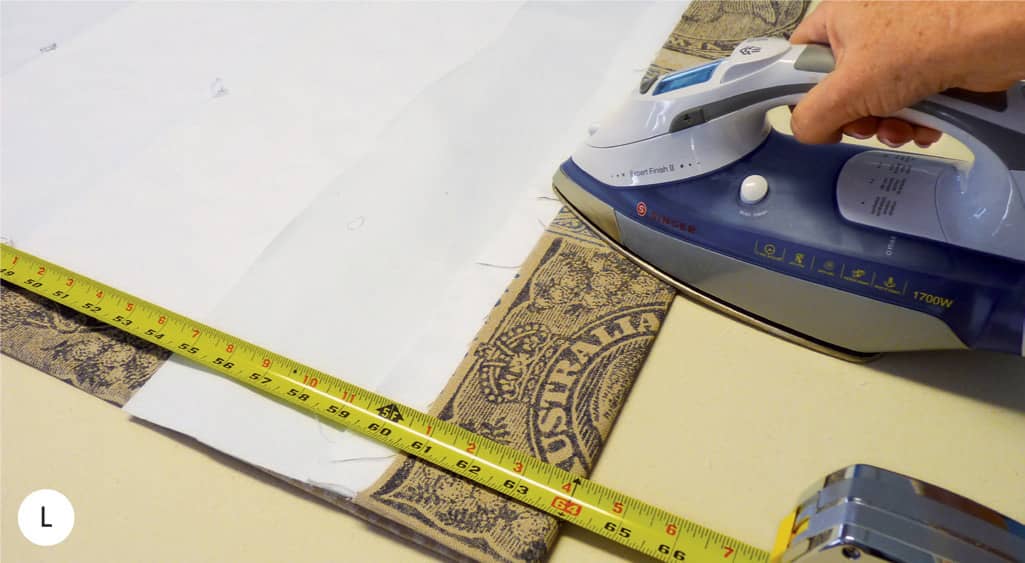
Measure, fold, and press at the finished length.
17. Cut the mounting board and attach the shade, finishing the board neatly. (See Chapter 7: Installing Window Treatments.)

Apply trim across the bottom hem. Low-tack tape marks the spacing.
Making Optional Return End Flaps
This shade has small flaps to cover the ends of the board and hide the lifting system. Cut the fabric and blackout lining to the size needed for your board and lifting system. Allow at least 2 inches (5 cm) to wrap to the front. Add 2 inches (5 cm) to the bottom edge for the hem.
1. With the fabrics face-to-face, sew a 1-inch (2.5 cm) seam along the bottom. (A)
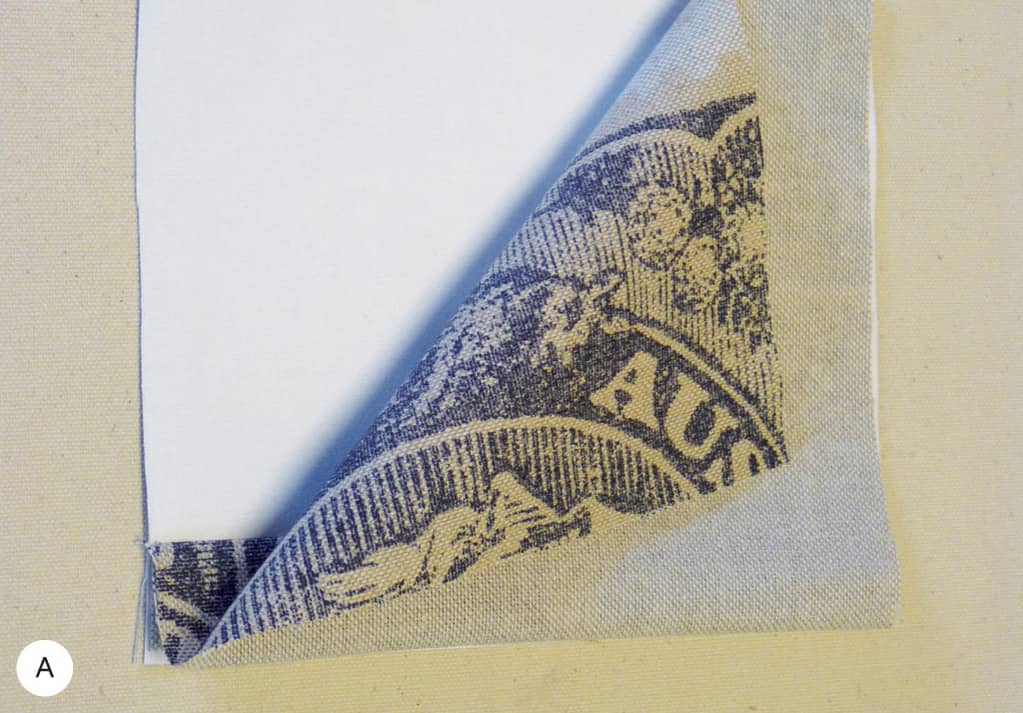
Sew across the bottom with a 1-inch (2.5 cm) seam. Turn over the fabric so it is doubled on the bottom.
2. Turn over the face fabric so that it is doubled on the bottom edge. Pin and sew each side edge with a 1/2-inch (1.3 cm) seam allowance. (B)
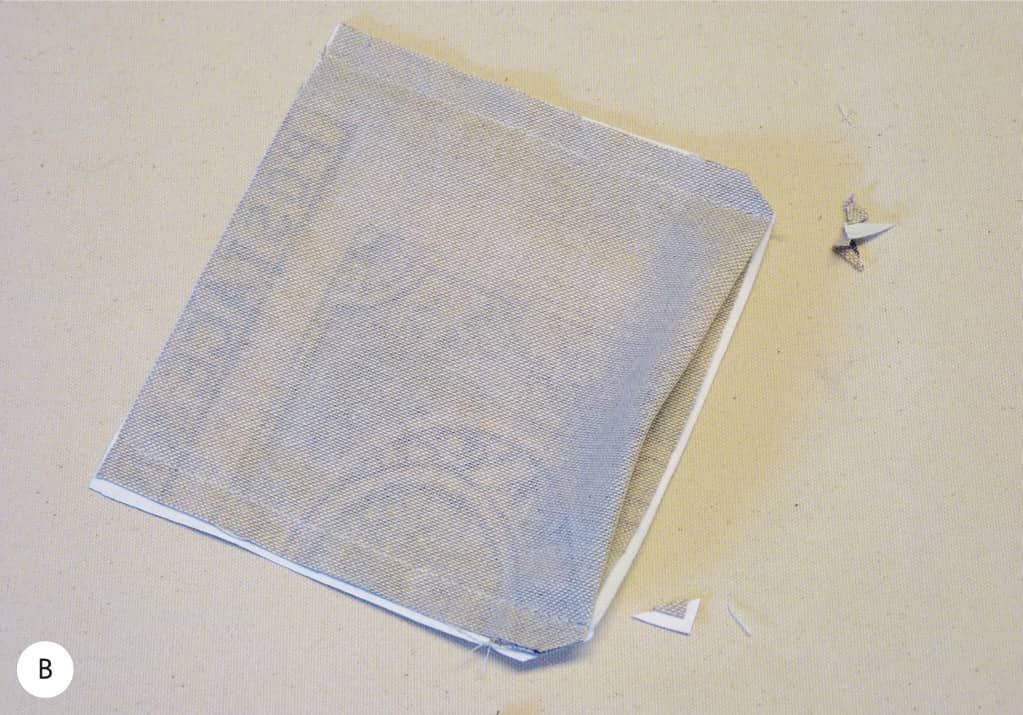
Sew each side and clip the corners.
3. Turn right sides out and press. Add an iron-on stiffener like buckram or heavy interfacing inside, to keep the end flaps neat. (C)
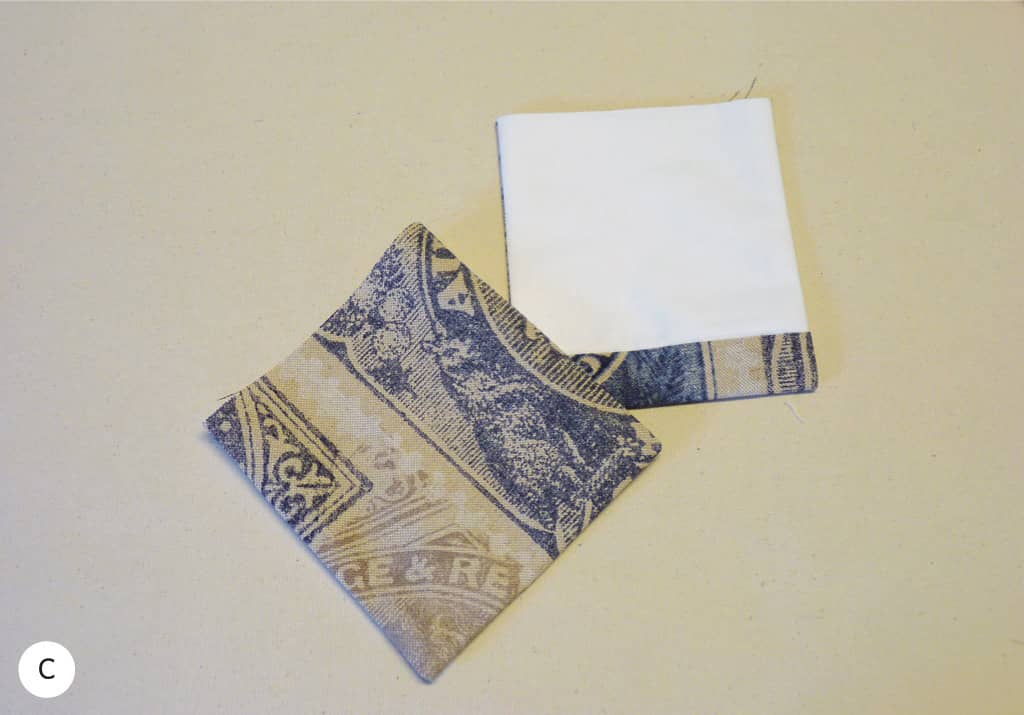
Press the flaps and add buckram or interfacing to stiffen.
4. Turn over the top edges and hand sew loop strip to the back.
5. Staple the hook tape to the board and attach. This makes it easy when installing to remove the flaps and then put them back in place. (D)
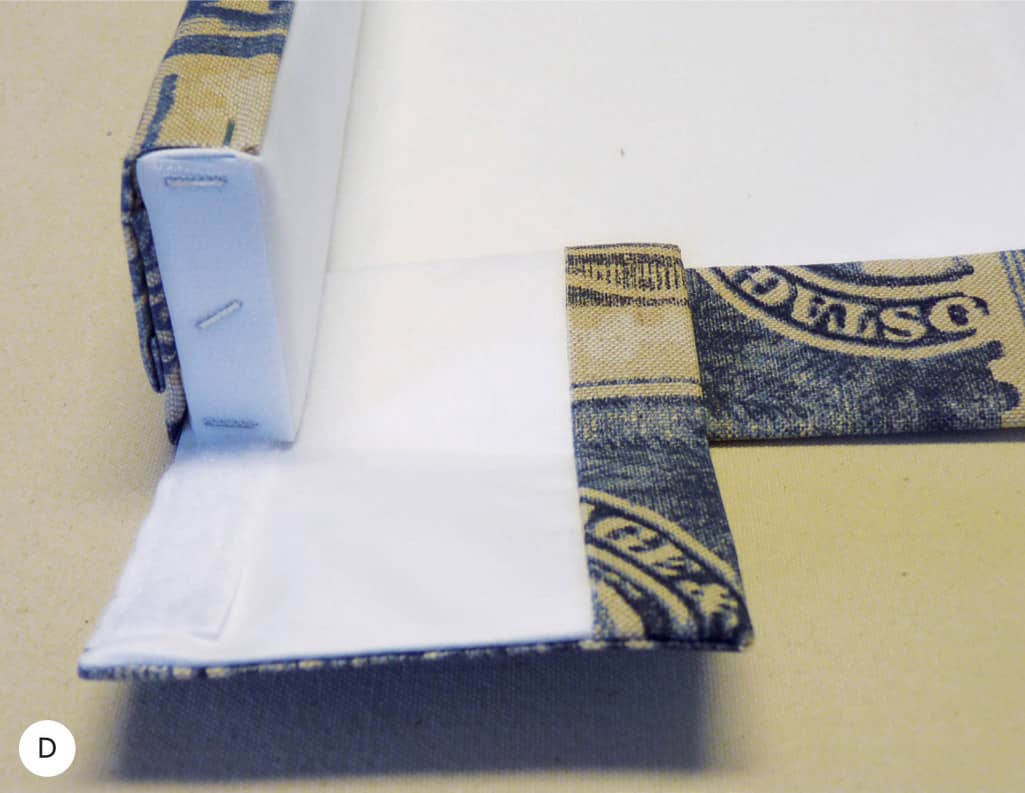
Attach the end return flaps to the face edge of the board with hook-and-loop tape.
6. Continue to finish the shade by attaching the lifting system and cord shrouds or RingLocks to control hazardous cord loops. Use cord-adjusting orbs at the bottom of the shade for adjusting the length.
7. The shade is completed and ready to install over the window.

Return end flaps hide the end of the board and the lifting system.

Even on bright, sunny days there will not be pinholes of light on this blackout shade.
RELAXED ROMAN SHADE
A relaxed Roman shade is less structured and has a softer look than a flat shade. The objective is to add a small amount of fullness, providing enough ease for the bottom hem to swag slightly. This can be achieved in several ways: by cutting the shade with a flared bottom section, by adding small pleats to each end, by adding one pleat in the center, or by angling the rings wider at the bottom.
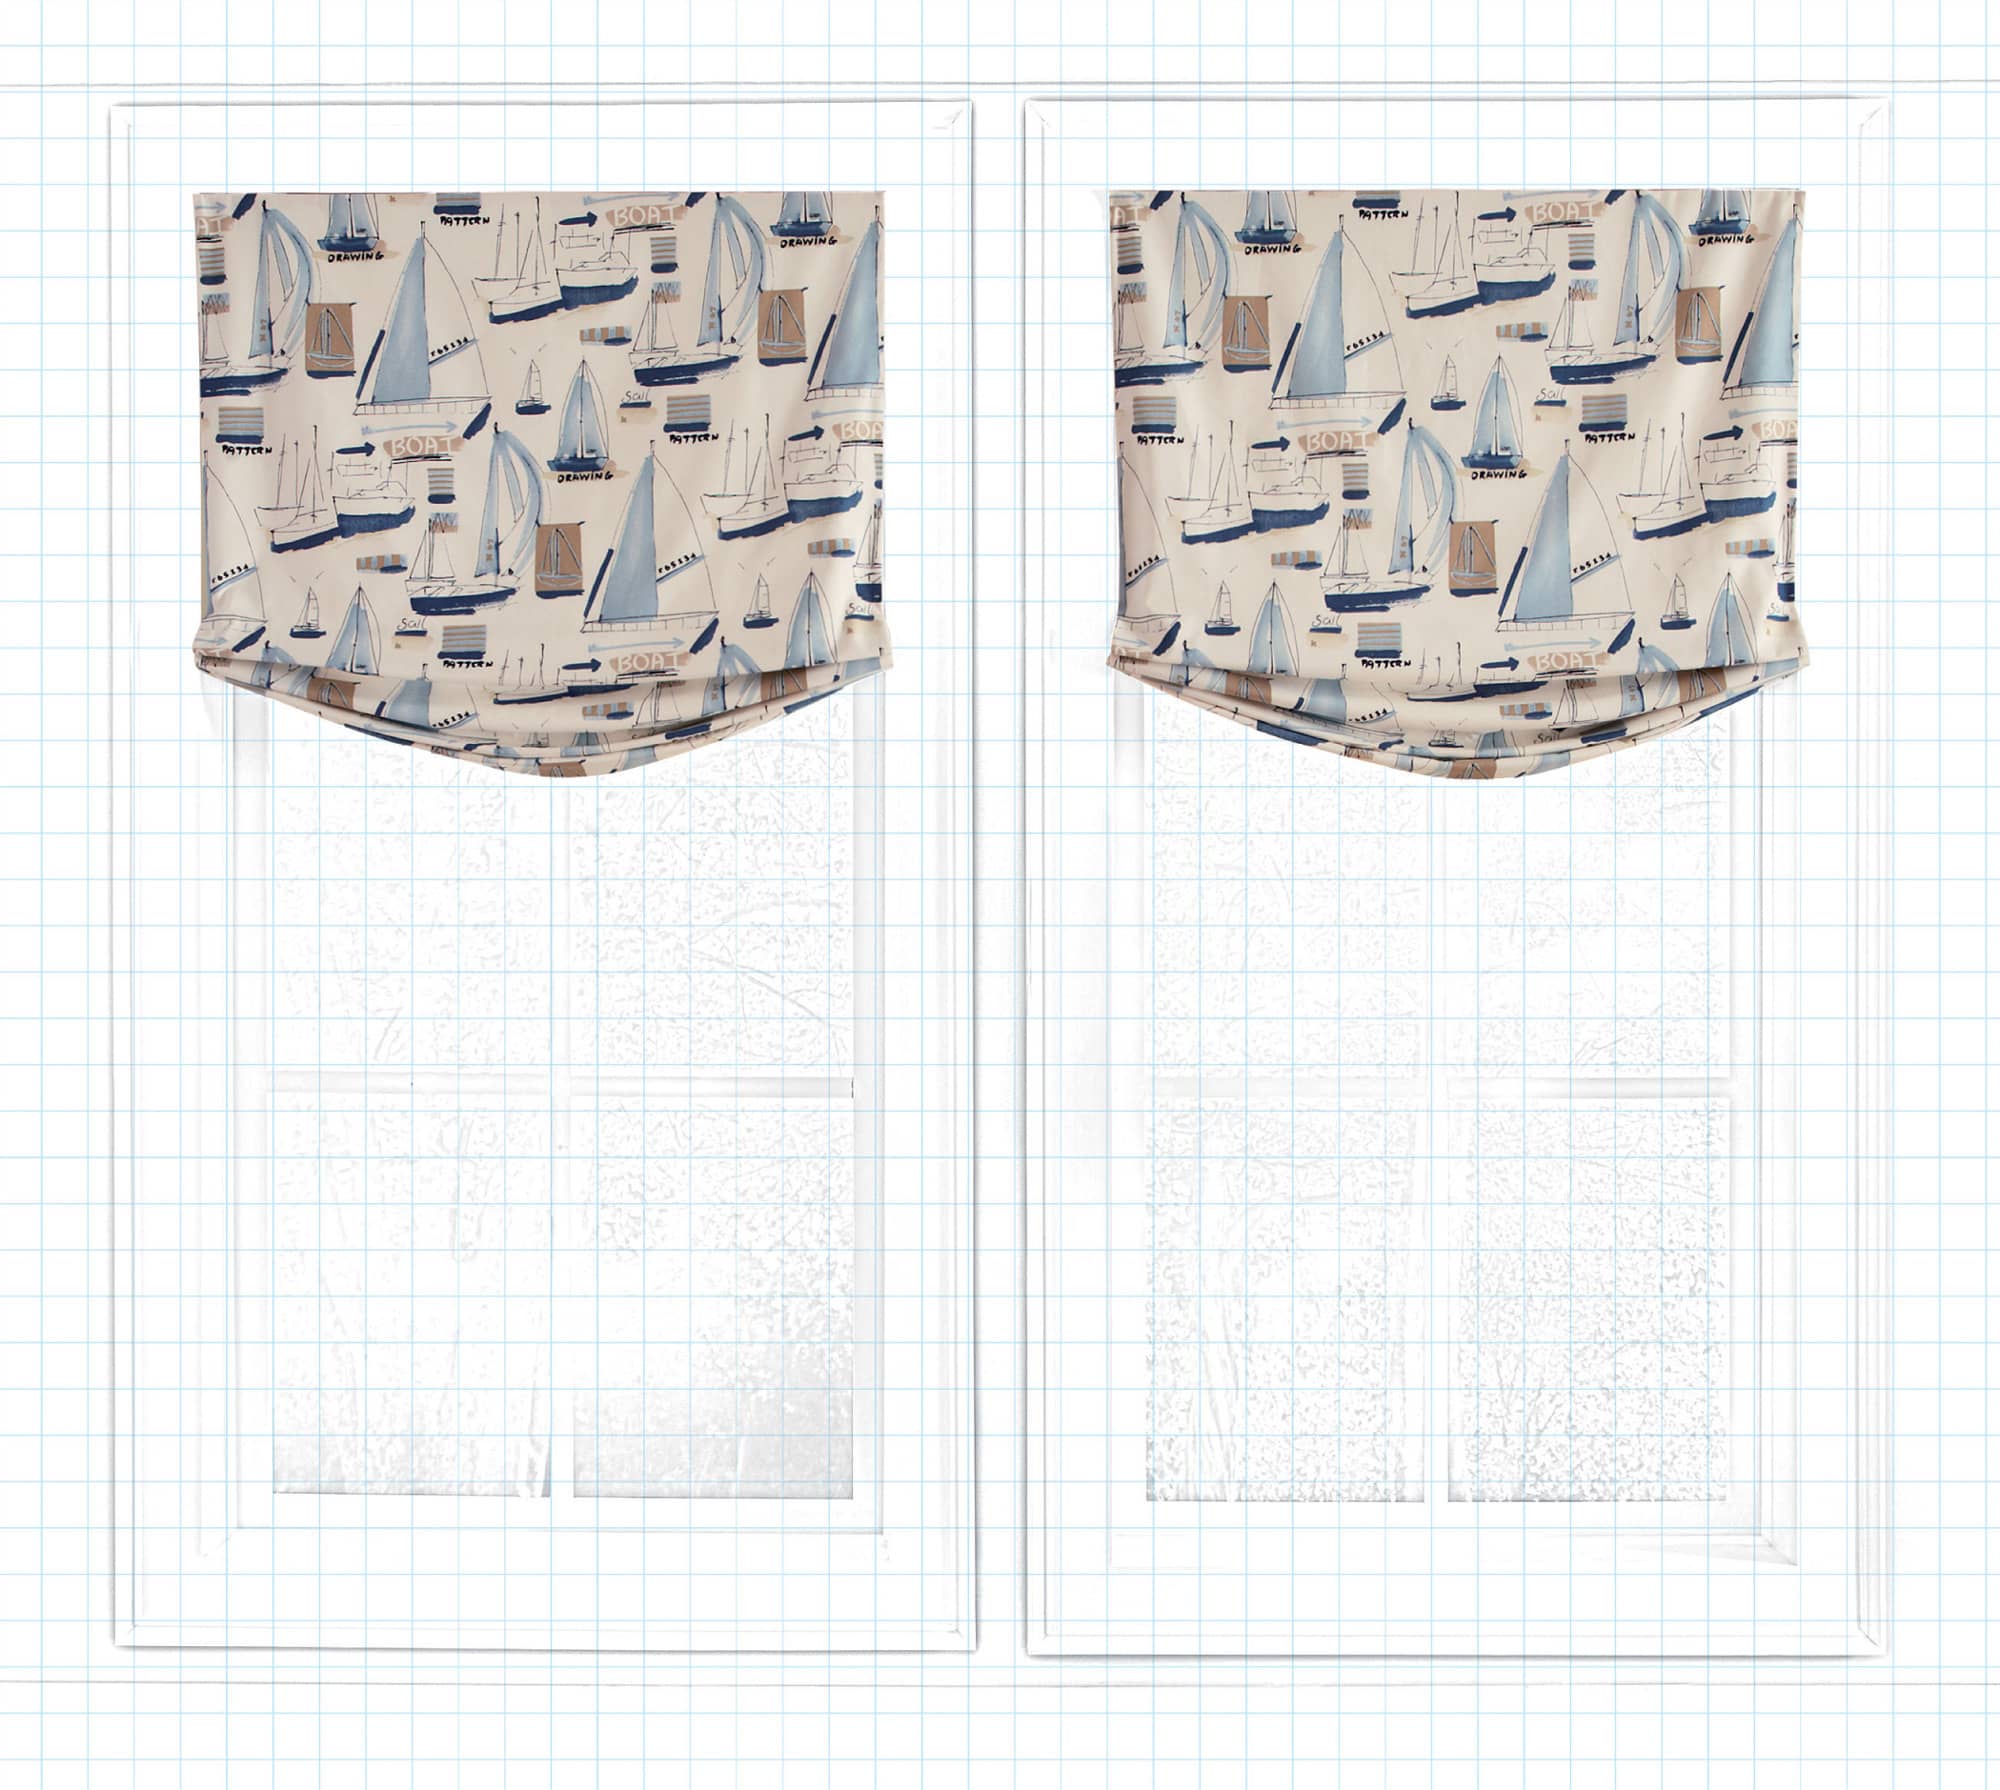
This version of a Roman shade has soft folds at the bottom hem.
Getting Started
In this instruction you will learn how to make a relaxed shade by cutting the bottom wider, in a fishtail shape. This is one of the easiest shades to make! These shades are non-working and set in a fixed position. Boards with Velcro are used to make installation easy. Stationary shades like this are the perfect choice for children’s rooms—there are no hazardous cords and they are easy to remove for cleaning.
If you would like the shade to be operable, this method is a good choice because the body of the shade is made straight and square; only the bottom section is shaped. The shade will stack up into neat folds above the relaxed hem.
What You Will Need
• decorator fabric
• lining
• mounting board
• wooden dowel
• 3/4-inch (1.8 cm) sew-on Velcro (hook and loop)
• heavy-duty stapler and staples
• small cable ties
• sew-on Roman shade rings
• tools and hardware for installation
Yardage Requirements
MAIN FABRIC
Measure your window and determine the finished width and length of your shade.
A. Finished length of shade ___ + 20 1/2 inches (21.6 cm) = ___ ÷ 36 inches (91.4cm) = ___ yards (meters) of fabric
B. Finished width ___ + 4 inches (10.2 cm) = ___ ÷ fabric width = ___. If this number is greater than 1, double the amount from Step A.
If using more than one width of a print fabric, you may need to match the pattern motif, which could require additional fabric.
Finished length of shade = ___ + 20 1/2 inches (21.6 cm) = ___ ÷ pattern repeat = ___ (round up). This is how many of pattern repeats you will need for each cut.
Pattern repeat ___ × number of pattern repeats needed ÷ 36 inches (91.4cm) = ___ yards (meters)
LINING FABRIC
A. Finished length of shade ___ + 20 1/2 inches (21.6 cm) = ___ ÷ 36 inches (91.4cm) = ___ yards (meters)
B. Finished shade width = ___ + 4 inches (10.2 cm) ÷ fabric width = ___. If this number is greater than 1, double the amount from Step A.
When sewing multiple widths together, you may want to split widths in half lengthwise for a whole piece in the center, and sew half widths to each side. Study the pattern motif to determine what is best. For shades with a short length, you can railroad fabrics and linings. This will allow you to have a wide shade without any seams.

Small pleats are added at each side to create the fullness needed for the relaxed, swag bottom hem.

One pleat can be used in the center to create a relaxed shade. Use minimal fullness; too large of a pleat will make the shade droop and look baggy in the center.
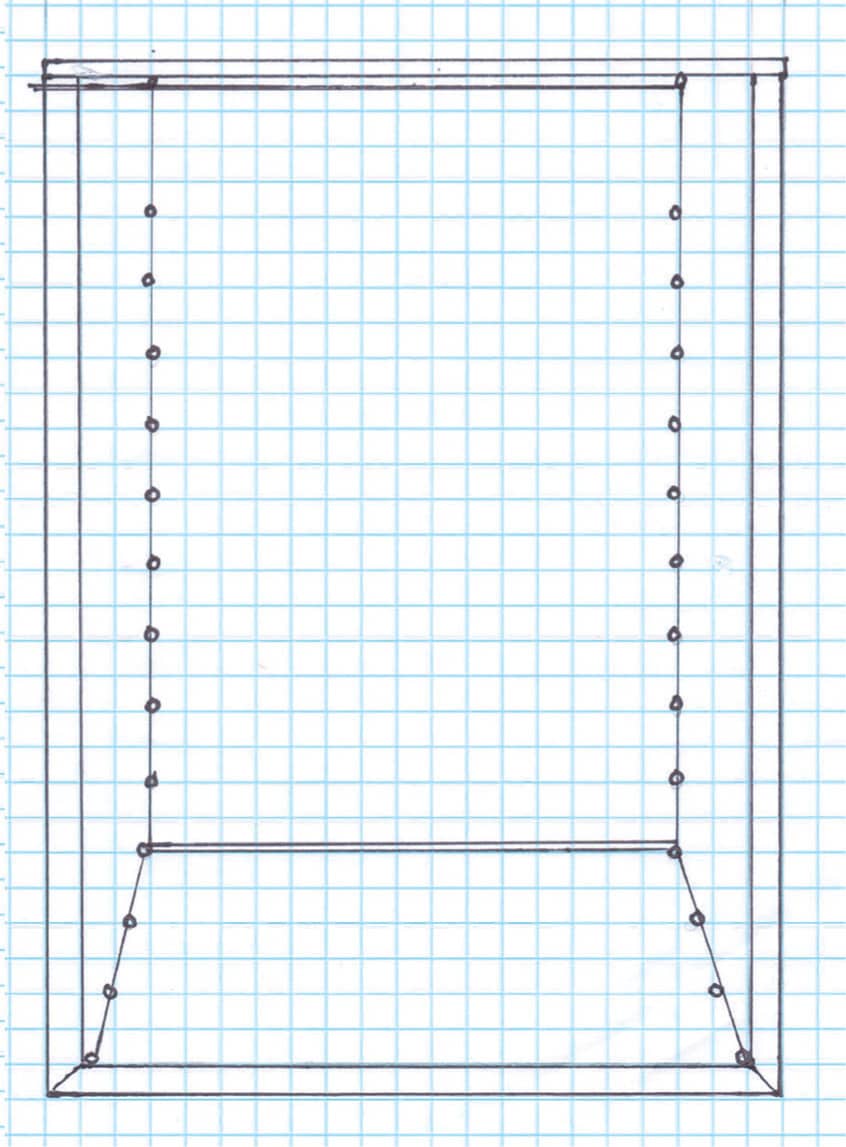
Back view of a Roman shade with rings angled wider at the bottom to create a relaxed style. The weight bar matches the width of the rings in the body of the shade.
Making a Relaxed Roman Shade
1. Measure the window to determine the finished width. For an inside-mounted shade, deduct 1/4 inch (6 mm). Measure an approximate finished length; it can be adjusted later.
2. Fold the fabric lengthwise, right sides together. Starting at the bottom, measure and mark as shown in the diagram (a) half the finished width plus 2 inches (5 cm), (b) 18 1/2 inches (47 cm), and (c) half the finished width plus 1 inch (2.5 cm), which will continue to the top. Cut and unfold. (A)

The fabric is folded and marked so that the bottom section is wider than the main body of the shade.
3. Place the lining face up and top with the cut face fabric, face down. Cut the lining to fit and pin to hold the edges together. Sew the side and bottom edges using a 1/2-inch (1.3 cm) seam allowance.
4. Turn right sides out and press the front and back, making sure the edges are flat and neat. (B)
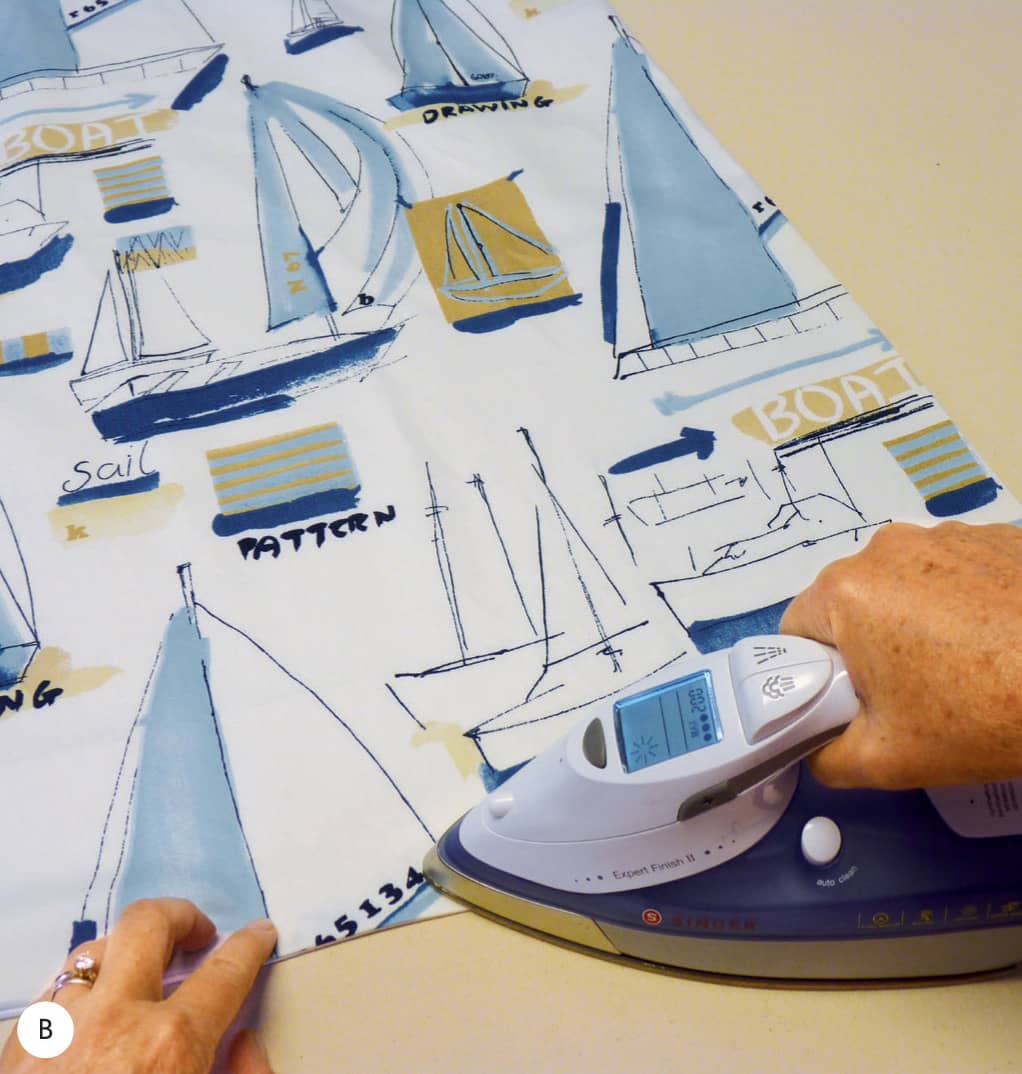
Press from the front, making sure the lining doesn’t peek out from behind the edges.
5. Place the shade face down and mark ring placement from the bottom, 1 inch (2.5 cm) from the edge and 6 inches (15.2 cm) apart. Continue to the height needed for a stationary shade, or to within 12 inches (30.5 cm) of the finished length for a working shade. Repeat for the opposite side.
6. Sew shade rings at each mark, catching the face fabric with the stitches. (C)
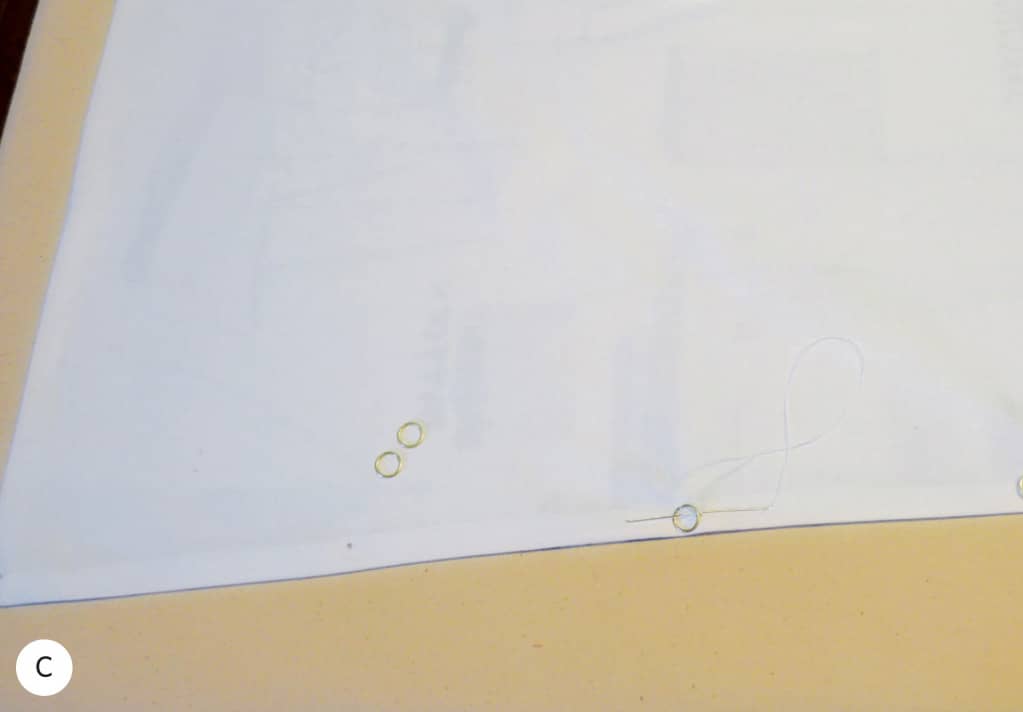
On a relaxed shade, rings are used only on the outer edges.
7. Measure from the bottom to the top and mark at the finished length plus 3/4 inch (1.8 cm). Cut away any excess fabric. On the front top edge, pin Velcro loop strip and machine sew to the shade. (D) Fold over and hand sew the Velcro to the back. (E) You can also machine sew, but the stitches will show from the front.

Velcro loop strip is pinned and then machine sewn to the front.

The Velcro is folded under to the reverse side and secured with hand sewing. Do not catch the face fabric with the stitches.
8. Cut a wooden dowel 2 inches (5 cm) less than the finished width and cover with a sleeve of lining and hand sew above the rings at the top of the angled bottom section. This will keep the shade from pulling in at the sides. (F)

A fabric-covered dowel is sewn to the outside edges to keep the shade from pulling in on each side.
9. Cinch together the four shade rings at the bottom section, plus additional rings up the side to achieve the desired length using a small cable tie. If making a working shade, cinch together only the bottom four rings to create stationary folds. (G)

Small cable ties are used to cinch together the shade rings on each side.
10. Cut the board to the finished width. Cover with lining and staple Velcro hook strip to the front. Install the board at the window and attach the shade. (See Chapter 7: Installing Window Treatments.) Smooth the folds at the bottom of the shade so that they hang evenly.
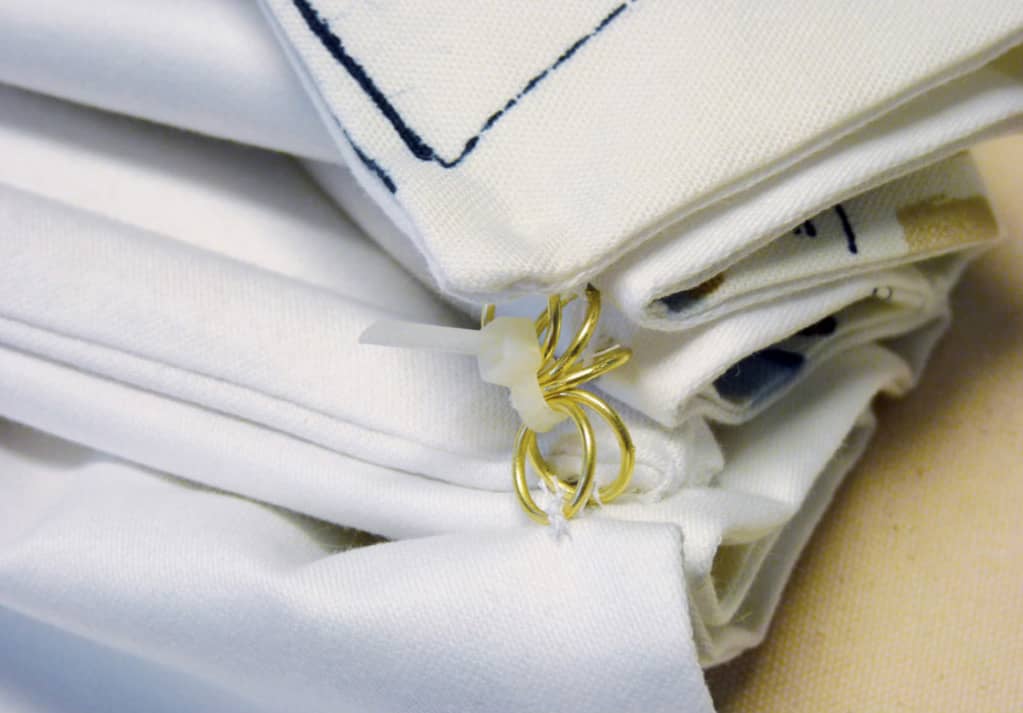
Cut off excess cable tie. The shade is ready to install.
BALLOON SHADE
This style of shade is made with softly gathered fabric, which falls off the top of the board and then is lifted up from the bottom with cords. Also known as “cloud shades,” balloon shades have a soft, unstructured appearance. Choose soft fabrics and linings to keep the shades from being weighted down. Balloon shades can be functional and lifted up and down, but because they require dressing to neaten them, it is more practical to make them set in a fixed position.

A fresh floral fabric creates a feminine balloon shade.
Getting Started
Plan to mount the board above the window frame and 1 inch (2.5 cm) beyond the frame on the sides. As with other shades, mount several inches above the window if you can, to expose more window view.
What You Will Need
• decorator fabric
• lining
• mounting board cut to size
• heavy-duty stapler and staples
• tools and hardware for installation
• screw eyes
• sew-on Roman shade rings
• Safe-T-Shade RingLocks or cord shroud
• shade cord
• cord-adjusting orb
Yardage Requirements
To determine the number of cuts or widths, measure across the mounting board and around each end and multiple times the desired fullness, such as two or two and a half, and divide by the fabric width. (See Chapter 3: Fundamental Techniques.) It is not recommended to make balloon shades with more than two and a half times fullness unless it is an unlined, thin material.
Board measurement × fullness ÷ fabric width = number of cuts needed (round up)
To determine the cut length, measure to where you would like the longest point to be and add 22 inches (55.9 cm). The finished length is adjustable after the shade is installed.
If using a print fabric, additional fabric may be needed to match the pattern motif.
Cut length × number of cuts needed ÷ 36 inches (91.4 cm) = number of yards (meters) (round up)
Use this calculation to cut lining fabric.
FIGURING YARDAGE FOR FABRICS WITH A PATTERN MOTIF (SEE CHAPTER 3: FUNDAMENTAL TECHNIQUES)
Cut length ÷ pattern repeat = number repeats needed per cut (round up)
Number of repeats needed × pattern repeat = cut length
Cut length × number of cuts needed ÷ 36 inches (91.4 cm) = number of yards (meters) (round up)
When sewing multiple widths together, you may want to split widths in half lengthwise for a whole piece in the center, and sew half widths to each side. Study the pattern motif to determine what is best. When possible, you can railroad fabrics and linings. This will create a shade without any seams.
Making a Balloon Shade
1. Cut and seam together the fabric and lining. Press the seams open. Place the lining face up and top with the decorator fabric face down, lining up the seams and bottom edges. Sew across the bottom edge using a 1-inch (2.5 cm) seam allowance. Press the seam to one side, facing toward the face fabric. (A)

The seam is pressed from the reverse side, flat toward the face fabric.
2. Turn the fabric right sides out and press the bottom seam with the face fabric wrapping to the back, creating a 1-inch (2.5 cm) hem. (B)

The hem is pressed to reveal 1 inch (2.5 cm) of face fabric on the reverse side.
3. Fold over 3 inches (7.6 cm) on each side. Trim away excess lining and fold under the cut edges to make a 1 1/2-inch (3.8 cm) doubled hem along each side. (C)
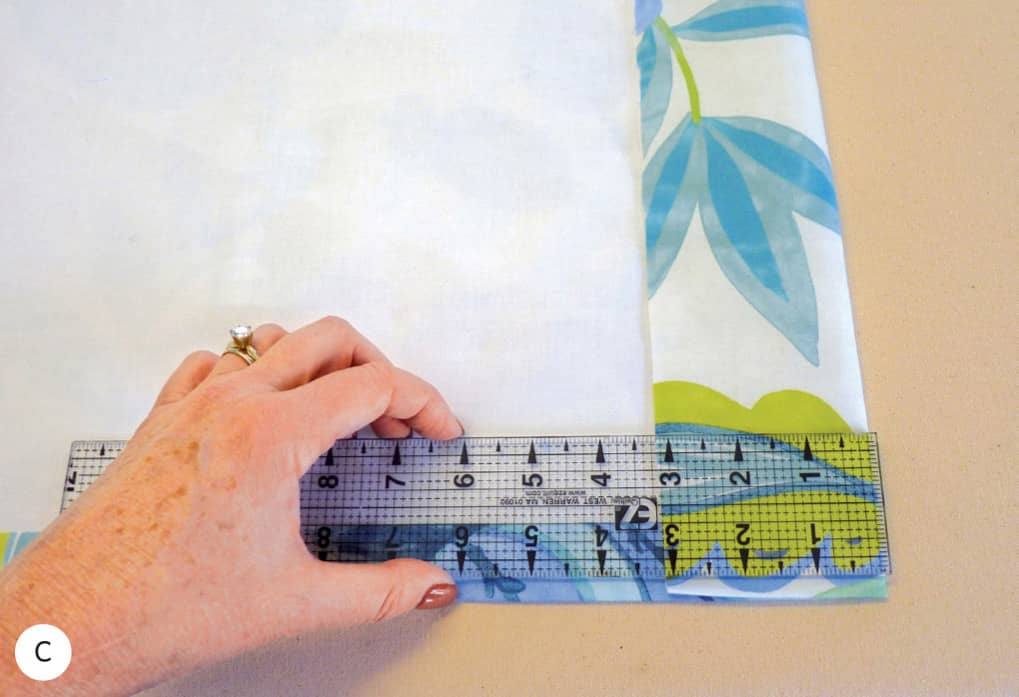
Finish the side edges by folding over 3 inches (7.6 cm) and then folding again for a 1 1/2-inch (3.8 cm) finished hem.
4. Press the hems and secure with pins. Finish the side hems by hand or machine sewing or with a fusible hem tape. (D)

The doubled side hem is ready to be pinned and finished.
5. After the side hems are finished, smooth out the lined fabric and measure and mark the length, remembering to add 2 inches (5 cm) extra at the top for board mounting. Secure with pins and sew across the top with a straight stitch or serged seam.
6. Determine how many poufs, or balloons, you would like on the bottom of the shade by dividing the board width by 10 and rounding up or down. For this shade the finished width was 35 inches (88.9 cm); divided by 10 = 3.5. I rounded up to four balloon poufs across the shade. (E)
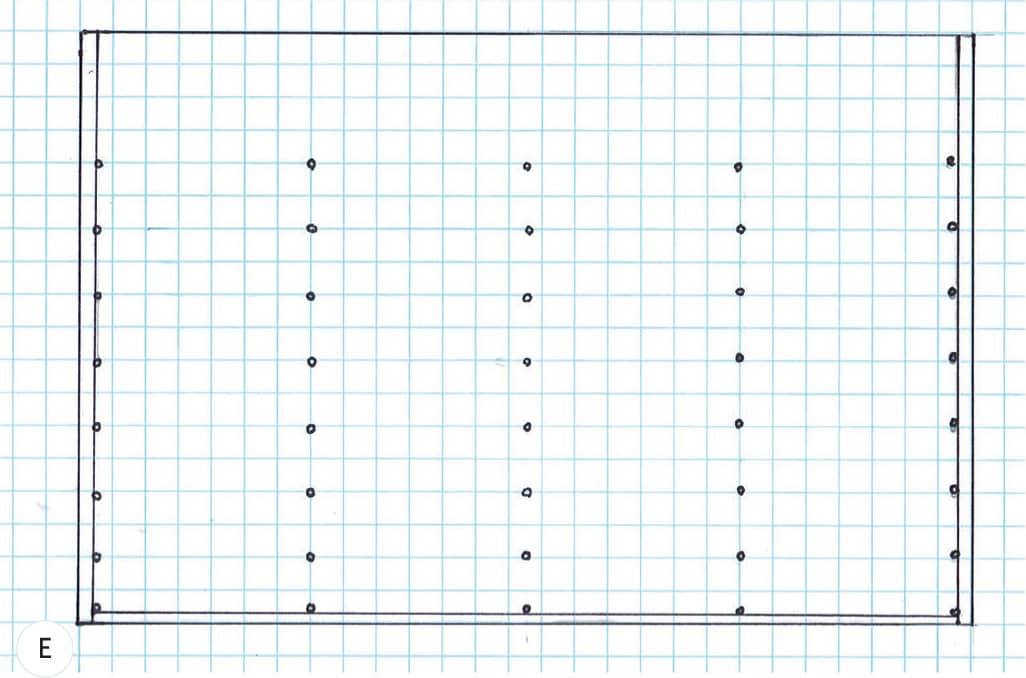
In this example there are five columns of rings to create four poufs on the bottom of the balloon shade.
7. Place the lined and hemmed shade face down and mark for the columns of rings. There will be rings placed along each side hem with the other rings evenly spaced across the shade. Begin by measuring across the shade from the inside of each side hem and dividing by how many poufs will be used. For example, if the finished flat shade measures 100 inches (254 cm) wide, and four poufs were planned, then each section would be 100 ÷ 4 = 25 inches (63.5 cm) between each column of rings.
8. One quick and easy way to mark a line for the columns of rings is to fold the flat shade lengthwise (into quarters for this example) and press a crease. When you unfold the flat shade fabric, the creases mark where the rings will be sewn. (F)
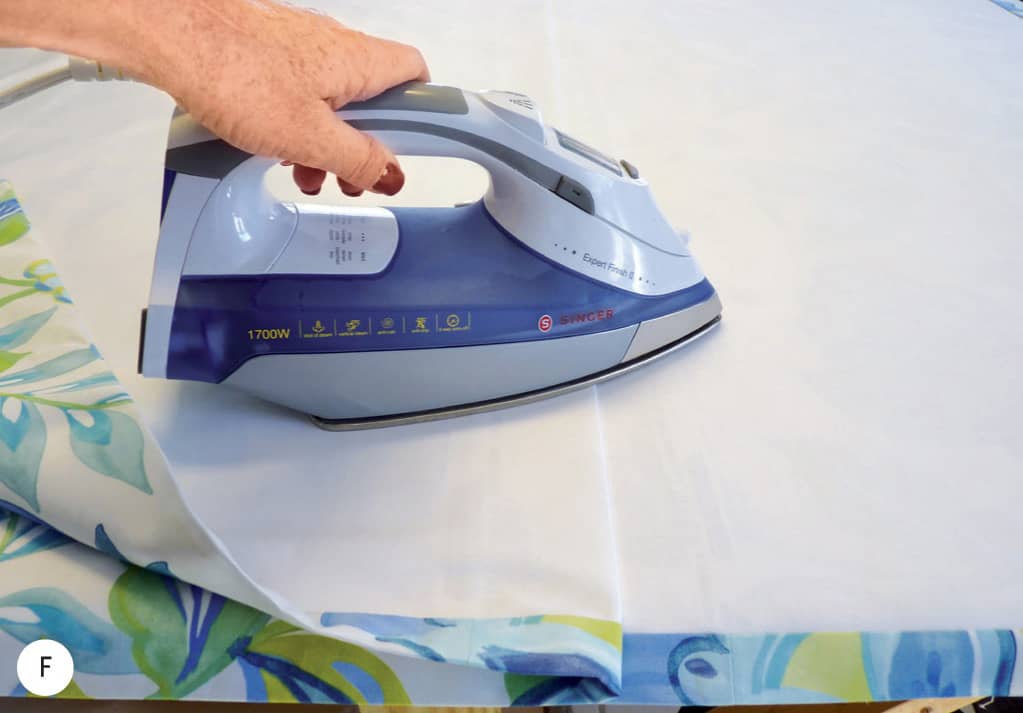
Pressing in a crease is an easy and accurate way to mark vertical ring placement.
9. Unfold the shade and make a tiny pencil mark for ring placement starting at the top edge of the bottom hem and up each ironed crease, making the marks 6 inches (15.2 cm) apart. Pin at each mark, catching both the lining and the face fabric. (G)
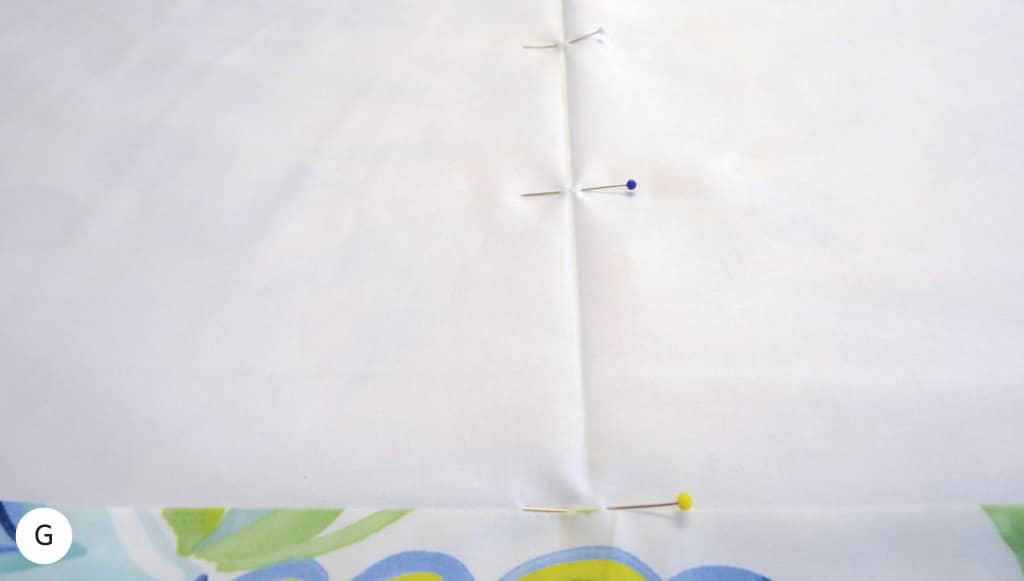
Pins are used to mark ring placement and hold fabrics together for sewing.
10. Sew shade rings at each mark, catching the face fabric with the stitiches.
11. Cover the mounting board and attach the shade to the top of the board, wrapping around each end and gathering to fit the board as you staple. Finish the top so all of the staples and cut edges are covered. (See Chapter 7: Installing Window Treatments.) (H)

The gathered balloon shade is attached to the top of the board, creating a soft, waterfall of gathers.
12. Attach small screw eyes under the board and in line with the top ring and 1 inch (2.5 cm) from the shade. Thread the cord through the rings with RingLocks or cord shroud and screw eyes. (See “Cord Safety” in chapter 3.) Cover a wooden dowel or small metal rod with a sleeve of matching fabric and hand stitch it behind the cords, connected to each bottom ring. (I)

This is how the shade looks from the reverse side. A covered dowel is secured at each bottom ring to keep the sections evenly spaced when the shade is raised.
13. Install the shade to the wall using angle irons. (See Chapter 7: Installing Window Treatments.) Pull the cord to raise the shade to the desired height and secure the cord by tying off to the last screw eye, or with a cord-adjusting orb. Cut away excess cord and dress the balloon shade with even, soft poufs and gathers.

When the shade is raised, the fabric falls between the rings, creating the “poufs” of the balloon shade.
London Shade
London shades are a beautiful style with a traditional flavor. They are best made from light- to medium-weight fabrics. When using printed fabrics, pattern placement is important and must be planned before cutting.
Because London shades cover the top half of the window, it is not a good choice for short windows without room to mount the shade above the frame. Wide windows will require two or more swag sections.
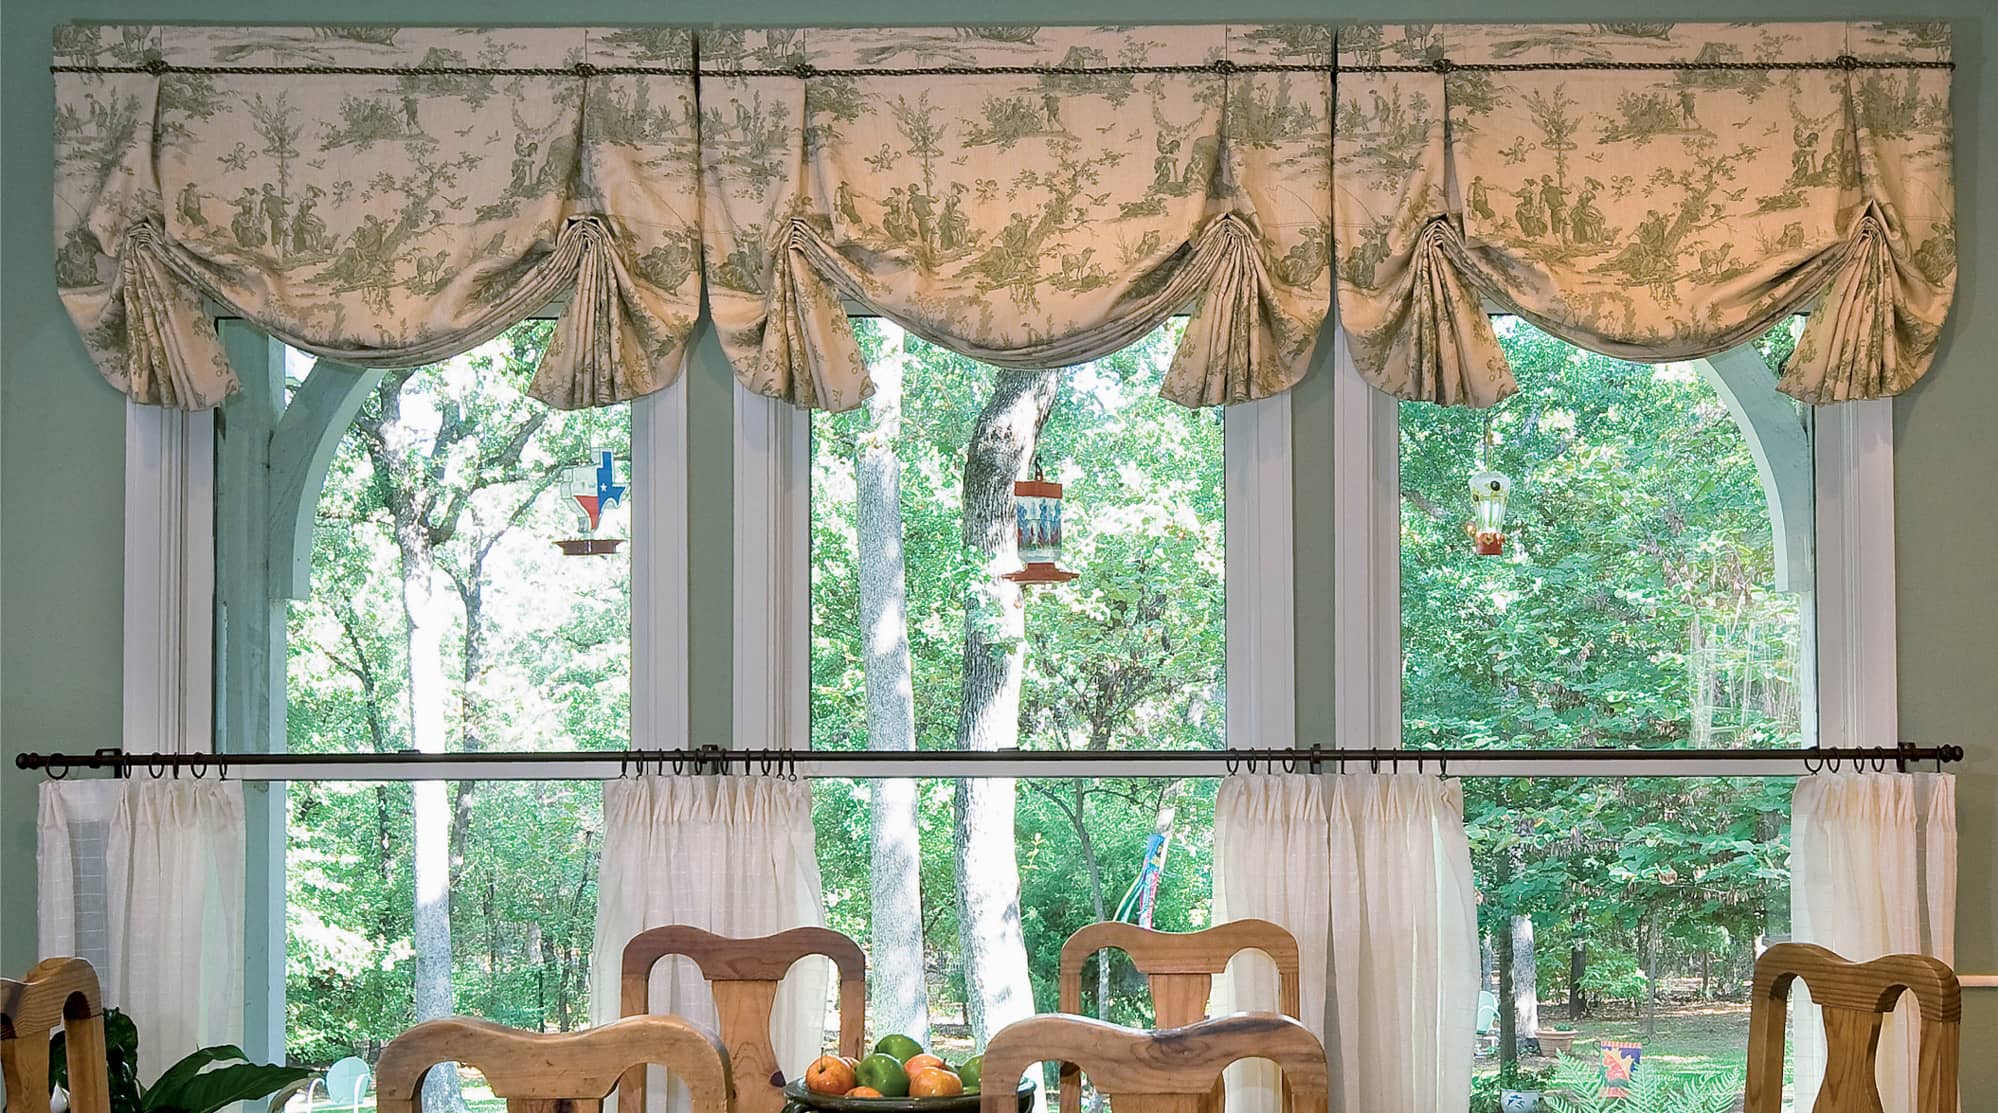
A London shade has pleats inset from each end. When the bottom is lifted, the fabric falls into soft folds in the center with pleated tails on each side


The placement of the pleats determines the length of the tails on the sides. The sketch at left uses a 1/6th proportion while the design on the right has a 1/4th proportion.
Getting Started
When designing a London shade, the position of the pleats determines the finished look. The more the pleats are inset from each end, the longer the tails will be and, if you place the pleats close to each end, the tails will be quite short. A good rule of thumb is to divide the finished width by 6 and use that number for spacing the pleats from the outside edges. For example, if the finished width is 42 inches (106.7 cm), divide by 6 for spacing of 7 inches (17.8 cm) from each end. A simple mock-up out of muslin or remnant fabric can help you determine the best proportions for your window.
Do not make the pleats overly full or the center section will have too much volume. A 10-inch (25.4 cm) pleat was used for this project, but a lesser size pleat would have worked with good results.
On a London shade, the side and bottom edges on the reverse should be finished with a matching or complementary fabric so the lining doesn’t show. Welt cord or another style of trim can be inserted into the seam.
What You Will Need
• decorator fabric
• lining
• mounting board
• metal rod or wooden dowel
• heavy-duty stapler and staples
• sew-on shade rings
• welt cord
• screw eyes
• shade lift cord
• Safe-T-Shade RingLocks or cord shroud
• cord-adjusting orb (optional)
• tools and hardware for installation
Yardage Requirements
Measure your window and determine the finished width and length of your shade. Because a London shade needs to be dressed after it is installed, it is recommended that it be made stationary. A working London shade would not be practical.
At the window, determine a finished length after the shade is pulled up in position, and add 18 inches (45.7 cm). This is the finished length to be used in the calculations below.
MAIN FABRIC
A. Finished length of shade ___ + 3 inches (7.6 cm) = ___ This is the cut length.
B. Finished width ___ + allowance for pleats ___ + returns ___ + 1 inch (2.5 cm) = ___ ÷ fabric width = ___. This is the number of cuts.
Cut length ___ × number of cuts ___ = ___ ÷ 36 inches (91.4 cm) = ___ yards (meters).
If using more than one width of a print fabric, you may need to match the pattern motif, which could require additional fabric.
Finished length of shade = ___ + 3 inches (7.6 cm) = ___ ÷ pattern repeat = ___ (round up). This is how many of pattern repeats you will need for each cut.
LINING FABRIC
You will need the same amount as the main fabric.
IF RAILROADING THE MAIN FABRIC OR LINING
Finished width ___ + allowance for pleats ___ + returns ___ + 1 inch (2.5 cm) = ___ ÷ 36 inches (91.4 cm) = ___ yards (meters)
Note: Extra fabric will be needed to add a facing around the sides and bottom and welt cord around the edges and along the top of the finished shade.
Making a London Shade
1. Begin by creating a cut plan. The shade has five parts: left, right, center, and two pleats. The left and right pieces include the return, which wraps around the end of the board. Use a strip of paper or fabric to make a template. Mark for seams inside the pleats. (A)

There are five sections for a London shade. If the fabric does not require pattern matching, the sections can be combined, requiring fewer seams.
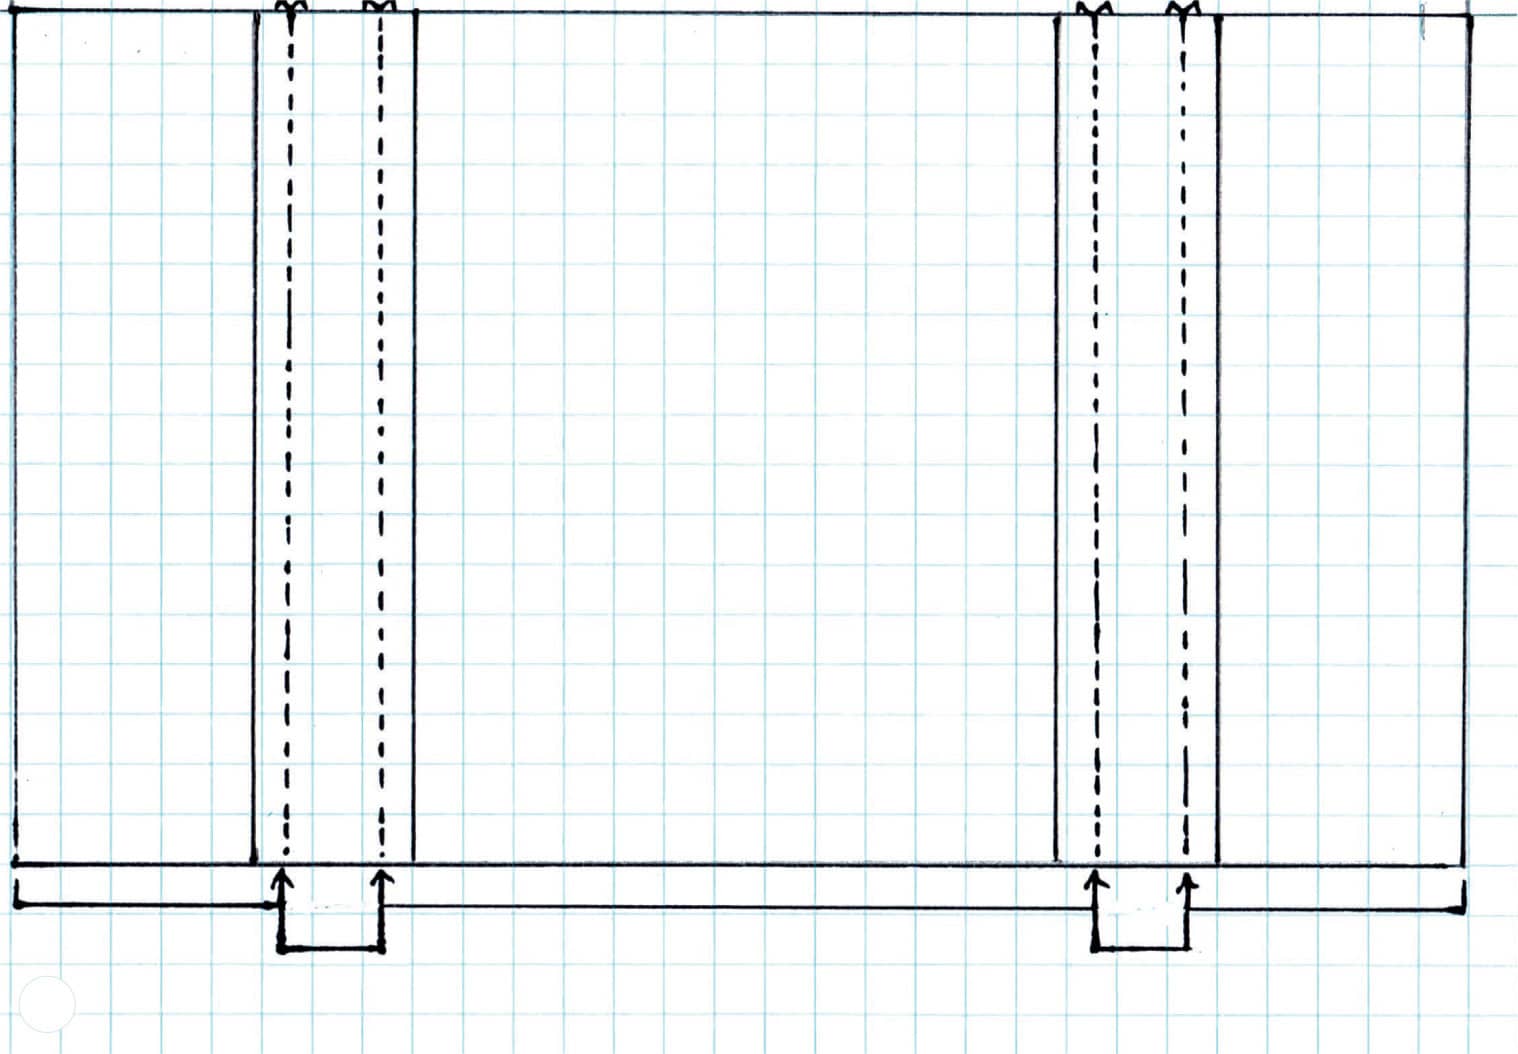
Hide seams inside the pleats. Mark this on the template before cutting fabric.
2. Use the template to determine the cuts, adding 1/2-inch (1.3 cm) seam allowances. On patterned fabric, make the cuts so that the pattern matches across the shade. (B)
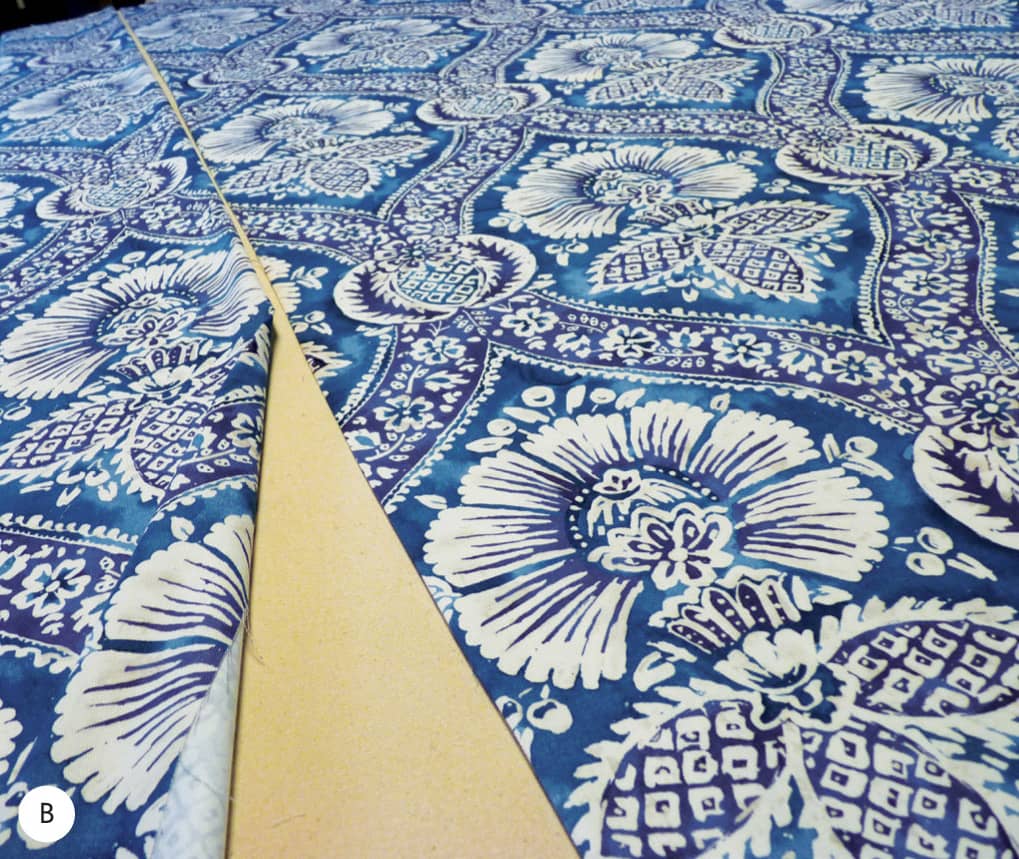
Check cuts before sewing the pieces together to make sure the pattern lines up.
3. Sew together the cuts and press the seams open. Cut and sew the lining to match the seamed face fabric. Sew a facing 6 to 8 inches (15.2 to 20.3 cm) wide along the bottom and sides of the lining. (C)

A facing of matching fabric is added around the sides and bottom of the lining. This prevents the lining from showing when the shade is lifted.
4. Cover enough welt cord to go around the sides and bottom edges. Sew the welt cord to the edges of the face fabric. (See Chapter 3: Fundamental Techniques.) (D)
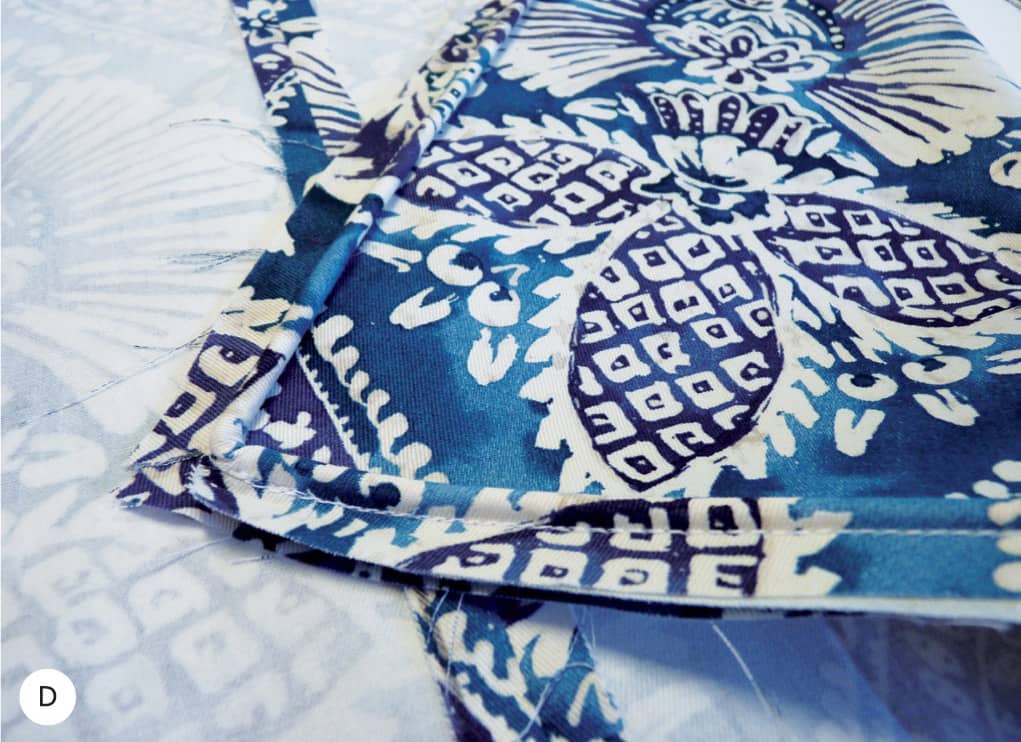
Sew welt cord around the edges of the seamed face fabric.
5. Pin together the front and back pieces and sew, getting close to the welt cord. Do not sew across the top. (E)

Pin the front and back together face-to-face and sew around the edges.
6. Trim away the seam allowance to about 1/4 inch (6 mm). Turn right sides out and press the edges, checking to make sure the welt cord is sewn neatly. Press on the face and back of the shade. (F)

Press the shade on both the back and the front.
7. Measure and mark the length, adding extra for board mounting. Cut off excess fabric and pin the fabrics together across the top.
8. Mark for the pleats and fold them evenly down the length of the shade and press. (G) Use pins to hold the pleats flat. (H)
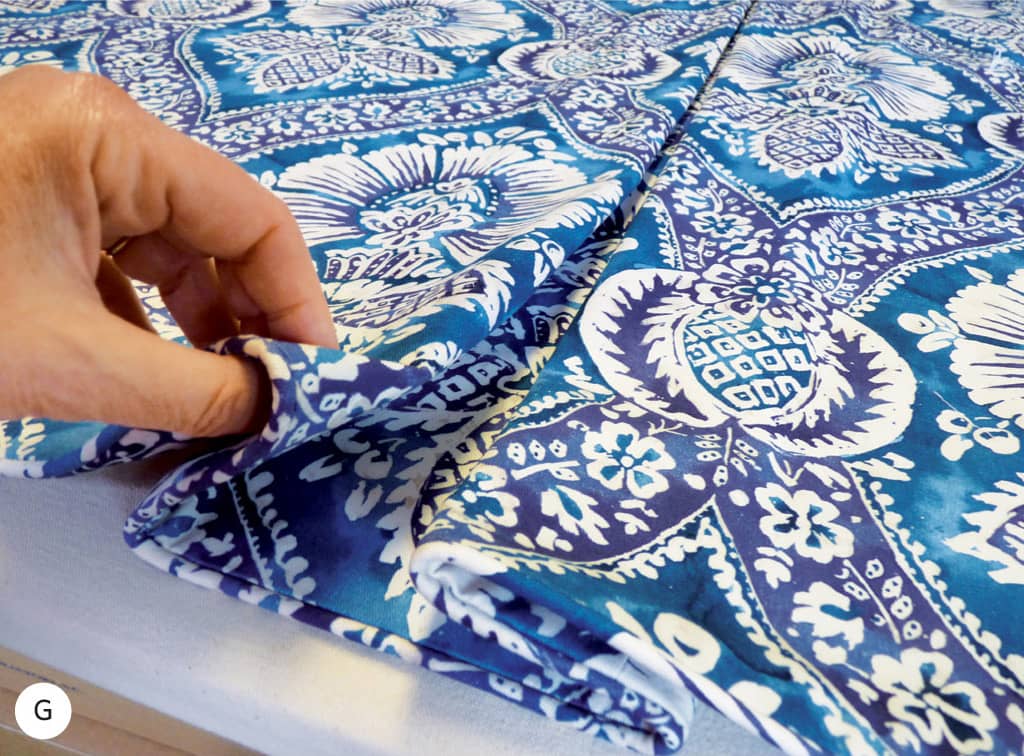
Fold the pleats on each side and measure to make sure they are evenly placed.

Press the pleats from the front and pin.
9. With the pleated shade face down, mark for rings down the center back of each pleat, starting at the top of the facing and to the top, spacing between 6 and 8 inches (15.2 and 20.3 cm). Sew rings at each mark, catching the face fabric. Do not catch the pleats underneath with the stitches.
10. Cut a metal or wooden dowel to fit between the rings. Cover with a sleeve of lining and sew to each bottom ring. This will keep the pleats spaced evenly. (I)
A view of the back before board mounting.
11. Cut a board to the finished size and mount the shade to the board. For this shade, additional welt cord was stapled along the top (J) and the matching fabric was stapled snug next to the welt cord with tack strip, then flipped over and wrapped around the board. (K) (See Chapter 7: Installing Window Treatments.)

Welt cord is added at the front edge of the board to match what was sewn to the shade.

Wrap fabric around the board, finishing the top.
12. Add screw eyes under the board above each column of rings. Tie cord to the bottom rings and thread through the rings with RingLocks or cord shroud and screw eyes and out one side, leaving extra cord for pulling up and adjusting the shade.
13. Install the shade on L-brackets. Pull the cords until the shade is to the desired height and tie off, or use a cord-adjusting orb to hold the shade in position. Tie a knot under the orb to prevent it from slipping and cut off excess cord, or add a cord cleat discretely behind the shade to wrap excess cord.
14. Dress the shade by lifting the tails on each side and smoothing the folds evenly to drop down. Even out the folds in the center to create a swag look. Tug down on the crease of each side of the pleats, folding neatly to allow the amount of fullness you want to show. The shade can be dressed to have a horn or an inverted pleat where it is pulled up with cord. Select whichever you like best! (L)

London shades need to be dressed to neaten the folds and to create a symmetrical design.