Chapter 12
Ten Features to Explore on a Rainy Day
In This Chapter
 Tagging files with cleaning instructions and copyright data
Investigating printing features and special-effects filters
Creating slide shows and video snapshots
Trimming frames from the beginning and end of a movie
Viewing photos and movies on a TV
Consider this chapter the literary equivalent of the end of one of those late-night infomercial offers — the part where the host exclaims, “But wait! There’s more!” Options covered here aren’t the sort of features that drive people to choose one camera over another, and they may come in handy only for certain users, on certain occasions. Still, they’re included at no extra charge with your camera, so check ’em out when you have a spare moment. Who knows; you may discover just the solution you need for one of your photography problems.
Enabling Mirror Lockup
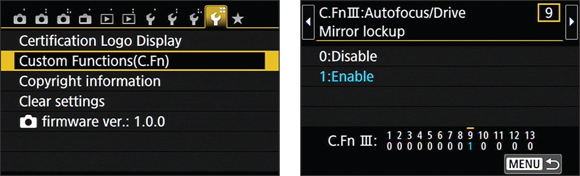
One component in the optical system of a dSLR camera is a mirror that moves when you press the shutter button. The vibration caused by the mirror movement can result in image blur when you use a very slow shutter speed, shoot with a long telephoto lens, or take extreme close-ups. To eliminate this possibility, your camera offers mirror lockup. When you enable this feature, the mirror movement is completed well before the shot is recorded, thus preventing mirror-related camera shake.
 Mirror-lockup shooting requires a special picture-taking process:
Set the Mode dial to P, Tv, Av, or M.
Mirror lockup isn’t available in the other exposure modes. Furthermore, you can’t enable lockup when in Live View or Movie shooting modes.
Set Custom Function 9, Mirror Lockup, to Enable, as shown in Figure 12-1.
For help navigating Custom Functions, see Chapter 1.
- Frame your shot.
- If you’re using manual focusing, set focus.
Press and hold the shutter button halfway.
This step engages autoexposure and autofocus, if you’re using that focusing method.
Press the shutter button all the way down to lock up the mirror. Then release the button.
You can no longer see anything through the viewfinder now. Don’t panic — that’s normal. The mirror’s function is to display in the viewfinder the scene that the lens will capture, and mirror lockup prevents it from serving that purpose.
Press the shutter button all the way down again.
The camera takes the picture.
 Using a tripod or other support is critical to getting shake-free shots in situations that call for mirror lockup. For even more protection, set your camera to the Self-Timer: 2 second mode (introduced in Chapter 2) and take your hands off the camera after you press the shutter button in Step 6. The picture is taken 2 seconds after mirror lockup occurs. If you own a remote-control unit, you can instead use it to trigger the shutter release.
A couple more fine points:
- Drive mode: Even if the Drive mode is set to Continuous or Self-Timer: Continuous, the camera behaves as it does in Single mode: You get one picture for each press of the shutter button.
- Auto shutoff: If you don’t press any buttons for 30 seconds after you lock up the mirror, it automatically flips back down.
Adding Cleaning Instructions to Images
If small spots appear consistently on your images — and you know that dirt on your lens isn’t the cause — your sensor may need cleaning. We don’t recommend that you clean the sensor yourself because you can easily ruin your camera if you don’t know what you’re doing. Instead, take the camera to a good repair shop for cleaning.
Until you can have the camera cleaned, however, you can use a software-based dust-removal filter found in Digital Photo Professional, one of the programs that ships with your camera. You start by recording a data file that maps the location of the dust spots on the sensor. To do this, you need a white piece of paper and the kit lens. Then take these steps:
- Set the lens focal length at 50mm or longer.
Switch the lens to manual focusing and set focus at infinity.
Hold the camera normally and then turn the lens focusing ring counter-clockwise until it stops.
Set the camera to the P, Tv, Av, or M exposure mode.
You can create the dust data file only in these modes.
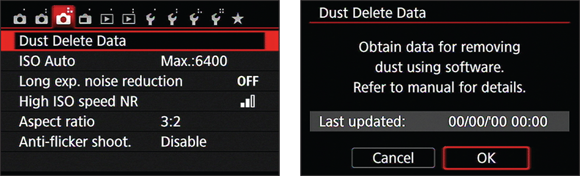
Display Shooting Menu 3 and choose Dust Delete Data, as shown on the left in Figure 12-2.
You see the message shown on the right in Figure 12-2.
- Choose OK.
- Position the white paper 8 to 12 inches from the camera and make sure that the paper fills the viewfinder.
Press the shutter button all the way to record the data.
No picture is taken; the camera just records the Dust Delete Data in its internal memory. If the process was successful, you see the message “Data obtained.”
If the camera can’t record the data, the lighting conditions are likely to blame. Make sure that the lighting is even across the entire surface of your paper and that the paper is sufficiently illuminated, and then try again.
On the Data Obtained screen, choose OK.
The current date appears on the initial Dust Delete Data screen. (Refer to the right screen in Figure 12-2.)
After you create your Dust Delete Data file, the camera attaches the data to every image you shoot. To clean a photo, open Digital Photo Professional and select the photo’s thumbnail in the main window. Choose Adjustment ⇒ Apply Dust Delete Data if you want to get right to it. You can also double-click the thumbnail. The photo then appears in a preview window. Select the Dust Delete/Copy Stamp tool palette and then click the Apply Dust Delete Data button to start the dust-busting feature. The program’s manual offers details.
Tagging Files with Your Copyright Claim
By using the Copyright Information feature on Setup Menu 3, you can add copyright information to the image metadata (extra data) recorded with the image file. You can view metadata in the Canon software; Chapter 10 shows you how.
Including a copyright notice is a reasonable first step to prevent people from using your pictures without permission. Anyone who views your picture in a program that can display metadata can see your copyright notice. Obviously, that won’t be enough to completely prevent unauthorized use of your images. And technically speaking, you hold the copyright to your photo whether or not you mark it with your name. But if you ever come to the point of pressing legal action, you can show that you did your due diligence in letting people know that you hold the copyright.
To turn on the copyright function, take these steps:
Set the camera Mode dial to P, Tv, Av, or M.
You can create or modify copyright information only in these modes. However, your copyright information (after it’s created) will be added to images you shoot in any exposure mode.
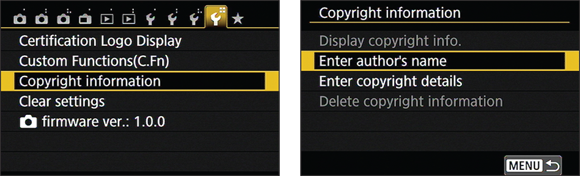
Display Setup Menu 3 and highlight Copyright Information, as shown on the left in Figure 12-3.
You see the screen shown on the right in Figure 12-3.
Choose Enter Author’s Name.
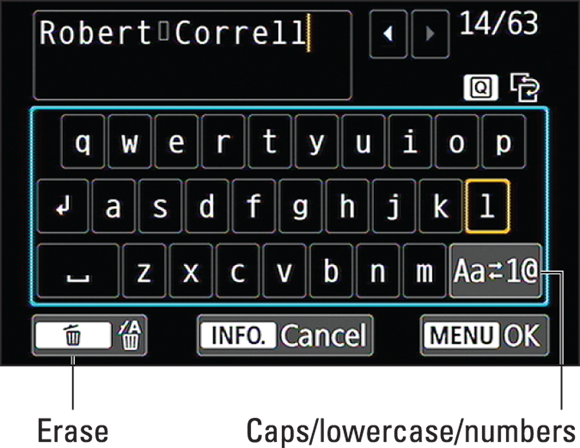
This step opens the data entry screen, shown in Figure 12-4.
Enter your name in the text box.
Your fastest and easiest option is to use the touchscreen-enabled keyboard: Just tap the letters you want to enter. Tap the symbol labeled Caps/lowercase/numbers in the figure to switch the keyboard from displaying all uppercase letters, all lowercase letters, or numbers and symbols. To move the cursor, tap inside the text or tap the arrows at the end of the text entry box; to erase the character to the left of the cursor, tap the Erase icon, also labeled in the figure.
If you don’t want to use the touchscreen, use these button-based techniques instead:
- Tap the Menu icon or press the Menu button to return to the screen shown on the right in Figure 12-3 or Info to cancel.
Choose Enter Copyright Details to add more copyright data.
You might want to add the year and possibly a web address, for example, or your company name. Just repeat the same text entry process you used to enter your name. (You don’t need to enter the word Copyright — it’s added automatically.)
- Tap the Menu icon or press Menu to exit the text entry screen.
- To wrap things up, tap or press Menu one more time.
You can disable copyright tagging by choosing the Delete Copyright Information option that’s shown on the right in Figure 12-3. (The option is unavailable, as in the figure, until you add copyright data.)
Exploring Two Special Printing Options
Through the Print Order option on Playback Menu 1, you can access two features that enable you to print directly from your memory card or the camera:
- DPOF (Digital Print Order Format): With this option, you select pictures from your memory card and then specify how many prints you want of each image. Then, if your photo printer has a card reader compatible with your memory card and supports DPOF, you just pop the card into the reader. The printer checks your “print order” and outputs just the requested prints. You also can print by connecting the camera to the printer using the USB cable supplied in the camera box.
- PictBridge: With a PictBridge–enabled photo printer, you can send pictures to the printer by connecting the two devices with the same USB cable you use for picture downloads.
If you’re interested in exploring either feature, look for details in your camera manual.
Adding Special Effects to Your Photos
With the Creative Filters, you can add special effects to your pictures. For example, Julie used this feature to create the three versions of her city scene shown in Figure 12-5. When you use this feature, the camera creates a copy of your image and applies the filter to the copy; your original remains intact. If the original was captured using the Raw Quality setting, the altered image is stored in the JPEG format.
You can choose from these effects:
- Grainy B/W: Creates a black-and-white photo with a speckled appearance.
- Soft Focus: Blurs the photo to make it look soft and fuzzy.
- Fish-Eye: Distorts your photo so that it appears to have been shot using a fish-eye lens, as illustrated in the top-right image in Figure 12-5.
- Toy Camera: Creates an image with dark corners — called a vignette effect. Vignetting is caused by poor-quality lenses not letting enough light in to expose the entire frame of film (like in toy cameras). When you choose this effect, you can also add a warm (yellowish) or cool (blue) tint. For example, Julie applied the effect with a warm tint to create the lower-left variation in Figure 12-5.
- Miniature: Creates a trick of the eye by playing with depth of field. It blurs all but a very small area of the photo to create a result that looks something like one of those miniature dioramas you see in museums. Julie applied the filter to the city scene to produce the lower-right variation in Figure 12-5. This effect works best on pictures taken from a high angle, like the one featured in the figure.
To try out the filters, take either of these approaches:
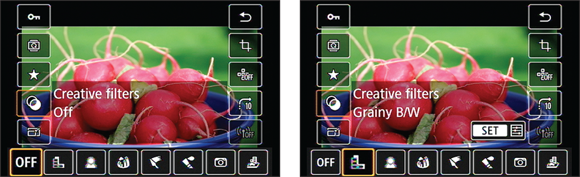
 Quick Control screen: After setting the camera to Playback mode, press the Q button and then use the up/down cross keys to highlight the Creative Filters option, as shown on the left in Figure 12-6. Symbols representing the available filters appear at the bottom of the screen. Use the left/right cross keys to highlight a filter icon, as shown on the right in the figure, and then press Set. You’ll see a preview of your photo with the currently selected filter active. You have the option of making changes to the settings before you apply and save, as described shortly.
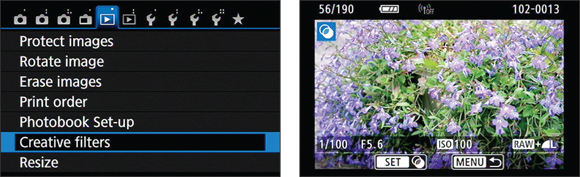
- Playback Menu 1: Highlight Creative Filters, as shown on the left in Figure 12-7, and press Set. The camera shifts to Playback mode, as shown on the right. Use the cross keys or Main dial to select a photo, press Set, use the cross keys to select a filter, and then press Set again.
From this point, both methods work similarly. After you select a filter, use the left and right cross keys to make adjustments to specific filter settings. For example, Robert is adjusting the Grainy B/W effect on a photo of radishes on the left in Figure 12-8. The right screen in the figure shows him previewing the Art Bold effect with a photo of flowers.
Press Menu to cancel and return to the screen where you can choose a different filter. Press Set to apply the filter. When asked, confirm that you want to save the image as a new file.
Tagging Pictures for a Photo Book
Many online and retail photo-printing sites make it easy to print books featuring your favorite images. The Photobook Set-Up option on Playback Menu 1 is a nod to this popular trend. Using this feature, you can tag photos that you want to include in a photo book. Then, if you use the Canon EOS Utility software to transfer pictures to your computer, tagged photos are dumped into a separate folder so that they’re easy to find. This feature works only when you download pictures by connecting the camera to the computer. In addition, it doesn’t work with Raw (CR2) files.
Unfortunately, we don’t have room in this book to provide steps for the process of creating your photo books this way, but if you’re interested, the camera manual tells you how to tag pictures for inclusion in the book. You can find instructions about the software side of the photo-book function on the software instruction CD that shipped with your camera.
Presenting a Slide Show
Many photo programs offer a tool for creating digital slide shows that can be viewed on a computer or (if copied to DVD) on a DVD player. But if you want a simple slide show — that is, one that just displays all the photos and movies on the camera memory card one by one — you don’t need a computer or any photo software. You can create and run the slide show right on your camera. You can even add some transition effects if you choose. And by connecting your camera to a TV, you can display your best photos and movies to the whole roomful of people.
To create and run the slide show, follow these steps:
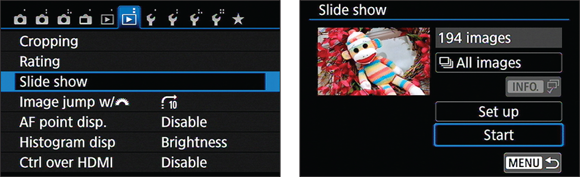
Display Playback Menu 2 and choose Slide Show, as shown on the left in Figure 12-9.
You see the screen shown on the right in Figure 12-9. The thumbnail shows the first image that will appear in the slide show. Should you change the selection criteria, the image will automatically update to show you the first file that will appear in the show.
Also on this screen, you see the total number of images (again, still or movies) slated for inclusion in the show. On your first trip to this menu screen, all images on the card are selected for the show.
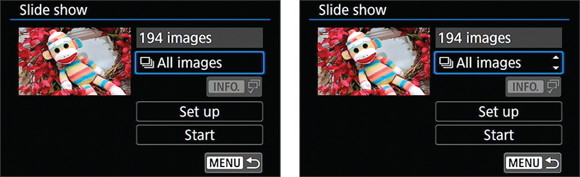
Tap the Select Files option or use the cross keys to navigate to the selection criteria box (shown on the left in Figure 12-10) and press Set.
The option box becomes active and is shown with up and down arrows, as shown on the right in Figure 12-10.
Press the up or down cross keys to specify which files to include in your show.
You can choose from the following settings:
- All Images: Includes all files, regardless of whether they’re still photos or movies.
- Date: Plays pictures or movies taken on a single date. As soon as you select the option, the Info label underneath the option box turns white, clueing you in to the fact that you can press the Info button to display a screen listing all the shooting dates on the memory card. Again, press the up or down cross keys to select a date and then press Set to exit the date list.
- Folder: Includes still photos and movies in the selected folder. Again, press Info to display a list of folders and highlight the one you want to use, and then press Set to exit the folder list. Chapter 11 shows you how to create custom folders.
- Movies: Includes only movies.
- Stills: Includes only still photos.
- Rating: Selects photos and movies based on their rating. (Chapter 10 shows you how to rate photos.) Press Info to display a screen where you can specify the rating that qualifies a file for inclusion and to see how many files have that rating. After selecting the rating, press Set to exit the rating screen.
- Press the Set button to deactivate the Select Files box.
Next, choose the Set Up option.
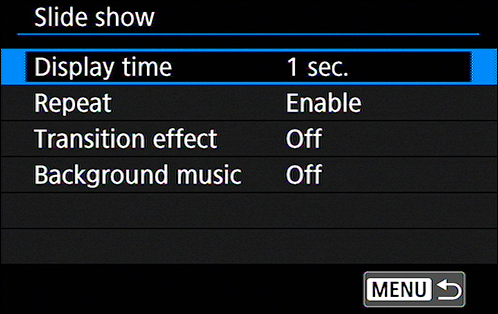
You cruise to the screen shown in Figure 12-11, which offers the following slide show options:
- Display Time: Determines how long each still photo appears on the screen. You can choose timing settings ranging from 1 to 20 seconds. Movies, however, are always played in their entirety.
- Repeat: Set this option to Enable if you want the show to play over and over until you decide you’ve had enough. Choose Disable to play the show only once.
- Transition Effect: You can enable one of five transition effects. With Slide in 1, photos push their way onto the screen from the right. With Slide in 2, they slide in randomly from one of the four sides. With Fade 1, photos fade in as if placed atop the previous slide; with Fade 2, one slide fades to black and then the next slide fades into view (which happens quickly). Fade 3 slides the photos (or movies) in from one of the four sides and fades it into view as in Fade 1. Choose Off if you don’t want any effects between slides.
- Background Music: You can register and upload background music onto your camera’s memory card to play during the slide show using EOS Utility. MP3s aren’t compatible. The audio must be 48-kHz, 16-bit, stereo, linear-PCM, WAV format, which you won’t have or easily be able to convert to unless you’re an audio-engineer geek like Robert. In lieu of using your own, Canon provides a small handful of samples when you install the EOS Utility. Please consult the EOS Utility manual that’s on the CD that ships with your camera.
After selecting your playback options, tap Menu or press the Menu button to return to the main Slide Show screen.
Refer to the screen on the left in Figure 12-10.
Tap Start or highlight it and press Set.
Your slide show begins playing.
During the show, you can control playback as follows:
- Pause playback. Press the Set button or tap onscreen. While the show is paused, you can press the right or left cross key to view the next or previous photo. Press Set again or tap the onscreen Set icon to continue playback from the current slide.
- Change the information display style. Press the Info button.
- Adjust sound volume (for movies). Rotate the Main dial.
- Exit the slide show. To exit the Slide Show, press the Menu button, or, if the show is paused, tap the Menu icon. To return to normal playback mode, press the Playback button.
Creating Video Snapshots
The Video Snapshot feature, found on Movie Menu 2, enables you to capture short video clips that you stitch into a single recording, called a video album. A few pertinent facts about this feature:
- Each clip can be no more than 8 seconds long. You also can record 2- and 4-second clips.
- All clips in an album must be the same length.
- You cannot shoot normal movies when the Video Snapshot feature is enabled.
To create your first album, follow these steps:
- Set the camera to Movie mode and open Movie Menu 2.
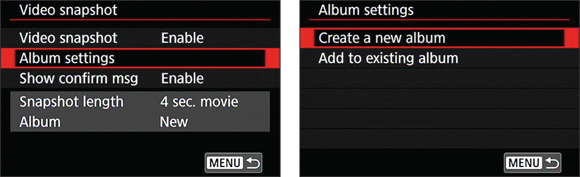
- Choose Video Snapshot > Enable (as shown in Figure 12-12).
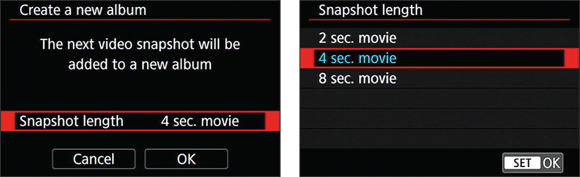
- Next, choose Album Settings > Create a New Album, as shown in Figure 12-13.
Choose Snapshot Length (as shown in the left image in Figure 12-14) and then change the setting if you like.
The right image in Figure 12-14 shows the snapshot lengths you can choose from.
Now you’re ready to start shooting snapshots.
Press the shutter button halfway to exit the menu screen and then press the Movie-Record button to record your first snapshot. While you’re shooting, a blue progress bar shows you how much time you have left for the clip. When you reach the maximum clip length, recording stops automatically. You see the last frame of the clip along with three options: Save as Album, Playback Video Snapshot, or Do Not Save to Album. Select the Save as Album option to store the clip in your first album.
When you record your second clip, you can choose to start a second, new album or add the clip to your existing album. Again, the option appears after the clip is recorded. Your choices are: Choose Add to Album, Save as a New Album, Playback Video Snapshot, and Delete Without Saving to Album. To stop capturing snapshots, return to Movie Menu 2 and set the Video Snapshot option to Disable. You can then shoot regular movies again.
While the camera is in Movie mode, you also can use the Quick Control screen to enable and disable Video Snapshot recording. To enable Video Snapshot recording, press the Q button to enter Quick Control mode, highlight the Video Snapshot icon, and select the snapshot length option, as shown on the left in Figure 12-15. Note that you can’t change the snapshot length while in the Quick Control mode. To do so, return to Move Menu 2. To disable Video Snapshot recording, select the Disable option, shown on the right in Figure 12-15.
A few final notes about recording video snapshots:
- Sound recording: By default, audio is recorded; you can control audio recording through the Sound Recording option on Movie Menu 2, just as for regular movies. You can also play background music.
- Movie Recording Size: All clips in an album must use the same Movie Recording Size option (which you choose from Movie Menu 2). If you want to change the setting, you have to create a new album for your next snapshot.
- Autofocusing: Your options are the same as for normal movie recording; Chapter 5 has details.
- Normal playback: To play a video snapshot after you exit the creation process, use the normal movie-playback steps, detailed at the end of Chapter 8.
Trimming Movies
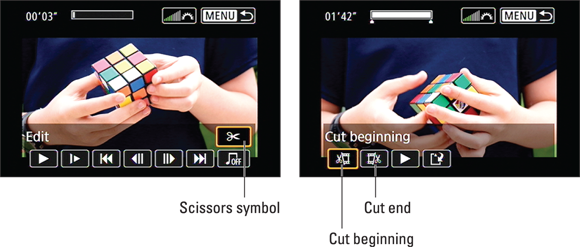
Your camera’s movie-edit feature makes it possible to remove unwanted material from the beginning or end of a movie (imagine the focus was poor at the start, as shown in the figure). To access the editing tools, set the camera to Playback mode and select a movie for playback. Then press the Set button to display the controls shown on the left in Figure 12-16. Use the cross keys to highlight the scissors symbol (Edit) and press Set to enter the editing screen, shown on the right in the figure.
To trim content from the start of a movie, highlight the Cut Beginning icon, labeled on the right in Figure 12-16, and press Set. Press the left/right cross keys to advance to the first frame you want to keep and then press Set. Then choose the Save option and select New File. This step saves your trimmed movie as a new file instead of overwriting your original. (Choose Overwrite if you wish to do so, but this is a riskier option.)
To trim the end of a movie, follow the same process, but choose the Cut End icon (labeled in Figure 12-16) instead of the Cut Beginning icon.
The in-camera movie-editing function doesn’t provide very precise trimming. If you want frame-by-frame control, download your movies to a computer and edit them using video-editing software.
Exploring Wi-Fi Functions
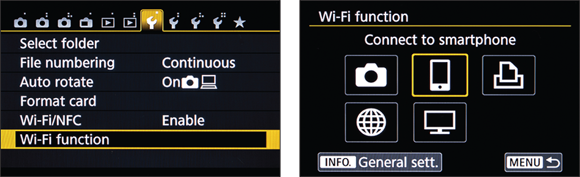
Your camera enables you to connect via a wireless network to various devices for picture sharing, printing, and downloading. To try out these features, visit Setup Menu 3 and set the Wi-Fi option to Enable, which then makes the Wi-Fi Function menu option available. Choose that option, as shown on the left in Figure 12-17, to launch the screen shown on the right, which is the starting point for all the Wi-Fi functions.
Chapter 10 explains how to connect your camera via Wi-Fi and includes initial setup steps you need to take for using all the Wi-Fi functions, so we don’t repeat them here. (Basically, you have to give your camera a nickname by entering data through the same type of keyboard described in the copyright section.)
After you get through the initial setup, you can take advantage of the following wireless features by selecting the icons indicated in the figure:
- Transfer images between cameras: You can connect to another camera that has compatible Wi-Fi features and then copy pictures from your memory card to the card on the other camera. The connection must be made through your wireless network; the cameras can’t talk directly to each other.
Connect to smartphone: Through this feature, shown selected on the right in Figure 12-17, you can view pictures on a compatible smartphone or tablet. Even better, you can transfer pictures so that you can display them on that device instead of having to drag your camera along every time you want to show off your work.
A couple of important points:
- You first need to download and install the Canon Camera Connect app on your phone or tablet. For Android-based devices, it’s available through Google Play; for Apple devices, search the App Store. See Chapter 10 for more information on installing the app and connecting to a smartphone.
- You can transfer only low-resolution copies of your images to your phone or tablet. Don’t worry; they’ll be plenty large for viewing on your device and for uploading to Facebook or whatever social media site you use.
The app also makes it possible to use your smart device to trigger the camera’s shutter. The hitch is that there’s a noticeable delay between the time you tap the Take Picture control on the device and the time the picture is recorded, and you can’t really adjust any camera settings through the app.
- Print from Wi-Fi printer: You can enjoy wireless printing if you have a printer hooked up to your Wi-Fi network and if that printer supports a technology known as PictBridge.
- Save images to Canon Connect Station: This option connects the camera to a Canon Connect Station (sold separately), which is essentially a Wi-Fi hub with internal storage. No computer is necessary. You can wirelessly share, store, view, and manage photos and movies.
- Upload to the Canon web service: This option connects the camera to Canon iMage Gateway, the Canon online picture-storage and sharing site. You can upload photos to the site and also configure your gallery to share pictures via Facebook and other third-party sites. To use this function, you must set up an account (which is free) and register your camera at the Canon iMage Gateway web page.
- View images on DLNA devices: If you have a television or media player that’s connected to your wireless network and carries the DLNA (Digital Living Network Alliance) specification, you can connect to the device for wireless playback.
Of all these features, we think the one people will appreciate most is being able to upload low-res pictures for playback on a smartphone or tablet. Fortunately, after you install the app, getting the two devices to connect is pretty easy, and using the app is fairly intuitive — which can’t be said about the other wireless functions. There’s a brief paper guide to Wi-Fi hookups in the camera box, but unless you’re a networking guru, you’re going to need to dig out the instructional manual on CD to find step-by-step instructions for using all the features with various types of wireless networks. Because the steps vary depending on your computer’s operating system and your wireless-network setup, we can’t be of much help with that part of the process.
 Be sure, too, to check the Canon website to make sure you have the latest copy of the Canon EOS Utility software.

 To delete a character, press the Delete button. It works like a Backspace key. Switch to the text box and position the cursor in front of the characters you want to delete.