This chapter is a small bonus in the book. My first idea was that basic endings are well known and therefore our study should start from the next level. However, it is true that some basic endings are either not so well known or only at a superficial level. Therefore, I decided to add a preliminary chapter dealing with those basic endings which, according to some trainers whom I consulted, pose problems to beginners. I also thought that it could help many trainers at the elementary level. Of course, experienced players can skip this section.
A great part of this chapter is devoted to King + Pawn vs. King endings. Most players handle these endings with confidence, but some have trouble in less common positions. Very often the problem lies in the overuse of the theory of the opposition. While opposition is a very useful concept and its best field of application is Pawn endings, its value is sometimes overestimated.
King + Pawn vs. King endings are best explained by means of the key squares theory, using opposition at the right time and adapting its value to each situation. I assume the reader knows the basic mates and the Bishop + Wrong Rook’s Pawn ending. In any case, a perfect demonstration of these endings can be found in many books.
ENDING 1 |
The rule of the square |
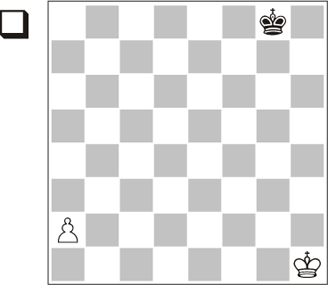
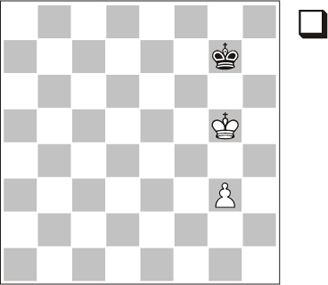
Position 1.1
The first question we have to answer in King + Pawn vs. King endings is this: Can the pawn promote without the aid of the king?
Calculating the race between the pawn and the enemy king is enough to answer this question. This calculation is not complicated but, anyway, experience has taught us a simple way to solve the problem at a glance: the so-called ‘rule of the square’. This rule helps us calculate and can be applied to any other endgame which presents the same race situation.
1.a4!
After the pawn advances, we draw an imaginary square that reaches the 8th rank. In this example the vertices of the square are a4-a8-e8-e4.
1…Kf7
Of course, the black king tries to prevent promotion. Now we are ready to state the main rule.
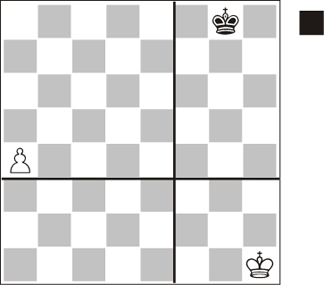
If, when recalling the rule, we doubt whether the king must reach the square with his move or he must already be inside, we shall observe this: if the king chased the pawn from the rear (in this example it might be from b3), should he be inside the square before moving? Of course not: therefore, it would be the same if the king came from farther away, be it from the pawn’s rear or from its side.
2.a5
It is clear that, in this case, the enemy king has not reached the square of the pawn, so White wins.
2…Ke6 3.a6 Kd6 4.a7 Kc7 5.a8Q
1-0
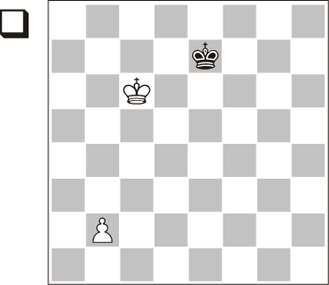
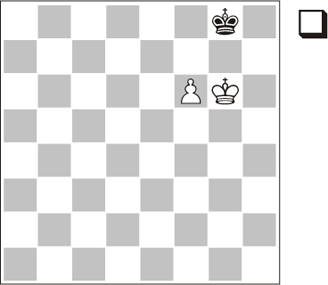
Blocking the way and supporting the pawn with the king
Let us now look at Position 1.3. The black king has clearly reached the square. Now the pawn can promote only with the aid of the king. The easiest way is by blocking the enemy king’s way.
This concept of blocking appears very often in pawn endings, but also in many others, and it is at the core of Rook vs. Pawn endings.
We can now state the second rule, which works with almost all pawns, the exception being the rook’s pawn.
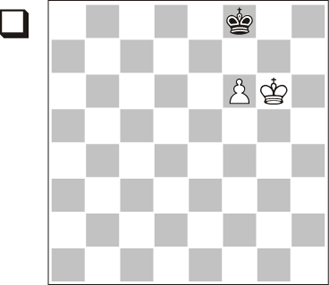
1.Kc7!
Preventing …Kc8 followed by …Kb8 to stand in the pawn’s way. Besides, from this square the king secures the pawn’s path to b8.
1…Ke6
Since the black king cannot get in front of the pawn, he tries to attack the pawn before it reaches the secure zone (b6-b7-b8).
Let us use this example to point out that, if the stronger side’s king has secured the side opposition on the 7th rank, the defender will not be able to disturb the pawn.
2.b4 Kd5 3.b5 1-0
ENDING 2 |
The pawn is on the 6th rank |
Opposition
We have just seen what happens in the two simplest cases:
- When the king does not support the pawn.
- When the king supports the pawn by preventing the enemy king from standing in its way.
However, the most interesting situation in a King + Pawn vs. King ending occurs when the defending king occupies a key square in front of the pawn. Then, everything depends on the relative position of the kings.
Position 1.4
The first important position, which we must fix in our minds, occurs when the pawn has reached the 6th rank and is only two steps away from the promotion square. Despite the proximity of the 8th rank, we will need to examine some positions before we grasp all the important details. In Position 1.4 (previous page), the pawn can take its two last steps almost automatically.
1.f7!
The pawn moves ahead and Black must retreat his king; the white king can thus support promotion.
1…Ke7 2.Kg7! 1-0
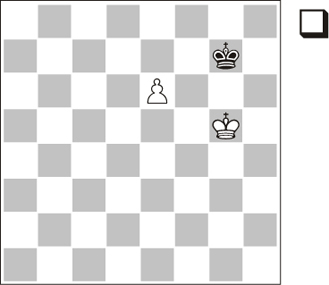
However, the result changes completely if in Position 1.4 it is Black’s turn. The reason is that the pawn cannot promote if both kings are opposed when the pawn reaches the 7th rank. Then we say that they are in opposition, like here after Black’s first move:
1…Kg8!
Position 1.5
Now the kings are opposed and in this situation, almost always, the side that has the opposition has the advantage, and the side to move is at a disadvantage.
As stated above, opposition has gained an excessive prestige; in some cases it is not so useful. If we want to make the most of it, and not to let it deceive us, we just have to notice how it suits us in each case.
This is the first important pattern we must recognise.
2.f7+
Here the pawn moves ahead but cannot promote. Anyway, other moves would not win against an accurate defence. For instance: 2.Kg5 Kf7! (2…Kf8 is also good). The safest way for the defender is to stay on the two squares available in front of the pawn. This fortress cannot be broken. If you have not done this before, it is worth observing and analysing this simple sequence: 3.Kf5 Kf8! (staying in front of the pawn is always the simplest way) 4.Kf4 Kf7! 5.Kf5 Kf8 6.Ke6 (if the defending king has always waited in front of the pawn, it is possible to get the opposition now that the enemy king must retreat from that file) 6…Ke8! 7.f7+ Kf8 8.Kf6 stalemate, as in the main line.
2…Kf8!
In contrast with Position 1.4, White is to move and to prevent the loss of the pawn, he must stalemate Black’s king.
3.Kf6 and draw by stalemate.
In this ending we have seen that, if the defending king takes the opposition when the pawn is on the 6th rank, the pawn cannot promote. If we go deeper, we also see that the major obstacle for the white king has been his own pawn. Therefore, we can conclude that:
Let us have a look at two more positions to consolidate some ideas related to the 6th-rank opposition. Then, our next positions will focus on how to manoeuvre before the pawn reaches the 6th rank.
Position 1.6
Regardless of the starting position of the kings: when the pawn is on the 6th rank, their manoeuvres are driven by opposition, as we will see in the analysis diagram and in the following position:
1.Ka6!
Taking the opposition. Not 1.Kb6?? Kb8! and it is Black who takes the opposition.
1…Kb8 2.Kb6! Kc8
2…Ka8 may be a clever attempt to induce a mistake, exploiting the proximity of the edge of the board, but fails against accurate play: 3.Kc7! (3.c7?? would be a gross mistake) 3…Ka7 4.Kd7 and the pawn promotes.
3.c7 Kd7 4.Kb7 and the pawn promotes.
Position 1.7
Most mistakes made in King + Pawn vs. Pawn endings occur in this position. The reason is that this situation is just provisional: the black king cannot keep the opposition because the pawn controls the f7-square. As stated above, the best squares for the lone king are those in front of the pawn. Otherwise, he may not get there in the right circumstances. This occurs in the next example, which is also important to find out why opposition is sometimes useless. Black loses, no matter who has the move. If Black is to move, the white king will immediately take the opposition on the 6th rank; if White is to move…
1.Kf5!
Now, wherever the black king moves, he loses the opposition. The important conclusion is:
Once we take the opposition, we lose it if one of the squares we need is out of reach.
1…Kg8 (1…Kf8 2.Kf6) 2.Kg6! Kf8 3.Kf6 The white king has gained the important 6th-rank opposition and wins. 3…Ke8 4.e7 Kd7 5.Kf7 1-0
One last example to make sure that we have taken into consideration all the subtleties of this ending. Not all pawns work in the same way. As we get closer to the edge of the board, pawns usually have their own rules. Therefore, I will devote a special section to the rook’s pawn. The knight’s pawn is not so exceptional, but nevertheless it presents some peculiarities due to the proximity of the edge of the board.
Knight’s pawn
Position 1.8
Let us have a look at the position. It is White’s turn and he cannot take the opposition, while we know that if the king moves in front of the pawn he will have to retreat from his blocking position on his next move. This position would be lost if Black had a central pawn, but with a knight’s pawn White can be saved thanks to a special detail.
1.Kh1!
The right move. This relative position of the kings, called diagonal opposition, usually does not help much, but works in this case.
1…Kf2
This move would secure promotion with any other pawn, but now the white king is in stalemate and the position is drawn. The pawn cannot promote after other moves either, since the white king comes back to his impregnable position in front of the pawn: 1…Kg4 2.Kg2!=.
ENDING 3 |
Key squares |
Position 1.9
When the pawn has not reached the 6th rank yet, the analysis grows in complexity, but there are very clear rules. If we know them, we will play the ending with accuracy and we will quickly know whether the pawn promotes or not. The essential concept here is that of key squares. But what are key squares and what is their effect?
Since the king has reached one of them, White wins:
1.Kf6!
Of course not 1.f6?? Ke8!, taking the opposition and thus drawing. As we have said, there is no need to hurry to push the pawn. The white king must pave the way first.
1…Ke8
The black king has retreated from the pawn’s path. What is the move that secures promotion?
2.Kg7!
Now the pawn’s path is clear and promotion comes in three moves.
2…Ke7 3.f6+ Ke6 4.f7 1-0
If, in the starting position, the white king had been on g6, 1.Kf6 would have led to the same position; if on f6, White wins with 1.Ke6 Ke8 2.f6, taking the opposition in the key situation: when the pawn reaches the 6th rank.
Were it Black’s turn in any of the three examples, White would win by means of one of those two manoeuvres: either supporting the pawn from the 7th rank or taking the opposition.
Therefore, we have seen that White wins if his king reaches any key square. That will condition our previous play.
Knight’s pawn
Position 1.10
Once again, the knight’s pawn poses extra difficulties, but the key square rule still applies. We just need to be slightly more careful.
1.Kg6!
The king must go to the other side to skip annoying stalemate tricks. The alternatives are: 1.g6? stalemate; 1.Kf6 This move does not let victory slip but, if Black plays accurately, White has to return to the starting position. 1…Kh7! (1…Kg8 2.Kg6 Kh8 3.Kf7 Kh7 4.g6+ Kh8 5.g7++–) 2.g6+?? (this move does miss the victory, as we have seen in Position 1.8. 2.Kf7! is the correct move, returning to the starting position) 2…Kh8! Now the pawn cannot be stopped.
1…Kg8 2.Kh6 Kh8 3.g6
With the king at this side of the pawn, promotion runs smoothly, as shown in Position 1.4.
3…Kg8 4.g7 Kf7 5.Kh7 1-0
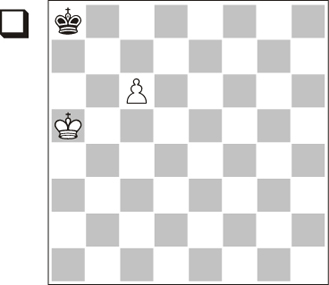
Key squares when the pawn has not reached the 5th rank
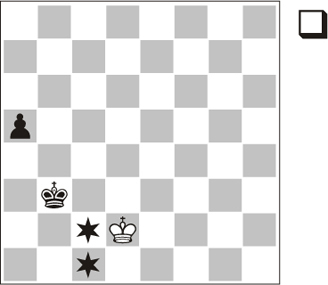
Position 1.11
For example, for a pawn on the 4th rank, the key squares are on the 6th rank; in the diagram, c6, d6 and e6. But the rule still applies: if the white king occupies one, the pawn promotes. The key squares for a pawn on the 5th rank are the same as on the 4th rank. For a pawn on the 2nd or 3rd rank that rule (the key squares are two ranks ahead) is still valid. That is, for a d3 pawn, the key squares would be e5, d5 and c5; for a d2 pawn, e4, d4 and c4.
In the diagram position, the white king easily reaches one of the key squares, but sometimes opposition plays a role, causing the fight for the squares to be harder.
1.Kd5!
Heading for the key square c6. 1.Ke5?? would be a mistake: in the position after 1…Ke7, opposition would be useful in the standard way: it prevents the enemy king from going further, in this case, from reaching the key squares.
1…Ke7 2.Kc6
Once White has occupied one of the key squares, the pawn promotes; we already know the procedure.
2…Kd8 3.Kd6 Kc8 4.Ke7 Kc7 5.d5 Kc8 6.d6 Kb7 7.d7 1-0
Trying to analyse what would have happened if Black were to move in the starting position is a simple and interesting Exercise.
The distant opposition
Position 1.12
In the diagram position the fight for the key squares is tougher. We already know that, for a 4th-rank pawn, the key squares are two ranks ahead; in this case, b3, c3 and d3 (marked in the diagram).
We also know that opposition prevents the enemy king from going further, so if the strong king reaches the 5th rank and then his counterpart takes the opposition from the 2nd rank, the former will not make progress or occupy the key squares. However, if the white king moves to the 2nd rank, it is Black who takes the opposition. What to do then? Sometimes we can succeed thanks to the so-called distant opposition.
1.Kb1!
When both kings are on the same file separated by an odd number of squares (3 or 5), we talk about distant opposition. This is an effective way to restrict the enemy king’s progress. For example, in this case the black king can gain a rank, but no more, as then his white counterpart will oppose him, taking the direct opposition. Thus the white king prevents him from advancing two ranks and getting to the key squares.
It is interesting to note that Black cannot win, even if it were again White’s turn. Distant opposition can be lost, the same as direct opposition (see Position 1.7), if some squares are out of reach. Now White would play Kc1 and Black would lose the opposition because …Kc5 is impossible.
1…Kb4
If 1…Kc4, then 2.Kc2, always taking the opposition and hindering progress.
2.Kb2!
Immediately taking the direct opposition, thus preventing the king from reaching the key squares.
2…c4 3.Kc2 c3 4.Kc1 Kb3 5.Kb1 c2+ 6.Kc1 Kc3=
Using reserve moves
Position 1.13
Remember that the key squares for a 3rd-rank pawn are two ranks ahead. Thus, here the key squares are f5, g5 and h5. The white king is already there, so White should win, but how to outflank the opposing king?
This is possible thanks to a reserve move with the pawn.
1.g4
As the kings are opposed, White pushes the pawn, giving Black the move. Thus the white king will reach the new key squares on the following move.
1…Kf7 2.Kh6 would not change matters.
2.Kf6
Now the king has occupied the key squares for the pawn on the 4th or even the 5th rank. Thus, the pawn could go that far, but there is an easier way.
2…Kh8
2…Kh6 3.g5+ Kh7 4.Kf7; 2…Kg8 3.Kg6 Kf8 4.Kh7 and the pawn’s path is clear.
3.Kg6 Kg8
The black king takes the opposition again, but once more White has a reserve move.
4.g5! Kh8 5.Kf7
And the pawn promotes straight away:
5…Kh7 6.g6+ Kh6 7.g7 1-0
ENDING 4 |
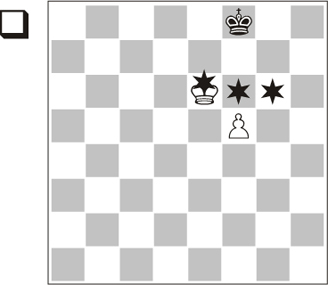
The rook’s pawn. Defending king in front of the pawn |

Position 1.14
So far, everything we have said is valid for all pawns with the exception of the rook’s pawn, which deserves special attention.
In a pawn ending, the rook’s pawn is the most difficult to promote. It requires its path to be clear. The reason is the possibility of a stalemate when the pawn reaches the 7th rank supported by the king, no matter from where. This new situation renders useless all our rules about the range, the opposition and the key squares stated in the previous endings.
In this position it doesn’t matter who is to move: this is always a draw.
1.Kh1
White loses the opposition, but no matter: there is a stalemate.
1…h2
Stalemate.
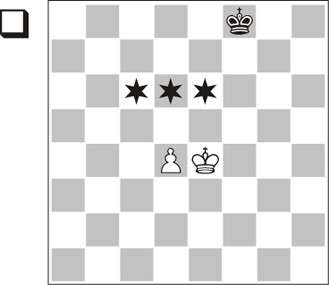
Quantity is not quality

Though we are studying single-pawn endings, exceptionally I will show you this diagram – an imaginary position, it cannot be reached in an actual game! – to illustrate the idea that there is little hope of promoting a rook’s pawn.
We can see here that if the defending king stands in the pawn’s path, not even 6 rook’s pawns are enough to win.
1.Kh1 Kf3 2.Kxh2 Kg4 3.Kh1 Kg3 4.Kg1 h2+ What else? 5.Kh1 Kg4 6.Kxh2 h3 7.Kh1 Kg3 8.Kg1 h4 9.Kh1 h5 10.Kg1 h6 11.Kh1 Kf3 12.Kh2 Kg4 13.Kh1 Kg3 14.Kg1 h2+ 15.Kh1
And again the only way to avoid stalemate is giving up the pawn and so either we lose all pawns or we cannot advance them.
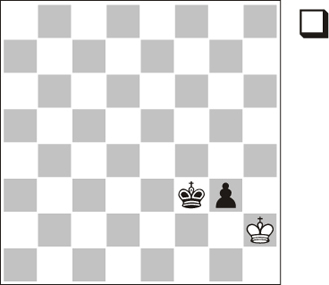
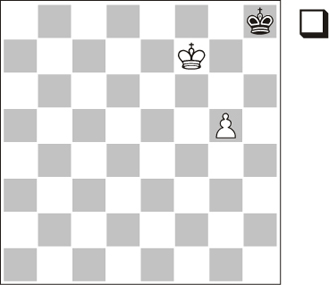
ENDING 5 |
Imprisoning the stronger side’s king |
Unfortunately for the strong side, standing in the pawn’s path is not the only way for the defender to draw this ending. The vicinity of the edge of the board can also dramatically restrict the mobility of the stronger side’s king.
Position 1.16
In the diagram position Black threatens 1…Kb2, securing the pawn’s path to promotion. But it is White’s turn:
1.Kc1! Preventing 1…Kb2 and threatening 2.Kb1.
1…Ka2
The only way to prevent the white king from getting in the pawn’s way. However, after this move the black king loses his mobility and will not be able to let his pawn advance. 1…a4 2.Kb1 a3 3.Ka1 leads to a well known drawn position.
2.Kc2!
Now White will not allow the king out of the corner. The rest is quite easy.
2…a4 (2…Ka3 3.Kb1=) 3.Kc1 a3 4.Kc2 Ka1 5.Kc1
Nothing can be done. The king cannot get out and if Black pushes the pawn, his king is stalemated.
This is so clear that we could add many doubled rook’s pawns to the diagram and still Black could not win.
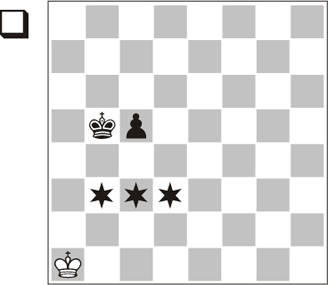
ENDING 6 |
Rook vs. Bishop. The wrong corner |
The ending Rook vs. Bishop is usually a draw. However, the defender has to be careful with some positions when the king is pushed to the edge of the board. This is especially dangerous when the king is pushed to the wrong corner.
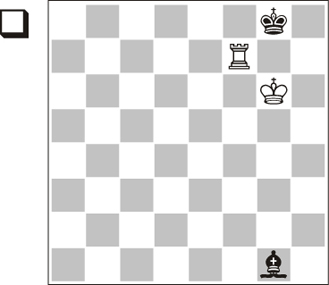
Position 1.17
In the diagram position, the black king cannot move away from the corner and Black loses, no matter where the bishop is.
1.Rf1
The winning plan is to force the bishop out of its safe place behind the white king, thus winning time to threaten checkmate on the 8th rank. 1.Rb7?? threatening mate would be a gross mistake: after 1…Kf8 the black king cannot be forced back to the wrong corner.
1…Bh2
Trying to stay in the safe zone, but there are not enough squares, as we will see in three moves. Other moves lose quickly. For instance: 1…Bd4 2.Rd1 Bb6 3.Rb1 Bc7 4.Rc1 and Black cannot hinder the 8th-rank check any more.
2.Rh1 Bg3 3.Rg1 Bh2 4.Rg2
The rook takes control over two of the safe squares; a discovered check with the king mines a third one (the f4-square). Therefore, the bishop is forced out to open field, and the white rook can exploit its position to win a decisive tempo.
4…Bd6 (4…Bf4 5.Kf5++–) 5.Rd2 Be7 6.Rc2 (6.Rd7? Kf8 draws) 6…Bf8 7.Rc8 and Black is checkmated.
ENDING 7 |
Rook vs. Bishop. The right corner |
The other corner is a completely different story. It is so easy to defend this ending from the right corner that going there straight away is a perfectly sound idea.
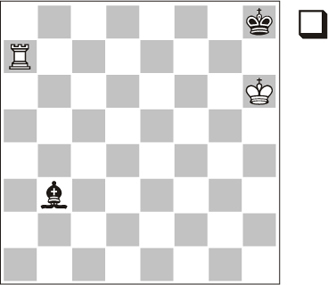
Position 1.18
The black king stands in the corner, while the bishop is ready to interpose on g8 in case of a check. Then White would have to let the bishop move to avoid stalemate, and the position would be repeated. There are no serious winning chances.
1.Ra8+ Bg8
Now either the rook or the king must release the pressure on the enemy pieces to avoid stalemate.
2.Ra7
2.Kg5 Kg7 3.Ra7+ Kh8 4.Kg6 Bc4 5.Ra3 Bd5 6.Rh3+ Kg8 7.Re3 Kh8 is similar.
2…Bb3 3.Kg6
3.Rh7+ Kg8 4.Rb7 Bd5. The bishop always has enough squares at its disposal along the a2-g8 diagonal.
3…Bc4
The only concern for the defender is that his bishop has enough distance to check the enemy king from the b1-h7 diagonal if necessary. Thus 3…Be6?? would be bad due to 4.Rh7+ Kg8 5.Re7 winning. The position is safe once this danger is averted.
4.Rh7+ Kg8 5.Rc7 Bd3+ 6.Kh6 Be4=
ENDING 8 |
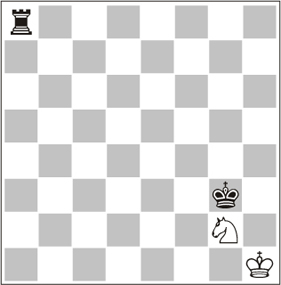
Rook vs. Knight. At the edge of the board |
When fighting against a rook, the knight may have more trouble than the bishop. Nevertheless, most positions are drawn. In this ending, keeping the knight close to the king is the best policy. If the knight is separated from the king, it can be lost.
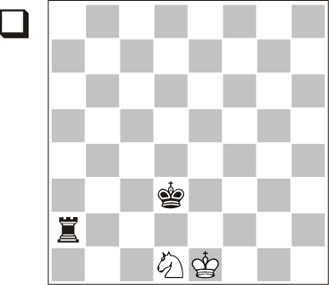
Position 1.19
No problems for White, though both the king and the knight have been driven to the edge of the board. Not so when they are in the corner. Moreover, this position has great theoretical importance, as it usually occurs as a result of a Rook vs. Pawn endgame, as we will see in the corresponding section.
When the knight and the king are together on the edge, moves are usually forced, but then there is a lower risk of blundering. The knight should not be separated from the king in any circumstances, though this does not necessarily imply an automatic defeat. The first move is clearly forced.
1.Nf2+ Ke3
The next move is also forced, following the rule of keeping together knight and king, although the check on g4 does not lose here.
2.Nd1+ Kf3
Now White has two options that may lead to the same position some moves later.
3.Nc3
3.Kf1 Re2 4.Nc3, and either the king or the knight will return on the next move. This is the only case where the king and the knight are separated for a moment.
3…Rc2 4.Nd1
Let’s see what would happen if the knight preferred to ride in the open field. 4.Nd5??
Once the knight has moved away from the king, it is very likely to be lost. That is the case here, though very often the process of trapping the knight presents tactical difficulties. The stronger side must restrict the knight’s movements, as well as exploiting double threats and pins to close the trap.
4…Rc4 (depriving the knight of the b4-square. It must go even further away) 5.Nb6 (if 5.Nf6 Rd4, taking away most of the squares for the knight: 6.Nh7 Kf4 7.Nf8 Kf5–+) 5…Rb4 6.Nc8 (there is no way back: 6.Nd5 Re4+ 7.Kf1 Rd4 8.Nc3 Rd3–+) 6…Rb7! (all the knight moves are controlled directly or indirectly) 7.Kd2 (7.Nd6 Re7+ 8.Kf1 Rd7–+) 7…Kf4 and the black king moves over to capture the knight: 8.Ke2 Ke5–+. Concrete analysis is complicated, but the important thing to remember is that separating the knight from the king should be avoided at all costs.
4…Re2+ The only way to divide the white army, but just for a moment.
5.Kf1 Rh2 6.Ke1 The king comes back immediately. 6…Rc2 7.Kf1=
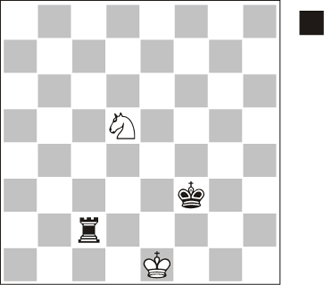
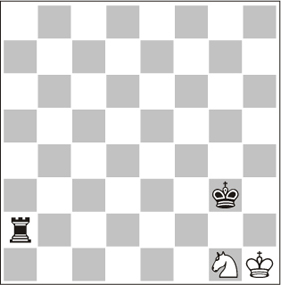
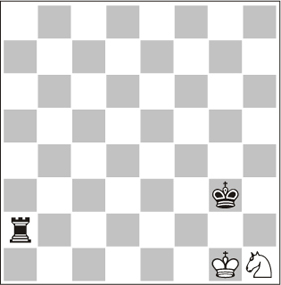
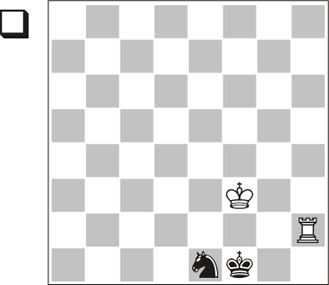
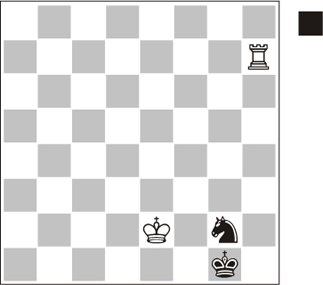
ENDING 9 |
Rook vs. Knight. In the corner |
Things are radically different when the king and the knight are at one corner of the board, no matter who occupies the corner-square. Their mobility is then restricted and the position becomes immediately lost. Even if the knight occupies the g2-square (an especially unfortunate square for the knight) most cases result in a defeat.
Position 1.21
Position 1.22
Position 1.23
There is no need for a deep analysis and it does not matter which side is to move: in all these positions White loses the knight straight away.
The third diagram is especially impressive: the knight is not even on the edge of the board, but it is lost anyway. This is our first example of a ‘knight’s dumb square’ and its effects, but it will not be the last.
Both endings mixed in a recent game
I have presented here a Rook vs. Knight ending because the basic ideas are 1) simple and 2) a must for all players.
It is true, though, that the trapping phase can sometimes be complicated. Also, some positions with the king and the knight on the edge require an accurate defence, although those cases follow the general rule that the defender only loses if one of the pieces is in the corner.
When I was rounding off this book, two top players played a surprising endgame whose result amazed everyone who likes studying chess (or so I thought). It is a remarkable ending, because it contains the ideas shown in the previous two endings and illustrates the difficulties of certain positions when the king and the knight are on the edge. Therefore, I thought it was worth including it here although, due to its complexity, I do not recommend learning it by heart, like the previous ones. I will not comment in detail on all possible lines for the same reason.
Bacrot had reached this position after an accurate defence of first a Rook + Pawn vs. Rook + Pawn, and then a Rook + Pawn vs. Rook ending (see Question 28 in the Final Test). He has just promoted to a knight, which, as we shall see in Ending 23, is the standard way of saving these positions. Now he has a supposedly well known drawn ending. I assume that at this point he relaxed, and he was probably in time trouble.
Nevertheless, there is a special circumstance, which is interesting for us from a theoretical point of view: the knight is ‘within range’ of its dumb square (g2) and the king is placed on the knight’s side next to that square. Defending this ending is somewhat difficult.
1.Kg3 Nd3 2.Rd2 Ne1 3.Rf2+ Kg1 4.Rf8 Ng2
So far everything has been forced. Now Black’s troubles start. The knight must go to the dumb square or move away from the king. Intuitively the natural option is 4…Nd3?, which loses due to 5.Kf3 Ne1+ 6.Ke2+–. On the contrary, 4…Nc2 leads to a draw, which I consider the easiest way, but over the board one tends to avoid taking the knight so far away: 5.Kf3 Kf1= with no real problems for Black.
Thus, some logical doubts arise: may it be that, if we promote on that square and have the king on that side of the board, the knight is forced to go to the dumb square, thus losing? Well, it is not so, but it is worth noting the difficulties.
5.Kf3 Kf1?
Actually, this is the losing move. That should not be surprising: with the knight on the g2-square, the defender is very likely to lose. The correct defence, not easy to find, was 5…Nh4+ 6.Ke3 Kg2 7.Rg8+ Kh3 8.Kf2 Kh2= and in practice Black has managed to return to the starting position.
6.Kg3+?
Kamsky misses his first chance to win: 6.Rf7!.
6…Kg1 7.Kf3 Kf1? 8.Rf7!
An amazing zugzwang position.
8…Ne1+ 9.Ke3+ Kg1 (9…Kg2 10.Ke2+–) 10.Ke2 Ng2 11.Rh7
Position 1.25
11…Nf4+ 12.Kf3 Nd3 13.Rh4 Ne5+ 14.Ke2?
Just an example of how difficult this stage is, we already know from Position 1.20. 14.Ke3!+–.
14…Kg2! 15.Re4 Nf7? (15…Nd7!=) 16.Re7 Nd6 17.Rg7+ Kh3 18.Kf3 Kh4 19.Kf4 Kh5 20.Re7 Nc4 21.Re6 Nd2 22.Rc6 Nb3 23.Ke3 Kg4 24.Rc4+ Kg3 25.Rc3 Na5 26.Ke4+ Kf2 27.Kd5 Nb7 28.Rb3 Nd8 29.Rb8 1-0