Exercise
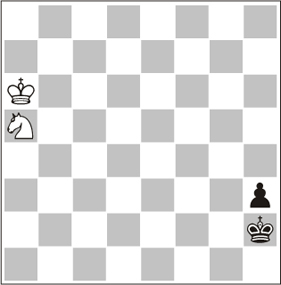
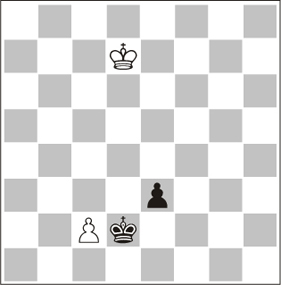
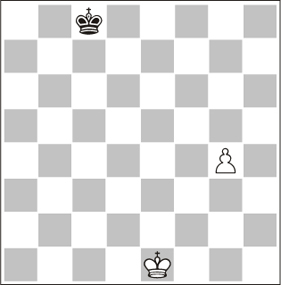
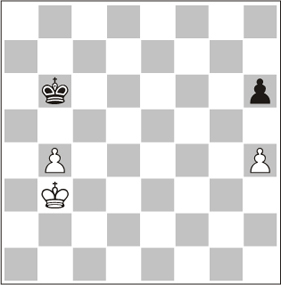
2.01 White to move.
Is it a draw?
Solution
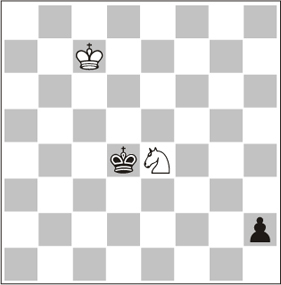
2.01 Yes, 1.Nc4! Kg2 2.Ne3+ Kf2 3.Ng4+= The white knight enters the right circuit.
Exercise
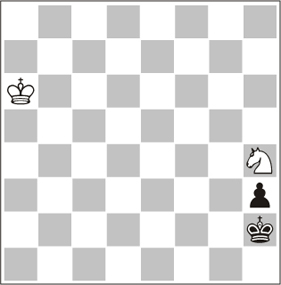
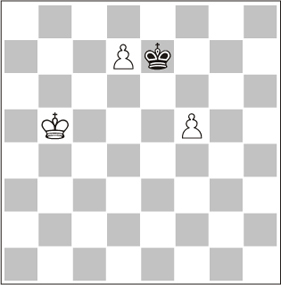
2.02 White to move.
Is it a draw?
Solution
2.02 No. 1.Nf3+ Kg2 2.Ne1+ Kg3–+ the pawn promotes.
Exercise
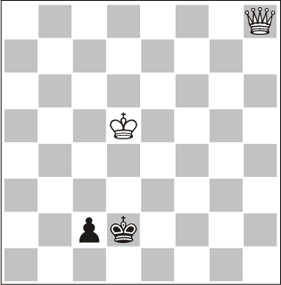
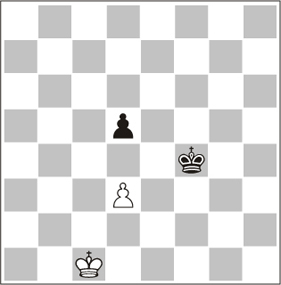
2.03 White to move.
Is it a draw?
Solution
2.03 No, because the king is inside the winning zone. 1.Qd4+ Ke2 2.Qc3 Kd1 3.Qd3+ Kc1 4.Kc4! Kb2 5.Qb3+ Ka1 6.Qc3+ Kb1 7.Kb3 c1Q 8.Qd3+ Ka1 9.Qa6+ Kb1 10.Qa2 mate.
Exercise
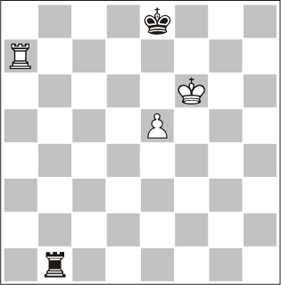
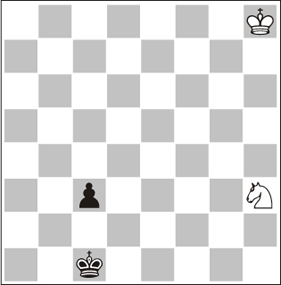
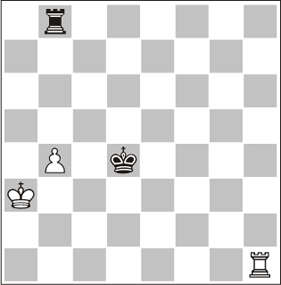
2.04 Black to move.
What should you play and with which result?
Solution
2.04 1…Re1!. Since it is impossible to get to Philidor’s position, Black tries K&H, other moves lose. See Ending 56.
Exercise
2.05 White to move.
What should you play and with which result?
Solution
2.05 1.Nf2!. Setting up a barrier. 1…Kc3 (1…Ke3 2.Ng4+; 1…Ke5 2.Ng4+) 2.Kd6 Kd2 3.Ke5 Ke2 4.Nh1 Kf3 5.Kd4! Kg2 6.Ke3 Kxh1 7.Kf2=.
Exercise
2.06 Black to move.
Is it a draw?
Solution
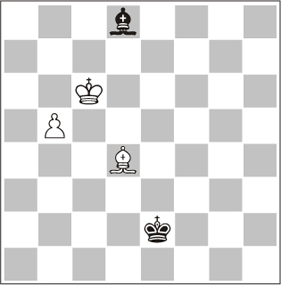
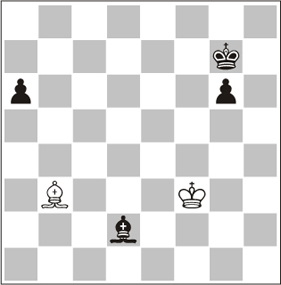
2.06 Yes: the black king takes the rear opposition. 4…Kd3! 5.Bb6 Bg5 6.Bc7 Be3 7.Bd6 (7.Kb7!? Kc4 8.Ka6 Kb3! 9.Bb6 Bg5 10.Bf2 Bd8 11.Be1 Ka4!=) 7…Kc4!=.
Exercise

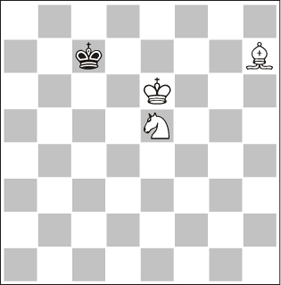
2.07 White to move.
Is it a draw?
Solution
2.07 White wins because the h6-f8 diagonal has just 3 squares. 1.Bh6 Kh5 2.Bg7 Bd2 3.Bd4 Bh6 4.Be3 Bf8 5.Bd2 Kg4 6.Bh6+–.
Exercise
2.08 Black to move.
Is 1…Bc4 a good or a bad move? Or is it irrelevant?
Solution
2.08 1…Bc4 is a mistake, the correct move is 1…Bd7 (1…Bc4? 2.Bg5 Bb3 3.Kd4 Ba2 4.Kc5 Bb3 5.Kd6 Bc4 6.e6++–) 2.Bg5 Bc8!= 3.Kf4 Bd7=.
Exercise
2.09 White to move.
Is it a draw?
Solution
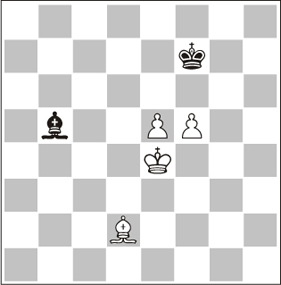
2.09 It is a draw: the black bishop controls both enemy pawns from the same diagonal and the blockade cannot be lifted. 1.Bc8 Bh2 2.Kd5 Kf6 3.Kc6 Ke7 4.Kb6 Bb8! 5.Bg4 Kd6 6.Bh3 Ke7 7.Kc6 Bf4=.
Exercise
2.10 Black to move.
Is it a draw?
Solution
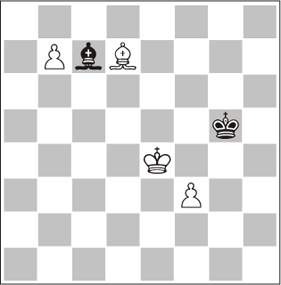
2.10 No. Black wins: his pawns are too far apart for the defender to cope. For example: 1…Kf6 2.Kg4 Ke5 3.Bc2 g5 4.Bd3 a5 5.Bc2 Kd4 6.Kf3 Kc3 7.Bd1 Kb4 8.Ke2 Bf4 9.Kd3 a4 10.Kc2 a3 11.Kb1 Kc3 12.Ka2 Bd6 13.Bg4 Kd2 14.Kb1 Ke3 15.Ka2 Kf4 16.Bd1 g4 and so on.
Exercise
2.11 White to move.
What should you play and with which result?
Solution
2.11 White wins by outflanking his opponent: 1.Kd6! d3 2.Kc5 Ke3 3.Kc4 d2 4.Kc3+–.
Exercise
2.12 Black to move.
Is it a draw?
Solution
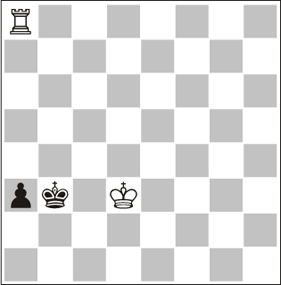
2.12 Yes, 1…Kb2! (1…a2? 2.Rb8+ Ka3 3.Kc2 a1N+ 4.Kc3+–) 2.Rb8+ Kc1! 3.Ra8 Kb2 4.Kd2 a2 5.Rb8+ Ka1! (5…Ka3 6.Kc2+–) 6.Kc2=.
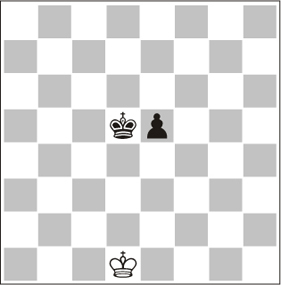
Exercise
2.14 White to move.
Is it worth playing on?
Solution
2.14 White can draw: 1.c4 e2 2.c5 e1Q 3.c6 Black has no checks and the white pawn reaches the 7th rank.
Exercise
2.15 White to move.
Can he win?
Solution
2.15 Yes, 1.Kc6! Kd8 2.Kd5 Kxd7 3.f6+–.
Exercise
2.16 White to move.
What should he do and with which result?
Solution
2.16 1.d4! (1.Kd2?? d4 2.Ke2 Kg3 3.Kd2 Kf3 4.Kc2 Ke2 5.Kc1 Kxd3 6.Kd1 Kc3 7.Kc1 d3–+) 1…Ke4 2.Kc2 Kxd4 3.Kd2!=.
Exercise
2.17 White to move.
Can he draw?
Solution
2.17 Yes, by finding the right circuit for the knight. 1.Nf4! (1.Nf2?? c2 2.Nd3+ Kd2 3.Nc5 Kc3 4.Ne4+ Kb4 5.Nf2 Kc4–+) 1…c2 2.Ne2+! Kd2 (2…Kd1 3.Nc3+ Kd2 4.Na2) 3.Nd4=.
Exercise
2.18 White to move.
Can he win?
Solution
2.18 1.Kf2! is the only way to reach the key squares. 1…Kd7 2.Kg3 Ke6 3.Kh4 Kf6 4.Kh5 Kg7 5.Kg5 Kf7 6.Kh6+–.
Exercise
2.19 White to move.
What is the correct result?
Solution
2.19 Draw. 1.g8Q+ Kf1! (1…Kf2 2.Qa2+ Kf1 3.Qb1+ Kg2 4.Qc2+ Kh3 5.Qd3+ Kg2 6.Qe2+ Kg1 7.Kg3+–) 2.Qc4+ Kg1! 3.Qc1+ Kh2!=.
Exercise
2.20 White to move.
Can he win?
Solution
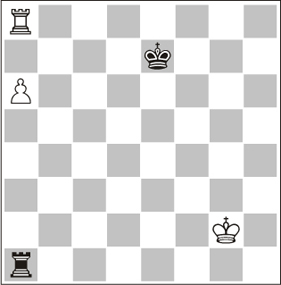
2.20 Yes, by cutting the king off: 1.Rh5!. See Ending 62 (1.Rc1 Kd5= see Ending 59).
Exercise
2.21 White to move.
What is the correct result?
Solution
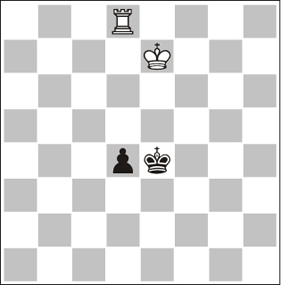
2.21 Draw. 1.Ke1!= Ke4 2.Ke2.
Exercise
2.22 White to move.
Can he win?
Solution
2.22 1.h5!+– See Ending 83 (1.Kc4 h5=).
Exercise
2.23 White to move. Suppose you have already spent 30 of your 50 moves to get here. It is time to be accurate. What would you do?
Solution
2.23 1.Nd7!. Also winning in less than 20 moves are the moves Bc2 and Kd5; but the text move is pure tactics. 1…Kc6 (1…Kb7 2.Bd3) 2.Bd3 (closing off the way out) 2…Kc7 3.Bb5! Kd8 4.Nf6 Kc7 5.Nd5+ (building the cage) 5…Kd8 6.Kd6 Kc8 7.Ke7 Kb7 8.Kd7 Kb8 9.Ba6 Ka7 10.Bc8 Kb8 11.Nb4 Ka7 12.Kc7 Ka8 13.Bb7+ Ka7 14.Nc6 mate. See Ending 93.
Exercise
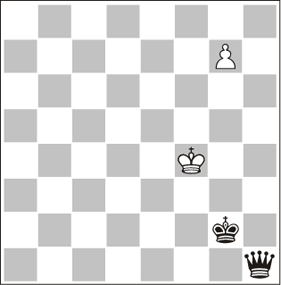
2.24 White to move.
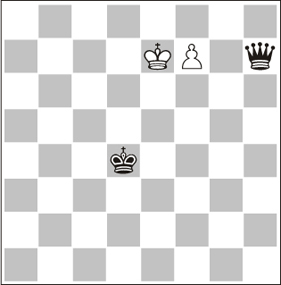
Can he draw?
Solution
2.24 Yes, because the black king is out of the winning zone, but White needs to find an only and paradoxical move. 1.Kf6!= (1.Ke8? Kd5 2.f8Q Ke6–+; 1.Ke6? Qg7 2.Ke7 Ke5–+).
Exercise
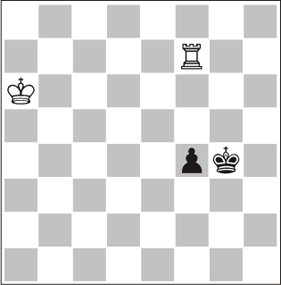
2.25 Black to move.
Can he draw?
Solution
2.25 Yes, Black draws if he knows the ‘shoulder-charging’ idea. (Ending 24) 1…Kf3!! (1…f3? loses: 2.Kb5 Kg3 3.Kc4 f2 4.Kd3 Kg2 5.Ke2 and White arrives in time; we will see this rule in Ending 21) 2.Kb5 Ke3 3.Kc4 f3 4.Re7+ Kd2!=.
Exercise
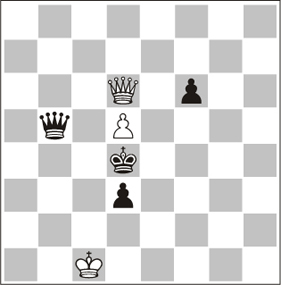
2.26 Black to move.
Would you trade queens on c5 to win?
Solution
2.26 No. White can keep the opposition. 1…Qc5+?? (1…Qc4+ wins) 2.Qxc5+ Kxc5 3.Kd2 Kd6 4.Ke3! Ke5 5.Kd2! (keeping the opposition is more important than taking a pawn). 5…Kd6 6.Ke3 Kxd5 7.Kxd3= Suba-Huerga, Benidorm 2007.