This is one of the most important chapters in this book, and the most important in this section about a piece fighting against a single pawn. Experience shows that rook endings are the most common endings in practice, and also the most complex, and that is why the chapter on rook endings is the longest in the book. Besides, many rook endings end up in a Rook vs. Pawn(s) ending when one of the players is forced to give up the rook for a passed pawn.
On the other hand, this struggle is much more complex than Queen vs. Pawn or Knight vs. Pawn, because any complexities in those are restricted to positions where the pawn is on the 7th rank or, exceptionally, on the 6th. But in Rook vs. Pawn endings, the struggle can be complex regardless of which rank the pawn stands on.
An experienced player who knows the themes and has time on the clock can calculate every single line with accuracy; however, sometimes it is not that easy. In any case, if the player is not familiar with the subtleties hidden in this ending, the task is simply impossible.
ENDING 21 |
Kings do not push. Just counting |
In order to solve these endings, the first approximate method is counting tempi: for the attacker, the tempi needed for both rook and king to control the promotion square; for the defender, the tempi needed for the king to secure promotion and for the pawn to reach its goal.
Unfortunately, this simple technique only works when no special circumstances alter the calculation, and that hardly ever happens in this ending.
A typical scenario where simply counting works occurs when the kings stand at different sides of the pawn; nevertheless, great care is needed even in those cases.
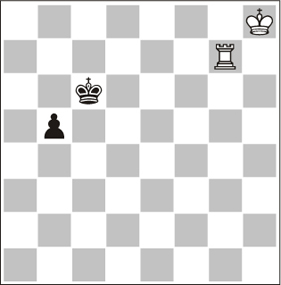
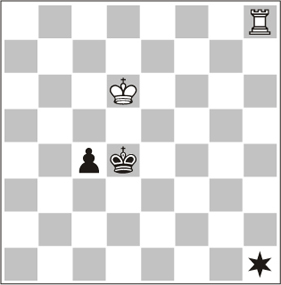
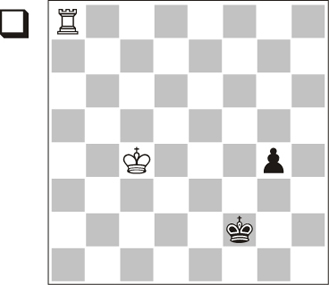
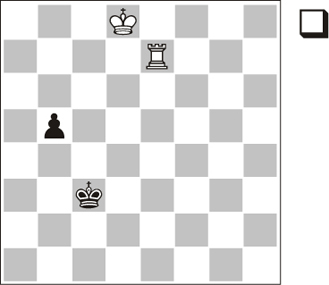
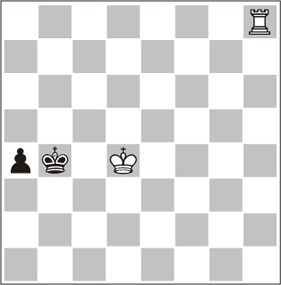
In the diagram position the kings will not meet, rook checks do not win tempi and there are no more special circumstances. That is why a simple count works. White needs 5 tempi to control the promotion square with both king and rook, whereas Black needs 5 tempi to promote. The conclusion is clear: if White is to move, he wins; if Black is to move, he draws.
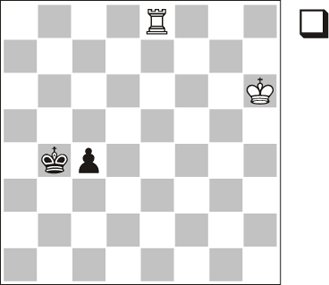
Position 5.1
If he had the move, Black could draw by 1…c3 2.Kg5 c2 3.Rc8 Kb3 4.Kf4 Kb2=.
1…c3 2.Kf4 c2 3.Rc8 Kb3 4.Ke3 Kb2 5.Kd2 and White has arrived in time, as our simple counts had anticipated.
Everything looks easy but, even in this position, if White changes the move order and starts 1.Rc8?, Black can interfere with White’s plan and draw thanks to a brilliant move: 1…Kc3! We will see the virtues of this move further on.
In practical play, things are hardly ever that easy. In the next examples we will discover the different resources both sides have at their disposal in order to ‘interfere with the natural course of events’.
Kings push… a bit
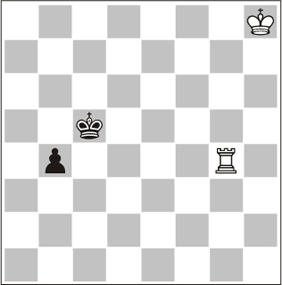
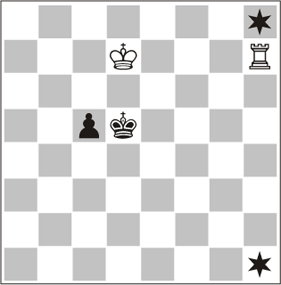
This position is very easy to solve, on the basis of the same principles as the previous one. With this we can complete our view of the issue. Euwe studied these positions in the 1930s and stated that, in 5.2, White only draws when the king occupies one of the marked squares, and wins in any other case. For instance, in this diagram it takes the king 5 tempi to arrive on time to control promotion, whereas Black needs 4 to secure it. That means White arrives on time if he has the turn.
The study of this diagram makes us think that there is a large area where a simple count works. It can work even if the king is on the same file as the defender, unless his way is blocked, as here.
1.Ke6 e3 2.Kd5 e2 3.Kd4 Kf3 4.Kd3 Kf2 5.Kd2 1-0
ENDING 22 |
Defending king on the 3rd rank cut off along a rank |
When the king and his pawn are still further from promotion (in general, whenever they have not crossed the middle line of the board), cutting off the king is a very important resource: if it works, the rest does not matter.
Cutting the king off is very useful when the defender’s king is on the third rank, and it wins straight away when we are dealing with a rook’s pawn or when the king and the pawn are separated (otherwise, the king can go round his pawn, although then he would lose a lot of time and probably the game as well).
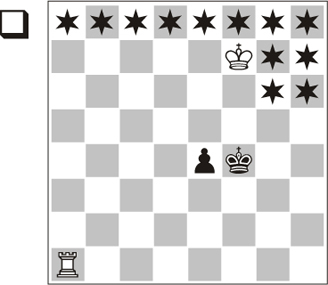
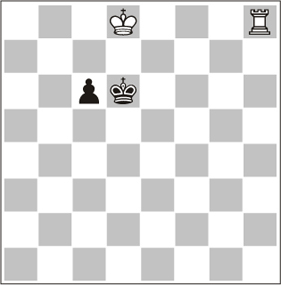
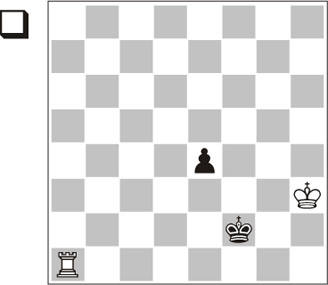
Position 5.3
In the diagram position, both circumstances occur, so cutting the king off wins. Moreover, the white king is so far away that this is the only way to win.
1.Rg5!
It is plain to see that the white king cannot arrive in time: 1.Rg8? Kc5! (1…Kb5 also works; instead, 1…a4? 2.Rg5!) 2.Kg7 a4 3.Kf6 a3 4.Ke5 Kc4 5.Ke4 a2 6.Ra8 Kb3 7.Kd3 Kb2 and draw; we will come back to this position in Ending 28.
1…a4
The king cannot go further. The only alternative, pushing the pawn, is also useless.
2.Kg7 a3 3.Rg3!
And the pawn dies. If we take a look at the manoeuvre, we can understand why cutting the king off one rank further brings nothing.
3…a2 4.Ra3+–
In order to fix these ideas in your mind, have a look at the following three positions and their statements. If you have doubts, do this Exercise: think about the statements until you are sure they are correct.
‘Cutting the king off’ series
Cutting off is decisive, Only 1.Rg5 wins
Cutting off is not decisive, but still only 1.Rg5 wins
Cutting off is useless, White cannot win even when it is his turn.
Once we have seen both scenarios (i.e. when the kings are not pushing against each other and when the rook wins on its own by means of cutting off), let us focus on the toughest and most frequent scenario: the struggle between the two kings.
ENDING 23 |
Strong king behind the pawn |
Underpromotion to a knight
We are going to see a tough fight from which we can draw some important conclusions. The strong king pushes his counterpart from the rear, while the rook occupies its most frequent position: the side attack. Here the main defensive resource is underpromoting to a knight, whereas the main attacking motif is going round.
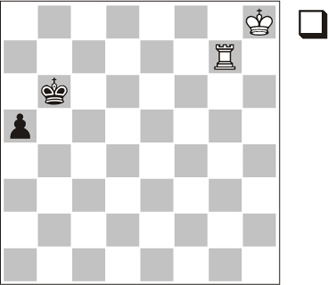
Let us start with Position 5.4, where White is to move. The white king is pushing the enemy king, who in turn blocks his way. There is no time for going round the pawn (a device we will see in the next example), so the only way to make progress seems to be a combination of rook checks and moving the king forward.
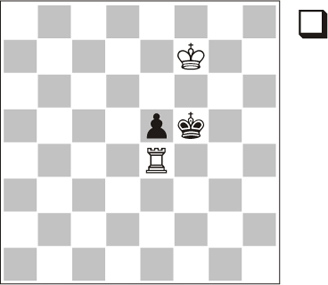
Position 5.4
1.Rh4+ Kc3 2.Kc5
With 2.Kb5 White can try to go round the pawn, but there is no time: 2…b3 3.Ka4 b2 and the white king lacks one tempo.
2…b3 3.Rh3+ Kc2 4.Kc4 b2 5.Rh2+ Kc1
The only move with a central pawn. In the case of a knight’s pawn there is another resource, based on the stalemate motif.
The easier way to draw is 5…Kb1! 6.Kb3 Ka1! 7.Rxb2 stalemate. It is important to take this motif into account.
6.Kc3
The checkmate threat hinders promotion. In this position, many players think they win straight away, so Black’s answer comes as a shock.
6…b1N+!
The only move, but enough to save the game. Now the easiest way to keep the knight safe is to keep it as close to the king as possible. This usually involves playing only moves. We have already seen this scenario in Ending 8. Therefore, we also know that the knight would be lost if it had come from a rook’s pawn.
This resource works with any other pawn. The consequences of this are important: pushing the defending king from the rear is useless. That is why pushing the king from one side (left or right) is more productive, as we will see in the following examples.
7.Kd3 Na3 8.Kc3 Nb1+ 9.Kb3 Nd2+ 10.Kc3 Nb1+ 11.Kd3 Na3 12.Ra2 Nb1 13.Rc2+ Kd1 14.Rg2 Kc1=
Outflanking
As we have seen, just pushing the king brings nothing. When the attacking king is behind the pawn, he must outflank his opponent to succeed.
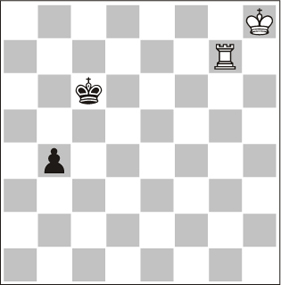
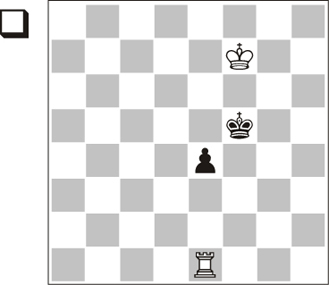
Position 5.5
Here both kings and pawn are placed one rank higher than in the previous example, so the white king has time for a new try: outflanking.
1.Rh5+
Let us check that, if Black is to move, there is no time for White: 1…c4! 2.Rh5+ Kd4 3.Kc6 (trying to push the king does not work: Black is not even forced to underpromote to a knight. Trying to outflank the opponent does not work either: the white king will fail) 3…c3 4.Rh4+ (4.Kb5 c2 5.Rh1 Kc3 6.Ka4 Kb2=) 4…Kd3 5.Kd5 c2=. Nevertheless, were the rook in a better position, White could win even if it was Black’s turn. The first and the last square on the file are the best ones to help the king. I recommend this Exercise: check that White is actually winning, even with Black to move, if the rook occupies one of the marked squares.
1…Kd4 2.Kc6!
This new resource allows the strong king to lift the blockade. Now the white king will go round and appear on the other side of the pawn.
2…c4 3.Kb5
Other moves also win, but visually this is more suitable for the chosen technique.
3…c3 4.Kb4 c2 5.Rc5
5.Rh1 is also winning.
5…Kd3 6.Kb3
and the pawn is lost.
The study of these last positions has provided us with a good knowledge of the scenarios where the stronger side’s king is at the rear of the pawn. However, if we want to fix this knowledge in our minds, examining the next series of positions should be both enjoyable and useful.
Here we compare the results with different locations of the rook and the advances of the pawn. Just observe and reflect. If you are not sure about the statements, try to calculate the variations in your mind: it will be a useful Exercise. If you have more doubts, play the variations on the board. In any case, do not go further unless all your doubts have been solved.
King opposed at the rear
Draw, no matter who moves Underpromotion to a knight With the rook on h1, White wins if he has the move
White to move wins Black to move, draw Outflanking The rook is best placed on the marked squares There, White wins even if it is Black’s move
White wins, no matter who moves Outflanking
Shoulder-charging
As we have seen, the rook needs support from the king to control and capture the enemy pawn. That is why the defending king should always stand in the way of the pawn. Shouldering is always an interesting resource, but it becomes critical when the stronger side’s king is approaching from the side.
Position 5.6
Many times, in order to help the rook, the king has to stand in front of his opponent and then the enemy king is pushed one rank (or file) back by means of a rook check. The purpose of this manoeuvre is twofold:
- To bring our king closer.
- To restrict the enemy king’s (and/or pawn’s) mobility.
We will name this way of struggling for a key zone ‘shoulder-charging’ or just ‘pushing’. Of course, all winning chances are for the rook, but only in the long run. Sometimes there is no time to exploit the advantage.
1.Kg4!
Visually the best move, though not the only way to win. The white king tries to reach the g3-square on the next move and then push the enemy king. The threat is 2.Re1+.
If you have realised that 1.Kh4! is the other winning move, it means you have grasped the essence of the kings’ struggle. The point is that, if White succeeds in establishing a king opposition on e3 and g3 (1…Ke3 2.Kg3 as in the game), Black will not escape from the checks.
1…Ke3
1…d3?! allows White to push the king: 2.Re1+ Kd4 3.Kf3 d2 4.Rd1 Kd3 5.Kf2+–.
2.Kg3!
Again, using opposition to push the black king, who cannot escape because he must stay near his pawn. The immediate check does not work: 2.Re1+?! Kf2!? and White must go back to the right path: 3.Rd1! Ke3 4.Kg3.
2…d3 3.Re1+ Kd2 4.Kf2+–
And the white king has made it to the key zone and can aid his rook.
The Rook vs. Pawn ending is usually a struggle between two kings. The rook just appears on certain occasions, and not without effect. Apart from pushing the enemy king, a technique shown in the last example, sometimes a timely check helps the rook win an important tempo to improve its position and control the pawn. The typical scenario sees the stronger side’s king coming from one side of the pawn.
Position 5.7
This is a typical scenario. The black king occupies an optimal position to secure the pawn’s path to promotion. Therefore, there is no time to lose: the white rook must be immediately transferred to the rear of the pawn. Mind the enemy king! Do not deliver this check if he can improve his position! Advice for the defender: Be careful not to advance the king before the pawn!
1.Rf8+!
Other moves only draw. For instance: 1.Kd3 g3 2.Rf8+ (2.Kd2 g2 3.Rf8+ Kg3!=) 2…Ke1!=. The king avoids blocking his own pawn.
1…Ke2 2.Rg8! Kf3 3.Kd3 (shoulder-charging!) 3…g3 4.Rf8+ Kg2 5.Ke2+–
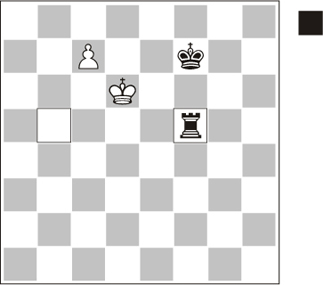
Shoulder-charging and time-gaining check
Position 5.8
This is a simple example of a perfect combination of the two main attacking resources when both kings stand on the same side of the pawn.
1.Ra2+!
Again, the black king enjoys an ideal position to support his pawn, so this check is very annoying.
Other moves do not suffice to win: 1.Ra8 e3 2.Rf8+ Kg1! 3.Re8 Kf2 4.Kh2 e2 5.Rf8+ Ke3=; 1.Kg4 e3 2.Rh1 e2 3.Rh2+ Ke3 =.
1…Kf3
If 1…Kf1 2.Kg3 and the pawn is lost. Now the kings are opposing: the position is ripe for a rear check and a subsequent push.
2.Ra8 e3 3.Rf8+ Ke2 4.Kg2+–
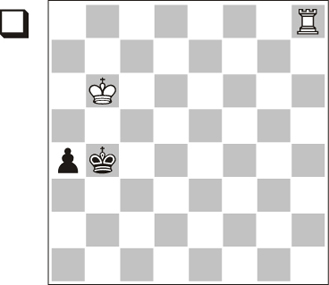
ENDING 25 |
The rook in front of the pawn |
Outflanking. The importance of zugzwang
In contrast with pawn endings, or positions with less powerful pieces, zugzwang positions very rarely appear with a rook on the board. Why? Because a rook usually has many moves at its disposal, and it is unlikely that they should all be harmful. Anyway, zugzwang plays a decisive role in a Rook vs. Pawn ending when the rook controls the pawn from a frontal position.
This famous Réti composition illustrates a zugzwang situation that holds theoretical value.
1.Re2!
Or 1.Re3. For the time being, we are more interested in analysing the natural move 1.Re1? and then 1…e4!.
Here is the zugzwang position we want to discuss. King opposition prevents the white king from approaching the pawn; any rook move on the first rank allows the pawn to move forward; a rook move to e2 or e3, or a check on f1, will only allow Black to gain time. 2.Ke7 is the most logical attempt: the white king tries to outflank his opponent (2.Rf1+ Kg4! 3.Ke6 e3 4.Ke5 e2 (the aforementioned gain of time) 5.Ra1 Kf3 6.Kd4 Kf2=). 2…Ke5!. Maintaining the king opposition is essential. This is another zugzwang position: White’s outflanking succeeds against any other move: 2…Kf4? 3.Ke6 e3 4.Kd5 Kf3 5.Kd4 e2 6.Kd3 and the king has succeeded. 3.Kd7 Kd5!=, keeping the opposition and the zugzwang. There is no way to make progress.
1…e4 2.Re1!
If you have paid attention to all the previous comments and lines, you will easily understand the rest. Black cannot keep the opposition. It is a mutual zugzwang.
2…Ke5 3.Ke7!
Now the black king has to allow outflanking.
3…Kf4 4.Kd6 (or 3…Kd4 4.Kf6 etc.) 4…Kf3 5.Kd5 e3 6.Kd4+–
ENDING 26 |
Special themes with a knight’s pawn |
As we already know, near the edge of the board pawns follow their own rules. This is especially true for the rook’s pawn, and we will later see some examples dealing exclusively with this. However, there is also much to say about the knight’s pawn. There are some stalemate themes that favour the defender, but also an important circumstance that works in the rook’s favour: if the defending king is forced to stand in front of his pawn and then moves to the rook file, he can easily be forced in front of his pawn again.
The following example is a study by Kopaev that illustrates the special features of the knight’s pawn. We will also use it to revise most of the motifs of Rook vs. Pawn endings.
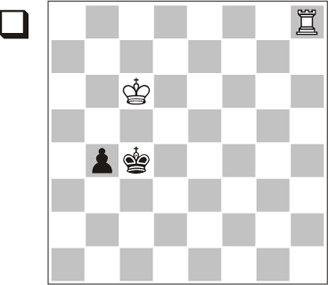
1.Rc7+!
A time-gaining check. Note that the king and the pawn are placed the same way as in 5.6, that is, the best position to secure the advance; therefore, this check is most annoying.
1…Kb3
With this move we can see the problems of the knight’s pawn. 1…Kd3 fails to 2.Rb7 and White has won time: 2…Kc4 3.Kc7 b4 4.Kb6! (outflanking) 4…b3 5.Ka5 Kc3 6.Ka4 b2 7.Ka3. A completely successful example of outflanking.
2.Kd7
The meaning of 1…Kb3 is clearly seen in 2.Rb7? b4 3.Kc7 Kc3! and compared to 1…Kd3 2.Rb7= Black has won a tempo.
2…b4 3.Kd6!
An important point. The white king approaches the pawn but, at the same time, hinders the black king’s way out to the ‘right side of the knight’s pawn’. 3.Kc6? would be a typical mistake in view of 3…Kc4! (shoulder-charging) 4.Kb6+ Kd3 and now that distractions have ended, it is time to count: Black needs 4 tempi to promote, whereas White needs 5 to control the b1-square with both pieces; therefore, it is a draw. 5.Ka5 b3 6.Rb7 Kc2 7.Ka4 b2=.
3…Ka2
Here comes disaster. Of course, the black king must get out of the pawn’s way, but the rook’s file is too narrow.
4.Kc5!
The c-file does not matter anymore. 4.Kd5 was also winning. Even 4.Ra7+?! wins. Though a little more awkward, this move shows how annoying it is for Black that his king is in front of his pawn. 4…Kb2 5.Rc7! Now this is the only winning move, hindering the black king’s ‘right way’ out. (5.Kc5? Kc3!=) 5…b3 6.Kd5 Ka1 7.Kc4 b2 8.Ra7+! and the black king must obstruct his pawn again, thus losing, in the same manner as in the main line (see below).
4…b3 5.Kb4!
The white king uses and abuses the awkward position of his black counterpart. Now 5.Ra7+ or 5.Kc4 would win as well.
5…b2 6.Ra7+
With any other pawn, the black king could move leftwards, but now he has to obstruct his pawn.
This is another special feature of the knight’s pawn, in this case in Black’s favour: stalemate chances. But here it can be avoided.
9.Rb7
Always be careful! Not 9.Rc2?? Ka1!=.
9…Kc1 10.Ka2+–
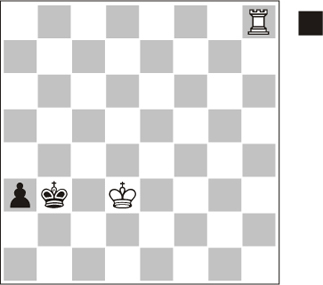
ENDING 27 |
The rook’s pawn. Pushing from the rear |
Knight at the corner = lost
When we studied Ending 9 we saw that it was losing with the knight in the corner. Therefore, Position 5.4 is a different story if Black has a rook’s pawn. The king’s pressure from the rear is thus very effective against a rook’s pawn.
Position 5.12
There are no subtleties here. White wins straightforwardly.
1.Rh4+! Kb3 2.Kb5 a3 3.Rh3+ Kb2 4.Kb4 a2 5.Rh2+ Kb1 6.Kb3! a1N+ (6…a1Q 7.Rh1 mate) 7.Kc3+–
And the knight is lost.
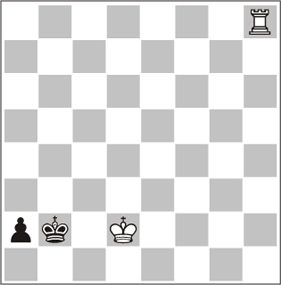
Stalemate in the corner

Position 5.13
A rook’s pawn cannot save the game by underpromoting to a knight; however, the stalemate chances make up for this drawback. That causes some players to pin their drawing hopes on the rook’s pawn, but that is a mistake.
1.Rb8+ Ka1!
The king hides behind the pawn and is stalemated; therefore, there is no time for the white king to approach the pawn, and it is a draw. It would also be a draw with any other pawn. With any other pawn, 1…Ka3? would be the right square to draw, but here the edge of the board hinders promotion: 2.Kc2!+– No matter what Black promotes to, White will capture it.
2.Ra8 (2.Kc2 is stalemate) 2…Kb2 3.Rb8+ Ka1! 4.Rc8 Kb2=
Let us now see what happens with the lateral push if we move both kings and the pawn one rank up.
The extreme position
Position 5.14
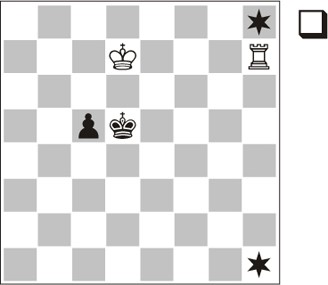
In a Rook vs. Rook’s Pawn ending, this is a key position you have to learn by heart. Most positions with no clear winner end up in this situation during analysis. This is an extreme position because, with Black to move, it is a draw, whereas White wins if he has the move (with simply 1.Rb8+).
Moreover, as shown in the following series of twin diagrams, things change if we move the pieces one rank up or down. It does not matter where the white rook is (the exception is the b8-square).
1…Kb2!
Avoiding the push. 1…a2? 2.Rb8+ Ka3 3.Kc2! and wins because a knight in the corner is always lost: 3…a1N+ 4.Kc3+–.
2.Rb8+
Other moves do not bring success either: 2.Kd2 a2! (Ending 28) 3.Rb8+ Ka1! Stalemate motifs!; 2.Rh2+ Kb3!=. Typical: when the rook is misplaced (not ready to check from the file), the best policy is to obstruct the enemy king (2…Kb1? 3.Kc3+–; 2…Kc1? 3.Kc3).
2…Kc1!
Since there is no time to prepare a stalemate, obstructing the pawn is pointless.
3.Kc3 (3.Ra8 Kb2) 3…a2 4.Ra8 Kb1 5.Rb8+ Kc1!=
Beware of overconfidence in stalemate: that would work with the white king on d2, but now 5…Ka1?? fails to 6.Rf8 and mate.
Lateral push positions
Draw, no matter who moves – stalemate

White to move, wins Black to move, draw
White wins, no matter who moves
Check these three positions in your mind as an Exercise. If we move both kings and the pawn one file to the right, the statements would not change, though some defensive moves would be different. You can check this as another interesting Exercise.
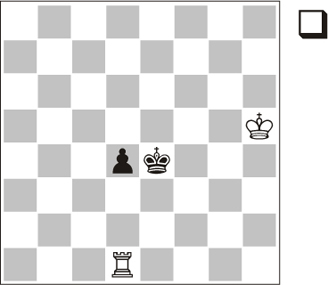
So far we have seen examples where the rook was trying to win, but there is one scenario where the rook faces certain problems to stop the pawn and can even lose. The best-known example is the so-called Barbier-Saavedra position, which involves stalemate and underpromotion motifs. However, this situation can also arise in a more standard way, as we can see below.
I recommend studying this example to understand how ideas from theoretical endings can apply to more complex positions.
Position 5.15
If the side having a rook is to move, given the positions occupied by both kings and the pawn, there are just two squares where the rook loses: those two marked on the board, f5 and b5. The winning sequence is long, but clear. The first move has to be a rook check hindering immediate promotion.
1…Rf6+ 2.Kd5!
First subtlety: not 2.Kd7 Rf1!=.
2…Rf5+ 3.Kd4
And not 3.Kc4 Rf1=.
Apparently, the white king cannot flee from the checks, but there is one square where he can hide: b7. We just need a way to cross the c-file.
3…Rf4+ 4.Kd3 Rf3+ 5.Kc2 Rf2+ 6.Kb3!
That is the way! Now the king hides on the b7-square without trouble.
6…Rf3+ 7.Kb4 Rf4+ 8.Kb5 Rf5+ 9.Kb6 Rf6+ 10.Kb7 1-0
Recommended Exercise: check that Black also loses with the rook on the b5-square. The sequence is similar.