The struggle between a rook and more than one pawn is also common in practice, but there is a greater variety of scenarios. The most interesting cases arise with two connected pawns, where some positions and manoeuvres are worth knowing.
In general, we may say that most players tend to overestimate the strength of the pawns, which causes them to misjudge some positions. Attacking resources are more hidden (the defence is clear: just push the pawns), but there are many, and they are worth careful analysis. Three interesting cases can be considered in the struggle between a rook and two connected pawns:
- Kings play no part.
- Both kings play a part.
- Only the defending king plays a part.
Each of these cases presents some special features. There is a fourth possible case (the stronger side’s king plays a part, and the other king does not), but that is too obvious.
ENDING 30 |
Kings play no part |
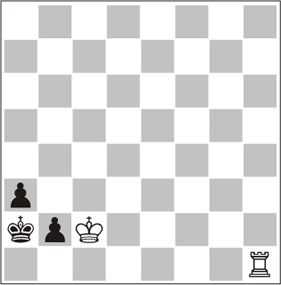
Extreme position. Rook behind the pawns
When kings play no part, the rook usually captures the pawns unless they are far advanced.
This is the extreme position where neither king plays a part. White wins if it is his turn, and loses if it is Black to move. There is no happy medium. Play is easy in both cases.
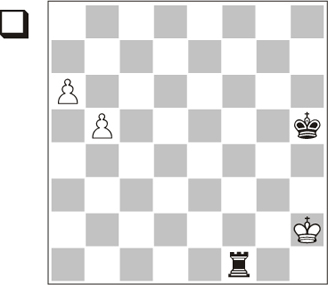
Position 6.1
1.b6
1.a7 Ra1 2.b6+– also brings promotion.
If Black moves, this is the winning plan:
- Transfer the rook to the rear of the more advanced pawn.
- Attack the other pawn and capture both. That is: 1…Ra1 2.Kg3 Ra5 and wins.
And one pawn promotes.
Rook in front of the pawns
If the rook is in front of the pawns (i.e. here on the g8-square) there are some differences to note. If the pawns start, the result is the same. However, if the rook starts, Black can stop the pawns (here, with …Ra8) but not capture them. Then, the king race will be decisive.
ENDING 31 |
Both kings play a part |
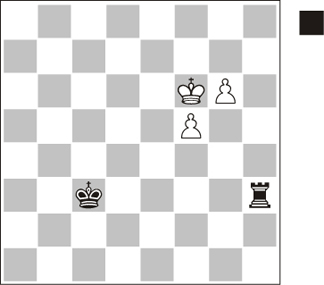
Stronger side’s king in front of the pawns
When the king and the rook work together to stop the pawns, they usually win. If the stronger side’s king achieves a position in front of the pawns, not even the most favourable scenario (except, of course, promotion) can save the game for the defender. The analysis of 6.2 is very simple.
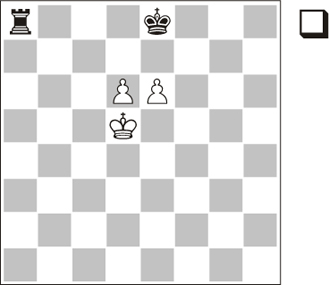
Position 6.2
1.Ke5 Ra1 2.Kd5 Re1 3.d7+ Ke7
And the pawns are captured.
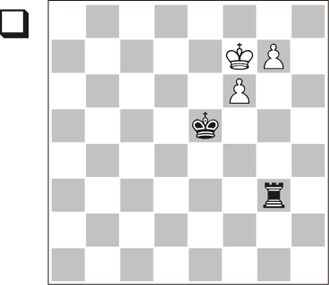
Stronger side’s king on one side of the pawns
If the stronger side’s king only manages to stand on one side of the promotion squares and the other king supports his pawns, things are more complicated.
Here White needs to exploit zugzwang themes on many occasions. First, a waiting move.
1.Ra1! Kc3 2.Ke3 Kc2 3.Rh1
Zugzwang again.
3…Kc3 4.Rc1+ Kb2 5.Kd2+– and the pawns are captured.
Things change if we move this position more than one file to the left.
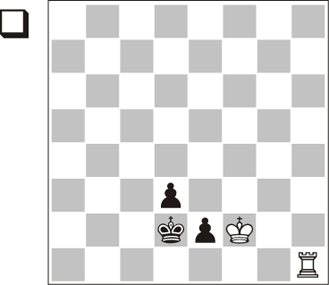
Rook vs. 2 Pawns series

White to move wins
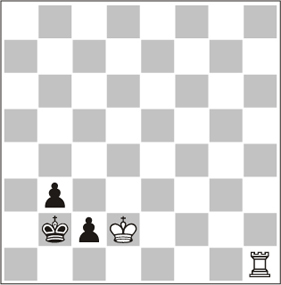
White to move: Stalemate Exercise: check this statement
Stalemate, no matter who moves
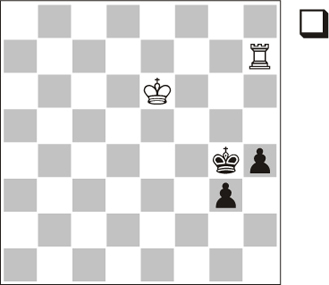
ENDING 32 |
Only the defending king plays a part |
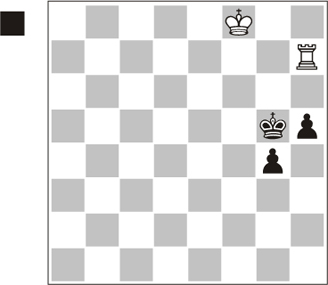
The king is in contact with the less advanced pawn (‘the tail-hook’)
When the king supports his pawns, and his counterpart is far from them, the pawns can win. However, the rook has more resources than one usually thinks, as we will see in the following examples:
Here the plans for both players are clear:
The side with the pawns will try to push one, exchange it for the rook and then promote the other pawn.
The side with the rook will try to bring the king closer, then sacrifice the rook for the more advanced pawn and capture the other with the king.
However, this is not a simple race or a tempi count: the rook has many resources to hinder the pawns’ progress. I do not think that many players would intuitively place their bets on the rook in the diagram position. A simple count justifies this lack of confidence, but a deeper analysis turns the tables.
1…Rf3!
A powerful resource worth taking into account: the rook prevents the king moving to g7 to push the f-pawn, which is closest to the black king, as then Black could not attack the g-pawn. The alternatives are:
1…Rg3 2.Kg7!. This is the key move, and a very important resource for the king in supporting his pawns. Dvoretsky calls this method ‘a change of the leader’. The king secures the advance of his f-pawn and wins, which otherwise would be impossible (2.g7 Kd4 3.Kf7 Ke5 is an easy draw). 2…Kd4 3.f6 Ke5 4.f7 Rf3 5.f8Q. The f-pawn promotes without the black king attacking the g-pawn.
Therefore, 1…Rg3 seems to be a waste of time; 1…Kd4 looks better, but again: 2.Kg7!. The same idea as in the previous line, but a more elaborate execution. Other moves only lead to a draw. 2…Ke5 3.f6 Rf3 (3…Ke6 4.f7) 4.f7+–. This is the problem: Black cannot exploit the extra time to attack the backward pawn (i.e. the g6 pawn) with the king, so he loses.
2.g7
2.Ke6 Rg3! and neither pawn can advance; 2.Ke5 looks nonsensical compared to 2.Ke6, but it has a hidden idea: 2…Rg3! 3.f6!?.
The point. Now, if the rook captures the g-pawn, the f-pawn advances and Ending 29 (where the rook loses) arises. But after 3…Rg5+!= Black will sacrifice the rook for the two pawns (3…Rxg6?? 4.f7+– Ending 29).
2…Rg3
The rook has lost a tempo, but the king is closer to the backward pawn.
3.Kf7 Kd4 4.f6
4.g8Q Rxg8 5.Kxg8 Ke5=.
4…Ke5=
Though further analysis is not necessary, we should look at this position closely, because this is the most typical extreme situation in this endgame. This is the situation that Black has been aiming for ever since his paradoxical first move: the rook controls the advanced pawn’s promotion, whereas the king keeps an eye on the backward pawn. It is an immediate draw. Dvoretsky calls this situation the ‘tail-hook’, an expression used by pilots and a very visual metaphor.
The series of checks
This position comes from an actual game. Once again, we can see that, although White’s position looks desperate because the king is far away from the promotion squares, there are plenty of resources for the rook. Concretely, this example shows the effectiveness of a series of checks to set up the ‘tail-hook’.
1…g3
1…h4, the other logical advance, leads to a draw as well:
A) 2.Rg7+. Bringing the king closer also leads to a draw, but this move (less intuitive in appearance) reveals the idea in a clearer way: the king approaches through the g- and h-files until he makes contact with the backward pawn. 2…Kf4 3.Rf7+ Kg3 4.Kg7 h3 5.Kg6! (it is important to leave the h-file open in case Rh7 is needed) 5…Kh2 (5…h2 6.Rh7 Kg2 7.Kg5 g3 8.Kg4=) 6.Kg5 g3 7.Kh4 g2 8.Rg7=;
B) 2.Ke7 h3 3.Ke6 Kf4 4.Kd5 Kg3 (4…g3 5.Rh4+=) 5.Ke4 Kh2 6.Rg7 g3 7.Kf3 g2 8.Kf2 Kh1 9.Rg6 h2 10.Rxg2=.
2.Ke7
It is logical to bring the king closer, but again it is clearer to start by delivering rook checks: 2.Rg7+ Kf4 3.Rf7+ Kg4 4.Rg7+ Kf3 (4…Kh3 5.Kf7 g2 6.Rg5! h4 7.Kg6 Kh2 8.Kh5 h3 9.Kh4) 5.Rf7+ Kg2 6.Rh7.
2…h4 3.Ke6 Kg4
Position 6.7
(analysis diagram)
This is the position that makes this ending interesting.
4.Ke5?
White plays a logical move (to bring the king closer)… and reaches a losing position. It was necessary to switch to the other plan: the rook delivers checks and the king tries to get in contact with the backward pawn.
4.Rg7+! Kf3 (4…Kf4 5.Rh7 g2 6.Rxh4+=; 4…Kh3 5.Kf5 Kh2 6.Kg4=) 5.Rf7+ Kg2 (5…Ke3 6.Rg7! hindering the pawns’ advance: 6…Kf2 7.Rf7+ Kg1 8.Rh7!) 6.Kf5 h3 7.Kg4 (the king contacts the pawn: draw) 7…h2 8.Rh7 Kf2 9.Kf4=.
4…g2?
Returning the favour right away. Calculations are very complex here. Placing both pawns on the 6th rank was winning, though there were some mating traps to avoid: 4…h3! 5.Ke4 (5.Rg7+ Kf3 6.Rf7+ Ke2! and the pawns promote without aid) 5…h2 6.Rh8 (6.Rg7+ Kh5! 7.Kf4 g2–+) 6…g2 7.Rg8+ Kh5! (the king flees from mate; 7…Kh3? 8.Kf3 g1N+!=) 8.Kf5 Kh6 9.Kf6 Kh7–+.
5.Ke4 Kh3 6.Rg7 Kh2 7.Kf4?
7.Kf3! h3 8.Kf2 Kh1=.
7…h3 8.Kf3 g1Q 0-1