Undoubtedly, rook endings are by far the most important endgames. There are several reasons for this: first, as we saw in the statistics, they are by far the most common type of endgame. In addition, they are far more complex and their theory is more abstract (therefore, more boring), and also, the number of important theoretical positions is much higher than in other endgames.
Practical aspects
I am sure the reader, no matter how experienced, has already noticed the frequency with which rook endings arise in his games (8% according to statistics) and has had time to regret how his lack of technique or basic knowledge made him lose a number of half points. Accurate play in rook endings is a very important indicator of a chess player’s strength. I will not say, as Kortchnoi in his excellent book Practical Rook Endings, that after reading this book your Elo rating will increase with 100 points. Things are not that easy, and neither is rating the only way to evaluate a player, not even his playing strength, nor are rook endings the only way to measure rating. Nevertheless, I assure you that serious work on rook endings will notably improve your results.
Of course, most rook endings arising in a game start with many pawns on the board. However, it is by no means rare for them to end up in a simple Rook + Pawn vs. Rook (see statistics) and very often the basic positions we will study here (especially the Philidor and Lucena Positions) appear on the board. Apart from that, the study of Rook + Pawn vs. Rook is the first and essential step to understanding endings with more pawns on the board. All in all, I have no alternative but to advise you to read this (and the following) chapter with the utmost attention.
Given its special complexity, I have divided this chapter into many sections. I recommend that you take it easy and study each section separately. Besides, be sure that you master one section before you jump to the next, although the last one (on the rook’s pawn) is more independent and can be studied at the beginning.
Technical aspects
Just as in other endings, the rook’s pawn is very special. However, here the differences are so many that we will devote a whole section to them (Section 6). Let us start with those endings that involve any other pawn. I warn the reader that the rules we will state for these cases not necessarily apply to the rook’s pawn. Of course, a sensible extrapolation is always possible.
As in other single-pawn endings, the stronger side strives to promote his pawn (in some exceptional positions, mate threats are an extra possibility), whereas the defending side has more varied resources than in the endings we have so far studied.
I consider a sensible way to organise our knowledge of rook endings would be to make the reader well aware of the resources available for the defending side: where they can be successfully adopted and where they do not work. Therefore, the examples will present, apart from the title, a reference to the main defensive technique, with the label ‘DT’. The understanding of the technique will help us extrapolate and guess the exceptions.
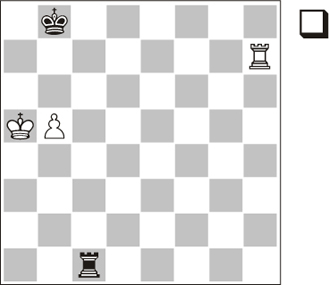
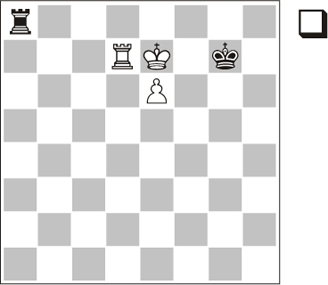
Section 1. Basic endings
In this section we will study two positions which are the most important ones in endgame theory. There are no excuses for not having a perfect knowledge of them; besides, ignorance can make you lose points!
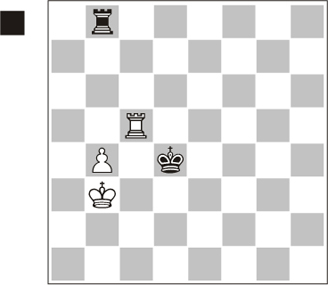
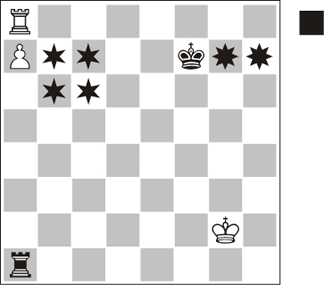
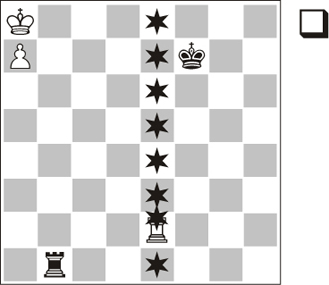
ENDING 52 |
The Philidor Position |
DT: Distant (rear) checks, cut-off king
A first approach to classify these endings is the position of the defending king. If he stands in the pawn’s path, the defender is already halfway to salvation. Once we have reached this position, there are several drawing systems, but the so-called Philidor Position is the easiest one and it works against all pawns. Here it is:
Position 10.1
1…Rg6!
This is the basic defensive position when the king stands in front of the passed pawn. The rook stands on its 3rd rank and just waits. This manoeuvre is intended to stop the white king’s progress. As we will see, the advance of the pawn is much less dangerous. Let us check what happens if Black deviates from the correct plan, or plays without a plan altogether. For instance: 1…Rg1?! 2.Kd6 Rd1+? 3.Ke6 and White is threatening checkmate, 3…Rd8? (a king move is better, but it would also lose as it would lead to the Lucena Position, which we will study later) 4.Rh7 and White wins straight away.
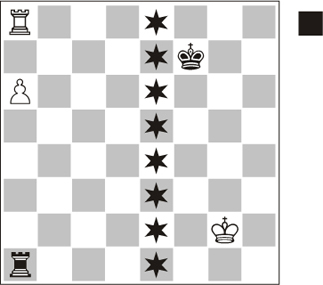
2.e6
After this move, Black’s defence is very easy, whereas White cannot make further progress. Now it is easy to play against any move, as long as we follow this rule: ‘Keep the rook on the third rank until the pawn moves’.
Some players fear an eventual rook swap, but it is easy to see that the result would always be a drawn King + Pawn vs. King endgame: if rooks are swapped on c6, the black king gets to e7 and draws; there is no way to swap rooks on d6 or e6 (with the black king on d8) because… how could the white rook occupy those squares?
The text move threatens 3.Kd6, winning, but…
2…Rg1!
The point! As soon as the pawn reaches the 6th rank, the white king loses his shield against rear checks. The black rook gets ready.
3.Kd6 Rd1+! 4.Ke5 Re1+ 5.Kf6 Rf1+
The white king lacks a shield against checks, so the ending is drawn. This simple position, known since the 18th century, is perhaps the most important one in endgame theory. A great number of rook endings eventually lead to this position, and it is usually enough to secure the draw.
Summing up:
A question may arise: does Philidor’s position work on the 4th or 5th rank as well or not? The answer is: yes, it also works, but manuals always show the example on the 3rd rank because that is the extreme situation. Anyway, do not make things too complicated for yourself: the Philidor Position is secure and simple to play. Therefore, if you reach a Rook + Pawn vs. Rook ending, you must try to adopt it.
However, this is not always possible, so it is important to know other defensive resources.
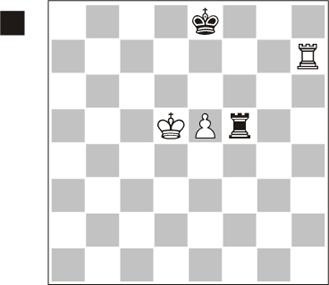
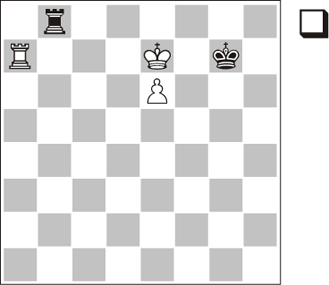
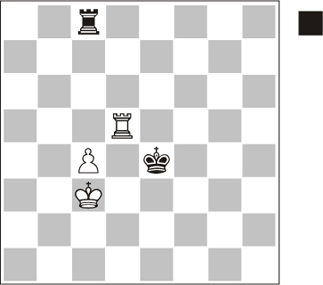
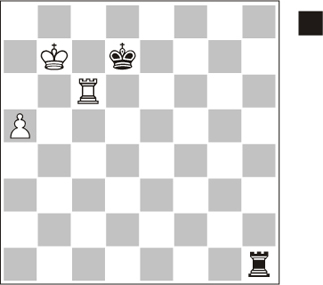
ENDING 53 |
Lucena Position. The bridge |
DT: Distant (rear) checks
In our first example, we saw the most frequent procedure to draw; now we will see the most frequent procedure to win.
If the defending king fails to stand in front of the passed pawn, play usually leads to the Lucena Position, which is the one we will study now.
When I tell my pupils that most Rook + Pawn vs. Rook endings, if played accurately, end up in a Philidor or Lucena Position, at first they are shocked. However, once they have analysed several positions (as we will do in this chapter), they come round to the same conclusion. That is why these are the most important positions in this type of endgame and, by extension, in endgame theory. All players should know them very well. Other positions in this book may or may not arise in your chess career, but I assure you that you will meet these two quite frequently.
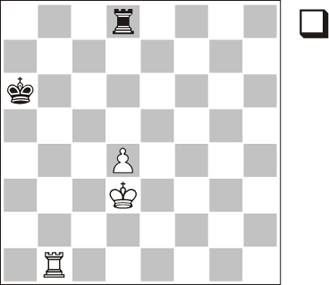
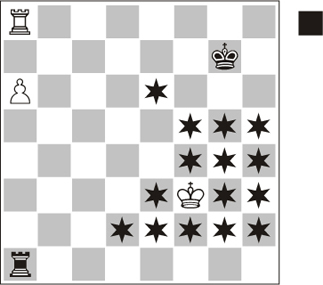
Position 10.2
In the diagram position the pawn has already reached the 7th rank and we will study the final part of the winning procedure. This position is very important because the stronger side will always be able to get here if the defensive techniques (Philidor being the most important) cannot be applied.
When the stronger side’s king is on the 8th rank and the pawn on the 7th rank, the only efficient defence consists in transferring the rook to the ‘long’ side, a method we will see in our first example. If the defending rook is unable to deliver checks from the long side, the ending is lost.
This position owes its name to Lucena, and it would not be a good idea to change that name because names are useful for teaching and learning. However, this ending does not actually appear in the famous book by Lucena dated 1497, the first book on modern chess, of which there are still some copies left.
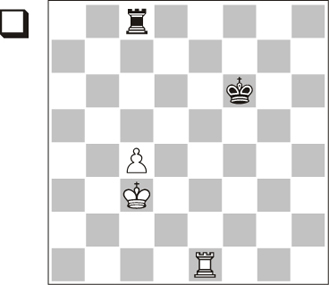
1…Rc2
Now the white king cannot get out, but Black is not saved either. White has three winning methods at his disposal, but I recommend that you pay attention to the main line, because this procedure can be applied against any pawn (the obvious exception being the rook’s pawn) and it is the most instructive.
2.Rf1+
First step: The black king is cut off one more file.
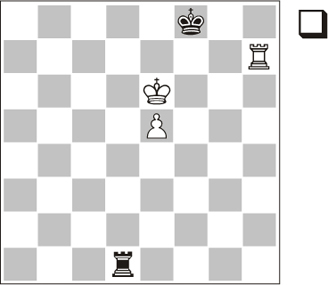
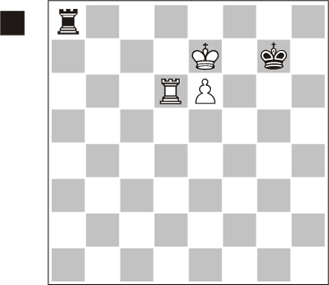
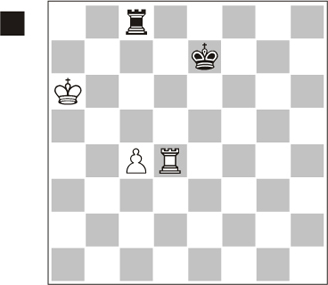
2…Kg7! (2…Ke6 3.Ke8+–) 3.Rf4!
Position 10.3
This is the main procedure. The rook will cover the king from rook checks. We call this manoeuvre The Bridge.
The bridge is a very vivid image, but also a very frequent procedure that can be applied with more pawns on the board.
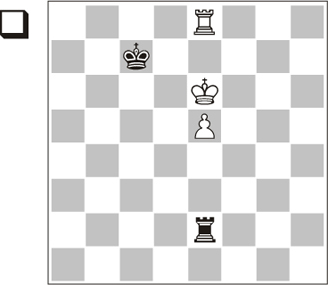
Second method: 3.Ra1. White transfers the rook to c8. Note that this method is not possible with a knight’s pawn. 3…Kf7 4.Ra8 Rc1 5.Rc8 Rd1 6.Kc7 Rc1+ 7.Kb6 Rb1+ 8.Ka5+–;
Third method: 3.Rf5. A less elaborated bridge. 3…Kg6 4.Ke7?! (4.Rf8 Kg7; 4.Rf4! is back on the right track) 4…Kxf5!. Note that this winning procedure allows the opponent to reach an annoying Rook vs. Queen ending. (4…Re2+ 5.Kf8 Rd2 6.Rf7+–) 5.d8Q+–. White will win but his task is not finished yet.
3…Rc1 4.Ke7
Threatening promotion. Black can just postpone it with checks.
4…Re1+ 5.Kd6 Rd1+ 6.Ke6 Re1+ 7.Kd5 Rd1+ 8.Rd4+–
End of the manoeuvre: promotion is unstoppable.
Section 2. Pawn on 5th rank or further
The chapter on rook endings is rather dense and needs to be divided into sections. These four key words can define the close relations existing between all endings where the pawn has reached at least the 5th rank: Philidor, Kling & Horwitz (K&H), Long Side and Lucena. This logical relation can be summarised as follows:
If the defender is unable to reach Philidor or K&H positions, the pawn will reach the 7th rank, and the attacker will reach the Lucena Position (thereby winning), unless the long-side strategy works.
This looks like a word play, but if things are not clear for you after reading the first section, I recommend that you read it again after some time.
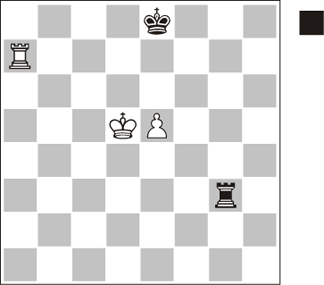
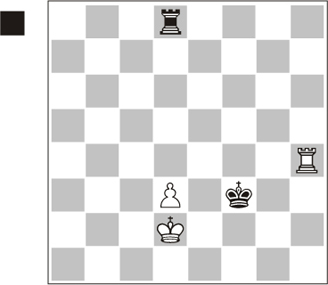
ENDING 54 |
The long side |
DT: Distant (side) checks
We will now see some positions where other methods of attack and defence arise that are alternative and/or complementary to Philidor and Lucena. We can say that we are just one step below those essential methods. These positions are relatively less important than the previous ones, but they are still essential to a serious command of the endgame.
Position 10.4 is obviously related to the Lucena Position (see Position 10.2) and almost the only drawn position when the pawn has reached the 7th rank and is supported by the king. If White had the move, a simple rook check on g1 and promotion is coming. Therefore, Black needs to have the turn and start delivering side checks. However, these checks will only be successful if the rook and the pawn are separated by three files. Let us see:
1…Ra8+! 2.Kd7 Ra7+! 3.Kd8 Ra8+ 4.Kc7 Ra7+
Here, it is easy to note that, with a shorter distance (just one file), this check would be impossible. Then we realise that, to enjoy such a distance from the enemy king, the rook has to be on the long side of the board and, therefore, the defending king has to be on the short side. Note that the pawn divides the board into two unequal parts.
This is the famous ‘long side’ in rook endings. When the rook and the pawn are separated by three files, the rook succeeds. This rule of distant effectiveness is important because it also applies in the case of rear and frontal checks, as we will see in Ending 59.
Its application in practical play is enormous, since very often the defending king is forced to choose one side of the board. In most cases the best side for the king is the short one, in order to leave the long side for the rook. Here, it is the only chance. Thus we can establish another valuable rule: ‘In order to avoid the Lucena Position, the only reliable resource is the long side’.
5.Kd6 Ra6+ 6.Kc5 Re6!=
If the king goes too far from the pawn, the pawn is lost. Also note that Black would lose if his king were on the first rank due to 7.Rf8+.
ENDING 55 |
The knight’s pawn. First-rank defence |
Position 10.5
Now we will see some defensive techniques that complement Philidor. First we will deal with the knight’s pawn. This pawn and the rook’s pawn allow an alternative and even more simple defensive technique.
We can see that the Philidor method does not apply here.
1…Rc8!
This is the alternative method – in this position, the only one. The king stands in front of the pawn while the rook just stays on the first rank. It is important to realise that this procedure does not work against a bishop’s or central pawn, because then there is more room for the attacking side on the left of the pawn. Given that clue, the reader should be able to discover the winning procedure with a bishop’s pawn. You can check it as an Exercise.
2.b6 Rf8 3.Rb7+ Ka8!
Black has to be careful until the end: 3…Kc8? loses to 4.Ka7+–.
4.Ra7+ Kb8 5.Rh7 Rg8
It is easy to see that White cannot make further progress.
ENDING 56 |
Central or bishop pawns. Kling and Horwitz (K&H) defensive technique |
DT: Rook in the rear of the pawn. Side checks
What happens with other pawns? Is the Philidor Position then the only defensive procedure available? And does that mean that the ending is lost if we cannot reach it? Well, no, but the defence is somewhat more difficult than against a knight’s pawn. In the struggle against a central or bishop’s pawn there is an important defensive technique: to place the rook at the rear of the pawn.
This resource always proves useful against a central pawn, even if the defending king is forced to the long side. Against a bishop’s pawn, the king must be on (or move to) the short side. Against a knight’s pawn, and this is essential (I will repeat it later in the summary), this defensive technique does NOT work.
I have seen many players, even title-holders, mix up defensive techniques. Pay attention and ensure that you will not add your name to the list.
Position 10.6
It is clear to see that Black will not reach the Philidor Position. I have deliberately chosen an unfortunate position for the black rook in order to illustrate all the problems that may arise. However, this is not the worst possible scenario: black rook on d5 and white king on f5 is a losing position for Black. You can check it after studying the example.
1…Rf1
If the defender cannot reach the Philidor Position, the rook must be ready to move to the rear of the pawn. We will see the reason in a moment. This is the only correct method, but Black can also draw with other moves, such as …Rf2, as long as the rook can get to the rear of the pawn on the following move. Concrete analysis is complicated, but finding the right move is easy if you are familiarised with defensive techniques in rook endings: if the Philidor Position is out of reach, let us try to reach K&H; what if this also fails? Sometimes life is really hard!
2.Kd6
The most challenging move, as Black now has a range of options. White threatens a back-rank check followed by unstoppable promotion.
2.Ke6!? is an annoying alternative, but less practical because Black’s answer is clearly forced: 2…Kf8! (not 2…Kd8? 3.Rh8+ Kc7 4.Ke7 and the rook fails to get to the rear of the pawn as in the main line) 3.Ra7 Re1! and basically we have reached the main line.
2…Re1!
Only move, difficult to find if you do not know the position. This is the K&H ‘trademark’. The rook stands behind the pawn to prevent its advance.
2…Rd1+? would be a ‘logical’ mistake, interesting to analyse: 3.Ke6 Kf8.
Position 10.7
(analysis diagram)
The difference between this position and the one resulting from 2.Ke6 Kf8! is difficult to grasp. Then the f1-rook was hindering the sequence which will now follow, giving the rook time to reach its ideal position behind the pawn: 4.Rf7+! Ke8 (4…Kg8 5.Rd7 Re1 6.Kf6 and the pawn goes ahead, though the ending is still difficult. The study of the following endings would help us understand, but remember that if we followed the correct procedure we would not reach this position) 5.Ra7 (winning a vital tempo to secure the advance of the pawn) 5…Kf8 6.Ra8+ Kg7 7.Ke7 followed by the advance of the pawn. The white rook occupies the important a-file and its counterpart lacks distant effectiveness; therefore Black is lost.
We will see this in Ending 58, but so far the important thing is that, if we can, we have to stand in front of the pawn.
This move illustrates the faulty defensive technique (rook on the short side). We can compare with the case of a bishop’s pawn. If there is a chance, we should always move our king to the short side. The text move is thus inaccurate. The correct choice was 3…Kf8!.
4.Rh8+
If White makes a waiting move, the black rook just waits as well; if White moves his king, Black can either check or wait, but going back to the previous position is safer: 4.Ra7 Re2!; 4.Kf6 Ke8.
4…Kc7
Now we can see the importance of placing the rook in the rear of the pawn: White cannot move Ke7 to secure the advance of the pawn. White can try different ways to make progress.
5.Kf6
A logical decision: White threatens to push the pawn. However, Black can easily force White back to previous positions. 5.Rh7+ Kd8 repeating; 5.Ra8 Re2 waiting; 5.Re8 leads to the main line after move 9.
5…Kd7!
Hindering the advance of the pawn.
6.Rh7+ Ke8 7.Ke6
We have again reached the position after move 3.
7…Kd8 (7…Kf8!=) 8.Rh8+ Kc7 9.Re8!?
The only serious attempt to make progress. The threat is 10.Kf7 followed by the advance of the pawn.
9…Rh1
Getting ready to deliver checks… from the short side! But this is the only move here. It only works due to the unfortunate position of the white rook. Of course, this defence works better from the long side. Against a bishop’s pawn this procedure would not be enough. Therefore, the defending king has to go to the short side in this case; otherwise, the ending is lost.
Nevertheless, it is important to see what would be the result of a waiting strategy by Black: 9…Re2?
Position 10.8
(analysis diagram)
10.Kf7!. This move that supports the advance of the pawn is possible due to the bad position of the black rook. 10…Rh2 (now it is late for this;10…Rf2+ 11.Ke7 Rh2 12.Rf8+–, hindering side checks. The threat is e5-e6, which would lead to a Lucena Position) 11.Rg8! (11.e6? Rh7+ 12.Kg6 Rh1 13.e7 Kd7=) 11…Rh7+ 12.Rg7 Rh8 13.Ke7 (13.e6? Kd6 14.e7 Kd7=) 13…Kc6 14.e6 Kc7 15.Kf6+ (White has several winning moves) 15…Kd8 (15…Kc6 16.Rd7+– also leads to the Lucena Position, as a brief analysis can confirm: 15…Kd6 16.Rd7+ Kc6 17.Rd1 Rh6+ 18.Kf7 Rh7+ 19.Kg6 Rh2 20.e7 Re2 21.Kf7 Rf2+ 22.Ke8, reaching the Lucena Position) 16.Kf7 Kc7 17.Rg1 Rh7+ 18.Kg6 Rh8 19.Rd1 and the Lucena Position arises again.
10.Rf8
Trying to cover the king, but…
10…Re1!
Insisting on the defensive strategy. White cannot make further progress. Draw.
ENDING 57 |
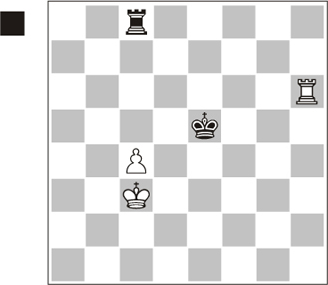
Central 6th-rank pawn. Rook with distant effectiveness |
DT: Side checks
This example and the following one are the most difficult endings in this chapter. I will not recommend that you study them until you have fully understood the previous ones. On a first reading you can have a brief look or skip them altogether.
As a general, simple rule: Once the pawn has reached the 5th, 6th or 7th rank and the defending king is unable to occupy a frontal position (Philidor or first-rank defence), the only efficient defensive method is to occupy the long side with the rook. The less advanced the pawn is, the greater the drawing chances; nevertheless, other factors, such as the position of the rooks, also play a role.
Position 10.9
When the pawn is on the 6th rank, drawing chances are greater than in the case of a 7th-rank pawn, but this last method remains the only chance: The defending rook has to occupy the long side. If the stronger side’s rook is ready to cover the king from checks, the black pieces have to occupy ideal positions to save the game.
1.Rd8
The defending rook occupies its ideal spot, that is:
A) The farthest file (distant effectiveness).
B) The 8th rank (preventing the white king from going there).
Therefore, White wants the black rook to move. 1.Kd6+?! facilitates the defence: 1…Kf8! and the king manages to stand in front of the pawn. On move 3 we will comment on other attempts.
1…Ra7+!
Using tactics to hinder White’s progress. 1…Ra1? would allow White to reach a Lucena-like position: 2.Ke8 Kf6 3.e7+–. 1…Ra6! is the only move that also works, because it prevents the white king from reaching the back rank.
2.Rd7
White would like to play 2.Ke8?! but then 2…Kf6= wins the pawn. Instead, 2.Kd6 is answered by more checks: 2…Ra6+ 3.Ke5 Ra5+ 4.Rd5 Ra8 5.Kd6 Kf8 (Philidor).
2…Ra8
Other moves along the a-file would also draw, but keeping loyal to your defensive method is the safest way. One alternative has theoretical significance, but in practical play we recommend that you avoid complications and follow the simplest way. 2…Ra1 3.Ke8+ Kf6! 4.e7 Ke6!=. An interesting and not very well known drawing position with a 7th-rank pawn.
3.Rd6!
Position 10.10
(analysis diagram)
A rather poisonous attempt. Black is almost in zugzwang. He cannot allow the white king to move to the back rank when the white rook is so well placed; on the other hand, the black rook must not leave the a-file, or it would lose its distant effectiveness.
There are no problems for Black after 3.Rb7, for example: 3…Kg6 4.Kd7 Kf6 5.e7 Kf7= and White has made no progress.
3…Kg6!
Only move. The black king just waits as near the pawn as possible. 3…Ra1? 4.Ke8! (we have said that White wins if the king reaches the back rank) 4…Ra8+ 5.Rd8 Ra6 6.e7 Kf6 7.Kf8+–; 3…Ra7+? 4.Ke8!; 3…Kg8?? 4.Rd8++–; 3…Rb8? 4.Rd8 (4.Rd7? Ra8!=; 4.Ra6? Rb7+!=) 4…Rb7+ 5.Rd7 Rb8 6.Ra7, reaching Ending 58.
4.Rd7
White cannot make progress against accurate defence, so he goes back to the starting position. 4.Kd7 Kf6 5.e7+ Kf7=.
4…Kg7 5.Rc7
A third attempt. However, now Black has a broad choice. The alternative 3.Rb7 does not change things.
5…Kg6=
The easiest way, though not the only one. Some alternatives have theoretical significance. 5…Ra1 6.Rd7 Ra2 (6…Ra8! is the simplest) 7.Ke8+ Kf6 8.e7 Ke6!=.
5…Rb8?, leaving the a-file, is a big mistake. With 6.Ra7 we reach the position where the defending rook lacks distant effectiveness (next example).
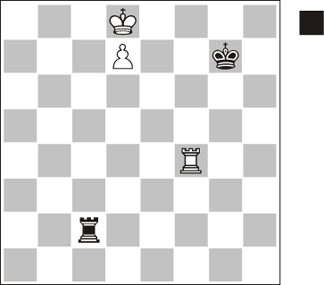
ENDING 58 |
Central 6th-rank pawn. Rook without distant effectiveness |
Position 10.11
When the defending rook lacks distant effectiveness and the strong side has a central pawn on the 6th rank, the ending is won. The winning sequence is so accurate that it would be really difficult to find it over the board. On the other hand, that shows us we are in an extreme position, on the edge between a win and a draw.
1.Kd6+!
First, White must transfer the move to his opponent, as the black pieces occupy their ideal positions (apart from the loss of distant effectiveness).
The straightforward attempt to drive the black king away (that is, Rg1) to reach the Lucena Position, misses the win: 1.Ra1? Rb7+! 2.Kd8 Rb8+! 3.Kc7 Rb2 (intending …Kf8 or …Kf6) 4.Rf1 (cutting off the king) 4…Ra2! The pawn needs one tempo to reach the 7th rank, so the black rook seizes the opportunity to recover distant effectiveness and save the game, as we saw in Ending 54. 5.e7 Ra7+ 6.Kd6 Ra6+ 7.Kc5 Re6. 1.Kd7? does not work either: 1…Kf6Z 2.e7 Kf7=.
1…Kf6
1…Kf8 2.Kd7 Kg7 3.Ke7 is the same.
2.Kd7Z Kg7
No useful moves were available. For instance: 2…Rb1 3.e7 Rd1+ 4.Ke8 Lucena; 2…Kg6 Here the king may be worse in some lines: 3.Ra1! Rb7+ 4.Kc6 Rb2 5.Re1! as in the main line.
3.Ke7Z
We are back in the starting position, but now it is Black’s turn and there are no useful moves in sight.
3…Kg6
3…Rb1 would relinquish the 8th rank and lose: 4.Ra8! Rb7+ (4…Rb2 5.Ke8 Rh2 6.Ra7+ Kf6 7.e7 Rh8+ 8.Kd7+–) 5.Kd6 Rb6+ (5…Kf6 6.Rf8+ Kg7 7.e7+–) 6.Kd7 Rb7+ 7.Kc6 Re7 8.Kd6 Rb7 9.e7+–.
4.Ra1! Rb7+ 5.Kd8
I consider 5.Kd6 Rb6+ 6.Kd7 Rb7+ 7.Kc6 Rb8 8.Kc7 more practical, reaching the main line. This is longer but easier. The text move illustrates another possible line worth knowing.
5…Rb8+
After 5…Kf6 White wins thanks to a forced sequence full of important tactical details.
Position 10.12
(analysis diagram)
6.e7! Rb8+ (6…Rxe7?! 7.Rf1+) 7.Kc7 Re8 8.Kd6! Rb8 9.Rf1+ Kg7 10.Kc7 Ra8 11.Ra1! Re8 12.Kd7+–.
6.Kc7 Rb2 7.Re1!
Securing promotion, which would not happen with the black king on g7.
7…Rc2+ 8.Kd7 Rd2+ 9.Ke8 Ra2
9…Kg7 10.e7 – Lucena.
10.e7+–
Winning as in the Lucena Position.
Summary of Section 2
This section deals with those positions where the pawn has crossed the mid-line of the board and the defending side cannot reach the Philidor Position.
- If the defending king stands in front of the pawn, there are drawing chances even though the Philidor Position is out of reach. However, you must remember that rules for the central and bishop’s pawn do not apply to the knight’s pawn. In the latter case, passive back-rank defence is the only option. Against a central pawn, the drawing technique is K&H.
- If the defending king cannot stand in front of the pawn, the only valid method (apart from a few exceptional positions) involves transferring the rook to the long side so that it has distant effectiveness.
Depending on how advanced the pawn is, the defending side will have more or less time to arrange the ideal set-up for his pieces:
- Against a pawn on the 7th rank, the defending rook has to deliver checks that cannot be covered by its counterpart.
- Against a pawn on the 6th rank, distant effectiveness is enough; in some cases, the rook must not leave the back rank.
- Against a pawn on the 5th rank there are more chances for the defender to get distant effectiveness, but difficulties may arise if the key file is under control of the enemy rook.
Now you can read again the sentence that introduced this section, which is an extremely concise summary of the study of all these positions. This idea alone may serve us to find our way through these endings, and clear guidelines are the basis of correct choices.
Section 3. Cutting off the king along files
Here we will start to study positions where the pawn is behind the mid-line. Though the pawn is still far from its goal, the scenario is easier to understand.
The long side is not the one and only hope for the defending side. Actually the player with the pawn needs more assets to win the ending. The defending king must be cut off, either along a file or along a rank. We will deal with positions with the king cut off along a file in this section, and along a rank in the next section.
ENDING 59 |
Cutting off along one file |
DT: Frontal checks, rook swap
In this new section we will deal with cases where the defending pawn is no further forward than the 5th rank. Since the pawn is so far from promotion, the defending king has plenty of time to get in front of the pawn and reach the Philidor Position. Therefore, winning chances necessarily involve cutting off the enemy king and preventing him from reaching the promotion zone.
There are two possible ways of cutting off the king: along a file and along a rank. Let us begin with the first case.
What happens when the defending king is cut off by one single file? In this position, both the rook and the king are ideally placed to prevent White’s progress. This is by no means zugzwang, because the black pieces can keep their efficiency even if they move. However, lots of players, regardless of their strength, have made mistakes in these positions. Our analysis will show us that the defending rook must stay on the back rank and the king on the 3rd or 4th rank.
Position 10.13
1…Rc8
Here the rook restrains the pawn. This is the clearest way to draw, though not the only one. It is convenient to know why other apparently logical moves fail, and why other moves work:
1…Rg8 Any rook move along the 8th rank is enough to draw, as long as the rook is not exchanged or captured. 2.c5. Otherwise, play goes on the same as in the main line. 2…Ke7! intending …Rd8. It is curious that this move would lose in the starting position, but here it is one of the only two drawing moves, since now in the resulting pawn endgame the white king will not reach the key squares: 3.Kc4 Rd8=. 2…Rg4! also draws, as the white king will not be able to aid his pawn. Black will capture the pawn if it advances, but this line requires accurate play. 3.c6 Ke7! 4.c7 Rg8=.
1…Ke7? Preparing (actually, threatening) a rook swap. In some positions, this is a useful resource, so it must be taken into account. However, here this is a wrong move. This is a rather frequent mistake, caused by the tempting possibility of getting a draw thanks to a rook exchange. This is a losing square for the king. 2.Kb4! A standard manoeuvre for the white king. He gets ready to occupy the a6-square, two files and two ranks ahead of the pawn (instead, 2.c5? Rd8!=; 2.Rd2? Rd8! 3.Rxd8 Kxd8 4.Kb4 Kc8!=) 2…Rb8+ (obviously, Black does not want to trade rooks anymore, as the white king would reach the key squares) 3.Kc5 Rc8+ 4.Kb5 Rb8+ 5.Ka6 Rc8 6.Rd4!.
Position 10.14
(analysis diagram)
The point. The black king is far from the e5-square and cannot attack the white rook in time. 6…Ke6 7.Kb7 Rc5 8.Kb6 Rc8 9.c5. The white pawn is already on the 5th rank and Black lacks side checks from the long side, so the ending is lost.
1…Rb8?! This move is not logical, as it allows the advance of the pawn, but it is also enough to draw. 2.c5!? Ke7! and Black manages to propose a timely rook swap: 3.Kc4 Rd8!.
1…Ke5? Cutting the white king off along a rank is not enough with the black king here. However, this is the right move when the black rook is on c8. 2.c5 Rh4 3.Rd8 Rg4 4.Kb3 (fleeing from a check along the c-file. After these preparatory moves, the pawn is unstoppable) 4…Rh4 5.c6 Rh6 (5…Rh7 6.Kc4) 6.c7+–.
2.Kb4 Rb8+!
A new resource: frontal checks to restrain the pawn. Note that frontal checks require the same distance as side checks to be successful. Therefore, since the rook and the pawn are separated by 4 files, distant effectiveness applies.
3.Kc5 Rc8+ 4.Kb5 Rb8+! 5.Ka6
5.Ka5!? is a good trick. Too many checks are wrong. As a general rule, an attack on the defenceless pawn is better than a check. 5…Ra8+? (5…Rc8! is the only chance, stopping the pawn and the king) 6.Kb6! and distant effectiveness disappears: 6…Rb8+ (6…Rc8 7.c5+–) 7.Kc7 and the pawn goes forward.
5…Rc8!
Again, too many checks fail. 5…Ra8+? loses to 6.Kb7 Ra2 7.c5+–.
6.Rd4 Ke5!
The point! Now it is a draw, as the white rook cannot defend the pawn and cut the king off at the same time.
7.Rd5+ (7.Rh4 Rb8=) 7…Ke6 8.Kb5 Rb8+! 9.Ka4 Rc8 10.Kb4 Rb8+ 11.Rb5 Rh8
Black gets ready to move the king into the drawing zone and reach the Philidor Position.
12.Rb7!?
Trying to cut the king off along the rank. 12.Rd5 Rb8+=.
12…Kd6 13.Kb5 Rh5+ 14.Kb6 Rc5! 15.Rd7+ Kxd7 16.Kxc5 Kc7 ½-½
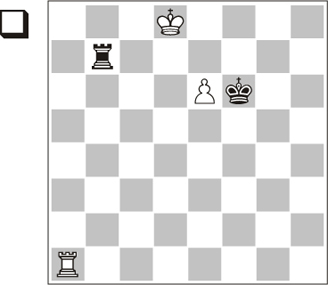
ENDING 60 |
Defending king cut off by two files. Grigoriev’s combined method |
DT: Frontal checks
In our last example we saw that, when the king is cut off by one file, the defending side is able to get a draw if he manages to place the rook and the king in their right positions. A question immediately arises: what happens if the king is cut off by two files?
Here the ending is won with a bishop’s or a central pawn. The winning procedure was discovered by Grigoriev and carries his name. When I explain the manoeuvre, it will become self-evident why it fails with a knight’s pawn. Anyway, you can check it as an Exercise. It is worth studying and understanding the manoeuvre, as you will not forget it. Then, in an actual game, you just have to check whether you can apply this procedure or not. This is more sensible than trying to learn by heart which pawns and how many files are necessary to win. That would be a mess and you are likely to forget it as time elapses.
1.Kb4 Rb8+ 2.Ka5 Rc8!?
We already know that an attack on the pawn is more accurate than an excess of checks. 2…Ra8+?! 3.Kb6 Rb8+ 4.Kc7+– loses quickly.
3.Kb5 Rb8+ 4.Ka6!
The white king reaches his ideal square. Here the king is ready to defend the pawn on its way from the 4th rank to promotion, as well as to disturb the black rook from the b7-square. This is the first stage in Grigoriev’s combined method. Note that with a knight’s pawn, this would be impossible.
4…Rc8 (4…Ra8+?! 5.Kb7 and the pawn goes ahead) 5.Rc1!
Once the king has reached the 6th rank, the rook goes behind the pawn to give it support. This is the second stage in Grigoriev’s method. The black king fails to help his rook in time. 5.Re4 would also win, but the winning procedure is more difficult and I do not recommend it. However, it is worth knowing that this resource is available: 5…Kf5 6.Rh4 Ke6 7.Kb7 Rc5 8.Kb6 Rc8 9.c5+–.
5…Ke7 6.Kb7 Rc5 7.Kb6 Rh5
7…Rc8 8.c5+–. Once more, when the pawn has reached the 5th rank and the king cannot stand in its way due to the unfortunate position of the rook, the ending is lost. The Lucena Position will arise on the board.
8.c5 Kd8
A logical but useless attempt to reach the Philidor Position.
9.Rd1+ Kc8 10.Rg1!
Black cannot reach either the K&H or the Philidor Position, so the ending is lost.
10…Rh8 (10…Rh6+ 11.c6+–) 11.c6 Rf8
Now we will see why a back-rank waiting strategy fails against a bishop’s pawn.
12.Ra1! This simple move is impossible if we shift the position to the left.
12…Kb8 13.c7+ Kc8 14.Ra8+ 1-0
A logical question arises: when the king is cut off along the file, is the long side important or not? The answer is: yes, it is important, as regards technique, but it has no influence on the result. A single file is not enough to win; with two files there is just one long-side scenario, where the defending side loses due to mating themes. This is what we are going to see now.
Position 10.16
The black king is cut off by two files, but his rook will occupy the long side. Grigoriev’s method does not work here, but White always wins thanks to some mating ideas. I recommend that you check this last statement (starting with 1.Ke4 etc) to strengthen your understanding of long-side defensive technique.
1.Kc4!
White’s idea has nothing to do with Grigoriev’s method: the king heads for the c6-square. We are going to see that Black loses, no matter where his king is. Imagine it is Black’s turn and he can choose the position of his king:
1…Ka5! The best square. White needs to lose one tempo. 2.Rb2 Ka4 (for 2…Ka6, see the main line) 3.Rb7 Ka5 4.Rb1 (done!) and now, if 4…Ka4 5.d5!; 1…Ka7 2.Kc4 Rc8+ 3.Kd5 Rd8+ 4.Kc5 Rc8+ 5.Kd6! Rd8+ 6.Kc7.
1…Rc8+ 2.Kd5 Rd8+ 3.Kc6!
This small trick secures the advance of the pawn: 3.Ke5?! Trying to apply Grigoriev is not enough to win, because once the black king gets one file nearer, long-side technique is enough to draw. 3…Re8+ 4.Kf6 Rd8 5.Rd1?? (of course, White could still return to the other plan with 5.Ke5) 5…Kb6 6.Ke7 Rh8! 7.d5 Rh7+!=.
3…Rc8+ 4.Kd7 Rc2 5.d5
And the pawn will promote.
Some ideas about cutting off
There have been attempts to establish some rules stating how many files are necessary to win in each case, but those rules were full of amendments and exceptions. As I see it, the best procedure is to learn ideas: defensive resources and attacking techniques.
If you have a good understanding of the combined method, in most cases you will be able to guess the correct result. We have not studied positions where the pawn has not reached the 4th rank, but those are less frequent and the same rules apply. However, it must be said that when the pawn is still on the 2nd rank, some variations can be extremely complex.
Summary
- The stronger side cuts off the enemy king by one file: it is useful, but not enough to win if the defending pieces occupy the right positions.
- The stronger side cuts the enemy king off by two files:
- When the pawn is on the 4th rank: if it is a central or a bishop’s pawn, the Combined Method wins (there is just one case where the defending rook can occupy the long side, but then the stronger side has mating threats to win). The Combined Method cannot be applied with a knight’s pawn; therefore, it is a draw.
- When the pawn is on the 3rd rank: the Combined Method is not enough, as the defending king has time to get in front of the pawn. Therefore, the ending is drawn if the defending pieces occupy the right positions.
- The strong side cuts the enemy king off by three files: with the Combined Method, the ending is won with any pawn on the 3rd or 4th rank, but not on the 2nd.
- The strong side cuts off the enemy king by four files: the ending is usually won, even when the pawn is on the 2nd rank, but more themes appear.
Section 4. Cutting off the king along ranks
There are two ways of cutting off the king. This is the most simple and efficient one. It can be applied beyond the 4th rank, and the procedure is the same, but we will study positions where the pawn is on the 4th rank or further up, as their analysis already contains the other cases.
ENDING 62 |
Perfect Cut along a rank |
Knight’s pawn
Position 10.17
This diagram illustrates a case of a king cut off along a rank. The idea is that the rook prevents the king from crossing ranks to get to the promotion area. It is important to note from the beginning that the defending king always occupies the long side. With the king on the short side, the defender’s rook could occupy the long side and deliver checks. Then, the defending side would just laugh at the cut.
The defending king may be on the same rank as the pawn or on the adjacent one. When both pawn and defending king are on the same rank, as here, we call this a Perfect Cut. The study of these examples will show us why:
1…Ra8
Preventing 2.Ka4.
2.Rc6
Threatening 3.b5 and 4.Kb4. There are many other ways to make progress, such as 2.Rh5 followed by b5 and Kb4, also winning: 2…Rb8 3.b5 Rb7 4.Kb4 Rb8 5.Rh6 Kd5 6.b6 etc.
2…Rb8 3.Ra6
Now Black cannot prevent Ka4 and b5.
3…Kd5 4.Ka4! Kc4 5.Rc6+! Kd5 6.b5 Ra8+ 7.Kb4
As you can see, we have reached the starting position, just one rank further. So the procedure is repeated.
7…Rb8 8.Rc7 Kd6 9.Ra7 Kd5 10.Ka5 Kc5 11.Rc7+ Kd6 12.b6 Ra8+ 13.Kb5 Ra1
White threatened 14.Rh7, 15.b7 and 16.Kb6, so Black goes for rear checks; the problem is that play will now lead to the ever-present Lucena Position.
As an Exercise, the reader can check that this procedure also works when the knight’s pawn is on the 3rd or even the 2nd rank, in the same fashion.
Bishop’s pawn
Position 10.18
Even if Black is to move, the ending is lost, as in the previous example.
1…Rb8 2.Rh5 Kf4 3.c5 Rc8 4.Kc4 Ke4 5.Rh6 Ke5 6.c6
Therefore, we can state that the Perfect Cut along the rank also works with a bishop’s pawn on the 4th rank. We can also state, without extra diagrams, that the same applies to the central pawn. Again, the reader can check, as an Exercise, that this procedure also works with a 3rd- or 2nd-rank bishop’s pawn, in the same fashion.
As we will see in our next example, this procedure does NOT work with a 3rd- or 2nd-rank central pawn.
Perfect Cut with a 3rd-rank central pawn
Position 10.19
Here we are. Now a new defensive system is at Black’s disposal..
1…Ra8! 2.d4 (or 2.Kc3 Ra3+, preventing progress: 3.Kc2 Ra8=) 2…Kg3 3.Rh5
Attempting Kd3 or Kc3, reaching an ideal position (cut-off king, 4th-rank pawn), but Black does not surrender. Other moves are no improvement. 3.Rh7 Kf4 4.Re7 Kf5 5.Kd3 Kf6 reaching Ending 59. 3.Rh6 Ra3 (cutting the king off. 3…Kf4 would also draw: 4.Kd3 Kf5 5.Kc4 Ra4+ 6.Kc5 Ra5+ 7.Kb4) 4.Re6 Kf4= and draw; more or less, the same as the main line.
3…Kg4 4.Re5 Ra3!
Necessary… and good! The white king will not be able to aid his pawn. Curiously, it is the defending rook that cuts off the enemy king now.
5.d5 Kf4! 6.Re8
This defensive procedure fails when the pawn is one rank more advanced, as then the pawn would reach the 7th rank.
6…Ra5=
ENDING 63 |
Imperfect Cut along a rank |
Position 10.20
We say that this cut is imperfect when the defending king is cut off along a rank but stays one rank ahead of the pawn (as in Position 10.19). Here White does not enjoy such a great advantage, although attack and defence techniques are still simple. If Black is on move, it is a draw.
1…Rb8!
White threatened to win by 2.Rb6. Now it is clear that no progress can be made. In order to understand that any other move was losing, instead of analysing lines, let us imagine that White was to move in the starting position:
1.Rb6! (White occupies this file to secure the advance of the pawn to the 5th rank) 1…Rc7 2.Kb4! (now only this move wins) 2…Rc8 (2…Kd4 3.Rd6+ Ke5 4.c5 is a Perfect Cut) 3.c5 Kd5 4.Rd6+ Ke5 and we have reached the position of the Perfect Cut: 5.Kb5 Rb8+ 6.Rb6+–.
2.Rg6 Rb7!
Black has to wait on the b-file.
3.c5 Kd5=
There is a marked contrast between this position and the previous one. That is why we call this scenario the Imperfect Cut along a rank.
This technique works the same with a knight’s pawn, and again the defending side needs to occupy immediately the file adjacent to the pawn. In the case of a central pawn, there are more possibilities for the defence, but you just need to remember that the same defensive technique shown here works.
ENDING 64 |
Apparent Cut along a rank |
This is actually an example of long-side defence, but I have included it here because many players often confuse both scenarios. We have already stated that cutting the king off along a rank is not enough to win against a long-side defence. Now we will see it over the board.
You may think this is the same situation as in the previous examples, but it is not so. The black rook can deliver checks from the long side, and the cut is harmless.

Position 10.21
1…Ra8 2.Rc5
Other moves do not bring anything either: 2.Kd4 Ra4+ 3.Ke5 Ra5+ 4.Kf6 Ra6+ 5.Kf7 Ra4=; 2.Rf7 Ra3+ 3.Kd4 Ra4+ 4.Kd5 Ra5+ 5.Kd6 Ra6+ 6.Kc5 Ra5+=.
2…Rd8 3.Rd5 Ra8 4.Kd4 Kf4
The easiest way: the black king approaches the pawn.
5.Rf5+ Kg4=
White has to allow …Kf4 or suffer checks from the black rook.
Summary: cutting the king off along a rank
The defending king can only be cut off along a rank on the long side. In other cases, the position is not dangerous if the defending rook occupies the long side.
The cut is perfect if the defending king stands on the same rank as the pawn, and imperfect if the defending king is one rank ahead of the pawn.
In the Perfect Cut scenario, the ending is always won with a knight’s or a bishop’s pawn, even if the pawn is still on the 2nd rank. To win with a central pawn, the pawn must be at least on the 4th rank.
In the Imperfect Cut scenario, the ending is drawn if the defending rook occupies the file adjacent to the pawn. Besides, more defensive resources are available against a central pawn.
Section 5. The rook’s pawn
The rook’s pawn is so special in these endings that there is a whole bunch of theory about it. Besides, this ending arises quite frequently, as rook’s pawns usually have a long life on the board. Drawing chances are much higher here, and the strong side can only win in especially favourable conditions. Almost any logical sequence of play involves the defending side placing his king or rook in front of the pawn. Therefore, we will classify these endings taking into account which is the blocking piece:
- The king: then the ending is an ironclad draw.
- The rook: then everything depends on which king arrives first. Some tactical subtleties arise when both kings arrive at the same time.
Thus, we will now deal with positions where the attacking king or rook stand in front of the rook’s pawn. We need a couple of positions for each case.
ENDING 65 |
Pawn on the 7th rank. Attacking rook in front of the pawn |
DT: Rear checks. Rook in the rear of the pawn
This is one of the most famous positions in rook endings. When the attacking rook stands in front of the pawn, the pawn can always reach the 7th rank, and this means either an immediate win or a very easy defence. The defending side has two opposite strategies: if he has time, he will move the king towards the pawn to capture it. If not, he must move the king in the opposite direction and keep him on g7 or h7.
1…Kg7!
The defender has to place his king on g7 or h7. Then the stronger side cannot make further progress. Let us check that all alternatives fail: 1…Ra3?? 2.Rh8!+–; 1…Ke6?? 2.Re8++–; 1…Ke7?? 2.Rh8+–.
Now the rook cannot move; therefore, the only plan available for White is to support the pawn with the king, and that is what he does.
2.Kf3 Kh7 3.Ke4 Kg7 4.Kd5 Kh7 5.Kc6 Kg7 6.Kb6 Rb1+!
When the white king gets in contact with the pawn, the black rook will start delivering rear checks, as the white king lacks a shelter.
7.Ka6 Ra1+ 8.Kb5 Kh7
There is no way to make progress; it is an easy draw. It is interesting to check how, when the pawn has already reached the 7th rank, it is impossible to win even with an extra h- or g-pawn. We will see that in the next chapter.
ENDING 66 |
Pawn on the 6th rank. The Vancura Defence |
DT: Distant (side) checks
We know now why the pawn should only reach the 7th rank if the black king cannot stand on g7-h7. So… what to do with it? If the pawn is not advanced, the defending king will come and capture it. Therefore, the best procedure is to take the pawn to the 6th rank, where it can be quite safe.
Position 10.23
The king is close to the safety zone g7-h7 and can get there if the pawn reaches the 7th rank. First question: can he go to capture the pawn?
1…Kg7
Answer: No! 1…Ke7? 2.a7! and the king gets trapped halfway; he cannot go back, as he will not get to the safe zone in time, but he has no time to reach the pawn: 2…Kf7 3.Rh8. Thus we can say that, when the pawn is on the 6th rank, the e-file is mined for the black king; if he has not crossed this file before, he cannot do it anymore.
Since the black king cannot approach the pawn, he gets into the safe zone instead. And now? We know White should not push the pawn but… is there something else to do? Yes, there is! Actually, this position was considered a win for White for a long time. Even the best chess players in the world were sure about this assessment, until a composer named Vancura found an astonishing defensive resource in 1924.
But let us speak first about White’s winning plan. The pawn can now be used as a shield against checks, and thus White has a winning plan: the king goes to the a7-square, the rook comes out and the pawn promotes. On the other hand, it is difficult to find the right defensive plan if you don’t know the position: the fact that even the best chess players in the world could not find it for many years is evidence of that.
2.Kf3
Trying to carry out the plan in the most straightforward way. Black will lose if he just waits. Other moves are possible, and the analysis of all king options is rather complex. For the moment we are just going to grasp the idea.
2…Rf1+
The starting point of the Vancura Defence. This moment is important and we must consider other options that may appear in an actual game. In our next example we will come to this.
Let us see what happens if Black just waits with 2…Kh7?, as in the previous endings with the pawn on the 7th rank. This plan illustrates all possibilities apart from the Vancura Defence: 3.Ke4 Kg7 4.Kd5 Kh7 5.Kc6 Kg7 6.Kb6 (now the king defends the pawn and the rook threatens to come out) 6…Rb1+ 7.Ka7. That is the point: the white king has a shelter. The rook will come out now and then the pawn promotes: 7…Kh7 8.Rb8 Ra1 9.Rb6 followed by Kb7, a7 and a8.
3.Ke4 Rf6!!
This is the point of the Vancura Defence: the rook attacks the 6th-rank pawn laterally; thus, if the white king approaches the pawn, the rook can deliver checks and the king cannot use the pawn as shelter. On the other hand, if the pawn is pushed, creating the threat Rg8, the black rook will immediately come back to the previous position, which we already know is drawn. Once we know the technique, its application is so simple that we just need a little care to avoid blundering. Let us consider some options:
4.Kd5 (4.Ke5 (threatening 5.Rg8) 4…Rb6 5.Kd5 Rf6=; 4.a7 Ra6!=) 4…Rb6 5.Kc5 Rf6 6.Kb5
White threatens to take his rook out.
6…Rf5+
Now comes the series of checks.
7.Kb6 Rf6+ 8.Ka7 Rf7+ 9.Kb6 Rf6+ 10.Kc5 Rf5+ 11.Kd4 Rf6
It is an ironclad draw.
Vancura Defence (II)
Now that we know the Vancura Defence, it is easy to apply. Nevertheless, a quick look at databases may show you that many titled players have lost this drawn position. This is a clear demonstration of: if you do not know this, you will not find it over the board.
Position 10.24
But let us come back to the interesting position we had after White’s second move. What would happen if it were White’s turn again? Or if the white king’s position was different (for example, after 2.Kf2, preventing a time-gaining check from the black rook to get to the 3rd rank)? What if Black plays carelessly and does not take his rook immediately to the 3rd rank? Or if the starting position is different? In short: how can we easily know whether the position is won or drawn?
In 1950, Romanovsky carried out a thorough study on the possible locations of the white king, supposing the black pieces were on a1 and g7. As usual, he established a drawing zone, which we can see in the diagram. However, as I have already said, I am not a great fan of memorising irregular zones, as very often they are not kept in one’s head for long. Therefore, I recommend that you pay attention to the right procedures in order to be able to answer accurately in any particular case.
2…Ra5!?
Still enough to draw; in terms of analysis this is the most interesting move, though not the easiest one.
2…Rf1+! 3.Ke4 Rf6 is the line we analysed in our previous example, as well as the safest way to draw.
2…Ra4!? This move prevents the king from reaching the winning zone, so it is enough to draw as well. Since it hinders the white king, this is easier than the main line: 3.Ke3 Rb4 4.Ra7+ Kg6 5.Rb7 Ra4 6.a7 Kf5 and the black king wins the race towards the pawn.
First we will see what happens if Black carelessly wastes time: 2…Ra2? 3.Ke4!. The king enters the winning zone. Let us see what happens now if Black ‘wakes up’ and tries to transfer his rook to the 3rd rank. 3…Ra5 (the rook will not find its way with 3…Re2+?! 4.Kd5+–) 4.Kd4 (the white king approaches b4. Now the rook must urgently move along the 4th rank to reach the 3rd rank) 4…Rb5 5.Ra7+ Kf6!? (putting the king on the 8th rank just helps White: 5…Kf8?! 6.Rb7 Ra5 7.a7+–; after 5…Kg6 6.Rb7 Ra5 7.a7 – as stated in the introduction to this section, the struggle becomes a mere king race, and the white king wins: 7…Kf6 8.Kc4 Ke6 9.Kb4 Ra1 10.Kc5+– and the king reaches b8) 6.Rh7! (the black king will arrive in time after 6.Rb7?, as he can gain a tempo in the king race by attacking the white rook: 6…Ra5 7.a7 Ke6 8.Kc4 Kd6 9.Kb4 Kc6=) 6…Ra5 7.a7 Ke6 8.Kc4 Kd6 9.Kb4 Ra1 10.Kb5!+–.
3.Ke4
3.Ra7+ allows many options, the soundest being …Kg6: 3…Kg6 4.Ke4 Rb5=.
3…Rb5
The black king is about to reach the saving rank.
4.Ra7+ Kg6!
Now the only move, as …Kf6 would allow the white rook to reach h6 in favourable circumstances, and the back rank is prohibited in view of the manoeuvre Rb7 and a6-a7. 4…Kf6 5.Kd4 Rb6 6.Rh7+–.
5.Rb7
On any other square on the 7th rank, the black king could also win a tempo on his way to the queenside. Instead, 5.Kd4 Rb6! 6.Kc5 Rf6=, and Black has reached the correct defensive set-up.
5…Ra5 6.a7 Kf6! 7.Rh7!?
Black has to be careful now. 7.Kd4 leads to a race whose result is already known. 7…Ke6 8.Kc4 Kd6 9.Kb4 Kc6=.
Position 10.25
(analysis diagram)
7…Kg6!!
Absolutely paradoxical (at first sight, as usual). The point is that the black rook must not leave the 4th rank, due to Kd5-c6, etc, and tactical problems arise if the black king hurries to the queenside. 7…Ke6? 8.Rh6+! Kd7 9.Rh8!+– is a known motif brilliantly executed.
8.Rc7 Kf6 9.Kd4 Ke6 10.Kc4 Kd6=
These variations are not exhaustive, but in my view they illustrate the situation quite well and help us draw some ideas to find our way in actual games.
You can play this endgame correctly with a good knowledge of the main themes and accurate calculation.
Let us summarise the main ideas from the perspective of the defender:
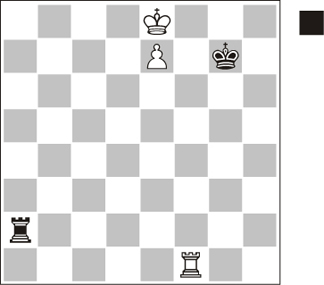
ENDING 67 |
The king is in front of the pawn and the pawn is on the 7th rank |
DT: Attacking king trapped, distant checks
We are going to see now what happens when the attacking king is in front of his pawn. We will start with positions with the pawn on the 7th rank. If the pawn is less advanced, it can be pushed without support from the rook, whose task is ‘cutting off the enemy king’. On the other hand, if the attacking king supports his pawn but tries not to stand in front of it, the enemy rook will force him to do so by means of checks.
This is the most important position in Rook + Rook’s Pawn vs. Rook endings. In order to win, the strong side needs to have the enemy king cut off on the f-file (or the c-file in the case of an h-pawn). If this cut is achieved when the pawn is less advanced, the pawn can be easily pushed later on. If this cut cannot be achieved, the best attacking procedure is to use the rook as a screen for the king before the enemy king approaches.
The winning sequence is long and complex but relatively easy to find over the board, if the clock allows you, once you know that the position is won.
Position 10.26
Once the pawn has reached the 7th rank, the rook heads for the b8-square. The journey takes three moves, no matter the chosen route. The defending king has to stay on the 2nd rank, as the white rook would get to b8 in just two moves with the black king on the 3rd rank, thus winning even if the black king was one file closer to the pawn.
1…Ke7 2.Rh8 Kd6!?
A good move, trying to make it difficult for the white king to get out via the a- and b-files. 2…Kd7 loses faster: 3.Rb8 Ra1 4.Kb7! (4.Rb7+? Kc8= and the white king will not come out of the corner. If you do not know this position, it is worth trying different alternatives, as you may reach this ending in your (blitz) games; 5.Rb2 Kc7 6.Rc2+ Kd7 7.Kb7 Rb1+ 8.Ka6 Ra1+ 9.Kb6 Rb1+ 10.Kc5 Ra1=) 4…Rb1+ 5.Ka6 Ra1+ 6.Kb6 Rb1+ 7.Kc5+–.
3.Rb8
The rook arrives just in time to offer an exchange and help the white king out, which would be impossible if the black king were on c6 or c7.
3…Ra1 4.Kb7 Rb1+ 5.Kc8!
5.Ka6 Ra1+ 6.Kb6 Rb1+ 7.Ka5 Ra1+ and White will not make progress here.
5…Rc1+ 6.Kd8 Rh1!
This resource creates the maximum difficulties. In case of 6…Rg1 the rook is not far enough away: 7.Ke8! Rg8+ 8.Kf7+–.
7.Rb6+!
The only way. 7.Ke8? Rh8+ 8.Kf7 Rh7+= and the pawn is lost; or 7.Kc8 Rc1+ repeating.
7…Kc5 8.Rc6+!!
This check is necessary to force the king to choose. 8.Ra6? Rh8+ 9.Kc7 Rh7+ 10.Kd8 Rh8+ 11.Ke7 Rh7+ 12.Kf8 Rh8+ 13.Kf7 Ra8! 14.Ke7 Kb5 15.Ra1 Kb6=; 8.Rb8? Rh8+ 9.Kc7 Rh7+=; 8.Rb1!? would also win, but then a Queen vs. Rook ending arises: 8…Rxb1 9.a8Q+–.
8…Kb5
8…Kd5 9.Ra6 (9.Rc8 Kd6) 9…Rh8+ 10.Kc7! (10.Ke7?! Rh7+! 11.Kf8 Rh8+ 12.Kg7? Ra8=) 10…Rh7+ 11.Kb6+–.
9.Rc8! Rh8+ 10.Kc7 Rh7+ 11.Kb8
And the pawn promotes.
We have seen that having the enemy king cut off by less than four files is not enough for the stronger side to push the pawn to the 7th rank and take the king out of the corner. Nevertheless, there is a chance to win with a favourable set-up that allows a shelter for the king before the pawn reaches the 7th rank, as we will see in our following example.
Position 10.27
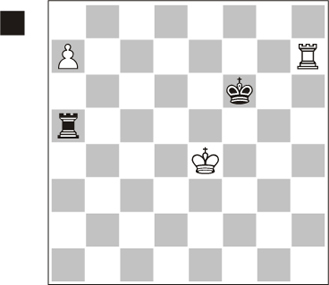
Here we have the critical position where the king and the rook support the pawn. If White is to move, 1.a6 wins, as the pawn is unstoppable: 1…Rb1+ 2.Rb6 Rc1 3.a7 Rc7+ 4.Ka6 Rc8 5.Rb8+–.
If Black is to move, accurate play saves the game. Obviously, White’s victory is easier if the black king is farther away or the pawn is more advanced.
If we keep this position in mind, we will be able to solve this kind of ending correctly, though there are many subtleties.
1…Rb1+! 2.Rb6 Rc1!
This is the ideal position for the rook to deliver checks.
3.a6
3.Rb2 makes sense, as White threatens 4.Rd2 and frees more squares for the king: 3…Rc7+ 4.Kb6 Kc8!= and the black king stands in front of the pawn or blocks the white king’s way out.
3…Rc7+ 4.Ka8 Rc8+ 5.Ka7 (5.Rb8 Rc1 (not 5…Kc7? 6.a7+– and double zugzwang) 6.a7 Kc7!=) 5…Rc7+ 6.Rb7 Kc8! 7.Kb6 Rc1 8.Rh7 Rb1+ 9.Ka7 Ra1=
There is no way to make progress.