In rook endings, there are many positions where two pawns are not enough to win. Only opposite-coloured bishop endings present a higher drawish trend.
Those positions where a rook and two pawns cannot win against a lone rook offer great theoretical-practical interest for many reasons:
- They occur quite often.
- Some are not easy to play unless you know the basic ideas.
- They are a useful introduction to rook endings with more pawns on the board. Concepts such as a passive rook for the stronger side and an active rook for the weaker side are especially important.
In order to study these endings we are going to distinguish five interesting scenarios with great drawing chances. These are the following:
- Doubled pawns.
- Rook and bishop’s pawns on the same wing.
- Connected pawns blocked by the enemy king.
- Attacking rook stuck in front of the 7th-rank pawn.
- Pawns stopped by the Vancura Defence.
This classification does not cover all possible drawish positions, but it includes the most important and frequent ones. Anyway, one should never diagnose as a win a position where the pieces of the stronger side occupy passive positions.
First scenario
ENDING 69 |
Central pawns |

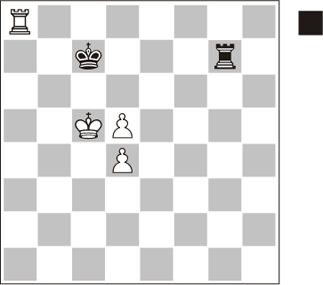
Position 11.1
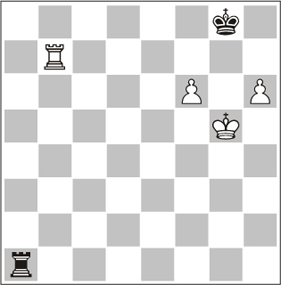
Positions with doubled pawns are generally drawn. However, the first thing you should know is that not all drawing methods applicable against one single pawn are valid here.
The greatest danger if you do not know this ending, or you are not sure how to draw, is that you may have made a wrong decision at a previous stage of the game where simplifications were possible. That is why it is important to be sure that this is a draw, an easy draw in normal circumstances, and how to draw.
The best defensive procedure consists in starting with the Philidor Position and then making a timely switch to K&H.
1.Rb7 Rg6 2.Rb6
This is the difference compared to positions with just one pawn. White can offer a rook exchange and ‘break’ the Philidor Defence. If we do not know the theory, we tend to be scared, especially if we have analysed this position ‘from a distance’. That concern may lead us to make wrong simplifying decisions. Therefore, you should take a close look at the sequence and lay the ghosts to rest for good.
2…Rg4!
This move is important now. The only available method is K&H, but Black has to capture the second pawn when he puts the rook at the rear of the pawn. Of course, the pawn ending is lost; other moves mess up things, though they may still be enough for a draw.
Dvoretsky considers 2…Rg1?! losing, on account of 3.Kc6! Rc1+ 4.Kd6+– and now 4…Rc8 5.Ra6 Rb8 6.Ke6 Rc8 7.d6 Rb8 8.Ra1 Rc8 9.Rh1, but in this line 3…Kc8! holds. 2…Rg7?! also loses, according to Dvoretsky: 3.Rb8+! Kc7 4.Ra8
Position 11.2
(analysis diagram)
4…Rg1! (4…Rg6? is indeed losing: 5.d6+ Kd7 6.Ra7+ Kd8 7.Kc6+–) 5.Ra7+ Kc8 6.Kc6 Rc1+ 7.Kd6 Rc4! and the rook reaches the right defensive position again, but Black is still in trouble: 8.Ke5 Rb4! (8…Kd8 is natural but loses on account of 9.Ra6! Rb4 10.Kd6 Kc8 11.Ra8+ Kb7 12.Kc5! (a difficult and important intermediate move. Now Black will not be able to reach the right defensive set-up) 12…Rb1 13.Rh8 Kc7 14.Rh7+ Kc8 15.Kc6 Rc1+ 16.Kd6 and two pawns render the K&H defence useless. You do not need to remember, not even to analyse, this long and complex variation, but it is instructive) 9.Ra6 Kd7.
In conclusion, other moves are possible, but you should not complicate your life in these endings. If there is a clear procedure, the best you can do is adopt this procedure and not deviate.
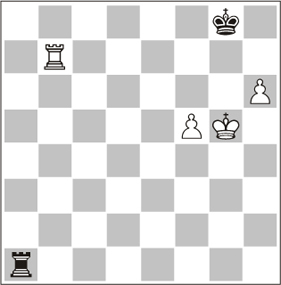
3.d6
3.Kc6 is more logical, but leads to positions already seen in the previous chapter: 3…Rxd4 4.Rb8+ (4.Kd6 Kc8 5.Rc6+ Kd8 6.Ra6 Kc8 7.Ra8+ Kb7 8.Rd8 Rh4!= Long Side) 4…Ke7= K&H.
3.Rh6 (intending Kd6) 3…Kd7! 4.Rh7+ Kd8= and now 5.Kd6 would allow Black to adopt the Philidor Defence again, and 5.Kc6 would allow K&H.
3…Rg1!
The rook can now move to deliver rear checks, while the d4 pawn is just a tiny shelter for the king, but cannot offer winning chances.
4.Kc6 Rc1+ 5.Kd5 Rh1 6.Rb8+ Kd7 7.Rb7+ Kd8 8.d7 Rh5+ (8…Ke7=) 9.Kc6 Rh6+ 10.Kc5 Rh5+ 11.d5 Rh6 12.d6 Rxd6!=
ENDING 70 |
Knight’s pawns |
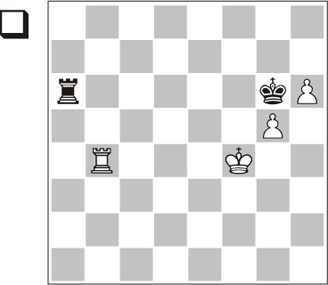
Second-rank defence
After having seen the last example, a terrible question may immediately arise: if the K&H defence is the only valid procedure for these endings and this procedure did not work against knight’s pawns… what happens then if our opponent has two doubled knight pawns? Will first-rank defence work? No need to worry: we are going to compare procedures and differences, and then draw conclusions.
Firstly, first-rank defence is useless against two pawns, as the stronger side may trade rooks in favourable conditions (in the next diagram, the manoeuvre would be …g2-Rf3-Rf1).
Secondly, and more reassuring: the stronger side cannot break the Philidor Position with a knight’s pawn, since there is not enough room.
Thirdly, if, as in our first example, the Philidor Position cannot be achieved, there are alternatives to K&H that are actually valid against other pawns.
Against two knight’s pawns the defending side must be careful and set up a different defensive position which we can name the Second-rank defence.
This game constitutes a warning against careless play.
1.Rb8?
After this, the white king is pushed to the back rank and Black wins thanks to the second pawn. Therefore, the defending king should avoid being pushed to the back rank. Then the right move is:
1.Rb2! This set-up is impregnable because Black has no room on the kingside. It would also work against a central or bishop’s pawn, but it is not so advisable. 1…Ra4 2.Rc2 (White can easily turn to the Philidor Position now: 2.Rb3 and there is no way to break it; if 2…Ra2+ 3.Kg1 g3 4.Rb8 and rear checks) 2…g5 3.Rb2 g3. Black intends …Rf4-f2 with a winning pawn endgame, and this threat can break White’s set-up. Nevertheless, we know that the pawn must reach the 6th rank after the king has done so; now we switch to a well-known defensive procedure: rear checks. 4.Rb8=.
1.Rb7? White captures the pawn, but we know that this loses. 1…Ra2+ 2.Kg1 Kh3 3.Rxg7 Kg3 (reaching a position we have already seen in the previous chapter) 4.Kf1 Ra1+ 5.Ke2 Rg1!–+.
1…Ra2+ 2.Kg1 Kh3 3.Rb3+ g3 4.Rb1
The only option, but now we will see why first-rank defence does not work against two doubled pawns.
4…Ra3 5.Rc1 g5 6.Rb1 g4 7.Rc1 g2 8.Rb1 Rf3 9.Ra1 Rf1+ 10.Rxf1 gxf1Q+ 11.Kxf1 Kh2
And the second pawn promotes.
Second scenario
The second drawing scenario is very famous… but little-known. Almost every player knows that this ending, with rook and bishop’s pawns, is a draw; however, most fear reaching this position, and they are right.
Certainly, to defend this ending, it is not enough to know that it is drawn; not even to know the best defensive set-ups, or the Rook + Pawn vs. Rook endings that may arise on the board at any time. Of course, all this is necessary, but not enough. You will also need patience, tenacity and constant alertness.
In any case, this ending will one day occur in one of your games and knowledge of the accurate defensive technique is undoubtedly useful. Life is far easier for the attacking side.
Let us start with a difficult situation for the defending side: the king is cut off on the back rank. Then we will deal with the normal defensive procedure.
The experience gathered in many games, as well as the analyses published in several books, above all the classical work by Levenfish and Smyslov Theory of Rook Endings, conclude that, when the defending king is cut off on the back rank, the ending is usually lost. The variations are not easy but, as usual, defence is more difficult than attack.
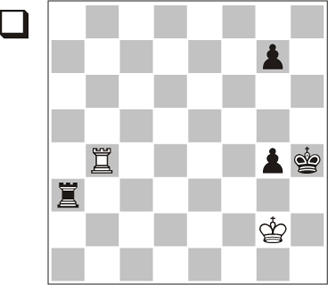
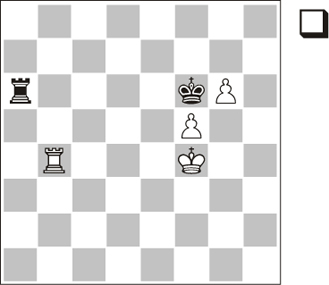
First we will see that the ending is lost if both pawns have reached the 6th rank:
Position 11.4
White threatens 1.h7+ followed by 2.Rb8+ and 3.f7. Checks are the only option.
1…Rg1+ 2.Kf5 Rf1+ 3.Ke6!
Maintaining the threat. The king heads for e8. Apparently, White could win without his king, but there is a diabolical resource.
Near the edge of the board, we should never forget stalemate themes: 3.Ke5 Re1+ 4.Kd4 Rd1+ 5.Kc3 Rf1 6.h7+ (6.Rg7+ Kh8 7.f7 Rc1+ 8.Kd4 Rc4+ with a desperate rook sacrifice) 6…Kh8 7.f7 Rxf7! and draw.
3…Re1+ 4.Kd6
4.Kd7? Kf7 allows Black to hold.
4…Rd1+ 5.Ke7 Re1+ 6.Kd8 Rd1+
If Black stops delivering checks to attack the bishop’s pawn, the rook’s pawn plays a decisive role: 6…Rf1 7.h7+! Kh8 8.Rb8! Kxh7 9.Ke7 Re1+ 10.Kf8. As we saw in Ending 58, when the stronger side’s king has reached the 8th rank there is no way to stop the pawn.
7.Ke8 Re1+ 8.Re7 Rf1 9.f7+ Kh8 10.Re6!+–
Followed by f7-f8.
It would be wrong to play 10.f8Q+ Rxf8+ 11.Kxf8 and stalemate again.
Once we know that the ending is easily won when both pawns have reached the 6th rank, let us see what the defending side can do to avoid this situation. We will seek help in Levenfish and Smyslov’s work.
Position 11.5
White threatens f5-f6, reaching the position in our previous example. So…
1…Rg1+ 2.Kf6
Now Black can follow three possible paths: to stay behind the h-pawn, to stay behind the f-pawn, or to wait. All are stubborn, but all lose.
2…Rh1
2…Rf1 3.Rg7+ Kh8 (3…Kf8 4.Rg5 Rh1 5.Kg6+–) 4.Re7 Kg8 5.Re8+! Kh7 6.Ke6 Kxh6 (6…Ra1 7.f6 Ra6+ 8.Kf5 Ra5+ 9.Re5 Ra8 10.f7+–) 7.f6 and promotion cannot be stopped, as 7…Re1+ leads to a lost endgame.
2…Ra1 3.Re7 Ra2 4.Ke5 (the king makes way for the pawn. Instead, 4.Ke6? Ra6+=) 4…Re2+ (4…Ra5+ 5.Kf4 Ra4+ 6.Kg5 Ra5 7.Kg6) 5.Kd6 Rf2 6.Ke6 Re2+ 7.Kd7 and now:
A) 7…Rf2 8.Re8+ Kh7 (8…Kf7 9.h7+–) 9.Ke6 Re2+ 10.Kf7 Ra2 11.f6 Ra7+ 12.Ke6 Ra6+ 13.Kf5 Ra5+ 14.Re5+– and the f-pawn cannot be stopped;
B) 7…Rd2+ 8.Ke8 Rf2 9.Re5 Kh7 10.Kf7 Kxh6 11.Re6+ Kh7 12.f6 Ra2 and the black rook cannot reach the back rank (thus drawing, as we saw in Ending 58) in time. 13.Kf8!+–. If it is the stronger side’s king which reaches the 8th rank, the ending is won.
3.Rg7+ Kf8
3…Kh8 4.Re7 Rxh6+ 5.Kf7 Ra6 (once again, the rook cannot reach the back rank. The reason now is the unfortunate position of the black king) 6.f6 Kh7 7.Kf8+ (the stronger side’s king is on the 8th rank…) 7…Kg6 8.f7 Kf6 9.Kg8!+–.
4.Kg6 Rg1+ 5.Kh7 Rf1 6.Ra7 Rg1 (6…Rxf5 7.Kg6! Rf1 8.Ra8+ Ke7 9.h7+–) 7.f6 Rg2 8.Rg7 Rf2 9.Kg6+–
When the checks are over, Black cannot stop the manoeuvre h6-h7 followed by Rg8.
We have seen that two pawns on the 6th rank lead to an easy win and, if the bishop’s pawn is on the 5th rank and the rook’s pawn is on the 6th rank, a very complex and accurate sequence makes victory possible. One of the aims of this book is that the reader obtains the maximum knowledge from the minimum analysis (see the introduction). Nevertheless, we cannot avoid complex analyses in some positions.
These two examples have shown the more complicated manoeuvres but, if we do not study more positions, we will probably get a wrong impression of other positions. Despite what it seems, and what many books say, a defending king cut off on the back rank does not automatically lose.
Therefore, we are going to complete the picture with three series of diagrams. The analysis is simple if we know the previous examples.
Series about rook and bishop’s pawns.
Defending king cut off on the back rank; bishop’s pawn on the 6th rank.
White wins, no matter who moves

White to move wins Black to move draws

Draw, no matter who moves
If you check the winning method studied for the first position and the variation commented on the 6th move, you will become convinced that the second and the third are a draw. If the h-pawn is less advanced, it is also a draw.
Bishop’s pawn on the 5th rank.
White wins Analysed

White wins Same procedure

White wins Same procedure
Here the interesting point is that classical defensive procedures fail:
- Philidor Defence: if Black just waits, White pushes his h-pawn to the 6th rank and then does the same with the f-pawn.
- K&H Defence presents the same problem.
- An attack on the h-pawn fails because there is no time to capture it and then go to the long side to deliver distant effective checks.
We can draw an interesting conclusion from all this:
Bishop’s pawn on the 4th rank.

White to move wins, Black to move draws
White wins
Draw
When the bishop’s pawn is on the 4th rank, the position of the rook makes a difference. The first diagram is very interesting. As we will see in the next example, this position may arise after a normal sequence of play. Black draws by means of a simple procedure: the rook alternates checks and attacks on the h-pawn (1…Rg1+ 2.Kf6 Rh1). This resource does not work with the h-pawn on the 4th or 5th rank, because White can play 3.f5 (or 3.h5), ignoring the threat to his h-pawn. If the h-pawn has not reached the 4th rank, the defence works again.
ENDING 73 |
The defensive procedure |
When the pawns are less advanced and, above all, when the defending king has not been pushed to the back rank, drawing chances increase.
The next position is taken from the game Gligoric-Smyslov, analysed in several books. It constitutes a perfect outline of the defensive ideas. If you study this example carefully, you should be able to handle this ending in an actual game. As the game progresses, I will point out the most important details.
First point: The black rook is well placed on the 5th rank, where it disturbs the enemy king’s advance. If both pawns reach the 5th rank, the rook is best placed in the corner (a1 or b1).
1.Rg6+ (1.f5 Rb1!) 1…Kf7!
Second point: If other circumstances are equal, the defending king is better placed on the f-file rather than on the h-file. However, 1…Kh7?! is not losing either.
2.Rg5
Driving the black rook off the 5th rank. Instead, pushing the pawns just leaves the white king without a shelter: 2.f5 Rb1! Third point: As soon as the two pawns reach the 5th rank, the defending rook gets ready to deliver rear checks. 3.Kg5 Rg1+ 4.Kh6 Rf1 5.Rg7+ Kf6 6.Rg8 Kf7=. White cannot make further progress.
2…Rb1!
Fourth point: The defending rook stays in the left corner, ready to deliver rear and side checks.
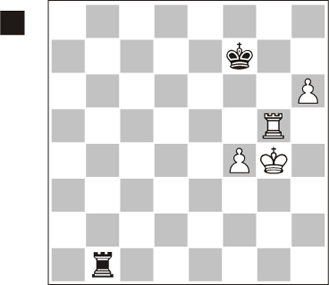
We have reached a critical situation:
Position 11.7
(analysis diagram)
3.Rc5
The white rook again has plenty of space. White now threatens 4.Kg5 and then to push the black king to the back rank. In the next few moves, the struggle to avoid being pushed to the 8th rank will be decisive.
In the previous ending we learnt that the position is lost if the king is pushed to the back rank and the pawns are already on the 5th rank. Pushing the h-pawn is another interesting attempt. The analysis here is quite complex, so in the next diagram we will study this possibility alone.
3…Kf6
The logical answer to oppose White’s intentions.
4.Rc6+
Now the rook will not cover 5th-rank side checks.
4…Kg7!
The idea is to avoid king opposition, since in that case the black king would be pushed to the back rank. For example: 4…Kf7? 5.Kg5! (threatening 6.Rc7) 5…Rg1+ 6.Kf5 and the black king has to retreat to the 8th rank, as 6…Kg7? fails to 7.Rg6++–.
5.Kg5 Rg1+! (forced) 6.Kf5 Ra1 7.Rc7+ (7.Rg6+ Kf7=) 7…Kh6 (always avoid the back rank) 8.Re7 (8.Kf6 Kxh5=) 8…Rb1
The black rook waits in the lower left corner. At the moment the pawn cannot be captured, but White cannot manoeuvre freely either.
9.Re8 (9.Kf6 Kxh5=) 9…Kg7
9…Ra1, just waiting, was still possible.
10.Re5 Ra1 11.Rd5 Rf1
The only unthematic move played by Smyslov in this ending. This is not exactly a mistake, but keeping the rook in the corner would be the standard procedure: 11…Rb1!.
12.Rd4 Ra1
Back to the right defensive spot.
13.Rd6 Ra5+ 14.Kg4 Ra1
It is worth pointing out that Black could return to the starting position with 14…Rb5.
15.Re6 Rg1+ 16.Kf5 Ra1 17.h6+
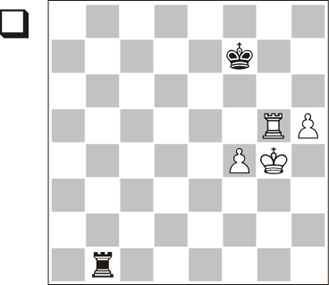
Position 11.8
(analysis diagram)
At last White decides to commit himself. The Rook + Pawn vs. Rook ending we will reach in a few moves is a theoretical draw.
17…Kh7!
Another important point: when a pawn reaches the 6th rank, the defending king must get in front of it. 17…Kf7?! is also possible, since Black would not lose here with the king on the back rank (as in the previous ending): 18.Rb6 (intending a side check) 18…Ra5+ 19.Kg4 Ra1 20.Kg5 Rg1+ 21.Kf5 and the black king is pushed to the back rank, but after 21…Ra1 (intending side checks) 22.Rb7+ Kg8 23.Kg6 Rg1+ 24.Kf6 Rh1! it is a draw.
18.Rd6 Ra2 (waiting move) 19.Kg5 Rg2+ (hindering the king’s advance) 20.Kf6
This leads to a theoretically drawn ending. 20.Kh5 Rh2+=; 20.Kf5 Ra2=.
20…Kxh6! 21.Ke7+ Kh7
21…Kg7 is also enough to draw, as long as Black is aware of a tactical detail: 22.f5 Re2+ 23.Re6 Rf2! (not 23…Ra2?? 24.f6+ Kh7 25.f7+–) 24.f6+ Kg6 25.Re1 Ra2!= long-side defence.
22.f5 Re2+ 23.Re6 Ra2 (long-side defence) 24.f6
We have seen a similar position with the king’s pawn (Ending 58). White threatens 25.Kf8, winning. Black must occupy the back rank.
24…Ra8! 25.Kf7 Kh6!
If we compare this position with Ending 58, this is the right move here. The difference is that here 25…Rb8 would also draw, because the black rook has more space and can still enjoy distant effectiveness.
26.Re1 Ra7+ 27.Re7 Ra8 28.Rd7 Kh7 29.Rd1 Ra7+ 30.Ke6 Ra6+ 31.Rd6 Ra8 32.Rd4 Kg8 33.Rg4+ Kf8
Draw, at last. An impressive exhibition of endgame skill by Smyslov, which will allow us to draw some conclusions after studying the following positions.
An important variation. Pushing the rook’s pawn
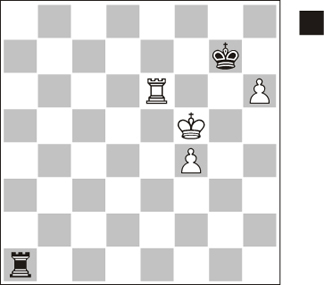
Position 11.9
This position would arise after 3.h6, an alternative in the previous ending. Pushing the h-pawn is quite logical, as the defending king is cut off on the f-file.
3…Ra1!
Now if the white king crosses f5, the rook can still check him. Black must be patient and wait until the pawn reaches the 7th rank. Let us see why: 3…Rg1+? 4.Kf5 Rh1 5.Rg7+! (the point!) 5…Kf8 6.Kg6 (as we know, almost all positions where the king is trapped on the back rank are lost) 6…Rg1+ 7.Kh7! Rf1 8.Ra7! (8.Rg4 Kf7) 8…Rxf4 (the rook captures the pawn, but from this unfortunate position it cannot prevent the h-pawn from promoting) 9.Kg6 Rg4+ 10.Kf6! Rf4+ (10…Kg8 11.Rg7+!+–) 11.Kg5 Rf1 12.Ra8+ Kf7 13.h7+–.
4.Rg7+
The most interesting attempt. 4.Kf5 Ra5+= makes no progress and 4.h7 Rg1+! – this time the h-pawn is lost and White cannot reach a winning Rook + Pawn vs. Rook ending: 5.Kf5 Rh1=. 4.Rh5 is the other challenging possibility, but there is only one possible answer: the black king has to block the threatening h-pawn. 4…Kg8 5.f5 Kh7 (the king’s mobility is restricted here but the threat to the h-pawn hinders White’s activity) 6.Rh3 Rg1+ 7.Kh5 Rf1 8.Kg5 Rg1+ 9.Kf6 Ra1! 10.Re3 Ra2 11.Re6 Kxh6! reaching a position already analysed in a previous ending.
4…Kf6 5.Rc7
Threatening Rc6 and Kg5, pushing the black king to the back rank.
5…Kg6
Or 5…Rg1+!? 6.Kf3 Rh1=; or even 5…Rh1?! 6.Rc6+ Kf7 7.Kg5 and the black king is forced to the back rank but the ending is still drawn, as we saw in the analysis to move 17 in the previous example.
6.h7 Rh1!
6…Rg1+? 7.Kf3 Rh1 was also considered a draw, but the Nalimov Tablebases showed that White can win with very accurate play. You do not need to know this variation, but it is instructive: 8.Ke4 Rh5 9.Ra7 Rh1 10.Rd7 (10.Kd5 Rd1+ 11.Ke6 Re1+ 12.Kd6 Rd1+ 13.Ke7 Kxh7=) 10…Rh5 11.Rc7 Rh1 12.Kd5 Rd1+ 13.Kc6 Rc1+ 14.Kd7 Rd1+ 15.Ke8 Ra1 16.Rd7 Re1+ 17.Re7 Ra1 18.Kf8 Rh1 19.Kg8+–.
7.Kf3
Apparently, the only way to make progress. Black is not threatening the h7 pawn, but still the white rook is tied to its defence. 7.f5+ Kf6= or 7.Rc5 Rg1+, drawing easily.
However, the waiting move 7.Rb7 would force Black to worsen the position of his rook: 7…Rh2. Now after 8.Rb5 the pawn cannot be captured, but Black still has 8…Kg7! and White cannot make further progress; any attempt would result in the capture of the h7 pawn. 9.Rg5+ (9.Kg3 Rxh7=; 9.f5 Rxh7=) 9…Kh8! 10.Rb5 Rh1=.
7…Kf5!
The black king has the white pawn within range and the position is an obvious draw. White can only break the status quo by giving up a pawn and the resulting ending is always a draw.
8.Rf7+ Kg6 9.Rb7 Kf5 10.Kg3 Kf6 11.Kg4 Kg6 No progress.
As we have seen, the variations are complex and the examples analysed are not, of course, definitive. We have simply gathered some resources to defend these positions in actual games. Let us summarise them briefly:
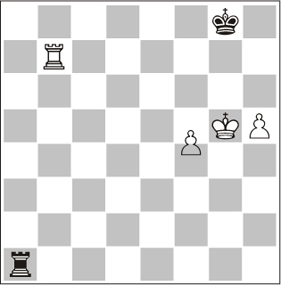
Third scenario
This comes as a real surprise the first time one hears of it. OK, two doubled pawns may be not enough to win, and two isolated pawns, two close pawns can be successfully stopped but… two connected pawns! They should win! It looks ridiculous. However, it is quite common that the defending king gets in between the pawns, blocking them. Kling and Horwitz had already studied this position with rook and knight’s pawns in 1851. Actually, once the defending side sets up the blockade, there is not much to be done. Here the connected pawns are far less dangerous than the drawish rook’s and bishop’s pawns.
Position 11.10
1.Rd4 Rb6 2.Rd8!
First White has to get the black king out of his strong position: the rook will assume this task.
2…Rb4+ 3.Ke5
If the white king moves back, Black can deliver more checks or play the same as in the game.
3…Rb7!
Some more checks were also possible, but the easiest way is to attack the g-pawn. At the same time, the rook controls two important squares, g7 and h7.
3…Kxg5?? loses on the spot to 4.h7+–.
3…Rg4? also loses, though this is more difficult: 4.Rg8+ Kh7 5.Kf5!+–.
With 3…Rb5+?! Black just complicates his life: 4.Rd5 Rb7 5.Ke6 and, despite the white king’s progress, Black can still draw: 5…Rb6+ 6.Ke7 Rb7+ 7.Rd7 Rb5 (threatening Rg5) 8.h7 Rb8!=.
4.Rg8+ (4.Kf4 would be a repetition) 4…Kh7 5.Re8 Kg6
Here we are again. Black had a little trick to force the draw: 5…Rb5+ 6.Kf6 Rxg5!.
6.Kf4 Rb4+ 7.Ke5 Rb7=
Nevertheless, if we move the whole position towards the centre of the board, White can break the blockade.
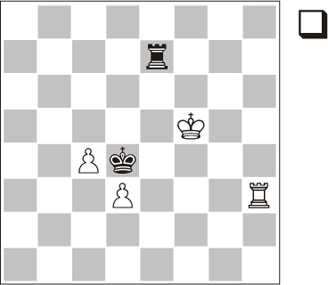
Central connected pawns
Here White can force a winning pawn endgame.
1.Re4 Rb6 2.Re6+!
Quite simple. You just have to take into account the position of your king (for instance, if the king were on g4 the ending would be drawn).
2…Rxe6 3.fxe6 Kxe6 4.Kg5+–
This example may lead you to think that this blockade only works near the edge of the board, but it is not so.
Another example of central pawns
We close this chapter with one example where the blockade succeeds against central pawns, but just because the white king is cut off.
Position 11.12
1.Kf6 Re1 2.Rg3 Re2 and clearly White cannot make further progress.
This was a very simple example that could give us a quite widely-applicable idea.
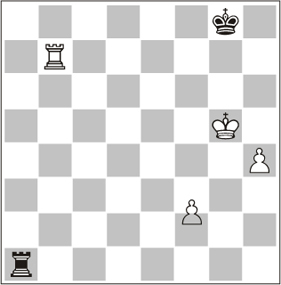
Fourth scenario
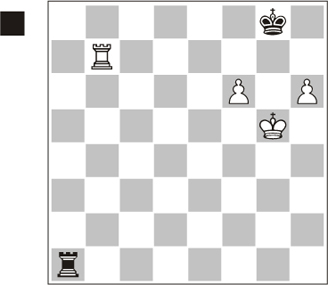
This is perhaps the best-known drawing scenario. Although most of us have seen it in our games, it still comes as a surprise. If a passed pawn reaches the 7th rank and the attacking rook is in front of it, the rook becomes completely passive and then the stronger side finds great difficulties in turning such a large material advantage (two pawns) into victory.
Position 11.12
The best-known case involves a rook’s pawn on the 7th rank, but it is not the only possibility.
The analysis is quite easy: the black pieces just occupy their ideal positions (rook on a-file and king on g7 or h7) and wait. The rook must be ready to deliver checks if the white king arrives to defend the a-pawn.
A second pawn, as here the g-pawn, does not change the result, as it cannot be used to take the black king out of the safe zone.
1.Kf3 Ra2 2.Ke4 Ra1 3.Kd5 Ra2 4.Kc6 Ra1 5.Kb6 Rb1+ 6.Kc6 Ra1 7.g4 Ra2 8.g5 Ra1 9.g6 Ra2
Of course, Black does not want to capture the pawn at all.
10.Kb7 Rb2+=
We can easily observe that, if the second white pawn was on the h-file, White could not win either. In both cases, the pawn stuck on the 7th rank could be on any other file.
Finally, the ending would be won if the second white pawn were on any other file, for instance the f-file. White would win by just pushing the pawn.
Fifth scenario
This is probably the least-known scenario, though the most common in practice.
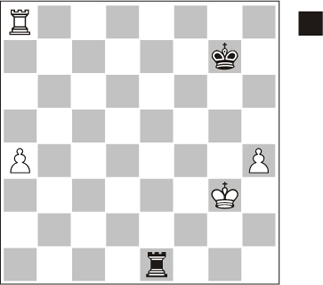
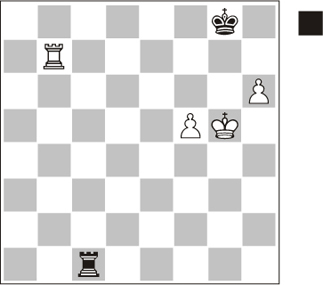
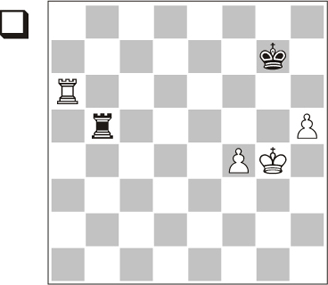
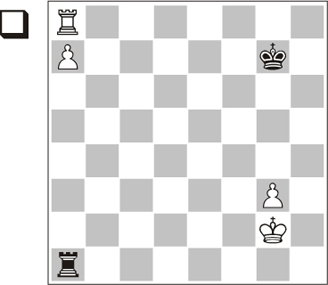
Position 11.14
There are some drawing positions involving a- and h-pawns, the most important one being an extension of the Vancura Defence.
1…Re4!
The only move to draw. This move is very important: Black adopts a Vancura defensive set-up and prevents the white rook from coming out of its passive position in front of the pawn.
From now onwards, defence is quite easy, as White cannot really make further progress. On the other hand, if Black adopts a wrong defensive set-up, White wins rather comfortably. If you quickly check your database, you will see that the latter is the most frequent scenario in practice.
1…Ra1? 2.Kf4 Kh7 3.Ke5 Kg7 4.a5 Kh7 5.a6 and, as we know from Ending 66, White wins even without the h-pawn.
2.a5
Or 2.h5 Kh7 3.Kf3 Rh4 4.Ke3 Rxh5 (Black captures the pawn and has time to set up the correct defence) 5.Kd4 Rg5 6.Kc4 Rg4+! (only move!) 7.Kb5 Rg5+ 8.Kb4 Rg4+ 9.Kc5 Rf4 – Vancura.
2…Re5!
Keeping the Vancura Position.
3.Kf3 Rh5 4.Kg3 Rc5 5.a6 Rc6! 6.Kf4
As soon as White pushes the a-pawn one step further, the black rook will be transferred to the rear of the pawn and we will reach Ending 75.
6…Kh7 7.Ke5 Rb6 8.Kd5 Rg6 9.Kc5 Rf6 10.Kb5 Rf5+! 11.Kb6 Rf6+!
When the white king moves far from the a-pawn, the series of checks may end. There is no way to make progress.