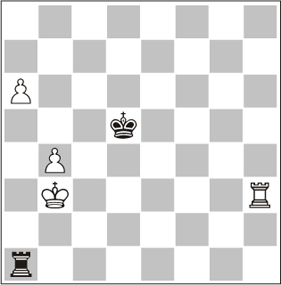
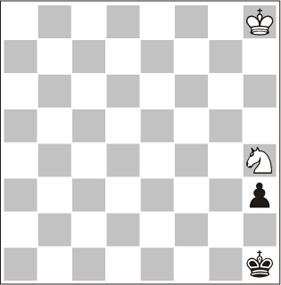
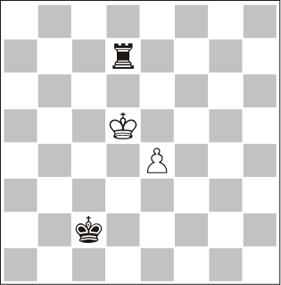
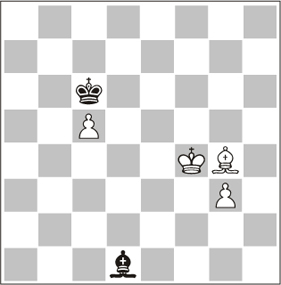
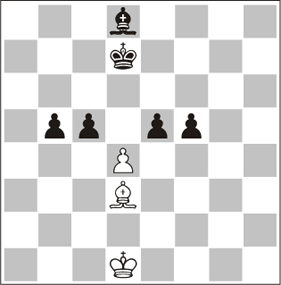
Exercise
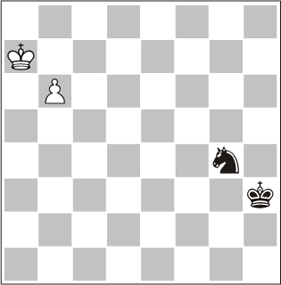
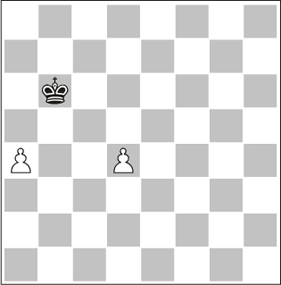
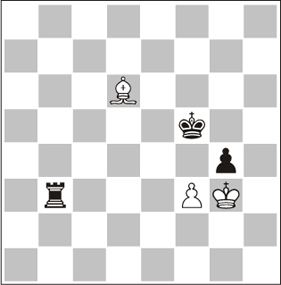
14.01 White to move.
What is the correct result?
Solution
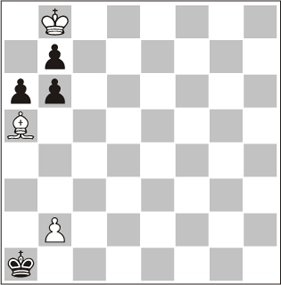
14.01 White wins. 1.b7 Ne5 2.Kb8!!. That is the point. See Ending 11.
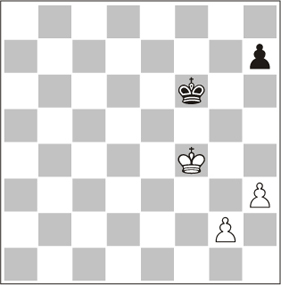
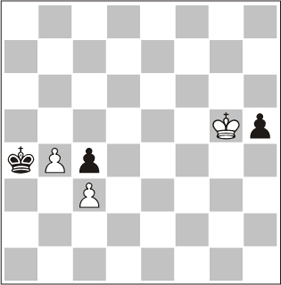
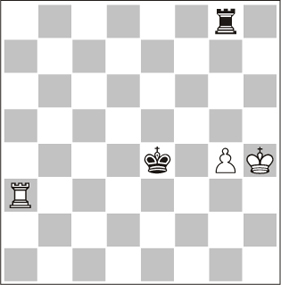
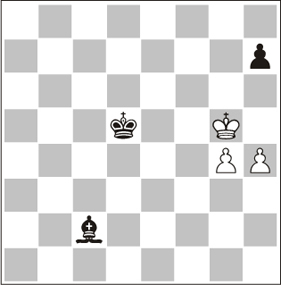
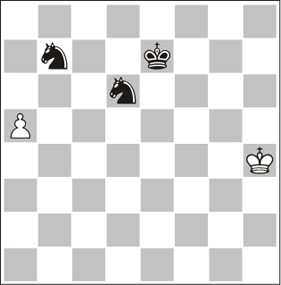
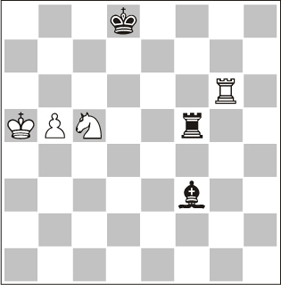
Exercise
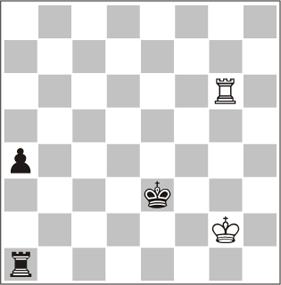
14.02 White to move.
What is the correct result?
Solution
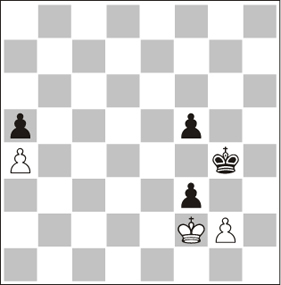
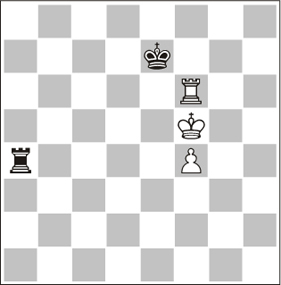
14.02 Kamsky-Karpov, Linares 1994. 62.Rg4! a3 63.Rg3+ Ke4 64.Rb3 Ra2+ 65.Kg3 Kd4 66.Rf3 Ra1 67.Kg2 ½-½.
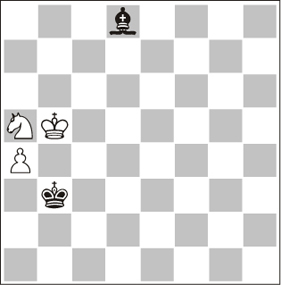
Exercise
14.03 Find a square where a black knight can draw here, with White to move.
Solution
14.03 Only two squares are valid: e8 and h5. With a knight on e8, the game could continue: 1.Kg8 (1.Kg6 Nd6=) Nf6+ 2.Kg7 Ne8+.
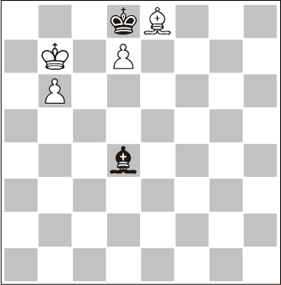
Exercise
14.04 Black to move.
Can he draw?
Solution
14.04 Fischer-Sherwin, Portoroz 1958. 78…Ke6? (78…Ra8! 79.Kh4 (79.g5 Rf8=) 79…Rh8+! (79…Rf8? 80.Rxf8 Kxf8 81.Kh5!+–) 80.Kg5 Rg8+ 81.Kh4 Rh8+ 82.Kg3 Rf8!= 83.Rxf8 Kxf8 84.Kf4 Kg8!) 79.Kh4 Ra8 80.g5 Rh8+ 81.Kg4 Ke7 82.g6 Rf8 83.Rf5 Rh8 84.Kg5 Rh1 85.Rf2 Rh3 86.g7 Rg3+ 87.Kh6 Rh3+ 88.Kg6 Rg3+ 89.Kh7 Rh3+ 90.Kg8 1-0.
Exercise
14.05 Black to move.
Can he draw?
Solution
14.05 Medina-De la Villa, Calella 1981. 43…Kc6! (43…Rxa6 44.Rh5+! Kd4 (44…Kc6 45.b5++–) 45.b5 Ra8 46.Kb4 Rb8 47.Rh6 Kd5 48.b6+–) 44.Rh5 Kb6 45.b5 Rb1+ 46.Kc2 Ra1 47.Rd5 Ra3 48.Kb2 Rg3 49.Kc2 Rh3 50.Rd8 Rh7! 51.Rd5 Rh3 52.Kd2 Ra3 53.Ke2 Rb3 54.Kf2 Ra3 55.Rf5 Rb3 56.Re5 Ra3 57.Re3 Ra2+ 58.Re2 Ra3 59.Rb2 Rh3 60.Re2 ½-½.
Exercise
14.06 White to move.
What is the correct result?
Solution
14.06 Stefansson-Lutz, Manila (ol) 1992. 59.g4? (59.h4 Kg6 60.Kg4 Kf6 61.Kh5 Kg7 62.Kg5 Kg8 63.Kh6 Kh8 64.h5 Kg8. Now, if we apply Bird’s Rule, the pawn must move to a different-coloured square: 65.g3!+–) 59…Kg6 60.h4 Kf6 61.g5+ Kg6 62.Kg4 h6 63.h5+ Kg7 64.g6 Kg8 ½-½.
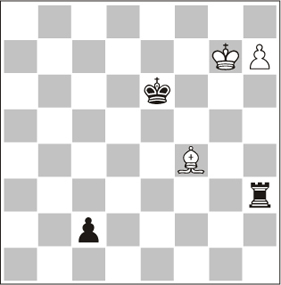
Exercise
14.07 Black to move.
Can he draw?
Solution
14.07 Dutreeuw-Hovhanisian, Aalst 2005. 76…Kc3? (76…Ka3 77.Nb7 Bb6=; 76…Ka2 77.Nb7 Bc7 78.Nc5 Ka3!=) 77.Nb7 Bc7 78.Nc5 Bb8 (78…Kb2 79.Ne6!+–) 79.a5 Ba7 80.a6 Kd4 81.Nd7 Kd5 82.Nb6+ Kd6 (82…Ke6 83.Kc6+–) 83.Nc8+ 1-0.
Exercise
14.08 White to move.
Is the ending won or drawn?
Solution
14.08 Moreno-Viñal, Pamplona Open 2005. It is drawn. 73.Ka6 Be3?? (73…Be5=) 74.b7 Bf4 75.Ka7 1-0.
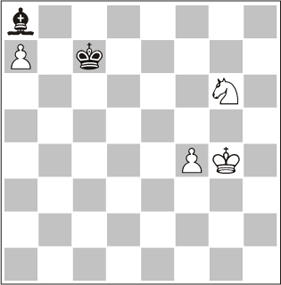
Exercise
14.09 White to move.
Can he draw?
Solution
14.09 Levitt 1997. Yes! 1.Ng6! (1.Nf3? Kg2 2.Ne1+ Kg3–+; 1.Nf5 Kg1!–+; 1.Kh7 Kg1! 2.Nf3+ Kg2 3.Nh4+ Kf2–+) 1…Kg1!? (1…h2 2.Nh4! Kg1 3.Nf3+=; 1…Kg2 2.Nf4+) 2.Ne5! Kg2 (2…h2 3.Nf3+) 3.Ng4!.
Exercise
14.10 White to move.
Can he win?
Solution
14.10 Kok 1935. Yes, 53.Kh4! Kb3 54.b5 Kxc3 55.b6 Kd2 56.b7 c3 57.b8Q c2 58.Qb4+ Ke2 59.Qe4+ Kd2 60.Qd4+ Kc1 61.Kg3 Kb1 62.Qb4+ Ka1 63.Qc3+ Kb1 64.Qb3+ Kc1 65.Kf2 h4 66.Ke2 h3 67.Kd3 1-0.
Exercise
14.11 White to move.
Can he win?
Solution
14.11 Yes, 1.Rh4, cutting the king off along a rank, but not 1.Rd7, as two files are not enough to win with a 3rd-rank knight’s pawn. If you have doubts, check Chapter 10: Cutting the King off along Files and Cutting the King off along Ranks.
Exercise
14.12 Black to move.
Can he draw?
Solution
14.12 Najdorf-Vinuesa, Mar del Plata 1941. Yes, 1…Kh3! (1…Kg3 2.b5+–; 1…f4 2.Ke2–+) 2.b5 (2.Ke3 Kg3!; 2.Ke2 Kg2!) 2…f4 3.Ke4 Kg3! 4.b6 f3 5.b7 f2 6.b8Q+ Kg2= ½-½.
Exercise
14.13 Is there any square on the board for the white king such that Black (to move) can draw?
Solution
14.13 Only the a1-square. 1…Ka5 2.Kb2! (2.d5 Kb6 3.Kb2 Kc5=) 2…Kxa4 3.Kc3 Kb5 4.Kd3 Kc6 5.Ke4 Kd6=.
Exercise
14.14 Black to move.
Larsen could not find a way to draw. Can you?
Solution
14.14 Taimanov-Larsen, Mallorca 1970. 63…Ke5?? (63…Rh8+ 64.Kg3 Ke5! 65.Ra6 Rh7!=; 63…Kf4! 64.Ra4+ Kf3!= – not 64…Ke5 65.Ra6+–) 64.Ra6! Kf4 (64…Rh8+ 65.Kg5 Rg8+ 66.Kh5 Rh8+ 67.Rh6 Rg8 68.g5 Kf5 69.Rf6+ Ke5 70.Rf2+–) 65.Rf6+ Ke5 66.g5 1-0.
Exercise
14.15 White to move.
Can he win?
Solution
14.15 Lerner-Dorfman, Tashkent 1980. Yes! 71.Rf2! (71.Kb7?. The king cannot reach its target: 71…Kf6! 72.Kc6 Ke5! 73.Kc5 g4 74.Kc4 g3 75.Rg2 Kf4 76.Kd3 Kf3=; 71.Ra2? (intending to cut the king off) 71…Kg6! (the only defence, avoiding the cut-off and standing in the white king’s way: 71…Kf6? 72.Ra5!+–; 71…Kh6? 72.Kb7 and the king arrives on time, just count) 72.Kb7 Kf5 73.Kc6 g4 74.Kd5 Kf4 75.Kd4 g3! (75…Kf3? 76.Ra3+ (winning time) 76…Kf2 77.Ke4 g3 78.Rf3+!) 76.Kd3 Kf3=) 71…Kh6 72.Kb7 g4 73.Kc6 Kg5 74.Kd5 g3 75.Rf8 Kg4 76.Ke4 1-0.
Exercise
14.16 Is this ending drawn?
Solution
14.16 Yes, but White must avoid being pushed from the rear, the winning procedure against a rook’s pawn. 1.Kg4! (1.Kg6 Kf4 2.h6 Ra6+ 3.Kg7 Kg5 4.h7 Ra7+ 5.Kg8 Kg6 6.h8N+ Kf6–+) 1…Ke4 2.h6 Ra1 3.Kg5 Ke5 4.Kg6 Ke6 5.Kg7!=.
Exercise
14.17 Black to move.
According to ChessBase Magazine notes, this position is a dead draw, but with Black being an exchange and a pawn up that is difficult to believe, isn’t it?
Solution
14.17 Miladinovic-Beliavsky, Ohrid 2001. 99…gxf3? (99…Rxf3+! 100.Kg2 Rd3 101.Bc7 Kg5 with the idea Kh4 and Rd2: 102.Be5 Rd5 103.Bc7 (103.Bg3 Rd2+; 103.Bh2 Rd2+ 104.Kg3 Ra2 105.Bg1 Ra3+ 106.Kg2 Kf4) 103…Rd2+ 104.Kg3 Rd3+ 105.Kg2 Kh4!–+ and the black king is driven from his blockade position) 100.Bc5 Ke4 101.Kf2. Now the ending is a real dead draw. See Ending 97. Black kept on trying for 30 moves; ½-½.
Exercise
14.18 Black to move.
Can he draw?
Solution
14.18 Yes! 1…Kc5!! is the only move that secures the draw. Preventing the cut along the 3rd rank (which would occur after the pawn’s advance) is not enough. The white king must be hindered as well, as analysis proves: (1…a5?? loses on the spot due to 2.Rh5!; 1…Kb5? (allowing the white king to arrive) 2.Kf7 a5 3.Ke6 a4 4.Kd5!. Done! The white king shoulders his black counterpart before the pawn reaches the 6th rank. Therefore, White wins: 4…Kb4 (4…a3 5.Rb8++– Ka4 6.Kc4) 5.Kd4!. Again. 5…Kb3 (5…a3 6.Rb8++–) 6.Kd3. And again. 6…Kb2 (6…a3, reaching the important Position 10 on White’s turn! 7.Rb8+–+) 7.Rb8+ Ka2 8.Kc2+–) 2.Kf7 a5! 3.Ke6 a4! (the pawn advances as the king holds) 4.Ke5 a3 5.Ke4 (5.Ra8 is another attempt. 5…Kb4 6.Kd4 Kb3! 7.Kd3 (see Ending 28) 7…Kb2! (7…a2 8.Rb8+ Ka3 9.Kc2! a1N+ 10.Kc3+–) 8.Kd2 a2 9.Rb8+ Ka1!=) 5…Kc4 (5…a2?? 6.Ra8) 6.Rc8+ Kb3 7.Kd3 (see Ending 28) 7…Kb2! (7…a2 8.Rb8+ Ka3 9.Kc2 +–) 8.Rb8+ Kc1! 9.Kc3 a2 10.Ra8 Kb1 11.Rb8+ Kc1!= (11…Ka1?? 12.Re8+–).
Exercise
14.19 White to move.
What is the result?
Solution
14.19 1.Kf5! and Black is unable to use any of the defensive procedures: neither Philidor, nor K&H. Therefore, we will reach the Lucena Position: 1…Rd1 (1…Ra5 2.Kf6+–) 2.Ke6 Kf8 3.Rf7+! Kg8 (3…Ke8 4.Ra7!. White takes the file the black rook would need for efficient distant checks. 4…Kf8 5.Ra8++–) 4.Rd7 Ra1 5.Ke7 Kg7 (5…Ra8 6.Rd8+!, not 6.Ra7? Re1!) 6.Ke8+! (6.e6 Ra8=) 6…Kg6 7.Rd6+! (7.e6 Kf6=) 7…Kg7 8.e6 Ra8+ 9.Rd8 Ra6 10.e7 Ra7 11.Rc8+–.
Exercise
14.20 White to move.
Can he draw?
Solution
14.20 Yes, but only with accurate play: 1.Kf2! Kd2 (1…c5 2.Ke3 Kc2 3.Ke2! Kc3 4.Kd1 Kxc4 5.Kc2=) 2.c5 Kd3 3.Ke1 Kc4 4.Kd2 Kxc5 5.Kc3=.
Exercise
14.21 What is the result after 1.Kc6, 1.Kc4 or 1.Ke6 ?
Solution
14.21 Volke-Kovalev, Minsk 1994. The game went 1.Ke6?, which is interesting for us, as this analysis involves a complete revision of the recurrent ideas in Rook vs. Pawn endings. (1.Kc4 and 1.Kc6 draw. 1.Ke6 loses. 1.Kc4! Re7 (1…Kd2 2.e5 Ke3 3.Kc5! Ke4 4.e6 Ra7 5.Kd6=) 2.Kd5 Kd3 3.e5=; 1.Kc6 Re7 2.Kd5 Kd3 3.e5=) 1…Rd4!. The rook moves to the rear of the pawn and chooses a square where later the black king will not obstruct it (1…Rd1? 2.e5 Kc3 (2…Kd3 3.Kd5!. Shouldering! 3…Ke3+ 4.Kc6! Kf4 and once the kings occupy both sides of the pawn, counting favours White: 3 tempi for him, 4 for Black. 5.e6 Re1 6.Kd7 Kf5 7.e7=) 3.Kf7 Rf1+ 4.Ke7 (4.Kg7? Re1 5.Kf6 Kd4–+) 4…Kd4 5.Kd6!. Shouldering again. As we know, shouldering from the rear leads to underpromotion to a knight and a draw. 5…Ra1 6.e6 Ra6+ 7.Kd7 Kd5 8.e7 Ra7+ 9.Kd8 Kd6 10.e8N+=) 2.e5 Kd3 3.Kf7 Rf4+ 4.Ke7 Ke4 5.e6 (5.Kd6 Kf5) 5…Ke5 6.Kd7 Rd4+ 0-1.
Exercise
14.22 Black to move.
Can he win?
Solution
14.22 54…Ke4! 55.Kh6 Kf4 56.g5 Bg6! 57.h5 Kf5–+.
Exercise
14.23 Black to move.
Can he win?
Solution
14.23 Berkvens-Van Beek, Dieren 2000. Yes, 55…Rg3+!! 56.Kh6 (56.Bxg3 c1Q 57.h8Q Qg5+ 58.Kh7 Kf7–+; 56.Kh8 Kf7–+; 56.Kf8 Rf3!–+) 56…Kf7! 57.Bc1 (57.h8N+ Kf6 58.Kh7 Rg7+ 59.Kh6 Rg4–+) 57…Rh3+ 0-1.
Exercise
14.24 Black to move.
Can he draw?
Solution
14.24 Domínguez-Bruzon, Havana 2005. 89…Kb6? (yes, 89…Be4! 90.Ne7 Kb7= the black king captures the a7 pawn and the bishop is able to stop the f-pawn, because both control diagonals are more than 4 squares long) 90.f5. Now one of the diagonals is 4 squares long and Black is lost in any case, but anyway, the bishop cannot stop the pawn anymore. 90…Kxa7?! 91.Ne7! 1-0.
Exercise
14.25 White to move.
Can he win?
Solution
14.25 Negulescu-Szuhanek, Bucharest 1998. Yes, due to the unfortunate position of the black king. 77.g4!! (77.Bxf5+? would allow Black to reach known defensive set-ups. 77…Kh6 78.g4 (78.Bc2 Be3 79.Kf6 Bd2 80.Kf5 Kg7=) 78…Bf6!= 79.Bc2 Bd8 80.Ke6 Kg7=) 77…Kh8?! (77…Kh6 is more stubborn: 78.g5+ Kh5 79.Bxf5 Kh4 80.Be6! Kh5 81.g6 Kh6 82.f5+–) 78.g5 Be3 79.g6 Bd4 80.Bxf5 Be5 81.Bd3 Bd4 82.f5 Be5 83.f6+–.
Exercise
14.26 Find mistakes in the following moves: 90…Kh7 91.Qe4+ Kh8 92.Qc4 Kh7 93.Qf7+ Kh8 94.Qd7 Rg5 95.Qb7 Rg8 96.Qb3 Kh7 97.Kf7 Rg5 98.Qe6 Rg7+ 99.Kf8 Rg5 100.Qf6 Rg8+ 101.Kf7 Rg5 102.Qd4 Rf5+ 103.Ke6 Rg5 104.Kf6 Rg8 105.Qd7++–.
Solution
14.26 Kramnik-Polgar, Monaco 1994. 90…Kh7?? (90…Rg7!) 91.Qe4+?? (91.Kf7 Rg7+ 92.Kf8+–) 91…Kh8 92.Qc4 Kh7?? (92…Rg7=) 93.Qf7+?? (93.Kf7+–) 93…Kh8 94.Qd7 Rg5 95.Qb7 Rg8 96.Qb3 Kh7?? (96…Rg7=) 97.Kf7 Rg5 98.Qe6 Rg7+ 99.Kf8 Rg5 100.Qf6 Rg8+ 101.Kf7 Rg5 102.Qd4 Rf5+ 103.Ke6 Rg5 104.Kf6?? (104.Kf7 Rf5+ 105.Ke7 Rg5 106.Qe4+ Kh8 107.Qe6+–) 104…Rg8?? (104…Rg7=) 105.Qd7+?? (105.Ke7 or 105.Kf7+–) and 1-0. For explanations, see Ending 100.
Exercise

14.27 Everybody knows that, in this game, Janowsky resigned in a drawn position, but it is not so well-known that Capablanca had a forced win. What would you play in this position in which Capablanca made a mistake?
Solution
14.27 Capablanca-Janowsky, New York 1916. 81.Bc3+? (81.Be1!. In principle, it is difficult to find the difference between this and the game move, but here the bishop prevents the black king from winning time: 81…Kxg6 (81…Be7 82.Bf2 Kxg6 83.Bc5+–) 82.b4 Kf5 83.Kd5 Kf4 84.b5 Ke3 85.Kc6 Kd3 86.Kb7! Kc4 87.Ka6 Kb3 88.Ba5+–; 81.Bd2! also wins, as it blocks the black king’s route to the rear of the pawn. 81…Kxg6 82.b4+– Kf5 83.Kd5 Kg4 84.b5 Kf3 85.Kc6 Ke4 86.Be1 Kd3 87.Kb7! Kc4 88.Ka6) 81…Kxg6 82.b4 Kf5 83.Kd5. Here Janowsky resigned. 83…Kf4 84.Bd4 (84.b5 Ke3 85.Kc6 Kd3! winning a necessary tempo to reach the c4-square: 86.Be5 Kc4=) 84…Kf3! 85.b5 Ke2!=.
Exercise
14.28 Black is going to lose his rook. Can he (to move) draw after all?
Solution
14.28 Kamsky-Bacrot, Sofia 2006. Yes, though a difficult defence is exhausting: 63…Ke4!! (63…e4 64.Rf5++–; 63…Kd4 64.Rf5+–; 63…Rh1+ 64.Kg7 Rxh7+ 65.Kxh7. Kings on both sides of the pawn. If we just count, the result is 6-6, so Black loses, and that is what happens here. 65…e4 66.Kg6 Kd4 (66…Ke5 67.Rf8 e3 68.Kg5 Ke4 69.Kg4 e2 70.Re8+ Kd3 71.Kf3+–)) 64.Rf8 Rh1+! 65.Kg6 Rxh7! (the white king must be as far as possible: 65…Kd3? 66.Rd8+! Kc3 (66…Ke3 67.h8Q Rxh8 68.Rxh8 e4 69.Kf5+–) 67.h8Q Rxh8 68.Rxh8 e4 69.Re8 Kd3 70.Kf5 e3 71.Kf4 e2 72.Kf3+–) 66.Kxh7 Kd3! 67.Rd8+ Ke3! (67…Kc3 68.Re8 Kd4 69.Kg6+–) 68.Kg6 e4 69.Kf5 Kf3! 70.Rh8 e3 71.Rh3+ Kf2 72.Kf4 e2 73.Rh2+ Kf1 74.Kf3 e1N+=. The game should be drawn, but the rest appears in the appendix to Ending 9. 75.Kg3 Nd3 76.Rd2 Ne1 77.Rf2+ Kg1 78.Rf8 Ng2 79.Kf3 Kf1 80.Kg3+ Kg1 81.Kf3 Kf1 82.Rf7 Ne1+ 83.Ke3+ Kg1 84.Ke2 Ng2 85.Rh7 Nf4+ 86.Kf3 Nd3 87.Rh4 Ne5+ 88.Ke2 Kg2 89.Re4 Nf7 90.Re7 Nd6 91.Rg7+ Kh3 92.Kf3 Kh4 93.Kf4 Kh5 94.Re7 Nc4 95.Re6 Nd2 96.Rc6 Nb3 97.Ke3 Kg4 98.Rc4+ Kg3 99.Rc3 Na5 100.Ke4+ Kf2 101.Kd5 Nb7 102.Rb3 Nd8 103.Rb8 1-0.
Exercise
14.29 White to move.
Can he draw?
Solution
14.29 Arencibia-Vladimirov, Leon 1991. Yes, but only one move works: 69.Rc5? (69.Ra6? Kc3!Z 70.Rb6 (70.Ke1 Kb4–+ 71.Ke2 Kb5 72.Ra1 c5–+; 70.Ke3 Re6+–+) 70…Rd2+ 71.Ke1 c5 72.Rc6 Rd5–+; 69.Ke3! (transferring the king to a drawing square before using frontal checks for defence) 69…Kb4 70.Ra1 c5 71.Rb1+ Ka3 72.Rc1 Rd5 73.Ke4=) 69…Kb4–+ 70.Rc1 c5 (the pawn is on the 4th rank and the white king is cut off along one file, therefore he must be on e3 or e4 to draw) 71.Rb1+ Ka3 72.Rc1 Rd5 (72…Rd5 73.Ke3 Kb2–+) 0-1.
Exercise
14.30 Black to move.
Can he draw?
Solution
14.30 Urbanec-Hora, Prague 1964. Yes! The c5-pawn is lost and the black king will make it to the rear of the pawn, but the bishop must play accurately. 89…Bb3? (here the bishop will not be able to reach the c8-h3 diagonal. 89…Ba4! 90.Bf3+ Kxc5 91.g4 (91.Ke5 Bd7! 92.Be4 Bg4! 93.Kf4 Bd7 94.Bf5 Be8 95.g4 Kd4 96.g5 Bh5 97.Bb1 Be8 98.Kf5 Ke3! 99.Kf6 Kf4!=) 91…Kd4 92.g5 Bc2 93.Bg4 Bg6 94.Bf5 Be8 95.Bc2 Bf7 96.Kf5 Ke3 97.Kf6 Kf4=) 90.Bf3+ Kxc5 91.Ke5!+– Bf7 92.g4 Bg6 (92…Kc4 93.g5 Kd3 94.Kf6 Be8 95.Bd5+– and Bf7) 93.Bd5 Bc2 94.Bf7 Kc6 95.Be8+ Kc7 96.Kf6 Kd6 97.g5 Bd3 98.Bg6 Bc4 99.Bc2 Kd7 100.g6 Ke8 101.g7 Bg8 102.Bg6+ Kd7 103.Bf7 Bh7 104.Bb3 1-0.
Exercise
14.31 White to move.
What is the correct result?
Solution
14.31 The correct result is a draw. Black’s pieces are awkwardly placed and unable to stop the white pawn, but the queen cannot win against two knights either. 3.a6 Nc5 4.a7 Ne6 5.a8Q Black sets up a famous fortress (see appendix).
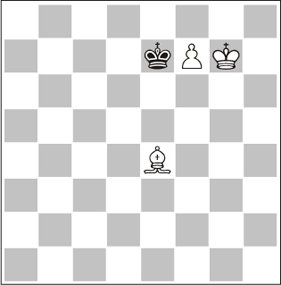
Exercise
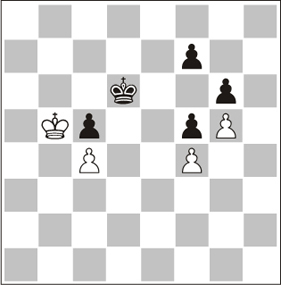
14.32 Black to move.
What is the correct result?
Solution
14.32 Andrés-De la Villa, Mondariz 2000. The correct result is a draw. 50…f6! (a good move, but not the only one, it seems. 50…Ke7 also draws) 51.gxf6 g5 52.f7! (the game continued 52.fxg5 f4 53.f7 Ke7 54.g6 f3–+) 52…Ke7 53.Kxc5 g4 54.Kd4 Kxf7 and the ending is drawn because the white king can defend his c4 pawn without leaving the square. See Ending 89.
Exercise
14.33 Black to move.
Can he win?
Solution
14.33 Yes, but he should not capture the white pawn. 1…f4! (neither 1…Kxg4 2.Re3, adopting the Philidor Defence, nor 1…fxg4 2.Re1!, adopting the First-rank Defence, win) 2.g5 (2.Rb8 Kg3! and the king hides behind the white pawn, winning easily) 2…Kg3 3.Kf1 f3 4.g6 Rh2 5.Ke1 f2+ 6.Ke2 Kg2 7.Rf8 Kg1 8.Ke3 Rg2!, avoiding the last trap and winning.
Exercise
14.34 White to move.
Can he win?
Solution
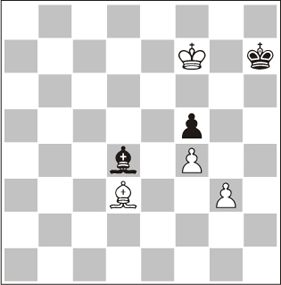
14.34 Yes! 1.b4! (not 1.Bc3 a5! 2.Kxb7 Ka2 3.Kxb6 a4 4.Kb5 Kb3 followed by …a4-a3 exchanging White’s last pawn) 1…bxa5 2.bxa5 b5! 3.axb6 a5 4.b7 a4 5.Kc7 a3 6.b8Q= (or 6.Kc6!, waiting to promote with check) 6…a2 7.Kb6! (gaining two tempi on the way towards the pawn) 7…Kb2 8.Kc5+ and the white king has entered the winning zone. Ending 17.
Exercise
14.35 White to move.
Choose: 1.gxf3+ or 1.g3 ?
Solution
14.35 Winants-Hansen, Wijk aan Zee, 1994. White could have drawn by choosing the right move. 1.gxf3+? (1.g3! f4 2.gxf4 Kxf4 with a draw, according to Bahr’s Rule. Ending 83) 1…Kh3! 2.f4 (2.Ke2 f4 3.Kf2 Kh2 4.Ke2 Kg3 and the f-pawn promotes) 2…Kg4 3.Ke3 Kg3 and now White’s f-pawn is lost and Bähr’s Rule states that Black wins.
Exercise
14.36 White to move.
Can he win?
Solution
14.36 Landenbergue-Salgado, Elgoibar, 2006. All rook endings are drawn… because we play them badly. 64.Rxa6? (White could win with a move by no means easy to find: 64.Re6! Rd4 65.Kxa6 Rxd5 66.Re1+–, cutting the king off along the f-file. This position will lead to Ending 67; 64.Rh6 should win as well) 64…Ke5! 65.d6 Ke6 66.Kb5 Rc1 67.a4 Kd7 68.Rb6 Rb1+? (68…Rd1! 69.Ka6 Rd5 70.a5 Kc8!= and in this funny position, despite White being two pawns up, he cannot make progress due to the passivity of his pieces) 69.Ka6 Ra1 70.a5 Ra2 71.Rb1 Kxd6 72.Kb6 Kd7 73.a6 Kc8 74.Ka7? Kc7 75.Rc1+ Kd7 76.Rc5 Kd6 77.Rh5 Kc7 78.Rh6 Ra1 79.Rh7+ Kc6 ½-½.
Exercise
14.37 Halberstadt, 1939.
White to move.
Can he win?
Solution
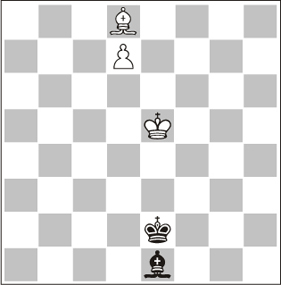
14.37 1.Ke4! (an amazing case of outflanking. 1.Ke6 Kd3 2.Kf7 Ke4 3.Ke8 Kd5 4.Ba5 Bh4 5.Bb4 Ke6=; 1.Kd4 Kf3=; 1.Kd6 Kd3 2.Kc7 Kc4 3.Kc8 Kd5 4.Bg5 Ba5 5.Bf4 Kc6=) 1…Bg3 (1…Bc3 2.Kf5 Be1 3.Kg5 Bd2+ 4.Kg6 Be1 5.Kf7 Kf3 6.Ke8 Ke4 7.Bc7 Bh4 8.Bd6+–) 2.Kd5! Kd3 3.Kc6 Be1 4.Kb5! (another amazing step back, preventing …Ba5. 4.Kb7? Kc4 5.Kc8 Kd5=) 4…Bg3 5.Kb6 (preventing …Bc7) 5…Bf2+ 6.Kb7 Be1 7.Kc8 Kc4 8.Be7 Ba5 9.Bd6 Kd5 10.Bc7+–.
Exercise
14.38 After a study by Riihimaa, 1942. This exercise is worth four. White will eat two black pawns on his next two moves, but he has four ways to do it. Which one of them leads to a draw?
Solution
14.38 Version of a study by Riihimaa, 1942. In the original study the king was on d2 when White has two options.
Option 1: 1.Bxb5+? Ke6 2.dxe5 Kxe5 (Black wins because the f-pawn will advance to f2 and then Black breaks the defensive zone by bringing his king to g1);
Option 2: 1.Bxb5+? Ke6 2.dxc5 e4! (to build up the right defensive position, with the bishop on g2 and the king on e2, White needs three moves and Black can always get in …f4-f3 first) 3.Bf1 (3.Be2 f4 4.Bg4+ (4.Bh5 f3) 4…Kd5 5.Ke2 Kxc5 6.Bh3 (trying to reach g2) 6…f3+! 7.Ke3 Kd5 8.Bg4 Bb6+–+) 3…f4! 4.Ke2 (trying to get the bishop to g2) 4…f3+! 5.Ke3 Ke5 6.Ba6 Be7 7.c6 Bc5+ 8.Kd2 Bb6–+. White cannot give up his bishop for the pawns;
Option 3: 1.Bxf5+! Kc6! (1…Kd6 2.dxe5+ Kxe5 3.Bd7 is a draw) 2.dxe5? (White is lost because he fails to reach the correct defensive position against these two pawns: bishop on the diagonal f1-d3 and king on b3) 2…c4!–+ 3.Kc2 (3.Bh3 Kc5–+) 3…Kc5 4.Be4 Bc7 5.e6 Bd6 6.Kb2 Be7 7.Bb1 Bf6+ 8.Kc2 b4 9.Ba2 Kb5–+;
Option 4: 1.Bxf5+! Kc6! 2.dxc5! (only like this. The presence of the black knight’s pawn allows the defence. See Ending 47) 2…Kxc5 3.Kd2 Kb4 (Pushing the e-pawn with 3…Kd4 4.Bg6 e4 5.Bf5 b4 6.Bg6 e3+ 7.Ke2 would bring about Position 9.12 – Ending 47) 4.Bg6 Ka3 5.Kc2 b4 6.Be4 b3+ 7.Kd2 Ba5+ 8.Kd1 Ka2 9.Bd5! Ka3 10.Be4! b2 11.Bb1=.
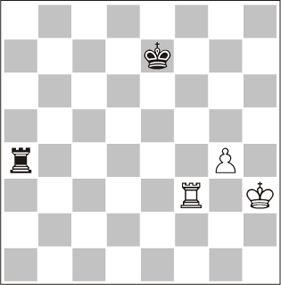
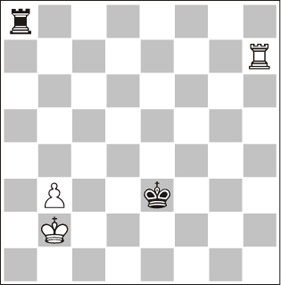
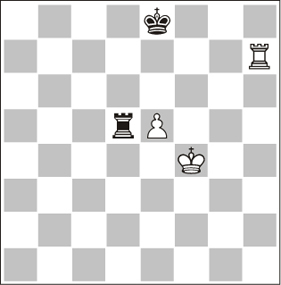
Exercise
14.39 Can White force a theoretically winning ending?
Solution
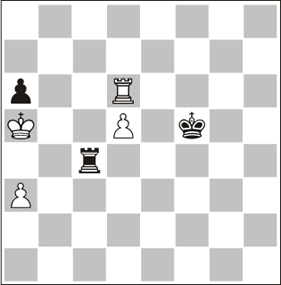
14.39 Yes, he can: 72.Ne6+! Kc8 73.Nd4 Rf8 74.Nxf3 Rxf3 75.Kb6! (preventing the first-rank defence – Ending 55) 75…Rb3 (75…Rf8 76.Ka7! Rf7+ 77.Ka8 Rf1 78.Rc6+ Kd7 79.Kb7 and the Lucena Position (Ending 53) is unavoidable) 76.Rg8+ Kd7 77.Rb8 1-0, Anand-Gelfand, Moscow 2012.
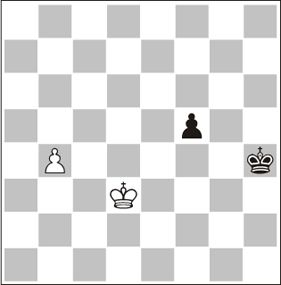
Exercise
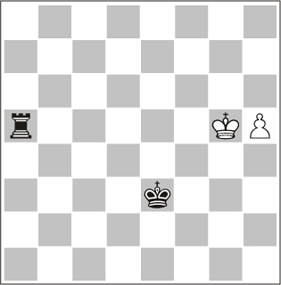
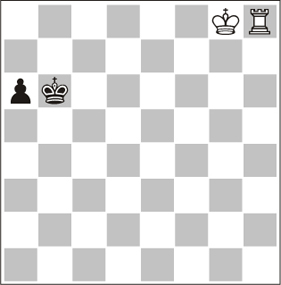
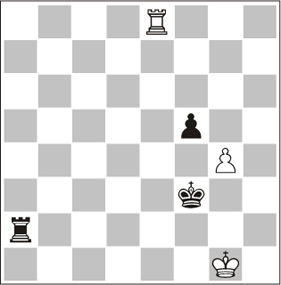
14.40 White to move.
Can he win?
Solution
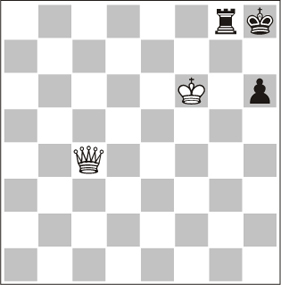
14.40 61.Rh7? (a terrible mistake, allowing the black king to approach the pawn. With 61.Kg3! Black is prevented from achieving the Vancura Position, so White wins trivially: 61…Kb7 62.Kg4 Rh1 63.Kf5+–, bringing the king to the g6-square and releasing the rook) 61…Kd6! 62.Kg3 Ke6 63.Kg4 Rh1 ½-½ (Gelfand-Anand, Moscow 2012).
The last two positions decided the 2012 World Championship!!
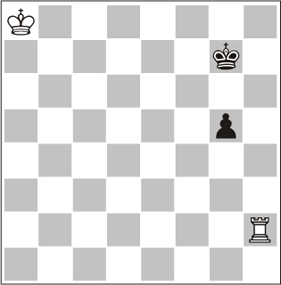
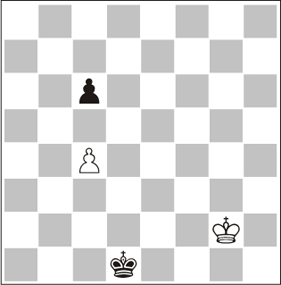
Exercise
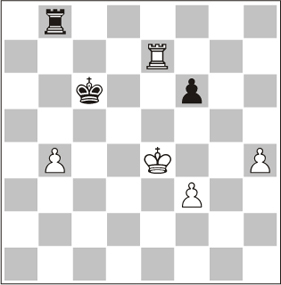
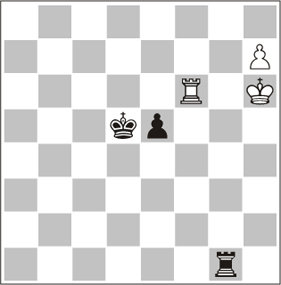
14.41 Black (to move) is down two pawns, but he can recover both of them. Is this enough to save him?
Solution
14.41 44…Rxb4+? (Black recovers both pawns just to reach a lost endgame. It was far better to bring the king closer: 44…Kd6! 45.Ra7 (45.Rh7 Ke6=; 45.Rf7 Ke6=) 45…Rxb4+ 46.Kf5 Rxh4 47.f4 Rh6! 48.Rf7 Rh4 49.Rxf6+ Ke7= – with the black rook on h4, White cannot make progress) 45.Kf5 Rxh4 46.Re4 Rh8 47.Rd4 Kc5 48.Rd3 Ra8 49.f4 Ra4 50.Rd7 Kc6 51.Rf7 Kd6 52.Rxf6+ Ke7
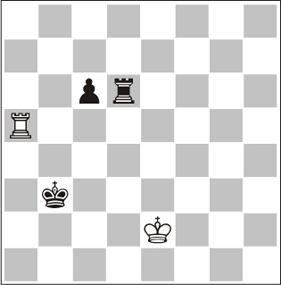
Analysis diagram
53.Kg6! (the poor positioning of the black pieces prevents them from achieving Philidor (Ending 52) or Kling & Horwitz (Ending 56) positions) 53…Ra1 54.Rf7+! Ke8 55.f5 Rg1+ 56.Kf6 Rf1 (the position is similar to ‘Kling & Horwitz’, but in the text of Ending 56 we read that against a bishop’s pawn, the king must be on the short side. Here, that is not possible) 57.Ra7 Rf2 58.Ra8+ Kd7 59.Rf8! Rh2 60.Kg7 Rg2+ 61.Kf7 Ra2 62.f6 Ra7 63.Re8 Ra6 64.Re1 and the Lucena position (Ending 53) will be achieved. Black resigned and Russia (Karjakin) beat Ukraine (Volokitin) in the 2012 Chess Olympiad.