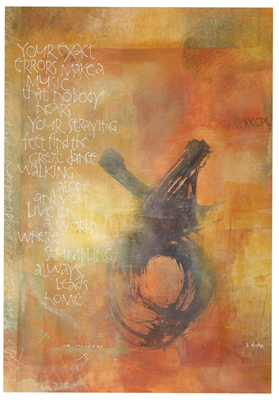
Week 22
Poem + Art
BY SUSAN TUTTLE | from Exhibition 36

Artwork and technique by
Laurie Doctor
The most difficult part of a creative project often is the question: Where do I begin? This week, start with words. Specifically, choose (or write) a poem to apply to your artwork. (This project was inspired by William Stafford's poem, “You and Art.”) Surround the poem with layers of paint and ink, and you'll be on your way to a meaningful finished product in no time.
Materials
 text or poem to use as inspiration
 text wove paper (Arches)
 permanent black felt-tipped pen
 optional: rubber stamps, waterproof ink
 acrylic paints in tubes
 sponge brushes (variety)
 pointed brushes (variety)
 sumi ink
 Japanese paper, unbleached
 white gel pen
 methyl cellulose (please read safety precautions on product label)
1. Find a poem that speaks to you
Begin with just one line. Determine the size of paper(s) you will work on. I chose Arches text wove paper (it will take all kinds of media), and I tore my papers to 14″ × 18″ (36cm × 46cm).
2. Write out the poem
Using a permanent black felt-tip pen, write out the line or poem in your own handwriting, or use a set of rubber stamps (waterproof ink is preferable). Don't fret over how it looks; it can get painted over in the process of working (which I actually did with my initial writing, adding the poem again later in the process). Writing out the poem helps infuse the meaning into your mind and into the piece.
3. Apply paint
Mix equal parts acrylic paint and water. Mix as few or as many colors as you like. Apply the colors to your paper with a wide sponge brush, using large strokes, just to get paint on the paper. Try doing this with your eyes closed to help get out of left-brain thinking and leave room for surprises!
4. Stop and come back later
Leave the sheets out where they can be seen, and let them catch you by surprise when you walk by at a later time. I did this, and when I came by my painting, I took out a big pointed brush, dipped it in sumi ink, and made an X that grew into a circle on my paper. I had been thinking about errors and how mistakes are indicated with an X, and then how circles represent wholeness.
5. Write out the poem again
Writing the poem becomes a kind of meditation. Write it again, overlapping the lines, with a pointed brush on a piece of Japanese paper. You could also use a white gel pen or a fine-point permanent pen. The overlapping lines create pattern and texture and are not meant to be legible.
6. Collage
Once the pigment on the Japanese paper is dry, mix up some methyl cellulose (a product available under various names, but essentially, a powder that you mix with cold water to create a paste) to be used as an adhesive. The type of collage technique I used in this piece is called Chine Collé. Using a brush, apply the paste to a section of the paper you have painted on; place the Japanese paper on top of the adhesive, and paste over the top of the Japanese paper with your sponge brush, removing any wrinkles. Japanese paper has an advantage over most other papers: If you do not like the way it looks on your substrate, you can dampen it and take it off.
7. Finish the piece
Incorporate the collage into the painting by painting on top of it with the color previously mixed. Continue making marks however you are moved to do so.
From the Artist…
A lot of what went into this piece (most of which was not mentioned in the project steps) was either covered up or not used. For example, I have sheets of blind contour drawings I made of snowflakes and feet (images from the poem) that were never integrated into the final product; this is an important part of the process, nonetheless. Art does not seem to have much to do with perfection; beginning with a phrase like “your exact errors” gave me permission to consider all my mistakes a part of this work.