Chapter 1: Buying Content at iTunes and Beyond
In This Chapter
 Exploring the iTunes Store
Previewing, buying, and renting media
Shopping beyond iTunes
Using iCloud to push purchases to all devices
iPad is set up with a preinstalled iTunes app that makes it easy to shop for music, movies, TV shows, audiobooks, and podcasts at Apple’s iTunes Store.
In this chapter, you discover how to use your iPad to find content on the iTunes website. That content can be downloaded directly to your iPad, or to another device and then synced to your iPad. In addition, I cover a few options for buying content from other online stores and how to download purchases automatically using iCloud.
 I cover opening an iTunes account and downloading iTunes software to your computer in Book I, Chapter 5. If you need to, go back and handle those two tasks before digging into this chapter.
Exploring the iTunes Store
Whether it’s your favorite shopping source or not, the iTunes Store is set up to be your most convenient source for content on your iPad at the moment. Sure, you can get content from other places, but the iTunes app comes preinstalled on your iPad — and Apple makes it easy to access it from various Apple devices or your PC.
So, time you get to know the iTunes Store: the easiest way to grab all those movies, TV shows, and music that you love for viewing and listening to on your iPad.
Visiting the iTunes Store
Using the iTunes Store from your iPad is easy with the built-in iTunes app. You just tap the iTunes icon on the Home screen. If you’re not already signed in, the dialog shown in Figure 1-1 appears, asking for your iTunes password. Enter your password and tap OK.
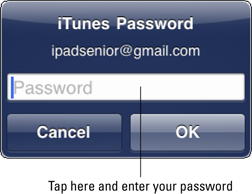
Figure 1-1: Log in to the iTunes Store.
Now you can roam around trying different options. You have music, podcasts, movies, TV shows, and audiobooks to choose from.
Start exploring musical selections by tapping the Music button in the row of buttons at the bottom of the screen, if it’s not already selected, to view selections as shown in Figure 1-2. Tap the See All link to display more music selections.
Tap the Music button in the top-left corner to go back to the Music selections, and then tap the Top Charts tab at the top of the screen to display top-selling songs and albums. Tap any of the items listed here to see more detail about them, as shown in Figure 1-3.
The navigation techniques in these steps work essentially the same in any of the content categories (the buttons at the bottom of the screen), which include Music, Movies, TV Shows, Podcasts, and Audiobooks. Just tap one to explore it.
If you want to use the Genius playlist feature, which recommends additional purchases based on the contents of your iTunes libraries, turn on this feature in iTunes with iPad synced to your computer, and then on your iPad, tap the Genius tab at the top of the screen. Song and album recommendations appear. Note that this service seems to work best on mainstream music genres such as pop and rock, not so well on narrower genres like swing music and show tunes.

Figure 1-2: Browse selections in the iTunes Store.

Figure 1-3: Detailed information may include the genre, release date, and song list.
Finding a selection
You can look for a selection in the iTunes Store in several ways. You can use the Search feature, search by genres or categories, or view artists’ pages. Here’s how these work:
Search: Tap in the Search field shown in Figure 1-4 and enter a search term using the onscreen keyboard. Tap the Search button on the keyboard or, if one of the suggestions given appeals to you, just go ahead and tap it. Search results will be divided into categories such as Music and Podcasts. Flick down to scroll through them and find what you need.
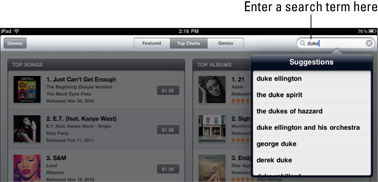
Figure 1-4: Search by composer, artist, or album title.
Genre: Tap the Genres button. (In some content types, such as Audiobooks, this is called the Categories button.) A list of genres/categories like the one shown in Figure 1-5 appears.
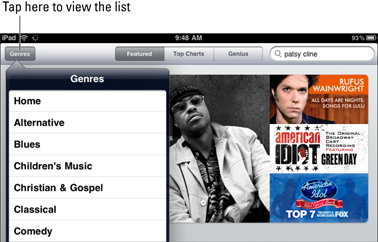
Figure 1-5: Find a genre of music to help you narrow down your search.
Link: In a description page that appears when you tap a selection, you can find more offerings by the people involved. For example, for a music selection, tap the Artist Page link to see all that artist’s selections. For a movie, tap the name of someone in the movie credits to see more of that person’s work, as shown for Kate Winslet in Figure 1-6.

Figure 1-6: If you have an artist you favor, search for her.
If you find a selection you like, tap the Tell a Friend link on its description page to share your discovery with a friend via e-mail. A message appears with a link to the selection. Enter an address in the To field and tap Send. Your friend is now in-the-know.
Want to see every option? When displaying items on the Featured tab for any type of content, tap the See All link to see all the featured selections rather than only the top New and Noteworthy selections.
Previewing music, a movie, or an audiobook
Because you’ve already set up an iTunes account (if you haven’t done so yet, see Book I, Chapter 5), when you choose to buy an item, it’s automatically charged to the credit card you have on record or against a store credit if you have one.
However, you might just want to preview an item before you buy it to be sure it’s a good fit. If you like it, buying and downloading are then easy and quick.
Follow these steps to preview your content:
1. Open iTunes and locate a selection you might want to buy using any of the methods I outline in earlier sections.
2. Tap the item to see detailed information about it, as shown in Figure 1-7.
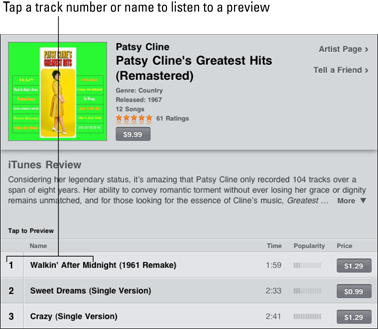
Figure 1-7: Why not preview before you buy?
3. If you’re looking at a music selection, tap the track number or name of a selection (refer to Figure 1-7) to play a preview. For a movie or audiobook selection, tap the Preview button shown in Figure 1-8.
If you like what you hear or see, you’re ready to buy. Which brings you to the next section.
The iTunes Store offers several free selections, especially in the Podcast category. If you see one you want to try, download it by tapping the button labeled Free and then tapping the Get Episode or similarly named button that appears.
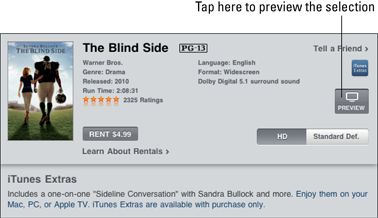
Figure 1-8: You can also preview movies before you rent or buy.
Buying a selection
Free content is out there, but for all but movie selections that you can also rent, other types of content often require that you buy what you want to consume. Buying involves authorizing the purchase and downloading the content to your iPad (which is done automatically after the purchasing part is complete).
When you find an item you want to buy, here’s how to make your purchase:
1. Tap the button that shows either the price (if it’s a selection available for purchase; see Figure 1-9) or the word Free (if it’s a selection available for free).
The button label changes to Buy X, where X is the particular content you’re buying, such as a song or album. (Refer to Figure 1-9.)
2. Tap the Buy X button.
The iTunes Password dialog appears. (Refer to Figure 1-1.)
3. Enter your password and tap OK, or if you have a credit, tap the Redeem link and enter the code provided.
The item begins downloading (see Figure 1-10) and is automatically charged to your credit card or against a store credit. When the download finishes, you can view the content using the Music or Videos app, depending on the type of content you bought.
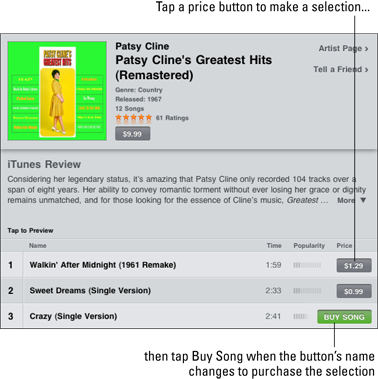
Figure 1-9: Buy the content you want using these buttons.
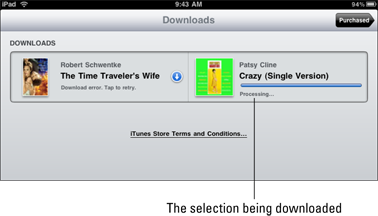
Figure 1-10: iTunes shows you the progress of your download.
If you want to buy music, you can open the description page for an album and buy individual songs rather than the entire album. Tap the price for a song, and then proceed to purchase it.
Note the Redeem button on many iTunes screens. Tap this button to redeem any iTunes gift certificates you might have gotten from your generous friends, or from yourself.
If you don’t want to allow purchases from within apps (for example, Music or Videos) but rather want to allow purchases only through the iTunes Store, you can go to the General Settings, tap Restrictions, then tap Enable Restrictions, and enter a passcode. After you set a passcode, you can tap individual apps to turn on restrictions for them.
If you have a 3G/4G-model iPad, you can allow content to be downloaded over your 3G cellular network. Be aware, however, that downloading larger items such as video or audiobooks could incur hefty data charges with your provider. However, if you aren’t near a Wi-Fi hotspot, it might be your only option. Go to Settings, Store, and tap the On/Off button for the Cellular setting.
Renting movies
In the case of movies, you can either rent or buy content. If you rent, which is less expensive, you have 30 days from the time you rent the item to begin to watch it. Once you have begun to watch it, you have 24 hours remaining from that time to watch it as many times as you like. To rent a movie:
1. With the iTunes app open, tap the Movies button.
2. Locate the movie you want to rent and tap the View button shown in Figure 1-11.
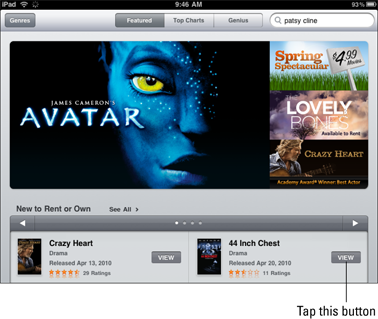
Figure 1-11: To rent, start by viewing details about the content.
3. In the detailed description of the movie that appears, tap the Rent button shown in Figure 1-12.
Note that some offer the option to Buy or Rent, others only offer the Rent button.
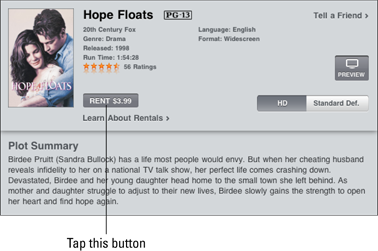
Figure 1-12: If you want to watch it only once, rent and save money.
The gray Rent button changes to a green Rent Movie button.
4. Tap the Rent Movie button to confirm the rental.
The movie begins to download to your iPad immediately, and your account is charged the rental fee.
5. To check the status of your download, tap the Downloads button.
The progress of your download displays. After the download is complete, you can use either the Music or Videos app to watch it. (See Book II, Chapters 2 and 3 to read about how these apps work.)
Some movies are offered in high-definition versions. These HD movies look great on that crisp, colorful iPad screen, especially if you have a third-generation iPad with Retina display. It’s best to download these over a Wi-Fi connection as a 3G/4G connection could incur hefty charges.
You can also download content to your computer and sync it to your iPad. See Book I, Chapter 5 for more about this process.
Listening to Podcasts
Podcasts are audio (and sometimes video) broadcasts you can listen to on your iPad. Most of these are free (at least I haven’t found any that aren’t, yet!), and iTunes features a wide variety of broadcast topics. They’re usually informative rather than strictly entertaining, and great for listening to on that long drive to your friend’s cabin in the woods.
It’s simple to find podcasts. With iTunes open, tap the Podcast button in the row of buttons at the bottom of the screen. Tap a podcast selection, and a detailed listing of podcast episodes like the one shown in Figure 1-13 appears.
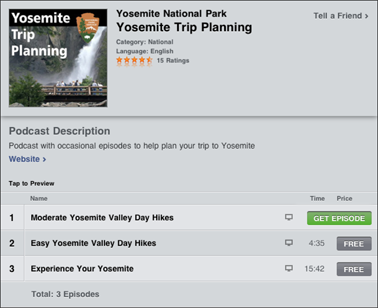
Figure 1-13: Many podcasts are free and provide useful and entertaining information.
Now you can tap the name or number of a podcast for additional information, or simply tap the Free button, and then tap the Get Episode button (refer to Figure 1-13) to download the podcast. After it downloads, you can play it using the Music app.
To save you some work, you might consider using the subscription feature in iTunes. First, locate a podcast that offers the Subscribe option and tap the Subscribe button. A URL for the podcast displays. Copy the URL, and then, with iTunes open, tap the Advanced menu and choose Subscribe to Podcast. In the dialog that opens, enter the URL of a podcast you like. Now you get all episodes of that podcast delivered to iTunes as they become available, and they’ll be available to all your devices through iCloud. (See more about setting up iCloud for automatically pushing purchases from one device to your other Apple devices in the final section of this chapter.)
Note that one item at the bottom of the iTunes Store is iTunes U. This category of content used to be built into and accessed through the iTunes Store, but as of iOS 5.1, when you tap it, you’re directed to download and access the content through its own app that sports a Newsstand-type interface for accessing course material. iTunes U offers you a compilation of free and often excellent online courses from universities and other providers. If you’re interested in online education, this is definitely an app you should download and use.
Shopping Anywhere Else
As mentioned earlier in this chapter, one feature that’s missing from iPad is support for Flash, a format of video playback that many online video-on-demand services use. Many content stores are hurriedly adding iPad-friendly videos to their collections, so you do have alternatives to iTunes for your choice of movies or TV shows. You can also shop for music from sources other than iTunes, such as Amazon.
You can open accounts at these stores by using your computer or your iPad’s Safari browser and then following a store’s instructions for purchasing and downloading content. Keep in mind that costs will vary. For example, one such provider is Hulu. (See Figure 1-14.) To get iPad-friendly content from Hulu, you have to sign up for Hulu Plus service and pay $9.99 a month. Then, download the app directly from Hulu and start watching content.
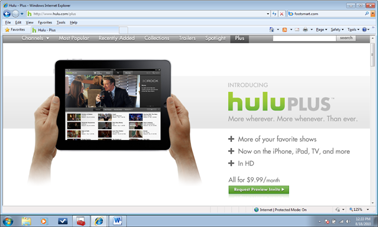
Figure 1-14: Hulu has jumped on the iPad wagon through its paid Hulu Plus service.
Here are some of the other online stores that are looking at offering iPad-compatible content, with more coming all the time:
Clicker (www.clicker.com) is working on providing its online television and movie content to iPad.
Ustream (www.ustream.tv) has a mobile app for streaming sports and entertainment programs to mobile devices.
ABC (http://abc.go.com) and CBS News (www.cbsnews.com) stream live TV programming to the iPad.
Netflix (www.netflix.com) makes non-Flash movies available that can be played on iPad.
Additionally, if you can get Flash-based content onto your Mac or Windows machine, you can stream it to your iPad using Air Video and Air Video Server, and it will do an on-the-fly conversion. Another free utility that converts most video to an iPad-friendly format is HandBrake. Go to http://handbrake.fr for more information.
There are also apps that stream content if you pay a subscription fee or are an existing customer. Two good ones are Xfinity TV from Comcast and TWCable from Time Warner.
Enabling Autodownloads of Purchases from Other Devices
With iCloud, once you set up an iCloud account, either during the initial setup of your device or through iPad Settings, you can make a purchase or download free content on any of your Apple devices and have those purchases automatically copied onto all your Apple devices. To enable this autodownload feature on iPad, follow these steps:
1. Tap Settings on the Home screen.
To use iCloud, first set up an iCloud account. See Book I, Chapter 5 for detailed coverage of iCloud, including setting up your account.
2. Tap Store.
3. In the options that appear, tap the On/Off button for any category of purchases you want to autodownload to your iPad from other Apple devices: Music, Apps, or Books (see Figure 1-15).
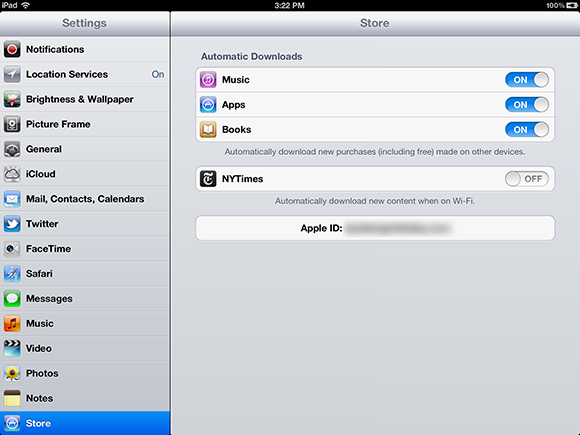
Figure 1-15: Authorize purchases from an app by turning it on here.
At this point, Apple doesn’t offer an option of autodownloading video content using these settings. You can always download video directly to your iPad through the iTunes app or sync to your computer using iTunes to get the content or through the iTunes U app for educational content.