Rabbits are easy to raise, make no noise, and reproduce year-round to yield an abundance of lean, flavorful, healthful meat. Rabbits can be kept just about anywhere, since most regulating agencies don’t classify them as livestock. Rabbits grow fast and require so little space they can be kept in a carport or on a back porch.
So why doesn’t everyone have rabbits? Well, it’s called the Easter Bunny Syndrome—rabbits are fuzzy, friendly, and so awfully cute, how could you possibly think about eating one? But here’s a good way around that issue: Let yourself get attached to your breeders while raising their many anonymous look-alike kits for meat.
Rabbit Families ......................................................................... 106
Choosing a Breed ..................................................................... 107
Recognizing a Good Animal .............................................. 109
Making the Purchase ............................................................ 110
Handling Your Rabbit ........................................................... 112
Meat Rabbits ............................................................................. 114
Rabbit Housing ........................................................................ 116
Feeding Your Rabbit .............................................................. 121
Breeding Rabbits ..................................................................... 125
The Nest Box .............................................................................. 126
Birth & Aftercare .................................................................... 128
Keeping Records ...................................................................... 134
Rabbit Health ............................................................................ 135
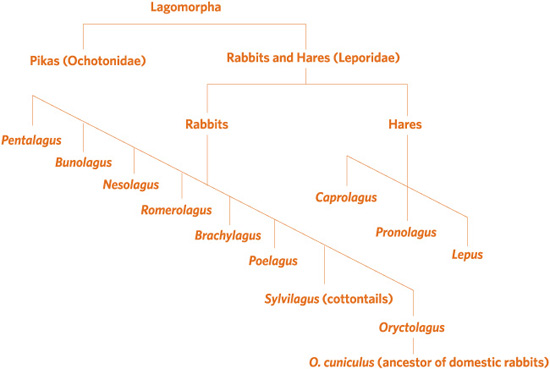
Rabbits belong to the lagomorph group of mammals. Lagomorphs are subdivided into two families, pikas, and rabbits and hares. Pikas are small short-eared animals that live in mountainous areas. Hares are closely related to rabbits but are usually larger, have longer legs and ears, and run with long, high leaps.
The rabbit group is further divided into 25 species. Wild rabbits native to North America include the eastern cottontail, the desert cottontail, and the marsh rabbit. The tame rabbits raised in North America as pets and for fur and meat are descended from wild European rabbits.
From fossils, scientists have determined the rabbit has been around for about 30 to 40 million years and has changed little during that time. When humans arrived on the scene, wild rabbits became part of their diet. Exactly when people decided to raise rabbits rather than hunt them in the wild is unknown. We do know that early sailors took rabbits along on voyages because they were easy to feed and care for and could be used as meat. These early sailors introduced rabbits to some of the new places they explored.
Early European settlers probably brought rabbits with them to the New World, but because wild rabbits and other game were plentiful here, settlers didn’t need to raise many rabbits. However, that trend changed in the early 1900s with the Belgian hare boom. The Belgian hare is a breed of rabbit, not a hare, as the name might imply. In the beginning of the twentieth century, a legion of aggressive promoters led people to believe raising Belgian hares could be a profitable pursuit. Some of the newly converted breeders were successful, but many others who invested in these rabbits lost money. Although Belgian hares didn’t do all their promoters had promised, they did increase interest in rabbits in North America.
Since then, other breeds have been imported to North America and several American breeds have been developed. Forty-five breeds are currently recognized in North America by the American Rabbit Breeders Association (ARBA), of which some are more suitable than others for meat production.
Rabbit Family Tree

Your choice of breed will affect many things, including the size of the cage you will need and when your young rabbits will be ready for their first breeding. A good way to learn about the different breeds is to become a member of ARBA (for contact information, see page 336). With your ARBA membership, you’ll receive a guidebook that has pictures and a written description of every breed. The association also publishes a Standard of Perfection, which gives detailed, up-to-date descriptions of each breed.
Besides reading about the different breeds, find out where you can see rabbits in your area. If an agricultural fair is held in your community, check out the rabbit section, where you can meet local breeders. Rabbit shows held under the auspices of ARBA usually include a great variety of breeds. These shows are called sanctioned shows and usually attract exhibitors from a fairly large area. If you become a member of ARBA, the magazine that comes with your membership will list upcoming sanctioned shows in your area. Your membership also provides a yearbook that lists all ARBA clubs and members. If you contact the club nearest you, you can obtain a calendar of its scheduled events, including shows where you can see the different breeds and meet knowledgeable breeders who will be able to help you get a good start.
When you visit a rabbit show, just look and learn the first few times you go—don’t buy yet. It won’t be easy, because you are sure to see several rabbits you’d like to take home. Try to put off a purchase until you find a breed that appeals to you and will fill your needs. Although any breed can be raised for meat, some breeds are better suited to the purpose than others, so keep your goals in mind.
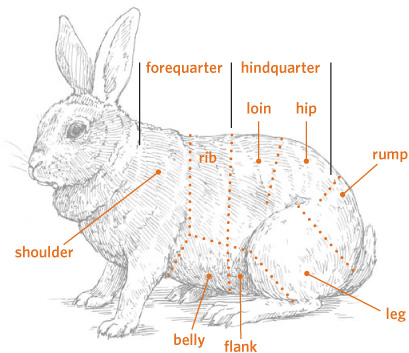
Parts of a rabbit
Quick Guide to Rabbit Breeds

For meat production, the large breeds, weighing from 9 to 11 pounds (4 to 5 kg) at maturity, generally convert feed to meat at the most efficient rate. They also yield an ideal fryer weighing 4 pounds (2 kg) or more at 8 weeks of age, the preferred age for harvest, and they dress out with less waste than other breeds—provided you start with quality breeders and not sale barn bunnies or freebies. Not all large breeds are ideal for meat production, and not all meat breeds grow large. The following popular breeds are worth looking into.
American Chinchilla. Developed in the United States as a dual-purpose furbearing and meat rabbit, the American Chinchilla is now a rare breed. It is a hardy rabbit and the does have good mothering instincts.
Californian. Developed in Southern California as a fine-boned, plump breed with full hips and a meaty saddle, ribs, and shoulders, the Californian rabbit is the second most popular meat rabbit.
Champagne D’Argent. Originating in the French province of Champagne, the Champagne D’Argent is among the oldest breeds. Argent is the French word for silver; the name of this breed means “silver rabbit from Champagne.” Babies are born completely black and gradually turn silver as they mature. The breed is known for having medium-fine bones, resulting in a greater proportion of plump, solid meat.
Florida White. Developed in Florida, the Florida White looks like a New Zealand but weighs about half as much, making it a good choice for a small family. This compact but meaty breed has a meat-to-bone ratio that’s at least as good as other meat breeds. The kits, though not as large, mature more quickly than those of other meat breeds.
New Zealand. This breed, despite its name, was developed in the United States and is considered the top meat-producing rabbit, known for its full, well-muscled body. Although New Zealands come in three colors, the white variety is generally considered to be more muscular than the red or black.
Satin. Developed in the United States, the Satin rabbit is known for its long silky fur that comes in many colors—including black, blue, chocolate, copper, red, and white—making it a dual-purpose breed suitable for both fur and meat production. The does are easy breeders with excellent mothering instincts, and the kits have a good growth rate with one of the best meat-to-bone ratios.
Crossbred. Having a buck and doe of two different breeds results in vigorous offspring that grow more quickly than either parent. Always select a smaller buck and a larger doe. A popular combination is crossing a Californian buck with a New Zealand doe. Never use a larger buck with a smaller doe, as the doe may have trouble giving birth to the larger offspring.
After deciding which breed you want, you must learn how to tell if a particular rabbit will make good stock. For the most part, that means making sure the rabbit is healthy and exhibits the proper characteristics of its breed. Pay special attention to the meat qualities of the rabbits you review for potential purchase.
Good health is the most important quality to consider when selecting your stock. Examine all of the following traits:
• Eyes should be bright, with no discharge and no spots or cloudiness.
• Ears should look clean inside; a brown, crusty appearance could indicate ear mites.
• Nose should be clean and dry; a discharge could indicate a cold.
• Front feet should be clean; a crusty matting on the inside of the front paws indicates the rabbit has been wiping a runny nose and may have a cold.
• Hind feet should be well furred on the bottoms; bare or sore- looking spots may indicate the beginning of sore hocks.
• Teeth should line up correctly at the front, with the top two teeth slightly overlapping the bottom ones.
• General condition of the rabbit’s fur should be clean; the body should feel smooth and firm, not bony.
• Rear end, at the base of the rabbit’s tail, should be clean, with no manure sticking to the fur.
Each rabbit breed has distinctive features that make it different from all other breeds. These features include colors, markings, body type (the proper size and shape for its breed), fur type, and weight. The more you know about the unique characteristics of your chosen breed, the better job you will do of picking out a good individual. Detailed descriptions of breeds are found in the Standard of Perfection, as well as materials from breed clubs.
Most meat-producing breeds are 15 to 17 inches (38 to 43 cm) long and share the following characteristics:
• Slightly tapered from front to back
• Wide, deep body
• Plump loin
• Well-rounded hips and rump
• Hard flesh
• Little waste when dressed
Rabbit Prices
How much you can expect to pay for a rabbit varies by breed, age, availability, and popularity; it can range from $10 to more than $100 per animal. Because so many factors affect the price, it is difficult to give an average. However, if you are buying a purebred rabbit of one of the common breeds, you should be able to find a good-quality animal for $20 to $50. Make sure the purchase price includes the pedigree.
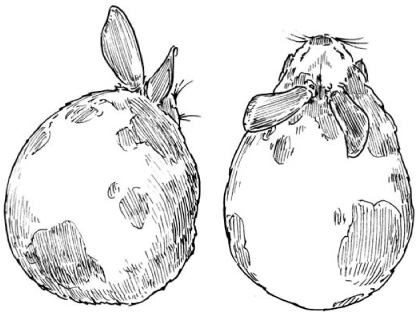
A meat-producing rabbit is well rounded at the rear and along the top (left), and slightly tapered front to back (right).
Before leaping into rabbit raising, make a good evaluation of your needs and preferences. Having the wrong type or number of rabbits can put a damper on your enthusiasm. Once you know what you’re looking for, it’s time to find stock. If you’ve done your homework, you’ll probably already know where to buy stock.
If you are new to raising rabbits, you might start with a trio: one buck and two does. Three rabbits is a reasonable number for a beginner to care for, and a trio can become the start of a breeding program. Since a doe has eight teats, by having two does and breeding them at the same time, if one has more than eight kits and the other has fewer, you can balance out the litter size.
If you purchase a trio, buy animals that are not too closely related; you can determine their bloodlines by looking at their pedigrees. It’s acceptable for the rabbits in your trio to have some relatives in common, but they should also have some differences in their family trees. They should not be brother and sisters; three rabbits from the same litter are too closely related to be used in a breeding program.
How Long Does a Rabbit Live?
Few rabbits live out their full, natural lives. Many get taken by predators, including raccoons and dogs. Rabbits raised for meat have a short life of 3 months or less. Rabbits kept as breeders are most productive between 6 months and 3 years of age, after which they may become rabbit stew. When properly fed and protected from harm, a rabbit may live an average of 6 to 8 years
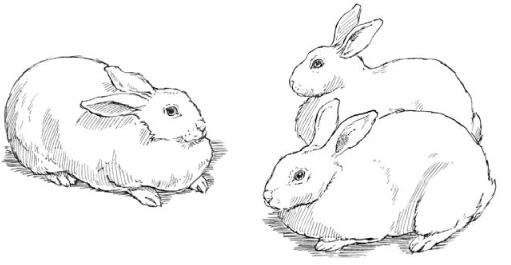
Two does and one buck make an ideal start.
Rabbits have a better start in life if they remain with their mother until they are 8 weeks of age. Rabbits that have not nursed for a full eight weeks may not thrive, so before you move rabbits to a new home, be sure they have been weaned from their mother and are eating well. Weaned rabbits will quickly learn to recognize you and anticipate your visits, but older rabbits will be ready for breeding sooner. Each age range has advantages and disadvantages.
Two to three months. As a beginner, consider buying rabbits that are 2 to 3 months of age. A baby rabbit is cute, fun, and easy to handle, and you’ll have the pleasure of watching it grow to adulthood. On the other hand, you’ll have a wait of six months or more before your first weaned kits will be ready for the freezer.
Four to five months. Baby rabbits are adorable, but you can’t always be sure exactly how they will look when they grow up. An advantage of purchasing a slightly older rabbit is that you can get a better idea of what it will look like when it matures. Rabbits that are 4 to 5 months old are still young, but their appearance will not change much further. On the other hand, older rabbits that have not been handled much will take a little more patience to learn to trust you.
Six months or older. With a 6-month-old rabbit, you’ll have a pretty accurate picture of what type of adult it will be. An older rabbit will also be ready for breeding sooner. However, you’ll miss the fun of watching it grow up. If it has not been handled much it may be mistrustful, and if it has been mistreated it may be downright unfriendly.
Two years or older. If you plan to breed your rabbits for meat production, don’t buy animals that are more than 2 years of age. You will have only one good year before you will be looking for replacement breeders.
The best way to determine a rabbit’s age is by checking its pedigree paper against its ear number. Although anything else is pretty much a guess, signs of a young rabbit include:
• A narrow lip cleft
• Smooth, sharp toenails
• Soft ears that bend easily
The breeder’s knowledge and experience can be very helpful to you if he or she knows what you’re looking for. You should know the answers to the following questions before you visit the breeder:
• Do you want a buck or a doe?
• What age rabbit are you looking for?
• About how much can you spend?
The breeder may have several rabbits that fit your criteria. Ask the breeder to remove the prospects from their cages so you can get a closer look. Placing the rabbits on a table will give you a chance to see them next to one another and to compare them in terms of size, markings, body type, and so on. Ask which rabbit the breeder thinks is the best and why. Use the information you’ve learned as well. Many of the conditions you’ll want to know about require handling the rabbit. If you are not an experienced handler, ask the breeder to help you check the rabbit’s teeth, sex, and toenails.
If you’re interested in a young rabbit, ask to see its mother and father so you can get an idea what the rabbit should look like at maturity. Ask to see written records for the parents that indicate how well they have performed. These include the parents’ pedigrees and records that provide information such as how many kits the mother has raised, how many kits the buck has sired, and perhaps information on how well the parents have placed at rabbit shows—which tells you how closely they conform to the ideal traits for their breed.
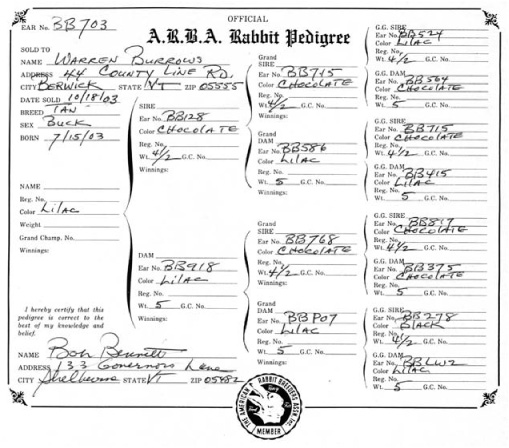
A typical pedigree paper should be included in the animal’s price of purchase.
Don’t make a final decision until you are sure the animal you are interested in is healthy; has no eliminations or disqualifications; meets the size, color, and other characteristics required of its breed; and meets your own criteria, including price. If you have examined the animal carefully and it has passed your inspection, the parent stock looks good, the rabbit meets your criteria, and you and the breeder agree on price, you have found your rabbit.
Once you’ve found your rabbit, here are some details to attend to before you take it home.
Pedigree papers. If you are purchasing a purebred rabbit, the price should include the pedigree paper. An organized breeder will have a pedigree paper ready. (See pages 134–35 for more about pedigree and registration.)
Feed. Ask the breeder what kind of food the rabbit is currently receiving, how much it receives, and how it’s fed. This information will help you smooth the rabbit’s transition to its new home. If you plan to use a different feed from that used by the breeder, make the change gradually. Ask the breeder to supply you with about 1 pound (0.5 kg) of the rabbit’s current feed. Give this feed to the rabbit for the first day or two. Then begin to mix the breeder’s feed with yours, gradually making a complete changeover to the new feed.
Guarantee. Ask about the breeder’s policy concerning problems that may arise with your new rabbit. Most breeders will guarantee the health of their rabbits for at least two weeks. After two weeks, it becomes difficult to know whether a problem started at the breeder’s rabbitry or was acquired after the rabbit was sold.
Repeated gentle handling will make your rabbit easier to handle, but you must observe certain points of rabbit etiquette. Being picked up can be scary for a rabbit. When you lift a rabbit, you take away its most effective method of defense—the ability to run away from danger. With practice, your skill will increase.
If your rabbit is frightened, it will try to run away. Its toenails help it grip surfaces, enabling it to run faster. When you lift the rabbit, you become the only surface it has to grip. This desire to grip often results in scratches for the handler and a panic situation for both the handler and the rabbit. Many new owners become discouraged when their rabbit scratches. Remember, your rabbit is scared—it’s not mad at you or scratching you on purpose. Make things easier on yourself by wearing a long-sleeved shirt when you handle a rabbit.
Rabbits have powerful hind leg and back muscles. If not properly supported, a rabbit can kick out and break its own back, causing paralysis.
Some breeds handle more easily and respond better than others. Most rabbits enjoy being stroked, especially when they are young. Remember always to talk calmly and quietly. Loud noises easily startle rabbits.
The time you spend learning proper handling skills will pay off in many ways. Rabbitry chores are easier if your animals cooperate during cage cleaning, grooming, and breeding.
A new rabbit has many adjustments to make. Give it a few days to get used to you and its new surroundings before you handle it a lot.
Get to know your rabbit in a setting where both of you are comfortable. A good place to get acquainted is at a picnic table covered with a rug, towel, or other covering that will give the rabbit secure, not slippery, footing. Your rabbit will be able to move safely around on the table, and you can safely pet it without having to lift it. Rabbits will usually not jump off a table; nonetheless, never leave the rabbit unattended when it is out of its cage.
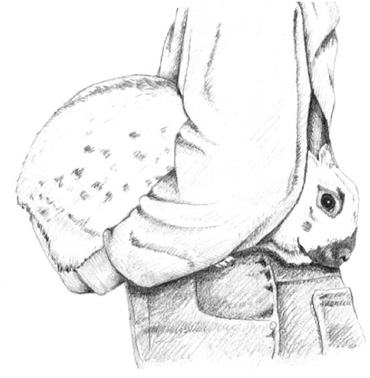
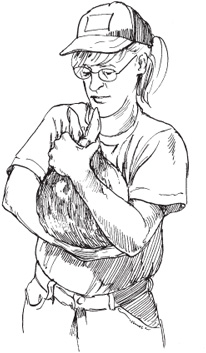
A “football hold” helps your rabbit feel safe while you’re carrying it. For extra security, place your free hand on the rabbit’s back.
Once your rabbit seems comfortable on the table, start to practice picking it up. The table offers a handy surface on which to set the rabbit safely back down.
The best way to lift a rabbit is to place one hand under it, just behind its front legs. Place your other hand under the animal’s rump. Lift with the hand that is by the front legs and support the animal’s weight with your other hand. Place the animal next to your body, with its head directed toward the corner formed by your elbow. Your lifting arm and your body now support the rabbit; it’s like tucking a football against you for a long run. Place the animal gently back on the table and repeat this lift.
Practice handling skills often, but for short periods of time—about 10 to 15 minutes daily is all it takes. Have a short practice session each day until you and your rabbit are comfortable with each other.
Once you feel at ease, begin to move around while holding your rabbit. You may need to steady and secure your animal with your free hand until it gets used to being carried. At first, just walk around the table; if your rabbit becomes frightened, you have a safe place nearby to set it down promptly.
If you need extra control, you can pick up your rabbit with one hand by grasping the loose skin at the nape of its neck, providing support under its rump with your other hand. This method can damage the fur and flesh over the rabbit’s back, however, and is especially harmful to the more delicate coats of Satin rabbits. Once you have lifted the rabbit, move it close to your body where it will feel more secure. After it’s tucked in football-style, you can use a one- or two-hand carry. The rabbit’s behavior will help you decide whether to use one or both hands.
Even the most mild-mannered rabbit can have a bad day, so be prepared to handle any situation in a calm, controlled manner. For instance, if an over-active bunny struggles and gets out of control, drop to one knee as you work to quiet the animal. Lowering yourself lessens the distance for the rabbit to fall and provides a position from which you can easily set the animal on the ground, if necessary. After a short rest on the ground, carefully and securely lift the rabbit again.
How to Hold a Rabbit
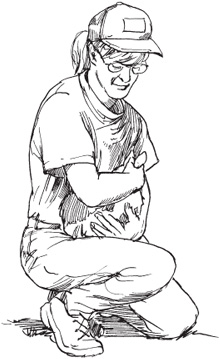
If the rabbit starts to struggle while you’re holding it, drop to one knee. A rabbit that escapes from your arms won’t have far to fall.
Use your upper hand to control the rabbit’s head; when the head is restrained, the rabbit is unable to move.
After you master lifting and carrying your rabbit, learn how to turn it over. In the future, as part of your health maintenance program, you’ll need to get your rabbit on its back in order to examine its sex, teeth, and toenails, so it’s worth your time to help your rabbit become accustomed to being held on its back.
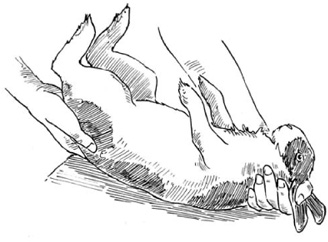
An easy trick to getting the rabbit on its back is to cradle it against your chest and then slowly lean forward over a table, until the rabbit’s back is on the table’s surface.
Turning a rabbit over puts the animal into an unnatural position. First, its feet are off the ground, so it cannot run away, and second, its underside is now exposed. Your rabbit has good reasons to resist this type of handling—a wild rabbit in this position is probably about to be eaten by a predator—so be especially careful and patient. Again, a rug-covered picnic table is a good place to practice.
To turn the rabbit over, use one hand to control the head and the other hand to control and support the hindquarters. Place the hand that holds the rabbit’s head so you are holding its ears down against its back while you reach around the base of the head. If you prefer, place your index finger between the base of the rabbit’s ears and then wrap your other fingers around toward its jaw. With your other hand, cradle the rump. With your hands in place, lift with the hand that is on the head and at the same time roll the animal’s hindquarters toward you. Try to do this movement in a smooth, unhurried manner.
If your rabbit has cooperated, you will now be able to let the table support its hindquarters so the hand that was holding the rump is free to check the rabbit’s teeth and toenails. If your rabbit fights against this procedure, keep trying, but do so in a place where it hasn’t far to fall, and try to support it securely.
Part of the trick to successfully turning your rabbit over is being able to grasp its head so it cannot wiggle away. A way to gain some extra control is to grasp the lower portion of the loin instead of cradling the rump.
Another approach is to pick up your rabbit and allow it to rest against the front of you instead of tucking it against your side. The animal will face upward with its feet against you. When it is in this upright position, place one hand on its head, as suggested above, and keep your other hand supporting its hind-quarters. Now bend forward slowly at the waist and lower the animal to the table, where it should arrive in the proper turned-over position.
If you need to turn your rabbit over for a closer look and no table is handy, let the animal rest on your forearm. Having the rabbit in this position gives you better control over the hindquarters, because they are tucked between your elbow and your body. This maneuver is easier if you sit in a chair. You can use your legs instead of the table to support your rabbit. You may find that when you are seated you can hold your rabbit more securely for such procedures as trimming toenails.
Rabbit meat tastes a bit like chicken; some people can’t tell the difference. Rabbit, however, is all white meat that is leaner than chicken, beef, pork, and even turkey—making it perfect for anyone on a fat- and cholesterol-reducing diet. Rabbits are harvested at one of three stages, depending on their age.
A fryer is a young rabbit under the age of 12 weeks, by which time it will have reached 4 to 5 pounds (2 to 2.5 kg) live weight (about 3 pounds [1.5 kg] for a 10-week-old Florida White). The meat is tender, fine grained, and bright pearly pink, and can be cooked in the same ways as a chicken fryer. Since older bucks tend to taste, well, bucky, they are best harvested at the fryer stage.
A roaster is older and larger than a fryer, generally grown by people who want more meat than a fryer provides. Its live weight is usually between 5½ and 8 pounds (2.5 to 3.5 kg), typically close to 6 (2.75 kg). The meat is firm, coarse grained, slightly darker in color, and less tender than a fryer, and the fat is of a creamier color and stronger flavor than that of a fryer. Cooking with liquids or oil helps keep a roaster moist and tender.
A stewer is generally older than 6 months, weighs more than 8 pounds (3.5 kg) live weight, and has more fat and tougher meat than a roaster. The best cooking methods for a stewer are braising and stewing. Of course, a younger rabbit makes great stew, but moist cooking is required to tenderize the meat of an older rabbit.
Rabbit giblets include the heart, kidneys, and a liver that is large in relation to the animal’s size. Even if you don’t ordinarily care for liver, you might enjoy rabbit liver. Compared to other kinds of liver, especially liver sold at the supermarket, rabbit liver has nearly no odor, is far more tender, and has a sweet, clean flavor. The kidneys, too, are tender and somewhat sweet.
The average feed conversion ratio for a rabbit is about 4, meaning it gains 1 pound (0.5 kg) of weight for every 4 pounds (2 kg) of feed it eats—assuming, of course, the rabbits eat everything they are fed and don’t scratch it out of the hopper onto the ground. Assuming you start with a pair of 4-month-old breeders, by the time you have your first litter of fryers they will have eaten a total of about 130 pounds (59 kg) of rabbit pellets.
Rabbit Meat Facts
• A rabbit dresses to between 50 and 55 percent of live weight, not counting giblets.
• Only 7 to 8 percent of a rabbit is bone.
• Rabbit meat has little marbling; fat surrounds the muscle and can be easily peeled away.
• Rabbit meat is higher in protein than any other meat (nearly 21 percent compared to the next highest, turkey and chicken, at 20 percent).
• A doe that produces five litters a year, averaging eight kits per litter, yields 120 pounds (54 kg) of meat or more each year.
• Since rabbits are raised in off-the-ground hutches, their meat is cleaner than that of animals living on the ground.
Can you save money by raising your own meat rabbits? That depends on the price of feed, how efficiently your rabbits grow, and the weight at which they are harvested. Using averages (and for simplicity’s sake, ignoring the cost of housing, water, electricity, and so forth) do the math: By the time a rabbit fryer reaches the live weight of 4 pounds it will have eaten at least 16 pounds of pellets. At 50 percent of live weight, a 4-pound rabbit dresses out to approximately 2 pounds. Your break-even cost can be calculated by comparing the purchase price of a rabbit with the cost of rabbit pellets. At current rates, a whole fryer sells for approximately $6 per pound, or about $12 for a 2 pounder. The current rate for one brand of all-natural rabbit pellets is about 25 cents per pound, or about $4 for 16 pounds, which is one-third the value of the meat. Even if you pay 50 to 100 percent more to purchase certified organic feed, it’s still a good deal.
Parts of a Butchered Rabbit
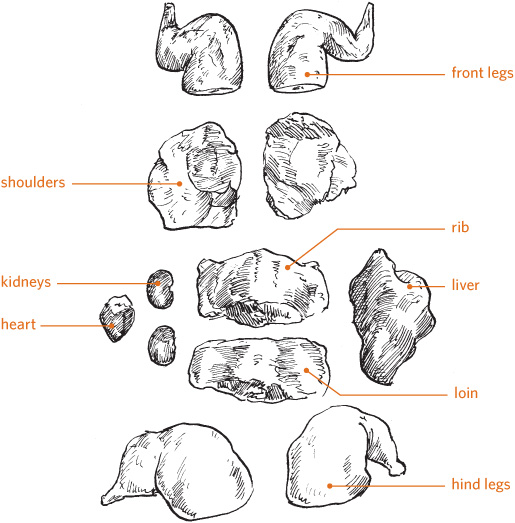
Let’s see what happens when we factor in the cost of feeding the breeder buck and doe. By the time the pair is 2 years old they should have produced seven litters averaging eight kits per litter, or 48 fryers weighing about 4 pounds each live or 2 pounds dressed, for a total of 96 pounds of rabbit. At a purchase price of $6.00 per pound, that comes to a total market value of $576.00. By that time, you would have fed the 48 fryers plus two breeders approximately 840 pounds of rabbit pellets at a cost of $210.00 dollars. Your total cost of producing 96 pounds of rabbit meat is a little less than one-third its market value, and your cost per pound is about $2.20.
Rabbit processors are few and far between, and most of those that do exist process for commercial rabbitries that produce meat for sale. Butchering your own rabbits is easy and takes little more than 15 or 20 minutes from start to finish. If you don’t have someone nearby who can show you how to kill, skin, and dress a rabbit, you can easily learn from an illustrated book such as Storey’s Guide to Raising Rabbits by Bob Bennett.
Rabbit housing, called a hutch, can be the largest single expense in rabbit keeping. You can buy one or build your own from largely recycled materials, but be sure it meets the needs of your animals. Proper housing will contribute greatly to the health and happiness of your rabbits.
An all-wire hutch is the first choice of an experienced rabbit raiser. Wire hutches come in two basic styles. The first type is intended to be suspended so the manure falls to the ground. The second type includes a pull-out tray the manure falls into. These cages, too, can be hung, but they can also be stacked on top of one another. Stacking saves space but can make it a little harder to reach each cage.
With proper care, rabbits have fewer health problems when raised outdoors. However, if you keep your rabbits indoors, you must have excellent ventilation. Outdoor housing must be adjustable to accommodate changes in weather. Where you live determines what weather conditions you will have to deal with. Rabbits are most comfortable at temperatures of 50 to 69˚F (10 to 20˚C). In hot climates, keep the hutch in the shade and make sure it has plenty of air circulation around it.
Hutch Size
Your rabbit will spend most of its time in its hutch and will need space to move around, as well as space for feeding equipment, and a doe needs room for her nest. A hutch 30 × 36 × 18 inches high (76 × 91 × 45 cm) is suitable for most meat breeds, although a 24-by-36-by-18-inch (61 × 91 × 45 cm) hutch is adequate for the smaller Florida White.
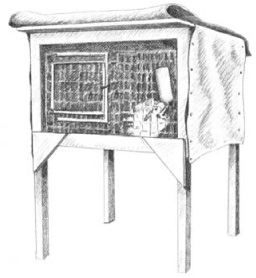
Wrap plastic sheeting around three sides of the cage to protect the rabbit from cold winds and precipitation.
Rabbits do well in cold weather and can survive temperatures well below freezing. However, they need to be protected from wind, rain, and snow. If your cages are outside, you’ll need to add protection as the temperature drops. Most outdoor cages can be enclosed by stapling plastic sheeting around three sides. If the weather gets cold in your region, cover the front with a flap of plastic as well. Do not enclose the whole cage so tightly that it is difficult to feed and care for your animal or that the ventilation is poor. Outdoor cages should also have a secure roof to keep out rain and snow. Try to take advantage of the winter sun. If your outside cages are movable, place them in a location that receives a lot of direct sun. Make sure the cage is not exposed to the wind.
A sturdy, secure hutch will contribute to the safety of your rabbits. Most cages are built on legs or hung above the ground, which protects them from dogs, cats, rodents, raccoons, and opossums. Keeping your cages in a fenced area or indoors is even better but may be impossible when you’re just getting started.
Clean cages are important to the health of your rabbits. If your cages are easy to clean, you will be able to do a better job of caring for your rabbits. Cages should have wire floors that allow droppings to fall through to a tray or to the ground. Choose all-wire cages or wood-framed cages that do not have areas where manure can pile up. Plan your cages so you can easily reach into them and clean all parts.
As you look at cages, you will discover many types of wire. The most common wire used for the sides and tops of hutches is 14-gauge wire woven in a 1 inch by 2 inch (2.5 × 5 cm) mesh. Smaller wire mesh also works well but will probably be more expensive. Sometimes you may have a choice of 14- or 16-gauge wire. The 14-gauge wire is heavier and stronger, and should be used for the large breeds.
You may also need to choose between wire that is welded before being galvanized and wire that is welded after being galvanized. Wire that is galvanized after welding is stronger and smoother for the rabbit’s feet.
The floor of the cage should be made of 14-gauge welded wire woven in a ½ inch by 1 inch (1.25 × 2.5 cm) mesh. This smaller mesh gives more support to the rabbit’s feet but still allows manure to pass through. Never use larger wire for the floor of the hutch. Rabbits can get their feet caught in the openings and break or dislocate their rear legs.
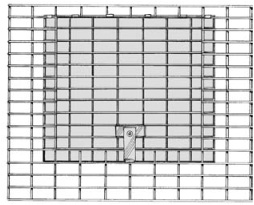
The door should overlap the cage on three sides. If it opens out, attach it to the cage on one side; if it opens in, attach it at the top.
The door opening is cut into the front of the cage. The door itself should be larger than the opening so it overlaps the opening on all sides. Doors should be placed toward one side of the front of the cage, so there is enough space left on the other side for the feeder and waterer.
A door that is attached at the top and swings into the cage when opened will fall back to a closed position even if you forget to latch it, and the rabbit cannot push it open. Cages with doors that open toward the outside make it easier for you to reach into the cage, but if you forget to latch the door, your rabbit may push it open and tumble out of the cage.
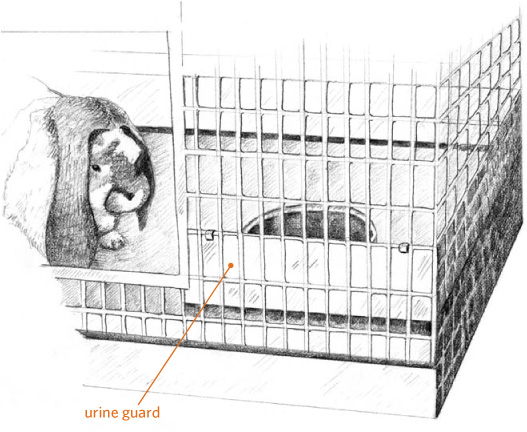
A urine guard helps keep the area around the cage clean.
Check the door and door opening for sharp edges. You don’t want a cage that will scratch you or your rabbit. Some cage doors are lined with metal or plastic to protect you from sharp edges.
Most rabbit cages are displayed with an attached feeder. However, the list price of the cage usually does not include the feeder. If the feeder doesn’t come with the cage, you’ll need to buy one. (See page 122 for information about feeding equipment.)
Baby-Saver Wire
Some manufacturers offer cages made from baby-saver wire, a specially designed wire mesh that can be used for cage sides. The upper portion of baby-saver wire has 1 inch by 2 inch (2.5 × 5 cm) mesh, and the bottom 4 inches (10 cm) has ½ inch by 1 inch (1.25 × 2.5 cm) mesh. Having this smaller mesh next to the hutch floor prevents babies from slipping through the wire, keeping them safely inside the hutch. Baby-saver wire is more expensive than 1 inch by 2 inch (2.5 × 5 cm) wire mesh, but makes a wise investment for a cage housing a producing doe.
A urine guard is a common extra feature on rabbit cages. Four-inch (10 cm)-high metal strips attached around the inside base of the cage help direct the rabbit’s urine so it falls directly below the cage floor. A urine guard also helps prevent baby bunnies from becoming stuck in or falling through the sides of the cage. Urine guards are not, however, a substitute for baby-saver wire unless they extend all the way around the bottom of the cage. Cages with urine guards are more expensive than those without them.
Managing Manure
Besides keeping urine from splashing where it is unwanted, urine guards help keep rabbit manure confined directly beneath the hutch for handy removal to the garden or compost bin. Rabbit manure is higher in nitrogen and phosphorus than most livestock manure and contains more potash than most. It can be applied directly to garden plants without danger of burning the plants or causing illness to humans who eat the resulting vegetables.
For a small rabbitry, buying cages is usually less expensive than building them. The price suppliers charge for cages is based on the cost of the cage materials. By purchasing materials in large quantities, suppliers get a discount and can charge less per cage. When you purchase materials to build just two or three cages, your cost per cage will likely be as much as or more than that of a ready-built cage.
Purchase the best possible cages you can afford; your rabbits will, after all, be spending most of their time there. You will need one cage for each rabbit, plus you may want to have one or two spares in case you don’t get around to butchering all the kits when they need to be removed from the doe’s hutch. Rabbit cages are available from several sources:
Mail-order rabbitry supply companies. Rabbitry supply companies specialize in cages and equipment for rabbit breeders. They generally offer the best quality, selection, and price. Most rabbitry supply companies have online catalogs or will send you a free catalog if you request one. A list of several suppliers is included in the appendix.
Farm supply stores. The same store where you buy your feed may also sell cages. Prices will probably be fairly reasonable and the quality acceptable.
Local rabbitry suppliers. Many small local suppliers also sell cages. These folks are often rabbit enthusiasts who build and sell cages and other supplies as a part-time business. However, it may be a challenge to find one of these suppliers near you. Talk with other rabbit raisers to find a supplier that serves your area.
Pet shops. Pet shops often carry rabbit cages, but their products may be more expensive than from other sources, and unless they specialize in rabbits, their supply may be limited. Ask a salesperson to assist you in selecting a cage, and if the selection seems limited, ask to browse through the stock catalogs and special-order a cage.
Other rabbit raisers. Many rabbit keepers begin with used cages. This option is usually a less expensive way to get started, but before you use secondhand equipment do the following:
• Check carefully for holes, rusted wire, chewed wooden areas, and sharp edges. Repair any problems before you introduce your rabbits to their new home.
• Carefully clean and disinfect the cage before you use it. Start by scraping off old manure and hair. Then wash the entire cage with a solution of bleach and water (mix 1 part household chlorine bleach with 5 parts water). Set the cage in a sunny spot and allow it to dry thoroughly before you put a rabbit into it.
Purchase the best possible cages you can afford; your rabbits will, after all, be spending most of their time there.
If you need to transport a rabbit from one location to another, you’ll need a rabbit carrier. Like cages, the best rabbit carriers are made of wire mesh. Purchase a good rabbit carrier if you plan to transport your rabbits often or for long distances. A carrier designed for transporting meat-sized rabbits is 12 inches (30 cm) high, has a top that opens for safe and easy removal of the rabbit, and has a wire floor with a tray below to collect droppings.
For infrequent use or short trips, you can use a standard pet carrier designed for transporting cats or small dogs. Whatever type of carrier you use, it should not be so roomy the rabbit bounces around in transit, risking bruises or other injuries.
If your all-wire cage will be used outdoors, you will need to adapt it to protect your rabbit from various weather conditions. The most common way to protect a hutch is to build a wooden framework into which you set the cage. A wooden frame has features that make it adaptable to a variety of situations:
• The sides can be left open for good air circulation.
• Removable, solid wooden sides or plastic sheeting can be attached for protection against cold weather.
• The cage can be removed from the frame for easy cleaning.
• The cage can be removed from the frame to move an expectant doe to a warmer location for a winter kindling.
The following plan for a single-hutch frame can be expanded to accommodate a multiple-unit hutch.
• Four 10-foot lengths of 2 × 4 lumber
• One 8-foot length of 2 × 4 lumber
• One 4-by-5-foot sheet of exteriorgrade plywood (3/4′ thickness)
• 12d common galvanized nails
• 6d common galvanized nails
• 8 L-brackets
• Wood screws
• Saw
• Tape measure
• Hammer
• Screwdriver
• Pencil
1. Cut two 60-inch lengths from one of the 10-foot 2 × 4s to form two front legs.
2. Cut two 56-inch lengths from a second 10-foot 2 × 4 to form two (shorter) back legs.
3. From each of the two remaining 10-foot 2 × 4s, cut:
• One 35 ¼-inch piece (for the side of the cage-support frame)
• One 38-inch piece (for the front and back of the cage-support frame)
• One 44 ⅛-inch piece (for the front and back roof support)
4. Cut the 8-foot 2 × 4 in half. These pieces will be the side roof supports. You will later recut them to length.
Preassembled versus Do-It-Yourself
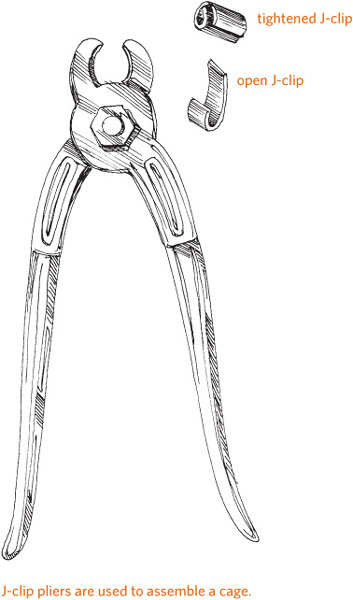
Suppliers often give you a choice of buying the cage assembled or unassembled. Assembled cages are more expensive and, if you order them from a catalog, cost more to ship. If you choose to save money and buy an unassembled cage, you’ll need a tool called J-clip pliers. If you have one or just a few cages to assemble, you may be able to borrow J-clip pliers from a local rabbit raiser. If you are going to assemble lots of cages, purchase one of these tools.
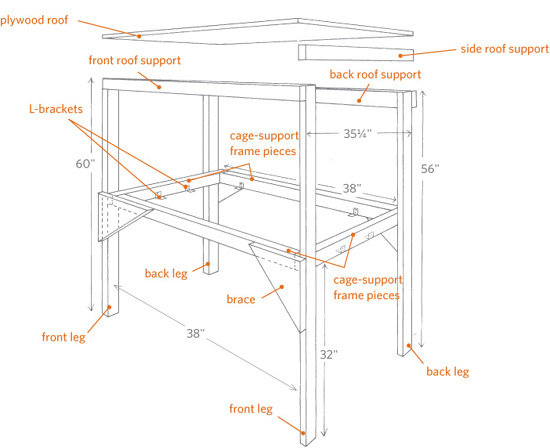
5. Lay the four cage-support frame pieces on edge on a flat surface. They should form a large rectangle, with the 38-inch front and back pieces between the 35 ¼-inch side pieces. Drive two 12d nails through the outside face of a side piece into the end of the back piece to make the corner. Nail the three other corners together in the same fashion to complete the cage-support frame.
6. Screw the L-brackets to the inside face of the cage-support frame, as shown in the illustration above. The bottom of each bracket should be flush with the bottom edge of the frame.
7. Mark one end of each of the legs with a pencil to indicate the bottom and to avoid confusion during assembly. Measure up from the bottom of each leg 32 inches, and draw a straight line across the inside face of each leg at this point. This mark represents the height of the cage-support frame.
8. Use 12d nails to attach the legs to the ends of the cage-support frame (as shown above, making sure that the bottom of the frame is even with the lines marked on the legs.
9. Use 12d nails to attach the front and back roof supports to the legs. The top edge of the front roof support should be slightly higher than the top of the front legs to prevent the front legs from being in the way when it comes time to put on the plywood roof.
10. Take one of the side roof supports and hold it in place against the legs on the right side of the hutch. With a pencil, mark the angled cut you’ll need to make at the side roof support’s ends so it fits snugly between the tall front legs and the short back legs. Cut the piece to size, and attach it with 12d nails to the front and back roof supports. For added strength, nail it to the tops of the legs as well. Repeat this procedure for the left side.
11. Use scraps of plywood to cut four isosceles triangles, with the equal sides being 12 inches long. Nail these braces to the hutch with 6d nails, as shown.
12. Use 6d nails to attach the 4-by-4-foot plywood roof. The roof should overhang all four sides, to help keep rain or snow out of the hutch. A large overhang along the front will give extra protection to the attached feeders.
Providing a healthy, balanced diet is key to successful rabbit raising. In the past, rabbit owners mixed different kinds of feeds to get the proper nutritional balance for their animals. Today, stores carry feed that is already balanced. However, a good feeding program requires much more than simply filling up the feed dish. Several types of ration are available to suit specific needs.
A wild rabbit picks and chooses what it eats to get a balanced diet. Your caged rabbits depend on you to satisfy their nutritional needs. Feeding commercial rabbit pellets is the best and easiest way to provide proper nutrition. A great deal of research goes into producing a balanced ration, and feed companies are well qualified to formulate rations. Commercial feeds vary in quality and price, and different feeds are available in different locations. Talk with other breeders and your feed store clerk to learn about brands of feed that are available in your area.
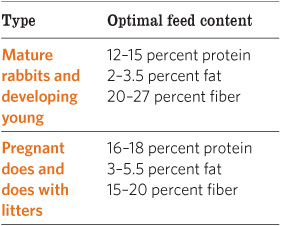
Rabbit Feed Guidelines
Caution
Never feed greens to young rabbits. Greens can give the youngsters diarrhea and can kill them.
Rabbit feed is available in several types, each intended to meet the needs of a rabbit at a different stage in its life. The ingredient that usually varies among these types of feed is the protein content. Mature animals usually need feed that provides 12 to 15 percent protein; active breeding does usually need 16 to 18 percent protein.
The label on a feed package will tell you not only how much protein but also how much fiber and fat the feed contains. For optimal health, follow the feed guidelines in the chart at left.
Salt is important to a balanced feed. You may see advertisements for inexpensive salt spools that can be hung in your rabbit’s cage. Using such spools is not necessary, and they will cause your rabbit’s cage to rust. Commercial rabbit pellets include enough salt to meet a rabbit’s needs.
Rabbits enjoy good-quality hay, and it adds extra fiber to their diet. If you feed hay, be sure it smells good, is not dusty, and is not moldy. And remember that feeding hay will add more time to your feeding and cleaning chores.
If you choose to feed hay on a regular basis, place a hay manger in each cage. Hay mangers are easy to construct from scraps of 1-by-2-inch (2.5 × 5 cm) wire mesh. If your cages are inside and are all-wire construction, you can just place a handful of hay on the top; the rabbits will reach up and pull it through the wire. Do not place hay on the floor of the cage because it will soon become soiled. The droppings that collect on it will promote disease and parasites.
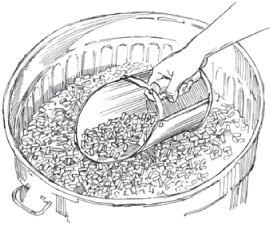
A covered metal garbage can keeps pellets clean and dry and keeps mice out; a scoop is handy for feeding.
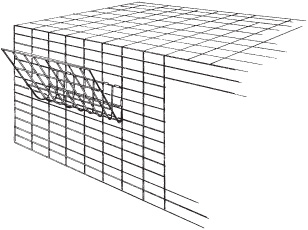
To make a simple hay manger, bend a scrap of wire mesh and attach it to the sides of your cage with J-clips. Make sure no sharp wire edges protrude into the cage.
Experienced rabbit raisers often give their animals special feeds, such as oats, sweet feeds, corn, and sunflower seeds. However, any additions to the diet can upset a rabbit’s digestion. It is best to keep to a simple diet of pellets and water, perhaps supplementing with some hay. Avoid additional feeds until you have several years’ experience in successful rabbit raising.
Many new rabbit raisers like to pamper their animals by giving them fresh greens and vegetables as treats. But the fact is that many of these treats can be harmful to rabbits. Because young rabbits have especially sensitive digestive systems, it’s best not to give them any treats. Absolutely do not give young rabbits any greens, including lettuce—greens can cause diarrhea. As a rabbit matures, its digestive system becomes hardier; still, treats should never become a large part of your rabbit’s diet.
What might you give as an occasional treat to adult rabbits? They’ll enjoy the following:
• Alfalfa
• Apples
• Beets
• Carrots
• Lettuce
• Pumpkin seeds
• Soybeans
• Sunflower seeds
• Turnips
Pellets are usually fed from crocks (heavy plastic or pottery dishes) that sit on the cage floor or from self-feeders that attach to the side of the cage. If you choose to use a crock, select one that is heavy enough that your rabbit cannot tip it over and waste its feed. To make feeding easier, place the crock close to the door of the cage. Never place the crock in the area that your rabbit has chosen as its toilet area. Because rabbits can soil the food in crocks, feed only as much as will be eaten between each feeding time.
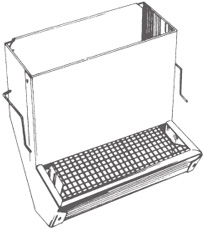
This self-feeder clips to the cage wire and can be filled from outside the cage.
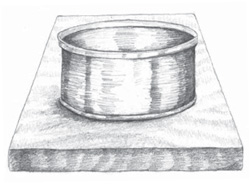
To keep costs low, make a simple feeder from a 12-oz. (340 g) tuna fish can. Tack the can to a 10 in. (25 cm) square of ½ in. (1.25 cm) plywood to make your feeder hard to tip.
Self-feeders attach to the wall of the cage and are filled from outside the cage. If you use a self-feeder, choose the type that has a screened, not solid, bottom. The screen allows fines (small, dusty pieces that break off from the pellets) to pass through. Otherwise, fines tend to build up because rabbits will not eat dust from feed. An advantage of self-feeders is that young rabbits are less likely to climb in the feed.
Your rabbits cannot thrive unless you provide them with a constant supply of clean, fresh water. Each day a rabbit will drink about 1 quart (1 L) of water, more in hot weather. As with feed, providing water can be done in several ways.
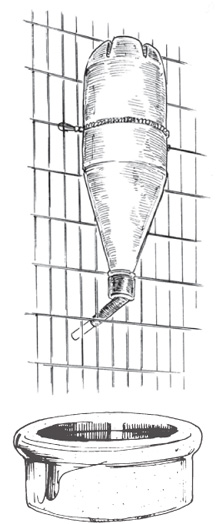
A water bottle (top) is cleaner than a crock (bottom) but will freeze and crack in cold weather.
The ideal type of waterer is a plastic water bottle that hangs upside down on the outside of the cage and has a metal tube that delivers water to the rabbit. This type of waterer keeps water cleaner than a crock does and cannot be tipped over, but water bottles freeze easily and therefore cannot be used outdoors in cold weather.
If you live in an area where freezing temperatures are common and you keep your rabbits outside, you might try heavy plastic crocks. You can remove frozen water from these crocks without breaking them or waiting for them to defrost. To save time during winter feeding, hit the plastic crocks against a solid object to dislodge the frozen water, then refill them.
The feeding habits of domestic rabbits are similar to those of wild rabbits. Wild rabbits are nocturnal—you don’t see them much during the daytime, but they often appear in the early morning or late afternoon to have their big meal of the day.
If our tame rabbits could pick a mealtime, they would probably agree with their wild relatives and choose late afternoon. Using this information, most rabbit breeders feed the largest portion of their rabbits’ daily ration in the late afternoon or early evening. Although different breeders develop schedules that work for them, two feedings a day—one in the morning and one in the late afternoon—seem to be most common. If you choose to feed twice a day, serve a lighter feeding in the morning and a larger portion in the afternoon.
Feeding Chart
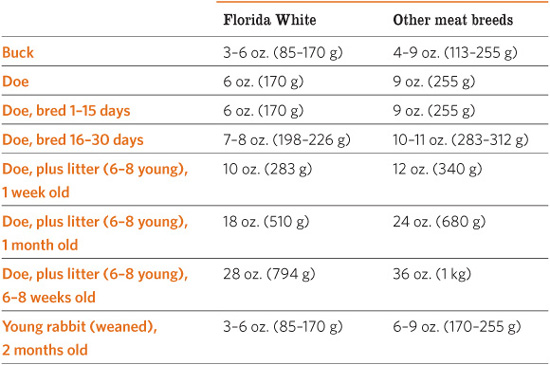
Whatever feeding schedule you choose, it’s important to follow it every day. Your rabbits will settle into the schedule that you set, and variations in that schedule may upset them. And even if you feed your rabbits only once a day, check their water twice a day to ensure they never run out. Remember, your rabbits need clean, fresh water at all times.
Although different breeders develop schedules that work for them, two feedings a day seem to be most common.
Knowing how much to feed is probably the most complicated part of feeding rabbits. No set amount is right for all animals, but the chart above gives some average amounts.
To use the guidelines in the chart, you’ll need to measure how much you feed each animal. You can make your own measuring container from an empty can. You’ll need a scale that measures weight in ounces or grams. To adjust for the weight of the can, place the can on the scale and set the weight dial back to zero. If this is not possible with your scale, remember to figure the weight of the can into your measurements. Add pellets to the empty can until the scale reads the number of ounces or grams you want to feed, then mark a line at that level. Repeat this procedure as many times as necessary to ensure that you give each of your rabbits the correct amount of feed at each feeding time.
Feed guidelines are exactly that: guidelines only. Some rabbits need a little more feed, and some need less. Adjust each rabbit’s ration according to its physical condition. Some reasons a rabbit’s feeding may need to be adjusted are these:
• A young, growing rabbit needs more feed than a mature rabbit of the same size
• Rabbits need more feed in cold weather than in hot
• A doe that is producing milk for her litter needs more feed than a doe without a litter
Form the habit of checking each rabbit weekly by running your hand down its back to feel the condition of the backbone. The bumps of the individual bones that make up the backbone should feel rounded. If the bumps feel sharp or pointed, your rabbit could use an increase in feed. (However, extreme thinness may indicate a health problem.) If you don’t feel the individual bumps, most likely too much fat is covering them and the rabbit should receive less feed.
A homemade feed measure is an inexpensive way to determine how much to feed each rabbit.
Stroking your rabbit takes only a few seconds, and if you check regularly, you can adjust the ration before your rabbit becomes too fat or too thin. If you need to adjust the amount you feed, make the change gradually. Unless the rabbit is very thin or very fat, increase or decrease by about 1 ounce (28 g) each day. You should see and feel a difference in one to two weeks.
Overfeeding is a more common problem than underfeeding. If you feed your rabbits too much, caring for them costs more than necessary. More important, overweight rabbits are less productive than animals of the proper weight. Fat rabbits often do not breed at all, and an overweight doe that does become pregnant often develops health problems.
Feeding Time Is Checkup Time
Feeding time is for more than just feeding. Any time spent with your rabbits gives you an opportunity to observe many important details:
• Has a youngster fallen out of a nest box?
• Is an animal sick or not eating well?
• Does a cage need a simple repair before it becomes a major repair?
• Does a rabbit need extra water because of extreme heat or freezing conditions?
A lot can happen to your rabbits in 24 hours. The expenditure of time to feed, water, and observe your rabbits at least twice a day is a worthwhile investment.
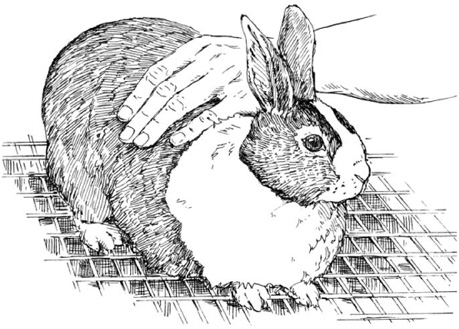
To determine whether you need to increase or decrease the ration, stroke each rabbit from the base of its head along the backbone, feeling the backbone beneath the fur and muscles.
Producing your own rabbits for meat is an exciting part of keeping rabbits. Before you begin your breeding program, make sure your rabbits are mature enough and in good health to ensure the best odds of success.
There are two main signs that your doe is ready for breeding: She rubs her chin on her food dish or on the edge of her cage, and her genital opening looks reddish. Rubbing is how rabbits leave their scent to mark territory and to let other rabbits know they’re around. If the doe’s genital opening is pale or light pink, she is probably not ready to mate.
The larger the breed, the more time it takes for the rabbits to reach maturity. Medium- to large-size meat breeds—those that mature at 6 to 11 pounds (3 to 5 kg)—are generally ready to breed at 6 months of age. Producing young is strenuous for the rabbit, so take the time to check each animal’s health before you consider breeding it. Breeders should be in good physical condition, not too fat and not too thin, and free from diseases, especially coccidiosis.
Bucks are almost always willing to breed; does sometimes resist. When you are ready to put the male and the female together for breeding, always take the doe to the buck’s cage. Rabbits, especially does, are territorial. If the buck is put into the doe’s cage, the doe may respond by defending her territory from the buck rather than mating with him. By taking the doe to the buck’s cage, you avoid arousing her territorial instinct, and she is more likely to mate.
When a doe and a buck are placed together, the buck is usually ready to mate and chases after the doe. If the doe is ready to mate with the buck, she will not run away and will raise her hindquarters after the buck starts the mating motions. To hold his position on the doe, the buck grabs a mouthful of her fur. Sometimes he pulls out some of the doe’s fur, but he usually does not hurt her. You will be able to tell when mating has occurred because the buck will make a noise (usually a groan or a squeal) and then fall off to the side of the doe.
Hutch Cards
Hutch cards, as their name suggests, are attached to the rabbits’ cages. They are kept so you can write down important information along the way (sample shown at right). Since the cards can be easily soiled or lost, copy the information into a permanent notebook on a regular basis—perhaps once a month.
Hutch cards help you keep track of how productive your breeders are. For a doe, a hutch card records such information as which buck she is bred to, when her litter is due, and how many young she kindles. For a buck, the card lists which does he is bred to, when they kindle, and how many young he has fathered.
Hutch cards are often available free from feed companies. You may be able to pick them up at your feed store, or you may have to write to the feed company and request a supply. You can also make your own.
Hutch Card
Doe’s name: ______________
Doe’s number: ______________
Buck’s name: ______________
Buck’s number: ______________
Date litter is due: ______________
Number born: ______________
Number weaned: ______________
Comments: ______________
Do not leave your rabbits unattended during mating. By watching, you can be sure mating has taken place and you can separate the animals if problems arise.
Sometimes the doe does not seem to want to mate with the buck. She will not raise her hindquarters and will run around the cage to try to get away from him. She may change her mind and be ready to mate after a few minutes, so leave them together for a short while. However, if the doe does not show interest within 10 minutes, take her back to her own cage and try again in another day or two.
Occasionally a doe that is not ready to mate will fight with the buck. If the buck and the doe fight, separate them and try again another day. If the doe is upset, she may bite. Be prepared: Have a pair of heavy gloves ready in case you need to remove the doe quickly.
Once mating has taken place, return the doe to her own hutch. Next, write down when the doe will kindle (give birth). You can expect the litter to be born in 28 to 35 days; the average length of gestation is 31 days. You might want to keep this information on a hutch card attached to the doe’s cage.
Fatness causes problems, such as pregnancy toxemia, in pregnant does. Resist the urge to give extra feed to the doe during the early stages of pregnancy. Most breeders keep the doe on her normal ration for the first half of the pregnancy (15 days). During the second half of the pregnancy, increase the doe’s feed gradually. (See the chart on page 123 for guidelines.) Just before a doe kindles, she will eat less, and you can decrease her feed during the last two days.
Your doe will need a nest box in which to have her litter. A nest box gives the kits a cozy place to snuggle and confines them so they won’t stray and become chilled. Nest boxes come in many sizes and types. The larger the breed, the larger the box required. Nest boxes can be made of wood, wire, or metal.
Wooden nest box. Homemade nest boxes are commonly made of wood. Use ¾-inch (2 cm) plywood. Many does love to chew on the edges of the nest box, and plywood holds up well. Use wood glue and nails to assemble the nest box. Drill a few holes in the bottom to permit drainage, which helps keep the box from becoming damp. A damp nest box can contribute to diseases in young rabbits.
Nest Box Sizes
• Florida Whites: 18 inches long, 10 inches wide, 8 inches high (46 × 25 × 20 cm)
• Other meat breeds: 20 inches long, 12 inches wide, 10 inches high (51 × 30 × 25 cm)
Some breeders in cold climates place a cover over part of the nest box to help retain heat. A disadvantage of a partial cover is that it traps moisture.
Wooden nest boxes need to be thoroughly disinfected between litters. Use a bleach-water solution (1 part household chlorine bleach to 5 parts water) to sanitize the box and let it dry thoroughly in the sunshine. Store nest boxes where they won’t be contaminated by other animals, such as dogs, cats, or rodents.
Wire nest box. You can build a nest box from ½ inch by 1 inch (1.25 × 2.5 cm) wire mesh. Line the box with cardboard in cool weather to prevent drafts. Discard cardboard liners after each litter to help keep the nest box clean.
Metal nest box. An advantage of metal nest boxes is that they are easy to clean. During cold weather, many breeders use cardboard liners as insulation.
A doe needs clean, dry, soft materials in the nesting box so that she can make a nice nest. Hay and straw are the most common nesting materials. Place about 2 inches (5 cm) of wood shavings in the bottom of the nest box and add lots of clean hay on top. Use less bedding in the summer. In winter, insulate the bottom of the box with layers of cardboard, followed by wood shavings, with hay packed tightly on top.
Choose the Right Nesting Material
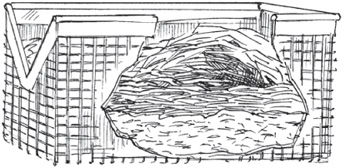
In cold weather, use several inches or centimeters of shavings and fill the box completely with straw.
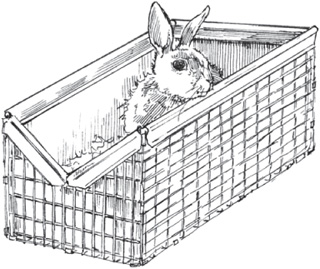
Line a wire nest box with corrugated cardboard.
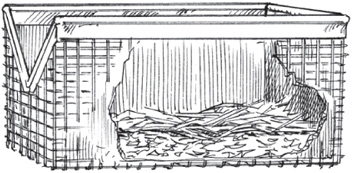
In warm weather, keep nesting material to a minimum. Too much may cause overheating of the litter. Use 1 in. (2.5 cm) of wood shavings, covered with a few handfuls of straw.
Place the prepared nest box in the doe’s cage on the 27th or 28th day after mating. If you put the box in too early, the doe may soil the nest with droppings or urine. Any later may be too late for a doe that kindles early. Do not place the nest box in the part of the cage the doe has chosen as her toilet area.
Cold-Weather Kindling
Although healthy adult rabbits don’t suffer when it’s cold, newborn rabbits are vulnerable to cold temperatures. If you’re expecting a litter during cold weather, be sure the doe has a well-bedded nest box. You may want to move the doe into a warmer location, such as a cellar or a garage. After the litter is about 10 days old, the cage, with the doe and the nest box of babies, can be moved back outside. Some breeders keep the box of newborn rabbits in their warm homes. At feeding times, they take the nest box out to the doe or bring her inside to nurse her litter.
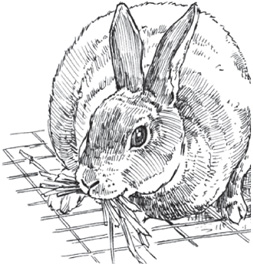
When the doe starts to carry straw around the hutch, it’s almost kindling time.
As the big day approaches, the doe will begin to prepare a nest. Some does jump into the nest box as soon as it is placed in the cage and rearrange the bedding to suit themselves. You may see the doe carrying a mouthful of hay around the cage as she decides where to place it. This indicates that kindling time is near.
The doe also uses fur that she pulls from her own chest and belly to pad the nest. Pulling the fur not only provides soft nest material but also exposes her nipples, making nursing easier for her babies after they’re born.
Some does, like some people, leave everything to the last minute. They show little interest in the nest box when you first put it in. You may feed your doe one evening and see an untouched nest box only to come back the following morning and see that it’s all over: The nest is made, fur is pulled, and babies have already arrived.
The doe will eat less the day or two before kindling. This change in appetite is normal. She also may act more nervous than usual.
Some does do a neat job of kindling, and you may not even notice the litter has arrived. If you look closely, you will see that the fur in the nest appears all fluffed up. On closer observation, the fur seems to move.
Be sensitive to the new mother’s anxieties. Be sure to keep the doe’s area quiet. If she appears nervous when you approach to check on the litter, distract her first. A nervous doe may jump into the nest to protect her babies, unintentionally stepping on and injuring them. Take a handful of fresh hay, a slice of apple, or another of the doe’s favorite treats if she needs a distraction. Once she is occupied, check things out.
Gently place your hand into the fur nest. You should feel warmth and movement. If the doe remains calm, part the fur and take a peek. You should see several babies cuddled together for warmth. Newborn rabbits have no fur, and their eyes will be closed. Take a quick count. Counting may be a challenge, as the bunnies will be piled on top of one another.
Check the new litter for babies that did not survive. If you find any dead babies, remove them, as well as any soiled bedding.
Medium- and large-size does usually have eight nipples from which their young will nurse. If a doe has more babies than nipples, some of the babies won’t get as much to eat as others. To prepare for this situation, many rabbitry owners plan the breeding so more than one doe kindles at a time. If one doe has an unusually large litter, some of the babies can be moved into the nest box of a doe that has had a small litter. Most does will accept additional babies if they are about the same size as their own and smell like their own.
Some people go to great lengths to trick the doe into thinking these additional babies are her own. One method is to put a strong-smelling substance on the doe’s nose. The idea is that a little dab of perfume or vanilla makes everything smell the same to the doe, and therefore she will not notice the extra babies. But you can be successful in fostering babies without using special scents. Here’s how: Rabbits nurse their young only at night. If you need to move babies to another nest box, move them in the morning. The babies cuddle in with their new littermates, and by feeding time, they will all smell the same to the doe.
Keeping the new mother in good health is the most important thing that you can do for the babies. Give the doe a limited amount of feed for the first few days after kindling. She will continue to eat and drink, but she will eat a little less than her normal amount. After a few days, her appetite will increase. She will then require an increased amount of feed so her body can meet its own nutritional needs and produce milk for the growing litter. The doe’s need for water will also increase.
Check the litter every two or three days to make sure the bunnies are healthy and remain in the nest with their siblings. It’s normal for the young to react to a human hand invading their nest, so don’t be surprised if the babies jerk away from your touch. Just be careful that they don’t injure themselves. Do not let individuals squiggle away from the warmth of the group.
Occasionally a baby will fall or crawl out of the nest box. Mother rabbits do not carry their babies like cats carry their kittens. If you find a young bunny out of the nest box, place it back with its littermates. In addition to needing the warmth of the group, babies that stray from the nest are likely to miss mealtime. The mother will nurse only one group of babies. Absent young won’t get fed and will soon die.
In cold weather, kits that leave the nest too early are at particular risk for dying of exposure. Rabbits are born without fur, and if they leave the warmth of the nest, they will soon become chilled. On cold days, begin your morning chores with a quick check for straying babies. If you find a baby outside the nest and it still feels warm to the touch, place it back with its littermates. If the baby feels cold to the touch, it may need some extra help regaining its body temperature (see the box on page 130).
Baby rabbits begin to grow fur within a few days of birth and by 2 weeks will be completely furred.
Most does will enter the nest box only at feeding time. Once in a while, however, a doe spends more time than necessary in the box. (She is more likely to spend excessive time in a nest box that is too big.) As a result, the nest box becomes dirty and damp—a perfect setup for disease. If you see droppings in the nest box or the bedding materials feel damp, clean the nest box.
1. Remove the nest box from the doe’s cage.
2. Remove and save any clean and dry fur the doe has pulled. Place this fur in a container—a cardboard box or a clean bucket with some clean bedding in the bottom—and gently place the litter in this temporary home.
3. Remove the soiled bedding and replace it with clean bedding.
4. Use your hand to form a hole in the clean bedding. Line this area with some of the saved fur, place the babies in it, and cover them with the remaining fur.
5. Return the clean nest box and litter to its location in the doe’s hutch. Your bunnies now have a clean and healthy nest to grow up in.
Caring for Orphans
Sometimes a doe dies after giving birth. In that case, you may wish to try to feed and care for the babies until they are mature enough to take care of themselves. To feed the young, make up the following mixture and store it in the refrigerator.
• 1 pint (473 mL) skim milk
• 2 egg yolks
• 2 tablespoons (30 mL) Karo syrup
• 1 tablespoon (15 mL) bonemeal (available in garden supply centers)
Use an eyedropper or drinking straw to feed this mixture to the babies twice a day. Feed them until they stop taking the milk (usually about N ounce [5 to 7 mL]).
In addition to keeping the kits warm and fed, make sure they urinate and defecate regularly. Stimulate elimination by stroking their genitals with a cotton ball after you feed them. Follow these procedures until the young are 14 days old.
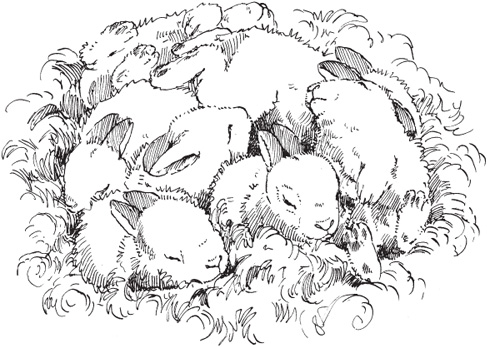
Ten-day-old babies in the nest. Newborns should be handled rarely, if at all, so the doe will not be upset by the intrusion in her nest and so you avoid passing your scent to the young.
The babies should open their eyes at 10 days of age. It’s important to watch for this event. Sometimes a baby cannot open its eyes even though it is old enough to do so. This situation usually indicates an eye infection. An infection may affect one or both eyes. Eye infections may occur in one or several littermates. Tending to this condition as soon as possible is your best means of avoiding blindness.
A baby that cannot open its eyes usually has dry, crusty material sealing the lids together. Use a soft cloth, cotton ball, or facial tissue soaked in warm water to wash and soften the crusted eyelids. Then use your fingers to gently separate the eyelids. Gently wash away any remaining crusty material. If the edges of the eyelid look reddish, place a drop of over-the-counter eyedrops for humans (Systane is a good choice) in the eye.
Check the babies for several days and repeat this procedure as necessary. Once the eye is cleaned and opened, most rabbits recover quickly.
If you see pus when you open an eye as directed above, the bunny has a more serious condition. After gently washing away the crusty material and pus, use medicated eyedrops containing the antibiotic neomycin; these eyedrops are available from your veterinarian. You will need to clean the eye and apply medication for several days, after which the infection should clear up.
Methods of Warming a Chilled Bunny
Share your body heat. Tuck the baby inside your shirt so it can rest against you and gain warmth. It’s a wonderful experience to feel a cold, almost lifeless bunny slowly regain consciousness.
If you have a heating pad, turn it on, cover it with a towel, place the baby rabbit on it, and place the pad and rabbit in a small box. Make sure the box provides protection if you are taking the rabbit into an area where there are pets, such as dogs or cats.
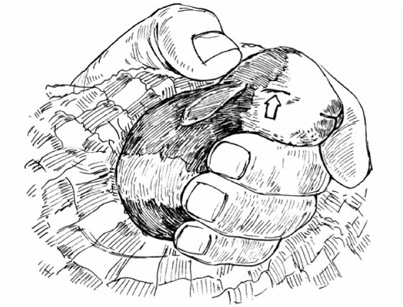
If a 10-day-old kit cannot open its eyes, it is usually because they are sealed with crusty material.
Some rabbits have a normal-looking eye after recovering from an infection of this type. However, some may develop a cloudy area on part or all of the eye. Cloudiness usually means the rabbit will be partially or totally blind in that eye
As the kits approach 3 weeks of age, they will begin to come out of the nest box. At this age, they also can find their way back into the box, so you don’t have to worry about constantly watching for strays. The bunnies will begin to eat pellets and drink water. You’ll need to start providing more food and water, even though the babies are still getting milk from their mother. Baby rabbits continue to nurse until they are about 8 weeks old.
Bunnies are at their cutest from 3 to 8 weeks of age. This age is an excellent time at which to begin to handle them. Be especially careful when you pick them up for the first time. Young rabbits are easily frightened, but they adapt quickly. Try to spend a few minutes each day handling the babies. Rabbits that are handled properly as youngsters will be more easily handled throughout their lives. Of course, you don’t want to get attached to rabbits you plan to eat, but you also don’t want them to be difficult to handle when the day comes.
It takes some practice to sex young rabbits accurately. Try to sex the litter at around 3 weeks of age, when you are beginning to handle the youngsters on a regular basis. Part of the young rabbits’ handling experience should include getting used to being turned over for examination, which is necessary for sexing.
The small sexual openings on young rabbits make it difficult to be absolutely sure which sex an animal is. To help you gain confidence in sexing your litters, start to check them at an early age and reexamine them weekly. Use a black marking pen to write a B in an ear of those you believe are bucks and a D in an ear of those you believe are does. Each time you reexamine the litter, check to see if you agree with what you thought when the rabbits were a week younger. You may find that you will change the letter in the ears of several animals. If you continue to check through weaning, you will find that sexing young rabbits becomes easier as the rabbits get older. Even experienced rabbit breeders can make mistakes in sexing young rabbits, so don’t become discouraged.
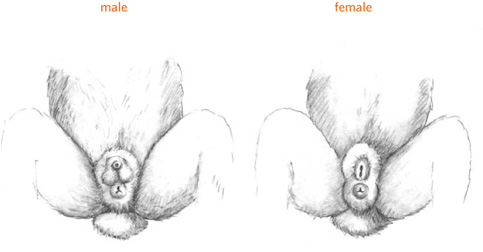
When the litter has reached 3 weeks of age, examine each young rabbit to determine its sex.
As the litter grows, keeping the hutch clean will become more of a challenge. The crocks used to feed and water the litter will become soiled frequently, as young bunnies climb into them and leave their droppings behind. Feeding smaller amounts more often will save more feed than feeding a large amount once a day. Giving several small feedings will also give you more opportunities to clean out the feed dishes. The cleaner the litter’s environment, the healthier it will be.
When the babies are out and about at 3 weeks of age or so, you can remove their nest box, unless the weather is very cold. Once the babies start eating pellets, they also produce droppings that dirty the box. If you choose to leave the nest box in the cage longer, be sure to clean it and replace the bedding whenever it becomes soiled.
As the litter reaches 8 weeks of age, the young rabbits are ready to be weaned, or removed from their mother. By now, young rabbits are used to eating pellets and drinking water, and the doe’s body needs a rest before she is ready to raise another litter.
In addition, by 8 weeks of age, the youngsters begin to exhibit adult behaviors. They express instincts about territory and breeding. Young bucks will begin to chase after their sisters. Rabbits can mate and produce litters before they are fully grown. Because having a litter at a young age is stressful for a doe, and because it’s not desirable for close relatives to breed, part of the weaning process includes separating the litter by sex.
Many breeders feel that the weaning process is easier on the mother if not all the young rabbits are removed at once. Since most litters are about half bucks and half does, a good plan is to remove the young bucks first. A few days later, the young does may be removed. This two-part weaning process allows time for the doe’s body to adapt gradually to the need for reduced milk production.
As rabbits mature, they do best if they have their own private space. Rabbits that are housed together often fight to decide who will be the boss of the hutch. Although rabbit fighting seldom leads to life-threatening injuries, torn ears, scratches, and bite injuries are common. Young rabbits being raised for meat can be kept more than one to a cage, but the cage should provide adequate space, and each cage should house just one sex. Rabbits can be kept more than one to a cage until they are up to 4 months of age. Be alert to any fighting and separate those involved.
The Doe’s Refuge
You may wish to allow the nest box to remain a little longer than three weeks, more for the doe’s sake than for the litter’s. As the babies explore their hutch, they pester their mother for extra attention. A nest box with a partial top provides a place for the doe to get away from the demands of the litter. Once the babies are big enough to climb on top of the box, the doe’s hideaway no longer serves its purpose, and it’s time to remove the nest box.
A tattoo set contains needled letters and numbers, tattoo pliers, and ink.
Tattooing is generally done at weaning. Of course, you do not have to tattoo rabbits destined to become meat, but you might want to tattoo any you plan to keep as future breeders to help you keep track of who is who. And if you want to register any offspring kept as future breeders, they must be tattooed.
If you have a small rabbitry, or won’t keep many of your breeders’ offspring, you may not want to spend money on tattooing supplies. In that case, ask other breeders if they will tattoo your animals for a small fee.
The tattoo may be a number, a word, or a combination of letters and numbers. Some breeders use short names, such as Joe or Pat, so the tattoo names the animal as well as identifies it. Others develop systems that provide more information about each animal. For example, in one system, a letter stands for a certain buck, another letter stands for a certain doe. Thus, if we had an animal with the tattoo TB3, we would know that it was a buck whose father was named Thumper and whose mother was named Bambi. The possibilities are endless. Develop a tattoo system that works best for you. Most tattoo sets are limited to five numbers or letters per tattoo, so be sure your system takes this limitation into account.
The letters and numbers in a tattoo set are made up of a series of small needles. When the tattoo pliers are closed on the rabbit’s ear, they make a series of small punctures. Tattoo ink is then rubbed into the area. The tattoo ink that goes into the punctures becomes permanent, while the ink on the ear’s surface soon wears away. Tattooing is a bit painful for the rabbit, but only for a short time.
To learn how to tattoo your own animals, observe others when they tattoo. Choose rabbits that are not show quality for your first tattoos. Tattooing has no one right way. Here is one successful technique:
1. Practice placing the numbers and letters in the tattoo pliers. Use a piece of paper to check what you have in the pliers. It’s very easy to get a 21 when you really wanted a 12. By checking first, you’ll avoid an incorrect tattoo.
2. Restrain the rabbit. The rabbit will pull away when the pliers are clamped, and it could be injured. If you have someone to help you, one person can restrain the animal and the other can do the tattooing. The holder can wrap the rabbit in a towel so only its head and ears stick out. The towel will keep the rabbit from moving and from scratching the holder. If you have to tattoo alone, you might place the rabbit in a narrow show carrier. The carrier keeps the rabbit confined and allows you to use both hands for the tattooing. One hand secures the left ear and the other holds the tattoo pliers.
3. Use a little rubbing alcohol on a cotton ball to wipe out the ear before tattooing. Cleansing the ear surface allows the ink to adhere better.
4. Look at the inside of the rabbit’s left ear. You’ll be able to see some of the blood vessels that are just below the surface of the skin. Find a space where no large vessels cross, and plan to place the tattoo there. Even with careful planning, you may hit a blood vessel. Hitting a vessel will cause some bleeding that can be easily stopped by applying some gentle pressure to the area. Bleeding can wash the tattoo ink out of the punctures, so avoiding blood vessels usually makes for a more successful tattoo.
Selecting Future Breeders
If you’re going to keep any of the bunnies for future breeding, move them to separate hutches and attach a card that identifies the rabbit housed there. The hutch card should include when the animal was born, what sex it is, and who the parents are. This information will come in handy when the rabbit is ready to be bred. In deciding which animals in the litter are best suited to be breeders, apply the same qualifications that you would use in evaluating an animal to purchase.
5. Clamp the pliers down on the rabbit’s ear in the spot you’ve chosen. This part is the hardest, because no one wants to hurt an animal. Take comfort in the fact that the pain is brief. Release your grip on the pliers immediately after you close them, and the worst is over. Just how hard to close the pliers to ensure a good tattoo is difficult to say. The thin ears of young rabbits need only the pressure used to pretest the tattoo on paper. Older animals have thicker ears that require a slightly firmer grip.
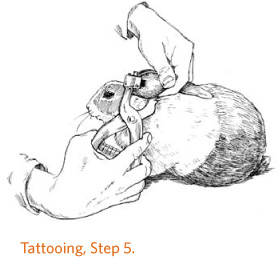
6. Give the rabbit a few seconds to calm down, and then look inside the ear. Your tattoo should appear as a series of dots.
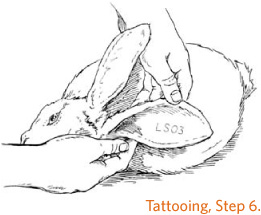
7. Now apply the tattoo ink. An old toothbrush works well for this purpose; the bristles help work the ink into the small punctures. Most rabbits do not seem to mind this part of the procedure.
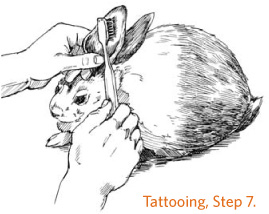
8. After the ink is applied, some breeders apply a thin layer of petroleum jelly. The jelly forms a seal that helps keep the ink in the punctures. The excess ink will wear off normally, or the mother may clean it off while grooming her baby. If the ink has not worn away by the time your rabbit is entered in a show, you will need to remove it to make the tattoo readable. Use a tissue and a little petroleum jelly to wipe the excess ink away.
If you own one or two rabbits, remembering all the important details about them is easy. But as time goes by and breeders are replaced, it will be difficult to recall everything about each animal. Keeping accurate written information about your rabbits is therefore important for the following reasons.
• You’ll have information to help you decide which doe gets bred to which buck.
• Your rabbitry will be more productive because your records will show which animals are your top producers; you can use this information to help you decide which animals to keep in your herd.
• You’ll know how much your rabbits cost you and how much meat they produce for you.
• You’ll have the information you need to make a written pedigree for each animal.
Written information includes hutch cards (described on page 125), pedigree papers, and registration papers. Of course, you need not write a pedigree for each meat animal, but you should certainly write a pedigree for any stock you keep for future breeding.
A rabbit’s pedigree paper is a written record of its family tree—who its parents, grandparents, and great-grandparents were. Usually, pedigrees also include such information as the color, tattoo number, and weight of each animal. You can use the information on a pedigree to help you make decisions that will affect your breeding program. Are you trying to increase the weight of your rabbits? If you breed your doe to a buck whose pedigree shows relatives with high weights, you will have a better chance of producing heavier rabbits than if you breed to a buck whose relatives are on the light side.
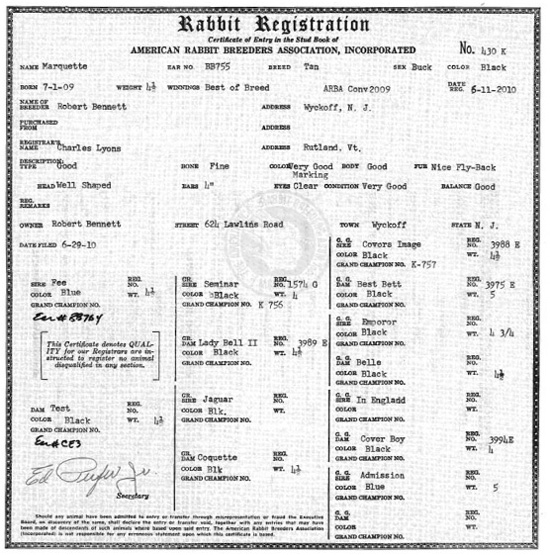
The registration certificate of the winner of best of breed at a national ARBA convention show.
Filling out a pedigree can be confusing at first. You have to take information from the buck’s pedigree and combine it with information from the doe’s pedigree. Pedigree forms use the term sire for the father or buck, and dam for the mother or doe. If you should someday decide to sell one or more of your breeders, those with pedigrees usually bring a higher price.
Sources of Blank Pedigrees
• The American Rabbit Breeders Association (ARBA) sells pedigrees in books of 50.
• Most breed associations have pedigrees that feature an illustration of their breed.
Many people mistakenly think pedigreed animals are the same as registered animals. A registered rabbit must have a pedigree, but it has to meet additional requirements as well:
• The rabbit must be examined by a registrar who is licensed by ARBA. The registrar goes to the rabbitry and checks to see that the rabbit has no disqualifications for its breed. The registrar will need a copy of the rabbit’s pedigree.
• The rabbit’s owner must be a member of ARBA.
• ARBA will charge a registration fee.
• The rabbit must have a permanent tattoo number in its left ear.
When you raise meat rabbits for yourself and your family, you may not want to go through the trouble and expense of registering any offspring you keep as future breeders. But you may want to consider registration if you are thinking of someday showing or selling rabbits.
The following four major factors contribute to your rabbits’ health: housing, environment, observation, and nutrition. A problem in one area can lead to problems in one or more of the others.
Housing. Hutches should offer protection from extremes in temperature, from wind, and from rain and snow. Hutches must be cleaned often to prevent disease-causing germs from flourishing.
Environment. Prevent situations that stress or upset your rabbits, such as exposure to loud noises, encounters with wild or frightening animals, and summertime heat.
Observation. One of the most important things you can do each day for your rabbits is to observe them. Through observation you’ll learn what is normal for each of your rabbits, and you’ll be better prepared to identify abnormal behavior. Changes in the way a rabbit acts or looks often indicate that it is not feeling well. The sooner a problem is spotted, the better the chances are of solving it before it becomes serious.
Nutrition. Feed the proper amounts of the right foods on a regular schedule. Be familiar with the amount of food each rabbit normally eats. A change in eating habits is often one of the first signs that a rabbit is not feeling well. And don’t forget your rabbit needs fresh water at all times.
If you start with healthy rabbits and take good care of them, they should have few health problems. If a problem arises, early treatment will increase your rabbit’s chances for a full recovery. Having the necessary things on hand will help you start treatment as soon as you notice a problem. Assembling a rabbit first-aid kit is easy; you may already have some of the supplies in your home. Every couple of months, go through the kit and check the condition of your supplies. Discard and replace expired medications.
For items you have to purchase, try to find other rabbit owners who would also like to make a first-aid kit for their rabbits. Most medicines come in fairly large amounts, so it helps if you can share the supplies and the cost with several others.
A Health Checklist
Occasionally an animal becomes sick. If you suspect a rabbit is not well, the following checklist will help you pinpoint what might be wrong.
The rabbit is eating less than its normal amount of feed.
 Yes
Yes  No
No
Discharge is coming from its eyes or nose.
 Yes
Yes  No
No
The rabbit’s droppings are softer than usual.
 Yes
Yes  No
No
The rabbit’s coat looks rough.
 Yes
Yes  No
No
The rabbit is dirty and has manure stuck to its underside.
 Yes
Yes  No
No
The rabbit is having trouble breathing or is breathing rapidly.
 Yes
Yes  No
No
If you checked “yes” for one or more of the above items, the rabbit may be ill. Begin a more thorough evaluation, or consult with your veterinarian to identify the problem.
Preparing a Rabbit First-Aid Kit
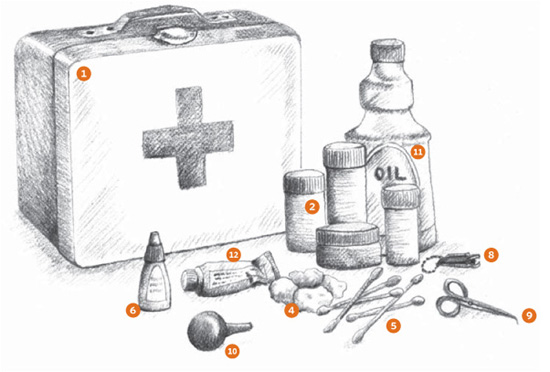
Be prepared for emergencies by keeping a fully stocked first-aid kit on hand. Your rabbit first-aid kit should contain the items listed below.
1. A container to hold your first-aid materials; a school lunch box is about the right size
2. Several small bottles or jars; empty containers from prescription drugs work well
3. Labels for marking each container with the following information:
• Name of the medicine
• What the medicine is used for
• How the medicine is given
• How much medicine is given
• How often the medicine is given
4. Cotton balls to clean wounds or apply medicines; store cotton balls in a plastic bag
5. Cotton swabs to clean wounds or remove ear mite crust; store swabs in a plastic bag
6. Saline solution wound wash
7. Disposable rubber gloves
8. Nail clippers for keeping nails trimmed. Clippers may also be used to trim teeth. Use ordinary nail clippers intended for humans or, if you have a large breed, use dog nail clippers.
9. Small pair of sharp scissors to trim hair from around wounds
10. Plastic eyedropper to give liquid medicines or put oil into ear to treat ear mites. Wash well between uses. Store in a small plastic bag.
11. Miticide or cooking oil to treat ear mites
12. The following products, purchased at a local farm store or drugstore:
• Antibiotic cream for wounds
• Bag Balm or Preparation H for sore hocks
• Eyedrops for nest-box eye infections
13. The phone number of your veterinarian, if she is knowledgeable about rabbits, or the phone number of an experienced rabbit owner in your area.
When a rabbit has a cold, it exhibits some of the same symptoms as humans do, such as sneezing and a runny nose. Unfortunately, 90 percent of the rabbits that appear to have colds actually have a much more serious disease called snuffles, which is caused by Pasteurella multocida. Snuffles can be treated, but it’s difficult to cure. You’re better off putting your time into preventing this illness, and the best prevention is to keep your rabbitry clean and well ventilated.
Sneezing is usually the first sign of a cold or snuffles, but many things other than disease can make a rabbit sneeze. If you hear sneezing, be sure to look for other signs of illness. A white discharge from its nose or matted, crusty fur on the front paws (caused by a rabbit wiping a runny nose) indicates that the rabbit probably has a cold or snuffles.
Rabbits and humans don’t communicate colds to one another, but rabbits communicate colds to other rabbits. If you suspect that a rabbit has a cold or snuffles, isolate it from your other rabbits and thoroughly disinfect its cage before moving another rabbit in.
If you want to try to treat the sick rabbit with antibiotics, contact your veterinarian for advice. Many rabbitry owners, however, would recommend that you simply have the rabbit put down. The risk of contagion is high, and snuffles can infect an entire rabbitry in no time at all.
Ear canker is caused by tiny mites that burrow inside the rabbit’s ear. A rabbit with ear mites will shake its head and scratch at its ears a lot, and the inside of its ears will look dark and crusty.
Although a miticide-containing oil is available from the vet, mites can easily be treated with common household oils. Mites breathe through pores in their skin. If they come into contact with oil, it blocks these breathing pores and they soon die.
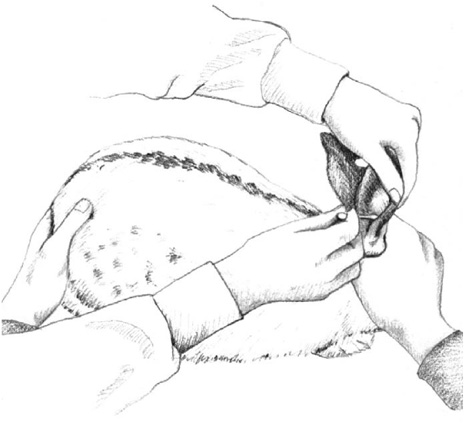
Use a cotton swab to remove loose, crusty material from the ear.
1. Use an eyedropper to put several drops of miticide-containing oil or olive, cooking, or mineral oil into the rabbit’s ear. Gently massage the base of the ear to help spread the oil around.
2. Use cotton swabs to remove some of the loose, crusty material.
3. Repeat this treatment daily for 3 days, wait 10 days, and repeat the treatment for 3 more days. Wait another 10 days and repeat the treatment again for 3 days.
Ivermectin, either injected under the skin or swabbed into affected ears, is another effective treatment for ear mites. Consult your veterinarian about the proper formulation and dose. Be aware that there will be a withholding period if you are treating rabbits raised for meat.
If you see mites on one rabbit, check all your rabbits. Mites are more likely to appear in rabbits that live in dirty cages. To prevent ear canker, keep your cages clean.
Properly trimmed toenails are important because they decrease the chances your rabbits will be injured. Long toenails can get caught in the cage wire and cause broken toes and missing toenails. The time spent trimming toenails will also decrease your likelihood of being scratched while handling your rabbits.
Trimming toenails is not hard to do, but many rabbit owners put off this task because they are afraid of hurting their rabbit. Learning to trim toenails is easier if you have a helper—one person can hold the rabbit while the other does the trimming. For most breeds, human fingernail or toenail clippers work well; larger breeds sometimes need dog toe-nail clippers.
A common disease that causes diarrhea is coccidiosis. The disease can kill rabbits if it goes untreated. Coccidiosis often occurs in young litters of rabbits. The protozoans that cause this disease are present in droppings and in soiled feed and bedding. A cage that was a clean home for one doe gets soiled much more easily when she has to share that space with eight growing youngsters. But older rabbits living alone may also contract coccidiosis. No matter what their age, rabbits kept in clean living conditions are much less likely to suffer from this disease.
Treatment of coccidiosis has two parts: thorough cleansing of the hutch and medical therapy for the animals.
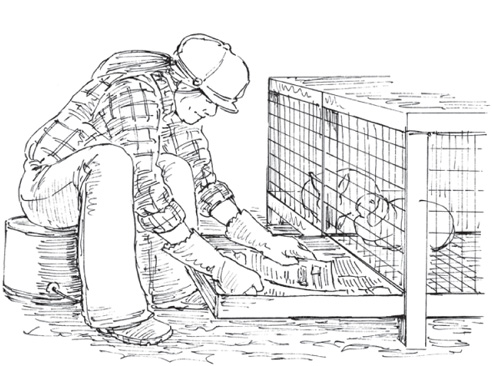
One of the best preventives against coccidiosis is to keep your rabbit’s cage clean.
Symptoms
• Soft droppings (diarrhea)
• Rough-looking fur
• Animal not growing as well as you think it should
• A potbelly, although the rabbit is rough-feeling over the backbone
Housing Treatment
• Remove all soiled bedding and food.
• Scrape all built-up manure from the cage at least every three days.
• Clean cage with a bleach-water solution (1 part household chlorine bleach to 5 parts water). Let dry thoroughly.
• If the bunnies are old enough (5 to 6 weeks), separate them into smaller groups, for which you’ll need additional cages.
Medical Treatment
Sulfaquinoxaline is used to treat coccidiosis. It should be available in most farm supply stores, probably as a treatment for coccidiosis in calves, pigs, or chickens. If the product label doesn’t give directions for treating rabbits, use the dosage suggested for poultry or mink.
Sulfaquinoxaline is mixed in water when given to animals. Mix up a batch of medicated water, following the instructions on the product label. Provide the medicated water for seven days, or as recommended on the label. The treatment plan is generally as follows:
• Give sulfa-treated water for seven days
• Give plain water for seven days
• Give sulfa-treated water again for seven days
• Repeat this sequence two to four times a year
Repeated treatment is necessary because during the first few days of sulfa treatment, the original organisms that made the rabbit sick are killed, and the rabbit will seem to be much better. The organisms that cause coccidiosis produce eggs, however, and a second treatment period is needed to kill organisms from the eggs that later hatch.
If the animal is being raised for meat, it must not be given medication within a certain number of days before it is sold. Follow the instructions on the label.
Coccidiosis is not the only trigger for diarrhea in rabbits. A rabbit may also have diarrhea because it lacks fiber in its diet, has experienced a sudden change of feed, is suffering from a disease of the digestive system, or has a bacterial infection. Administering tetracycline (by mixing it in with the rabbit’s water) may cure some cases of bacterial diarrhea. Consult your veterinarian about this treatment and others.
The person holding the rabbit should sit with the rabbit supported on his or her legs and turned over for trimming. The person doing the trimming can now use both hands—one to push the fur back to see the nail, the other to do the trimming.
If possible choose a white rabbit for your first trimming job. When you look at a white toenail, you will be able to see a pinkish line extending from the toe. This line is the blood vessel that brings nourishment to the growing nail. Toenails that need trimming have a clear white section after the pink. This white area can be trimmed without hurting the rabbit; trimming the pink area will hurt the rabbit and cause bleeding. Leave about ¼ inch (6 mm) of nail beyond the end of the blood vessel.
On colored toenails, seeing where the blood supply ends is more difficult. If you are not sure, trim only a little at a time. If you cut too closely and the rabbit begins to bleed, use a clean cloth to apply direct pressure and stop the bleeding.
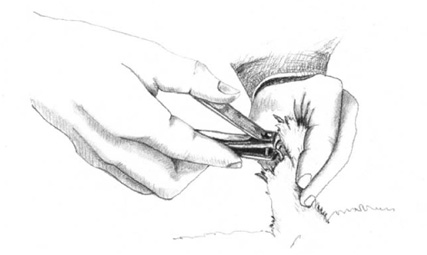
Use toenail clippers to trim your rabbit’s nails.
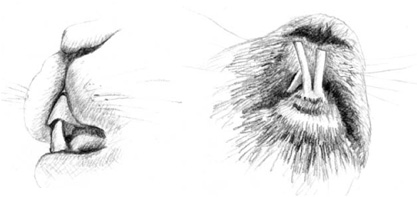
Properly aligned teeth (left) are much healthier for a rabbit than teeth that are overgrown because they are not properly aligned (right).
A rabbit’s teeth grow continuously, about ½ to ¾ inch (13 to 19 mm) per month. In a normal rabbit, the top front teeth slightly overlap the two bottom teeth. Normal chewing keeps a rabbit’s teeth at a proper length. If the teeth do not meet properly, this normal wearing down doesn’t occur and the teeth can grow overly long. This condition is called malocclusion, buckteeth, or wolf teeth. The top teeth may curl around and grow toward the back of the rabbit’s mouth, like a ram’s horns. The bottom teeth may grow out in front of, instead of in back of, the top teeth. These bottom teeth may grow so long they stick out of the rabbit’s mouth and may even grow as far as into its nostrils. The rabbit may have a hard time closing its mouth. When it tries to chew, these long teeth can stick into its mouth and cause it pain; they can also make it difficult for the rabbit to pick up its food.
Watch for these two warning signs of malocclusion in your breeders:
• A rabbit is losing weight but does not seem sick
• A rabbit drops its food or seems to have difficulty chewing when it eats
If you suspect malocclusion, remove the rabbit from its cage to check its teeth carefully. Good handling skills will really pay off, because you must turn your rabbit over to examine its teeth. To help your rabbit comfortably eat its food, you will have to trim these overgrown teeth. It’s easiest to have two people for this job—one to hold the rabbit and another to trim.
1. Use fingernail clippers to trim the teeth as close to normal length as possible. Be careful not to cut shorter than normal, or you may cause bleeding and discomfort. You may have to trim each tooth more than once to get it down close to normal size. You may need a larger tool for some large breeds. Your rabbit may not like having you stick the clippers in its mouth, but the actual clipping does not hurt it, because the teeth have no nerves.
2. Check the rabbit every two or three days to see how its teeth are coming along. Trimming should enable your rabbit to begin to eat normally again.
Some rabbits develop malocclusion from an injury, as when a rabbit chews on its wire cage. Whatever the cause, once the teeth are out of position, they rarely return to the proper position. In most cases, the teeth must be clipped every two to three weeks for the rest of the rabbit’s life. Most cases of malocclusion are inherited. To avoid perpetuating this trait, animals with malocclusion should never be used as breeders.
The hock is the joint in a rabbit’s hind leg between the upper and lower leg bones. Because the rabbit carries most of its weight on its hind feet, the area between the hock and the foot suffers a lot of wear and tear. Although the rabbit has fur on this part of the leg, it is not always thick enough to protect it. Sometimes the fur wears away and the unprotected skin develops sores. A sore hock can cause much discomfort. Causes of sore hocks include the following:
• Poor breeding of rabbits with thinly furred footpads
• Small feet compared to body size
• Large breed carrying a heavy weight, putting stress on the hock area
• Nervousness, resulting in frequent foot stamping
• Solid hutch floor with wet (from urine) bedding
Suspect sore hocks if your rabbit shows signs of being uncomfortable when it moves. Your rabbit will put its foot down and then quickly reposition it, as would a person trying to walk barefooted over sharp stones.
If you suspect a rabbit has sore hocks, remove the animal from its cage and examine its hock area. Are there areas where the fur has been worn off? Are these areas bleeding or infected? Also examine the front feet for sores.
If you spot sores, clean the hock area and apply a medicated cream, such as Bag Balm or Preparation H.
You can help your rabbit recover more quickly by checking its cage for things that may have caused the sore hock, such as sharp spots on the cage floor or wire that has been used upside down (on a ½ by 1 inch [1.25 × 2.5 cm] wire floor, the ½-inch [1.25 cm] wire should face upward to create a smoother surface). Place a board or piece of carpeting in the cage to keep your rabbit’s feet off the wire. Keep the cage clean to reduce risk of infection.
Sore hocks take a long time to heal and, if untreated, can become infected. The sooner you start treatment, the better your chance of success will be.
Hot weather can be hard on rabbits, and high temperatures can kill them. The fur coats that keep rabbits cozy in the winter sometimes provide too much warmth during the summer months. To keep your rabbits comfortable during a heat wave:
• Place outside hutches in shady locations.
• Provide good ventilation. Remove plastic sheeting or the hutch cover. If your hutches are inside, open windows or provide a fan to increase air circulation.
• Provide lots of cool, fresh water.
During a hot spell, check your animals often during the day. It’s normal for a rabbit to stretch out in the coolest part of its hutch. During hot weather, supply a wet towel for the rabbit to lie on during the hottest part of the day to help keep it cool. If your weather is particularly humid, a wet towel can’t evaporate enough to cool a rabbit, in which case put a rabbit cooler in each hutch (described on page 141).
If a rabbit is breathing heavily and its muzzle is dripping wet, it may have heatstroke or sunstroke. You must act immediately to save the rabbit’s life.
Rabbit Coolers
Be prepared for extreme heat—use empty plastic soda bottles to make rabbit coolers. Fill the bottles two-thirds to three-quarters full with water, and keep them in your freezer. In periods of extreme heat, lay a frozen bottle in each cage. If you are traveling with rabbits in hot weather, place a cooler in each rabbit carrier. The rabbits will cool down by stretching out alongside their coolers.
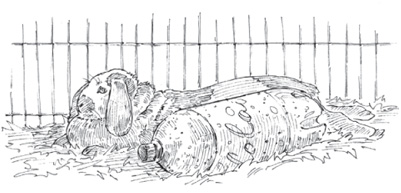
1. Move the rabbit to a cool location.
2. Wipe the inside and outside of the rabbit’s ears with ice cubes. Because the blood vessels in a rabbit’s ears are closer to the surface than those in other parts of its body, ice applied to the ears will cool it faster than applying ice to any other spot. Wrap the ice in a cloth so you can hold it more easily.
In an advanced case of sunstroke, the rabbit may be almost lifeless. In this situation, every second is important. To cool the rabbit as quickly as possible, gently place it in a container of water. Use room-temperature water, not cold water, so you don’t give the rabbit a sudden shock. Do not let the rabbit’s head go under the water; just wet it up to its neck. Once it is wet, place it in a quiet, shaded area to recover.
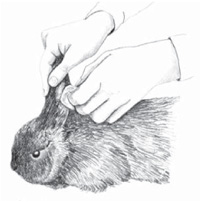
Wipe the inside and outside of your rabbit’s ears with an ice cube to counteract heatstroke.
