Our relationship with honey bees began thousands of years ago, judging by a Spanish rock painting circa 6000 BC showing a man climbing a tree and removing a wild nest. Beekeepers eventually began hiving bees in hollow tree trunks (gums) and straw baskets (skeps), destroying the nest to collect the honey. The insects were encouraged to reproduce by swarming, the only way to populate new nests provided by the beekeeper.
The honey bee is not native to the New World, so aboriginal Americans have no history with this insect, although Mayan and other native civilizations kept other types of bee. Bee skeps first voyaged to the Americas on the ships of early Spanish explorers and English settlers.
Why keep bees? The benefits of keeping honey bees include harvesting products of the colony (honey and pollen) and employing the insects in the service of pollination. Honey has been claimed to have numerous health properties, and its sweet taste is lovely in tea or coffee, and in a variety of desserts. A cosmopolitan pollinator, the honey bee is known for servicing a number of crops, particularly fruits, nuts, and vegetables. Contracting hives to a grower for pollination can be a profitable business, but it comes at the sacrifice of producing a honey crop. Keeping bees is also a relatively environmentally benign activity, because no land needs to be owned nor is preparation (such as plowing or fertilizing) required, as is the case for many crops.
And then there is the appeal of the craft itself. Go to any gathering of beekeepers and listen to them talk (even about their challenges) with enthusiasm and pride. Go into a beeyard on a pleasant day and sit there, immersed in the calm serenity of the scene. Watch the bees coming and going, sometimes even indulging in what is called “playtime.” If beekeeping is truly in the blood, it is impossible to resist the allure of the craft. For want of a better term, some call the passion that arises in some novices “bee fever.”
Bee Selection ............................................................................. 144
Getting Started ......................................................................... 146
A Bee’s Life .................................................................................. 147
Housing Bees ............................................................................. 150
Installing New Bees ............................................................... 156
Working a Colony ................................................................... 161
Managing Nutrition .............................................................. 164
Harvesting Honey .................................................................. 165
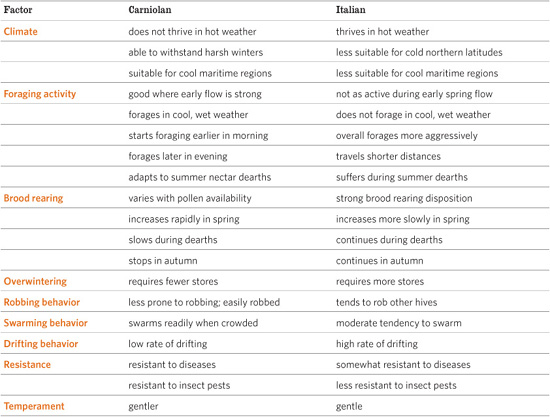
Two popular subspecies of the Western honey bee are Carniolan bees (Apis mellifera carnica) and Italian bees (Apis mellifera ligustica). The two are considered gentle and productive, but they have a few differences that cause various beekeepers to choose one over the other in specific geographic areas.
The Carniolan bee originated in Carniola, which is now part of Slovenia. It is the second most popular honey bee in North America. Carnis are dark brown to black (sometimes described as dusky brown-gray) with lighter brown stripes and are sometimes called gray bees. They fly at cooler temperatures than Italians, making them ideal for northern climes and areas where the early spring nectar flow is strong. They also fly in wetter weather, making them more productive where Italians remain in the hive to avoid spring showers.
Carniolans respond to environment conditions by adjusting brood rearing to the nectar flow. During times of dearth, and as winter approaches, they stop rearing brood; during times of plenty, brood rearing gears up. This system has the advantage that a great number of workers during times of heavy nectar flow produce more honey, while fewer bees in the hive during long winters and times of dearth use up less stores. On the other hand, during summer dearths, the weaker colony is more likely to be robbed, and during times of plenty the rapid population buildup easily leads to swarming. Carniolans therefore require more careful management than Italians.
Who’s Who in the Hive
In a honey bee colony there are three castes: a fertile female (queen), sterile females (workers), and males (drones). Division of labor occurs within castes, which often have specific duties depending on age. As the word caste suggests, these three individuals in a colony cannot change much, and each will not survive without the contribution of the rest.
The Italian originated in the continental part of Italy and is the most popular honey bee among commercial beekeepers in North America. It is readily identifiable by yellow and brown bands on the abdomen. Italians are adaptable to most climates, from cool to subtropical, but are less able than Carniolans to cope with hard winters and cool, wet springs. They also have a greater tendency to drift.
Italians aggressively raise brood and continue doing so in times of dearth and as winter approaches. Their high population going into winter requires lots of stores to keep all those bees warm and fed. Consequently, the hive tends to be weakened as spring approaches, making Italians less ready than Carniolans to take advantage of a strong early nectar flow. However, once brood rearing ramps up it continues throughout the summer. During times of poor nectar flow, instead of foraging over longer distances, they are more likely to rob honey from weaker hives. Italians do best in climates where favorable weather throughout the summer is conducive to a continuous flow of nectar.
Beekeeper Talk
brood. Eggs, larvae, and pupae, collectively, that develop into baby bees.
brood chamber. The main body of a hive, where the brood are raised.
colony. A family of bees living within a single hive.
dearth. A scarcity of nectar.
drift. To mistakenly return to another hive after foraging.
flow. An abundance of nectar.
hive. The place where a bee colony lives.
hive body. The brood chamber.
nectar. Sugary water produced by plants, used by bees to make honey.
nuc. A nucleus colony of bees, purchased with their drawn comb and brood.
pollen. Yellow protein powder produced by plants, fed to brood.
rob. To take honey from another hive.
stores. Honey or nectar used by bees as food.
super. A box placed on top of the brood chamber for the collection of honey.
swarm. To leave the hive in large numbers, led by a queen, to start a new colony.

When a Bee Stings
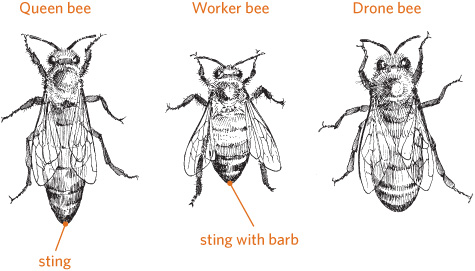
A bee won’t normally sting unless it has been squeezed, stepped on, or swatted at, or it feels its colony is being threatened. A drone has no stinging apparatus. A queen has a stinger, but rarely will she use it on a human, and if she does, the stinger has such small barbs that she can pull the stinger back out and go on her way.
A bee sting is most likely to come from a worker bee, which has a barbed stinger that cannot pull out of a human’s tough skin. When a worker stings and then flies away, the stinger gets ripped out of its body, rupturing the abdomen, and the bee will die. It is easy to see why these insects are not eager to sting, but they will do so if threatened.
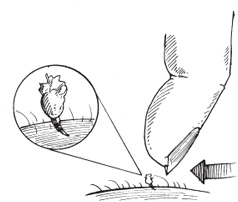
The most important thing you can do when you are stung is to remove the stinger immediately, preferably by scraping it off.
Learning to be a beekeeper takes time, and like many activities, you get back proportionally what you put into it. The largest time investment will be in the learning phase: reading and attending bee schools, workshops, and beekeeper meetings. Plan on a steep learning curve the first year or so, and expect continuing challenges after that. Part of the fun of keeping bees is that you never stop learning.
It’s best to begin with two bee colonies, rather than just one. As a novice, you may lose a colony during the first season; don’t worry, even an expert will occasionally lose a colony. Having a colony in reserve will provide you with a cushion against a discouraging disaster that might bring your beekeeping activities to a premature end. The second unit would then provide an invaluable resource—bees and brood to keep your beekeeping operation going in case of emergency. Having two colonies is also useful for comparative purposes; the shortcomings of one colony are easier to detect when you have another to compare it to.
A bee colony should never be completely ignored. Chores not done at the proper time cannot usually be done effectively later, if at all. Plan on inspecting your bees an average of every two weeks during the active season, perhaps more often as the new season is getting under way and less often in the inactive part of the year. Each visit can be quite brief, depending on the season and your reason for being at the hive. Some visits may last a minute or two; others involving a specific task might take 20 to 30 minutes per hive at the longest. Most inspections that involve opening the hive are a substantial disruption to colony life, so they should not be done without an important purpose. Have a goal in mind before disturbing your bees.
In the wild or in the hive, a honey bee nest is made up of parallel combs filled with hexagonally shaped cells. The hexagon is the structural form that provides the most strength using the least amount of material, a proven mathematical axiom. The comb is constructed solely of beeswax, produced by the bee’s own body, and serves as both the pantry for the colony’s food and the cradle for the brood.
The central combs usually have the young bees and/or brood in the middle, surrounded by a band of pollen and then honey. As combs are built out from the center of the nest, less brood and more pollen and honey is often found on each. The side combs generally are full of honey and are excellent insulators, maintaining the heat necessary to keep the brood developing.
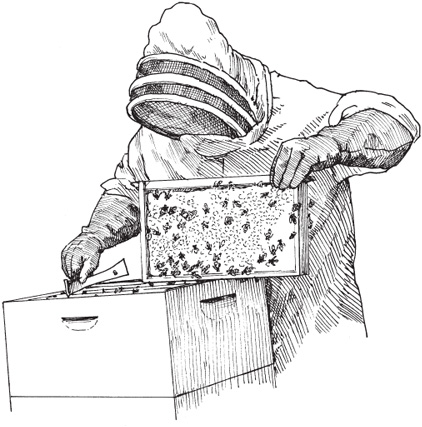
Visit your bees every two weeks or so during spring and summer, and always have a specific purpose for your inspection.
Seven Basic Tips for Getting Started
The following suggestions will minimize problems as you begin keeping bees.
1. Start with new equipment of standard (Langstroth) design and dimensions. Used and homemade equipment can come with problems you aren’t experienced enough to recognize or handle.
2. Do not experiment during your first year or two. Learn and use tried-and-true methods. Master them. Later you will have a better basis for comparison if you choose to experiment in future years.
3. Before buying a beginner’s outfit, know how each piece of equipment is used and be sure you need it.
4. Get Carniolan or Italian bees. These honey bees are the two most commonly available in the United States. Bees acquired from a competent producer should be gentle and easy to handle. In future years you can experiment with other races or strains to form comparisons.
5. Begin with a package of bees or a nucleus colony (nuc) rather than an established, fully populated one. Establishing a nuc or package will help you gain confidence.
6. Start early in the season, but not too early. All beekeeping is local, so seek guidance from local beekeepers and bee inspectors about timing in your specific area. Advice about managing honey bees from those in other geographic areas, even if they are successful, is fraught with risk.
7. Recognize that your colonies will not produce a surplus of honey the first year, especially those developed from package bees. The first year is a learning time for the beekeeper and a building time for the new honey bee colonies.
Like many other insects, the honey bee goes through complete metamorphosis. Each caste undergoes a developmental process where the body radically changes in both form and function. Beginning with an egg, which hatches into a small worm (larva), the individual then moves into a resting phase called the pupa. During the pupal process, tissues are rearranged into the final stage, the adult. Thus, the individual bee has specific lifestyles: eating and developing and contributing to the colony’s maintenance and growth.
Development takes place in the cells of the comb. When an egg hatches, the workers first provision it with a nutritious jelly in a process called mass feeding. As the larvae develop, the adults provide food as needed, a process called progressive feeding. At the end of the larval period, the bees cap each brood cell with wax and each larva then reorganizes its tissues through a process called pupation. Once this change or metamorphosis has occurred, the fully formed adult chews away the cap of its cell and emerges to join the other adults in the colony.
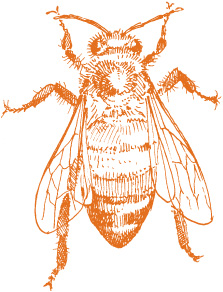
The queen is the reproductive center of the colony. She is the only female capable of laying fertile eggs, without which the colony could not grow in population. She is also the longest-lived individual, sometimes surviving several years, and the largest in size, with a long, tapering body. Because her job is to lay fertile eggs, the queen has about 160 ovarioles, or ovary tubes (workers have four at most) and a single sperm storage device, the spermatheca.
Although the queen lacks some characteristics of the workers, including wax glands, pollen baskets, and a scent gland, she is still able to sting. This ability helps her control rivals but is apparently not used in general defense. Queens also have notched jaws or mandibles, which differentiates them from workers that have smooth ones.
Egg production by the queen ebbs and flows with colony development and is based on many factors, including prevailing weather conditions, the state of the local vegetational complex, and the makeup of the population within the hive. In the active season, some queens may lay up to 2,000 eggs a day if a large population is deemed needed, but when the conditions change, egg laying does as well.
Within the insect class, honey bees belong to the order Hymenoptera, which includes ants, bees, and wasps. The large super family of bees (Apoidea) includes not only honey bees but also bumblebees, carpenter bees, orchid bees, and many others. Honey bees are in the genus Apis and include the European or Western honey bee, Apis mellifera, kept for honey production and to ensure the pollination of various crops around the world.
The queen doesn’t actually rule a colony, but she certainly exerts control. Her most important task is to use a suite of chemicals or pheromones called queen substance to prevent workers’ ovaries from developing to the point where they produce eggs. Workers do, rarely, produce eggs but they cannot be fertilized, and they result exclusively in drones that cannot sustain a colony of laying workers. Because no workers develop to replace workers that die, a colony raising a worker-produced brood rapidly loses population.
Another way the queen exerts control is by determining the sex of her offspring, producing either drones from unfertilized eggs or workers from fertilized eggs. So she is responsible for the eventual population makeup of the colony.
Each colony usually has only one queen, but sometimes you might find two or more. The usual explanation is that both a mother and a daughter who is about to replace her are present for a short period on the same comb. Occasionally a number of virgin queens may appear in a swarm, especially among Africanized honey bees (see Glossary).
The worker honey bee is a fully formed female, but her ovaries are small and kept from developing by contact with the queen’s pheromones. The worker population is responsible for all the activities for which honey bee colonies are known, including honey production, pollen collection, temperature regulation, and defense. Workers number in the tens of thousands, making this caste the most populous in the colony.
A worker begins life as a fertilized egg laid by the queen and hatches into a larva in 3 days. The larva is fed for about a week, and then pupates in 12 more days, emerging as an adult after a total of 21 days. The importance of understanding this 3-week development cycle is that it lets you monitor a colony’s population either for honey production or pollination. It takes at least 6 weeks to build up a colony from a maintenance population level to one that can be counted on to be productive.
The drone is the male bee, a remarkable organism in his own right. First of all, he is haploid, the result of parthenogenesis or virgin birth. That means he has half the number of chromosomes as a female bee. He is the genetic mirror image of his mother and he has no father. His only known job is to mate with virgin queens, providing them with a great many copies of himself in the bargain.
During the active season a colony has at most only a few thousand drones. At the first sign of stressful environmental conditions, the colony disposes of its drones by banishing them from the hive.
Development Rates

When you think of the members of a honey bee colony, three individuals come to mind: queen, worker, and drone. In the last two decades, however, a fourth has intruded itself into the hive, the Asian mite known as Varroa destructor.
The varroa mite is not a run-of-the-mill parasite. It is an exotic organism completely new to its host, and thus the Western honey bee has little natural defense against the mite’s depredations. Well over 90 percent of infested colonies are at risk of dying. The mite is locked into the honey bee life cycle in ways not fully understood. It is totally dependent on the honey bee and cannot live isolated from its insect host for long.
Flying bees carry mites, an activity called phoresis. Mites in a colony that is weakened by starvation or predation may mount a worker bee and travel with her to a healthy hive. Robber bees may be infested as well. Finally, drones, which are preferred by mites, are universally accepted into colonies and can enter a large number during their lifetimes, thus becoming a primary distributor of mites among hives.
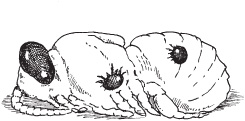
Varroa mites on a pupa.
The reproductive phase of the varroa mite shows how tightly its existence is woven into the fabric of honey bee colonies. Not only are certain types of cells more attractive to female mites, but certain specific ages of the larvae are as well. Mites prefer drone brood because it takes longer to develop, giving the parasite more time to produce additional mites per brood cycle than is possible in worker brood.
Unlike many other diseases and pests the varroa mite is not a passing phase. It is a permanent resident in all colonies in affected regions. It cannot be eradicated from the nest. This futile goal of many beekeepers has resulted in the use of increasingly more toxic treatments, which are now considered counterproductive to honey bee health.
Bees versus Wasps
Although bees and wasps may look similar, they are not. Bees are vegetarians, consuming only sweet plant juice, called nectar (carbohydrate), and pollen (protein). Wasps also imbibe nectar, but they take their protein from other organisms; they are carnivorous and often prey on other insects (including pests). Many people in the general public don’t realize that bees and wasps are both beneficial insects that should be protected.
A Worker Bee’s Jobs
During its life a worker goes through a set series of predetermined tasks depending on its age and colony need. A typical sequence:
House bee. Tasks during the early part of a bee’s life include cleaning brood cells, attending queens, feeding brood, capping cells, packing and processing pollen, secreting wax, regulating temperature, and receiving and processing nectar into honey.
Nurse. These bees feed the larvae a nutritious jelly called brood food.
Comb builder. Glands on the bee’s belly secrete wax flakes that she molds into comb.
Honey maker. Workers receive relatively raw nectar from foraging bees and place it in the comb. They fan their wings in unison to evaporate excess liquid and they also add enzymes, which chemically transform the nectar. The result is honey.
Forager. Two to three weeks after emergence, the house bee begins to fly from the colony preparing to become a forager. Field bees are usually guided by scouts to the best nectar sources nearby. Once they begin foraging on a certain crop, field bees tend to be faithful to this plant, visiting it exclusively. One well-known characteristic of honey bees is their so-called dancing. Their regular, repetitive movements communicate many things, from the location of a food source to a call for a grooming session from a nearby sister bee.
The movable-frame beehive is the foundation of modern beekeeping. Most managed beehives are of the type patented by the Rev. L. L. Langstroth in 1851. The dimensions he used, a box accommodating 10 frames,  inches (243 mm) high (often called full-depth), have become standard in the United States.
Other systems are also available and make sense in some situations. These alternatives include hives based on eight frames, which allow for easier lifting for the operator, and the shallower (6⅝ inch/168 mm) Dadant square box, for people wishing to interchange equipment extensively. Another system that is rapidly gaining adherents is the top bar hive, a radically different design employed by beekeepers who prefer a small-scale approach.
The standard box or hive body is constructed of wood, although other materials such as plastic and even concrete have been used in some areas with success. Initially stick to tried-and-true standard wooden equipment; experiment with other configurations only as you gain confidence and experience. Most hive bodies are made of pine or cypress, both of which will provide years of service.
Painting the exposed surfaces will lengthen the box’s life. The majority of hives are painted white, which allows hives in full sun to stay cool; however, white hives are much more visible in the landscape. In cold climates, black or other colors may increase heat absorption from the sun. Some paint stores and recycling centers give away off-color or leftover paint.
Supers. Supers are boxes that in construction are identical to those used for the hive body, and are stacked on top of the hive body for the collection and harvesting of honey. The word super refers to the superior position of the additional boxes on top of the hive, the natural place where a strong colony stores honey.
The Top Bar Hive
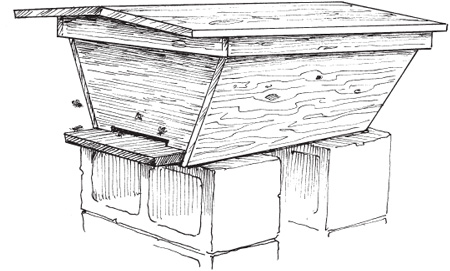
The top bar hive is inexpensive, flexible, and offers the following advantages:
• The brood is generally placed toward the hive’s front entrance and the honey is located in the rear. Since you don’t have to dismantle the whole hive to examine the brood or take off honey, working the hive is less stressful on the bees and they are less likely to become defensive.
• The top bars butt against each other, doubling as a cover and thereby reducing material requirements and conserving weight. An outer cover of tin or cardboard is necessary, however, to protect the colony from moisture.
• The hive can be mounted on a stand at waist level. Working the hive is therefore more comfortable because you don’t have to continually bend over.
Boxes are available in several depths. Commercial beekeepers with lifting equipment, and hobbyists living in temperate climates, often use two full-depth, 9⅞-inch-high (243 mm) boxes to make up the basic hive. Full-depth boxes allow bees to cluster into a ball to keep warm in winter, and provide room for storing the honey needed for winter food. During nectar flow, supers are placed on top of the basic hive. Since a full-depth super full of honey can weigh 100 pounds (45 kg), shallower boxes can be used as supers.
In warmer climates, where bees don’t need to store up much honey, some beekeepers use a single full-depth brood chamber, while others prefer several medium-depth 6 5/8-inch (168 mm) chambers. Medium-depth boxes are lighter in weight and, when used as both brood chambers and supers, let you standardize with boxes of all the same size.
Frames and foundation. Ten combs fit in the standard hive body (brood chamber), each surrounded by a frame. The frame is designed to have a critical gap, or bee space, of about ⅜ inch (10 mm) on all sides between it and the interior wall of the hive. The bees do not build into or glue up this space.
Frames can be either wooden or plastic. The latter is preferred by beekeepers who are concerned about beeswax contamination due to mite treatments. Each frame has a top bar, a bottom bar, and two side bars assembled into a rectangle that holds the comb.
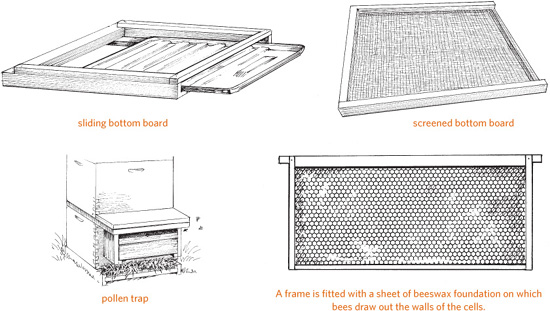
The bottom board, the floor of the hive, has a number of functions. Bottom boards available in supply houses are usually reversible, providing the option of a small entrance to conserve colony heat during winter and a larger one for the rest of the year.
A sliding bottom board allows you to monitor varroa mite fall. A screened bottom board controls the mite population by letting mites fall through to the ground.
You can modify the hive floor to fit other accessories such as feeders, pollen traps (for scraping pollen off bees’ legs as they enter), or dead bee traps (to measure colony mortality).
Frames are fitted with sheets of beeswax foundation, the template from which bees build their nest. Foundation is commercially produced out of beeswax or plastic, and embossed with a pattern of hexagonal cells. The bees then draw out the walls of the cells based on the template (foundation). You can purchase reinforced foundation that has embedded vertical wires with hooks.
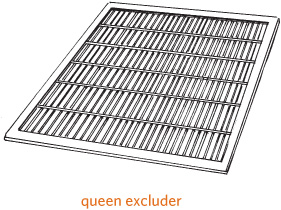
Queen excluder. The queen excluder is a series of parallel bars spaced so worker bees can squeeze between them, but the larger queen cannot. The excluder is placed above the brood chambers to prevent the queen from entering the honey supers and laying eggs there. Excluding the queen keeps honey supers from being contaminated with brood, since most beekeepers prefer to work with solid combs of honey.
Langstroth Hive Bodies and Supers
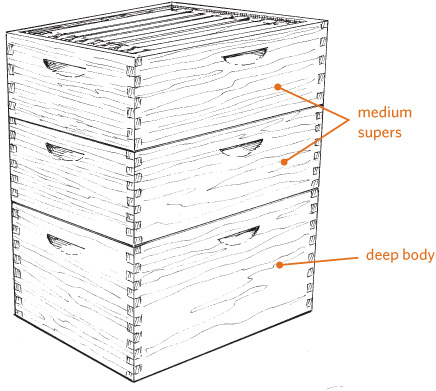
The Langstroth system consists of four-sided boxes with standard interior dimensions to accommodate standard-size frames of honey comb. A deep ( inches [243 mm]) box might be used as a brood chamber, where the queen lays her eggs and the bees care for the developing larvae, but when used for honey stores, a deep box full of honey weighs 100 pounds (45 kg), making it difficult to handle. Instead, medium boxes (6X inches [168 mm]) are more typically used as supers for honey collection and harvesting.
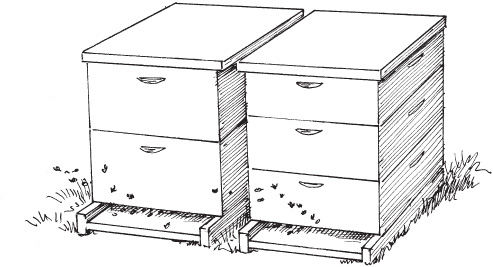
During early summer the hive consists solely of brood chambers. Commercial beekeepers tend to prefer one or two deep boxes for brood, as shown on the left. During nectar flow, a queen excluder and one or more supers are placed on top for the collection and harvesting of honey. Hobbyists who prefer to have brood chambers and supers of the same size will standardize on all mediums because they are lighter and easier to handle; three medium boxes, as shown on the right, provide a similar amount of brood space as two deep boxes.
Covers. Most supply houses sell telescoping outer hive covers and ventilated inner hive covers. Both are standard and useful for the novice. Many large-scale beekeepers opt for what is called a migratory cover, which is often nothing more than a piece of plywood used without an inner cover. These covers are cheaper than the telescoping variety, but not as secure. An advantage, however, is that they allow hives to be stacked together tightly when moved by truck.
The inner cover usually has a rim and an oblong hole in the center to accommodate a bee escape device. The rim is notched, offering the option of increased ventilation.
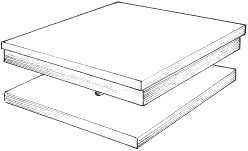
Telescoping outer cover (top) slides down around a ventilated inner cover (bottom), which provides a barrier between the top cover and the bees. The inner cover makes the top cover easier to remove.
Hive stand. In most areas a hive stand is essential. It keeps a wooden hive off the ground, protecting it from dampness, dry rot, and termites and other insects. Either concrete blocks or pressure-treated wooden rails might be used to construct a stand. In areas where ants are a problem, the hive stand can be a rack perched on narrow legs that are inserted into cans of oil or water, which keep these insects at bay.
Feeders. You’ll need a feeder to furnish food for a new colony while it’s getting established and to feed an established colony when stores run low. The Boardman feeder, an inverted glass jar that fits in the entrance of the hive, is a good choice for the beginner. A major advantage of the Boardman is that the syrup level can be monitored and the syrup supply replenished without dismantling the hive. This feeder has several disadvantages, however. It doesn’t hold much food, and if used with a weak colony, it may incite robbing behavior.
Types of Feeders
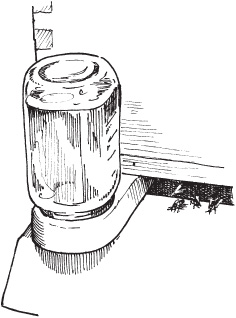
A Boardman feeder helps a new colony get established and can be used to feed any colony that is running low on stores.
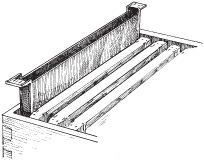
A division board feeder replaces one of the 10 honey comb frames.
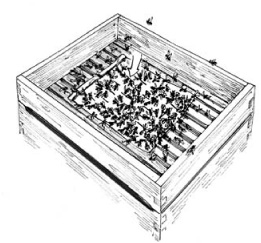
An inexpensive feeder consists of a zipper bag filled with syrup and placed on top of the frames, and punctured with holes or small slits so the syrup can seep out for the bees to collect.
Other types of feeding arrangements include modified frames (division board feeders) and top feeders, some of which are quite elaborate. An inexpensive alternative is to use a small plastic bag filled with syrup, punctured with small holes, and placed over the frames.
Smoker and fuel. The smoker is a most important and essential beekeeping tool, although you may find some beekeepers who claim not to need it. Smoke suppresses defensive behavior, and you should have a smoker lit any time you are in the beeyard.
Smokers usually come in two sizes, 4 by 7 inches (10 × 18 cm) and 4 by 10 inches (10 × 25 cm). Stainless steel models last longer than those made from regular sheet metal. Some smokers have a shield to prevent direct contact of the hot barrel with the beekeeper’s clothing.
You’ll need fuel to burn in the smoker. Practically anything that burns is good smoker fuel, from pine needles to dried dung. Avoid any material that has been chemically treated, such as coated burlap or pressure-treated wood. Chop seasoned ½ to ¾ inch (1 to 2 cm) limbs into 3 to 4 inch (8 to 10 cm) lengths. Seasoned chips or chunks from logs or stumps also work well.
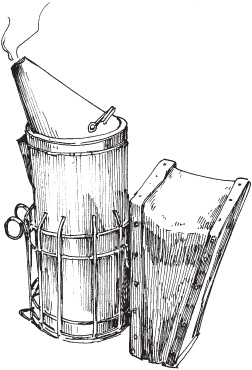
A good smoker and chemical-free fuel are indispensable for controlling bees while you work the hive.
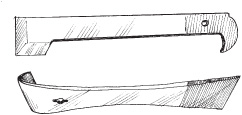
Two common hive tools.
Hive tool. Sometimes called the universal tool, the traditional steel hive tool is hard to beat for the variety of jobs it can do. Its main jobs are to remove frames from a hive and to scrape debris off hive parts. Several shapes have been devised, and you can paint yours in bright colors so you can find it easily when you leave it behind in the field. In a pinch, you could use a screwdriver or something similar to manipulate a hive, but you have to take great care to avoid damaging your equipment. The best approach is to buy two tools, one for each of your new hives.
A wide range of protective clothing is available to beekeepers. A good idea is to wear more when you begin a hive manipulation, because it’s usually easier to take some off than to put more on. Depending on your reaction to stings, you may decide to be fully protected or not. Only one item is essential, however: the veil. Although you can recover from the effects of stings no matter where they might occur on your body, a sting to the eyeball will cause severe damage, perhaps resulting in blindness. Never manipulate bees without wearing a veil.
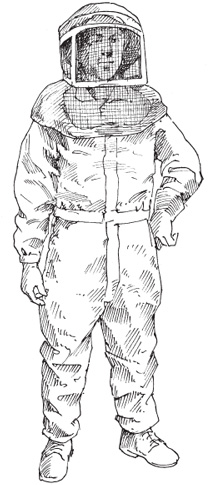
A complete beekeeper outfit covers you from head to toe. The crucial part is the veil, which you should always wear when working a hive.
Veil and hat. A variety of headgear is sold to novice beekeepers to support that critical accessory, the veil. Wear a veil at all times to protect your face and head from stings where they are most dangerous. Veils are designed to be worn with helmets and hats, or in some cases without a hat (the Alexander model). The square folding type veil is more durable over time because you can easily pack it away when you are not using it.
Gloves and coveralls. Gloves give the novice confidence. They are often abandoned by experienced beekeepers but can become necessary in an emergency. Several kinds of gloves are available, including rubber ones, but the traditional canvas or leather glove with a long cuff designed for beekeeping is best. Coveralls range from all cotton to a space-age model made from breathable foam.
When thinking of potential sites, consider the bees’ preferences as well as your own. Bee studies done in temperate locations, where nests are usually found in hollow trees, reveal certain natural preferences. The insects choose an elevated location, about 10 feet (3 m) off the ground, with a southerly exposure and not too much sun or shade. But in setting up your hives, you need to consider accessibility and the potential concerns of neighbors while applying a measure of common sense.
Out of sight is out of mind. The closer your hives are to your residence the better. As a beginner, keep your colonies nearby so you will be encouraged to visit them often. Casual visits are important even if you don’t open the hives. You can learn a lot simply by observing the entrance.
Don’t invite vandalism. Isolated beehives can attract the attention of vagrants, bored kids, and thieves. Colonies have been stolen in their entirety, pelted with rocks, tipped over, targeted with gunshot, and tossed into rivers. Keep yours where you can see them easily, but camouflage your hives in shrubbery and/or locate them behind fences and buildings.
Provide some room to work. Manipulating a colony takes space, so don’t put yours too close together. Always allow enough space between colonies so each can be worked without disturbing others nearby (you’ll have to decide for yourself how much space is enough, based on your mobility and needs).
In Times of Drought
Many areas where honey bees are located experience dry times during the course of the year. When intermittent creeks cease to flow and tree leaves show signs of moisture stress, bees start collecting water from leaking faucets, bird baths, pet dishes, and swimming pools. Drinking from a chlorinated swimming pool won’t harm the bees, but this practice can disturb humans in the vicinity. When honey bees become more noticeable to the general public, complaints start rolling in.
Don’t let your bees become trained to a swimming pool or other unsuitable watering place. Once they establish a water foraging pattern, it’s almost impossible to change. Prevention is the only cure for this problem. At times when your bees are likely to forage in nearby urban areas during a dry spell, you must furnish them with a reliable source of clean water.
Stay on the level. A hive must be on level ground. Honey is heavy and moving it can be difficult. Experienced beekeepers use aids, such as a wheelbarrow, a hand truck on inclined planes, and a mechanical lift to transport filled supers.
Neighbors are a constant concern for a beekeeper, and it’s important to keep them on your side, especially if you are in an urban or suburban area. The following procedures may help you avoid potential problems caused by beekeeping activity.
Look up local regulations dealing with keeping bees or any animals in your neighborhood or area. If the restrictions are intolerable, consider writing up a specific ordinance for your situation. Your local and state beekeeping associations will help in this regard.
Place hives away from foot traffic and building entrances. Orient hive entrances so they face away from likely human foot traffic.
Erect a 6-foot (2 m) barricade between the hive and the lot line. Use anything bees will not pass through, such as dense shrubs and solid fencing. Potential problems occur any time bees are flying close to the ground and across the property line of a neighbor.
Provide a watering source. If no pond or stream is nearby, set out a tub of water near your hives. Add wood floats to prevent the bees from drowning. Change the water periodically to avoid stagnation and mosquito breeding. To prevent stagnation, a better watering device is one that trickles water down a wooden board or slowly drips onto an absorbent material such as a cloth, keeping the surface damp.
Minimize robbing by other honey bees. In times of dearth, bees may seek out weaker colonies and rob their honey. Robbing bees are usually quite defensive and are more likely to sting passersby. Manipulate your hives only during nectar flows, if possible. To prevent robbing, keep extraneous honey or sugar water from being exposed by avoiding sloppy feeding techniques, exposing combs during manipulation, and taking off honey inappropriately. Use entrance reducers to minimize the likelihood of stronger colonies robbing weaker ones.
Prevent swarming. When a colony gets so big that the hive starts feeling crowded, a large group of bees may swarm away, looking for another place to live. Although swarming bees are the most gentle, a large, hanging ball of bees often alerts neighbors to beekeeping activities and may cause undue alarm.
Keep no more than three or four beehives on a lot less than half an acre. If you desire more colonies, find a nearby farmer who will host bee colonies in exchange for some honey.
Work your bees when neighbors are not in their yards. Bringing attention to your beekeeping activities only invites trouble.
Bribe the neighbors. Give each neighbor a jar or two of honey every year and you are less likely to get complaints about your bees.
Rooftop Hives
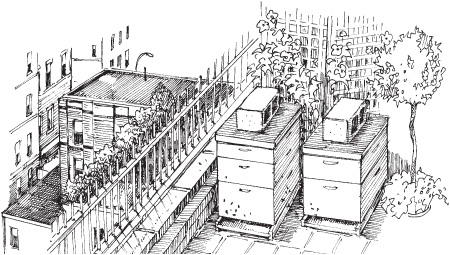
One of the best locations for honey bees is on a roof. Many apiaries thrive on city rooftops from Paris to Chicago. The benefits to a rooftop location include the fact that your hives avoid interference by humans and other mammals—such as bears. And rooftop hives are easy to monitor. Urban bees forage in parks, gardens, street trees, and balcony flower boxes: any nectar source within approximately 1 mile (1.5 km) of the colony. City bees can be more productive than country bees.
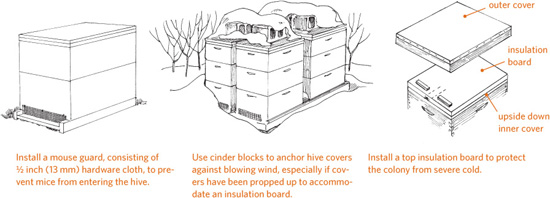
The challenges of keeping bees on a roof include the difficulty of lifting honey-filled supers by hand, since you can’t use a truck or other big mechanical device. In addition, a roof can be sweltering in summer and/or extremely cold in winter, when you’d rather not be up there yourself. Fortunately, bees are good at maintaining their own temperature. Be sure to supply barrels of water during heat spells, and make sure the hive covers are firmly held in place by cinder blocks or other weights in case of high winds.
Outside of beekeeping circles, finding a good source of honey bees can be difficult. You can locate reliable sources by subscribing to specialized beekeeping publications and joining local and national beekeeper associations. Bees can be obtained in a package, as a nucleus hive, as an established colony, from a swarm, or from a wild or feral colony, but as a beginner you should consider only the first two options.
The best way for a novice to begin is with package bees. In the United States most packages originate in the South and the West so they can be ready for the needs of more northerly beekeepers in early spring.
A package is easier for a beginner to handle than a nuc because the bees are not yet a true, organized colony but just a bunch of insects in a box. They lack a home to defend and have limited organization and little sense of purpose. They are, therefore, among the least defensive of honey bees.
Bees in a package have been stressed in many ways. They have been separated from their original queen, endured the rigors of a trip through the mail or other delivery method, and perhaps suffered other indignities such as being left out in the rain or hot sunshine. Since you can’t know what your package bees have been through, transfer them into a hive without delay.
Watching your package develop into a fully functioning honey bee colony can be extremely satisfying. But be aware that only rarely will a colony established from package bees produce a honey crop the first season.
Any brand-new hive that receives a package is considered a fragile work in progress. The bees have been treated roughly and will have a tough time as they transition from a purposeless mass of insects in a screened box to a productive colony in a beehive. They need a lot of tender loving care as they get to know their new queen and establish a feeding regimen. Below are some tips and guidelines.
Install a package as soon as possible after it arrives. Any delay will result in fewer live bees in the colony. Although packages are designed to be stored for a limited time period—a maximum of a week might be possible—every day of delay is critical.
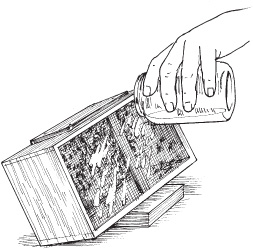
If a package needs to be stored, feed the bees by dripping sugar syrup (1 part sugar mixed with 1 part water, by volume) through the screen. Add just enough syrup to dampen the bees. Turning the package on its side (so the sugar syrup goes through the screen) makes the feeding process easier. Some package designs have an enclosed bottom to hold syrup temporarily.
What Is a Package?
A package is a screened cage packed with honey bees. The unit is really an artificial swarm, taken from a large colony and literally shaken through a funnel into a screened box. A caged queen comes included in the package, along with a can of sugar syrup to sustain the bees on their journey. Blocking the entrance of the queen cage is a candy plug, a sugary mixture which the worker bees will ultimately eat to release her into the hive. The package typically contains about 11,000 bees (3,500 bees to 1 pound/0.5 kg).
Package bees can no longer be expected to be free of diseases and pests. At least some parasitic mites are probably found in any package, and some packages have more than others. Nevertheless, the unit is still not as potentially problematic as a nucleus or an established colony, both of which come with comb that may carry mites. You should not have to worry about managing varroa mites until your colony develops a sizable population.
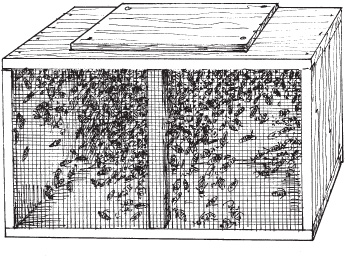
Do not feed package bees by brushing syrup on the screen with a paint brush, as some people recommend. The danger of damaging honey bees’ delicate mouth parts and limbs with the brush is too great. Instead, tip the package and drip enough syrup on the screen to dampen the bees, shown below.
Before installing your package bees, assemble all your equipment and abeekeeper clothing.
1. Make sure everything is laid out and ready for the installation. Tools needed include a hive tool, a pair of pliers for removing the food can of sugar syrup, and a sharp knife or thin nail for puncturing the candy plug in the queen cage. You also need your veil and gloves, a smoker, and the feeder.
2. Fill the feeder with sugar syrup and have it ready.
3. Remove four frames from the center of the hive, and lean them against the hive body.
4. Plug the entrance to the hive with straw or leaves so the bees can’t leave easily. Do not seal off the entrance entirely.
Smoker Basics
The smoker is a primary tool for controlling bees while you work. Here’s how to properly operate a smoker.
Lighting the Smoker
1. Have your fuel handy.
2. Crumple up one-half to three-quarters of a sheet of newspaper so it will fit into the smoker, but don’t wad it so tightly that it won’t burn easily.
3. Light one end of the paper, put it into the smoker, and start puffing the bellows. At the same time, use your hive tool to push the paper down into the smoker and get it burning well.
4. Add some small wood chips on top of the paper. When they are burning nicely, add bigger chips until you have filled the smoker. The smoke produced should be cool to the touch. Guard against hot smoke or flames. To cool the smoke, pack some green material like grass clippings on top of the burning mass in the canister.
5. Close the lid.
If the fire goes out, shake everything out of the smoker and start again. Don’t get frustrated—you may need three or four tries to get it right.
After half an hour, about half the fuel will be burned and you should fill the smoker again. When you have finished for the day, plug the snout of the smoker with a wad of paper. The fire will go out and preserve the half-burned fuel to make the next lighting easier.
Using the Smoker
Using a smoker requires experience and patience and is an art form itself.
1. Put a hook on the bellows of the smoker so you can hang it from your belt while you move around, or hang it from the end of the opened hive so it will be handy while you’re working with the bees.
2. As you approach, give the hive a couple puffs of smoke in the entrance. If you are standing between two closely spaced hives, give both a little smoke in the entrances.
3. Use your hive tool to pry up the cover. Waft smoke over the frames and gently direct it into the colony.
4. Replace the cover and wait at least a minute before removing the cover again.
If possible choose a calm, sunny day to install the package. The best time to set up a colony is in the morning (9 a.m. to 11 a.m.) before bees become too active. Read the following steps several times before proceeding so you have the sequence clear in your mind.
1. Put on your veil and light your smoker in the unlikely case it is needed. Since package bees, like swarms, are not usually defensive, coveralls and gloves are not necessary.
2. Use the hive tool to pry the lid gently off the package in one or two places, as you might open a paint can. This method usually does not allow bees to escape, although some may. Don’t worry about escaped bees; they will rejoin the colony in due time.
3. Remove both the sugar syrup can and the queen cage, and then invert the package lid over the empty spaces thus created to keep the majority of the bees inside. Ignore any bees that take flight; concentrate on the job at hand.
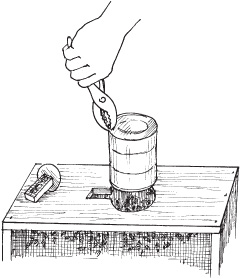
Installation, Step 3.
4. Examine the queen and make sure she’s alive. A colony established with a dead queen will lose many workers and they may abandon the hive. If she is dead, call the producer and arrange to have another queen sent immediately. The package can usually be stored for a few days as noted (see page 156). Some queens are caged with worker attendants who feed and groom her.
5. Remove the cork or rotate the metal disk to expose the candy in the end of the queen cage. Make a hole in the candy with a small nail, being careful not to injure the queen inside.
6. Install the queen cage by wedging it, candy side down, between frames near the inside wall of the hive body. Avoid entirely blocking the screen on the cage so the bees can feed the queen through it. Properly orienting the queen cage can be challenging, so try not to obsess too much about it. Indirect introduction of the queen allows the bees to become organized while freeing her gradually, reducing the risk she will be lost or killed in the initial confusion.
7. In one smooth motion, invert the package and dump the bees into the space in the hive body created when you removed the frames (see illustration at top right). Don’t worry about getting them all in; only a critical mass (with the queen) is needed to attract the outliers.
8. Replace the frames in the hive gently so as not to damage the bees.
9. Install the feeder.
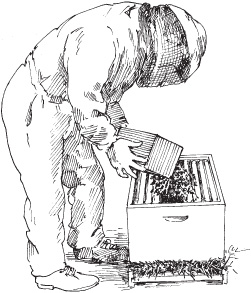
Installation, Step 7.
10. Put the empty package near the entrance. Bees attached to it or flying around outside the hive will rejoin the colony on their own.
The next day, make sure the hive entrance is somewhat open for the bees to enter and exit; do not remove the plug entirely, however, so the small population can effectively guard the entrance. Leave the unit alone for at least a week to allow the colony to release the queen by eating through the candy plug. When a week has passed, briefly open the hive to check only on the queen’s status by briefly opening the hive (see First Inspection on page 159).
Continue to fill the feeder as it becomes emptied. Package bees must be continuously fed until they stop taking syrup, which can take as long as eight weeks. Carefully observe the syrup levels in the feeder to determine when you can stop replenishing it. Err on the side of giving too much rather than too little.

Tools needed to install package bees include (left to right) a sharp knife, a pair of pliers, and a hive tool.
Because it is a fragile unit, an installed package requires more attention than an established colony. The bees’ progress must be carefully monitored so you can lend assistance as needed.
The population is small, about 11,000 bees to begin with, and workers live only four to five weeks. Three weeks are needed for a functioning adult to develop from an egg and maybe two more before it begins foraging, so initially the colony’s population will rapidly decline.
If established on beeswax foundation, the comb must be drawn (built out from the embossed base). The colony will recruit certain bees for this task, and they won’t be available for other duties. The new queen should begin to lay eggs as soon as possible to begin a suitable brood nest. Nectar and pollen may be scarce, so your most important concern is with the food supply. The mantra should be feed, feed, feed!
Your first inspection of the bees should occur a week after installation and be brief. You have one objective: to see if the queen has been released and is functioning.
1. On a sunny day, light the smoker and don protective gear.
2. Observe the activity around the hive before attempting to remove the cover. Are bees actively entering and exiting? Do they have pollen pellets on their legs? Does the activity look normal and relaxed, or do the bees appear agitated or excited? Take all this in, but remember the primary objective of your visit.
3. Check your smoker to ensure the smoke is cool, not hot. The smoke gets hot when too little fuel is in the smoker. Add a little fresh green grass to the smoker to cool the smoke if necessary.
4. Puff several times, sending smoke into the entrance; remove the cover and again puff several times into the top of the hive.
5. Replace the cover, wait at least two minutes, and remove it again. Locate the queen cage. It should be empty. Take it out and put it aside for the time being.
6. If the bees have built comb around the cage, attaching it to the foundation, scrape it off with your hive tool, as it will interfere with subsequent construction.
7. Now search for the queen. Remove an outside frame and prop it outside against the hive to provide room to work the rest.
8. Slowly take out each frame, one at a time, examine it, and replace it.
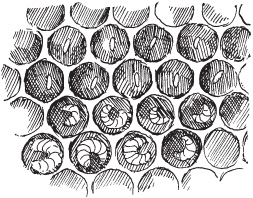
First Inspection, Step 8.
9. When you have finished your inspection, and either found the queen or determined that she is not present or functional, replace the combs and close up the hive.
You don’t have to actually see the queen. It’s enough to see evidence that she is on the job, such as drawn cells and eggs or young larvae in jelly. When you are satisfied the colony is functioning properly, replace the combs and close up the hive.
If you do not see the queen, nor any eggs or larvae, the queen may still be functioning, but you would be wise to begin planning to get a replacement. Check the colony again in a day or two. If you still find no sign of brood, assume the colony is queenless and acquire another queen as soon as possible.
If you find signs of a functioning queen (in the form of eggs), begin to monitor the colony’s progress on a weekly basis. Always make these visits brief. You just want to linger long enough to determine the population’s characteristics, such as number of frames of food and brood, absence of disease, brood-to-adult ratio, and food supply.
You must continue feeding for at least three weeks, stopping only when the bees no longer consume the syrup. As time goes on, the colony should begin to fill with bees. At that point, the colony is established and can be managed like any other colony in a beekeeper’s operation.
A nucleus colony, or nuc, is a small but complete colony containing brood, adults, and a laying queen. It may comprise three to five frames and be delivered in a throwaway or returnable box. Many beekeepers have success with nucs, and they are widely used to increase colony numbers.
As a functioning colony, a nucleus is much less fragile than a package. Because it is small, the residents are not generally defensive, but the beekeeper must be on guard because the unit is much better organized than any package colony. It also comes complete with combs, which has advantages and disadvantages: The frames should contain stored food, which is an edge over the use of package bees that require continuous feeding, but the combs also increase the risk that a disease may be introduced to the colony.
A nucleus colony (nuc) with an entrance that can be completely sealed during transit
Some suppliers will install a nuc if you bring a standard hive body to the seller’s establishment. If the nuc is delivered in a reusable container, then the frames must be relocated to the center of a waiting brood chamber. To do so, lightly smoke the bees and transfer all the nuc frames into the center of the hive body. A small, functioning colony should now be in the middle, flanked by five to seven frames of foundation or drawn comb. Install a feeder for the colony and put on the cover. Even though the frames contain stored food, it is still important to monitor food reserves and provide food when necessary.
Because it already has brood, the nucleus colony will probably contain a population of varroa mites. If the seller has done a good job managing them, the mite population should be small, but don’t count on it. Begin to monitor the mite population immediately to determine its potential to adversely affect the nuc’s development.
Many beekeepers have begun their careers by catching swarms. However, this method is not recommended for a beginner. The window for collecting and installing a swarm successfully is small, and although swarming bees do not usually sting—because they are disoriented and not protecting an established nest—they can be defensive in rare instances. Of particular concern is a hungry or dry swarm that has consumed its food supply, and you have no way to know in advance if this is the case. As a beginner, stick with an artificial swarm in the form of packaged bees.
Established Colony
Purchasing established colonies is risky for the beginner. A fully functioning unit can be defensive, and an inexperienced beekeeper may simply not be up to the task of manipulating it. One big risk is the potential for acquiring a devastating varroa mite population, which will affect not only that specific hive but others nearby as well. Another disadvantage is that the history of the unit is not known. It might have been neglected and be substandard; a novice will not have the experience necessary to detect deficiencies.
The Colony’s Year
• As the active season begins, the increased pollen and nectar resources from the field stimulate the queen to begin laying large numbers of eggs. This balancing act continuously ensures the colony has the requisite number of workers to warm and care for the developing brood.
• As the population grows, the hive becomes constricted for space and drone eggs appear. This overcrowding eventually causes the colony to begin swarming preparations.
• Queen cells are constructed and the colony begins to rear queen replacements.
• The old queen is readied for flight and the scouts begin to seek out new nesting sites.
• The swarm, headed by the old queen, moves on a warm day and establishes itself in a temporary bivouac before it decides to move to a new location.
• A virgin queen is allowed to emerge in the parent colony and fly in order to mate so the colony can again develop a stable population.
• Both parent and child colony begin preparations for the inactive period—winter in temperate regions. Through this season, the colony maintains a steady population level, ready to begin anew next year.
Before manipulating a colony keep a few things in mind. The better the weather, the more pleasant the experience will be. Honey bees begin to cluster (form dense groups in the shape of a ball) when the temperature drops to about 57°F (14°C). You shouldn’t manipulate a colony when a cluster has formed.
Working a colony with a cluster disorganizes the bees, and they may not have enough time to reorganize before the temperature drops again, which can lead to life-threatening complications. If a colony must be manipulated during cold weather, do it early in the day.
Bright, sunny, warm days are much better than cloudy days for inspecting colonies. Bees can be highly defensive in the rain and on hot, muggy days, especially when thunderclouds are present. During these periods, worker bees may stop foraging, and that means too many bees are in a colony with nothing to do except deal with the beekeeper. Also static electricity from such unstable weather conditions may make bees irritable.
The best time to work bees is during a nectar flow, when the maximum number of worker bees is out foraging. You can tell a nectar flow is in progress by examining the frames for fresh nectar: It is so liquid it can be shaken out of the cells. You may also notice increased activity in nearby fields and bees on open blooms, but these observations are less reliable than looking at the combs and seeing fresh product.
Tips for Working a Colony
• Choose a bright, warm, calm day, ideally during a nectar flow when field bees are absent from the hive.
• Dress appropriately (see Dress for Success on page 162).
• Work slowly, calmly, smoothly.
• Use a cool smoke, and don’t over-smoke the hive.
Of course, it is not always possible to work bees during nectar flow. And if the flow should suddenly cease due to inclement weather, close up the hive and leave as soon as possible.
Honey bee colonies are sensitive to vibrations. Do not bang on the hive or jar the bees. They might overlook a single instance, but doing it again is a mistake. Other repetitive vibrations coming from lawn mowers or cars and trucks also can set off a colony’s defensive behavior.
Bees have good and bad days. If you have trouble each time a colony is visited, step back and analyze what might be the matter. What is the weather like? Is the colony being bothered by animal nuisances? Enlist another beekeeper to come, watch, and give pointers on technique. In general, treating a colony like a good friend brings dividends: The bees will often respond in like manner.
The late season really begins in late summer: July and August, to be exact. At this time the beekeeper begins to anticipate and prepare for the coming winter. In the north (United States Department of Agriculture hardiness zone 6) the target date is August 1. A month or so later is appropriate for beekeepers in zone 7. This season is critical. Late honey may flow in various regions, complicating things in unexpected ways.
Your objective at this time of year is to ensure that a viable population of honey bees goes into winter with a good chance of surviving. Young bees are important, but even more significant are good healthy populations of winter bees. These overwintering insects are adapted to storing nutrients for a long period of time. Summer bees cannot overwinter as easily, since they lack specific structures known as fat bodies.
Avoid Nighttime Inspections
Some of the worst experiences are not with flying bees but with crawling bees at night. Instead of flying in the dark, they may crawl up from the ground or otherwise get under your clothes or veil.
If you must manipulate a colony at night, use a red light—bees are not attracted to it as they are to white light. Some beekeepers manipulate the bees in the dark via red light if the daily temperature is extremely high. They have the advantage of working at a cooler temperature, but they must still contend with crawling bees.
Photographs often show a beekeeper in the field, fully clad in suit, gloves, helmet, and veil. That degree of protection is sometimes appropriate, but not always, especially when it’s hot. Some beekeepers wear little or no protection, but that is not recommended either. The best advice is to wear what makes you feel comfortable and at ease around the hive. What you wear can vary from occasion to occasion; experience will be the key to dressing for success when managing your hive. Here are a few tips:
• Wear light-colored, smooth fabrics
• Avoid red or black, which can trigger defensive responses
• Don’t wear a sweater, flannel shirt, knit socks, or other fluffy fabrics in which a bee’s delicate hooked feet can get permanently caught
• Tie or tuck in long hair
• Tuck pant cuffs into high boots or socks
• Remove rings, watch, and other ornaments—their movement might glitter in the sun, provoking defensive behavior
• Don’t wear odors that might attract the insects, like aftershave, hair spray, or deodorant
• Other products may also be offensive, including gasoline and petroleum products that give off fumes
Winter bees are made by the queen. Thus, the beekeeper must take pains to ensure she is up to the job. Brood rearing naturally slows down at this time, making it hard for you to detect a failing queen. On the other hand, honey bees are good at detecting a failing queen and you may see signs of supersedure cells (those destined to produce queens that will replace the current queen) being constructed.
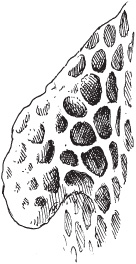
A supersedure cell cup on the face of the comb indicates the colony is about to replace the queen.
If you have any doubt about the queen’s condition, give serious thought to requeening (either by purchasing queens or letting the colony requeen itself). Some beekeepers requeen in late summer or early fall on a regular annual basis, for a number of reasons: New queens lay at a higher rate than older ones, so the resultant population is more numerous; late summer requeening allows for multiple chances for queen acceptance; and a first-year queen is much less apt to swarm the following spring. Further, a substandard population in the late season can hinder a colony’s preparations for winter. By combining weak colonies into a stronger unit, the colony has a better chance to survive the coming harsh conditions. The larger colonies can always be split in the spring.
Employing good varroa mite management techniques during the late season is particularly important. Parasitized honey bees are not good candidates for winter survival. The mite population is usually large at this time, fueled by all the brood the colony produced since beginning the active season. Many mites are protected in the brood cells and not susceptible to chemical exposure. Having a break in the brood cycle at this time reduces the brood population available to be parasitized, and makes the mites vulnerable to chemical control. You can create a break in the cycle by requeening, or by dividing the strong colonies, treating and requeening the splits, then letting them overwinter outside in mild climates or in a shed, garage, or cellar in a harsher climate.
Winter management begins in the late fall. Once a cluster forms (at around 57°F [14°C]), little can be done to manipulate hives with any degree of success. During this period beekeepers turn to repairing equipment and getting the extraction area shipshape for the coming active season.
In areas where mice are present, install mouse guards to prevent the rodents from entering hives when the bees are clustering above the bottom board. In areas with fierce winds, add a windbreak, such as a bale of hay or the odd piece of plywood.
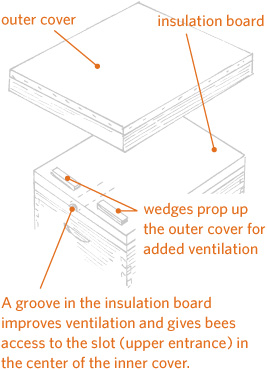
Whether or not to wrap colonies with tar paper, straw, or other materials, as is done in some regions, is a subject of much debate. Honey bees do not attempt to warm the entire space of their hive; they only warm their cluster. The cluster produces a great deal of warm, humid air that must be exhausted, so the hive should never be closed entirely. If this air is not removed, moisture may condense on the inner surfaces of the hive, which is highly harmful to bees. Provide an upper entrance during winter. Also, sometimes the outer cover is slightly propped up by small wedges to increase ventilation.
You can protect a colony from severe cold by using a top insulation board. No airspace lies between it and the inner cover, which has been turned upside down. Some beekeepers simply put an empty super filled with a fiberglass-type material on top of a hive. This material must be protected by a screen or the bees will attempt to remove it. Do not fill supers with hay, straw, or leaves, as these materials can trap a lot of moisture.
Beekeepers have a wonderful management tool: the ability to change a single individual, the queen, and thereby influence the behavior and direction of an entire honey bee colony. Thus, one of the universal answers to any problem is to requeen. More often than not, this action solves not one but a whole host of problems.
All queens are not equal, however. A queen’s egg-laying potential varies based on the conditions under which she was reared, her age, her lineage, her history, and perhaps most significant, the kind and number of sperm she carries. Of these, the only factor a beekeeper can judge readily is her age; all other characteristics aren’t known until her resulting colony can be observed.
One of the debates in beekeeping circles regards whether beekeepers should purchase queens or let the bees rear their own when making splits or replacing the current queen. This issue has no clear answer, although it makes sense that a commercial producer would raise a queen in a more controlled environment than is possible in a colony left to its own devices. The question then is whether producers should be held to any standard. Beekeepers would be better served generally by asking specific questions about rearing conditions, but many don’t know what to ask—and they get few definitive answers if they do.
You can monitor the degree of varroa mite infestation in a hive by counting the mites that fall off bees. For this purpose you’ll need a sticky board, available from a beekeeping supplier. The sticky board is covered with adhesive so the mites will stick to it. You can make your own sticky board using heavy white freezer paper from the grocery store. Cover the surface facing the bees with a thin layer of petroleum jelly (Vaseline). Place a sheet of 1/8-inch hardware cloth on top of the sticky board so your bees won’t stick to it.
Place the sticky board on the hive’s bottom board. Mites that fall off the bees will fall through the hardware cloth and stick to the sticky board. Leave the sticky board on the bottom board for a day or two, then remove the sticky board and count the mites. A magnifying glass will help you identify the mites among other hive debris. Divide the total number of mites by the number of days they were collected.
If you collect more than 50 mites per day, it’s time to think about treating your colony against varroa mites. For information on current treatment methods contact your local beekeeper club or county Extension agent.
Honey bees are vegetarians and consume only plant juice (nectar) for their energy needs and pollen for development. Colonies cannot survive without honey or nectar stores. Honey bees also need 10 essential amino acids for growth and development; pollen provides these in varying amounts. Certain pollens from fruit trees, for example, are much more nutritious than the pollen of other species such as pines.
Pollen also contains enzymes important to bee health and development, sterols for hormonal production, minerals, and vitamins. If workers do not receive enough pollen, their brood food (hypophryngeal) gland is affected, resulting in reduced longevity. Queen bees that do not receive enough pollen can have early supersedure, and virgins can fail to adequately mate. The lack of pollen may also be responsible for a reduction in the number of drones available for mating and/or a decrease in their potential sperm production.
Managing honey bee nutrition is one of the beekeeper’s most important jobs. Supplementing colony nutrition is, like beekeeping itself, more art than science. The food generally has to be prepared from ingredients purchased elsewhere. It then has to be administered to the colony at the correct time and under optimal conditions to be sure it is eaten.
Monitoring carbohydrates in a colony is relatively easy. It is generally done by estimating the number of frames of nectar or honey. Another way is to heft a colony—get an estimate of its weight. The best food is combs of honey or nectar. Beekeepers routinely shift these among colonies to ensure all have adequate resources.
The traditional supplemental bee feed is cane sugar crystals mixed with water and administered as needed. The usual proportion is 1 part sugar mixed with 1 part water, but the strength should vary depending on conditions. In spring, the solution should be weaker and more nectarlike to stimulate greater population growth. In the inactive time of the year, particularly during cold weather when bees have difficulty evaporating excess water, the solution should be stronger, with more sugar than water.
Mixing Sugar Syrup
The strength of sugar syrup should be varied, depending on conditions.
1:2
This light syrup is made using 1 part sugar to 2 parts water (for example, 1 cup sugar to 2 cups water). It is used in late winter and early spring to stimulate the queen to lay eggs.
1:1
This medium weight syrup is made using 1 part sugar to 1 part water (for example, 1 cup sugar to 1 cup water). It is used as artificial nectar to feed brood larvae in spring and summer or to get the bees to draw comb.
2:1
This heavy syrup is made using 2 parts sugar to 1 part water (for example, 2 cups sugar to 1 cup water). It is used in fall or early winter as a honey substitute to feed your bees.
Colony Collapse Disorder
First identified in 2006, Colony Collapse Disorder (CCD) was responsible for the death of many hives, especially those managed by large-scale commercial pollinators. Symptoms of CCD include the complete absence of adult bees in colonies, with little or no build-up of dead bees in or around the colonies; the presence of capped brood in colonies; and the presence of food stores, both honey and bee pollen, which are not immediately robbed by other bees and may also be ignored by wax moth and small hive beetle.
No one single cause for CCD has been identified; most see it as the possible result of a number of things, perhaps acting together. CCD appears to be less of a concern to many stay-at-home, small-scale beekeepers. If you suffer large-scale bee loss and can find little reason for it, carefully document the symptoms to be able to clearly communicate them to others. Include in your written statement details about management decisions and environmental conditions.
The optimal time for harvesting will depend in part on the nectar flows in your area and in part on your honey preferences. Depending on its source, some honey is stronger tasting than other honey. Follow this basic rule of thumb: Do not take the honey until you are sure the colony does not need it for the winter.
If you have more or less continuous nectar flows throughout the season, you may choose to wait and take off the honey at the end, or you may take it at intervals through the season. If you are able to separate varietal flows (from different flowers), the latter may be desirable. If you have large crops, you may wish to spread the work over more than one extraction and you may wish to minimize the number of supers you own by reusing them during the season.
If you have a single early flow, you will normally take off honey once, at the end of your season.
If you have both an early and a late flow, you can take one of two approaches. You can take off honey after each flow, or wait and take it only after the final flow. The former approach will give you two separate crops, probably of different color and taste, while the latter will give you a blend. The former will also be more laborious while the latter will allow you to own fewer supers.
Simply stated, take off only honey that is surplus to the needs of the colony. To establish what these needs are, ask yourself these questions.
• Is the main nectar flow finished?
• Are minor flows yet to come?
• How long before winter begins?
• How much will the colony consume between now and then?
• How much will they need to make it through the winter?
• Though honey may be in the supers, do the hive bodies also contain the requisite amount?
Your goal is to come to the end of the season with as much honey or stores in the hive bodies as the bees require for overwintering in your area. Requirements vary throughout the country. The practices of beekeepers in your area, modified by your experience as time goes by, are your guide.
Removing the bees so you can take the honey crop may be done in one of two principal ways: by brushing or using escapes.
Brushing is easy, inexpensive, and relatively quick. If you are harvesting from many supers, however, brushing becomes tedious, and it’s difficult to keep the bees from returning to the frames even as they are being brushed. Brushing also can provoke robbing.
Before you begin, place an empty hive box on a solid bottom board a little distance from the colony, where you can put the brushed combs one by one after the bees are removed. Cover it with a damp towel. If you don’t have an extra super, improvise with a cardboard box or other container, but be sure bees can’t get access to the just-brushed combs.
Several kinds of bee brushes are available. Most beekeepers prefer those with plastic bristles, but they are harder on bees than softer ones made of natural bristles.
The bee escape is an elegant piece of equipment that acts as a one-way valve. Bees can exit through a set of flexible springs but cannot return. The inner hive cover has an oblong hole that accommodates commercially available (sometimes called Porter) bee escapes.
Is It Honey Yet?
A key factor in deciding when to remove honey is assessing its moisture content. Generally, honey must be at or below 18.6 percent water before it is ripe enough to harvest. When bees determine the moisture content is correct, they cap it over with comb wax. Thus, a rule of thumb is to remove only honey from frames that are two-thirds capped.
As in other aspects of beekeeping, err on the side of harvesting too little rather than too much. Honey will absorb moisture from the air during processing, so be conservative here—process honey only after it has been capped and limit its exposure to warm, moisture-laden air during extraction and bottling.
Alternatively, you can construct escape boards. Be sure the hive has no cracks or other ways robbers might enter above the bee escape. Use duct tape to seal any areas of concern. With the escape board in place overnight, the vast majority of bees should leave the super, and you can then remove it as a unit, fairly free of bees.
Before using this method, check the combs in the super you are harvesting to make sure it is free of brood. If brood is present above the escape board, removing the bees is more difficult because they are reluctant to leave the developing offspring.
Brushing Bees
Time is of the essence to prevent robbing of the honey by bees from other colonies. Move the brushed combs inside a hive body or box as soon as possible.
1. Remove the frame and hit the bottom of the frame against the ground to remove as many bees as possible.
2. Quickly, gently, but firmly brush off the remaining bees with a sweeping motion. You can’t get all the bees off; don’t waste time trying. Just remove the majority.
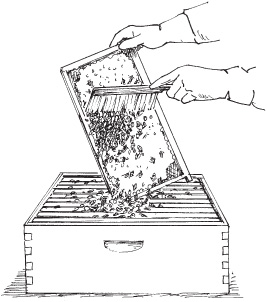
3. When the frame is mostly free of bees, transfer it to the empty box or container.
Bee Escapes
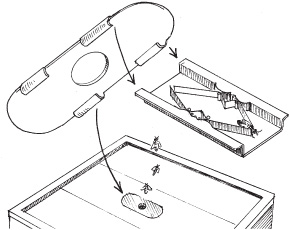
The Porter bee escape consists of a plastic oblong board that fits into the slot in the center of the inner hive cover, and a set of springs that have just enough tension for the bees to pass through but are too close together for a bee to return.
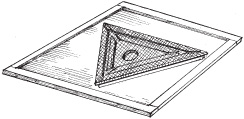
This bee escape board uses a double triangle design that lets bees easily leave the super but not so easily return.
The easiest ways to remove honey from the comb are to crush the comb and strain the honey, or use an extractor. For a small amount of honey, manually crushing the comb is less expensive than acquiring an extractor; if you have a large amount of honey to harvest, crushing the comb is not practical.
The simplest way to crush honeycomb is to put it in a nylon stocking and then squeeze it, forcing the honey to separate from the comb. Squeezing and forcing takes a long time and can waste a lot of honey. Another disadvantage of this method is that the comb is destroyed and cannot be reused.
Honey is hygroscopic, which means it absorbs water from the air. The longer the honey is exposed to air during straining, the more moisture the honey will absorb. Warm honey flows better and can be processed more quickly, but warming the honey can result in the absorption of more moisture. Running a dehumidifier will mitigate this situation to some degree.
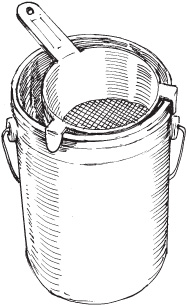
Use a strainer to separate honey from crushed comb.
Extractors are of two kinds: radial and centrifugal. To use an extractor, you must first remove the cappings from the frames. Both styles of extractor spin the uncapped frames at a high speed, slinging the honey out of the comb onto the extractor walls; from there it drips to the bottom of the holding tank. Many models are available, holding from two to sixty or more frames. Some extractors spin the supers themselves, frames and all.
An extractor is expensive, but you don’t necessarily need to purchase one. Some associations lend extractors or even extract for their members. In some areas, private custom extractors are available to do the job for a fee.
Honey can be stored for a long period. Some discovered sealed in ceramic vases in sunken Greek and Roman ships was still edible after thousands of years. Honey straight from the hive is, like wine, a living organism filled with enzymes, proteins, and sugars, all capable of changing the honey’s properties over time. Honey that is highly processed by heating and filtering, on the other hand, is killed and converted into nothing more than dead syrup.
Too much moisture will destroy honey. Once the moisture level rises above 19 percent, natural yeasts present in honey begin to ferment, producing alcohol. Honey allowed to stand for a long period might crystallize—a process that separates out the solids and thereby increases the liquid portion, promoting fermentation.
Many consumers believe crystallization ruins honey, but it is the fermentation, not the crystals themselves, that leads to spoilage. If a distinct alcoholic odor is not discernible, then fermentation has not begun. You can easily reliquefy crystallized honey by immersing the container in warm water.
Temperature can affect honey in several ways. Most commercial honey has been flash-heated to 160°F (71°C). At home it can be brought to 120°F (49°C) for easier liquefaction and filtration, but should not remain at this temperature for long. Warm temperatures denature enzymes in the honey and also convert the fructose into hydroxymethylfurfural. At high levels, this organic compound, derived from dehydrated sugars, is toxic to bees.
The optimal crystallization temperature is 57°F (14°C). For best results, store honey above or below that temperature. It can even be frozen with no ill effects.
Stored in bulk, honey is slower to granulate than honey kept in smaller jars. Thus, when storing honey for extended periods, use larger containers. As a small-scale beekeeper, you can use 60-pound (27 kg) or 5-gallon (4 L) food grade buckets with tight-fitting lids and bottle the honey in smaller quantities over time as you consume it.
Honey Extractors
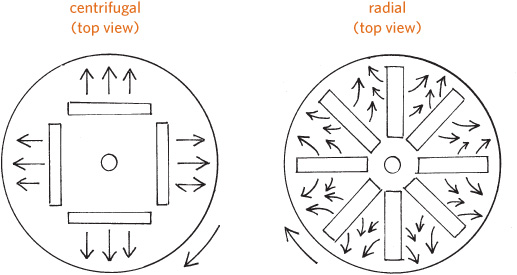
An extractor, whether centrifugal or radial, literally slings honey out of the comb.
Warning: No Honey for Infants!
Raw honey is a potential source of Clostridium botulinum spores, which are widely found in the soil and in dust. By 1 year of age, most children develop resistance to this normally benign strain of botulinum. But in an infant’s immature gastrointestinal tract, bacteria from these spores may grow and multiply, making a toxin the baby’s undeveloped immune system is unequipped to handle. The result is infant botulism.
Although infant botulism is rarely lethal, it is unpleasant and easy to avoid by not sweetening baby food with raw honey, and not attempting to soothe a crying baby by coating a pacifier with honey. At greatest risk are infants under the age of 6 months, although to be on the safe side, children up to the age of 12 months should not be given raw honey.
Many people like to eat honey in the comb. Producing quality section comb honey is not easy. It requires large, established populations of honey bees and strong honey flows. The insects do not like to work in the close quarters demanded of them in frames designed to hold comb honey sections. When they are forced to do so, the result is a lot of incomplete sections of questionable quality. Different kinds of technologies have been developed to ensure better comb honey with less labor. The production of comb honey is not generally recommended for beginners.
Chunk honey, however, is easier to make using cut comb, and reduces the amount of extraction needed. Simply cut a thin piece of comb from a frame, place it in a jar, and cover it with strained honey.
Can you save money on honey by keeping bees? Aside from your initial purchase of equipment and bees, annual expenses include the cost of requeening and any health care treatments required. With good management, including not removing all your bees’ stores and feeding them syrup—and assuming you live in a good nectar flow area—the cost of producing your own honey is negligible compared to the price of store-bought honey, and you will have the pleasure of enjoying a superior product.
Beeswax is unique and made only by honey bees. It is literally the foundation for the bee nest, becoming both the cradle for future bee generations and the colony’s food warehouse. The elegant form of the six-sided cell uses the least amount of material for maximum strength and has been copied for many human applications. A recent spectacular example is the James Webb Space Telescope, partial successor to the aging Hubble Space Telescope.
Beeswax is an ingredient in many cosmetics, creams, and salves, and a component of wood and metal polishes.
Most of the world’s beeswax is recycled into foundation and given back to the bees to manufacture comb. It is also an ingredient in many cosmetics, creams, and salves, and a component of wood and metal polishes. It is a good dry lubricant used by carpenters and others in woodworking applications. Of course, it makes a superior candle that is used for many purposes including religious services.
During the year, you will likely accumulate wax from scrapings of the hive and frames. Wax cappings from the honey crop and the wax rendered from combs that are being renovated also provide good sources of wax, which should be collected and saved. Considering that bees produce at most only 1 pound (0.5 kg) of wax for each 7 pounds (3 kg) of honey, it would be a shame to let it go to waste. The Internet is full of useful information on how to melt the wax into blocks and how to use the resulting beeswax.
Beeswax is easy to melt and can be readily damaged by overheating. The best way to make the finest wax blocks is to use a solar wax melter, which is little more than an insulated box covered with glass and set in direct sunlight.
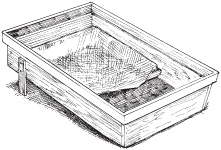
Beeswax is easy to melt in a solar wax melter, consisting of a box with a glass cover. Old combs, cappings, and other hive scrapings placed in an upper tray are melted, accumulate at the bottom of the box, and, when cooled, are removed as a solid cake.
Honey bees produce a variant of honey called honeydew. It is a sweet material collected and processed just like honey, although its source is not flowers but other insects.
In certain parts of the world, forests support large populations of plant-sucking insects that plug into the circulatory system of a plant by drilling through the bark. They have to suck a lot of juice out of a plant’s vascular system to get the appropriate nutrition, and in the process, they excrete surplus liquid in the form of a sweet juice, which honey bees then collect and modify in a manner similar to making honey.
The resultant honeydew generally has a markedly different flavor than honey. Major areas of honeydew production include pine forests of Germany, western Turkey and nearby Greece, and the beech forests of New Zealand. Other regions, such as the Panhandle of Florida, also have honeydew flows that support the honey bee population but are not sufficient to be harvested by beekeepers.
Pollen can be collected from a hive and later fed back to the bees or used as a health food. Specialized pollen traps at the hive entrance force worker bees to clamber through small openings. In the process, any pollen balls located on the last pair of legs are literally scraped off.
Because traps are hard on a colony, do not place them on a hive that has a low population. Even on a populous colony, remove them periodically to give the bees a chance to replenish their protein reserves.
Pollen is fragile and quickly loses its nutritional value when exposed to the air. For use in bee feed, mix the fresh pollen with sugar and freeze it until it is needed.
Dried pollen is often touted as a perfect food for humans, but little research has been done to back up this claim. One reason is that all pollen is not the same and, just like honey, has radically different characteristics based on its plant source. Bees try to consume a diet of mixed pollen rather than pollen from a single plant source. A standard dose of pollen for various ailments and applications therefore does not make sense.
Pollen is a magnet for environmental pollutants, whether particulates from smokestacks or pesticides. Since you have no way to know the source of collected pollen, you cannot easily ensure its purity for either bee or human use.
To Your Health
Beeswax, pollen, honeydew, and honey: All are generally considered to be health supplements or natural foods. Little direct scientific evidence supports many of the health claims for these products, but interest in their properties is growing. The American Apitherapy Association provides information on the use of honey bee products in a branch of human medicine called apitherapy. In some countries where modern medicine is not available or too expensive, apitherapy is the basis for what has been called green medicine. Cuba, for example, has a significant body of physicians engaged in this endeavor.
This alternative therapy employs bee products in a variety of ways to treat human health problems ranging from simple wounds to chronic conditions such as multiple sclerosis. Honey has been a remedy and treatment for human ailments for centuries. It has been used to treat sore throats, coughs, and other conditions, including hangovers. Some people find that eating honey produced by local bees reduces pollen allergies.
Honey has been used as a topical dressing for burns, wounds, and other injuries. It contains an enzyme known as glucose oxidase that, as a by-product, forms hydrogen peroxide, which kills many kinds of bacteria. Further, its ability to attract water leaves little moisture available for infection-causing bacteria to thrive on—honey literally dehydrates the bacteria to death. Some patients suffering from a pernicious form of bacterium, methicillin-resistant Staphylococcus aureus, have had remarkable results when treated with honey.