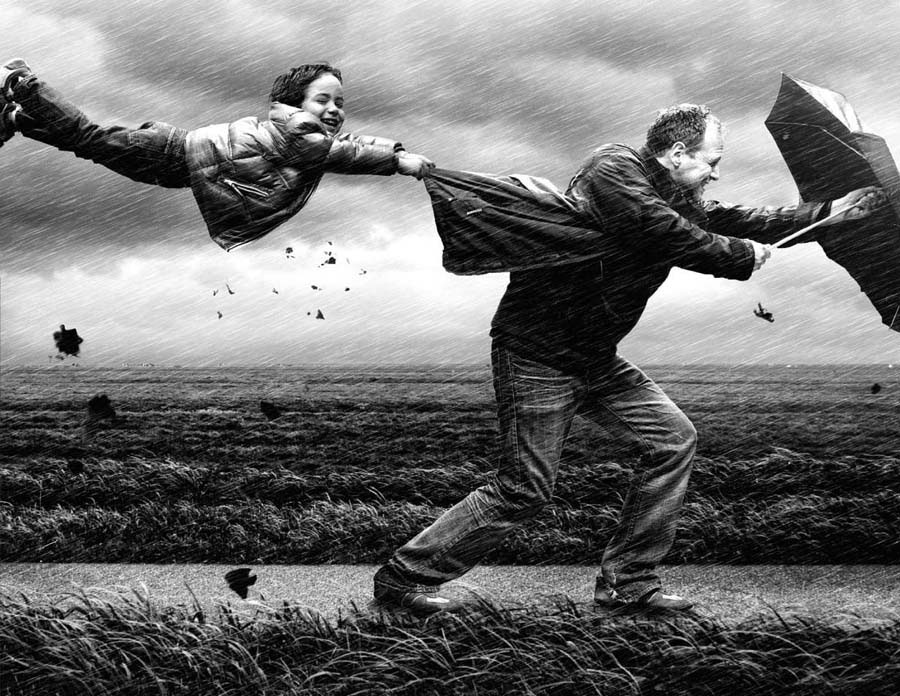
Wind by Adrian Sommeling
The first step in the creation of any surreal image will be a clear concept of the vision that you’re trying to create. After you have this, you’ll need to either take or source your base images to adapt, manipulate, and composite.
If you’re taking your base images yourself, it’s very easy to feel the need to keep up with the market when it comes to cameras. The speed at which photographic technology is evolving is mind-bending, but always remember that the most important element in the creation of a good photograph is the photographer—and her or his skill and vision—and not the camera. This is why I’ve included this chapter on cameras, to show you that any type of camera will be sufficient, whether it is a flagship DSLR, a film camera, a point and shoot, or even a cellphone.
It might help to think of the process of creating a surreal image as a recipe: here is what you want to create, these are the things that you will need to achieve it, and these are the steps you will need to take in the process.
I first fell in love with photography because it allowed me the opportunity to show people how I saw the world. Whether they shared my vision wasn’t so much the point; what I loved was the chance to communicate it. Surreal photography is, perhaps, all the more exciting because it fuses the world around you—something that other people are able to experience, even if they don’t see it the same way as you do—with something that is entirely unique to you: your subconscious, your dreams, and your imagination. What you experience as surreal, then, might be entirely contrary to someone else’s concept of the surreal.
This book explores two different methods of creating surreal images: with your camera, and with digital manipulation. In some respects, using your camera alone to create surreal images might owe a little to chance—you can’t tell exactly how a cross-processed image will look until the film is developed, for example. With other techniques, it will take practice to become entirely familiar with the effects of a fisheye lens or an IR filter so that you can shoot to achieve the outcome that you want. The more you practise these things, the more intuitive they will become. Not only that, but the more that you immerse yourself in the world of the surreal, the more ideas you will want to explore and develop.

Notebook by Daniela Bowker
When you use digital manipulation to create a surreal image, you might have taken a photograph that you feel can be altered to express a surreal vision, or you might have a surreal vision that you wish to create before you have any images. If you want to recreate your surreal vision from scratch, it’s probably best to treat it as a project: map out what it is that you want to create, plan what you will need, how you will go about sourcing it, account for every item in the image and every step in the process, and cover every eventuality. If it sounds a long way from spontaneous creativity, that’s because it is, but you don’t want to be compositing your final image to find that you didn’t shoot Little Red Riding Hood in her pristine red cloak, just her torn and muddied one, when actually you need both images.
Finally, don’t think that surreal photography has to be one thing or the other, physical or digital. It doesn’t mean you need to use an IR filter in isolation from the host of tools in your editing suite, or cross-process without the option to composite. The more that you explore all the options available to you to create surreal images, the more you will end up learning about how they can work in conjunction with each other, and the deeper your journey into surreal photography will be.
A Good Recipe
Creating a surreal image is a little like baking: you need a recipe to make a good cake.
Shoot stats:
Canon EOS Rebel XSi with a Canon EF 50mm ƒ/1.8 II lens at 50mm; ƒ/1.8 with a shuttter speed of 1/3200 second and ISO 200.
While I don’t go everywhere with my DSLR, the chances of me being caught without a camera are almost nil. I usually have a smartphone in my pocket and a compact camera in my bag, both of which are important components of my photo-taking arsenal and more than capable of producing images worthy of a little surreal transformation.

iPhone 5
With its combination of a good camera and huge range of compatible editing apps, the iPhone has proved to be a photographic game-changer. The widespread use of the term “iPhoneography,” a variant of the broader “phoneography” points to its common popularity.

Samsung Galaxy S III
The continued improvement of cameras in cellphones is leading people to question the usefulness of the compact camera.

Nokia Lumia 900
The camera in this phone has an aperture of ƒ/2.2 and a resolution of 8 megapixels. It can definitely be used to make quality surreal images.
CAMERAPHONES
Cameras have been a ubiquitous component of the cellphone for years now; there are some phones that come without the ability to snap a quick picture, but you almost have to go out of your way to find one. Just as the technology in compact cameras and DSLRs has progressed, so too have the cameras in phones. The iPhone 5, the Nokia Lumia 900, and Samsung’s Galaxy S III all come with 8-megapixel sensors, something you would have been hard-pressed to find in a flagship DSLR a decade ago. Their lenses offer apertures of ƒ/2.4, ƒ/2.2, and ƒ/2.6 respectively—impressive, as some current compact cameras don’t have lenses that fast. The improvements are only going to continue, but as of right now you can create perfectly acceptable surreal images with a good phone.
When it comes to creating surreal images from photos taken on a cellphone, the smartphone has the advantage over any other. For a start, it is generally easier to access the images taken on a smartphone—you can email them to yourself or save them to the Cloud—and the cameras in smartphones tend to be of superior quality. However, the killer feature of the smartphone is that you don’t have to transfer the photo anywhere else in order to give it a surreal makeover. By virtue of any one of hundreds of applications (or apps) that are available for download, some for free and some at a small cost, you can transform an ordinary shot into something out of this world. We’ll look at the best apps and what you can achieve with them in Chapter Two: Phoneography & Compact Cameras.
If you’re a little apprehensive of using a smartphone to grab a potential surreal shot, don’t be. It’s a lens with a shutter and a sensor—you can work one of those! There are a few things you can do to help your phoneography on its way to surreal awesomeness, though.
First, make sure that your subject is well-lit. Cameraphones have small sensors, which can result in noisy, grainy images if they’re taken in low-light situations. A lot of light will make all the difference.
Second, get in close, but avoid using the digital zoom function. You want your subject to fill the frame so that you don’t have to crop it later and sacrifice image quality. The digital zoom will do terrible things to your image quality, so it’s best left alone.
Third, keep still! This goes for any photography, but is especially important when using a phone because the small size accentuates camera shake. If you can, lean or rest your camera on something, hold your breath when you release the shutter, and remember that shutter lag might mean that your image isn’t actually captured for a few moments after you’ve released the shutter.
Finally, give your lens a quick clean before you take a photo. Your phone lives in your pocket or your bag and spends plenty of time in your hand, bathed in grease, fluff, and dust—not what you want obscuring your image!
THE DEATH OF THE COMPACT CAMERA?
Sales of compact cameras have been declining for several years now, and the majority of observers put this down to the rise of the cameraphone. Why carry around two pieces of equipment that perform the same function when one will do? Many believe the death of the compact camera is imminent as between the cameraphone and smaller, lighter interchangeable lens cameras, they no longer fulfill a need. I don’t think that the demise of the compact camera is as inevitable as some people make it out to be, but they certainly will become more niche, catering to people who want to carry rugged cameras halfway up mountains or across deserts, or those who want to try underwater photography. I wouldn’t be without mine.

Olympus SH-25MR
This reasonably priced Olympus SH-25MR comes with 12 different filter effects. They might not make a surreal image by themselves, but it’s certainly a start.

Canon S110
The Canon S110 has full manual control, but is small enough to fit into your pocket. It’s a great option if you’re looking for a compact camera.

Pentax RZ18
This Pentax compact camera, the RZ18, has 12 digital filters, including a miniature effect and a toy-camera look, which you can apply to your images after you’ve taken them.
COMPACT CAMERAS
I always feel a touch indignant when someone sneers at a compact camera just because it’s a compact camera. I don’t think that deriding full manual control, impressive sensitivity ranges, plenty of megapixels, and the ability to shoot in Raw format in something that I can toss in a bag and sometimes even fit in a pocket, is entirely justified. Yes, compacts do come with their limitations, but I wouldn’t be without one, particularly for situations when size or discretion is a consideration.
If you’re intending to use your compact camera as your primary source of images for creating surreal photographs, then you really need to be using something that has the ability to shoot in Raw format. We’ll take a look at different file formats presently, but in this instance it’s important to know that shooting Raw will give you maximum flexibility in processing your images, which is vital when you are performing digital manipulations. Furthermore, if a camera is able to record files in Raw, the chances are that it will come with the kinds of controls that allow you to dictate how you want your photograph to look, not how your camera thinks it should look.
If this kind of camera isn’t what you have or what you can afford, don’t worry. There’s still plenty that you can accomplish with photos taken using any other kind of compact camera. In fact, the vast majority of compact cameras on the market now come with an entire range of ready-installed filters. Before you’ve even transferred your photos from the memory card to your computer, you can get them halfway to a new surreal existence with an interesting effect, a cross-processed look, or an antique cast.
The world might have gone digital, but analog photography is clinging on for dear life, and it has its part to play in the creation of surreal images. It isn’t so much that surreal photographers are using film cameras to capture the majority of photos they’ll transform into surreal creations, it’s more that film cameras offer two exciting prospective techniques for surreal images: cross-processing and multiple exposures.
Chapter 3: Camera Technique is dedicated to exploring how cross-processing film and multiple exposures can be used to create surreal images, but if you’re interested in achieving these effects, you’ll need a film camera to do it.
If you’re new to film photography or if you got rid of your analog equipment when the digital revolution came, you might be wondering how best to lay your hands on a film camera. The answer lies with a bit of patience and a bit of time spent scouring the secondhand market. Plenty of camera dealers have analog gems hiding away, and there’s always eBay if you feel like some online bidding. It’s possible to pick up a good 35mm compact, such as an Olympus Trip, for under $80 or an SLR plus a lens or two for well under $160. Though remember, let the buyer beware.
35mm film is still widely processed and you shouldn’t have many difficulties finding a specialist camera store or chemist that provides the service. Alternatively, you could look into having your images developed by mail, which is something you might have to do if you use a slightly more exotic film, such as 120. There are many companies that offer a mail-order film-developing service, from which you can also purchase film. Remember to have your photos burned onto disc as well as printed when you have them developed, which makes it possible for you to use them as base images in digital composites.

Square Not Square
Ooh, look at that pincushion distortion! All down to the cheap lens in a Holga.
Shoot stats: Holga camera with Ilford Delta 400 film.
Maybe, though, you’re interested in experimenting with a so-called “toy camera” to see what surreal beauties you can snap. Toy cameras, with their light leaks, cheap plastic-y lenses, and unreliable metering have been all the rage for a while now. When you combine the idiosyncrasies of a toy camera with the effects of multiple exposures and cross-processed film, you have the means to create dreamlike, almost unbelievable surreal scenes.
Pinhole cameras are the most basic form of camera around; they are quite simply sealed boxes containing a sheet of unexposed photographic paper or film into which you introduce light through a small hole to produce an exposure, and therefore an image. In the right hands a pinhole camera can produce the most beautiful images that, with some luck and creative thinking, can be wonderfully surreal.
Swirling Lines and Light
This image was taken by the Photojojo team with their SLR pinhole body-cap.
Shoot stats: Holga camera with Ilford Delta 400 film.
Image © Photojojo.com.
Pinhole images tend to have long exposures so that enough light can reach the paper or negative to ensure an exposure takes place. As a consequence, they often enjoy a great sense of motion and interesting shadowing.
Making your own pinhole camera from a box and experimenting with developer in your bathroom might not appeal to everyone (find more on pinhole photography on pages 140–143), but not to worry, you can achieve pinhole-style images with a DSLR. You can buy pinhole body-caps from quirky online photography stores or even try making one yourself. Then it’s just a case of experimenting with long exposures and a tripod!

SLR Pinhole Body-cap
You can buy an SLR pinhole body-cap to take pinhole photos with an SLR from many online outlets.
THE HISTORY OF LOMOGRAPHY
Lomos, Dianas, and Holgas are all well-known cameras names on the trendy photography scene. They are all types of “toy camera” marketed by the company Lomographische AG (though Holga is its own entity), under the name “Lomography.” The Lomography LC-A is based on the Russian-made Lomo LC-A.
Lomo produced cheap, lo-fi compact cameras for the Russian market that caught the eye of Lomography’s founders in 1991. Apparently, they loved the quirky, badly metered, occasionally blurry images that Lomos produced and signed a deal to sell them outside Russia.
Lomography, with its spontaneous philosophy that eschews the traditional principles of photography, has risen and risen in popularity. There is now an entire range of Lomography cameras featuring fisheye or ultra-wide lenses, multiple lenses, and colored flashes. And no, they’re not as cheap as they used to be.
When it comes to supreme flexibility and superior image quality, interchangeable lens cameras are where it’s at. Until 2008, an interchangeable lens camera would have meant an SLR, but the extremely exciting CSC has emerged since then. Smaller and lighter, it is a capable, but more compact alternative to SLRs. Both CSC and SLR cameras are incredible photographic tools and either will serve you well.
Compact System Cameras
CSC (or CoSyCa) stands for Compact System Cameras. You might also have heard them referred to as MILCs (Mirrorless Interchangeable Lens Cameras), EVIL cameras (Electronic Viewfinder Interchangeable Lens) or just “mirrorless cameras.” Don’t be deterred by the crisis of identity; these are very competent cameras.
CSCs offer the lens-changing flexibility of DSLRs, but through a vital adaptation are significantly smaller and lighter than a DSLR: they lack a mirror and a pentaprism. In a DSLR, it’s the mirror and the pentaprism that allow you to see your scene through the optical viewfinder—CSCs have done away with the mirror, the pentaprism, and consequently the optical viewfinder, and instead have just an electronic viewfinder.
As the relatively new kid on the photographic block, some manufacturers are still dipping their toes into CSC waters, whereas others have concentrated extensively on research and development around the system. But the selection of cameras and lenses is growing—and fast. You can buy tiny compact-camera-sized cameras with interchangeable lenses or slightly larger ones that will give most DSLRs a run for their money, in which case a CSC could give you great value for money and the opportunity to shoot plenty of photos ready to be transformed into otherworldly images.

Olympus OM-D E-M5
the dust- and splashproof Olympus OM-D also boasts a 5-axis image stabilisation (IS) system to reduce blur, and a 1.44 million dot high-definition viewfinder.

Sony NEX-6
Sony has been one of the leading developers of the CSC and the NEX-6 is a great example of a high-quality CSC.

Pentax Q10
The Pentax Q10 is scarcely larger than a compact camera, but benefits from the flexibility of interchangeable lenses.
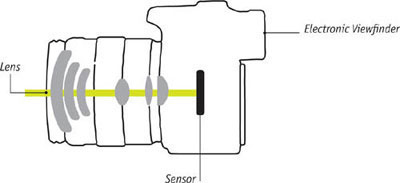
Compact System Camera
By getting rid of the mirror and optical viewfinder found in SLR cameras, manufacturers have created smaller, lighter, mirrorless CSCs.
DO MEGAPIXELS MATTER?
Megapixels have assumed the position of a layperson’s (and a salesperson’s) measure of a camera’s quality. 14 megapixels good—16 megapixels better! They’re easily quantifiable and comparable. But what is a megapixel, and do they really matter?
A pixel is a dot of information. The word “pixel” is a combination of “picture element.” A picture comprises these elements, or dots of information, in lines running horizontally and vertically. One million of these dots, or pixels, is a megapixel. The more pixels you have, the more information is stored in your picture.
Megapixel count—or resolution—is important if you plan to enlarge or crop your images. The increased density of the pixels will ensure that your images don’t appear grainy as the pixels are spread more thinly over the expanse of the picture.
The minimum resolution for CSC or DSLR (and most compact) cameras on the market right now is 10 megapixels. This is enough pixels to allow for generous enlargements and a good amount of cropping. I think we can safely say that we’ve pushed past the point where megapixels matter.
What does matter is the physical size of a camera’s sensor. The gold standard of camera sensors (barring medium format) is the 35mm full-frame; it measures 36 × 24mm. This sized sensor is generally only found in professional grade DSLRs; advanced and entry-level DSLRs tend to have slightly smaller APS-H or APS-C sensors. As cameras get smaller, so do their sensors until you get to cameraphones with imaging chips that can be 25mm2. Herein lies the problem; fitting X amount of megapixels onto a smaller sensor requires smaller photosites that are less sensitive to light. This in turn means more noise and lower image quality, hence “better” cameras having “bigger” sensors.
The Digital Single Lens Reflex camera is top of the tree in the photography world. You might, however, be wondering why I’m bothering to discuss DSLRs here when they’re big, heavy, expensive, and I’ve I made a point of emphasizing that it’s the photographer that is the important factor in taking a photo, not the camera. Simply put, DSLRs are the best tools for the job, especially as they allow you, the photographer, the control that you need to take a photograph that is just as you want it to be, not how the camera thinks that it should be. DSLRs also offer the best range of lenses, good low-light capability, and have larger image sensors than other cameras, which all makes for better quality photographs.
If you’re thinking of buying a DSLR, or any camera, it’s important to hold it in your hands and get a feel for it. Shelling out anything between several hundred dollars for an entry-level machine and a few thousand dollars for a professional-grade camera means that it has to be something you will feel comfortable using. There’s an extensive range of DSLRs on the market, so finding one that suits you might be more a case of having too much choice than not enough!
Remember, though, that a key benefit of any interchangeable lens camera is just that: the ability to change lenses. You will serve your needs far better to spend less on a camera body and more on lenses than you will buying yourself a top-of-the-range body, but being limited to the single kit lens that comes with it.

Pentax K-30
Pentax’s K-30 is a weather-sealed DSLR that has a multiple-exposure function—very useful for building surreal images.
FILE TYPE CRIB SHEET
The formats in which your images come off your camera or out of your editing suite can be tongue-twisting acronyms. Here’s a rough-and-ready guide to what’s what.
Raw: A Raw file is the equivalent of a photographic negative, but in digital form. Raw is not a single file type like JPEG and TIFF, but is a generic term covering all manufacturers’ Raw file formats, for example, Nikon’s NEF, Canon’s CR2, and so on. The data that it stores is “raw,” or unadulterated, and comes direct from the camera’s imaging sensor. Being an unprocessed image, it will be up to you to “develop” the files using an Raw processor. This might mean more work for you, but it does ensure that you have maximum control over the final presentation of your images. It also means that the files are quite large, but on the upside, the control that Raw affords you as a photographer is unparalleled. All interchangeable lens cameras and most high-end compact cameras will be able to record images in Raw format.
DNG (Digital Negative): The DNG format was developed by Adobe in an attempt to create an open-platform lossless Raw file. Raw is fantastic due to the control that it affords photographers, but “Raw” can mean different things to different camera manufacturers. The theory behind DNG is that it’s a publicly available format that stores the same depth of information as a Raw file, but without the potential threat of not being able to access the data in the future due to changes in software. In practice, very few camera manufacturers support the format, but you can always convert your native Raw files to the DNG format without losing any data.
JPEG (Joint Photographic Experts Group): JPEG files are significantly smaller than Raw files because the data has been processed and compressed. This is, then, both an advantage and disadvantage: they’re easier to store and you can fit more of them onto your camera’s memory card, but you lose a degree of control over your final image and there will be visible differences between the original and the compressed files. (These differences are known as “compression artifacts.”) Most digital cameras will produce images in JPEG format, and when you save a final version of an edited Raw file, the chances are you will convert it to JPEG.
TIFF (Tagged Image File Format): TIFF files are a publishing and design industry-standard. They tend to be very large files holding extensive data in a lossless format. Some cameras export images in TIFF format, although Raw is preferable, but you are more likely to see TIFF files exported from an editing suite. Their advantage here is that they don’t flatten the different layers that have formed the edited image.
PSD: PSD is Photoshop’s native file format. Its primary advantage is that it maintains an image’s layers, whereas other formats flatten layers. This is valuable as it allows for easier editing at a later date.
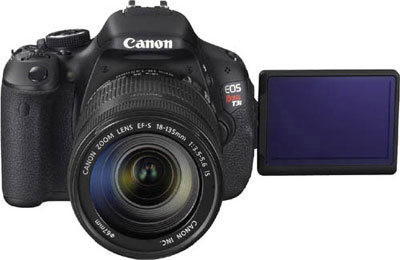
DSLR options
Canon’s 5D Mark III (left) has a full-frame 22 megapixel sensor and is capable of taking multiple-exposure images. But if you think that might be more than you need, the entry-level Rebel T3i (below) is a more-than-capable DSLR.
THE COMPARATIVE SIZES OF CAMERA SENSORS
Cramming more and more pixels onto smaller and smaller sensors doesn’t necessarily lead to higher image quality.

36 × 24mm = Full frame
Usually found in flagship DSLR cameras, but can also be found in smaller DSLRs and even some compact cameras.

27.9 × 18.6mm = APS-H
Found in some Canon DSLR cameras.
23.6 × 15.6mm = APS-C
Found in Nikon DX-format cameras, other midrange and entry-level cameras, and some CSCs.

22.3 × 14.9mm = APS-C
Found in Canon “prosumer,” midrange, and entry-level DSLR cameras.

17.3 × 13mm = Four Thirds
Found in Four Thirds and Micro Four Thirds system cameras.

13.2 × 8.8mm
Found in Nikon CX-format and high-end compact cameras.

8.8 × 6.6mm, roughly
Found in some high-end compact cameras.

7.6 × 5.7 mm
Found in some high-end compact cameras.

6.16 × 4.62mm
Found in many compact cameras, some smaller CSCs, and mobile phones.
There are quite a few other smaller-sized sensors out there, for example 1 × 1.8 inches and 1 × 2.5 inches. This is to give you an idea how they compare. And if you’re wondering about the fraction measurements, that’s convention and dates back to the sizing of television tubes!
Sometimes, you might find that a composite image you are working on is missing something. Being the land of the surreal, it could quite easily be a giraffe skipping over the ocean or the Eiffel Tower floating by on a cloud. However, you don’t happen to have photos of either a giraffe or the Eiffel Tower in your portfolio and a quick trip to the Serengeti or Paris is out of the question. What to do?
Well, you could sink into a pit of creative despair and lament the fate of your never-to-be-realized vision, or you could succumb to rage and delete your creation, but luckily enough neither of these reactions is necessary. Stock agencies have a huge variety of images for sale to suit.
The range of stock agencies is also vast; in addition to the more expensive agencies such as Getty and Corbis, there are microstock agencies, (Fotolia, Shutterstock, and iStockphoto), which are regarded as being at the lower end of the market. Their business model is to sell lots of copies of images very cheaply. If you’re looking for more specialist subjects, perhaps news, nature and wildlife, sports, or travel images, there are a host of agencies dedicated to supplying these photographs, too. Take a look at the reference section on page 192 for details.
Whatever you are looking for, you will be able to find it among the stock agencies’ collections. Even better, you will be probably be able to purchase a picture of it on a plain background, making it easier to select and insert into your composite.

Giraffe Stock
This image was downloaded from Fotolia and cost just a few dollars. I could have chosen from thousands!
Purchasing an image from a stock agency is simple, and probably not as expensive as you might imagine. All agencies have their own methods of operation and terms of service, but the general principles are the same—you register an account, search for your chosen image, select the appropriate license, purchase the image, and then download and use it.
How much you pay for an image will depend on how you intend to use it, and therefore the type of license that you will require, and how large the image is. Some agencies offer subscription schemes as well as the ability to purchase one-time images. If you think that you might make use of stock imagery on a fairly regular basis, it might be worth choosing a particular agency and subscribing to a package.
Some images will be for sale royalty-free, others will be rights-managed. Royalty-free images have far fewer restrictions on where, when, and how often they can be used. Rights-managed photos tend to be higher quality, will likely cost more, and will be licensed with limitations as to where, when, how often, and for how long they can be used.
Even if you purchase a royalty-free image, you might have to select a license that reflects how you intend to use the final composite containing the stock image. If the final image is just for your own gratification, then a basic license will invariably be sufficient. However, if you intend to sell copies of the final composite, include it in a publication that has a print run in excess of a stipulated number of copies, or use it commercially in any way, you might find that you will need to select a license that will allow for this. It’s worth reading the terms and conditions carefully, but thankfully most agencies set them out clearly, so you don’t have to wade through a bog of legalese.
TO PAY OR NOT TO PAY?
There are a few stock agencies out there that offer their images—entirely legally—for download without payment. Whether or not you are comfortable using free images is a personal choice. For some people, it’s a means to an end, especially if they’re in a pinch, provided by photographers who are happy to do so freely. Others regard free stock as an insult to photographers; by offering work for free, it devalues the entire market and denigrates the craft.
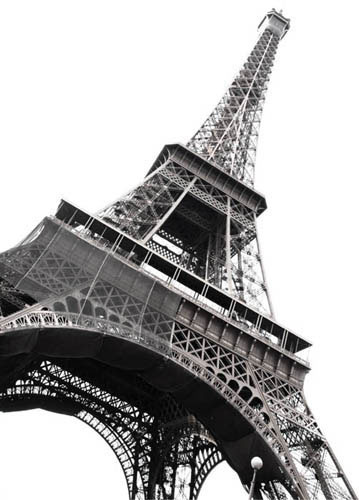
The Eiffel Tower
There were thousands of images of the Eiffel Tower available; this one was from Fotolia. It came on white, making it easy to cut out, and cost a few dollars.


