
What is the best part of painting expressive flowers? You cannot mess up. They can be any size, color and shape that you choose without apology or explanation. Step one is to let go of any anxiety, fear or insecurity you have. You are painting your dream garden, and it can look any way you choose.
I paint the idea of flowers. What interests me is not the specific type of flower, but the impression of flowers to convey emotion. I use flowers as a starting point to play with color and express joy, lightness and wonder.
In this warm-up exercise, I am going to share the basic forms I use to create floral designs. I encourage you to be creative and respond to any impulses you have while painting. You can use any colors, shapes and designs you want.
When you are stuck, go back to the core components of design. Ask yourself, “Can I use a line or texture to make the piece more interesting? Can I add contrast to make the colors pop?” Usually, if you are stuck and incorporate one or more of the design elements, you can jump-start your painting again.
acrylic paint
Aureolin Hue • Indian Yellow Hue • Light Ultramarine Blue • Light Violet • Naphthol Red • Primary Magenta • Prussian Blue Hue • Quinacridone Magenta • Sap Green • Teal • Titanium White
canvas, 20" × 20" (51cm × 51cm)
chalkboard markers
chalkboard sticker or chalkboard paint
paintbrushes
paper towel
ruler
stencil
tape
Resist trying to make your art perfect. Perfect can read as boring sometimes! Much of the art I am drawn to has something a little edgy or “off” about it. This can bring a surprising and imaginative element to your art. Leaving a trace of handmade is a beautiful thing in today’s digitally enhanced world of perfection and predictability.
Observe other real and painted flowers and experiment to find what style feels most natural and most aesthetically pleasing to you. The possibilities are endless with flowers!
In the garden, everyone is an artist without apology or explanation.
—Louise Beebe Wilder—

STEP 1: Cover the canvas with a layer of white paint. Let dry.

STEP 2: Measure approximately 5" (13cm) from the bottom of the canvas at three points across. Note: I usually just eyeball this and don’t actually use a ruler.

STEP 3: Connect these points by drawing a line with a chalkboard marker or pencil to create the tablecloth space, or freehand it, which is what I usually do.

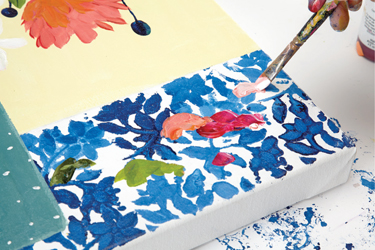
STEP 4: Tape above the line to separate the tablecloth area from the rest of the painting. Position a stencil on the canvas. Paint with a dark blue color over some spots of the stencil. Mix dark blue with white on your palette and paint over other parts of the stencil to create color variations in the design.

STEP 5: Carefully remove the stencil. Let it dry before you stencil the next section of the tablecloth. You can use a heat gun to dry the paint more quickly.
Repeat with the stencil until finished. Don’t worry if the stencil isn’t perfect. I prefer the imperfections that give it a carefree, handmade quality. You can also cover spots you don’t like with fallen flower petals later. Let dry.

STEP 6: Tape beneath the tablecloth line to avoid overlapping colors.
Paint the background using a large brush with a light yellow. I mixed Indian Yellow Hue and Titanium White. Use your finger or a brush to further blend the colors.

STEP 7: Freehand sketch a vase. You want be careful not to make the vase too tall so you have plenty of room for the flowers. Paint the vase any shape and size you like. I made a soft turquoise color by mixing blue, green and white together.

STEP 8: Paint five or six stems coming out of the vase in a random way. I always start with thin lines knowing that I can make them thicker later. Use one color or several colors, such as green, blue, teal, or mix colors to create new shades. Keep a wet paper towel nearby to wipe off anything you don’t like.
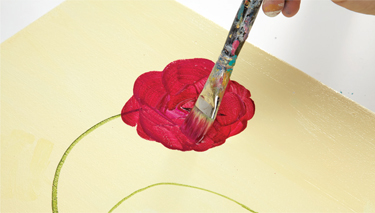
STEP 9: Start by painting a few large flowers. Stay loose and don’t strive for perfection. We are not painting a realistic painting; rather, we want an impressionistic quality. Start loosely and gradually build the flowers in layers. Using magenta, create loose circle flowers, or one of your favorite flower shapes.

STEP 10: Using paint that you have on your palette, blend the colors directly on the canvas.
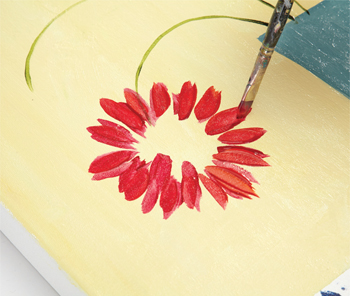
STEP 11: Using mixes of colors—red, magenta and yellow—paint dahlia shapes with small pointy petals. They can be open or drooped over.

STEP 12: Paint open petals using a mixture of yellow and white or whatever color is calling you.

STEP 13: Use white paint to create daisies.

STEP 14: Use yellow for the daisy centers. Use violet to create coneflowers.

STEP 15: Use blue to paint buds with your finger. These finger dots are an easy and effective way to fill in space and transform the painting.

STEP 16: Connect stems to the buds with a thin fine-tipped brush.
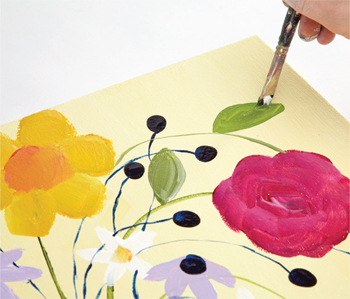
STEP 17: Paint leaves of various shapes and sizes using shades of green, blue or any color you like to fill in areas.

STEP 18: Add details to the leaves, such as vein lines, using a detail brush.

STEP 19: Add details to the insides of the flowers and leaves. Use a variety of paint mixtures, whatever you have on your palette that works well for the insides of the flowers. I sometimes like to use my finger for this.

STEP 20: Be imaginative with your details; not all leaves need to have veins; dots are fun, too.

STEP 21: Continue adding final details to the flowers in any way that makes you happy.

STEP 22: Touch up areas of the tablecloth with white paint if there are any parts along the edge that you find distracting.

STEP 23: Add small details to the vase and any other areas that need another layer of paint.
STEP 24: Add a few colorful strokes on the table area to give the impression of fallen petals. This works especially well to cover any imperfection from your stencil.

STEP 25: Stick a chalkboard sticker onto the vase or use chalkboard paint to create a label. Pick a word that is calling to you, and write it on the label.
Note how you felt while you were creating. Were you able to relax and let go? What did you enjoy the most? What felt most natural? Lean into what you love while you are creating and go with what feels good to you.
This painting is just a starting point for exploration! I encourage you to alter the colors and shapes of the flowers and vase to really explore what is possible. Perhaps you can paint a scene with many vases. You can create interesting background textures and designs that we will explore in upcoming chapters.

Here is a variation of this painting. I used chalkboard paint for the entire vase and added one of my favorite quotes from my five-year-old daughter. I also used a color palette of mostly reds and yellows mixed together.