
As Flora and Lynzee explained, collaborating is the ultimate act of stepping into the unknown, taking risks, being brave and opening to possibilities. My dear friend and Flower Tribe artist Megan Jefferson and I are going to demonstrate how collaborating takes us to new levels of creativity.
We incorporate Lia’s way of painting in fields as an “embroidery” by dividing the canvas into sections. We will bring these individual sections together by repeating details, such as color and markings, throughout the painting. Lia is like a sponge absorbing her surroundings and experiences, and her art reflects her ability to absorb the intricacies of life around her. She swirls these stories around in her paint and creates a fantasy world rooted in reality. We will use several sources of inspiration to create a similar world.
The first time Megan and I collaborated on a painting I was nervous and aware of my insecurity as an artist. What if she didn’t like what I painted? What if I offended her by painting over something? Overcoming fear is an essential practice in art and, of course, life. Often there is absolute ecstasy on the other side of fear. You just have to cross the threshold. The more you push yourself toward your heart’s desires and away from your fear, the easier this life-affirming practice becomes.
acrylic paint
color of your choice
canvas, 24" × 36" (61cm × 91cm)
heat gun
inspiration tray—beads, photos, fresh flowers, natural objects such as shells, fabric, magazine cutouts, decorative paper, pattern books
paintbrushes
scraping tool
spray bottle
stencils
stamps
Remember to communicate while you work about what you like or don’t like in the painting. Ask for help if you need it. If you are stuck, switch places.
Don’t be afraid to mix colors. If you are struggling with color, add a new color into a color already being used on your canvas to create a different tone.
The best part of any creative venture is the collaboration with others. An artistic project in any form unites ideas and brings out talents that might otherwise lie dormant.
—Amy Butler—

STEP 1: Gather your objects of inspiration and select your individual color palettes, which do not have to coordinate in any way. Megan and I picked a colorful vintage tablecloth, origami paper and magazine cutouts with designs and colors that appeal to us for inspiration as we paint.
Divide your canvas into fields with painted lines like a quilt or embroidery. This doesn’t have to be perfect because it will be painted over eventually.

STEP 2: Together, begin blocking in the background to cover the white space of the canvas.

STEP 3: Switch sides and place the canvas upright to spray water on the wet paint. I use a fine mister while Megan uses a large spray bottle.

STEP 4: Continue blending wet-into-wet. Spraying the canvas with water really allows the quality of the materials and the essence of the paint to show through. Let dry (or dry areas with a heat gun) to avoid creating a muddy painting when you switch sides again. As it is drying, you can smooth out thick areas of paint with your finger or a brush.

STEP 5: Switch sides frequently. Keep your style loose as you work into the semi-wet canvas in a carefree and noncritical way. Use a scraping tool to add interesting detail and reveal the colors layered underneath.
Encourage your partner to build upon each your painting elements. While painting, we ask each other questions, such as “Is there anything you really love here you don’t want me to touch? I think a nice dark color in the upper right will help the colors pop. Are you inspired to do any drips? What do you think about this large circle space in the bottom right? Is it okay as is or can it be painted over a bit?”
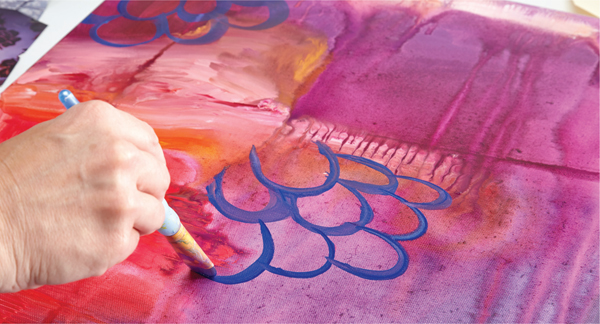
STEP 6: Make marks inspired by your objects of inspiration.

STEP 7: Scrape into the paint with any mark-making tool that inspires you. (One of my favorite is this Catalyst Wedge available at art supply stores.)

STEP 8: Block in areas to quiet the painting as you bring it all into cohesion.

STEP 9: Repeat a stencil pattern throughout the painting to create more variety and detail.

STEP 10: A stamper is a quick and easy way to add repetition and transform a space.

STEP 11: Keep switching places with your partner and adding detail inspired by what is already happening on the canvas or from your inspiration tray. Get lost in your joy and feed off the energy from your co-creator!

STEP 12: Continue layering the painting by cutting in, laying stencils, scraping, stamping and brushing on leaf shapes.

STEP 13: Details, details, details. Simple marks that reflect your signature style make great finishing marks. Keep going until you are both happy with the piece!

See the stepped-out version of this second collaborative example in the e-companion. (Go to createmixedmedia.com/paintedblossoms to learn more.)